This page describes how to connect Jira Cloud to Gemini Enterprise.
After you set up your data source and import data the first time, the data store syncs data from that source at a frequency that you select during setup.
Supported versions
The Jira Cloud connector supports version 2 of the JIRA Cloud REST API.
Before you begin
Before you set up your connection, do the following:
Ensure that your Atlassian account is set up to use the new centralized user management model.
Verify that you have Jira organization administrator access to the Jira instance and project. With the organization administrator access, you can set up minimum permissions and provide access privileges to user groups. For information about how to verify Jira organization administrator access, see Verify Jira organization administrator access.
(Optional) To retrieve user email addresses from Jira Cloud, even when settings restrict email visibility, install the User Identity Accessor for Jira Cloud app. You must be a Jira Site administrator to install and configure this app. After you install the app, configure it to securely retrieve user email addresses. You might not need to install this app if email addresses are already publicly accessible.
To enforce data source access control and secure data in Gemini Enterprise, ensure that you have configured your identity provider.
To enable OAuth 2.0 and obtain the client ID and secret, see OAuth 2.0 (3LO) apps in the Atlassian developer documentation.
Verify Jira organization administrator access
Login to Atlassian with your user credentials.
Select the Jira app.
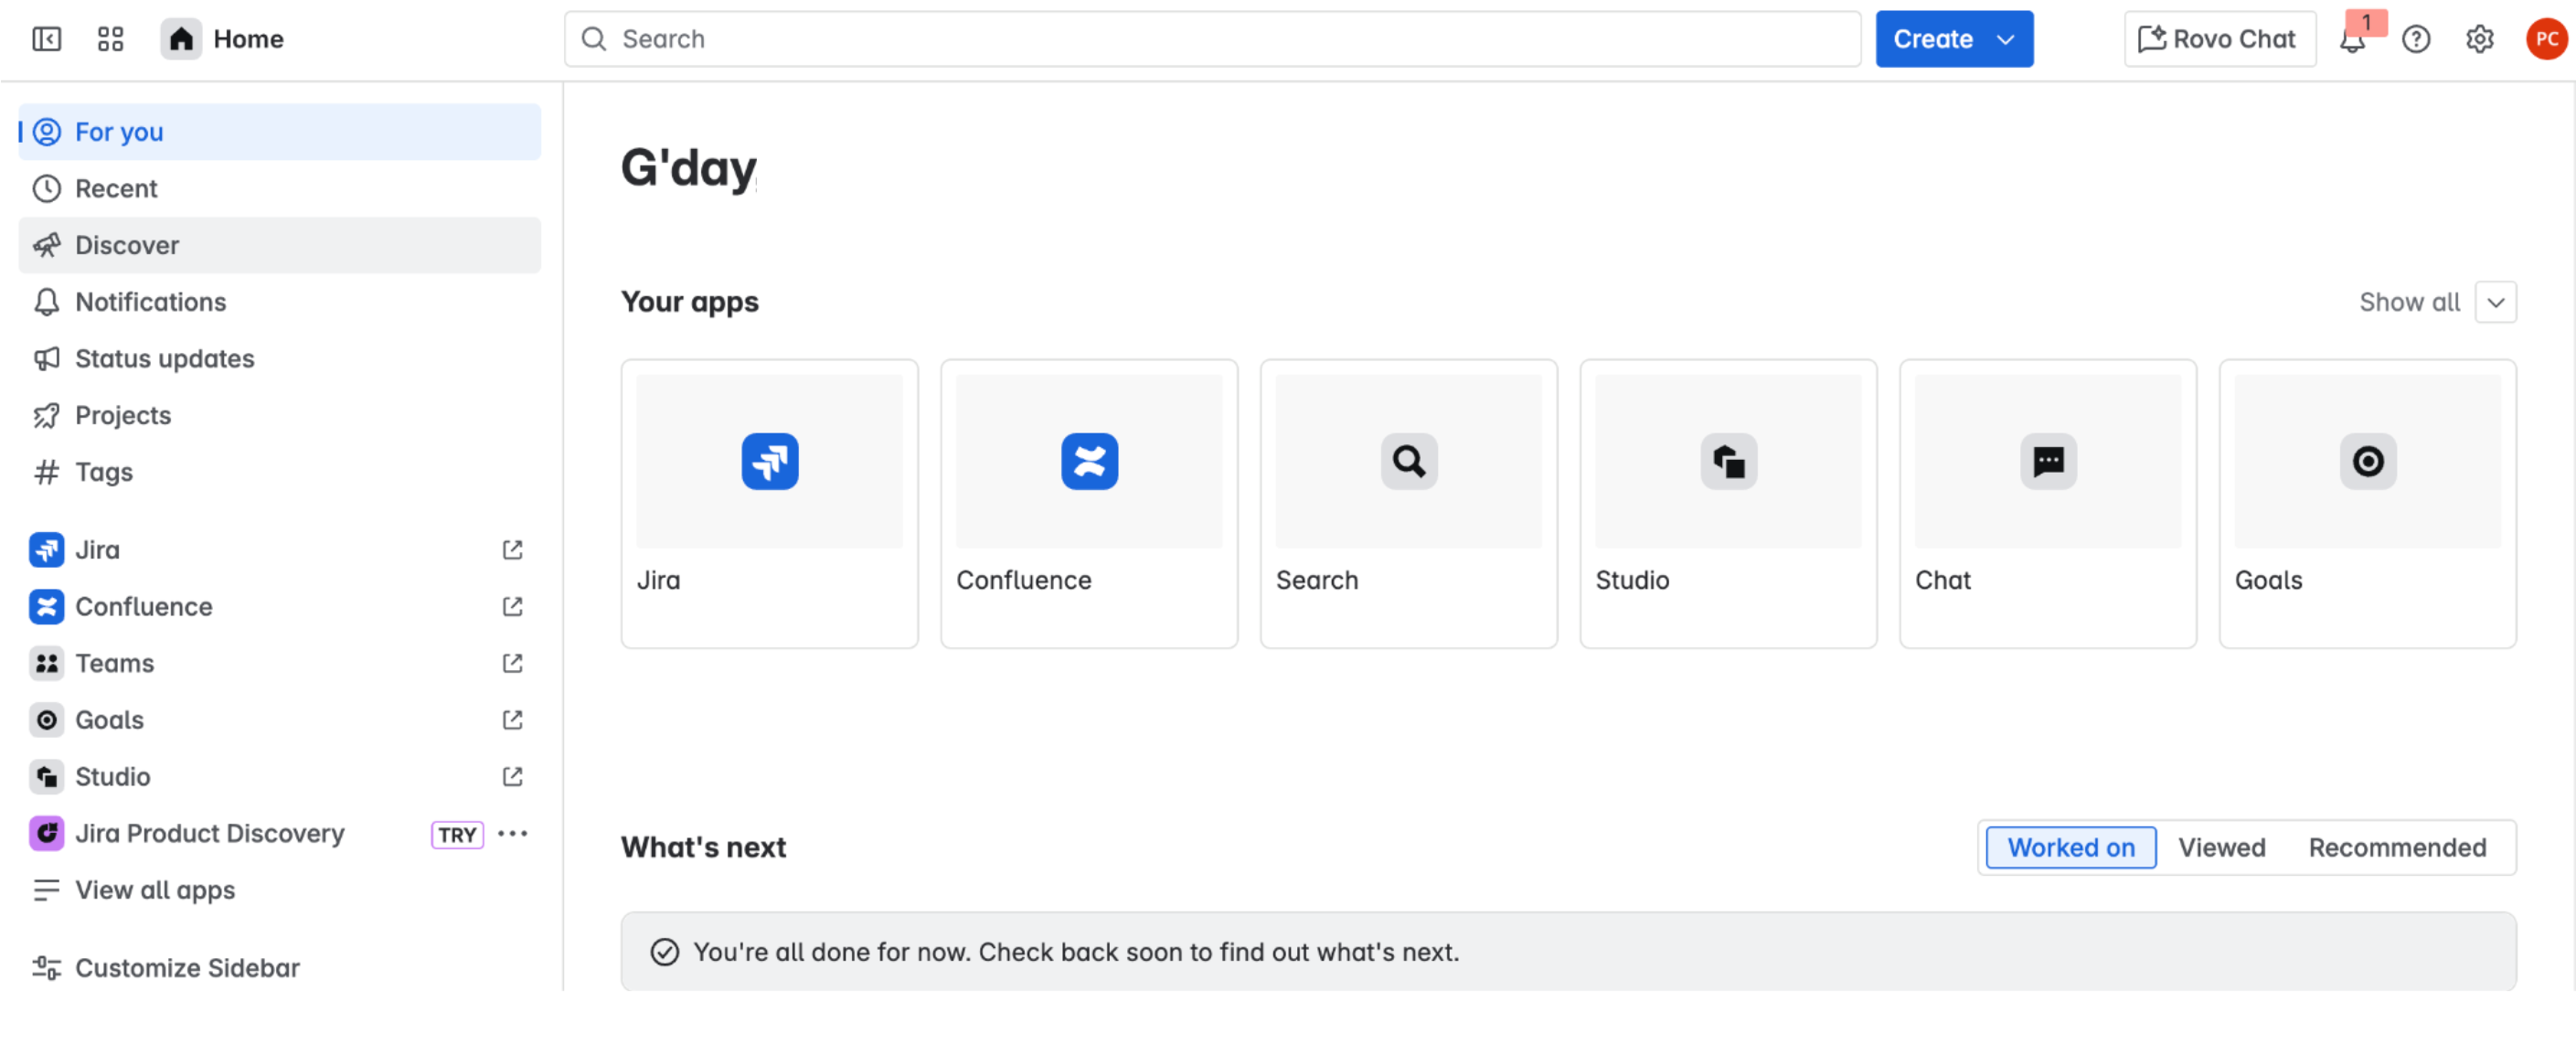
Atlassian home page Click Settings.
If you see the System option under Jira settings, you have Jira organization administrator access. Otherwise, request your Jira organization administrator to provide access.
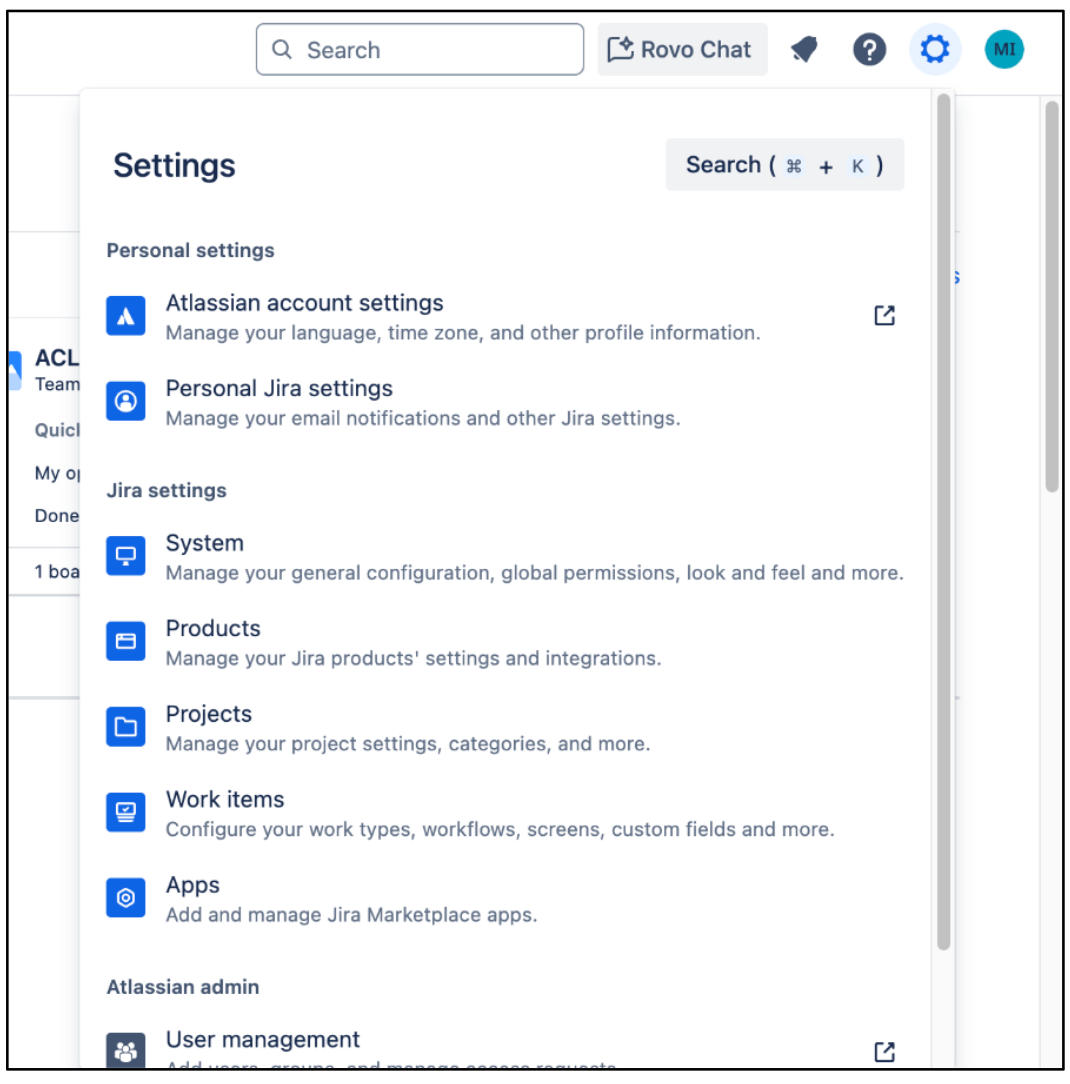
Settings
Create an OAuth 2.0 integration
- Sign in to the Atlassian Developer Console.
Click the profile icon and select Developer console.

Select Developer console Click Create and select OAuth 2.0 Integration.
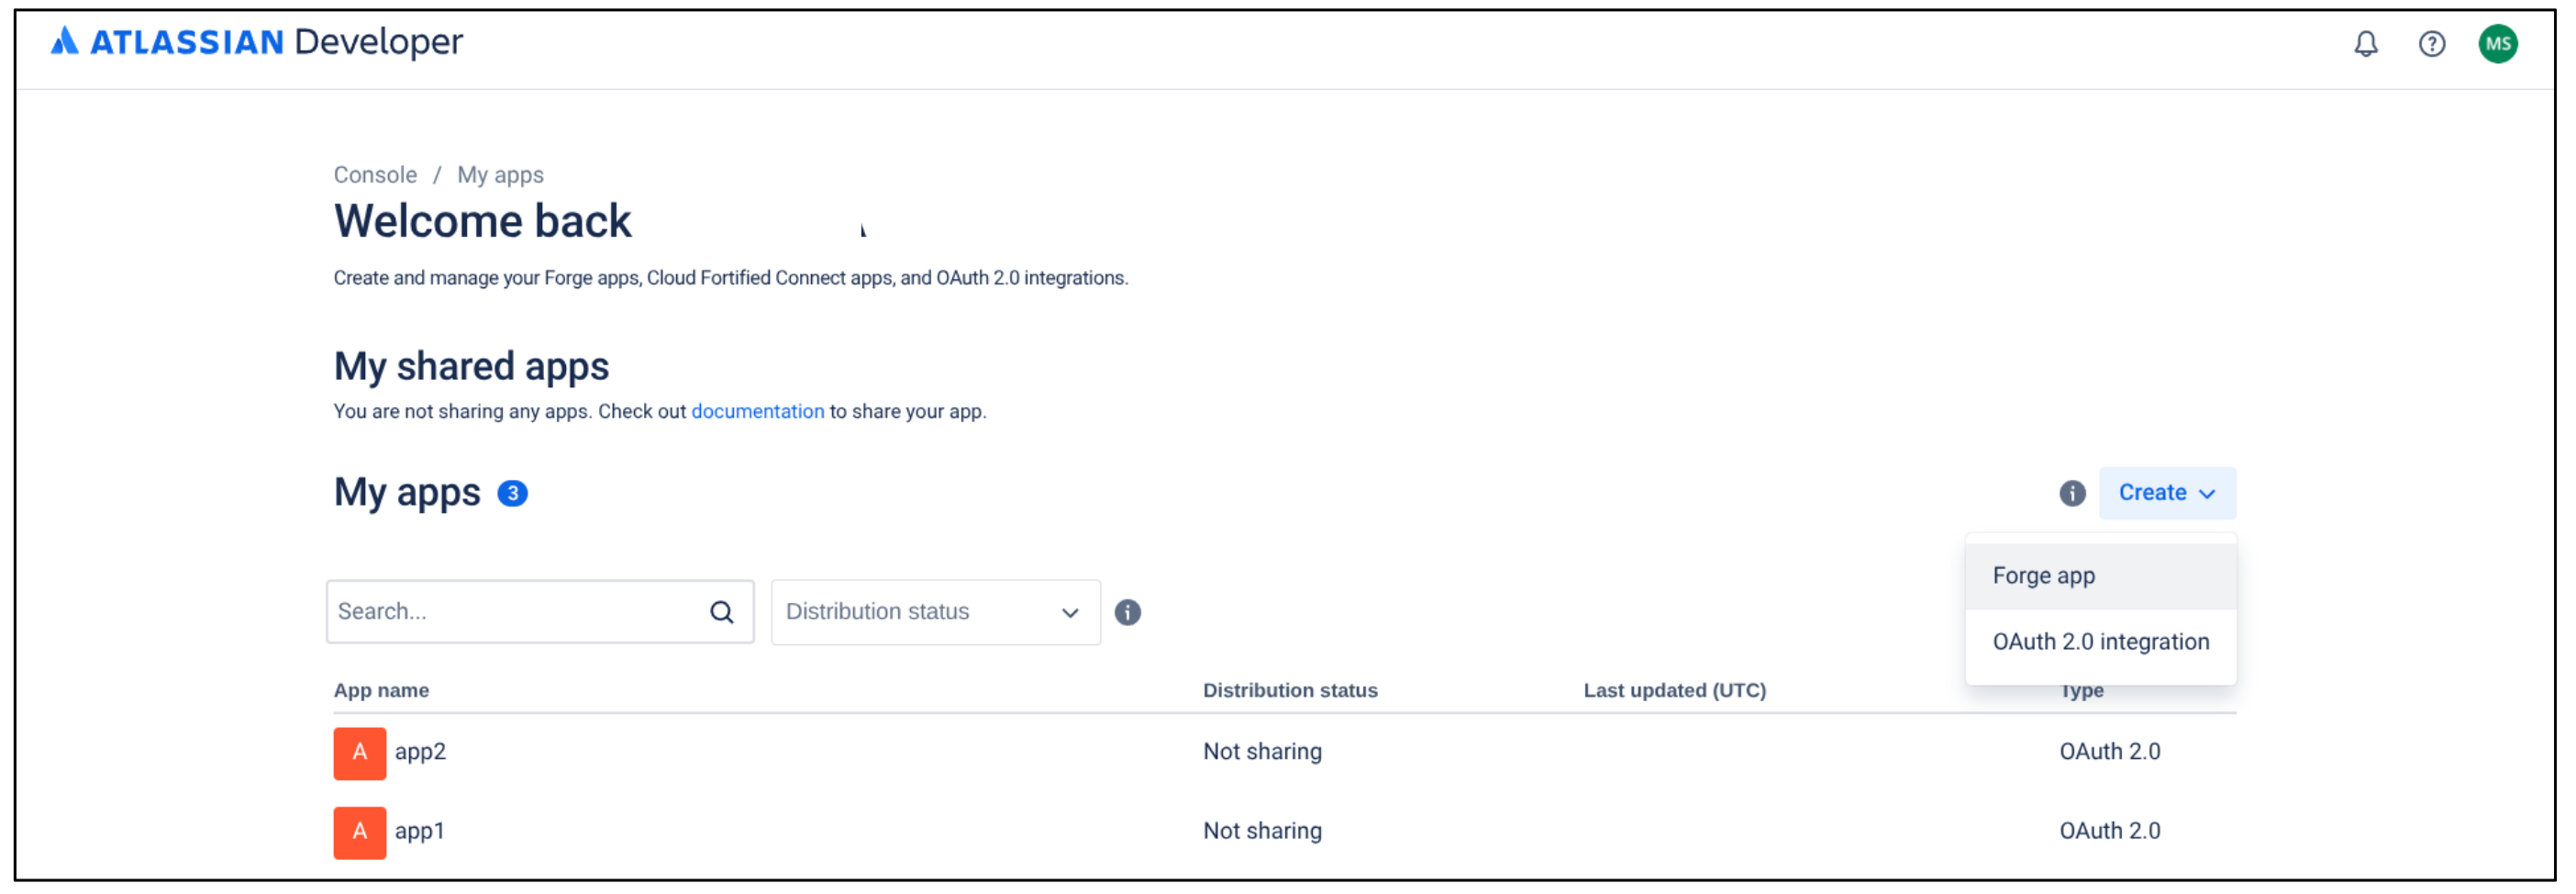
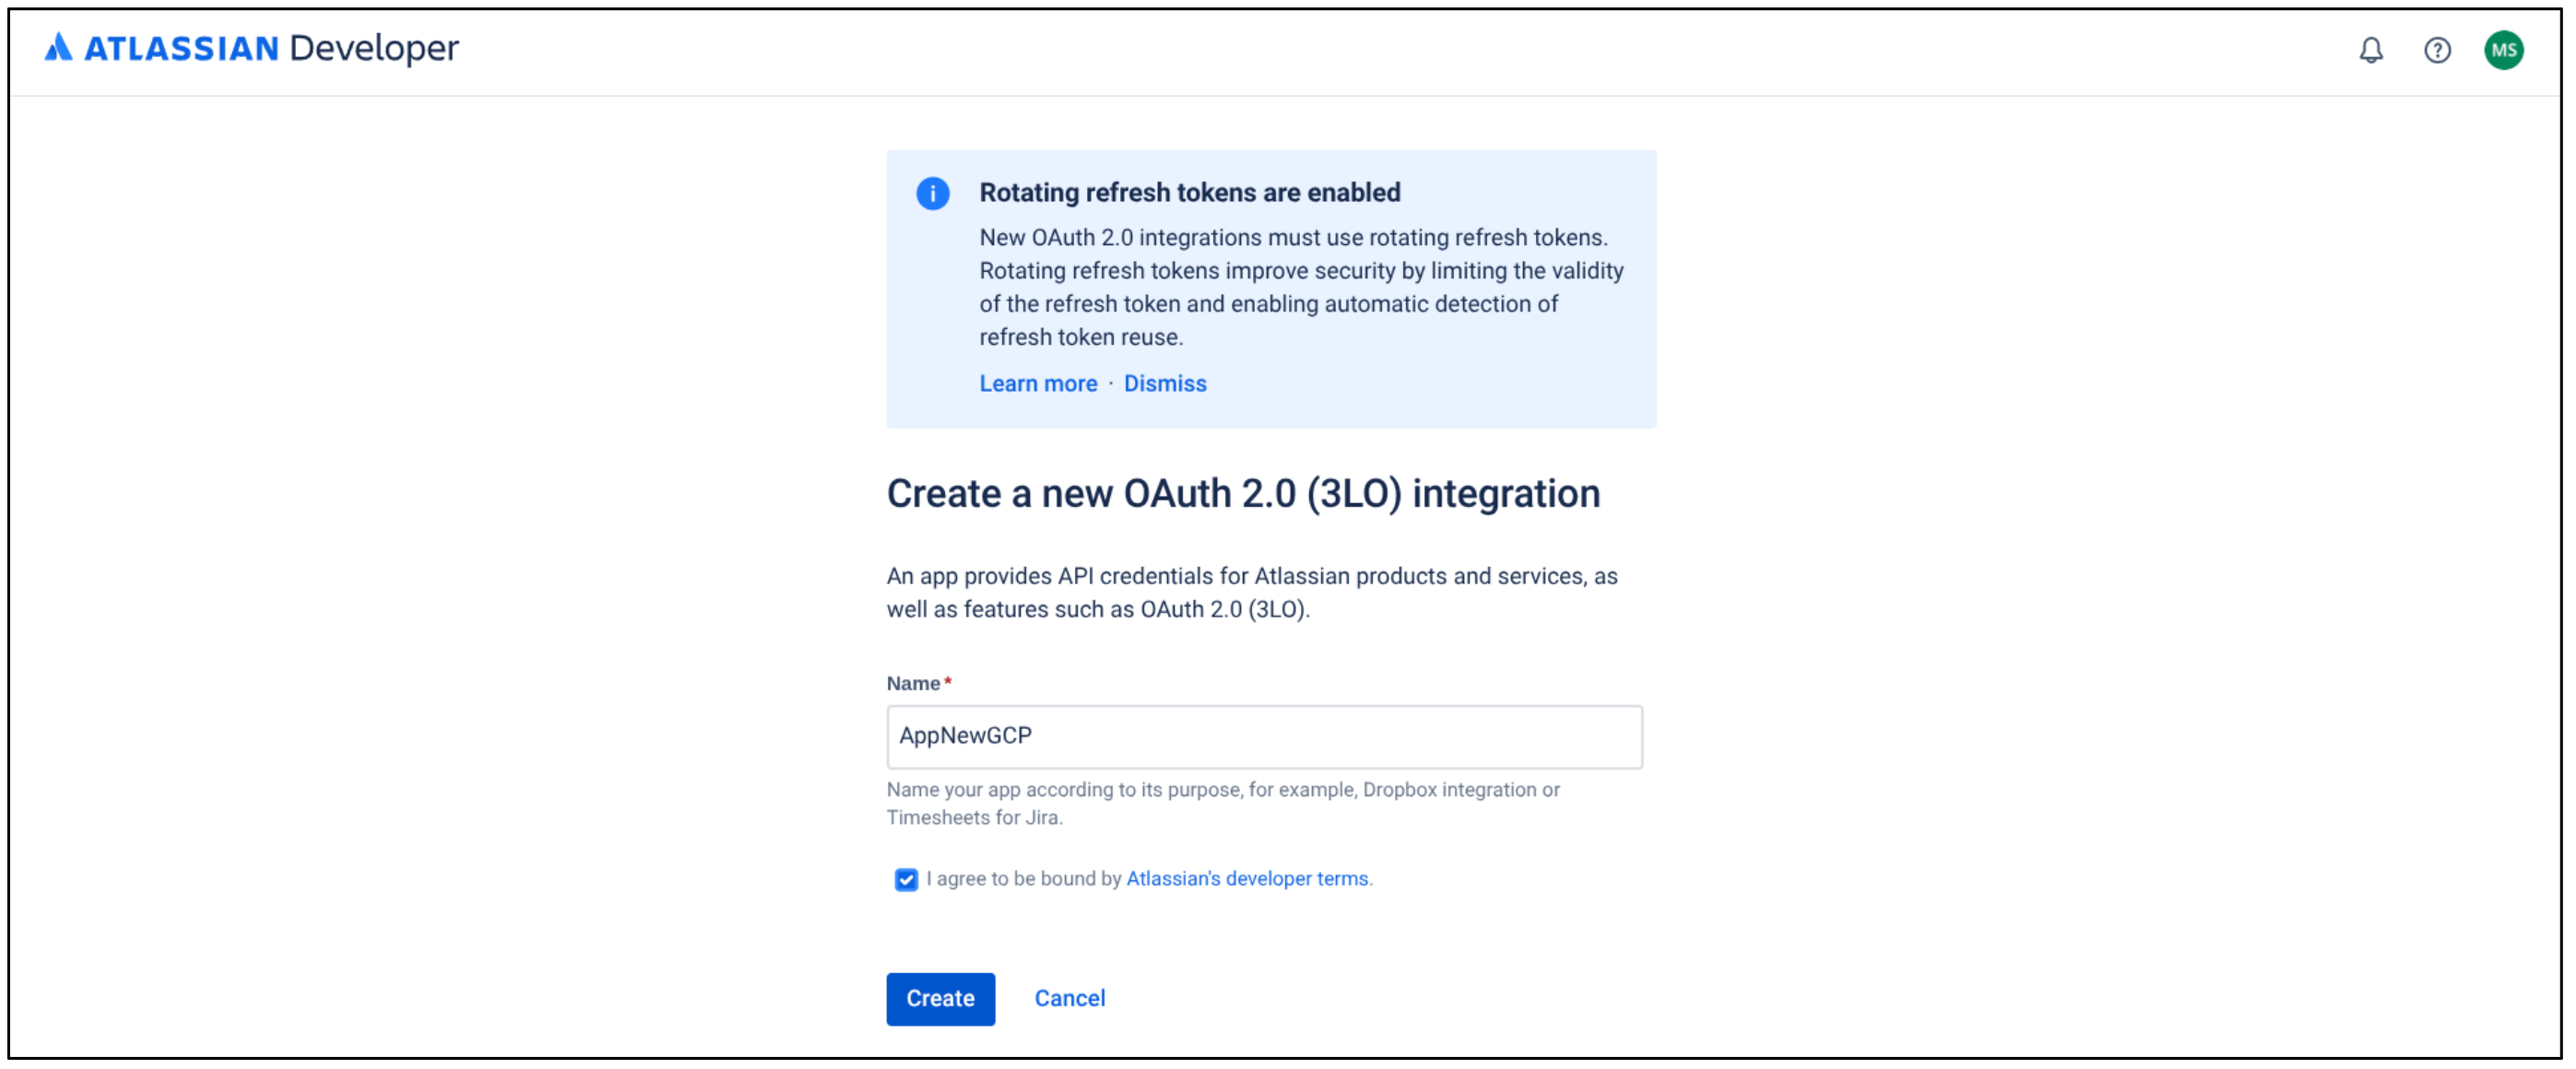
Select OAuth 2.0 Integration Enter a name for the app.
Select the checkbox to agree to Atlassian's developer terms.
Click Create.
Create a new OAuth 2.0 Integration Click Authorization.
In the Authorization type table, select Add for OAuth 2.0 (3LO).
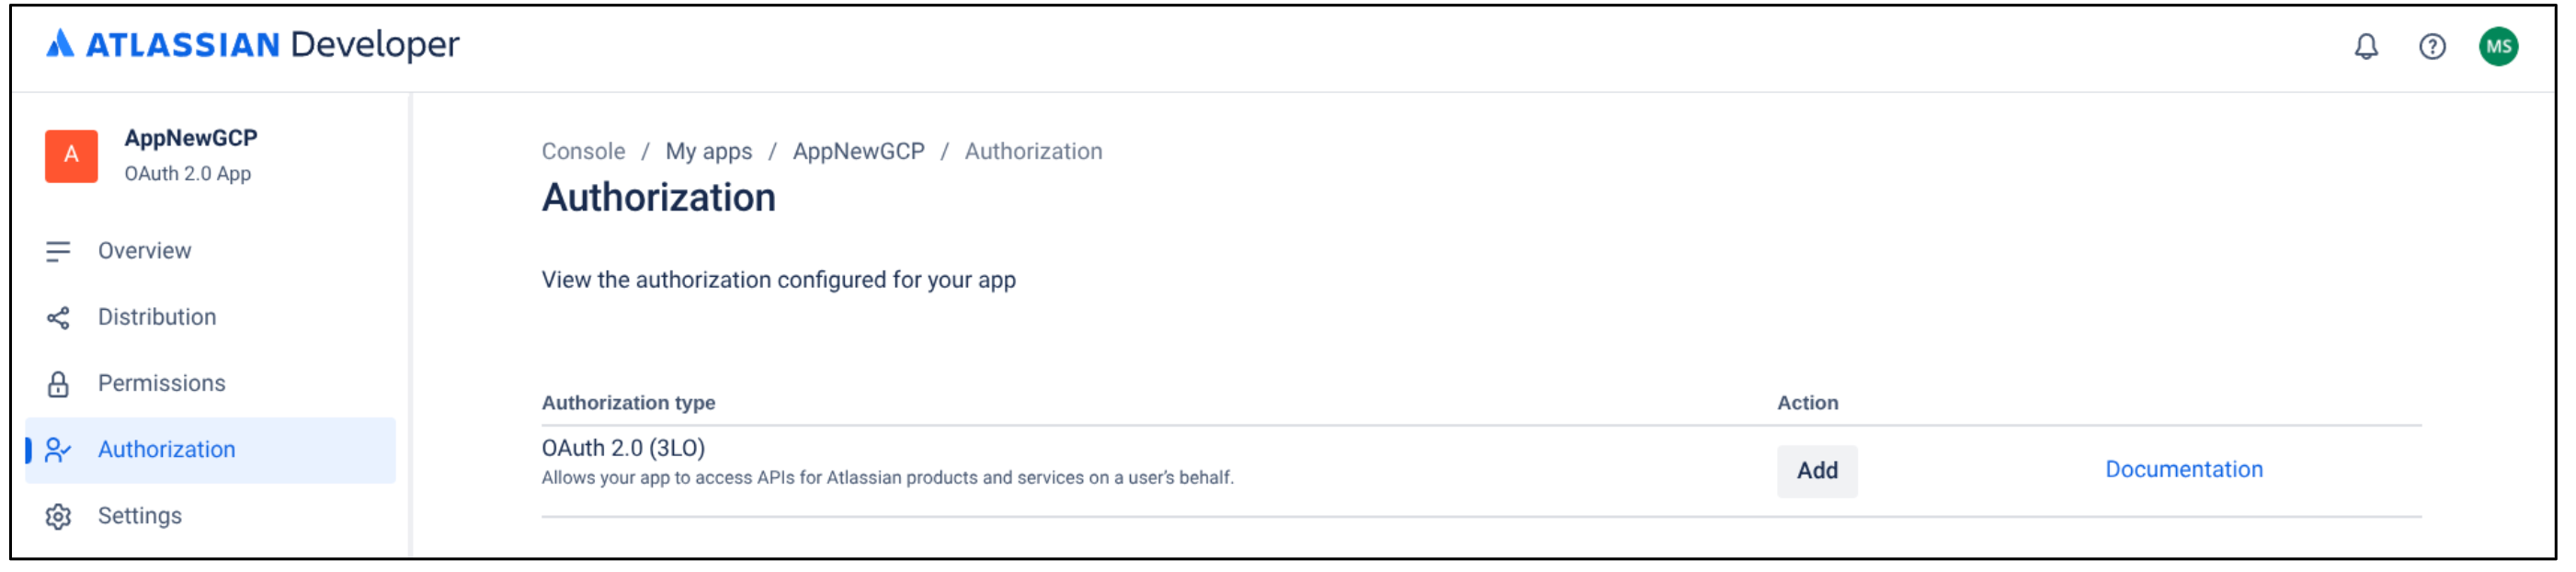
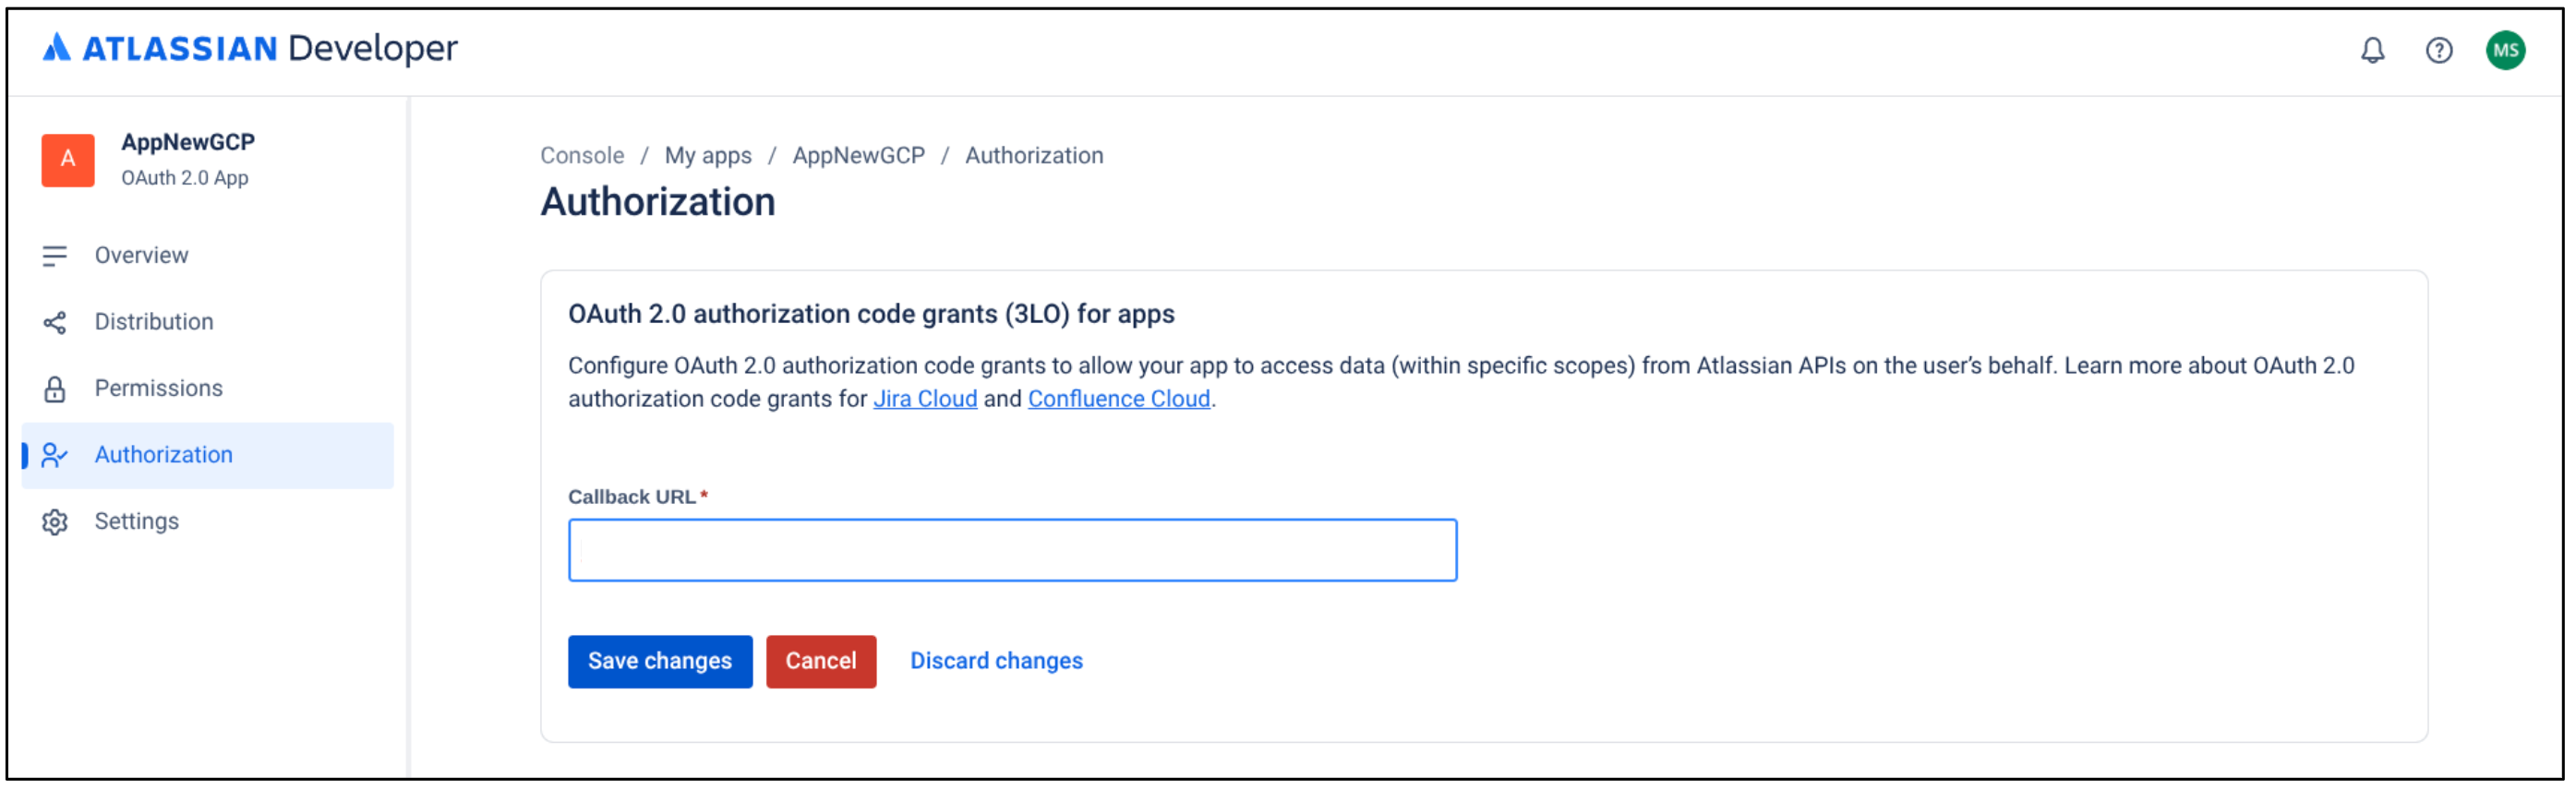
Add authorization type In the Callback URL field, enter
https://vertexaisearch.cloud.google.com/console/oauth/jira_oauth.html.Click Save changes.
Save changes
Configure the minimum permissions required for the application
On the application page, click Permissions.
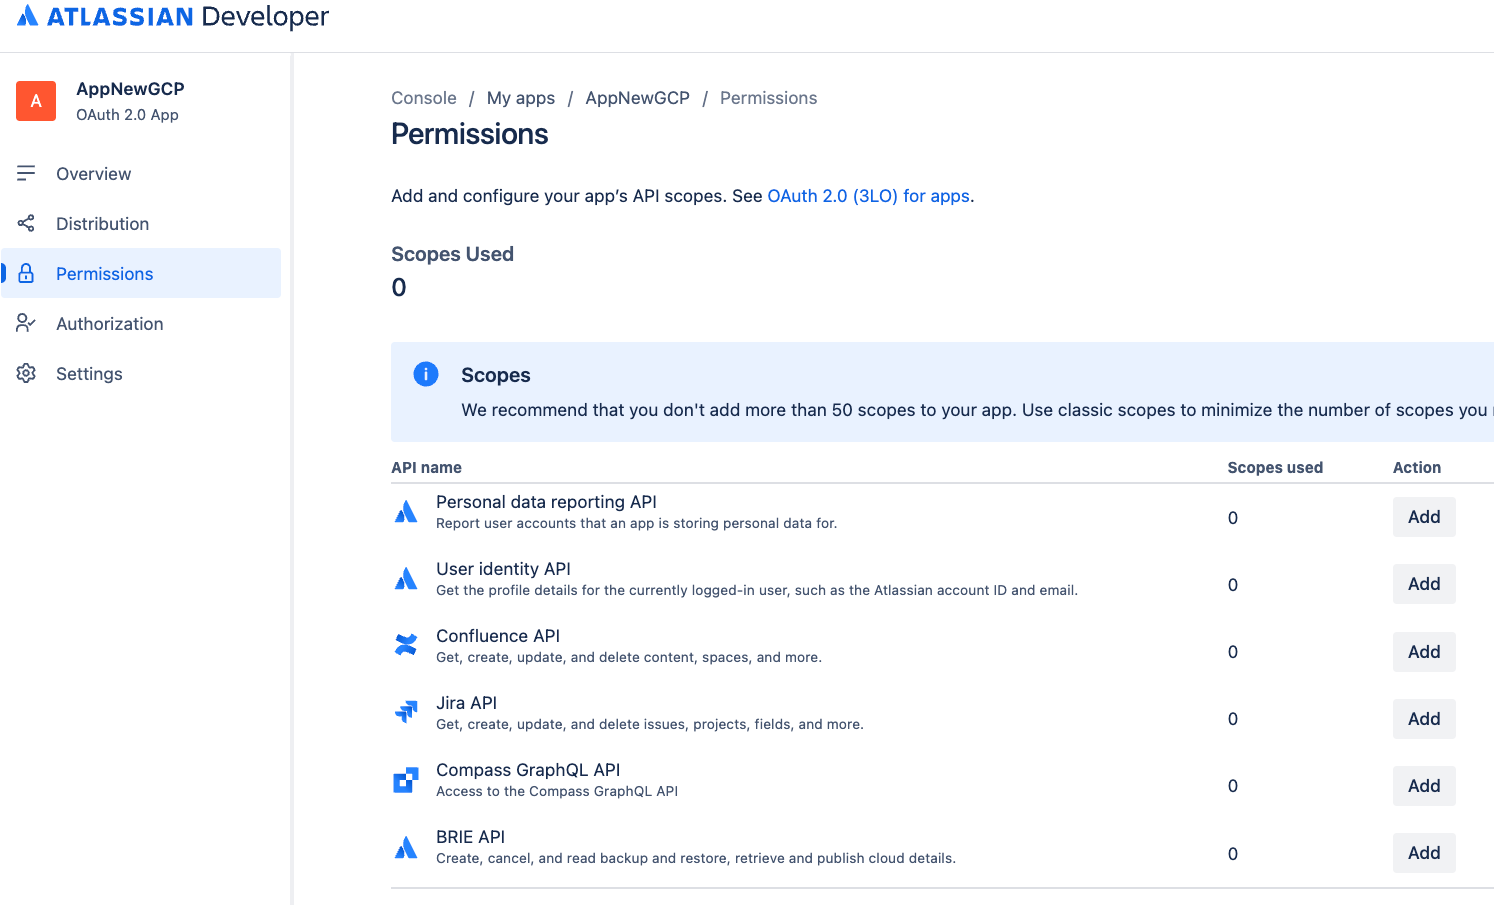
Select Permissions Go to Jira API and click Add.
Click Configure.
Go to the Classic scopes tab.
Click Edit scopes and select the following permissions:
read:jira-userread:jira-work
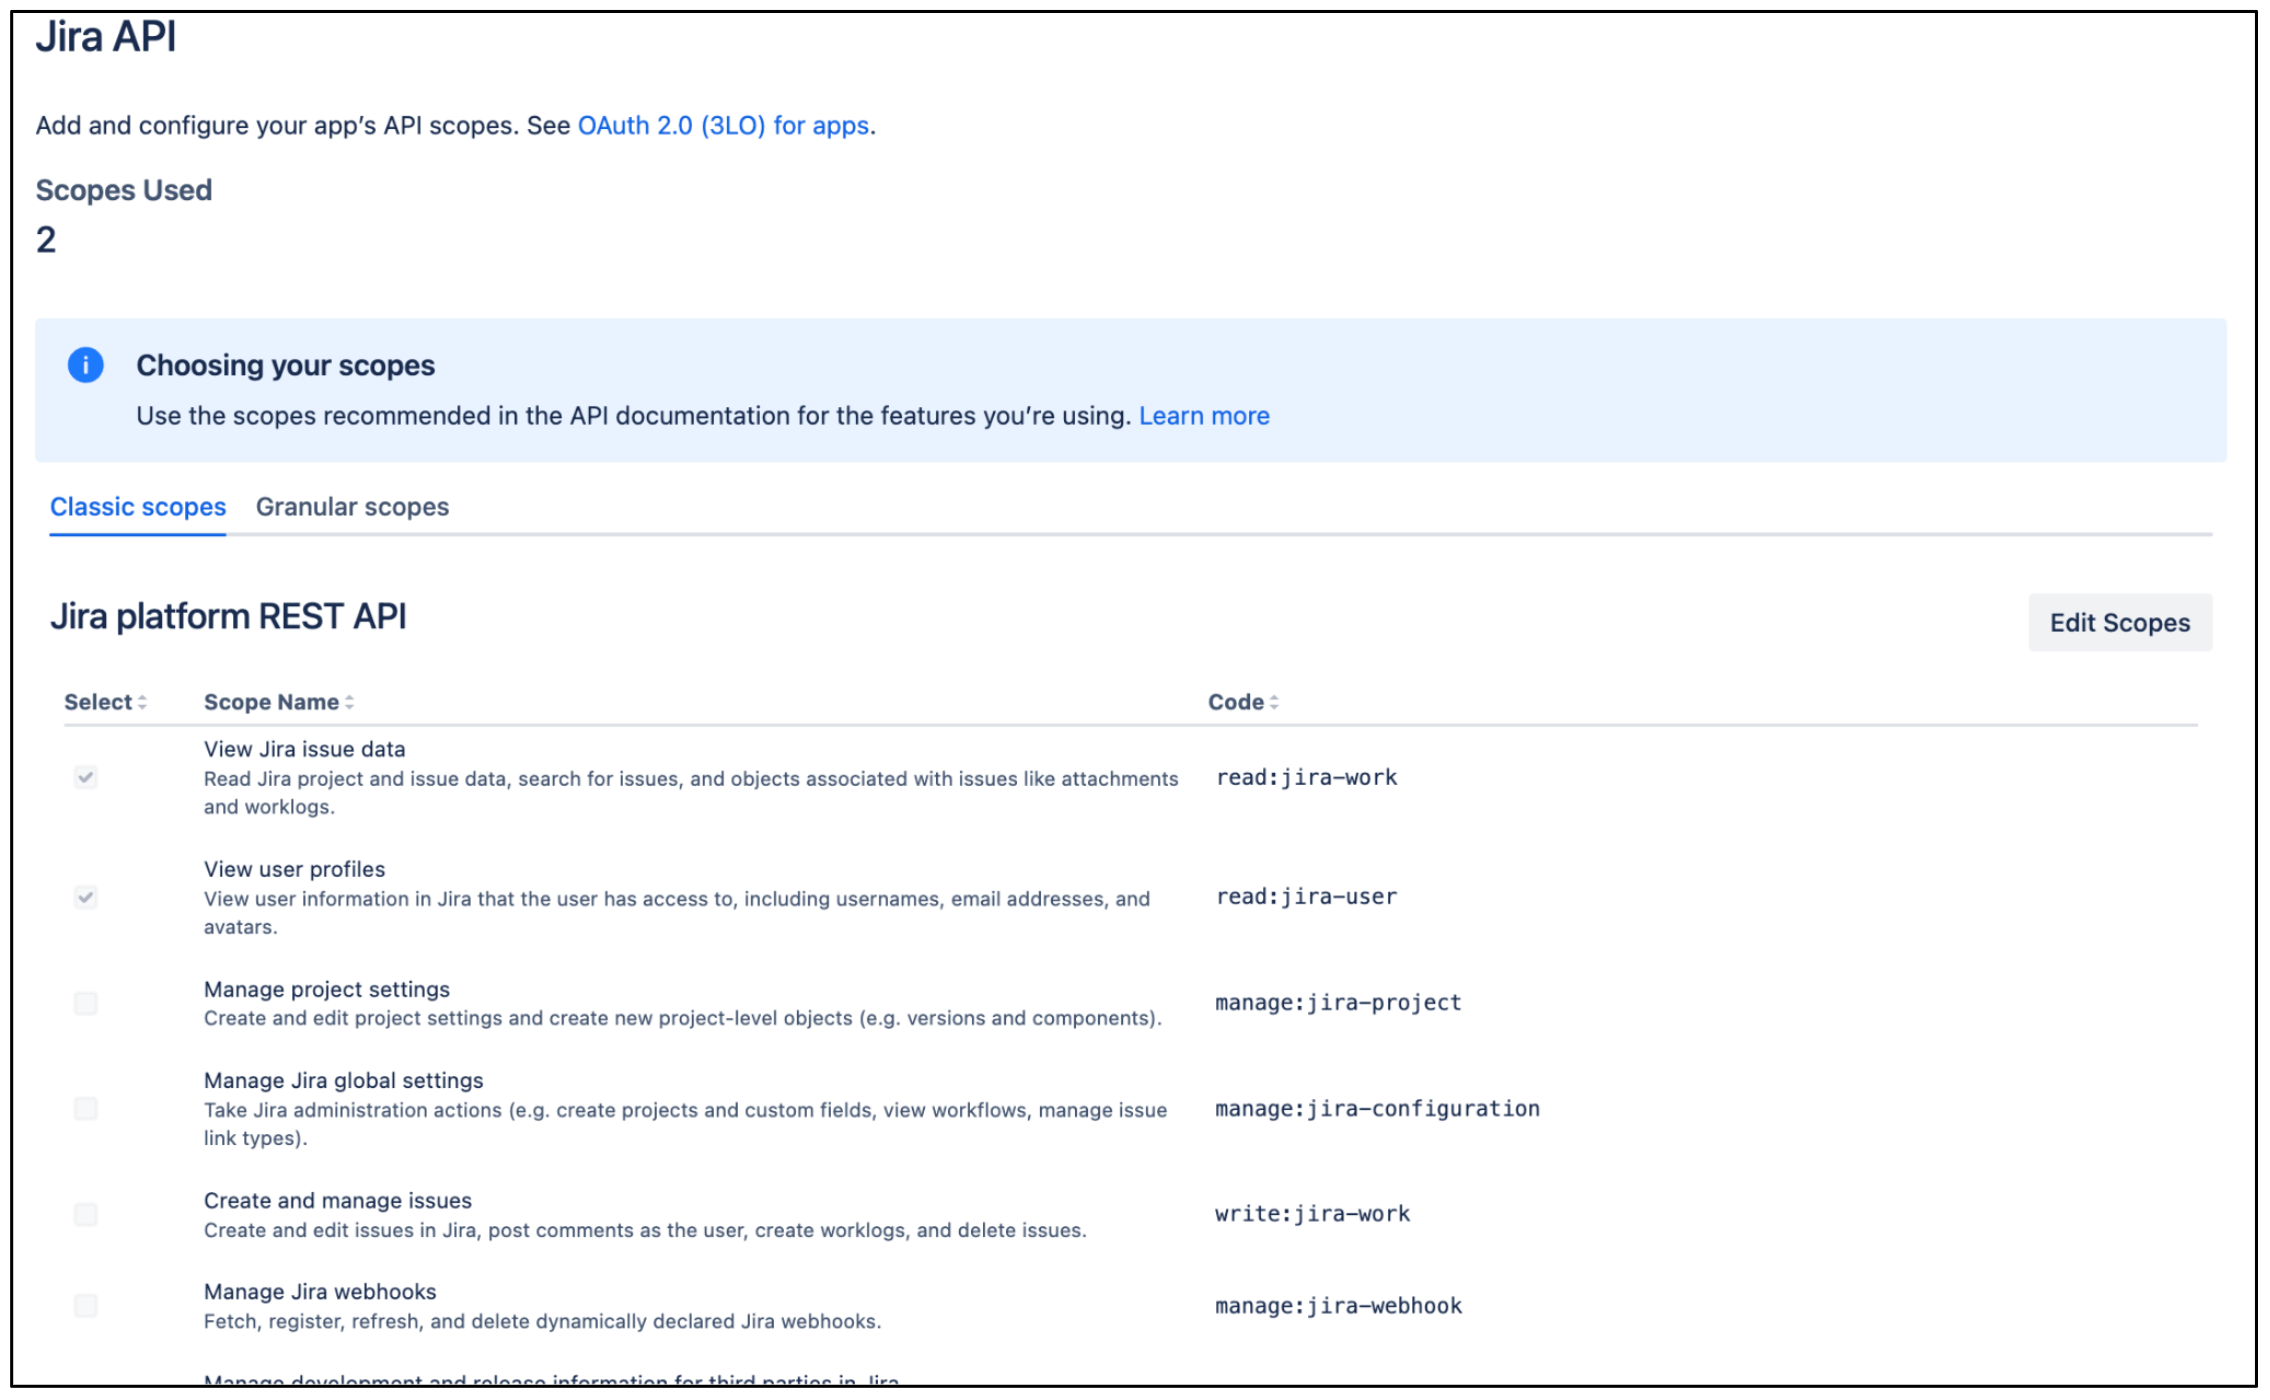
Edit Classic scopes Confirm that the two scopes are selected, and then save your changes.
Go to the Granular scopes tab.
Click Edit scopes and select the following permissions:
read:issue-security-level:jiraread:issue-security-scheme:jiraread:group:jiraread:user:jiraread:avatar:jiraread:audit-log:jira
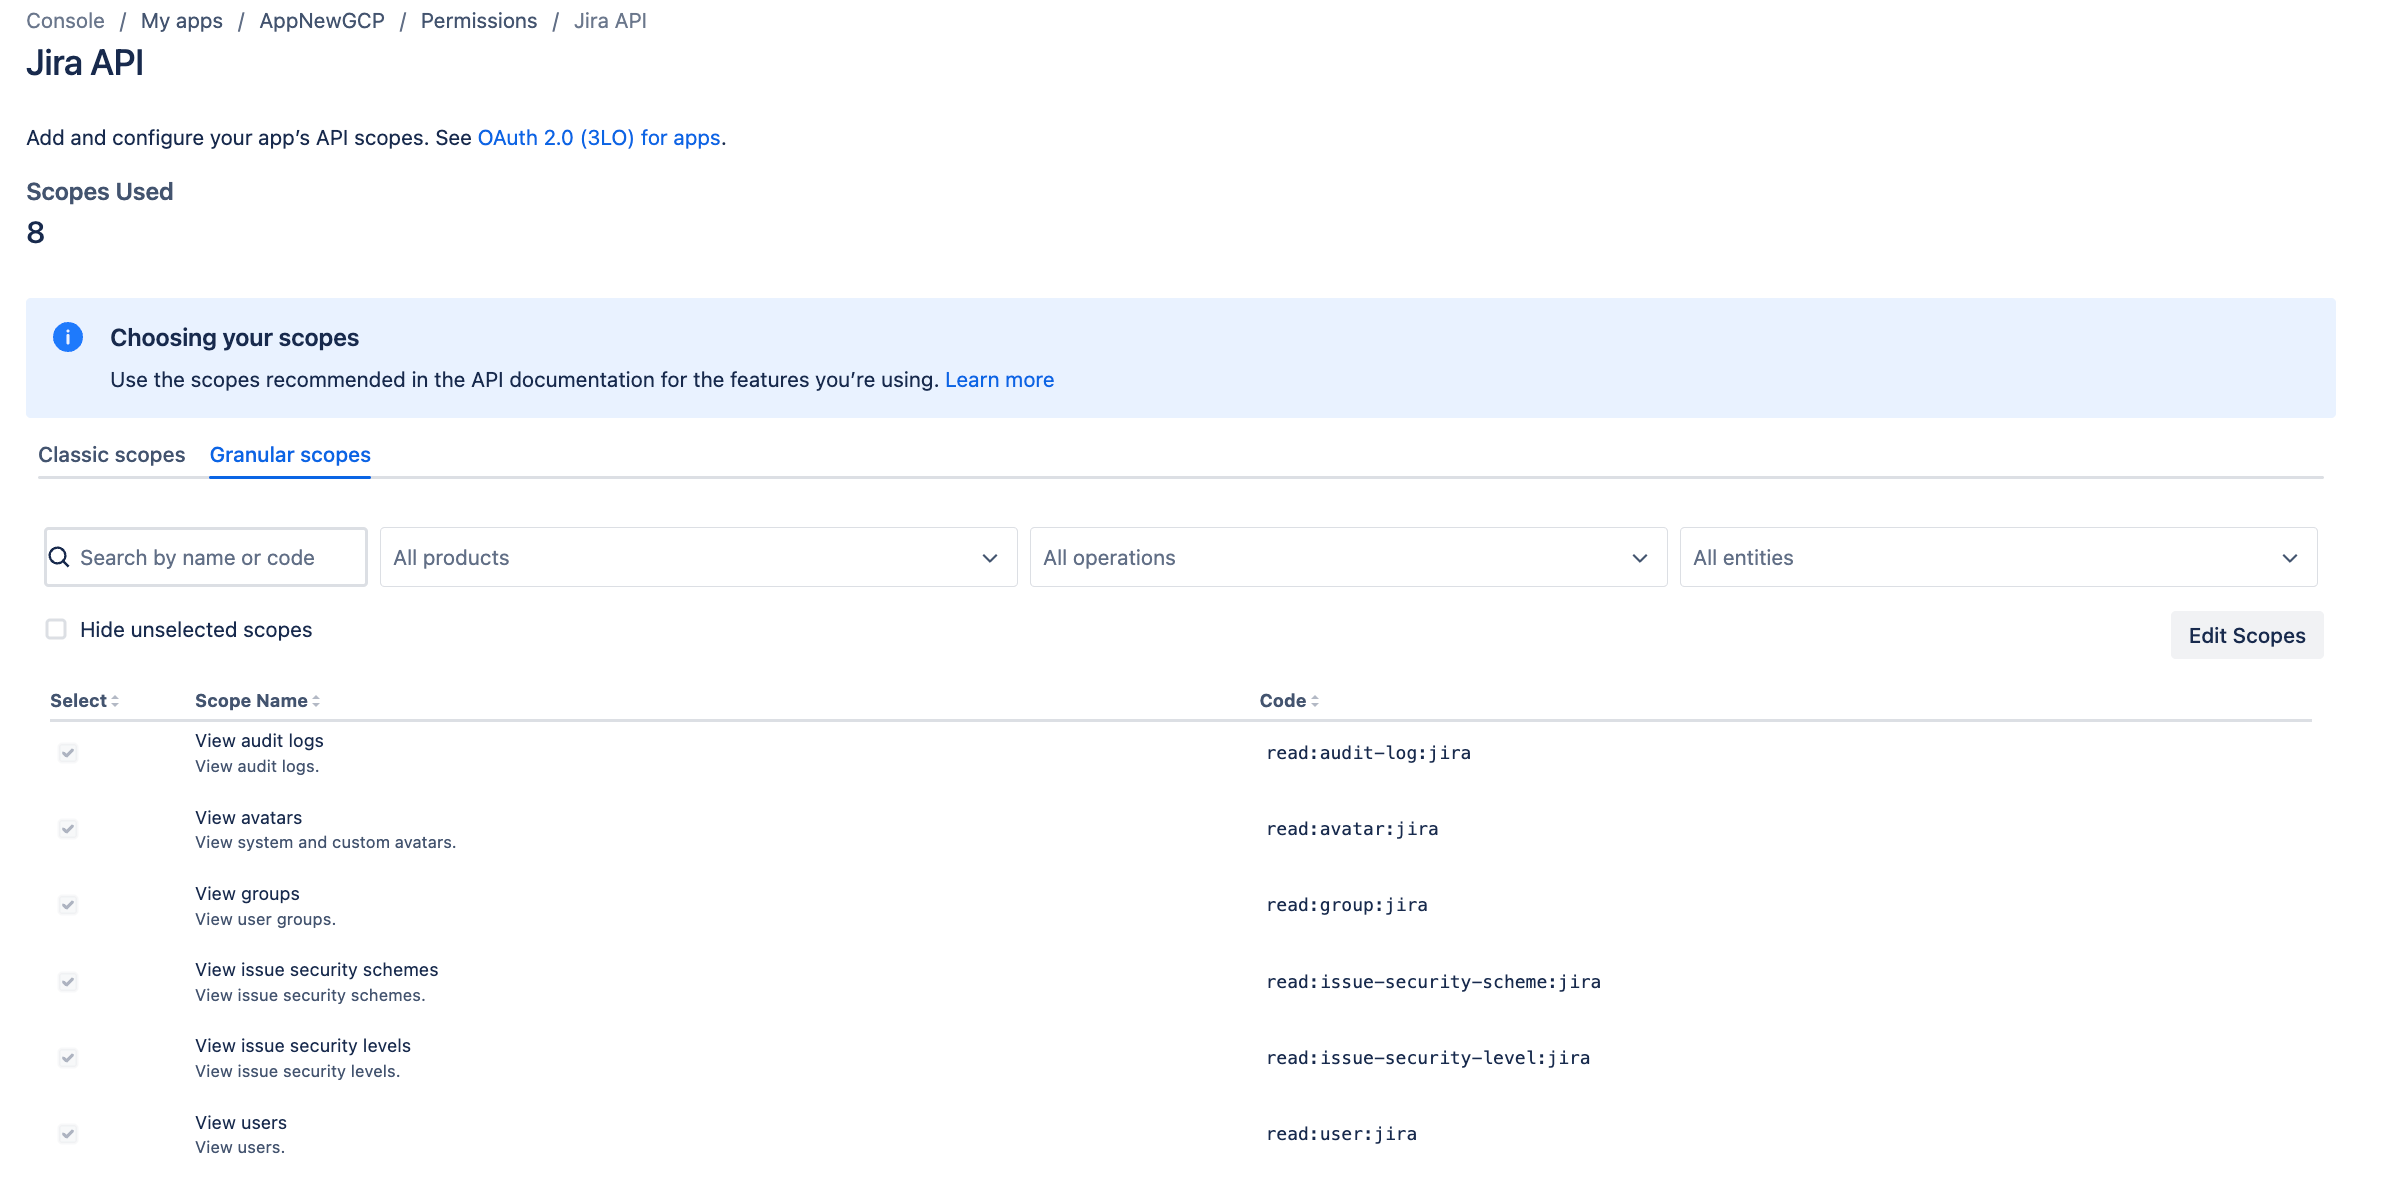
Edit Granular scopes
Minimum permissions
The following tables list the minimum permissions required to create a Jira Cloud connector.
Classic scopes
| Permission | Usage reason | Description |
|---|---|---|
| read:jira-work | Data ingestion | Allows the connector to read details of entities (including issues, attachments, comments, and properties). |
| read:jira-user | Enforce Access Control Lists (ACLs) | Allows the connector to read user and group details. |
Granular scopes
| Permission | Usage reason | Description |
|---|---|---|
| read:issue-security-level:jira | Enforce ACLs | Enables enforcement of ACLs for issues based on their specific issue security levels. |
| read:issue-security-scheme:jira | Enforce ACLs | Enables enforcement of ACLs for issues based on their associated issue security schemes. |
| read:group:jira | Enforce ACLs | Allows the connector to read group information in order to enforce ACLs related to group memberships. |
| read:user:jira | Enforce ACLs | Allows the connector to read user information in order to enforce ACLs related to individual user permissions. |
| read:avatar:jira | Enforce ACLs | Allows the connector to read user and group information to enforce ACLs. Avatar is not used, but is part of the granular scopes that are bundled with groups and users. |
| read:audit-log:jira | Monitor ACLs | Allows the connector to read Jira's audit log for ACL verification and monitoring. |
Obtain a client ID and client secret
- Click Distribution and select Edit.
- Select Sharing to enable editing other fields.
- Fill out the remaining fields:
- For Vendor, enter
Google. - For Privacy policy, enter
https://policies.google.com. - For Does your app store personal data?, select Yes.
- Select I confirm that I've implemented the personal data reporting API checkbox. For more information, see Personal data reporting API.
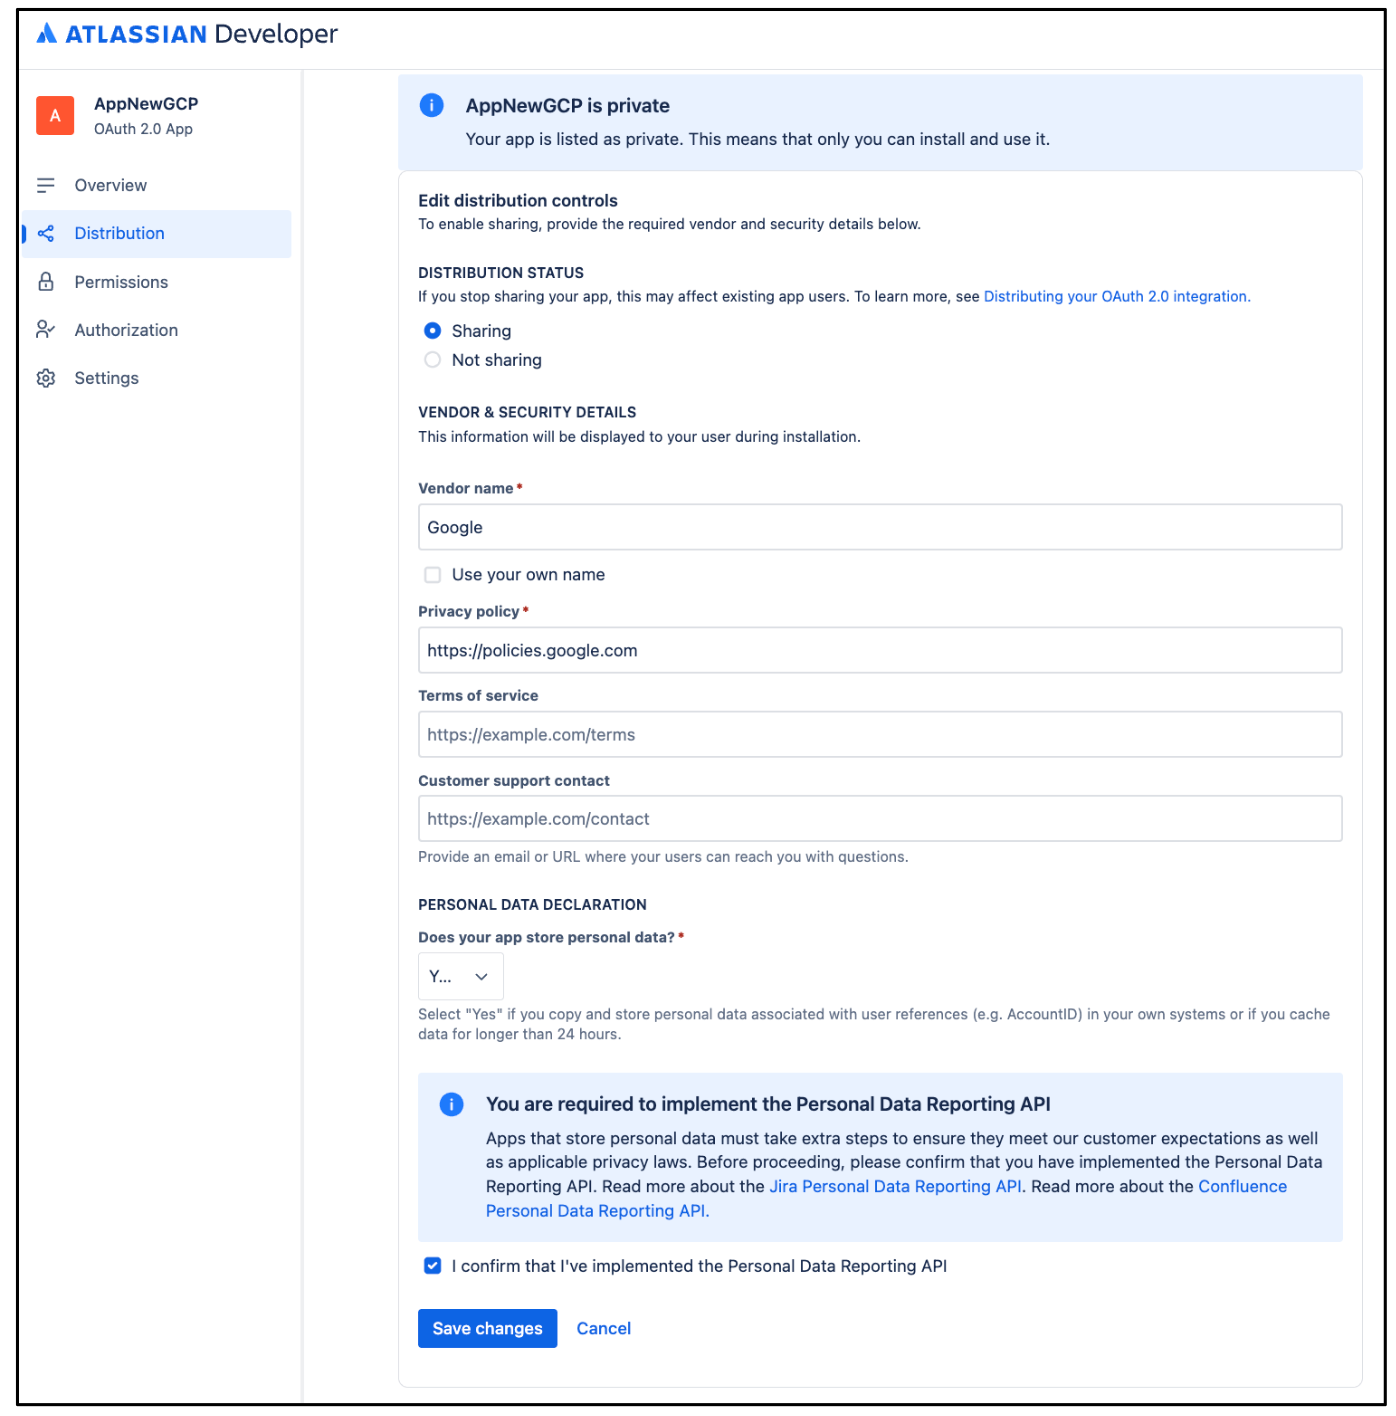
Edit Distribution
- For Vendor, enter
Click Save changes.
Click Settings to copy your Client ID and Client secret.
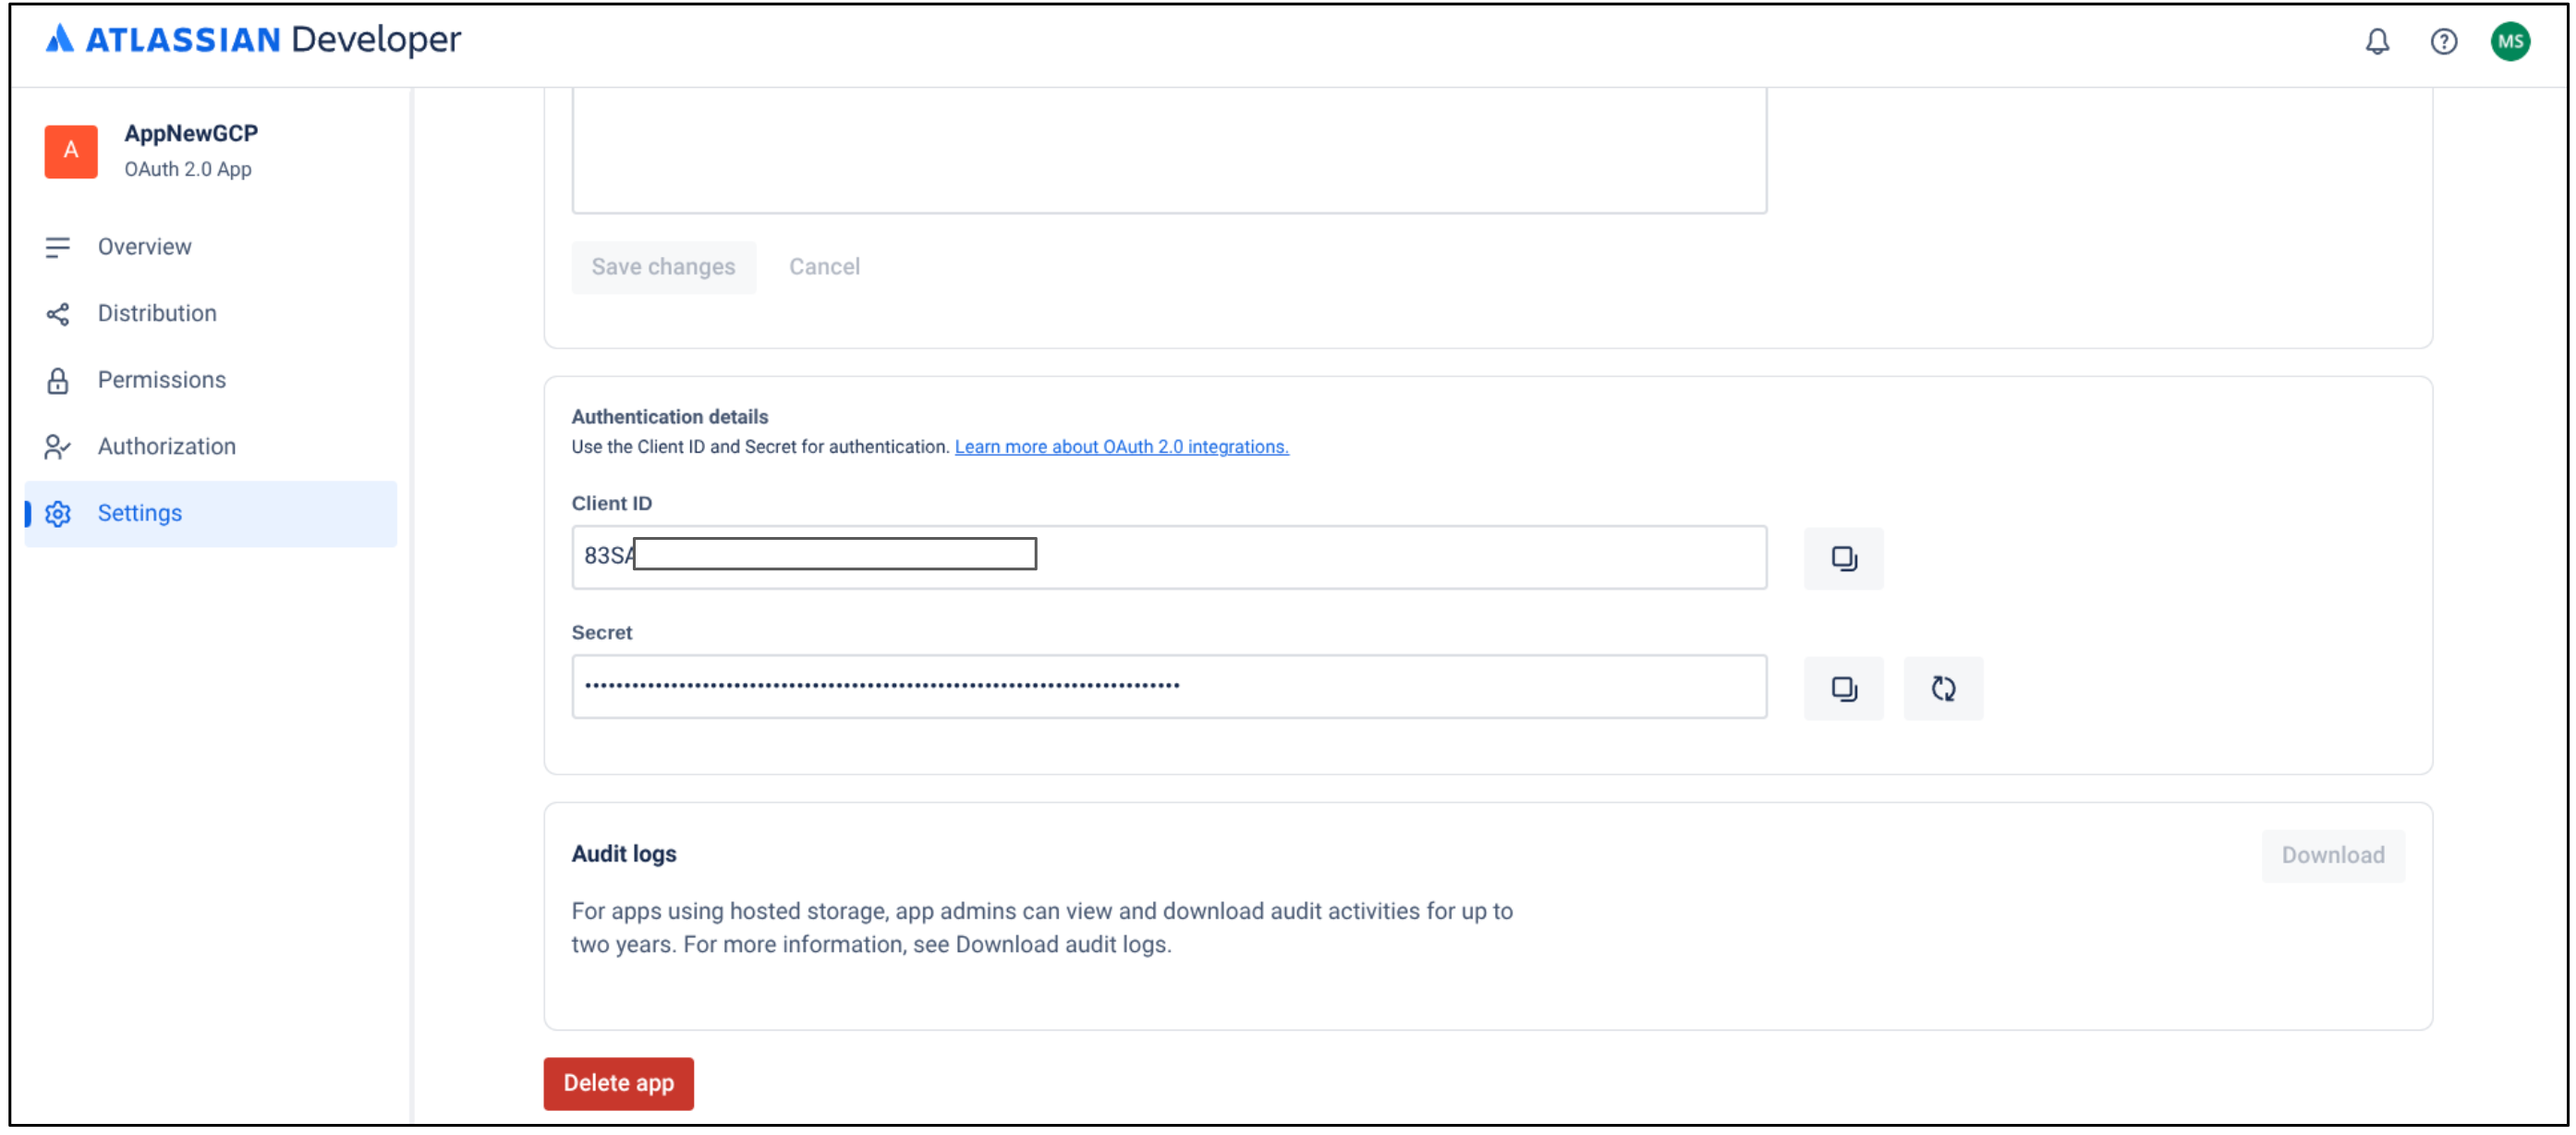
Copy your client ID and client secret
Obtain an instance ID and instance URL
Obtain the instance ID:
- Open a new tab, copy the instance URL, and append
/_edge/tenant_infoto the instance URL. For example,https://YOUR_INSTANCE.atlassian.net/_edge/tenant_info. Navigate to the link to find the
cloudIdvalue. ThecloudIdis your instance ID.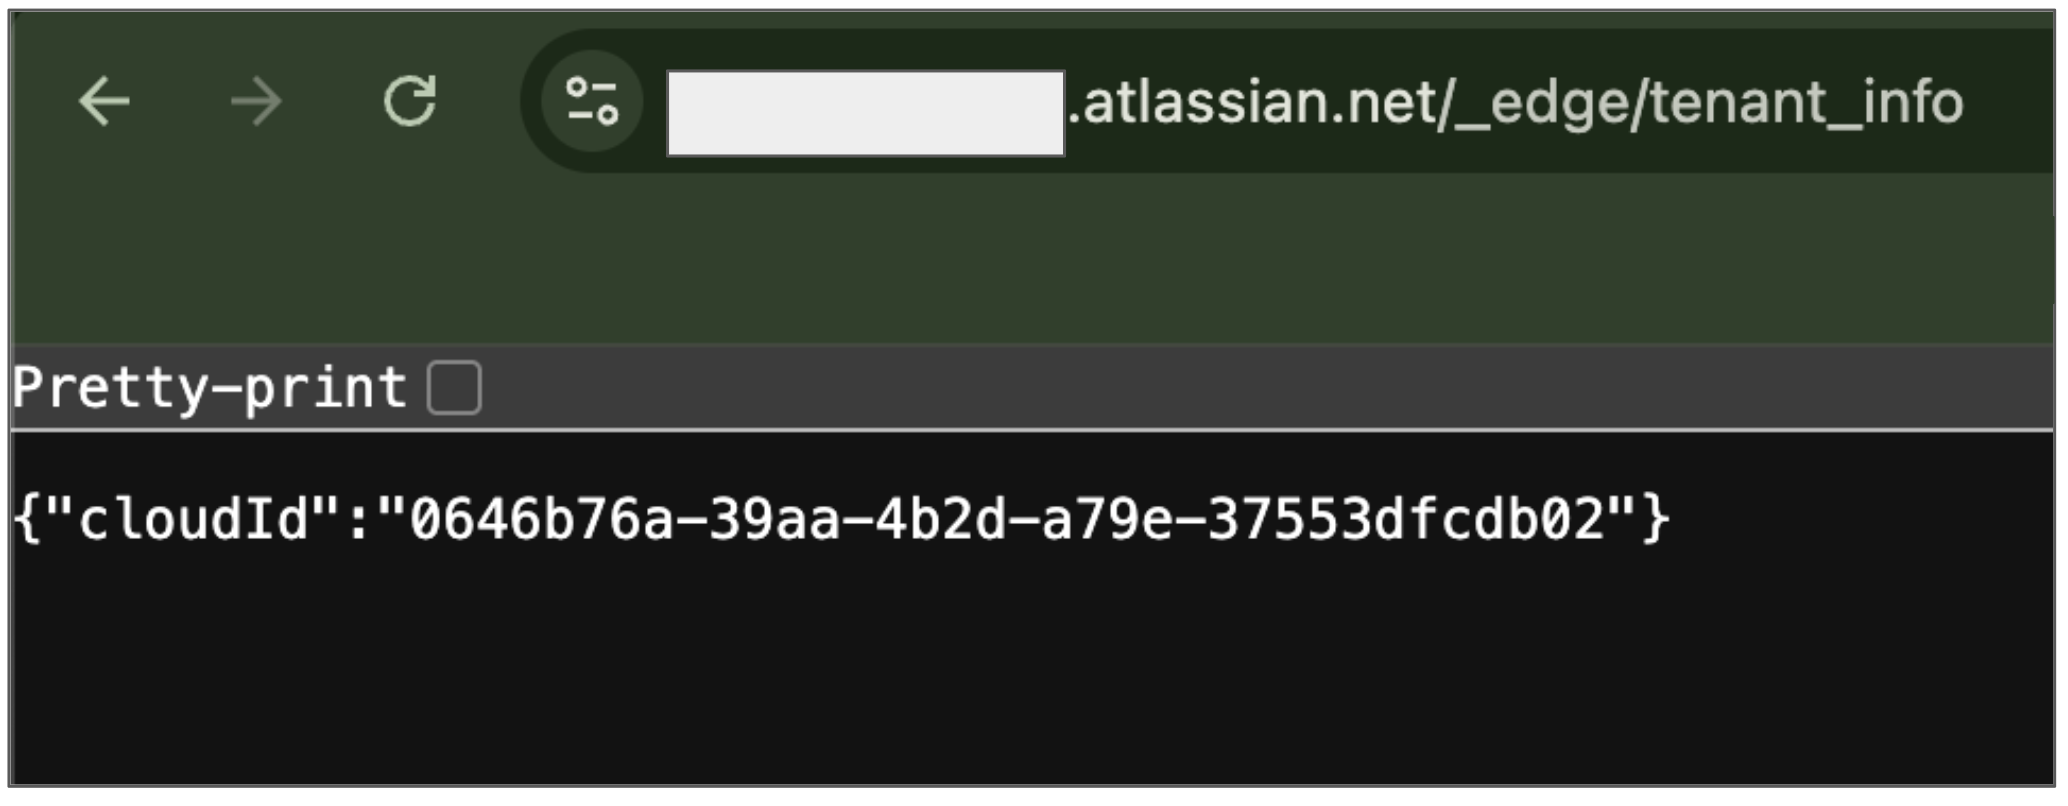
Obtain your instance ID
- Open a new tab, copy the instance URL, and append
Obtain the instance URL:
- Go to atlassian.net and sign in with your administrator account.
- Select the app you want to sync. For example, sync the first app.
- Find the instance URL (the subdomain in the address bar).
Grant administrator roles
To grant the Jira administrator the Discovery Engine Editor role in the Google Cloud console, do the following:
- In the Google Cloud console, go to the Gemini Enterprise page.
Navigate to IAM.
Locate the user account which has administrator access in Jira and click the Edit icon .
Grant the Discovery Engine Editor role to the administrator.
To grant a user an administrator role in Atlassian, do the following:
Sign in to Atlassian using an organization administrator account.
Click the menu icon and select your organization. Alternatively, you can go to admin.atlassian.com.
On the Admin page, click the product and select the Manage users button.

Manage users Click Groups under User management.
On the Groups page:
- Click Create group.
- Enter a name for the group.
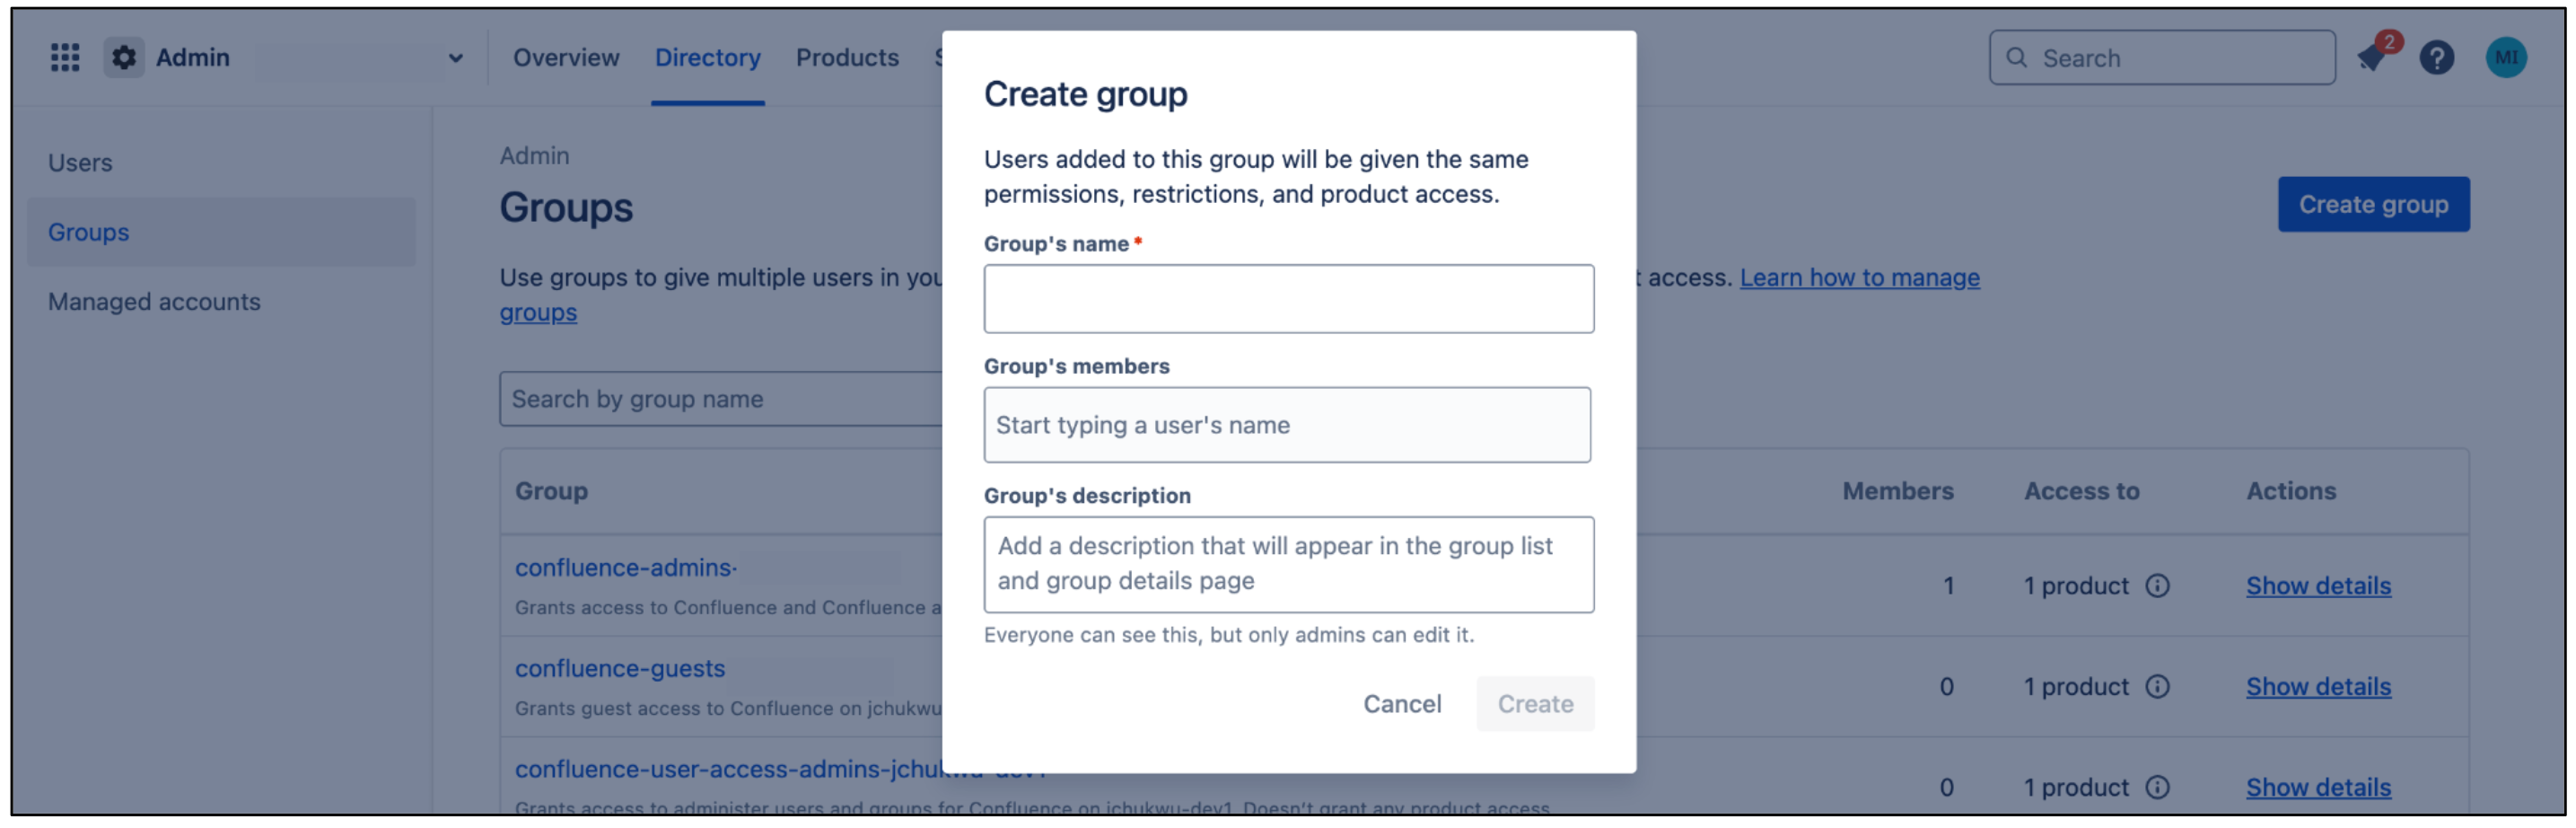
Create group
This group receives permissions required by the connector. Users added to this group inherit these permissions.The connector uses this group to authenticate and fetch documents.
On the group page, click Add product.
Select User access admin as the role for Jira.
Select Product admin as the role for Jira administration.
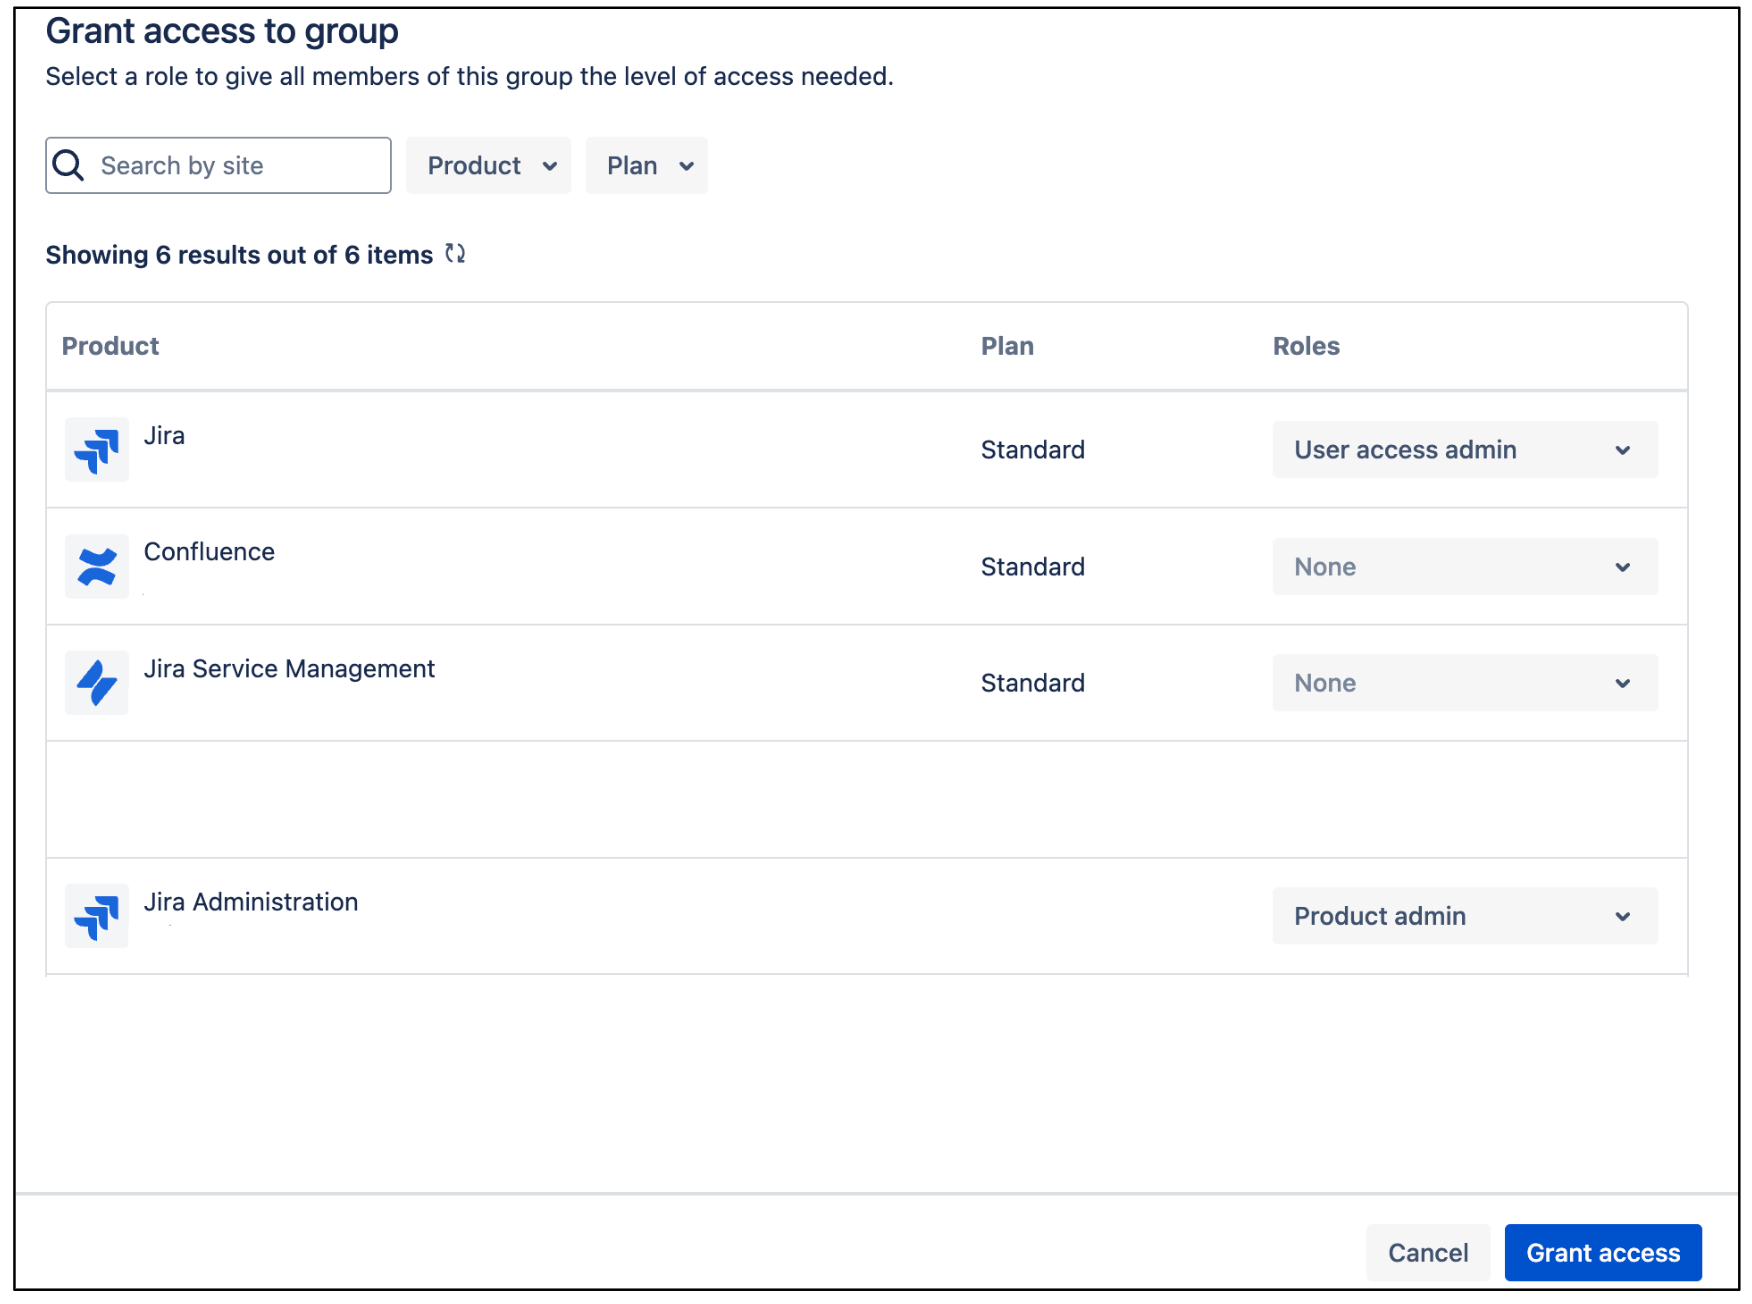
Jira user access administrator Click Grant Access.
Click Add group members to add a user account or group members that the connector uses to authenticate and access the required resources.
Add group members
Manage user visibility
To make the user's email visible to anyone in the Atlassian account, follow these steps:
Sign in to the Atlassian Developer Console.
Click the profile icon and select Developer console.
Click the user profile icon and select Manage account.
Manage account Navigate to the Profile and visibility.
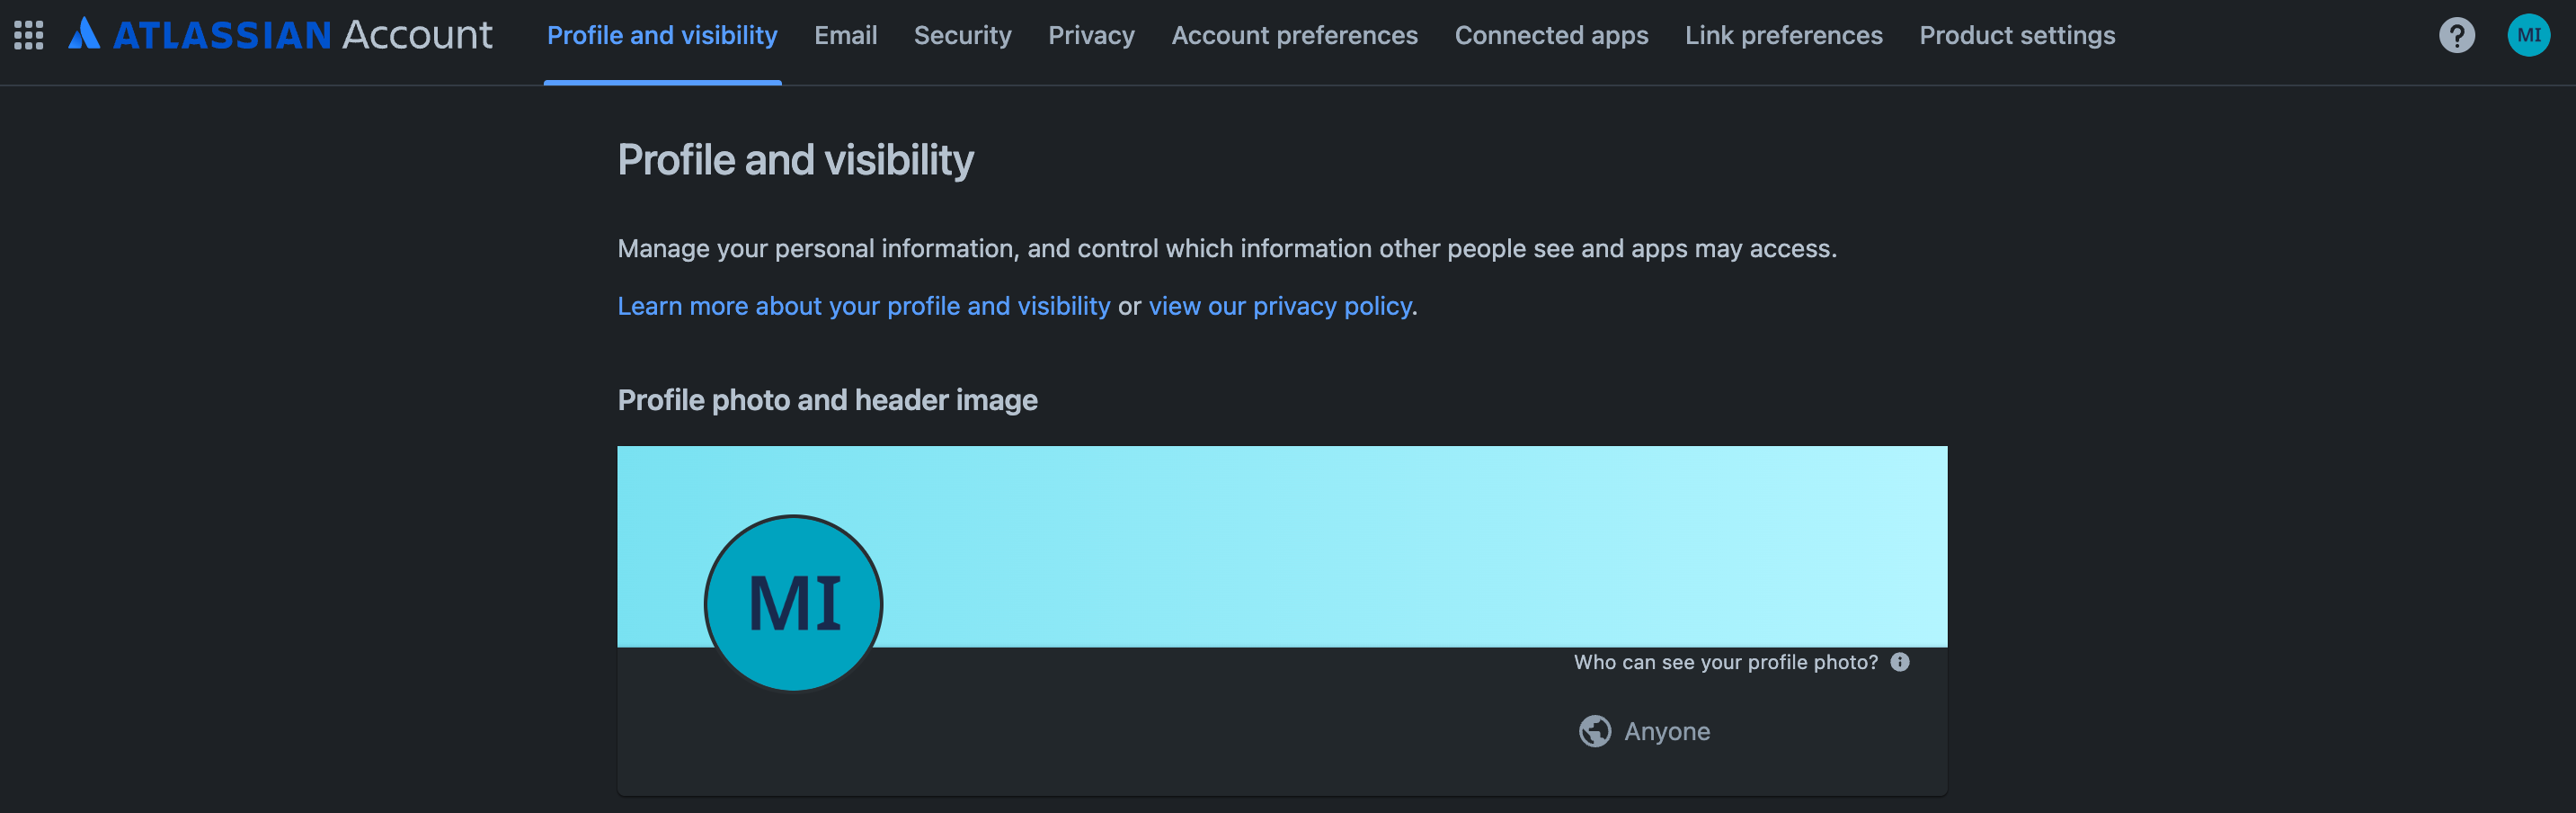
Profile and visibility Go to Contact and set the Who can see this as Anyone.

Contact
To make the user's email visible to anyone in the Jira, follow these steps:
Sign in to Atlassian with your user credentials.
Select a Jira app.
Click Settings > System.
Select General Configuration in the left pane.
Click Edit Settings.
For User email visibility, select Public.

Select email visibility Click Update.
Install and configure User Identity Accessor for Jira Cloud
If user email addresses aren't publicly accessible by default due to privacy settings in Jira Cloud, you must install the User Identity Accessor for Jira Cloud app to securely retrieve user email addresses. If user email addresses are already publicly visible, you might not need to install the app. For more information about restricted email visibility, see Manage user visibility.
Roles and permissions
To install and configure the User Identity Accessor for Jira Cloud app, you must have the appropriate administrative role and grant the required app-level permissions.
- Required role: You must be a
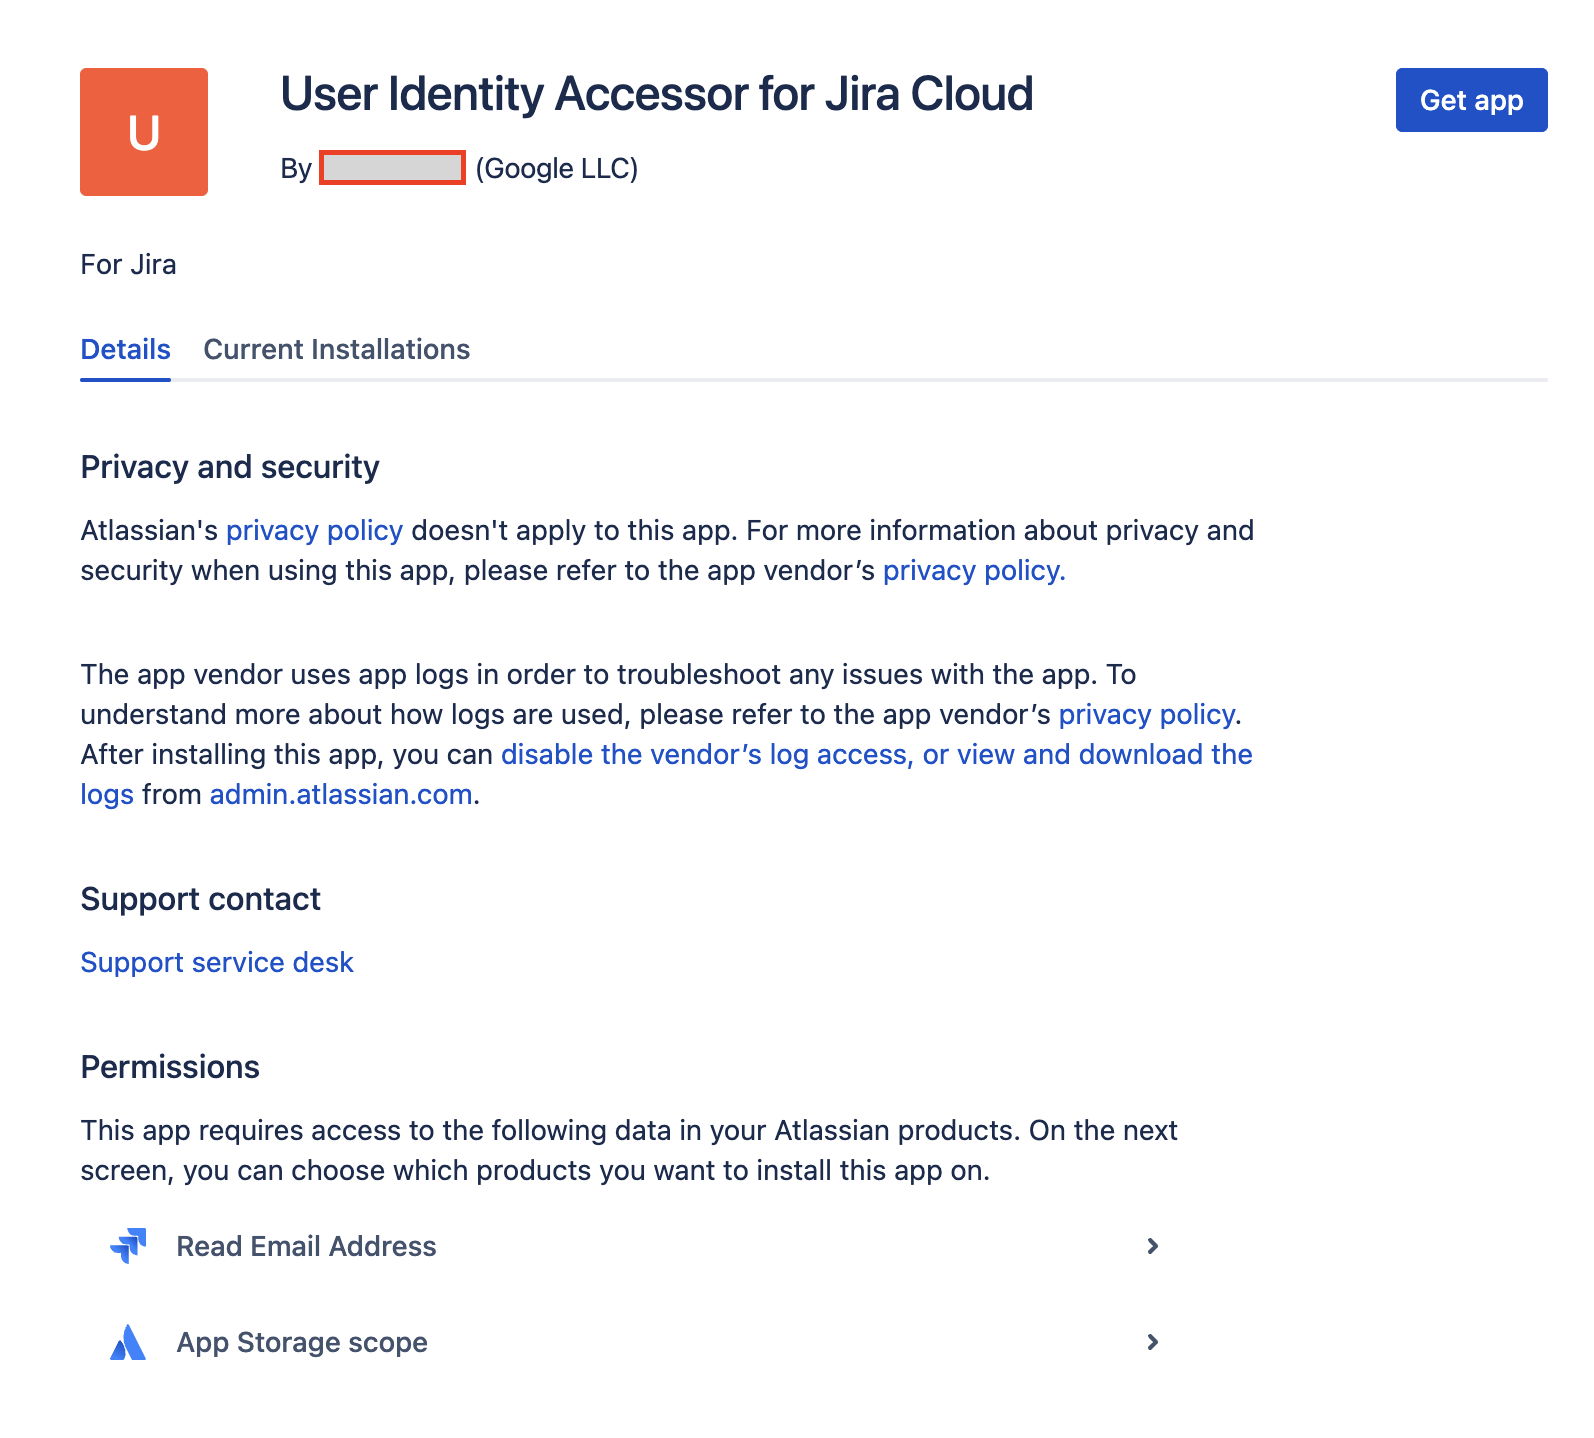
Jira Site administratorto install and configure the app. - App-level permissions: You must grant the following permissions during the app installation:
Read Email Address: Allows the app to securely retrieve user email addresses, even when profile visibility is restricted.App Storage scope: Enables the app to read and write to its storage device.
Install User Identity Accessor for Jira Cloud
To install the User Identity Accessor for Jira Cloud app on your Jira Cloud site, follow these steps:
- Navigate to Atlassian Developer Console.
Review the Read Email Address and App Storage scope permissions and click Get app.
Review permissions and get app From the Select a site to install this app on list, select the Jira site where you want to install the app. This list displays only the sites for which you have administrator access.
Note: You must be an administrator of at least one Jira site to install the app.
Click Install to complete the app installation.
Configure User Identity Accessor for Jira Cloud
After you've installed the User Identity Accessor for Jira Cloud app, configure an API key that your external system (for example, your Jira Cloud Connector) uses to securely call the app's web trigger to fetch emails.
Access the configuration page
To access the User Identity Accessor for Jira Cloud app's configuration page, follow these steps:
- In your Jira Cloud instance, click the Settings ⚙️ icon in the navigation menu.
- Select Apps from the menu.
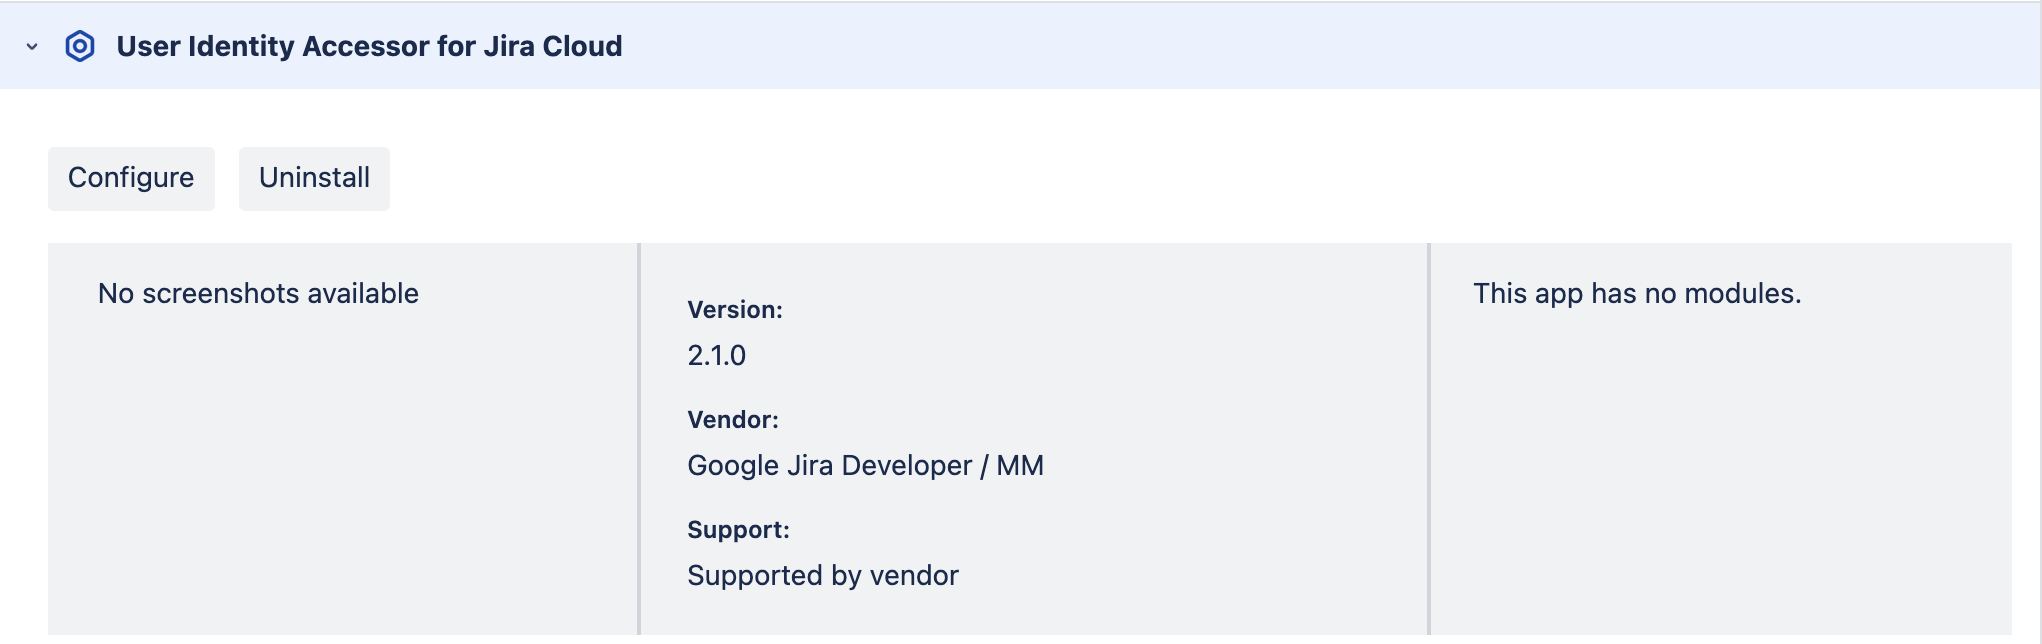
- On the Apps administration page, locate your app, User Identity Accessor for Jira Cloud, in the Manage apps list.
Click Configure or the link associated with your app. The app's dedicated configuration page opens within Jira Cloud.
Configure the User Identity Accessor for Jira Cloud app
Set up the API key
To set up the API key on the configuration page, follow these steps:
In the API Key Configuration section, specify the secret key for authenticating requests to the app's webtrigger. You can authenticate requests using either of the following methods:
Enter your own key: Type or paste your own strong, unique API key into the API Key field. Use a key of at least 20–30 characters with a mix of uppercase letters, lowercase letters, numbers, and symbols.
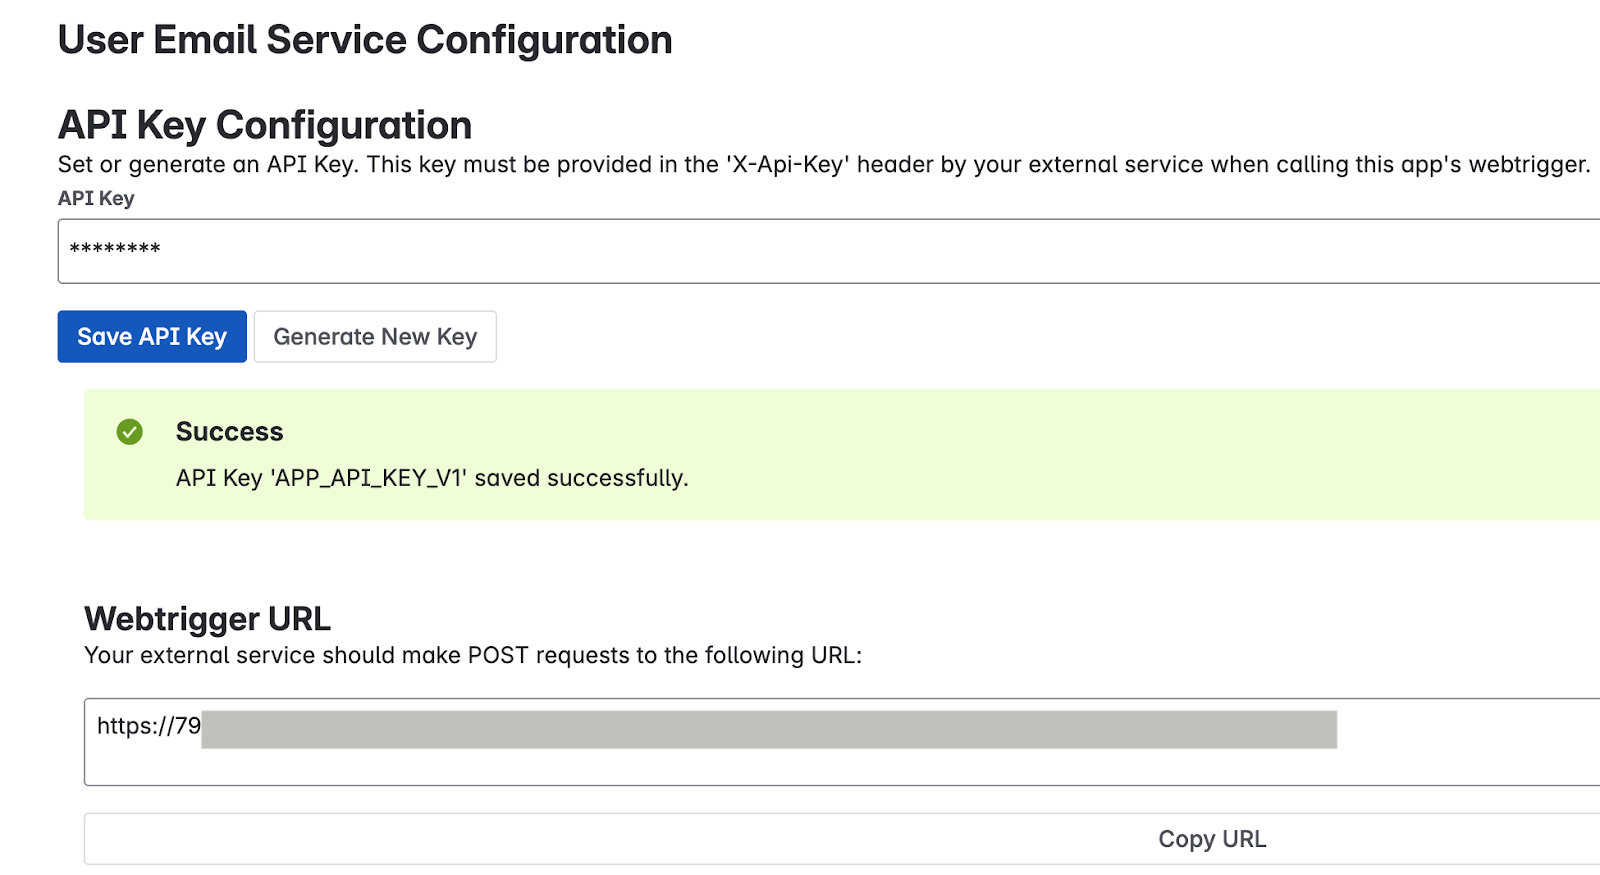
Enter your own key Generate a key: Click the Generate New Key button. The system generates and displays a strong, random key in the field.

Generate a key Important: Immediately copy the API key displayed in the field. For security reasons, you might be unable to view the full key again after saving or navigating away. If lost, you need to set or generate a new one.
Click Save API Key. A success message confirms that the key is securely saved.
Test the app configuration
Verify if the User Identity Accessor for Jira Cloud app is configured correctly by sending a request from your external system and confirming that user email addresses are returned successfully.
Get the webtrigger URL
- On the Apps administration page, locate the Webtrigger URL section, which displays the
unique URL specific to your Jira site and this app installation:
- Your external system must call this URL to request user emails.
- The URL typically looks like:
http://uuid/domain.net/x1/randomId. For example,https://YOUR_INSTANCE_ID.hello.atlassian-dev.net/x1/WEBTRIGGER_ID, whereYOUR_INSTANCE_IDis your Jira Cloud instance identifier andWEBTRIGGER_IDis the unique identifier for the webtrigger endpoint generated for your app.
- Click the Copy URL button or copy the entire URL.
Configure your external system
Configure your external system that needs to fetch Jira user emails with the API key and webtrigger URL obtained in the previous steps.
Endpoint URL: The webtrigger URL you copied.
HTTP Method:
POSTRequired Headers:
- Content-Type:
application/json X-Api-Key:
YOUR_API_KEYReplace
YOUR_API_KEYwith the API key you set or generated in the Set up the API key section.
- Content-Type:
Example curl command
This example demonstrates calling the User Identity Accessor for Jira Cloud webtrigger, which accepts an array of account IDs and returns the email addresses.
curl --location --request POST 'https://YOUR_INSTANCE_ID.hello.atlassian-dev.net/x1/ENDPOINT_PATH' \
--header 'X-Api-Key: YOUR-API-KEY' \
--header 'Content-Type: application/json' \
--data-raw '{
   "accountIds": [
       "ACCOUNT_ID_1",
       "ACCOUNT_ID_2"
   ]
}'
Replace:
YOUR_INSTANCE_IDwith your Jira Cloud instance IDENDPOINT_PATHwith the API endpoint pathYOUR_API_KEYwith the API key you set or generated in the Set up the API key sectionACCOUNT_IDwith Atlassian account IDs you want to target
Expected response
[{"accountId":"ACCOUNT_ID_1","emailAddress":"EMAIL_ADDRESS_1"},
 {"accountId":"ACCOUNT_ID_2","emailAddress":"EMAIL_ADDRESS_2"}]
Replace:
ACCOUNT_ID_Xwith actual Atlassian account IDsUSER_EMAIL_Xwith user email addresses returned from your API call
Implement security best practices
To confirm the security of your API key, follow these recommendations:
- Store the API key securely within your Jira Cloud Connector's configuration.
- Verify that all communication with the webhook URL occurs over HTTPS. This is the default for User Identity Accessor for Jira Cloud webtriggers.
Support for User Identity Accessor for Jira Cloud
Support offerings are available from Google for the User Identity Accessor for Jira Cloud app that can include maintenance and regular updates to keep the app up-to-date. If you encounter any issues or have questions specific to the app functionality, contact Google Cloud Support. For more information, see Getting Cloud Customer Care.
Create a Jira Cloud data store
Console
To use the Google Cloud console to sync data from Jira Cloud to Gemini Enterprise, follow these steps:
Sign in to the Atlassian site as a user with organization administrator credentials.
In the Google Cloud console, go to the Gemini Enterprise page.
In the navigation menu, click Data Stores.
Click Create Data Store.
On the Select a data source page, scroll or search for Jira Cloud to connect your third-party source and click Select.
In the Authentication settings section, enter the Instance URI, Instance ID, Client ID, and Client secret.
Click Login.
Verify that you are logged in as an admin user, select the site on which the app will be used, and click Accept.
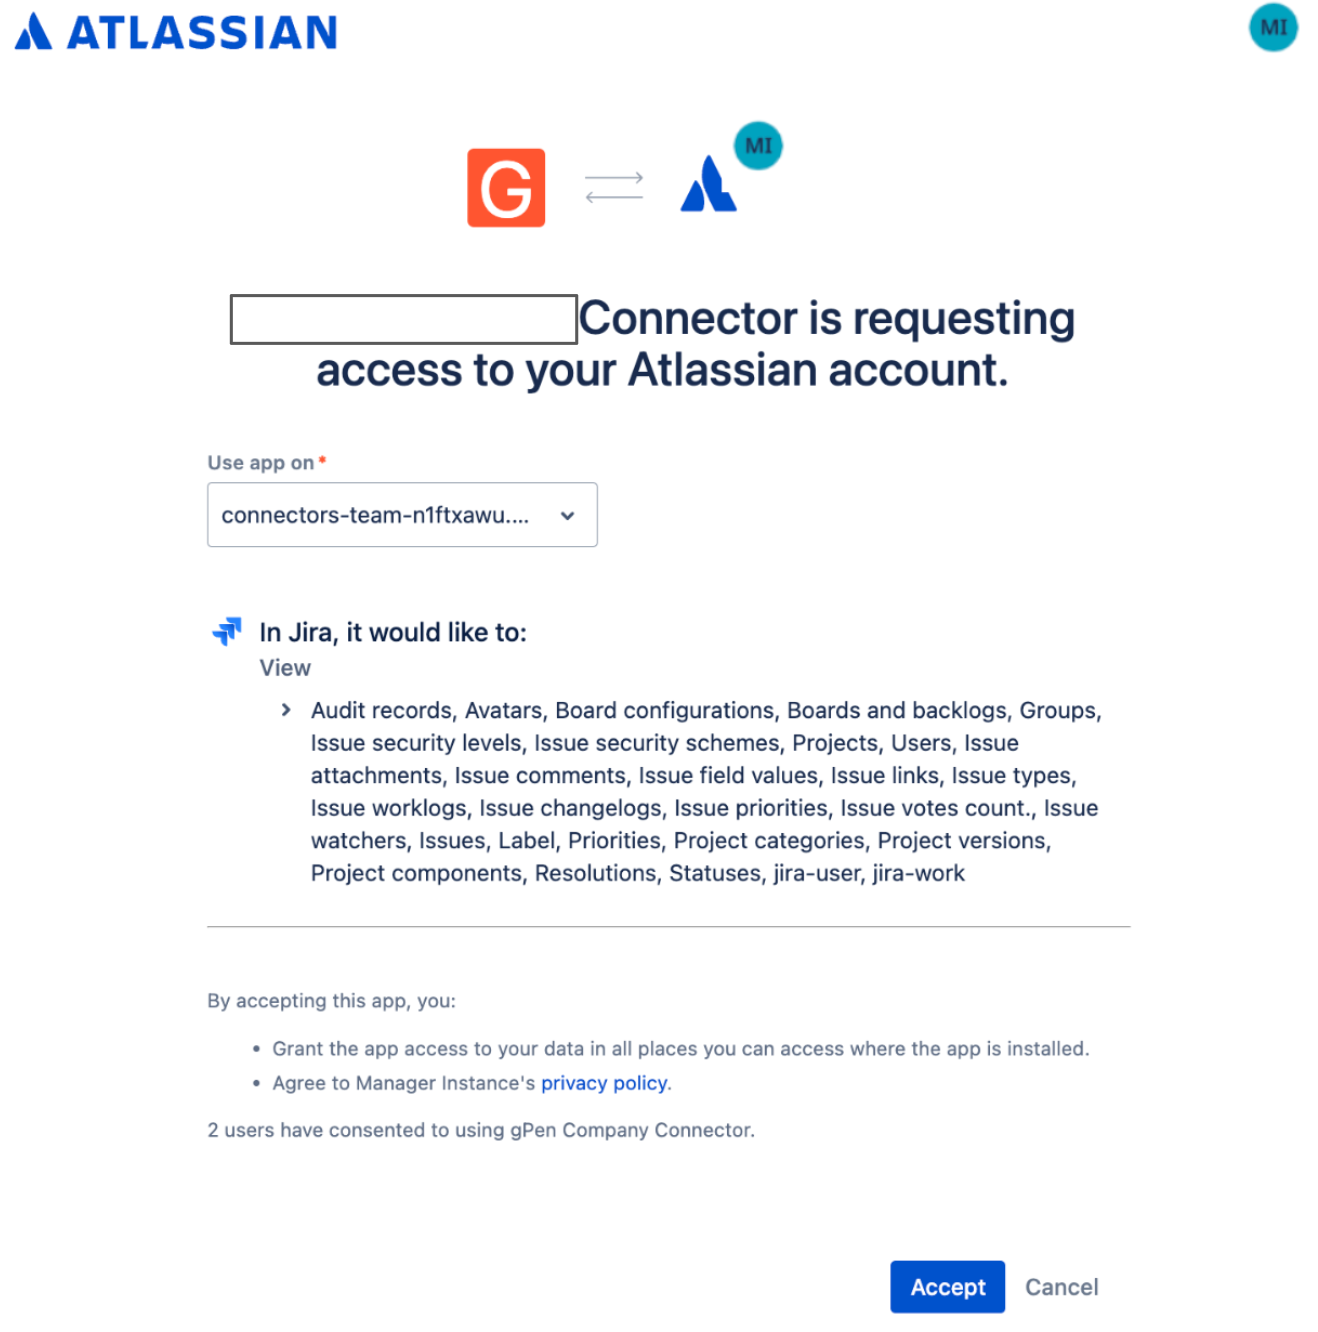
Choose a site on which to use the app Click Continue.
In the Advanced options section:
Optional. To allow a set of static IP addresses in your system, select Enable Static IP Addresses for registration.
In the Max QPS field, enter an integer to define the maximum queries per second to be sent to your Jira Cloud instance. The default value is 12 QPS.
In the Jira Identity Sync Forge URL field, enter the URL generated by the User Identity Accessor for Jira Cloud app.
In the Jira Identity Sync Forge Client Secret field, enter the client secret configured in the User Identity Accessor for Jira Cloud, which is the API key you generated or created in the Set up the API key section.
Click Continue.
In the Entities to sync section, do the following:
Select the entities you want to sync:
Issue
Attachment
Comment
Worklog
Optionally, to sync specific projects, do the following:
- Click Filter.
- To filter entities out of the index select Exclude from the index or to ensure that they are included in the index select Include to the index.
- Enter the project keys. Press enter after each project key.
- Click Save.
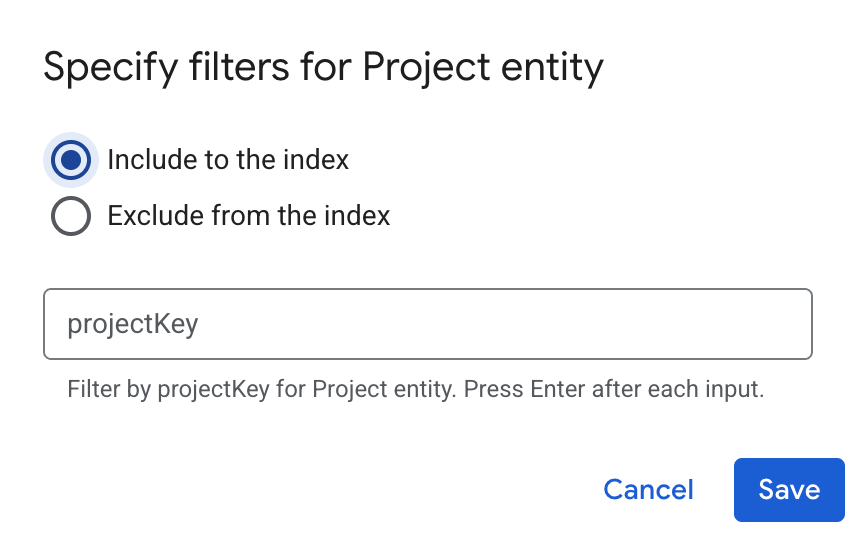
Specify filters to include or exclude entities. Click Continue.
Select the Sync frequency for Full sync and the Incremental sync frequency for Incremental data sync. For more information, see Sync schedules.
If you want to schedule separate full syncs of entity and identity data, expand the menu under Full sync and then select Custom options.

Setting separate schedules for full entity sync and full identity sync. Click Continue.
In the Configure your data connector section:
Select a region for your data store. You cannot change the region later. For more information on multi-regions, see Gemini Enterprise locations.
Enter a name for your data connector. You can change the name later.
Optional. To change the data connector ID after entering the name, click Edit and change the value. You cannot change the data connector ID after creating the data store.
Click Create. Gemini Enterprise creates your data store and displays it on the Data Stores page.
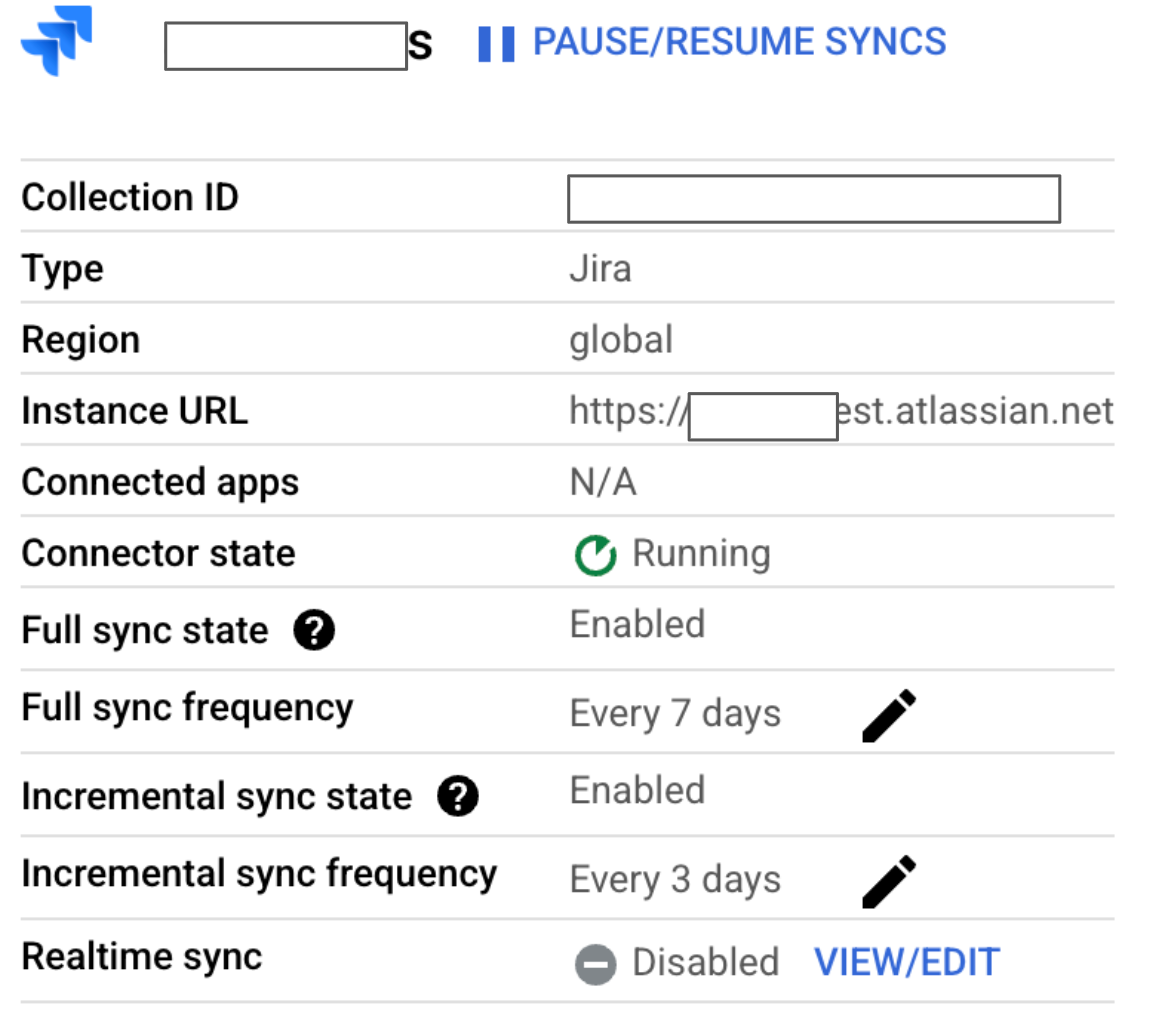
To check the status of your ingestion, go to the Data Stores page and click your data store name to see details about it on its Data page. The Connector state changes from Creating to Running when it starts synchronizing data. When ingestion is complete, the state changes to Active to indicate that the connection to your data source is set up and awaiting the next scheduled synchronization. Depending on the size of your data, ingestion can take several minutes or several hours.
For detailed information on quotas, including default limits and instructions to request higher quotas, see the Quotas and limits.
Enable real-time sync
Real-time sync only syncs document entities and doesn't sync data related to identity entities. The following table shows which document events are supported with real-time sync.
| Jira entities | Create | Update | Delete | Permission changes |
|---|---|---|---|---|
| Issues | ||||
| Worklogs | ||||
| Projects | ||||
| Comments | ||||
| Attachments |
To enable real-time sync for a Jira Cloud data source connector, follow these steps:
Generate a webhook URL
- Navigate to the Gemini Enterprise page, and in the navigation menu, click Data Stores.
- Select a Jira Cloud data store.
Click View/Edit in the Realtime sync row.
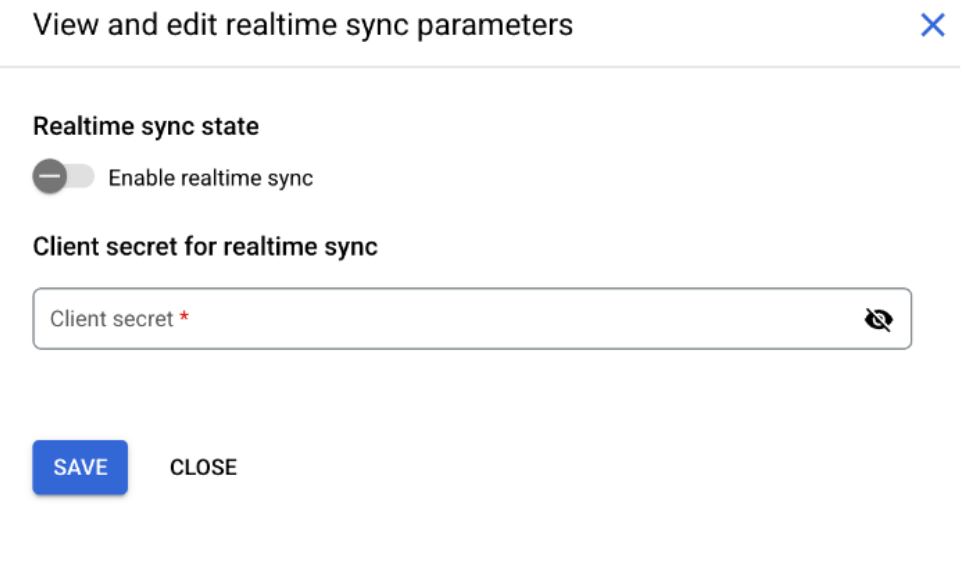
Realtime sync : Disabled state In the View and edit realtime sync parameters dialog, do the following:
- To turn on real-time sync, click the Enable realtime sync toggle.
- Enter a value in the Client secret field and copy it. You need this value again when creating a webhook in the Jira administration console.
- Click Save.
Enable real-time sync
After the status of Realtime sync changes to
Running, click View/Edit.
Realtime sync : Running state In the View and edit realtime sync parameters dialog, do the following:
- Copy the Webhook URL.
- Click Close.
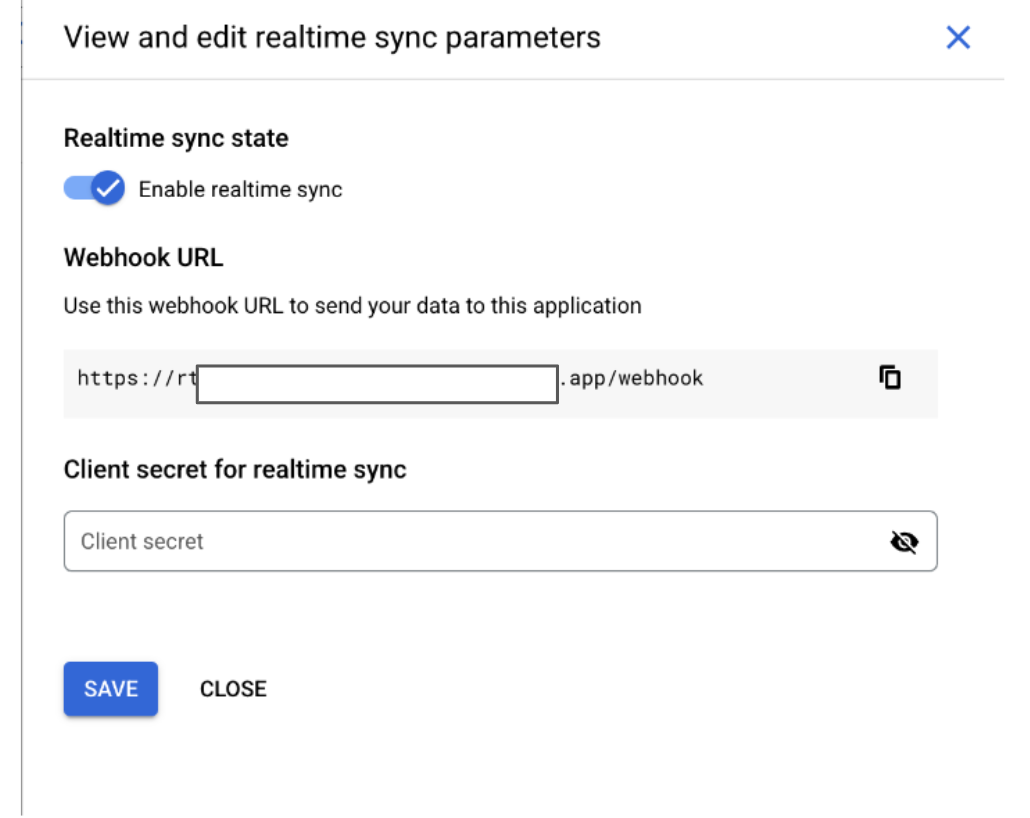
Copy webhook URL
Create a webhook
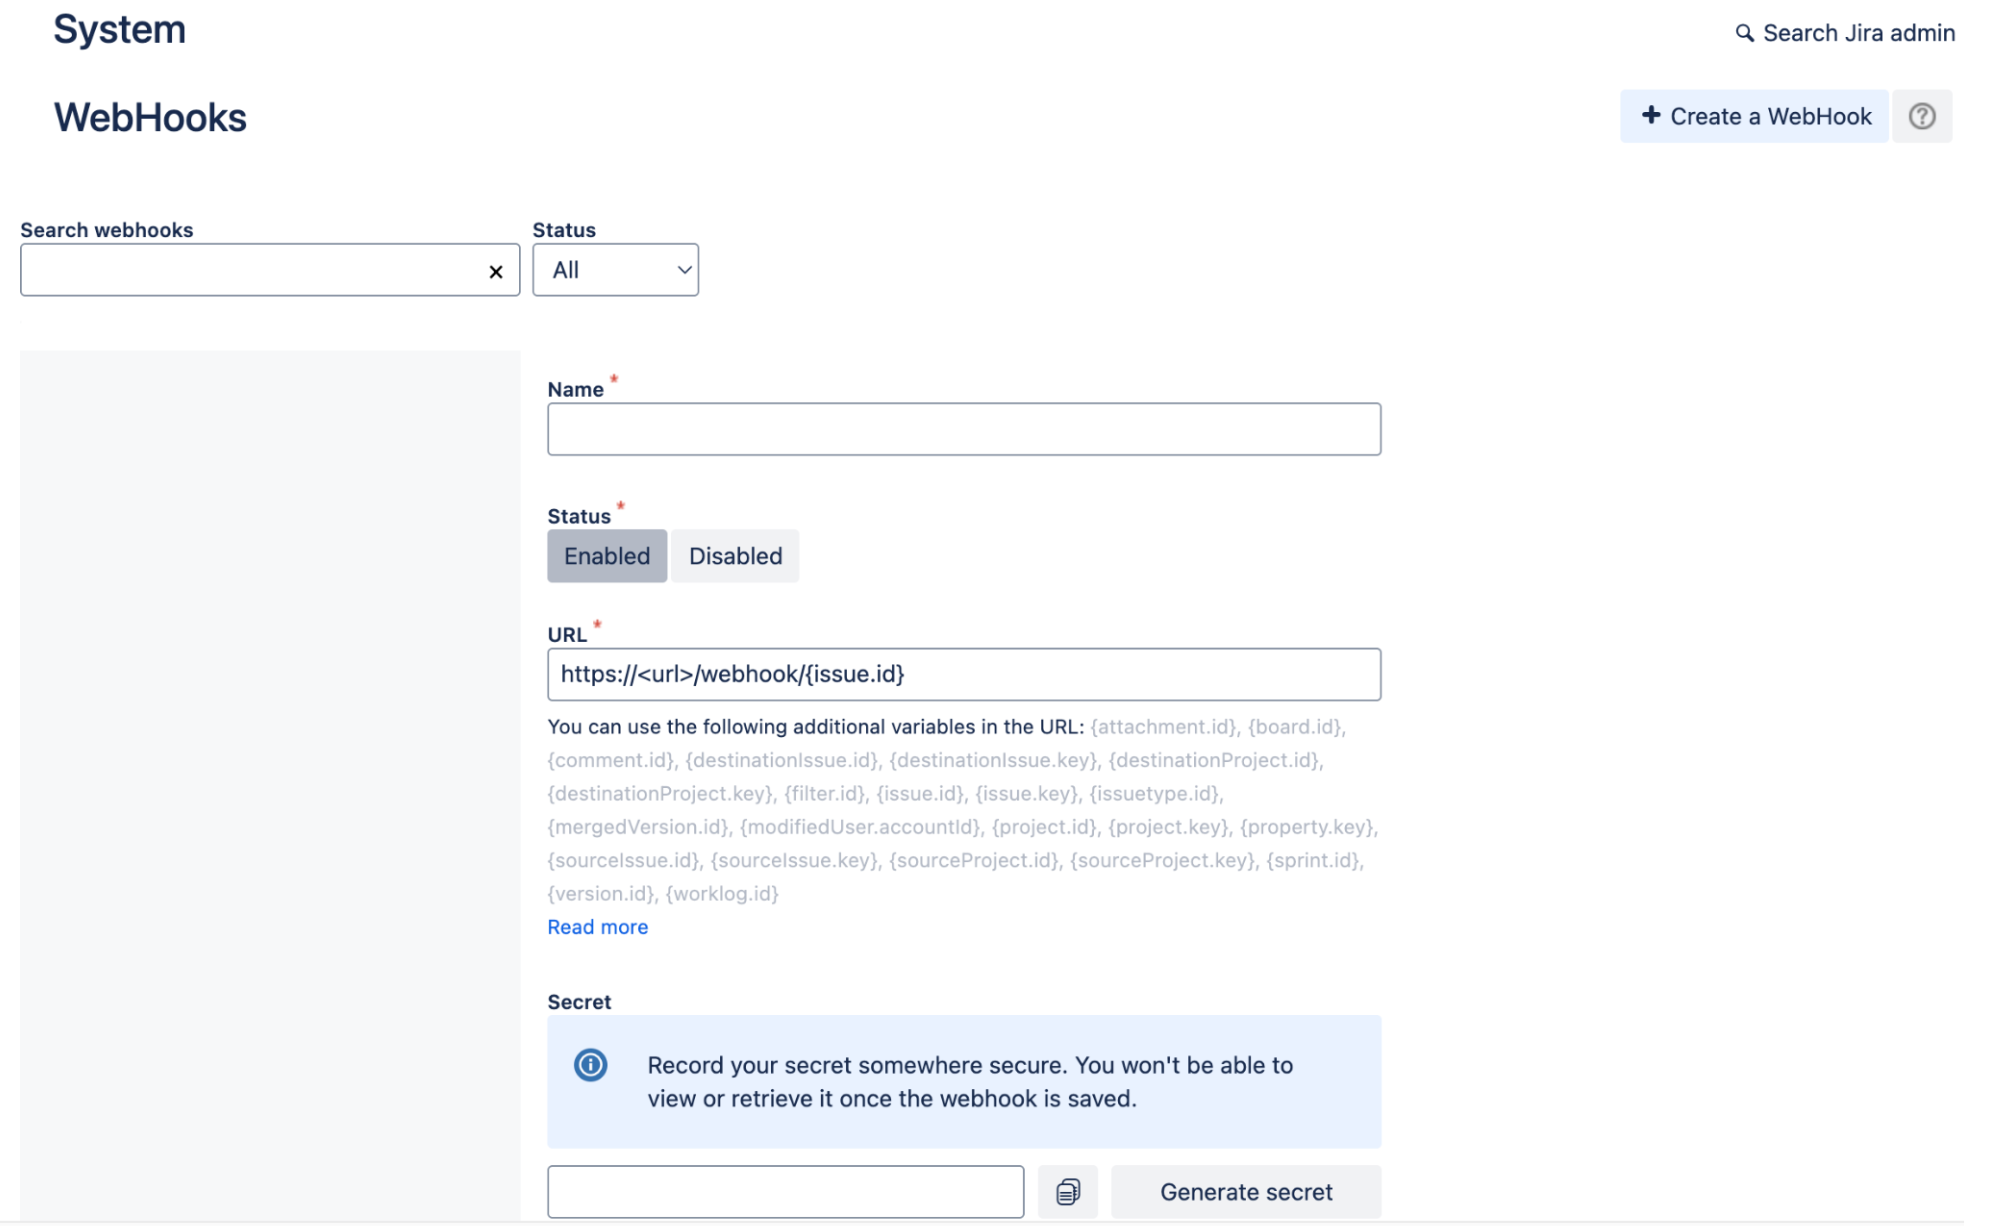
- Sign in to the Jira administration console.
- Click Settings and select System.
- In the System settings pane, select Webhooks.
- Click Create a webhook. For information about webhooks, see Webhooks.
- Enter a name for the webhook.
- Select the Status as
Enabled. - In the URL field, paste the URL copied from Gemini Enterprise and append
/{issue.id}. In the Secret field, enter the same value you entered when generating a webhook URL in Gemini Enterprise.
Webhooks In the Issue related events section, select the following options:
Entities Created Updated Deleted Issue Yes Yes Yes Worklog Yes Yes Yes Comment Yes Yes Yes Attachment Yes No Yes 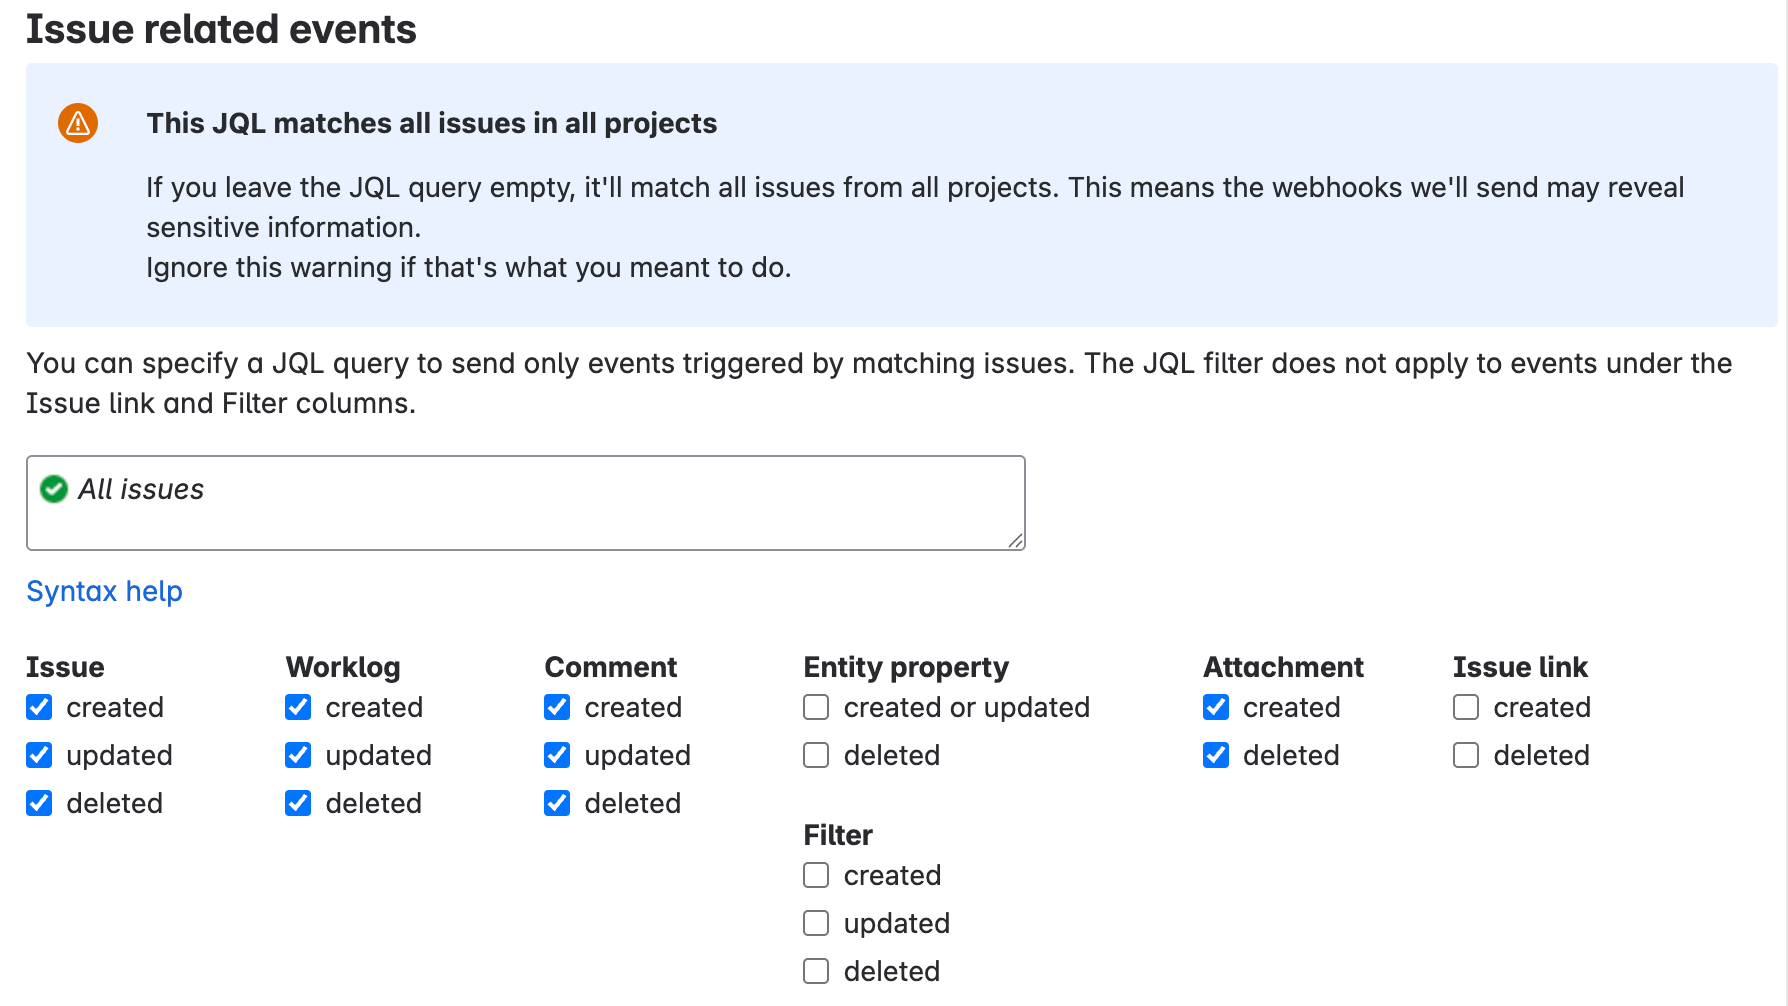
Issue related events In the Project related events section, select the created, updated, and deleted checkboxes for the Project entity.
Click Create.
Error messages
The following table describes the common error messages, their descriptions, and possible solutions when connecting Jira Cloud with Gemini Enterprise.
| Error code | Error message | Description | Troubleshooting |
|---|---|---|---|
| JIRA_INVALID_AUTH_1 | OAuth setup failed. | A token refresh call encountered a problem, possibly related to credentials, the secret manager, or connectivity. | Exception details are provided in the full error message. Possible causes and solutions include:
|
| JIRA_INVALID_AUTH_2 | Authentication failed. | The connector cannot authenticate with Jira Cloud because the user account lacks sufficient API access. | Re-authenticate the datastore using administrator credentials. |
| JIRA_MISSING_PERMISSION_1 | Non-admin users are not authorized to get the issue security schemes. | A user account without administrator privileges attempted to retrieve the issue security schemes. | Grant the necessary administrator permissions to the user account. |
| JIRA_MISSING_PERMISSION_2 | Non-admin users cannot get permission schemes. | A user account without administrator privileges attempted to retrieve permission schemes. | Grant the necessary administrator permissions to the user account. |
| JIRA_MISSING_PERMISSION_3 | Problem while fetching project permissions. | A user account without administrator privileges attempted to retrieve project details. | Grant the necessary administrator permissions to the user account. |
| JIRA_IO_CONNECTION | Problem while connecting to Jira. | The connector fails to connect to your Jira Cloud instance, indicating a general inability to establish or maintain communication with the Jira server. | Verify your Jira URL and cross check your authentication credentials. Verify your Jira instance is operational and your API token or OAuth scopes grant the necessary permissions. |
| JIRA_INVALID_INSTANCE_ID | Failed to fetch the required details from your Jira instance. Please check your Jira Instance ID. The Jira Instance ID must be a UUID. | The system fails to retrieve necessary details from your Jira instance because the provided Jira Cloud instance ID is invalid. The Jira Instance ID must be a UUID. | Ensure the instance ID you entered is a correct UUID. |
Known limitations
For unstructured data, each media type has different restrictions. For more information, see Prepare data for custom data sources.
For structured data, each document must not exceed 500 KB in size.
Application roles with specific, non-empty roles cannot be granted
Browse projector security level permissions.Document permissions determined by user custom fields or group custom fields are not supported.
Jira Cloud doesn't allow any restrictions on worklog levels.
Jira Cloud doesn't index PDF attachments that exceed 2,000 pages.
Attachments added to private comments don't inherit the access restrictions (ACLs) on the comments.
Only the previous 20 comments for an issue in Jira Cloud are fetched.
Sprint tables can't be ingested.
The legacy user management model is not supported for integration with Jira Cloud. Only the centralized user management model is supported. For more information, see Atlassian Organization consolidation guide.
When querying a Jira entity (for example, an issue), related data like comments and attachments are not automatically included. This is because they are stored and indexed as separate entities.
Next steps
To attach your data store to an app, create an app and select your data store following the steps in Create an app.
To preview how your search results appear after your app and data store are set up, see Preview search results.
To enable alerts for the data store, see Configure alerts for third-party data stores.