When ServiceNow actions are turned on, end users can ask the assistant to perform the following ServiceNow actions:
- Create ServiceNow incidents
- Update ServiceNow incidents
For example, a user could enter "create a ServiceNow incident about a computer hardware failure" or "update ServiceNow incident INC0010001 to have high urgency" into the app. The assistant asks for additional details if necessary, and then asks the user to confirm the create or update request.
The assistant can read and update the following ServiceNow fields through actions:
Field |
Description |
|---|---|
Caller |
Required. The email address of the caller on whose behalf the incident is being created, for example user@google.com. |
Title |
A brief title of the incident to be created. |
Description |
Details on the incident to be created. |
Category |
Category of the incident to be created. |
Impact |
Impact of the incident. |
Urgency |
Urgency of the incident. |
State |
State of the incident. |
Assigned to |
Email address of the user to assign the incident to, for example, user@google.com. |
Assignment group |
User group to assign the incident to. |
Close code |
Close code for the incident. |
Close notes |
Close notes for the incident. |
Set up authentication and permissions for ServiceNow
Before turning on ServiceNow actions, a ServiceNow administrator must authorize and set up a ServiceNow connector for actions. This is required to connect your integration and allow read and write permission for actions.
Before setting up your connection, ensure that you have the following in place:
Administrator permission: You must be a ServiceNow administrator.
ServiceNow instance: Create a ServiceNow instance by following the instructions on the ServiceNow Developer documentation.
Google Cloud project: Set up a Google Cloud project with an administrator account capable of managing organization-level configurations, ensuring the organization can set up a workforce pool.
Workforce pool: Make sure your organization is set up to manage a workforce pool.
For more information, see the OAuth 2.0 with Inbound REST blog post.
Set up ServiceNow
ServiceNow offers two primary sites:
- Main ServiceNow site: The site for your ServiceNow instance.
- Manages users, groups, and system administration tasks.
- URL: The URL for your ServiceNow instance.
- Sign in using your administrator credentials.
- Developer site:
- Configures the knowledge base, sets up workflows, and develops custom applications.
- URL:
https://developer.service-now.com. - Sign in using your ServiceNow ID.
Create an OAuth endpoint
To create an OAuth endpoint, do the following:
- Sign into the main ServiceNow instance with administrator privileges.
- Navigate to All > System OAuth > Application registry.
- Click New, then select Create an OAuth API endpoint for external clients. Retrieve the client ID and client secret.
- Fill in the required information:
- Name: Unique name.
- Redirect URL:
https://vertexaisearch.cloud.google.com/oauth-redirect
- Click Submit to create the credential.
- After submission, click the name to view the client secret.
- The secret is masked. Click the lock icon next to it to unmask and view the secret.
- Keep a copy of the client ID and secret to use when required.
- Go to
developer.service-now.comand click Manage instance password. - Keep a copy of the username and password to use when required.
- At this stage, all five pieces of information needed to set up a ServiceNow data store are available. If there are no concerns with using the Admin role to pull data, proceed to creating a data store.
Set up roles and permissions
You must have a security administrator role to create and manage users. If you don't have this role, elevate your role to security_admin by clicking Elevate role under your profile. Select the security_admin role and click Update. The security_admin role is required to create roles and manage users.
- Create a custom role with ACL rules:
- Navigate to All > User administration > Roles.
- Click New to create a new role.
- Select a name and click Submit.
- Navigate to System security > Access Control (ACL) to create a new ACL rule.
- Click New to create a new ACL rule.
- Select a role, such as
sys_user_role. - Click Submit and assign the role.
- Repeat this process until all the table access is granted. The
connector requires access to the following tables for each entity to
run successfully:
- Incident:
incident. - Catalog item:
sc_cat_item,sc_cat_item_user_criteria_mtom,sc_cat_item_user_criteria_no_mtom,sc_cat_item_user_mtom,sc_cat_item_user_no_mtom. - Knowledge:
kb_knowledge,kb_knowledge_base,kb_uc_can_read_mtom,kb_uc_can_contribute_mtom. - Attachment: All listed items.
- Identity:
sys_user_role,sys_user_has_role,sys_user_group,sys_user_grmember,sys_user. - Updated as new criteria are pulled:
core_company,cmn_location,cmn_department. - User criteria:
user_criteria.
- Incident:
- Verify all ACLs are updated by navigating to
sys_security_acl_role_list.doin the search bar. - Select the role to verify.
- Confirm that all the required ACLs are assigned to the selected role.
- Grant the role to a service account:
- Go to All > User Administration > Users and select the user.
- Find the user to grant the role to and select the user.
- If no user is available, navigate to System security > Users and groups > Users.
- Click New to create a new service account in the User table.
- Select the Web service access only checkbox.
- Go to the Roles table at the bottom of the page.
- Click Edit on the right.
- Grant the role created earlier and assign it to the user. Depending on the type of role created, select the appropriate one and assign it.
- Obtain the username and password for the user. From the same page, click Set password.
- Auto-generate a password and save it for later use:
- User ID:
manager. - Password: Enter the auto-generated password.
- User ID:
Create a dedicated role and assign ACLs
When you use a non-admin user role, you might encounter issues when you perform a ServiceNow action even though your user role contains the required permissions. To avoid this issue, create a dedicated role and assign the required permissions.
Create a new role
- Navigate to User Administration > Roles.
- Click New.
- Specify a name for the new role, such as
database_admin_restricted. - Optionally, enter a description.
- Click Submit.
Assign the new role to the authenticating user
- Navigate to User Administration > Users.
- Select the user requiring the restricted access.
- In the user record, navigate to the Roles related list.
- In the Roles related list, click Edit.
- In the Collection column, find and select the role that was just created.
- Click Add to move the role to the Roles List.
- Click Save.
Implement row-level permissions
- Navigate to System Security > Access Controls (ACL).
- Click New.
Configure the following fields:
- Type: Select record.
- Operation: Select read.
- Name:
- In the first drop-down, select the sys_db_object table.
- In the second drop-down, select None.
- Requires role: In the Insert a new row field, search and select the newly created role.
Click Submit.
Repeat these steps to implement row-level permissions for the sys_glide_object and sys_dictionary tables.
Implement field-level permissions
- Navigate to System Security > Access Controls (ACL).
- Click New.
- Configure the following fields:
- Type: Select record.
- Operation: Select read.
- Name:
- In the first drop-down, select the target table, such as sys_db_object.
- In the second drop-down, apply the permission on all fields in the table or select a specific field name, such as name.
- Requires role: In the Insert a new row field, search and select the newly created role.
- Click Submit.
- Repeat these steps to implement field-level permissions for specific fields or all fields in the sys_glide_object and sys_dictionary tables.
Configure the workforce pool
Follow the instructions to set up a workforce pool with one of the following configurations:
Configure a ServiceNow action
Before you begin, make sure that a Google Cloud administrator has completed the steps in Set up authentication and permissions for ServiceNow and provided you with the following:
| Field | Description |
|---|---|
| Client ID | The client ID for your ServiceNow integration. |
| Client secret | The client secret for your ServiceNow integration |
| Username | User account of your integration. |
| Password | Password of your integration. |
| Instance URL (or Destination host) | Instance URL of your ServiceNow site. This is in the format:
https://INSTANCE_NAME.service-now.com |
| Auth URL | The Authorization URI for your ServiceNow API client. This is in the format:
https://INSTANCE_NAME.service-now.com/oauth_auth.do |
| Token URL | The refresh token URI for your ServiceNow API client. This is in the format:
https://INSTANCE_NAME.service-now.com/oauth_token.do |
Configure ServiceNow actions in the Google Cloud console
To add actions to your app using the console, do the following:
- In the Google Cloud console, go to the Agent Builder page.
- In the navigation menu, click Actions.
- Click Add actions.
- To select ServiceNow as the source for the actions, in the ServiceNow card, click Connect.
- On the Configuration page, select the ServiceNow data store from the
Select an instance drop-down list.
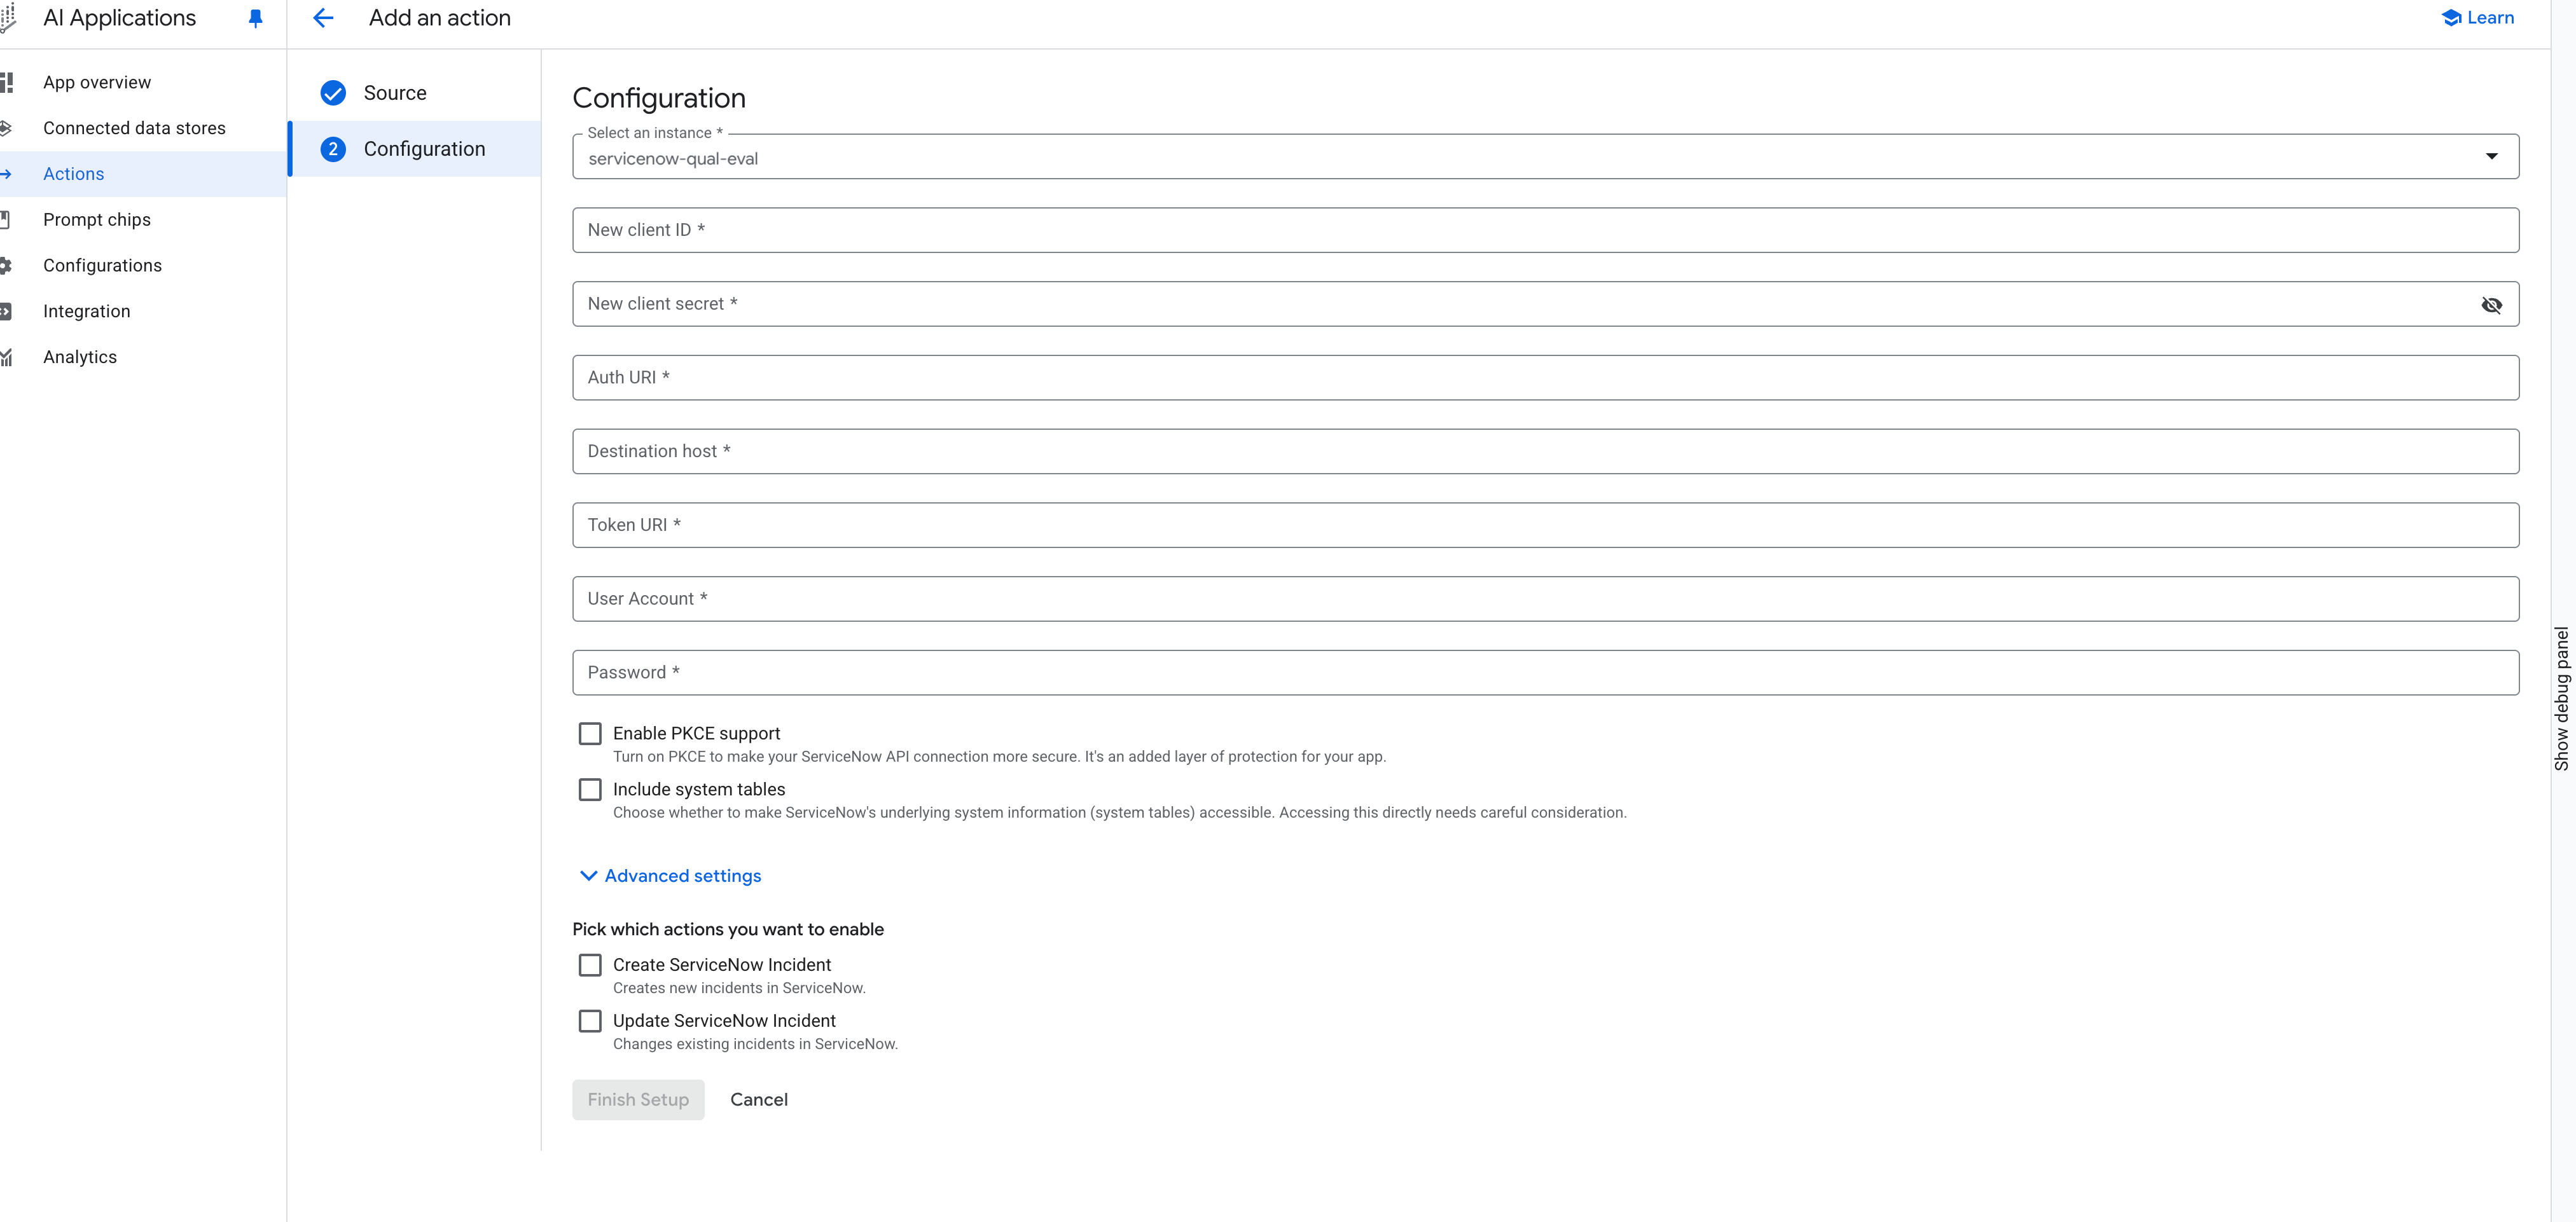
Configure ServiceNow setup Enter authorization information for the selected connector instance:
- Enter the New client ID and New client secret that you retrieved when you created the OAuth endpoint.
- Enter the ServiceNow Auth URI. Use the format
https://<var>INSTANCE_NAME</var>.service-now.com/oauth_auth.do. - Enter the ServiceNow Destination URI. Use the format
https://<var>INSTANCE_NAME</var>.service-now.com. - Enter the ServiceNow Token URI. Use the format
https://<var>INSTANCE_NAME</var>.service-now.com/oauth_token.do. - Enter the User Account and Password of the ServiceNow administrator.
Optional: Select Enable PKCE support for an additional security layer for your app.
Optional: Select Include system tables to make ServiceNow's underlying system information (system tables) accessible. Select this option after careful consideration and only if absolutely necessary.
Select the ServiceNow actions that you want to enable.
Click Finish Setup. Your action is displayed on the Actions page. It takes a few minutes for actions to take effect in your app.
Configure ServiceNow actions using the API
To add actions to your app using the API, do the following.
Create a ServiceNow connector for actions:
  curl -X POST \
  -H "Authorization: Bearer $(gcloud auth print-access-token)" \
  -H "Content-Type: application/json" \
  -H "X-GFE-SSL: yes" \
  -H "X-Goog-User-Project: PROJECT_ID" \
  "https://discoveryengine.googleapis.com/v1alpha/projects/PROJECT_ID/locations/global:setUpDataConnector" \
  -d '{
    "collectionId": "COLLECTION_ID",
    "collectionDisplayName": "COLLECTION_DISPLAY_NAME",
    "dataConnector": {
      "dataSource": "servicenow",
      "params": {
        "user_account": "USER_ACCOUNT",
        "client_id": "CLIENT_ID",
        "client_secret": "CLIENT_SECRET",
        "password": "PASSWORD",
        "instance_uri": "INSTANCE_URI",
        "auth_type": "OAUTH_PASSWORD_GRANT"
      },
      "refreshInterval": "86400s",
      "entities": [
        {
          "entityName": "knowledge_base",
          "params": {
            "inclusion_filters":{},
            "exclusion_filters":{}
          }
        },
        {
          "entityName": "catalog"
        },
        {
          "entityName": "knowledge"
        },
        {
          "entityName": "incident"
        },
        {
          "entityName": "attachment"
        }
      ],
      "syncMode": "PERIODIC",
      "staticIpEnabled": false
    }
  }'
Replace the following:
PROJECT_ID: the ID of your project.COLLECTION_ID: an ID for the collection.COLLECTION_DISPLAY_NAME: a display name for the collection.USER_ACCOUNT: the user account of your ServiceNow integration.CLIENT_ID: the client ID for your ServiceNow integration.PASSWORD: the password of your ServiceNow integration.INSTANCE_URI: the instance URI of your ServiceNow site.
Update the connector to include action configurations.
curl -X PATCH \
  -H "Authorization: Bearer $(gcloud auth print-access-token --project "PROJECT_NUMBER")" \
  -H "Content-Type: application/json" \
  -H "X-Goog-User-Project: PROJECT_ID" \
  "https://discoveryengine.googleapis.com/v1alpha/projects/PROJECT_ID/locations/global/collections/COLLECTION_ID/dataConnector?update_mask=action_config,bap_config,destination_configs" \
  -d '{
  "name": "projects/PROJECT_ID/locations/global/collections/COLLECTION_ID/dataConnector",
  "actionConfig": {
    "isActionConfigured": true,
    "actionParams": {
      "client_id": "CLIENT_ID",
      "client_secret": "CLIENT_SECRET",
      "auth_uri": "AUTH_URI",
      "token_uri": "TOKEN_URI",
      "pkce_support_enabled": true,
      "include_system_tables": true
    }
  },
  "bapConfig": {
    "supported_connector_modes": "ACTIONS"
  },
  "destinationConfigs": [
    {
      "key": "host_url",
      "destinations": [
        {
          "host": "INSTANCE_URL"
        }
      ]
    }
  ]
}'
Replace the following:
PROJECT_ID: the ID of your project.COLLECTION_ID: the ID for the collection.USERNAME: User account of your ServiceNow integration.CLIENT_ID: The client ID for your ServiceNow integration.PASSWORD: Password of your ServiceNow integration.AUTH_URI: The Authorization URI for your ServiceNow integration.TOKEN_URI: The refresh token URI for your ServiceNow integration.INSTANCE_URL: Instance URL of your ServiceNow site.
Enable ServiceNow actions for your assistant.
curl -X PATCH \
  -H "Authorization: Bearer $(gcloud auth print-access-token --project "PROJECT_NUMBER")" \
  -H "Content-Type: application/json" \
  -H "X-Goog-User-Project: PROJECT_NUMBER" \
  "https://discoveryengine.googleapis.com/v1alpha/projects/PROJECT_NUMBER/locations/global/collections/default_collection/engines/APP_ID/assistants/default_assistant?update_mask=enabledActions" \
  -d '{
    "name": "projects/PROJECT_NUMBER/locations/global/collections/default_collection/engines/APP_ID/assistants/default_assistant",
    "enabledActions": {
      "projects/PROJECT_NUMBER/locations/global/collections/CONNECTOR_ID/dataConnector": {
        "actionInfo": [
          {
            "actionName": "create_servicenow_incident",
            "actionDisplayName": "Create ServiceNow Incident"
          },
          {
            "actionName": "update_servicenow_incident",
            "actionDisplayName": "Update ServiceNow Incident"
          }
        ]
      }
    }
  }'
Replace the following:
PROJECT_NUMBER: the number of your Google Cloud project.APP_ID: the ID of the app.CONNECTOR_ID: the connector's collection ID that you generated in previous step.
After you add actions, the assistant can perform those actions on behalf of your end users in the app. The first time that a user asks the assistant to perform a ServiceNow action, they are asked to authorize access to their ServiceNow account. To use the assistant, users must have Gemini Enterprise Plus licenses.