Halaman ini menjelaskan perluasan gambar. Outpainting memungkinkan Anda menggunakan Imagen untuk memperluas konten gambar ke area yang lebih besar atau area dengan dimensi yang berbeda.
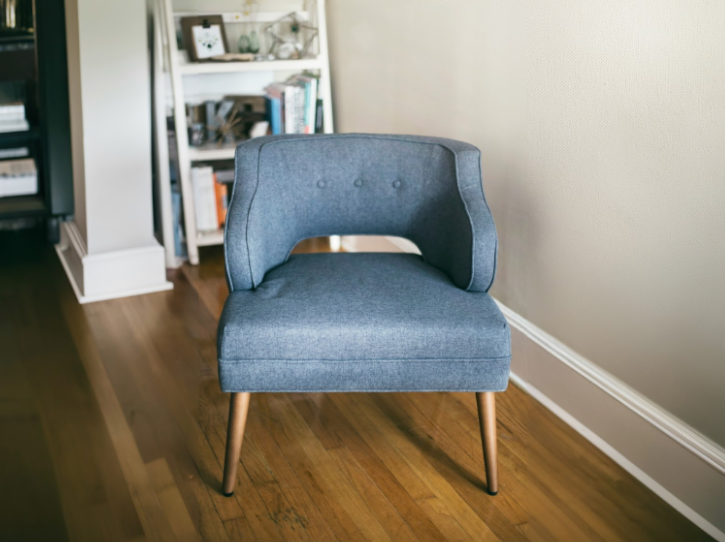
Contoh outpainting
Perluasan adalah metode pengeditan berbasis mask yang memungkinkan Anda memperluas konten gambar dasar agar sesuai dengan kanvas mask yang lebih besar atau berukuran berbeda.
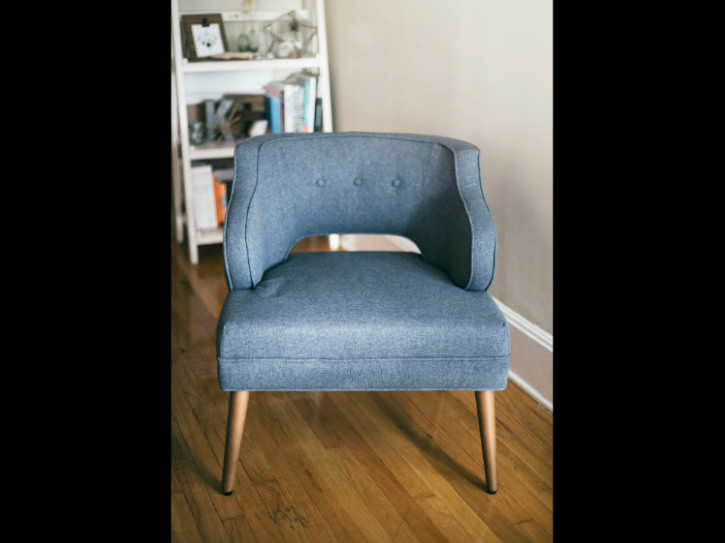
Sumber gambar: Kari Shea di Unsplash. |

|
|
Melihat kartu model Imagen untuk Pengeditan dan Penyesuaian
Sebelum memulai
- Sign in to your Google Cloud account. If you're new to Google Cloud, create an account to evaluate how our products perform in real-world scenarios. New customers also get $300 in free credits to run, test, and deploy workloads.
-
In the Google Cloud console, on the project selector page, select or create a Google Cloud project.
Roles required to select or create a project
- Select a project: Selecting a project doesn't require a specific IAM role—you can select any project that you've been granted a role on.
-
Create a project: To create a project, you need the Project Creator
(
roles/resourcemanager.projectCreator), which contains theresourcemanager.projects.createpermission. Learn how to grant roles.
-
Verify that billing is enabled for your Google Cloud project.
-
Enable the Vertex AI API.
Roles required to enable APIs
To enable APIs, you need the Service Usage Admin IAM role (
roles/serviceusage.serviceUsageAdmin), which contains theserviceusage.services.enablepermission. Learn how to grant roles. -
Siapkan autentikasi untuk lingkungan Anda.
Select the tab for how you plan to use the samples on this page:
Console
When you use the Google Cloud console to access Google Cloud services and APIs, you don't need to set up authentication.
Java
Untuk menggunakan contoh Java di halaman ini dalam lingkungan pengembangan lokal, instal dan lakukan inisialisasi gcloud CLI, lalu siapkan Kredensial Default Aplikasi dengan kredensial pengguna Anda.
Menginstal Google Cloud CLI.
Jika Anda menggunakan penyedia identitas (IdP) eksternal, Anda harus login ke gcloud CLI dengan identitas gabungan Anda terlebih dahulu.
If you're using a local shell, then create local authentication credentials for your user account:
gcloud auth application-default login
You don't need to do this if you're using Cloud Shell.
If an authentication error is returned, and you are using an external identity provider (IdP), confirm that you have signed in to the gcloud CLI with your federated identity.
Untuk mengetahui informasi selengkapnya, lihat Menyiapkan ADC untuk lingkungan pengembangan lokal dalam dokumentasi autentikasi Google Cloud .
Node.js
Untuk menggunakan contoh Node.js di halaman ini dalam lingkungan pengembangan lokal, instal dan lakukan inisialisasi gcloud CLI, lalu siapkan Kredensial Default Aplikasi dengan kredensial pengguna Anda.
Menginstal Google Cloud CLI.
Jika Anda menggunakan penyedia identitas (IdP) eksternal, Anda harus login ke gcloud CLI dengan identitas gabungan Anda terlebih dahulu.
If you're using a local shell, then create local authentication credentials for your user account:
gcloud auth application-default login
You don't need to do this if you're using Cloud Shell.
If an authentication error is returned, and you are using an external identity provider (IdP), confirm that you have signed in to the gcloud CLI with your federated identity.
Untuk mengetahui informasi selengkapnya, lihat Menyiapkan ADC untuk lingkungan pengembangan lokal dalam dokumentasi autentikasi Google Cloud .
Python
Untuk menggunakan contoh Python di halaman ini dalam lingkungan pengembangan lokal, instal dan lakukan inisialisasi gcloud CLI, lalu siapkan Kredensial Default Aplikasi dengan kredensial pengguna Anda.
Menginstal Google Cloud CLI.
Jika Anda menggunakan penyedia identitas (IdP) eksternal, Anda harus login ke gcloud CLI dengan identitas gabungan Anda terlebih dahulu.
If you're using a local shell, then create local authentication credentials for your user account:
gcloud auth application-default login
You don't need to do this if you're using Cloud Shell.
If an authentication error is returned, and you are using an external identity provider (IdP), confirm that you have signed in to the gcloud CLI with your federated identity.
Untuk mengetahui informasi selengkapnya, lihat Menyiapkan ADC untuk lingkungan pengembangan lokal dalam dokumentasi autentikasi Google Cloud .
REST
Untuk menggunakan contoh REST API di halaman ini dalam lingkungan pengembangan lokal, Anda menggunakan kredensial yang Anda berikan ke gcloud CLI.
Menginstal Google Cloud CLI.
Jika Anda menggunakan penyedia identitas (IdP) eksternal, Anda harus login ke gcloud CLI dengan identitas gabungan Anda terlebih dahulu.
Untuk mengetahui informasi selengkapnya, lihat Melakukan autentikasi untuk menggunakan REST dalam dokumentasi autentikasi Google Cloud .
Memperluas konten gambar
Gunakan contoh kode berikut untuk memperluas konten gambar yang sudah ada.
Imagen 3
Gunakan contoh berikut untuk mengirim permintaan perluasan gambar menggunakan model Imagen 3.
Konsol
-
Di Google Cloud konsol, buka halaman Vertex AI > Media Studio .
- Klik Upload. Di dialog file yang ditampilkan, pilih file yang akan diupload.
- Klik Perluasan.
- Di menu Outpaint, pilih salah satu rasio aspek yang telah ditentukan sebelumnya untuk gambar akhir Anda, atau klik Kustom untuk menentukan dimensi kustom untuk gambar akhir Anda.
-
Di toolbar pengeditan, pilih penempatan gambar Anda:
- Rata kiri:
- Penyejajaran tengah horizontal:
- Rata kanan:
- Sejajarkan atas:
- Penyejajaran tengah vertikal:
- Sejajarkan bawah:
-
Opsional: Di panel Parameters, sesuaikan opsi berikut:
- Model: model Imagen yang akan digunakan
- Jumlah hasil: jumlah hasil yang akan dibuat
- Perintah negatif: item yang harus dihindari saat membuat gambar
- Pada kolom perintah, masukkan perintah untuk mengubah gambar.
- Klik Generate.
Python
Instal
pip install --upgrade google-genai
Untuk mempelajari lebih lanjut, lihat dokumentasi referensi SDK.
Tetapkan variabel lingkungan untuk menggunakan Gen AI SDK dengan Vertex AI:
# Replace the `GOOGLE_CLOUD_PROJECT` and `GOOGLE_CLOUD_LOCATION` values
# with appropriate values for your project.
export GOOGLE_CLOUD_PROJECT=GOOGLE_CLOUD_PROJECT
export GOOGLE_CLOUD_LOCATION=us-central1
export GOOGLE_GENAI_USE_VERTEXAI=True
REST
Untuk mengetahui informasi selengkapnya, lihat referensi API Edit gambar.
Sebelum menggunakan salah satu data permintaan, lakukan penggantian berikut:
- PROJECT_ID: Google Cloud Project ID Anda.
- LOCATION: Region project Anda. Misalnya,
us-central1,europe-west2, atauasia-northeast3. Untuk mengetahui daftar region yang tersedia, lihat Lokasi AI Generatif di Vertex AI. prompt: Untuk perluasan gambar, Anda dapat memberikan string kosong untuk membuat gambar yang diedit. Jika Anda memilih untuk memberikan perintah, gunakan deskripsi area yang ditutupi untuk mendapatkan hasil terbaik. Misalnya, "langit biru" bukan "masukkan langit biru".referenceType:ReferenceImageadalah gambar yang memberikan konteks tambahan untuk pengeditan gambar. Gambar referensi mentah RGB normal (REFERENCE_TYPE_RAW) diperlukan untuk kasus penggunaan pengeditan. Maksimal satu gambar referensi mentah dapat ada dalam satu permintaan. Gambar output memiliki tinggi dan lebar yang sama dengan gambar referensi mentah. Gambar referensi mask (REFERENCE_TYPE_MASK) diperlukan untuk kasus penggunaan pengeditan dengan mask. Jika ada gambar referensi mentah, gambar mask harus memiliki tinggi dan lebar yang sama dengan gambar referensi mentah. Jika gambar referensi mask kosong danmaskModetidak disetel keMASK_MODE_USER_PROVIDED, mask dihitung berdasarkan gambar referensi mentah.- B64_BASE_IMAGE: Gambar dasar yang akan diedit atau di-upscale. Gambar harus ditentukan sebagai string byte berenkode base64. Batas ukuran: 10 MB.
- B64_OUTPAINTING_MASK: Gambar hitam putih yang ingin Anda gunakan sebagai lapisan mask untuk mengedit gambar asli. Masker harus memiliki resolusi yang sama dengan gambar input. Gambar output akan memiliki resolusi yang sama dengan gambar input. Gambar mask ini harus ditentukan sebagai string byte berenkode base64. Batas ukuran: 10 MB.
- MASK_DILATION - float. Persentase lebar gambar untuk memperlebar masker ini. Nilai
0.03direkomendasikan untuk perluasan gambar. Menetapkan"dilation": 0.0dapat menghasilkan batas yang jelas di titik ekstensi, atau dapat menyebabkan efek batas putih. - EDIT_STEPS - bilangan bulat. Jumlah langkah pengambilan sampel untuk model dasar. Untuk
outpainting, mulai dari
35langkah. Tingkatkan langkah jika kualitasnya tidak memenuhi persyaratan Anda. - EDIT_IMAGE_COUNT - Jumlah gambar yang diedit. Nilai bilangan bulat yang diterima: 1-4. Nilai default: 4.
Metode HTTP dan URL:
POST https://LOCATION-aiplatform.googleapis.com/v1/projects/PROJECT_ID/locations/LOCATION/publishers/google/models/imagen-3.0-capability-001:predict
Isi JSON permintaan:
{
  "instances": [
    {
      "prompt": "",
      "referenceImages": [
        {
          "referenceType": "REFERENCE_TYPE_RAW",
          "referenceId": 1,
          "referenceImage": {
            "bytesBase64Encoded": "B64_BASE_IMAGE"
          }
        },
        {
          "referenceType": "REFERENCE_TYPE_MASK",
          "referenceId": 2,
          "referenceImage": {
            "bytesBase64Encoded": "B64_OUTPAINTING_MASK"
          },
          "maskImageConfig": {
            "maskMode": "MASK_MODE_USER_PROVIDED",
            "dilation": MASK_DILATION
          }
        }
      ]
    }
  ],
  "parameters": {
    "editConfig": {
      "baseSteps": EDIT_STEPS
    },
    "editMode": "EDIT_MODE_OUTPAINT",
    "sampleCount": EDIT_IMAGE_COUNT
  }
}
Untuk mengirim permintaan Anda, pilih salah satu opsi berikut:
Contoh respons berikut adalah untuk permintaan dengancurl
Simpan isi permintaan dalam file bernama
request.json, dan jalankan perintah berikut:curl -X POST \
-H "Authorization: Bearer $(gcloud auth print-access-token)" \
-H "Content-Type: application/json; charset=utf-8" \
-d @request.json \
"https://LOCATION-aiplatform.googleapis.com/v1/projects/PROJECT_ID/locations/LOCATION/publishers/google/models/imagen-3.0-capability-001:predict"PowerShell
Simpan isi permintaan dalam file bernama
request.json, dan jalankan perintah berikut:$cred = gcloud auth print-access-token
$headers = @{ "Authorization" = "Bearer $cred" }
Invoke-WebRequest `
-Method POST `
-Headers $headers `
-ContentType: "application/json; charset=utf-8" `
-InFile request.json `
-Uri "https://LOCATION-aiplatform.googleapis.com/v1/projects/PROJECT_ID/locations/LOCATION/publishers/google/models/imagen-3.0-capability-001:predict" | Select-Object -Expand Content"sampleCount": 2. Respons ini menampilkan dua objek prediksi, dengan byte gambar yang dihasilkan berenkode base64.{ "predictions": [ { "bytesBase64Encoded": "BASE64_IMG_BYTES", "mimeType": "image/png" }, { "mimeType": "image/png", "bytesBase64Encoded": "BASE64_IMG_BYTES" } ] }Imagen 2
Gunakan contoh berikut untuk mengirim permintaan perluasan gambar menggunakan model Imagen 2.
Konsol
-
Di Google Cloud konsol, buka halaman Vertex AI > Media Studio .
-
Di panel tugas di bagian bawah, klik Edit gambar.
-
Klik Upload untuk memilih gambar produk yang disimpan secara lokal yang akan diedit.
-
Di toolbar pengeditan, klik Perluasan.
-
Pilih salah satu rasio aspek yang telah ditentukan sebelumnya untuk gambar akhir Anda, atau klik Kustom untuk menentukan dimensi kustom untuk gambar akhir Anda.
-
Opsional. Di toolbar pengeditan, pilih penempatan horizontal ( kiri, horizontal tengah, atau rata kanan) dan penempatan vertikal ( atas, vertikal tengah, atau rata bawah) gambar asli Anda di kanvas gambar yang akan dibuat.
-
Opsional. Di panel Parameters, sesuaikan Number of results atau parameter lainnya.
-
Klik Generate.
Python
Untuk mempelajari cara menginstal atau mengupdate Vertex AI SDK untuk Python, lihat Menginstal Vertex AI SDK untuk Python. Untuk mengetahui informasi selengkapnya, lihat dokumentasi referensi API Python.
REST
Sebelum menggunakan salah satu data permintaan, lakukan penggantian berikut:
- PROJECT_ID: Google Cloud Project ID Anda.
- LOCATION: Region project Anda. Misalnya,
us-central1,europe-west2, atauasia-northeast3. Untuk mengetahui daftar region yang tersedia, lihat Lokasi AI Generatif di Vertex AI. prompt: Untuk perluasan gambar, Anda dapat memberikan string kosong untuk membuat gambar yang diedit.- B64_BASE_IMAGE: Gambar dasar yang akan diedit atau di-upscale. Gambar harus ditentukan sebagai string byte berenkode base64. Batas ukuran: 10 MB.
- B64_OUTPAINTING_MASK: Gambar hitam putih yang ingin Anda gunakan sebagai lapisan mask untuk mengedit gambar asli. Masker harus memiliki resolusi yang sama dengan gambar input. Gambar output akan memiliki resolusi yang sama dengan gambar input. Gambar mask ini harus ditentukan sebagai string byte berenkode base64. Batas ukuran: 10 MB.
- EDIT_IMAGE_COUNT: Jumlah gambar yang diedit. Nilai default: 4.
Metode HTTP dan URL:
POST https://LOCATION-aiplatform.googleapis.com/v1/projects/PROJECT_ID/locations/LOCATION/publishers/google/models/imagegeneration@006:predict
Isi JSON permintaan:
{
  "instances": [
    {
      "prompt": "",
      "image": {
          "bytesBase64Encoded": "B64_BASE_IMAGE"
      },
      "mask": {
        "image": {
          "bytesBase64Encoded": "B64_OUTPAINTING_MASK"
        }
      }
    }
  ],
  "parameters": {
    "sampleCount": EDIT_IMAGE_COUNT,
    "editConfig": {
      "editMode": "outpainting"
    }
  }
}
Untuk mengirim permintaan Anda, pilih salah satu opsi berikut:
Contoh respons berikut adalah untuk permintaan dengancurl
Simpan isi permintaan dalam file bernama
request.json, dan jalankan perintah berikut:curl -X POST \
-H "Authorization: Bearer $(gcloud auth print-access-token)" \
-H "Content-Type: application/json; charset=utf-8" \
-d @request.json \
"https://LOCATION-aiplatform.googleapis.com/v1/projects/PROJECT_ID/locations/LOCATION/publishers/google/models/imagegeneration@006:predict"PowerShell
Simpan isi permintaan dalam file bernama
request.json, dan jalankan perintah berikut:$cred = gcloud auth print-access-token
$headers = @{ "Authorization" = "Bearer $cred" }
Invoke-WebRequest `
-Method POST `
-Headers $headers `
-ContentType: "application/json; charset=utf-8" `
-InFile request.json `
-Uri "https://LOCATION-aiplatform.googleapis.com/v1/projects/PROJECT_ID/locations/LOCATION/publishers/google/models/imagegeneration@006:predict" | Select-Object -Expand Content"sampleCount": 2. Respons ini menampilkan dua objek prediksi, dengan byte gambar yang dihasilkan berenkode base64.{ "predictions": [ { "bytesBase64Encoded": "BASE64_IMG_BYTES", "mimeType": "image/png" }, { "mimeType": "image/png", "bytesBase64Encoded": "BASE64_IMG_BYTES" } ] }Java
Sebelum mencoba contoh ini, ikuti petunjuk penyiapan Java di Panduan memulai Vertex AI menggunakan library klien. Untuk mengetahui informasi selengkapnya, lihat Dokumentasi referensi API Java Vertex AI.
Untuk melakukan autentikasi ke Vertex AI, siapkan Kredensial Default Aplikasi. Untuk mengetahui informasi selengkapnya, lihat Menyiapkan autentikasi untuk lingkungan pengembangan lokal.
Dalam contoh ini, Anda menentukan model sebagai bagian dari
EndpointName.EndpointNamediteruskan ke metodepredictyang dipanggil diPredictionServiceClient. Layanan ini menampilkan versi gambar yang telah diedit, yang kemudian disimpan secara lokal.Node.js
Sebelum mencoba contoh ini, ikuti petunjuk penyiapan Node.js di Panduan memulai Vertex AI menggunakan library klien. Untuk mengetahui informasi selengkapnya, lihat Dokumentasi referensi API Node.js Vertex AI.
Untuk melakukan autentikasi ke Vertex AI, siapkan Kredensial Default Aplikasi. Untuk mengetahui informasi selengkapnya, lihat Menyiapkan autentikasi untuk lingkungan pengembangan lokal.
Dalam contoh ini, Anda memanggil metodepredictpadaPredictionServiceClient. Layanan ini menghasilkan gambar yang kemudian disimpan secara lokal.Batasan
Model dapat menghasilkan detail yang terdistorsi jika gambar yang diperluas 200% atau lebih dari gambar asli. Sebagai praktik terbaik, sebaiknya Anda menambahkan langkah pasca-pemrosesan untuk menjalankan pencampuran alfa pada gambar yang di-outpaint.
Kode berikut adalah contoh pasca-pemrosesan:
parameters = {
   "editConfig": {
       "outpaintingConfig": {
         "blendingMode": "alpha-blending",
         "blendingFactor": 0.01,
       },
   },
}
Langkah berikutnya
Baca artikel tentang Imagen dan produk AI Generatif lainnya di Vertex AI:
- Panduan developer untuk mulai menggunakan Imagen 3 di Vertex AI
- Model dan alat media generatif baru, yang dibuat dengan dan untuk kreator
- Baru di Gemini: Gem Kustom dan peningkatan pembuatan gambar dengan Imagen 3
- Google DeepMind: Imagen 3 - Model text-to-image berkualitas tertinggi kami
Kecuali dinyatakan lain, konten di halaman ini dilisensikan berdasarkan Lisensi Creative Commons Attribution 4.0, sedangkan contoh kode dilisensikan berdasarkan Lisensi Apache 2.0. Untuk mengetahui informasi selengkapnya, lihat Kebijakan Situs Google Developers. Java adalah merek dagang terdaftar dari Oracle dan/atau afiliasinya.
Terakhir diperbarui pada 2025-09-30 UTC.
-