This page describes mask-free editing by using only text prompts. Mask-free editing lets you edit an image without a mask. This method of editing is useful for edits that pertain to the entire image, or when the location of the edits is not as important for your use case.
Mask-free (entire image) editing example
You can edit a base image (generated or uploaded) using only a text prompt. You don't have to specify the area to modify, and the update is applied to the entire image (also called mask-free editing).
To make a mask-free edit, use a prompt describing what you want to see instead of instructions of what to change. For example, consider an existing image of a cat you want to change to a dog. An mask-free edit prompt of "a dog" might be more effective than "change the cat to a dog". Similarly, consider an image you generate with the prompt "a cat at the beach". To change this image, use an edit prompt "a dog at the beach".
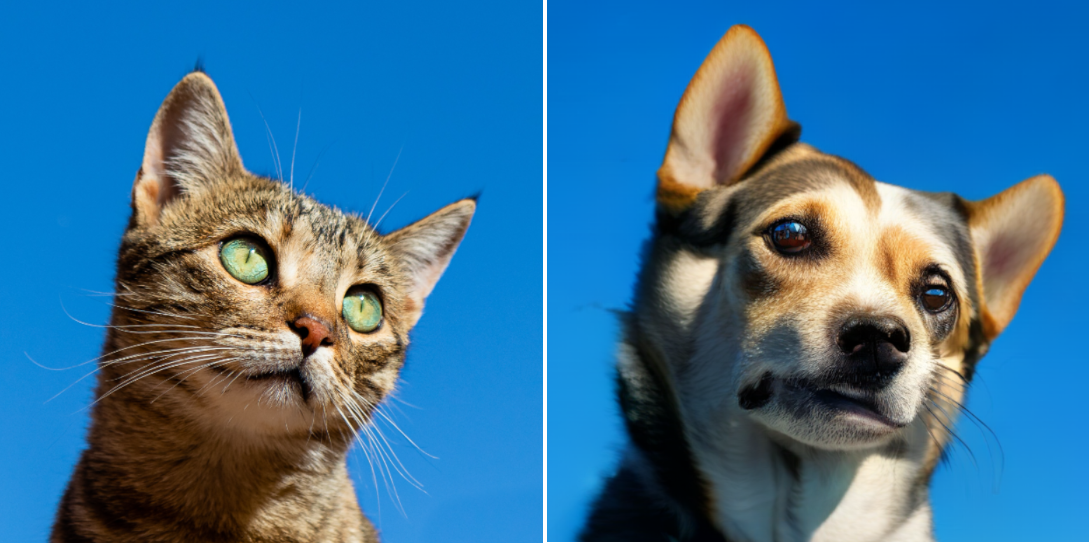
Edited image (right): Image generated using Imagen on Vertex AI with the original base image and the prompt: a dog.
View Imagen for Editing and Customization model card
Before you begin
- Sign in to your Google Cloud account. If you're new to Google Cloud, create an account to evaluate how our products perform in real-world scenarios. New customers also get $300 in free credits to run, test, and deploy workloads.
-
In the Google Cloud console, on the project selector page, select or create a Google Cloud project.
Roles required to select or create a project
- Select a project: Selecting a project doesn't require a specific IAM role—you can select any project that you've been granted a role on.
-
Create a project: To create a project, you need the Project Creator
(
roles/resourcemanager.projectCreator), which contains theresourcemanager.projects.createpermission. Learn how to grant roles.
-
Verify that billing is enabled for your Google Cloud project.
-
Enable the Vertex AI API.
Roles required to enable APIs
To enable APIs, you need the Service Usage Admin IAM role (
roles/serviceusage.serviceUsageAdmin), which contains theserviceusage.services.enablepermission. Learn how to grant roles. -
Set up authentication for your environment.
Select the tab for how you plan to use the samples on this page:
Console
When you use the Google Cloud console to access Google Cloud services and APIs, you don't need to set up authentication.
Python
To use the Python samples on this page in a local development environment, install and initialize the gcloud CLI, and then set up Application Default Credentials with your user credentials.
Install the Google Cloud CLI.
If you're using an external identity provider (IdP), you must first sign in to the gcloud CLI with your federated identity.
If you're using a local shell, then create local authentication credentials for your user account:
gcloud auth application-default login
You don't need to do this if you're using Cloud Shell.
If an authentication error is returned, and you are using an external identity provider (IdP), confirm that you have signed in to the gcloud CLI with your federated identity.
For more information, see Set up ADC for a local development environment in the Google Cloud authentication documentation.
REST
To use the REST API samples on this page in a local development environment, you use the credentials you provide to the gcloud CLI.
Install the Google Cloud CLI.
If you're using an external identity provider (IdP), you must first sign in to the gcloud CLI with your federated identity.
For more information, see Authenticate for using REST in the Google Cloud authentication documentation.
Use mask-free editing
Use the following samples to edit an entire image without a mask area.
Console
-
In the Google Cloud console, go to the Vertex AI > Media Studio page.
Go to Media Studio - In the lower task panel, click Edit image.
Go to the Edit image screen.
Edit generated image
- Generate images using a text prompt
- Click on a generated image.
- Click Edit image.
Edit uploaded image
- Click Upload an image.
- Select the local file to edit.
Enter a new prompt modifying the image.
- Optional. Modify any Parameters.
Click Generate.

Edit image view of an image edited with Imagen on Vertex AI from the prompt: a matcha cake. Original image shown in top right. Original image credit: David Holifield on Unsplash (shown in the Google Cloud console).
Python
To learn how to install or update the Vertex AI SDK for Python, see Install the Vertex AI SDK for Python. For more information, see the Python API reference documentation.
In this sample you use the load_from_file method to reference a local file as
the base Image to modify. After you specify the base image, you use
the edit_image method on the
ImageGenerationModel and save the edited image locally. You
then have the option to use the show() method in a notebook
to show you the edited image.
REST
Before using any of the request data, make the following replacements:
- PROJECT_ID: Your Google Cloud project ID.
- LOCATION: Your project's region. For example,
us-central1,europe-west2, orasia-northeast3. For a list of available regions, see Generative AI on Vertex AI locations. - TEXT_PROMPT: The text prompt that guides what images the model generates. This field is required for both generation and editing.
- B64_BASE_IMAGE: The base image to edit or upscale. The image must be specified as a base64-encoded byte string. Size limit: 10 MB.
- EDIT_IMAGE_COUNT: The number of edited images. Default value: 4.
HTTP method and URL:
POST https://LOCATION-aiplatform.googleapis.com/v1/projects/PROJECT_ID/locations/LOCATION/publishers/google/models/imagegeneration@002:predict
Request JSON body:
{
  "instances": [
    {
      "prompt": "TEXT_PROMPT",
      "image": {
        "bytesBase64Encoded": "B64_BASE_IMAGE"
      }
    }
  ],
  "parameters": {
    "sampleCount": EDIT_IMAGE_COUNT
  }
}
To send your request, choose one of these options:
curl
Save the request body in a file named request.json,
and execute the following command:
curl -X POST \
     -H "Authorization: Bearer $(gcloud auth print-access-token)" \
     -H "Content-Type: application/json; charset=utf-8" \
     -d @request.json \
     "https://LOCATION-aiplatform.googleapis.com/v1/projects/PROJECT_ID/locations/LOCATION/publishers/google/models/imagegeneration@002:predict"
PowerShell
Save the request body in a file named request.json,
and execute the following command:
$cred = gcloud auth print-access-token
$headers = @{ "Authorization" = "Bearer $cred" }

Invoke-WebRequest `
    -Method POST `
    -Headers $headers `
    -ContentType: "application/json; charset=utf-8" `
    -InFile request.json `
    -Uri "https://LOCATION-aiplatform.googleapis.com/v1/projects/PROJECT_ID/locations/LOCATION/publishers/google/models/imagegeneration@002:predict" | Select-Object -Expand Content
"sampleCount": 2. The response returns two prediction objects, with
the generated image bytes base64-encoded.
{
  "predictions": [
    {
      "bytesBase64Encoded": "BASE64_IMG_BYTES",
      "mimeType": "image/png"
    },
    {
      "mimeType": "image/png",
      "bytesBase64Encoded": "BASE64_IMG_BYTES"
    }
  ]
}
What's next
Read articles about Imagen and other Generative AI on Vertex AI products:
- A developer's guide to getting started with Imagen 3 on Vertex AI
- New generative media models and tools, built with and for creators
- New in Gemini: Custom Gems and improved image generation with Imagen 3
- Google DeepMind: Imagen 3 - Our highest quality text-to-image model