In Vertex AI Studio, you can design and iterate your prompts and compare results from different configurations and models. Once you finish engineering your prompt, you can deploy your prompt as a web application to share with your collaborators or target users to let them test out the web application. The web application is hosted on Cloud Run and is available outside the Google Cloud console.
In this quick start, you will:
- Create a prompt with prompt variables
- Deploy your prompt as a web application
- Monitor deployment progress and test the deployed application
- Update and re-deploy your prompt
- Test out prompt submission with multimodal supports
Before you start
If you have never used Vertex AI Studio before, you can follow another quickstart guide or take the Google Cloud Skills Boost course to learn the basics of Vertex AI Studio. In this guide, you should have the following:
- A Google Cloud project with billing and the Vertex AI API enabled.
- The roles required to deploy a Vertex AI Studio prompt as a web application. If you created a new project for this guide, then you already have the required permissions.
Optionally, you can also ensure that the Compute Engine default service account has the roles required for the deployment service account. If you have permission to grant roles, then you can instead grant these roles when deploying your application.
Required roles
To get the permissions that you need to deploy a Vertex AI Studio prompt as a web application, ask your administrator to grant you the following IAM roles on your project:
-
Vertex AI User (
roles/aiplatform.user) -
Enable the required APIs:
Service Usage Admin (
roles/serviceusage.serviceUsageAdmin) -
Grant required roles to the Compute Engine default service account:
Project IAM Admin (
roles/resourcemanager.projectIamAdmin) -
Deploy a Cloud Run application:
-
Cloud Run Admin (
roles/run.admin) -
Cloud Run Source Developer (
roles/run.sourceDeveloper)
-
Cloud Run Admin (
For more information about granting roles, see Manage access to projects, folders, and organizations.
You might also be able to get the required permissions through custom roles or other predefined roles.
Required roles for the deployment service account
To ensure that Compute Engine default service account has the necessary permissions to execute builds on your behalf, ask your administrator to grant Compute Engine default service account the following IAM roles on your project:
-
Vertex AI Service Agent (
roles/aiplatform.serviceAgent) -
Cloud Build Service Account (
roles/cloudbuild.builds.builder)
For more information about granting roles, see Manage access to projects, folders, and organizations.
Your administrator might also be able to give Compute Engine default service account the required permissions through custom roles or other predefined roles.
If you have permission to grant roles, then you can instead grant these roles when deploying your application.
Create a prompt with prompt variables
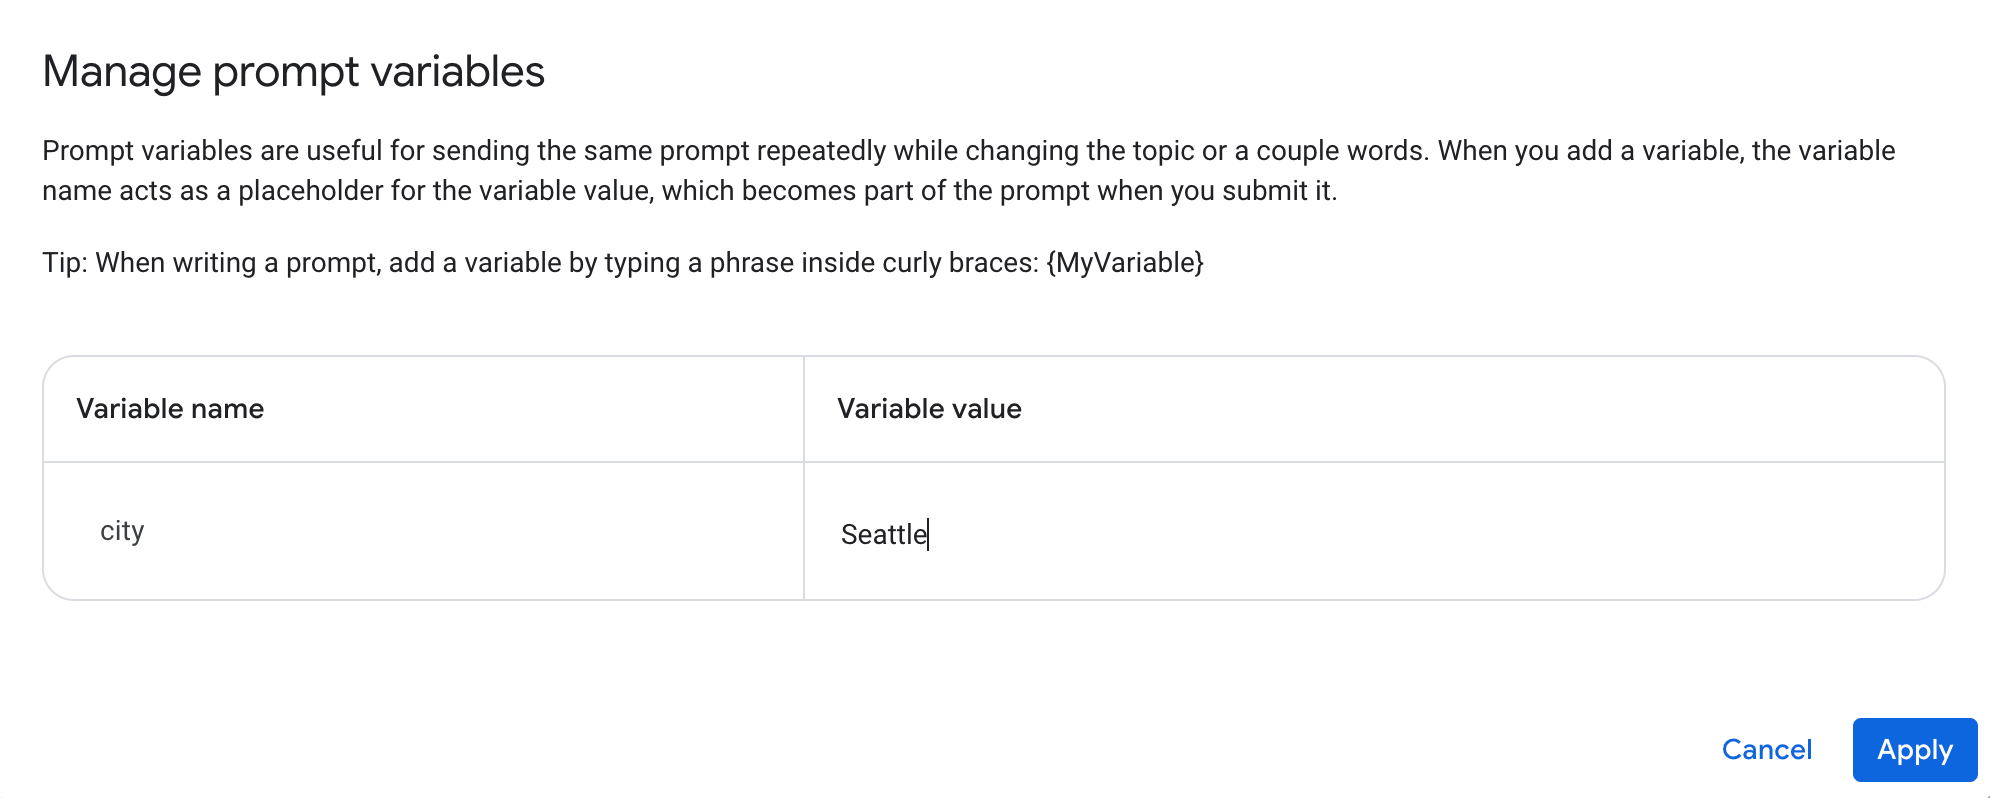
Navigate to the create prompt page of Vertex AI Studio, and then click Add variable in the prompt input box.
In the Manage prompt variables dialog, enter a variable name and give it a value. Then click Apply.
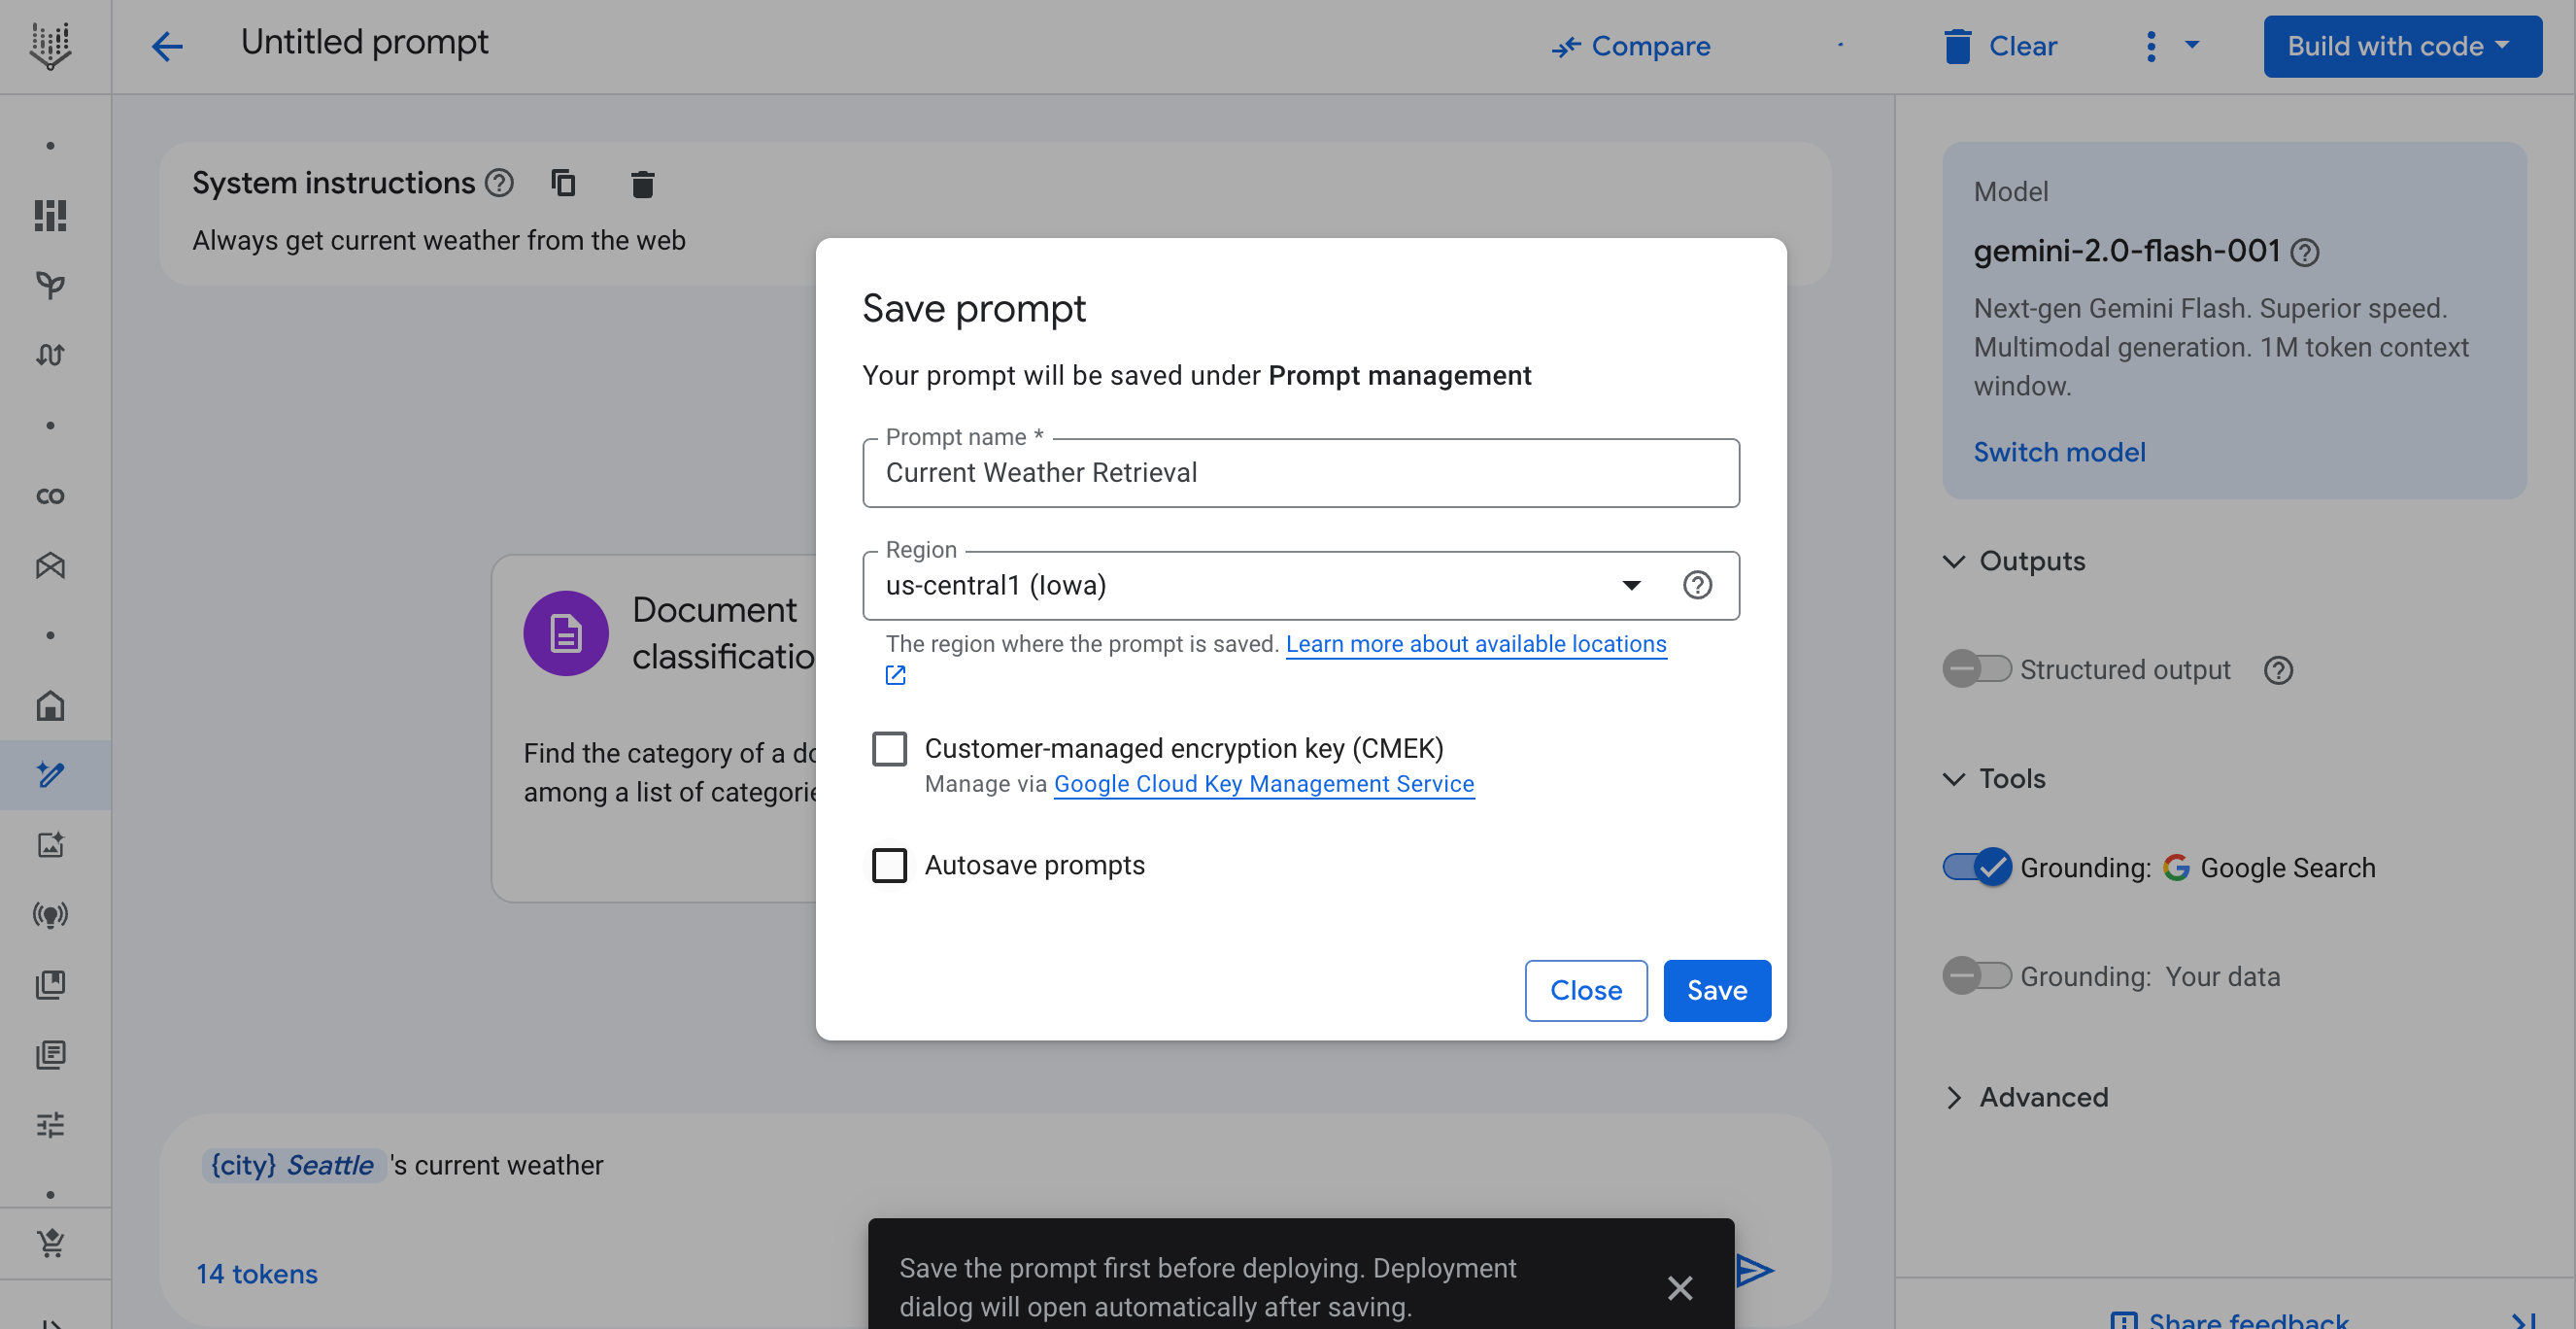
In the prompt input box, compose the prompt using the variable and then adjust other parameters. For example, you can enable Grounding with Google Search, and has "Always get current weather from the web" as the system instructions.
Deploy your prompt as a web application
To deploy your prompt as a web application, click the Build with code button on the top right corner. Then click Deploy as app.

Save the prompt
The save prompt dialog will pop up, as saving is required before a prompt can be deployed. The deploy dialog will open automatically once the prompt has been saved.
Enable APIs for the first deployment and grant permissions
- Once the prompt is saved, the deployment process will continue. If this is your first deployment, you will see a dialog for enabling required APIs. Click Enable required APIs.
-
After the APIs are enabled, the Create a web app dialog will appear. You can choose to
Required authentication (via Identity Aware Proxy) or Allow public access.
- If required authentication is chosen, follow the guide to grant access (include yourself).
- When you select Allow public access, it means anyone can access the app. Therefore, don't include sensitive or personally identifiable information (PII) in your prompt. Check the I understand this app will be deployed publicly checkbox to acknowledge.
- Click Create app to start the deployment.
- If this is your first deployment, another dialog will pop up asking you to grant the required roles to the service account. Click Grant all to proceed.
Deployment starts
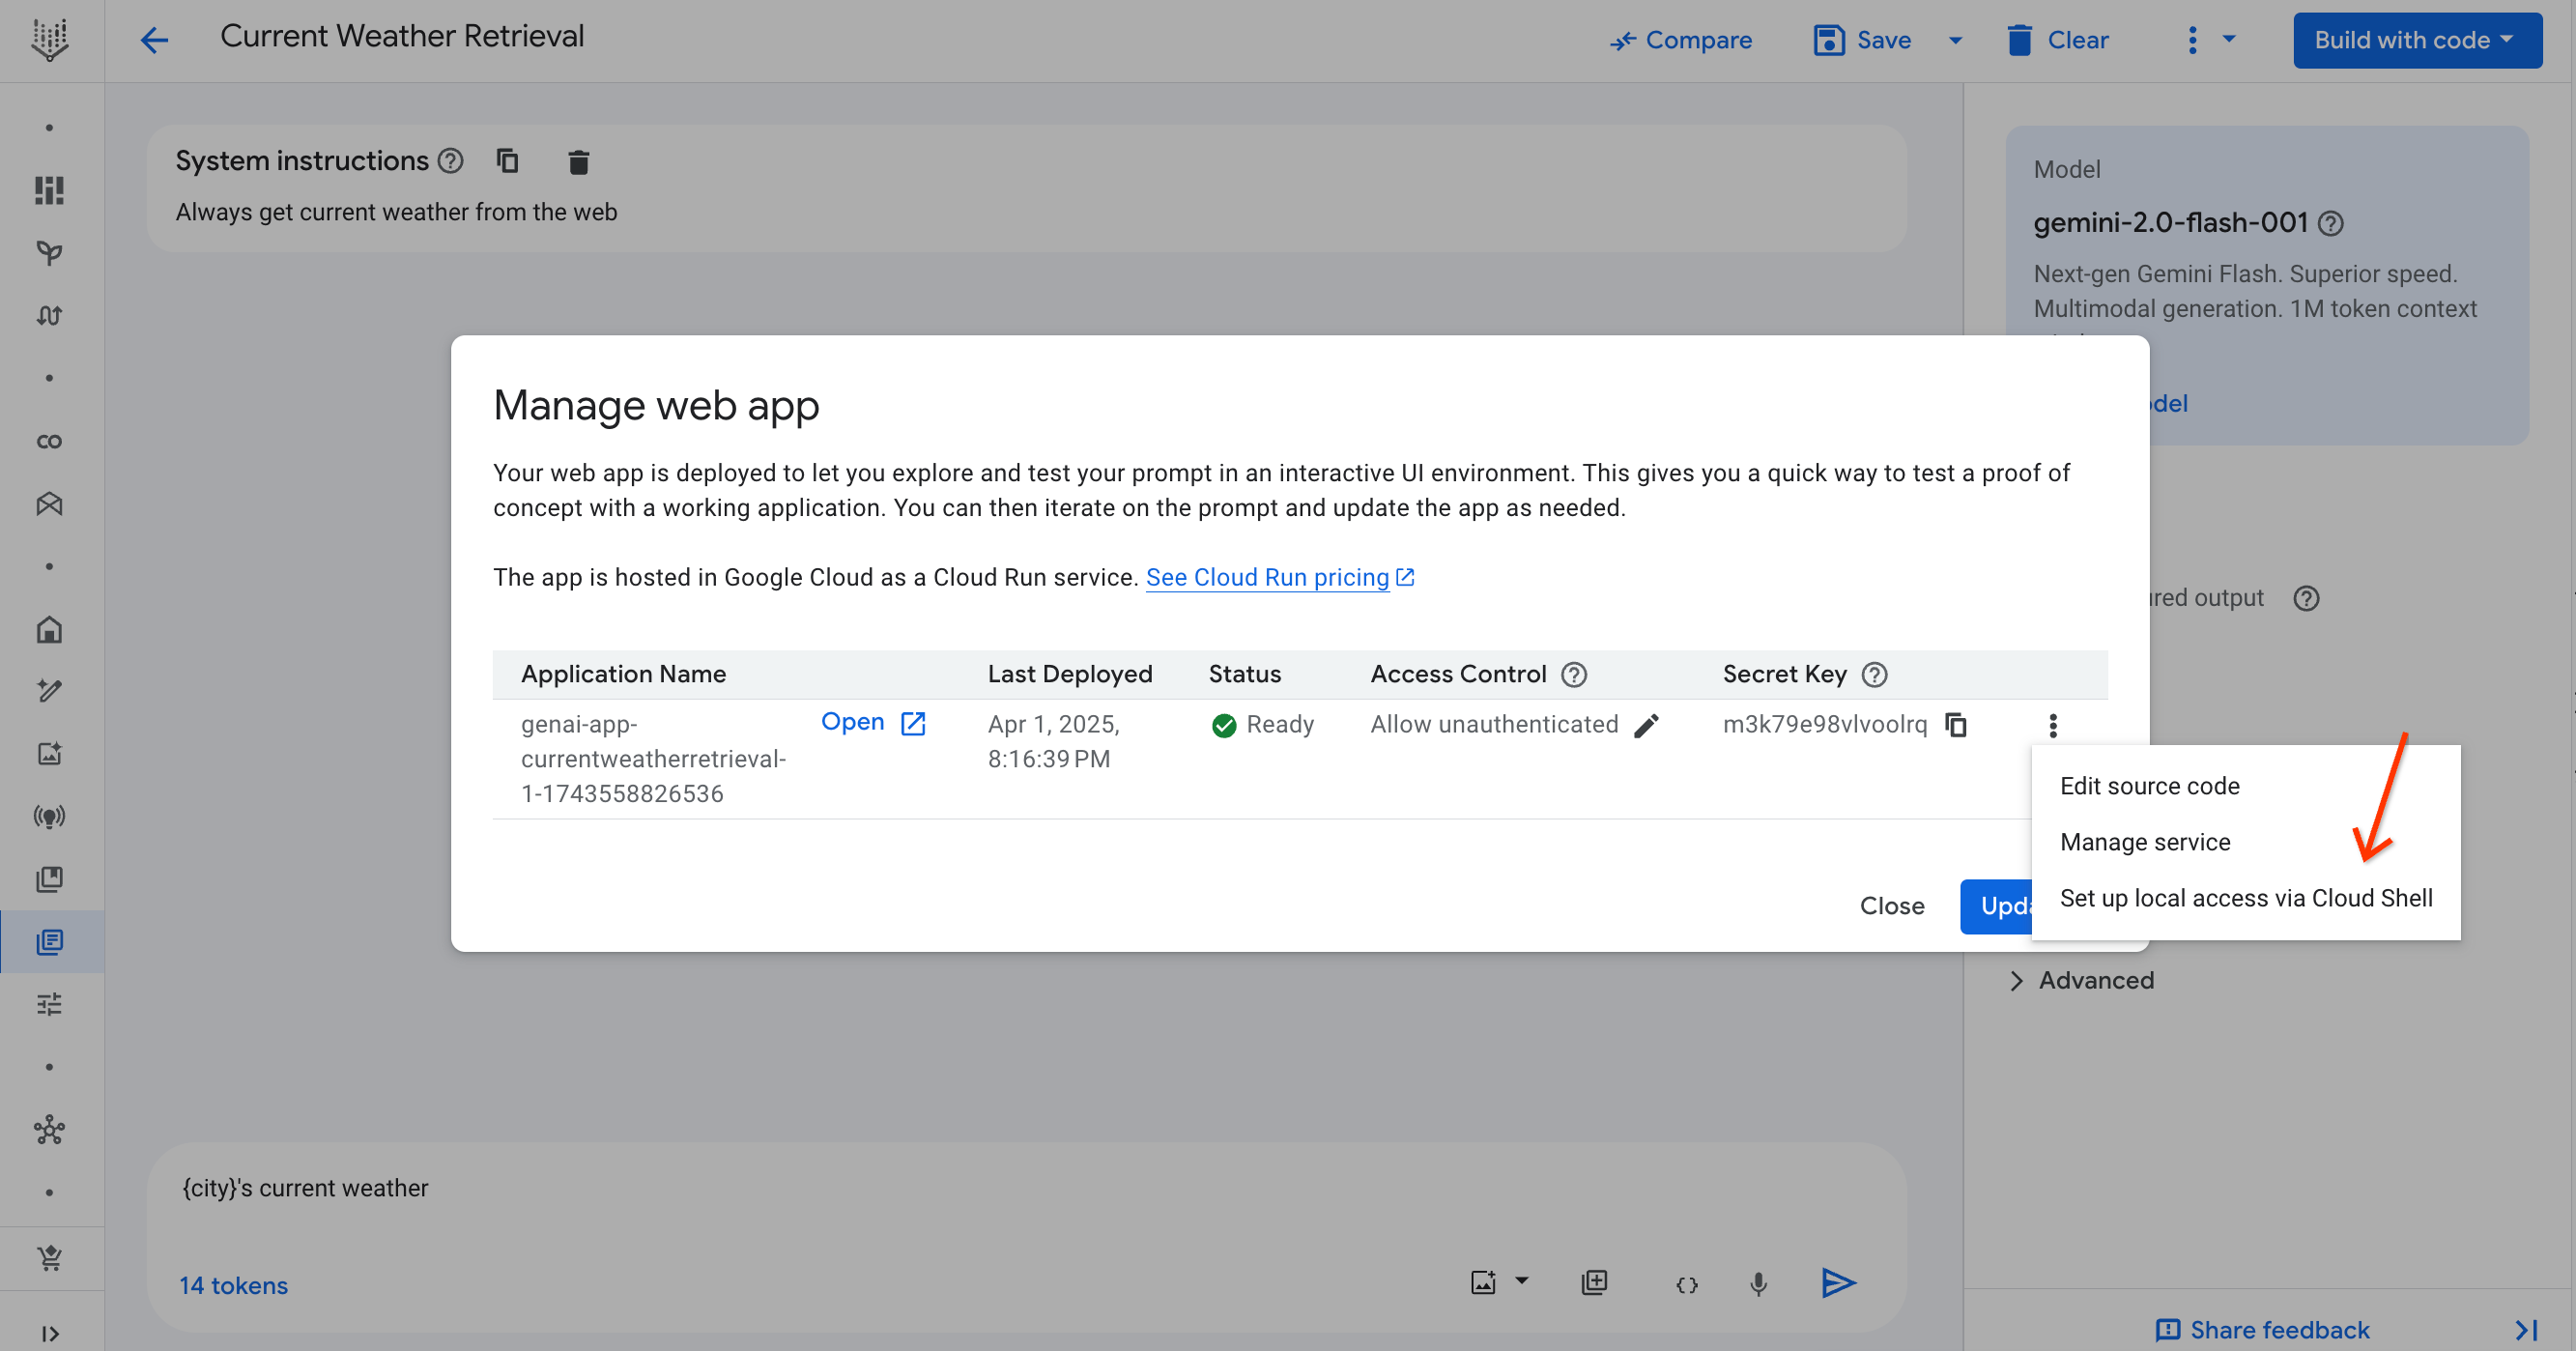
Vertex AI Studio will create a zip file that contains the source code for the web application and will upload the zip file to a Cloud Storage bucket. After deployment starts, the Manage web app dialog will pop up with information about your deployment, such as your application's name, when it was last deployed, its deployment status, and more.
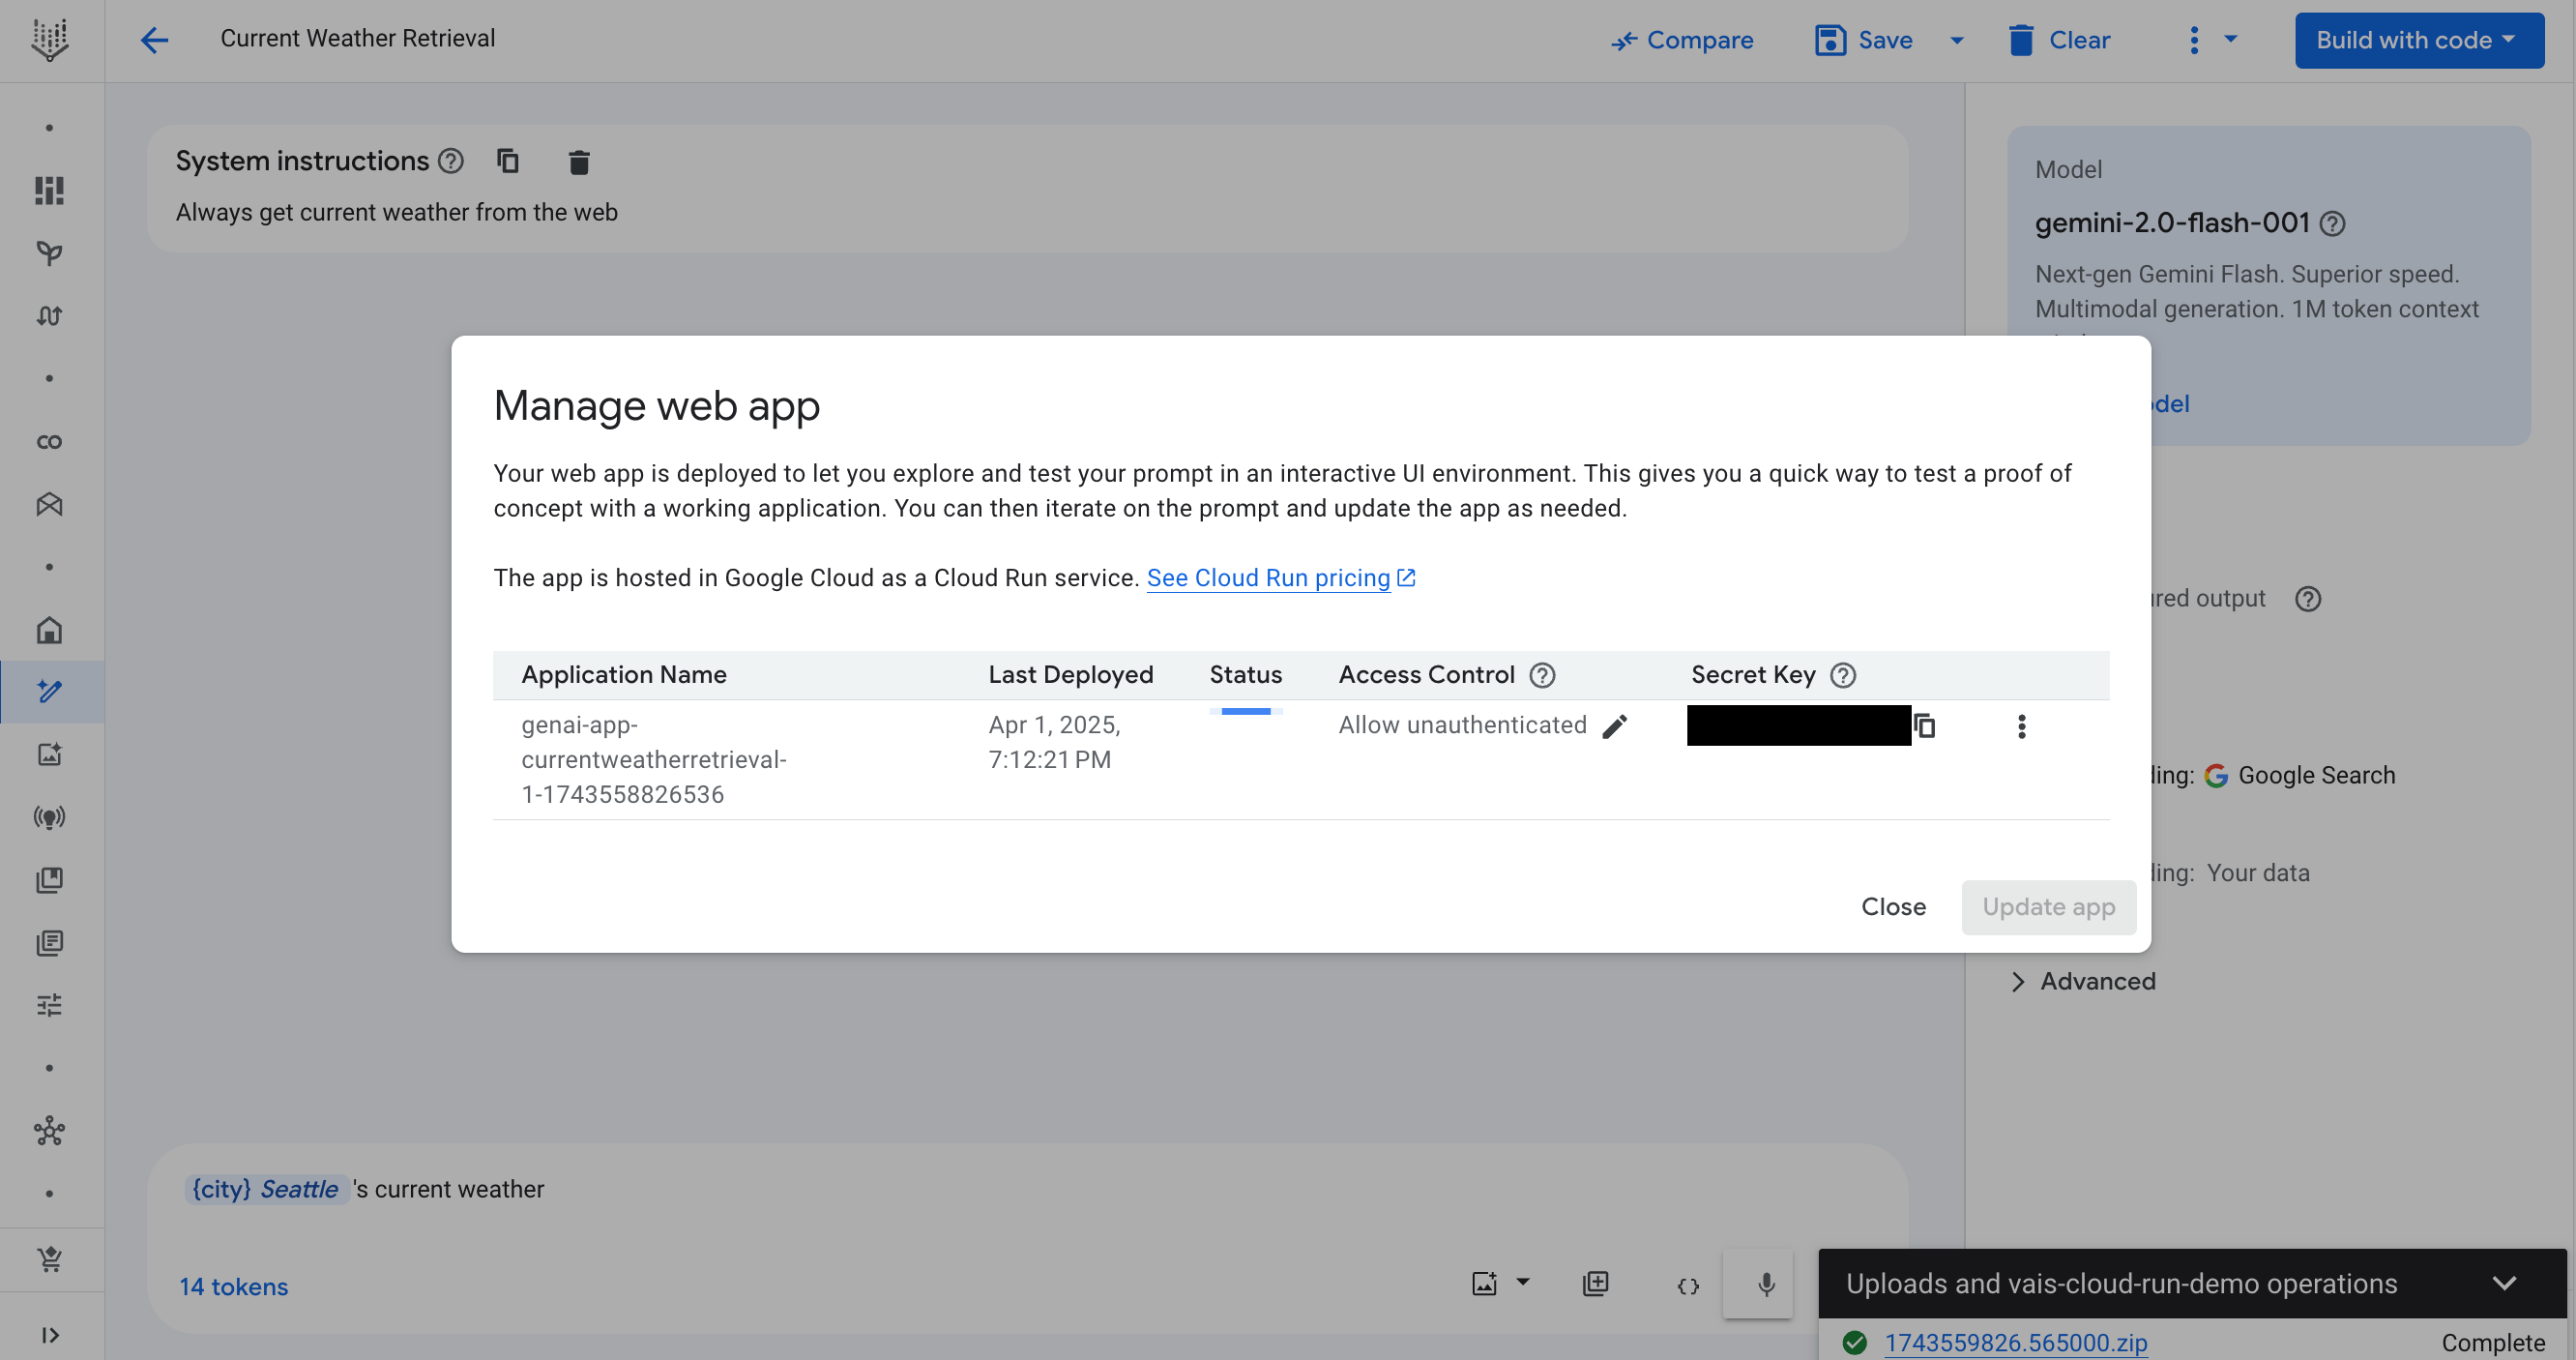
Monitoring the deployment status
Deployment takes 2-3 minutes to complete, and the deployment status is shown in the Status column of the Manage web app dialog. If you close the Manage web app dialog, you can reopen it from the menu under the Build with code button.
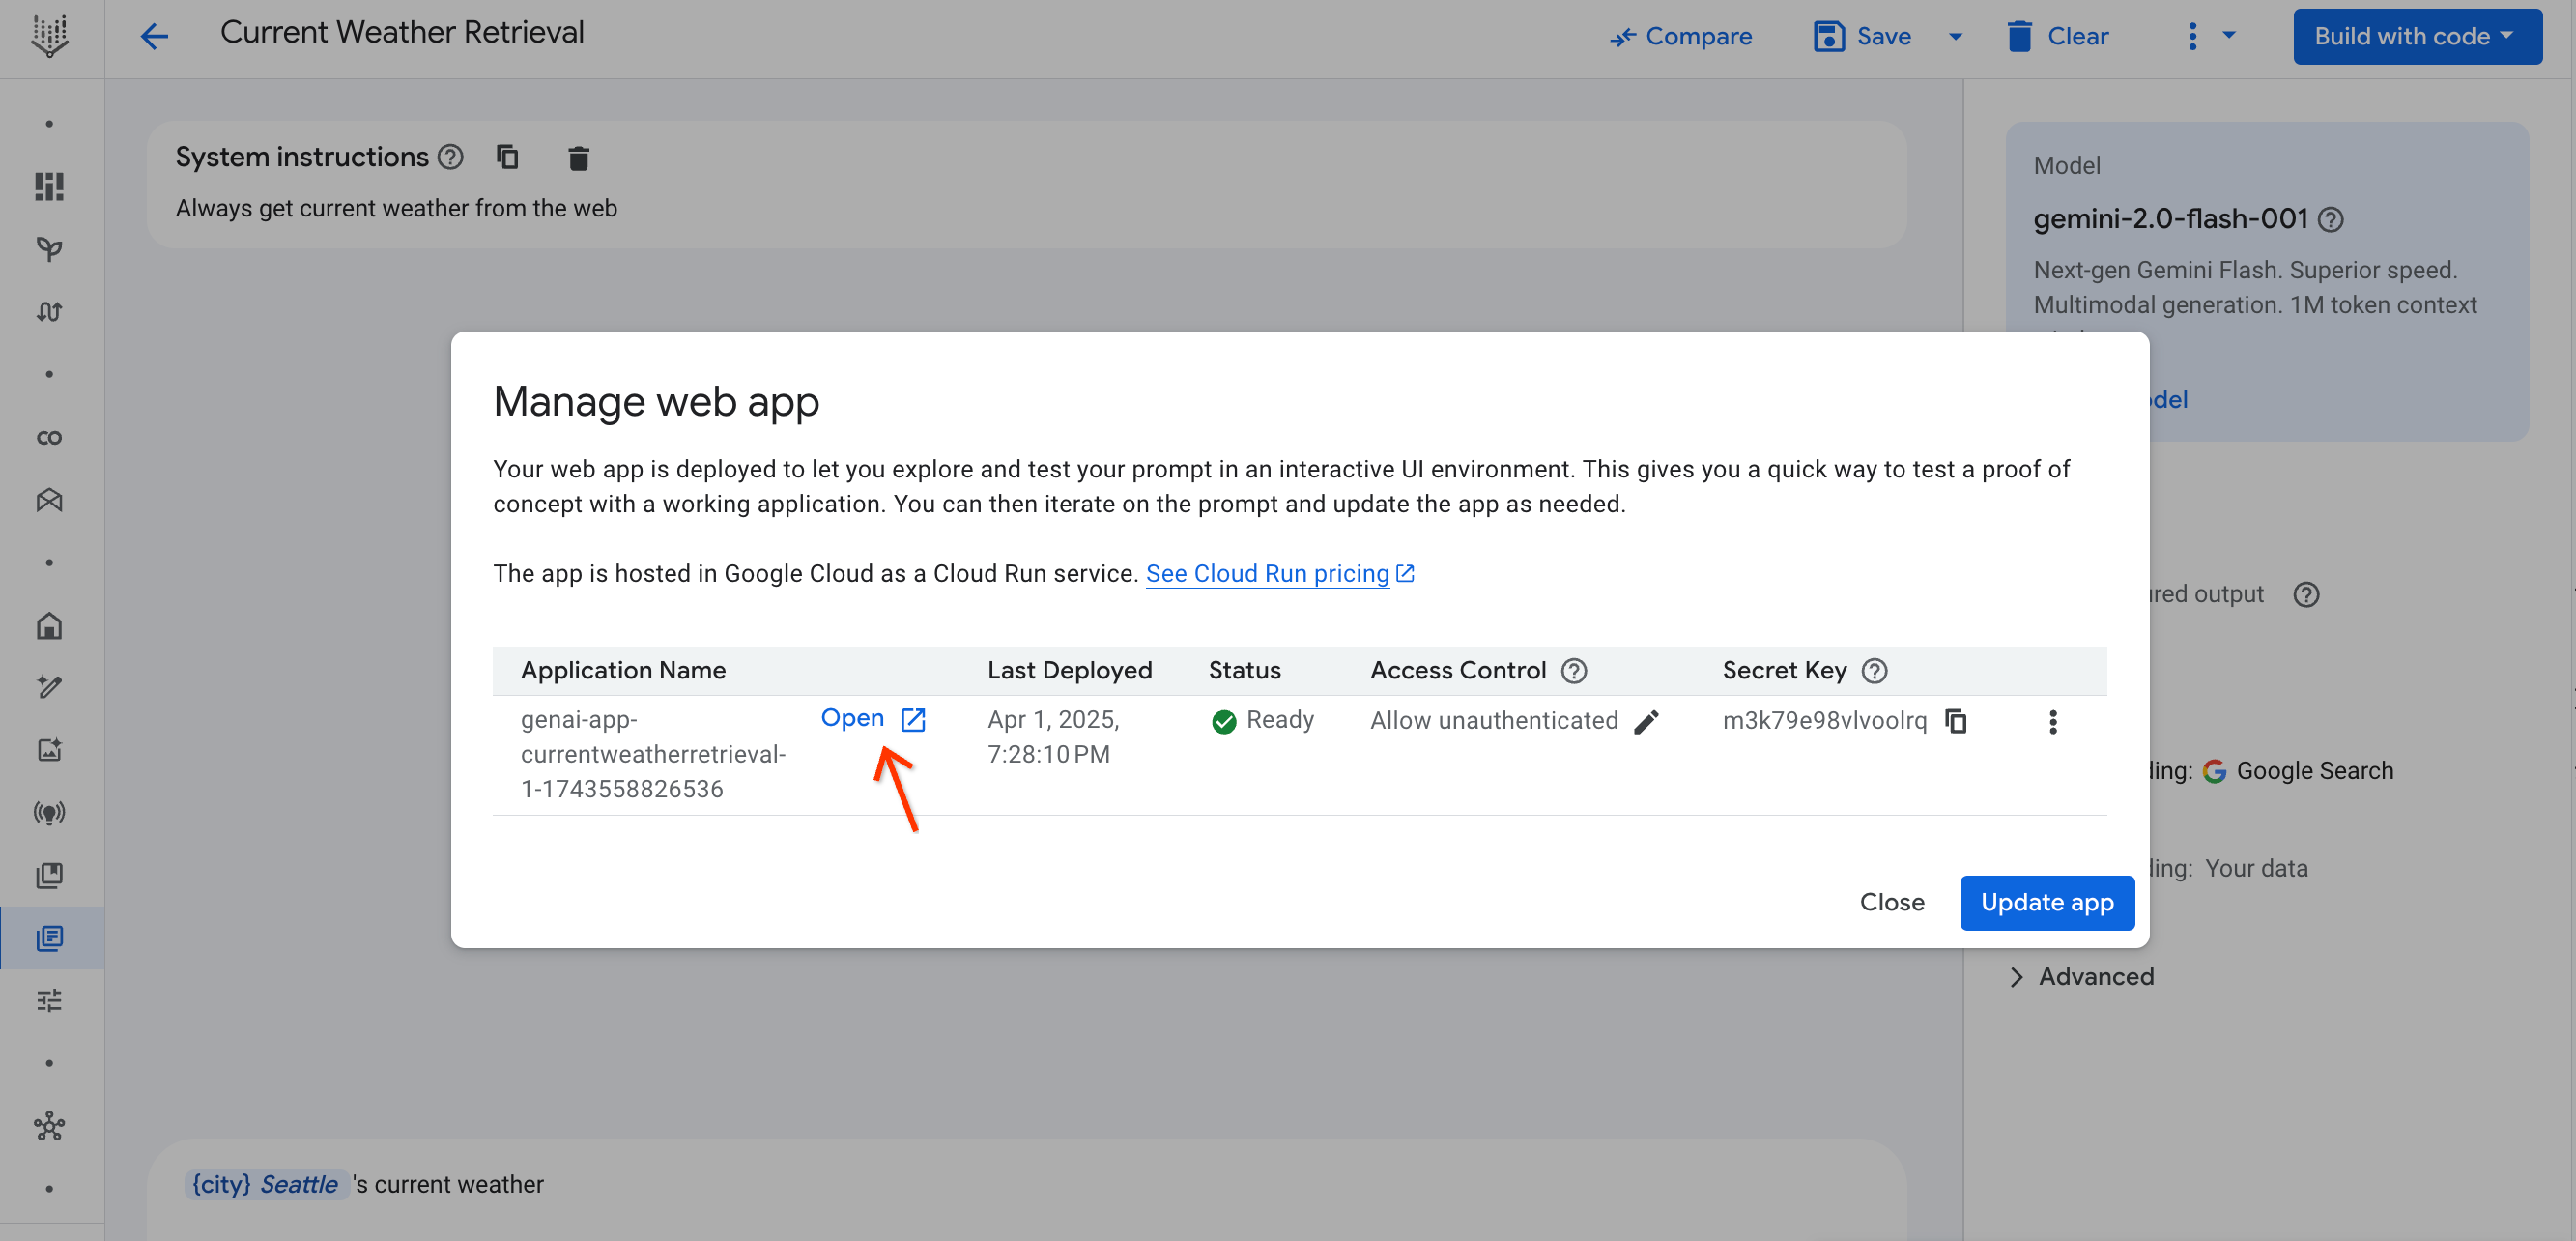
Once the deployment is complete, the status column will change to Ready, and the Open button will appear next to the application name.
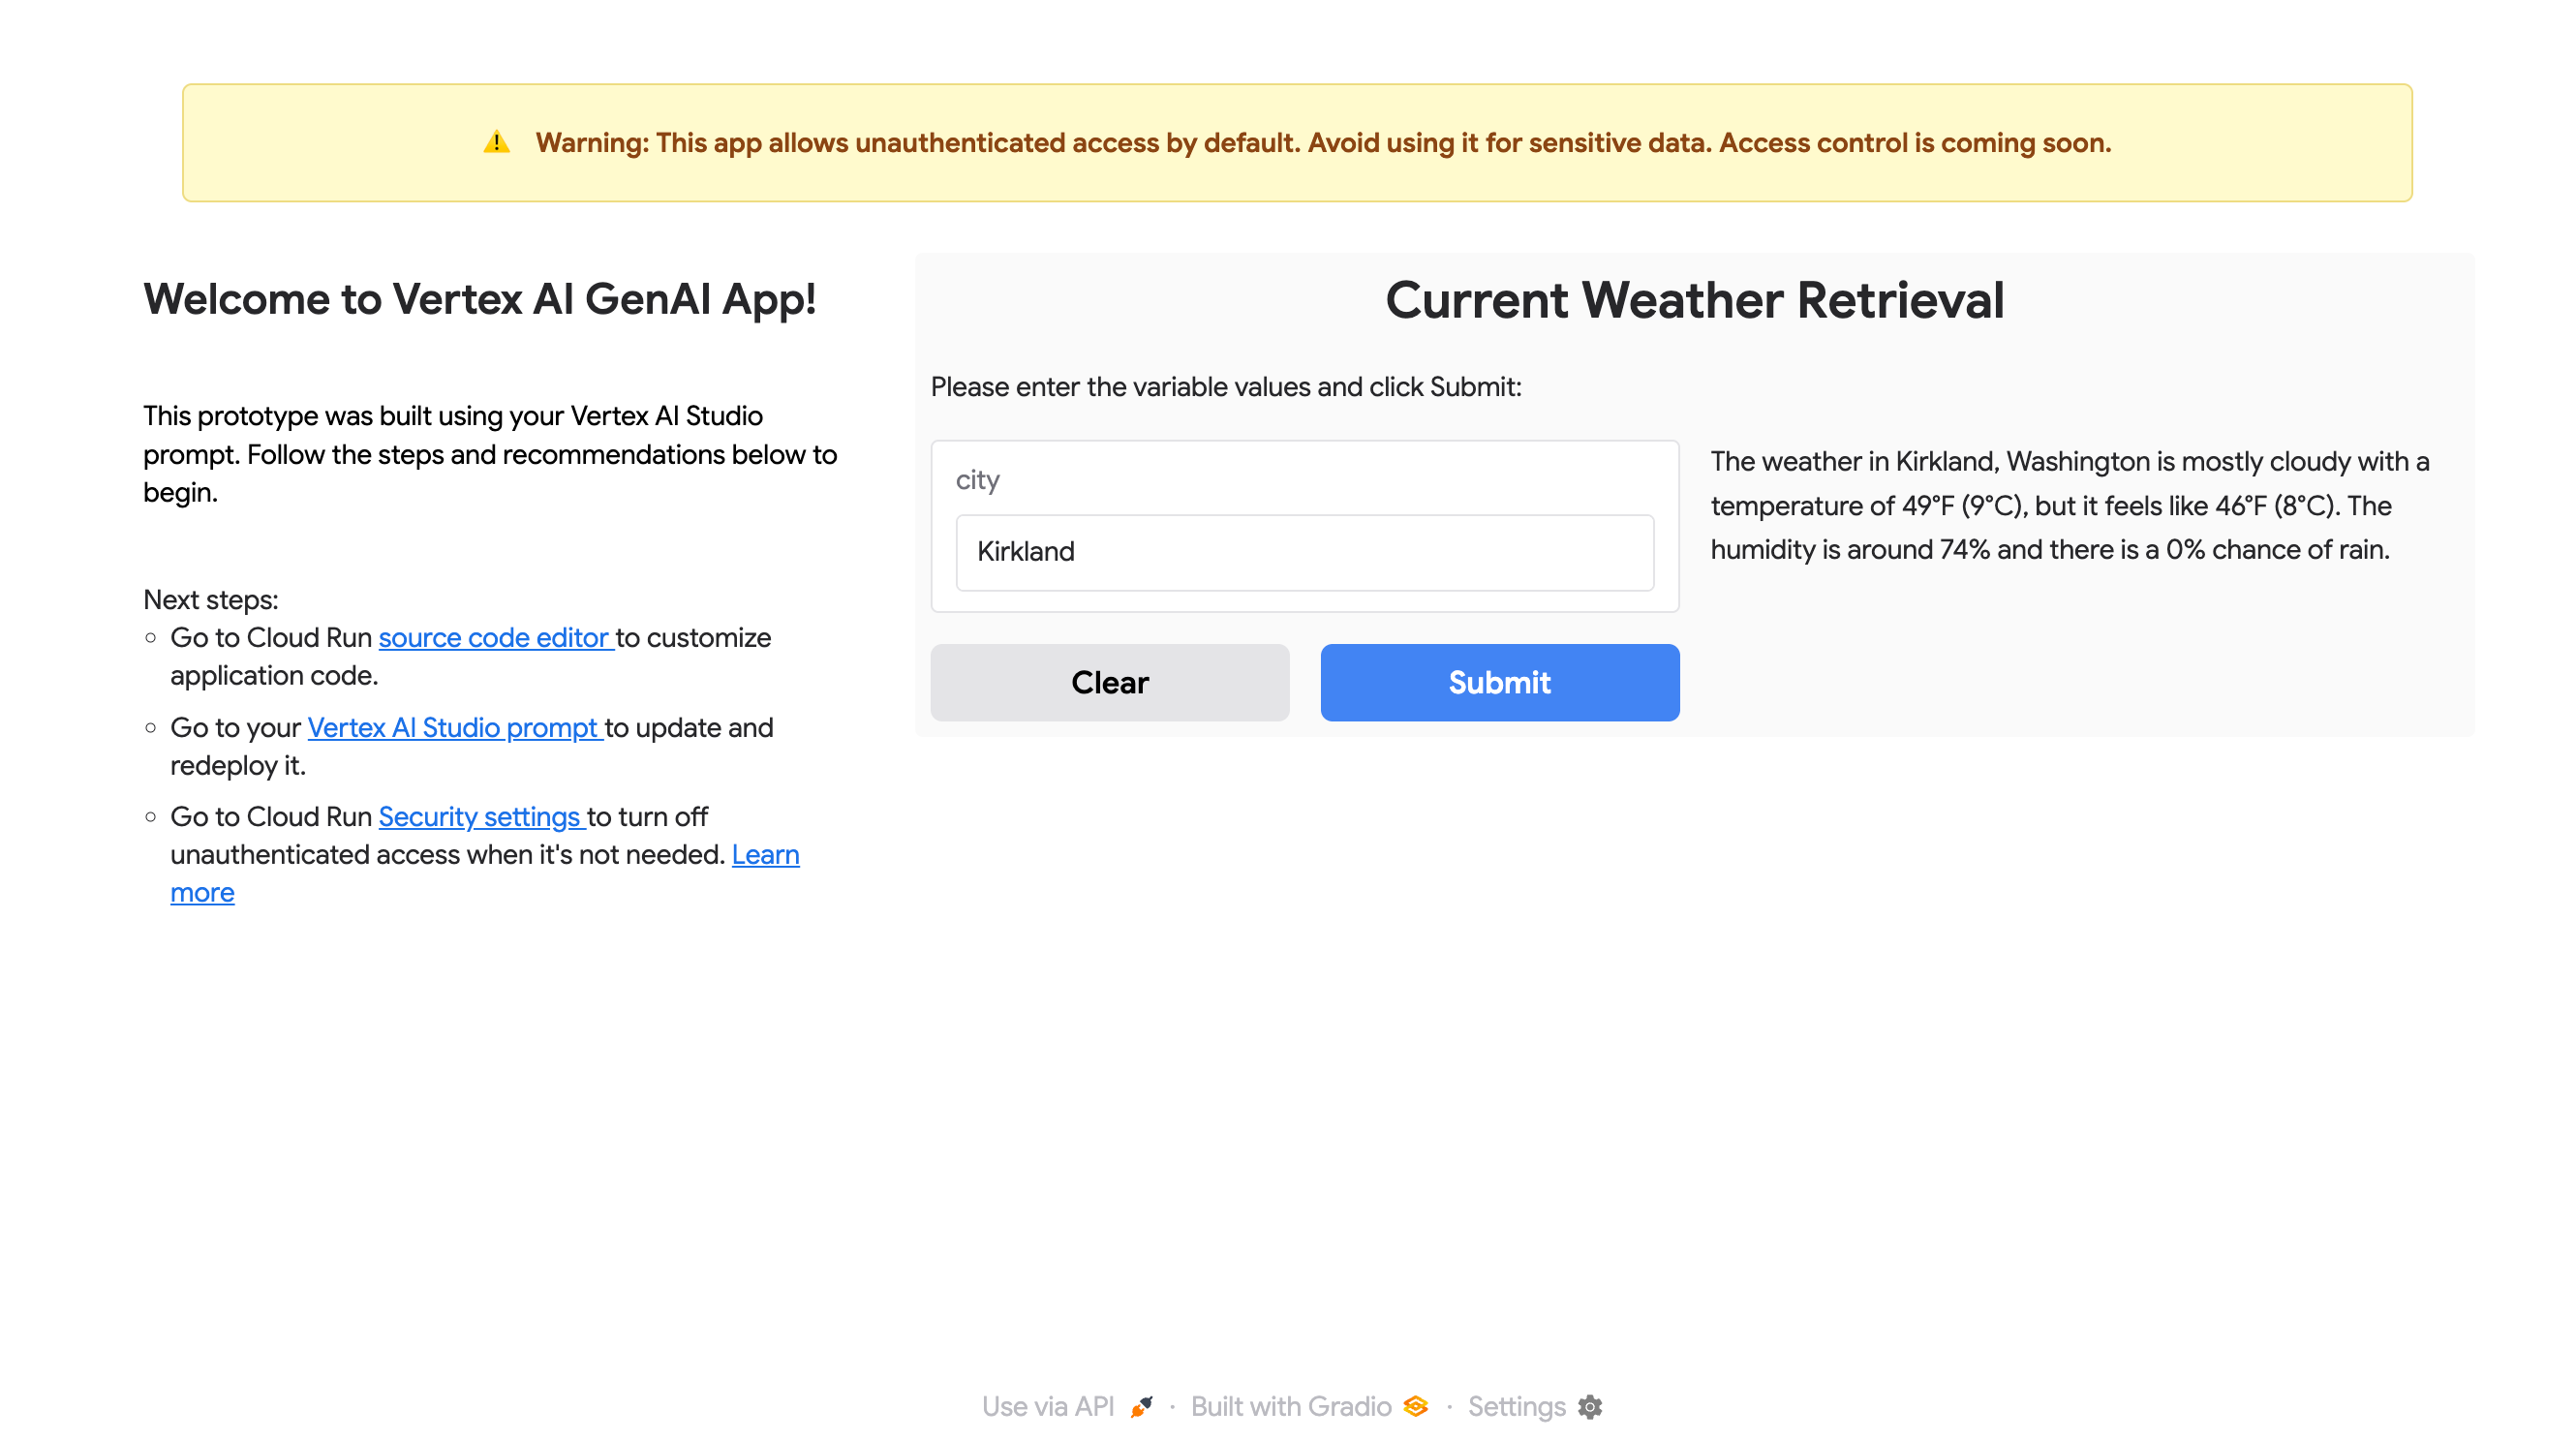
Access control and secret key
Your web application is deployed with Allow unauthenticated access control enabled by default. You can turn it off by clicking the pencil icon button. See the turn off public access section for more information.
To provide basic protection, the web application requires a secret key to be appended to the URL for submitting the prompt. You can find the secret key in the Secret Key column. If you open the web application from Vertex AI Studio, the key will be appended to the URL for you.
Open the web application and submit the prompt
Click Open in the Manage web app dialog to access the deployed
application. The application should be opened with the secret key appended to
the URL in the format of ?key=SECRET_KEY.
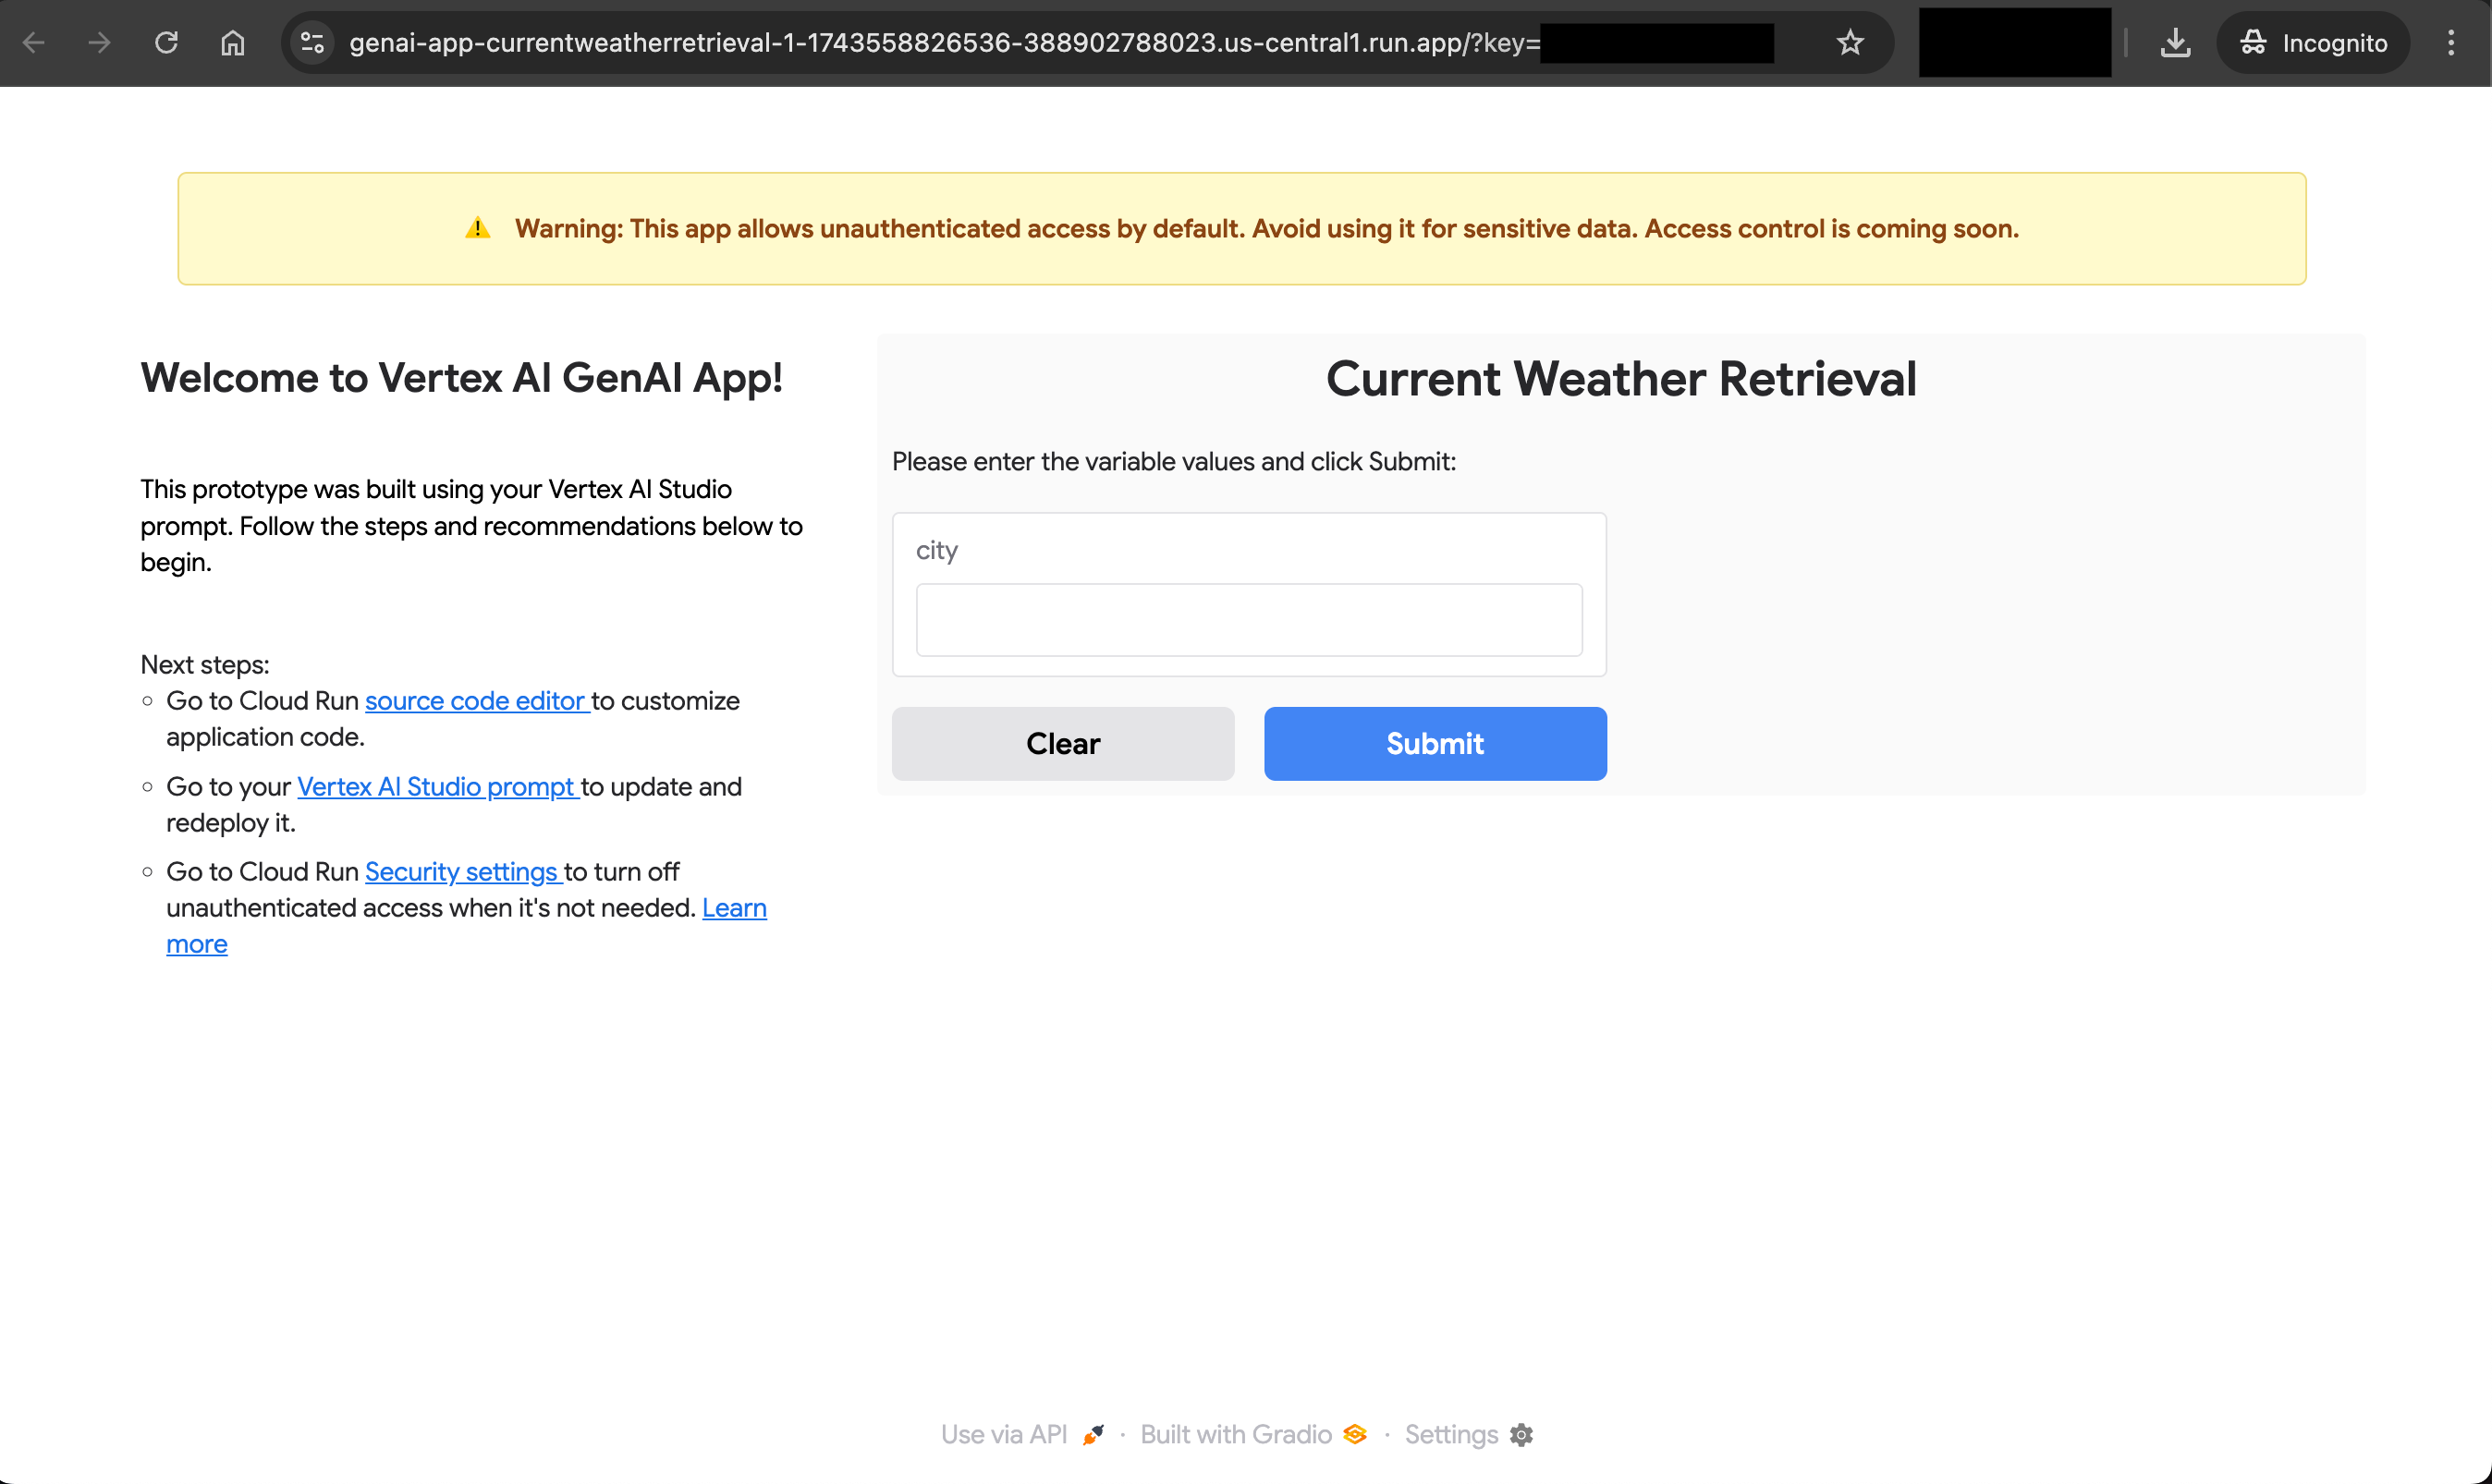
Enter a value to the variable and then click Submit. You should be able to see the results on the right.
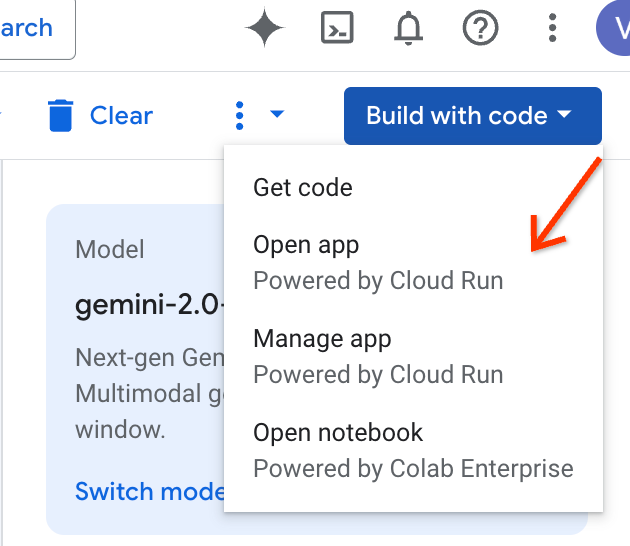
Open the web application from the Build with code button menu
If your web application is ready, you can also open it from the Build with code button menu.
Cloud Run is a serverless service, which means that the container for the application will be shut down if it is not actively used. Therefore, the web application can sometimes take a few seconds to load, or a submission won't work if you have left the web application idling for too long. Refreshing the page should solve this issue.
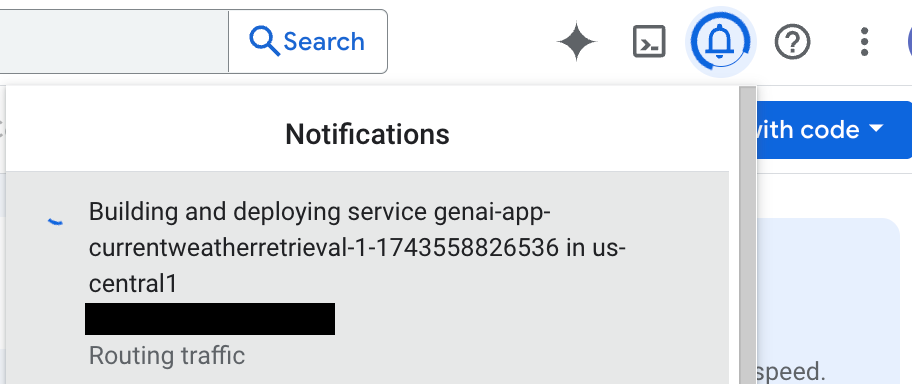
Monitoring the status from the notification bell
You can also monitor the status from the Notifications menu by clicking the bell icon. The bell icon will stop its loading animation and show a green circle if deployment is completed successfully.
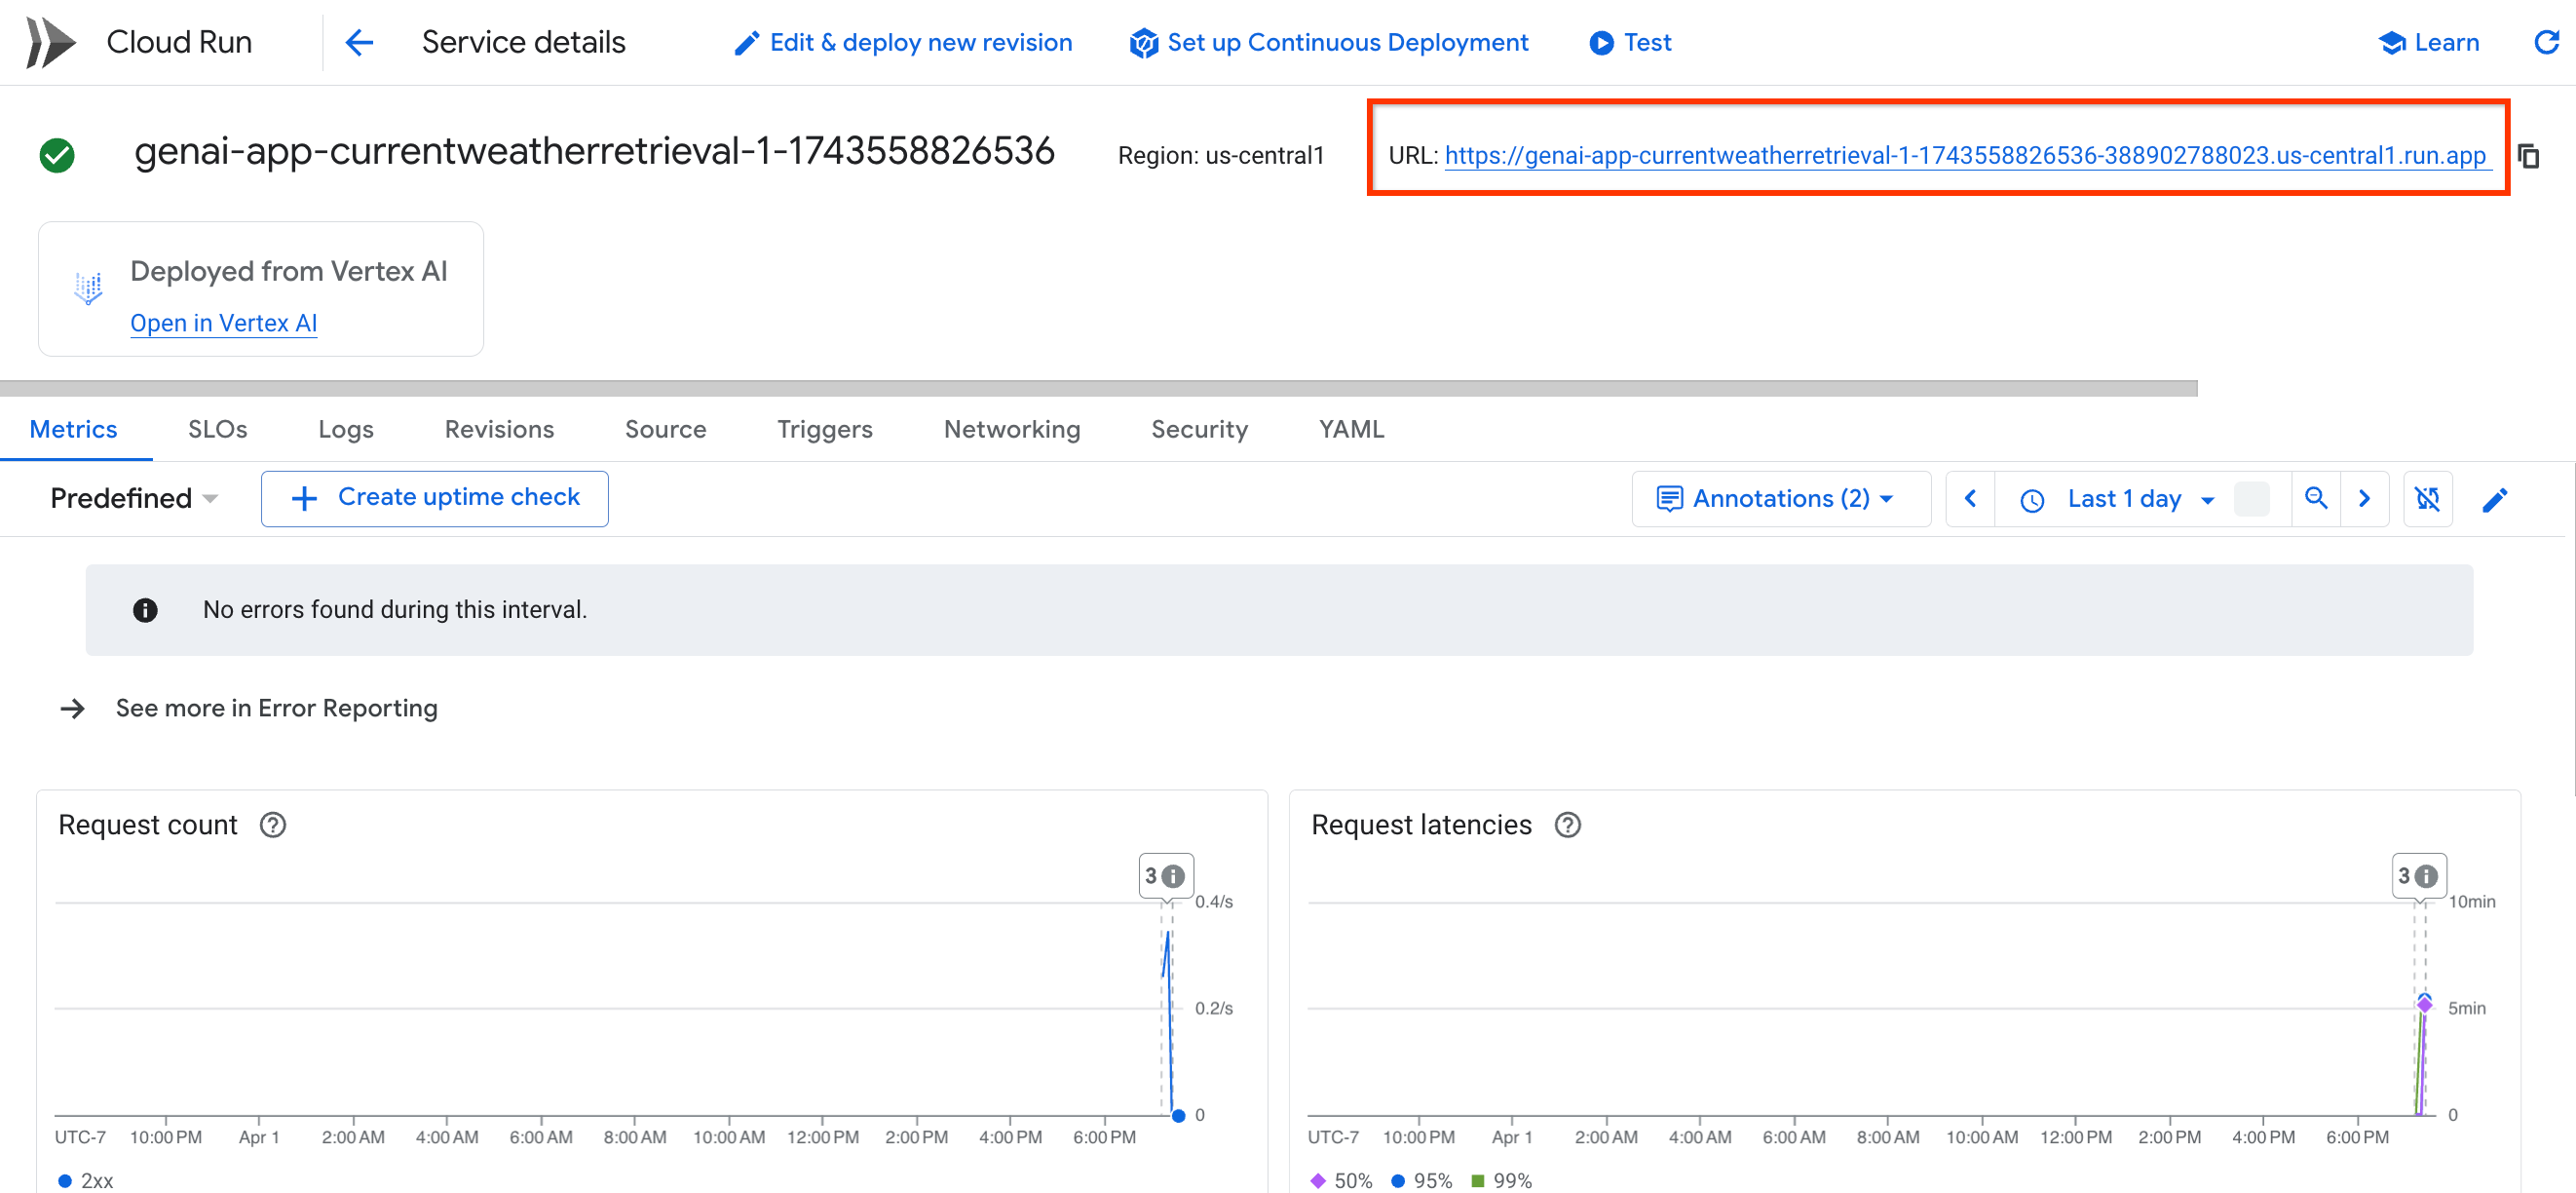
If you click the notification, it will redirect you to the Cloud Run
page. The URL in the Cloud Run page does not have the secret key
appended. You will need to manually append it in the format ?key=SECRET_KEY.
Update and re-deploy your prompt
You can further edit your prompt in Vertex AI Studio and turn the prompt into a conversation. Then click the Build with code button and click Manage app to open the Manage web app dialog. Click Update app to re-deploy your web application with the updated prompt.
A confirmation dialog will appear. It tells you that if you redeploy, you will lose any changes that you made to the deployed web application outside Vertex AI Studio (such as in the Cloud Run source code editor). Click Confirm to proceed.
The Manage web app dialog will pop up again. The process is similar to the initial deployment. You can monitor the progress in the same way as the first deployment.
After the update is done, you can open the web application again. You will see the conversation UI with the prompt variable. Fill in the value and type any non-empty content to continue the conversation.

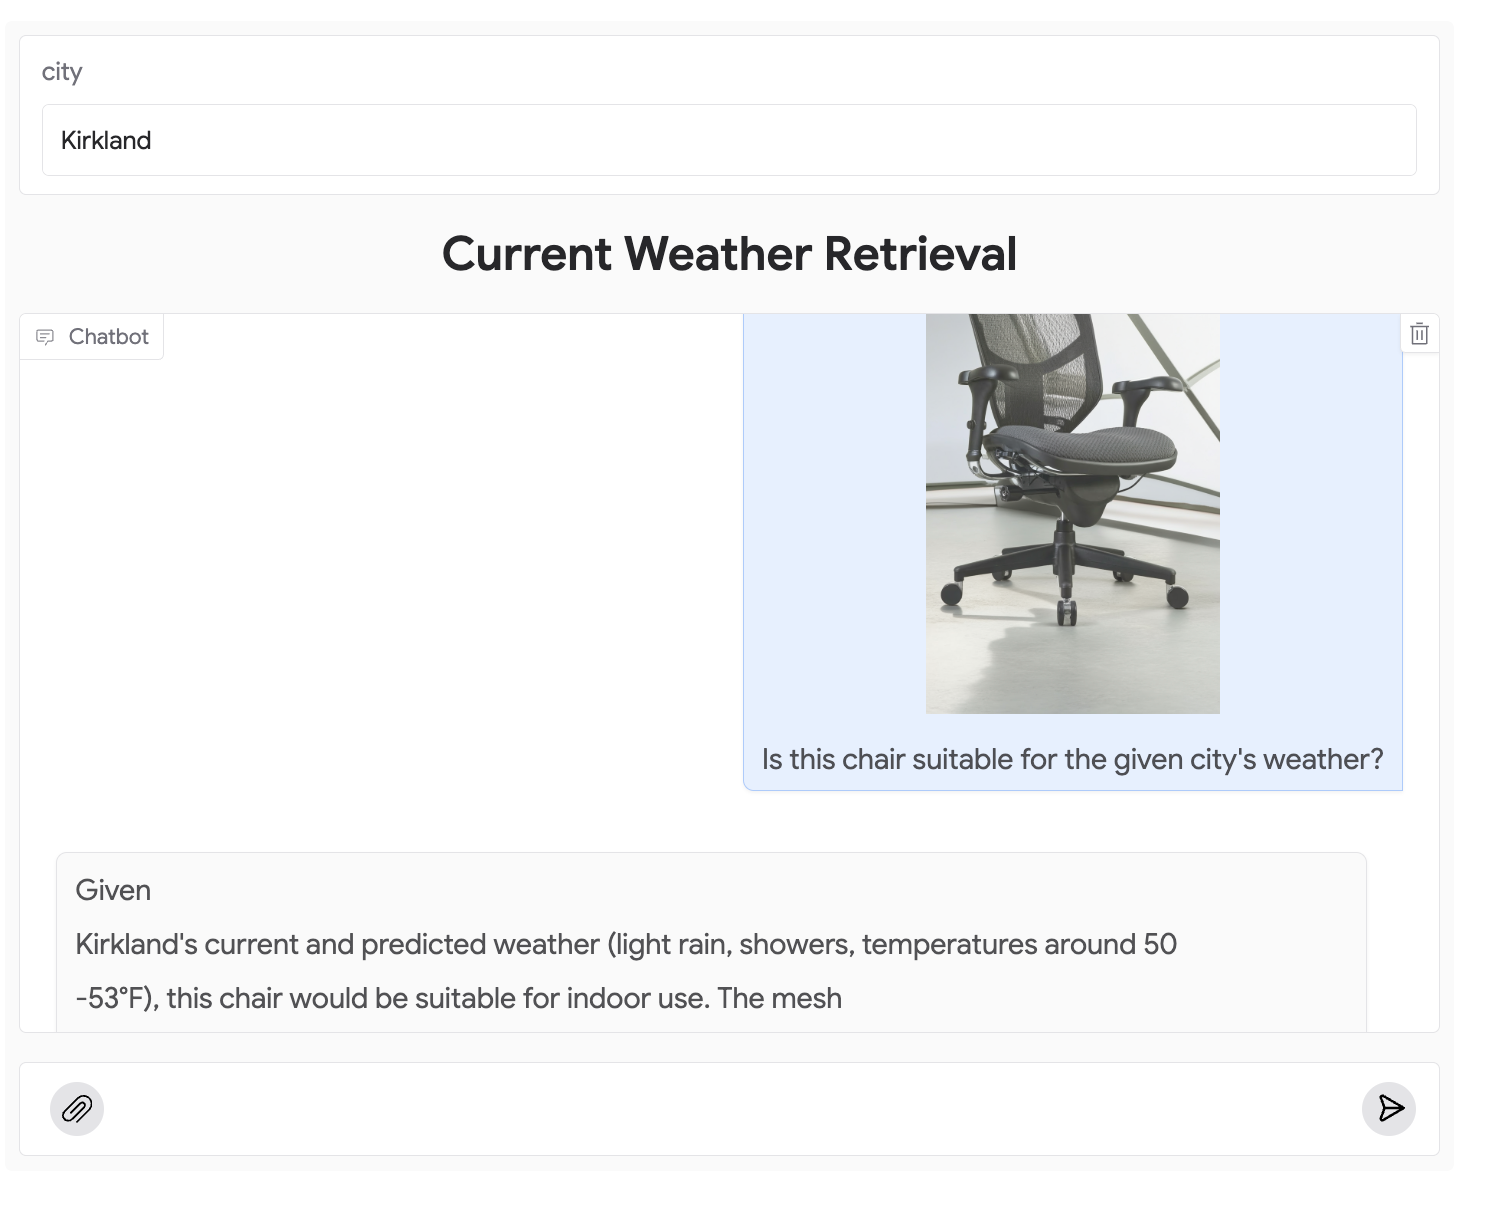
Insert multimodal content
You can insert inputs such as images, video, audio, and documents into the conversation UI. What inputs are supported depends on the model selected for the prompt. See the documentation for multimodal support for each model.
To insert a file, click the clip icon button in the conversation input box.
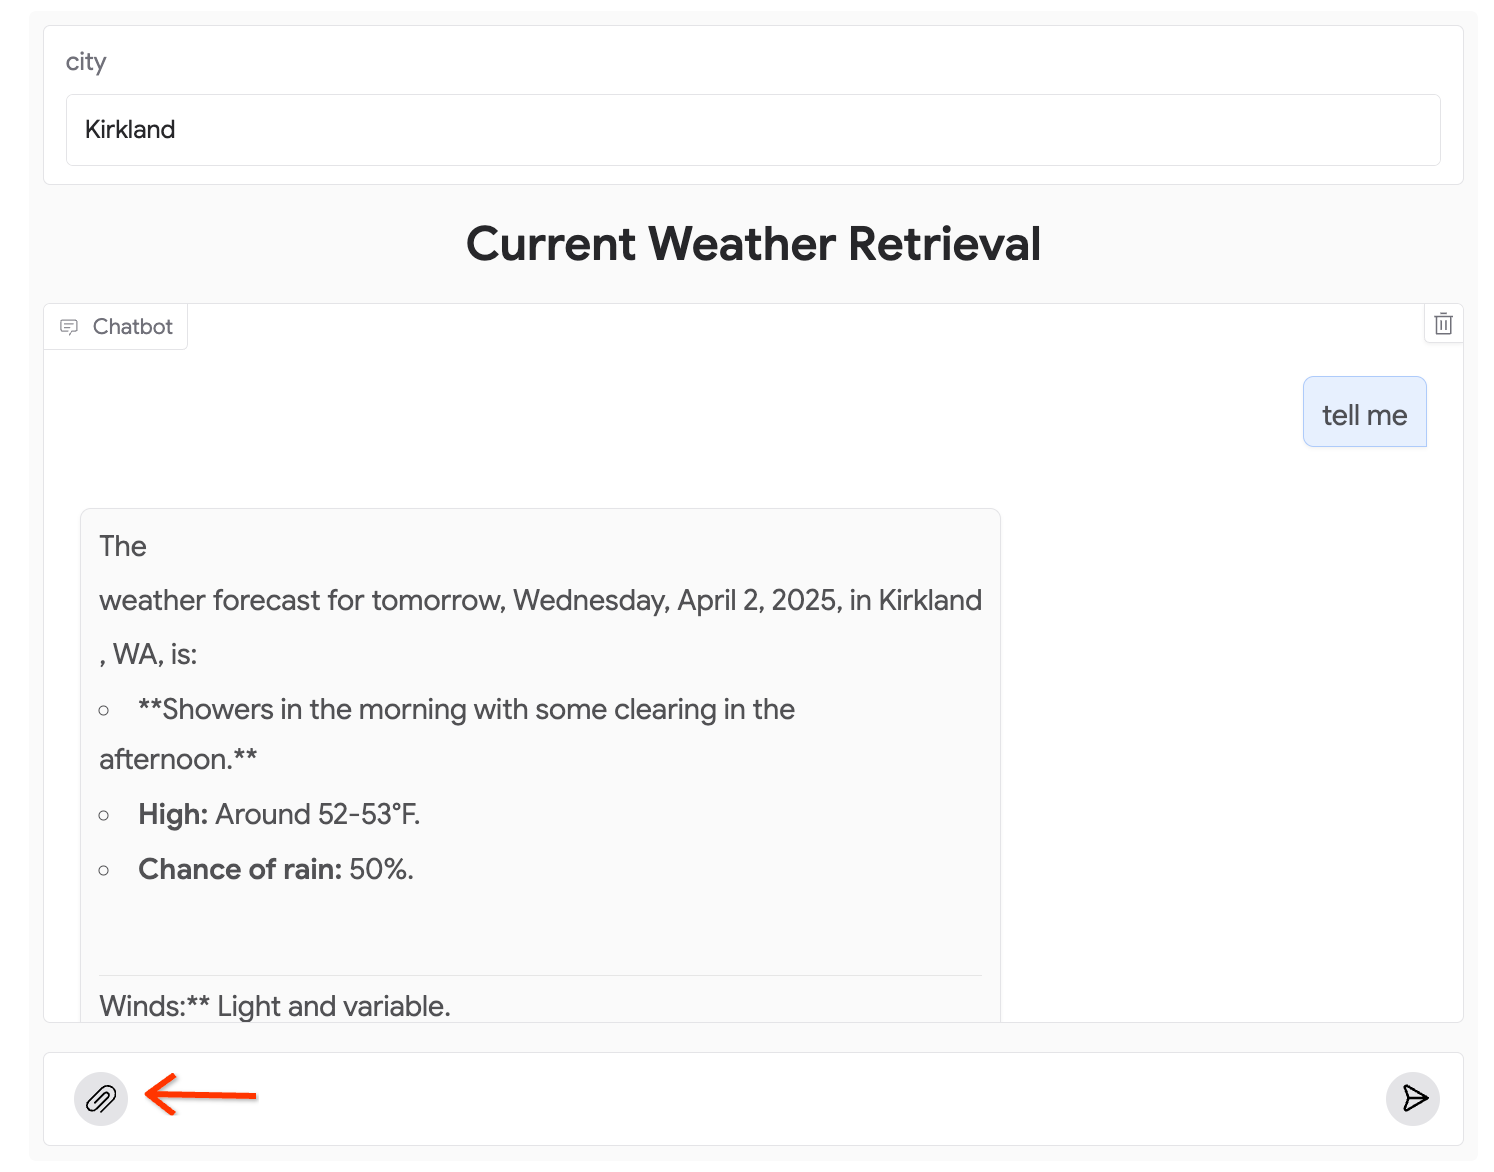
You will be able to interact with the model with the input you provide.
Advanced Topics
Once you are familiar with the deployment process, you can consider the following actions.
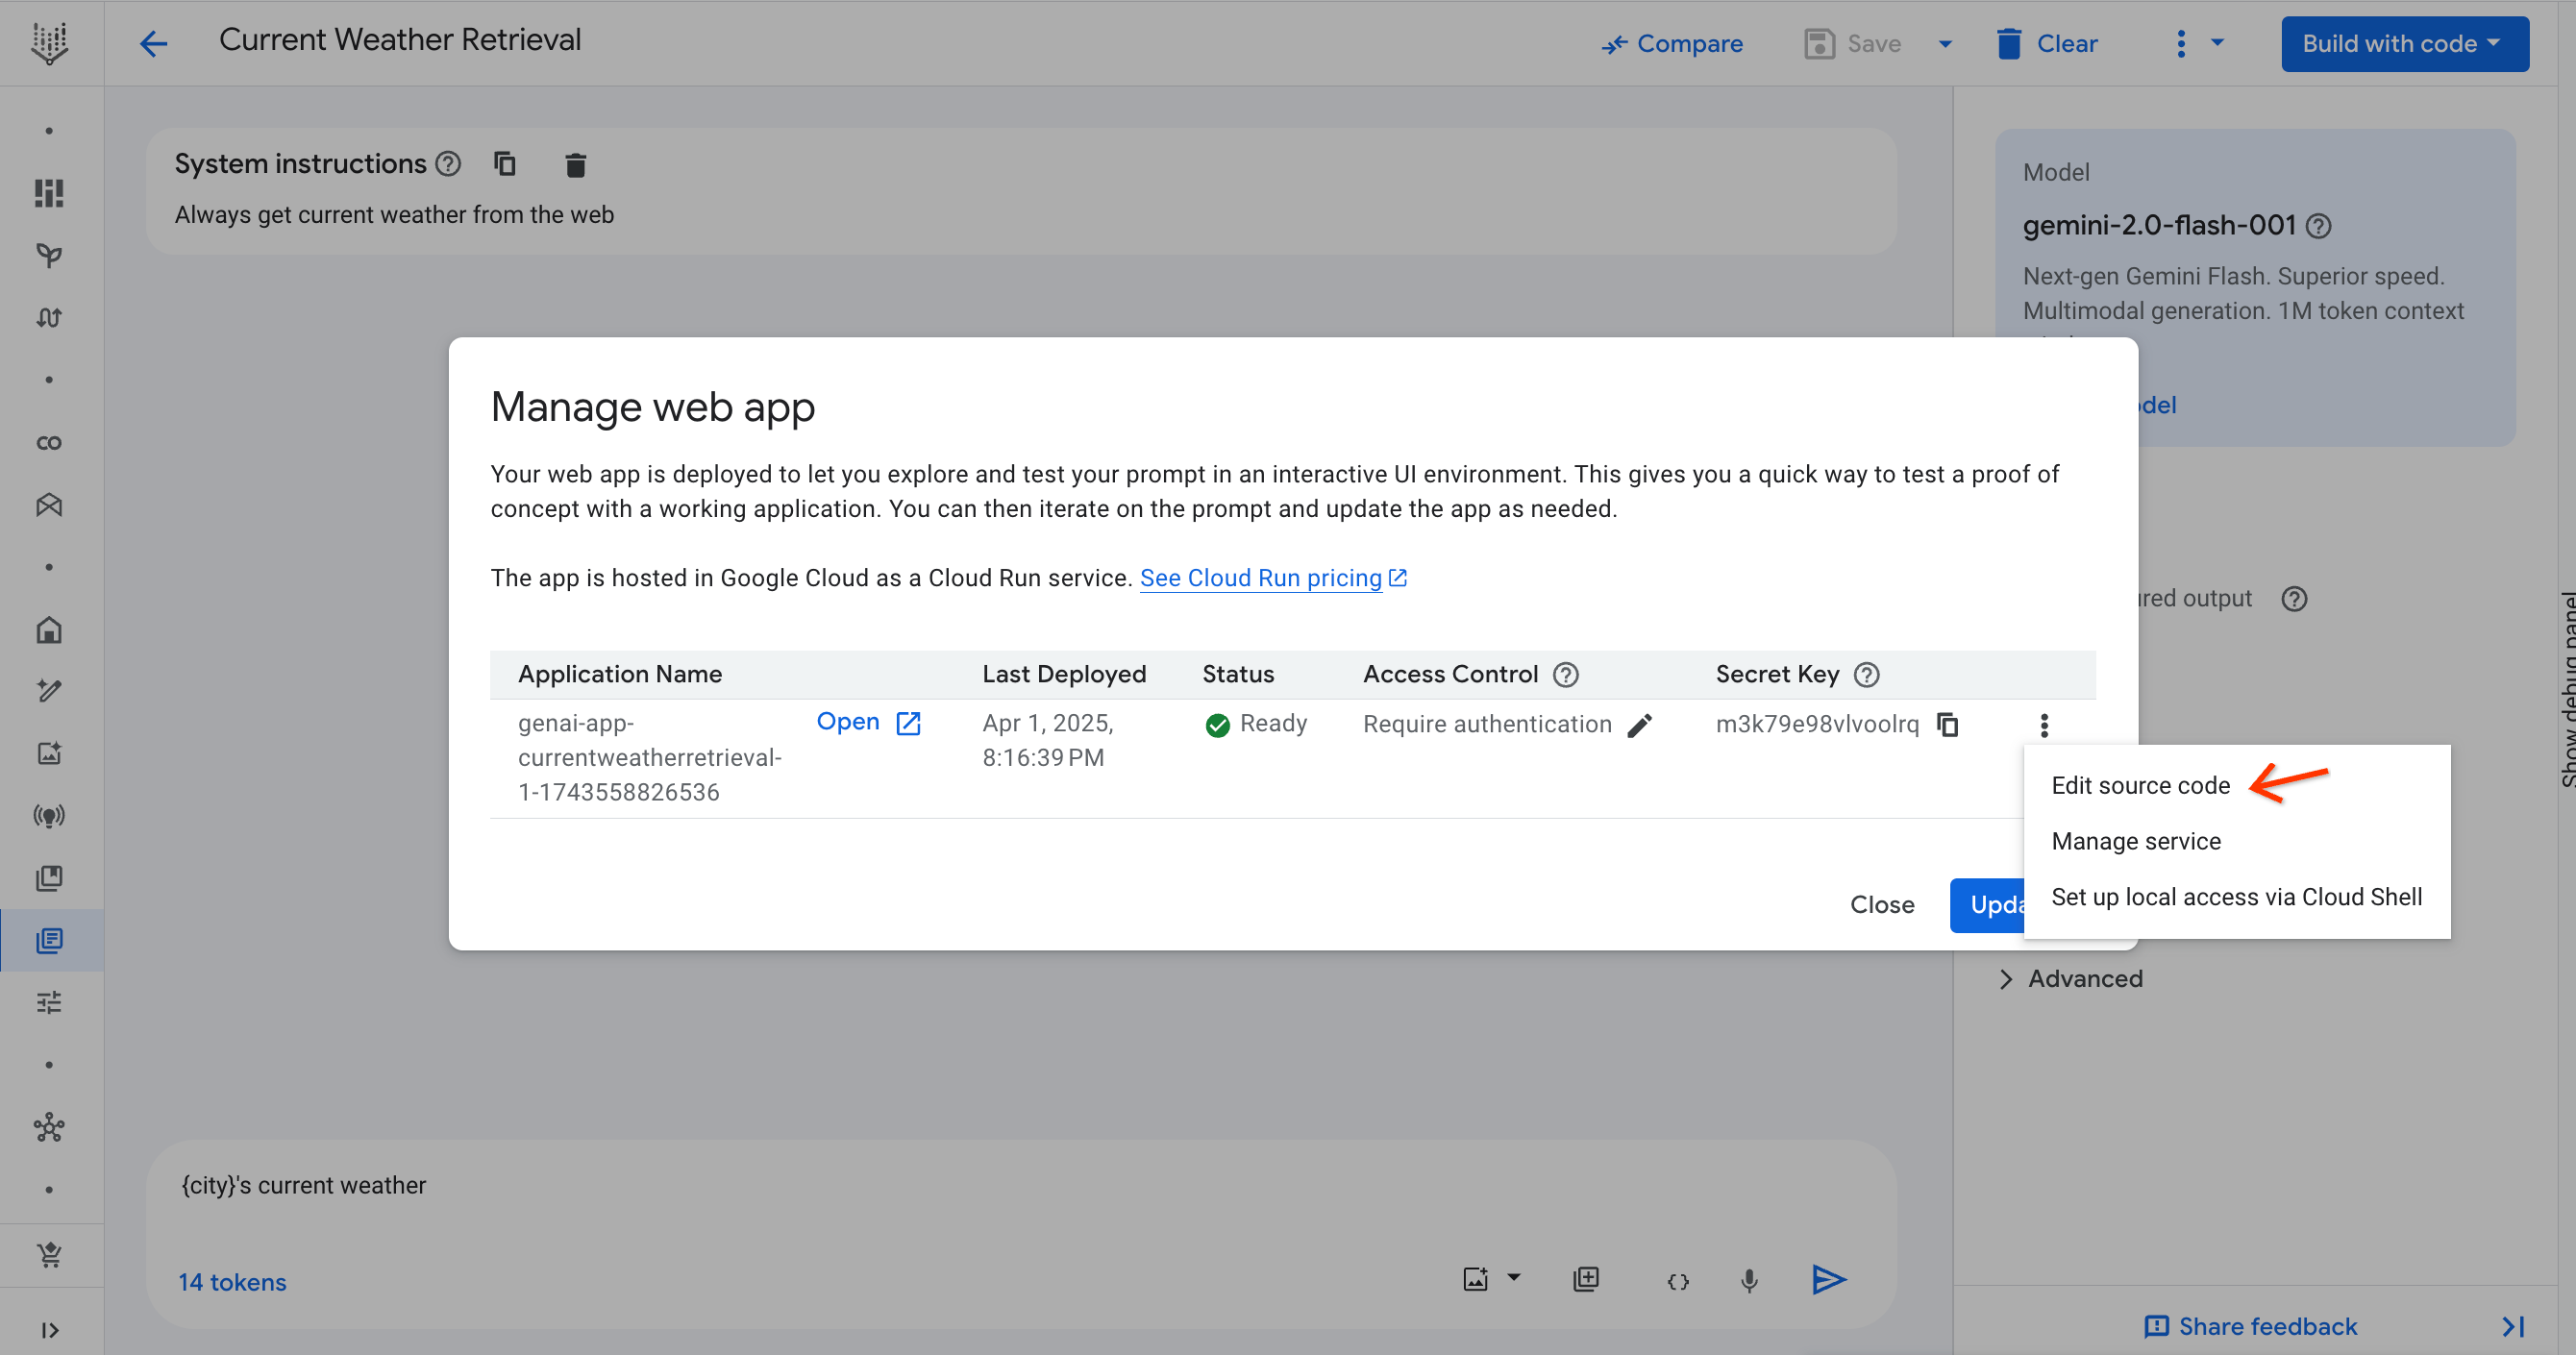
Edit source code in Cloud Run
If you want to customize the web application, you can make changes to the
source code in Cloud Run. Open the Cloud Run source code
page from the Manage web app dialog by clicking the
more icon button at the end of the row.
Alternatively, You can also navigate to the security page from the web application by clicking the source code editor link.
In the Cloud Run source code page, click Edit source to start editing mode. Once you are done, click Save and redeploy.
After the re-deployment is completed, you need to open the application from Vertex AI Studio. You can navigate to the Vertex AI Studio page from the link in the Deployed from Vertex AI badge.
Grant access
To grant users or groups access to the app, follow the steps:
- Open the Manage Web App dialog.
- Click the pencil icon in the Access Control column. The Cloud Run security page opens in a new tab.
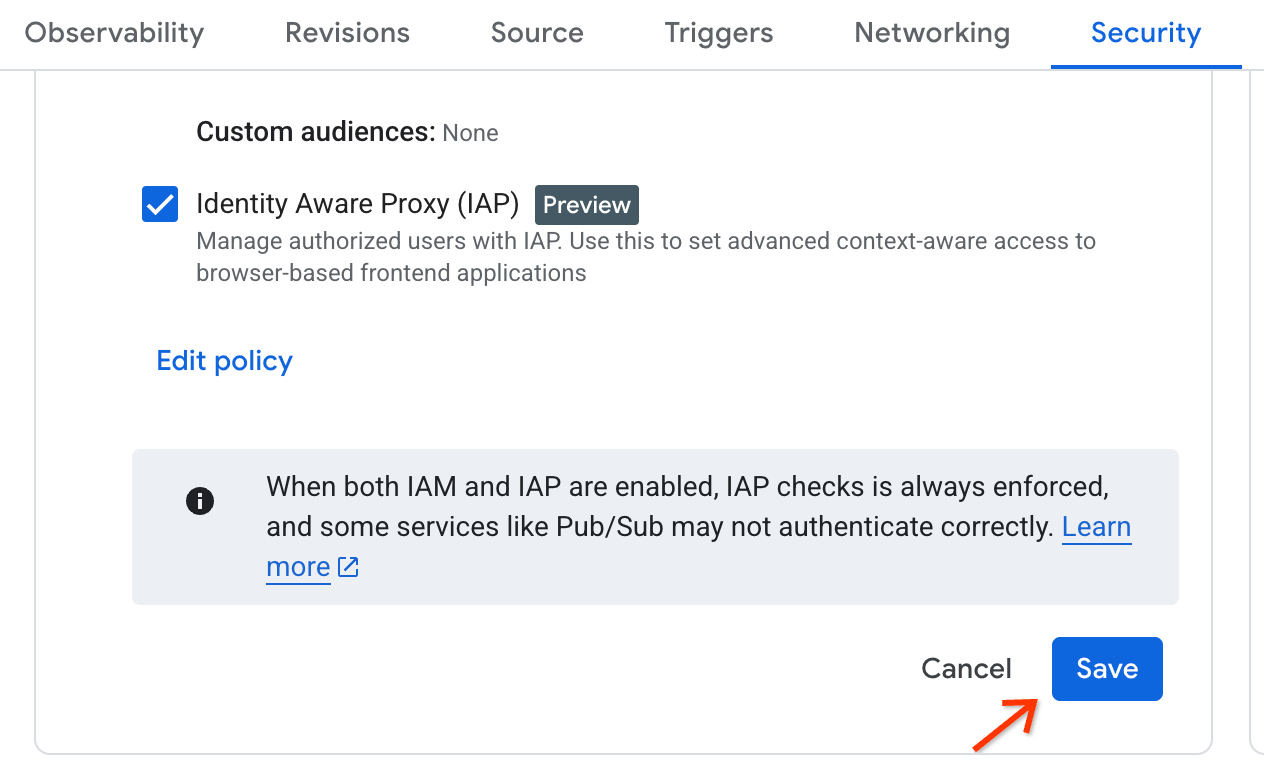
- On the Cloud Run security page, find the checkbox for Identity-Aware Proxy (IAP). Make sure it is checked, and then click Edit Policy.
-
A subtask will show up to let you edit access. Enter user or group emails to the Principal field.
If you are a user in an organization, you can only add users from the same organization.
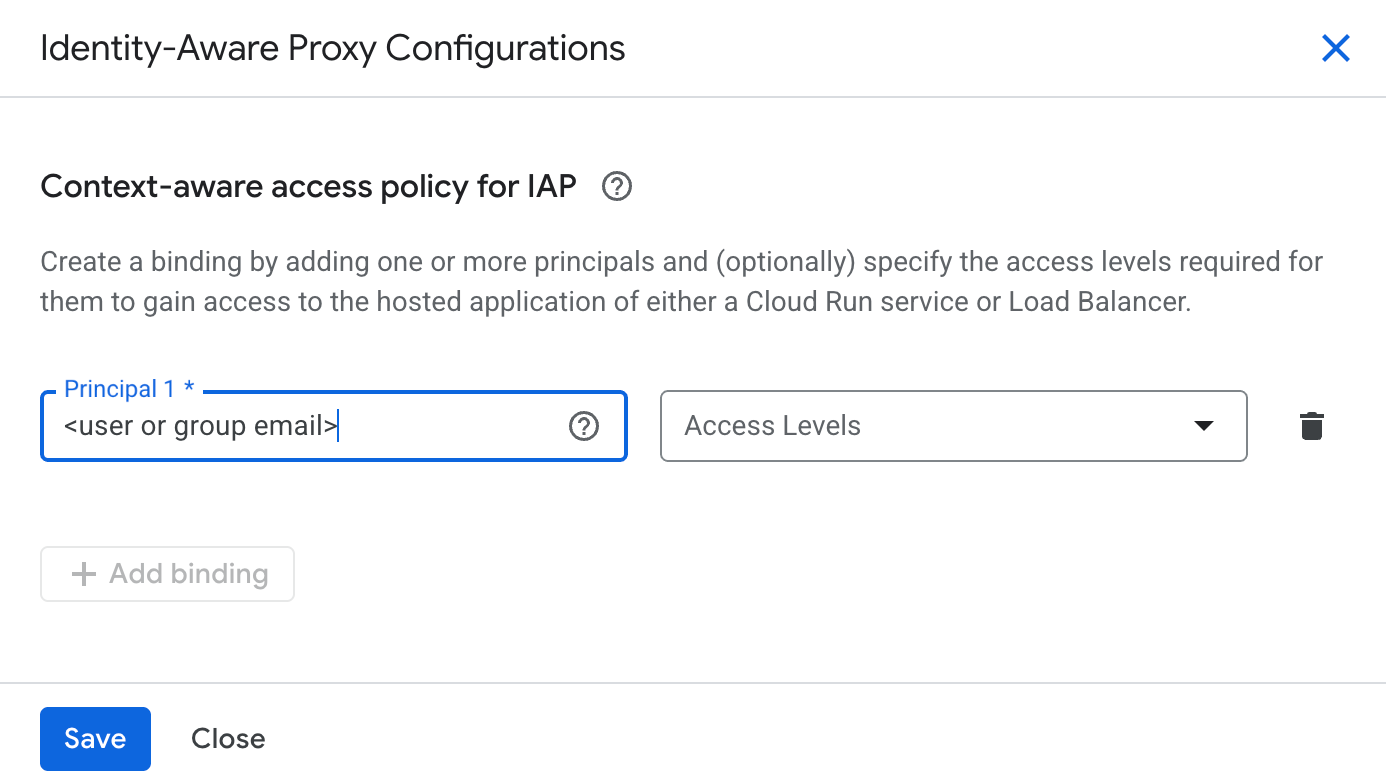
- Leave the access levels field empty.
- Click Save.
-
After the subtask is closed, click Save again in the Cloud Run page.
Turn off public access
When you don't need the web application to be publicly accessible, you can turn it off in Cloud Run. Open the Manage Web App dialog, and click the pencil icon in the Access Control column. The Cloud Run security page will open in a new tab.
You can also navigate to the security page from the web application by clicking the Security settings link.
In the Security page of your web application's corresponding Cloud Run service, check Use Cloud IAM to authenticate incoming requests and choose Require authentication. Click Save.
This will result in your web application no longer being accessible through the URL. You will see an Error: Forbidden page if you try to access it.
Turn on public access again
If you want to turn back public access, clear the Use Cloud IAM to authenticate incoming requests checkbox and save. If you choose the Allow unauthenticated invocations, it won't work if your project is in an organization. See authentication in Cloud Run for more details.
Set up local access for development
In the Public Preview, access control is not yet supported. Therefore, once you turn off public access, the only way you can access the web application is by setting up a local proxy. You can do this through gcloud commands. First, open Cloud Shell through the terminal icon button in the top right corner of the Google Cloud console. It will ask you to authorize Cloud Shell. Click Authorize to continue.
Once it is done, open the Manage web app dialog and click the
more icon button at the end of the row to see more actions. Click Set up
local access via Cloud Shell.
A command will be added to your Cloud Shell. Press enter and wait for it to
finish printing. Click the link in the line starting with Click on the
link to preview. You will be able to view your application. This link
only works when you have the gcloud command running.

Common issues
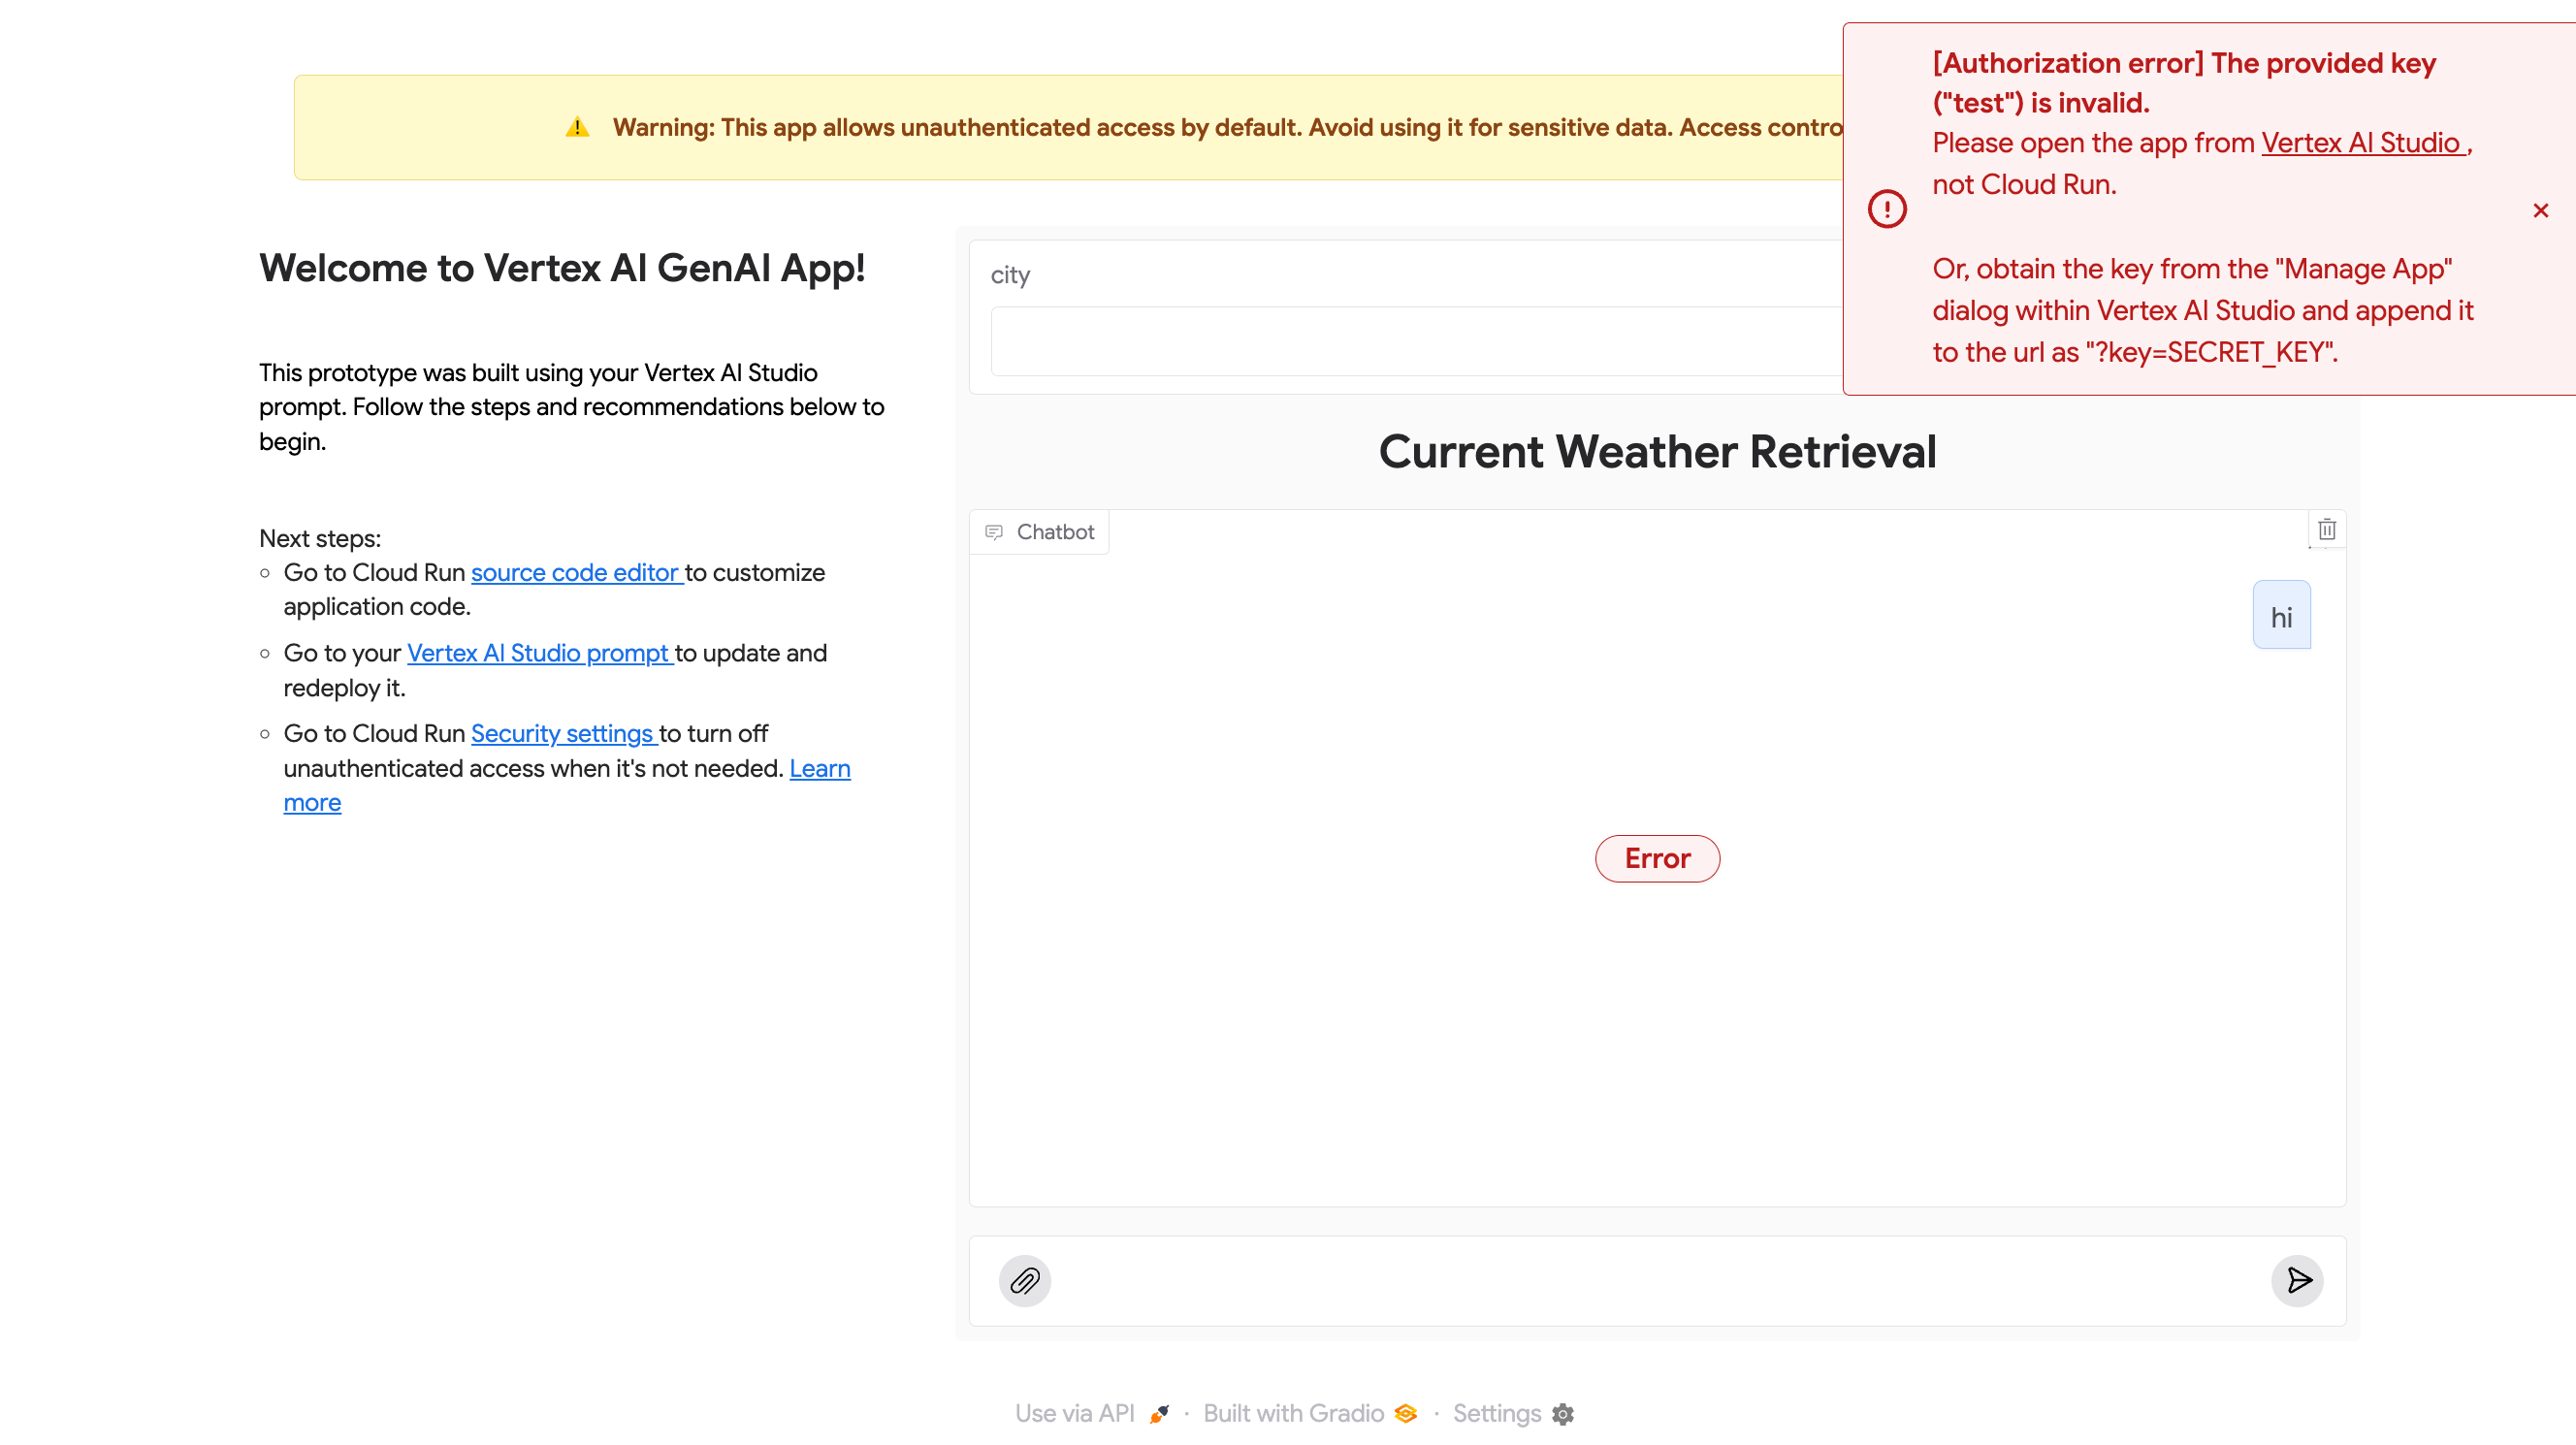
Authentication error: No secret key
If you see the following error, it means no secret key is appended to the
URL. Follow the instructions to open the web
application from Vertex AI Studio, or copy the secret key from
the Manage app dialog and append it to the URL in the format of
?key=SECRET_KEY.

Authentication error: Invalid secret key
The following error means that the key appended to the URL is invalid. The secret key is unique to each prompt. If you have a secret key from another prompt, it won't work. Follow the instructions to open the web application properly.
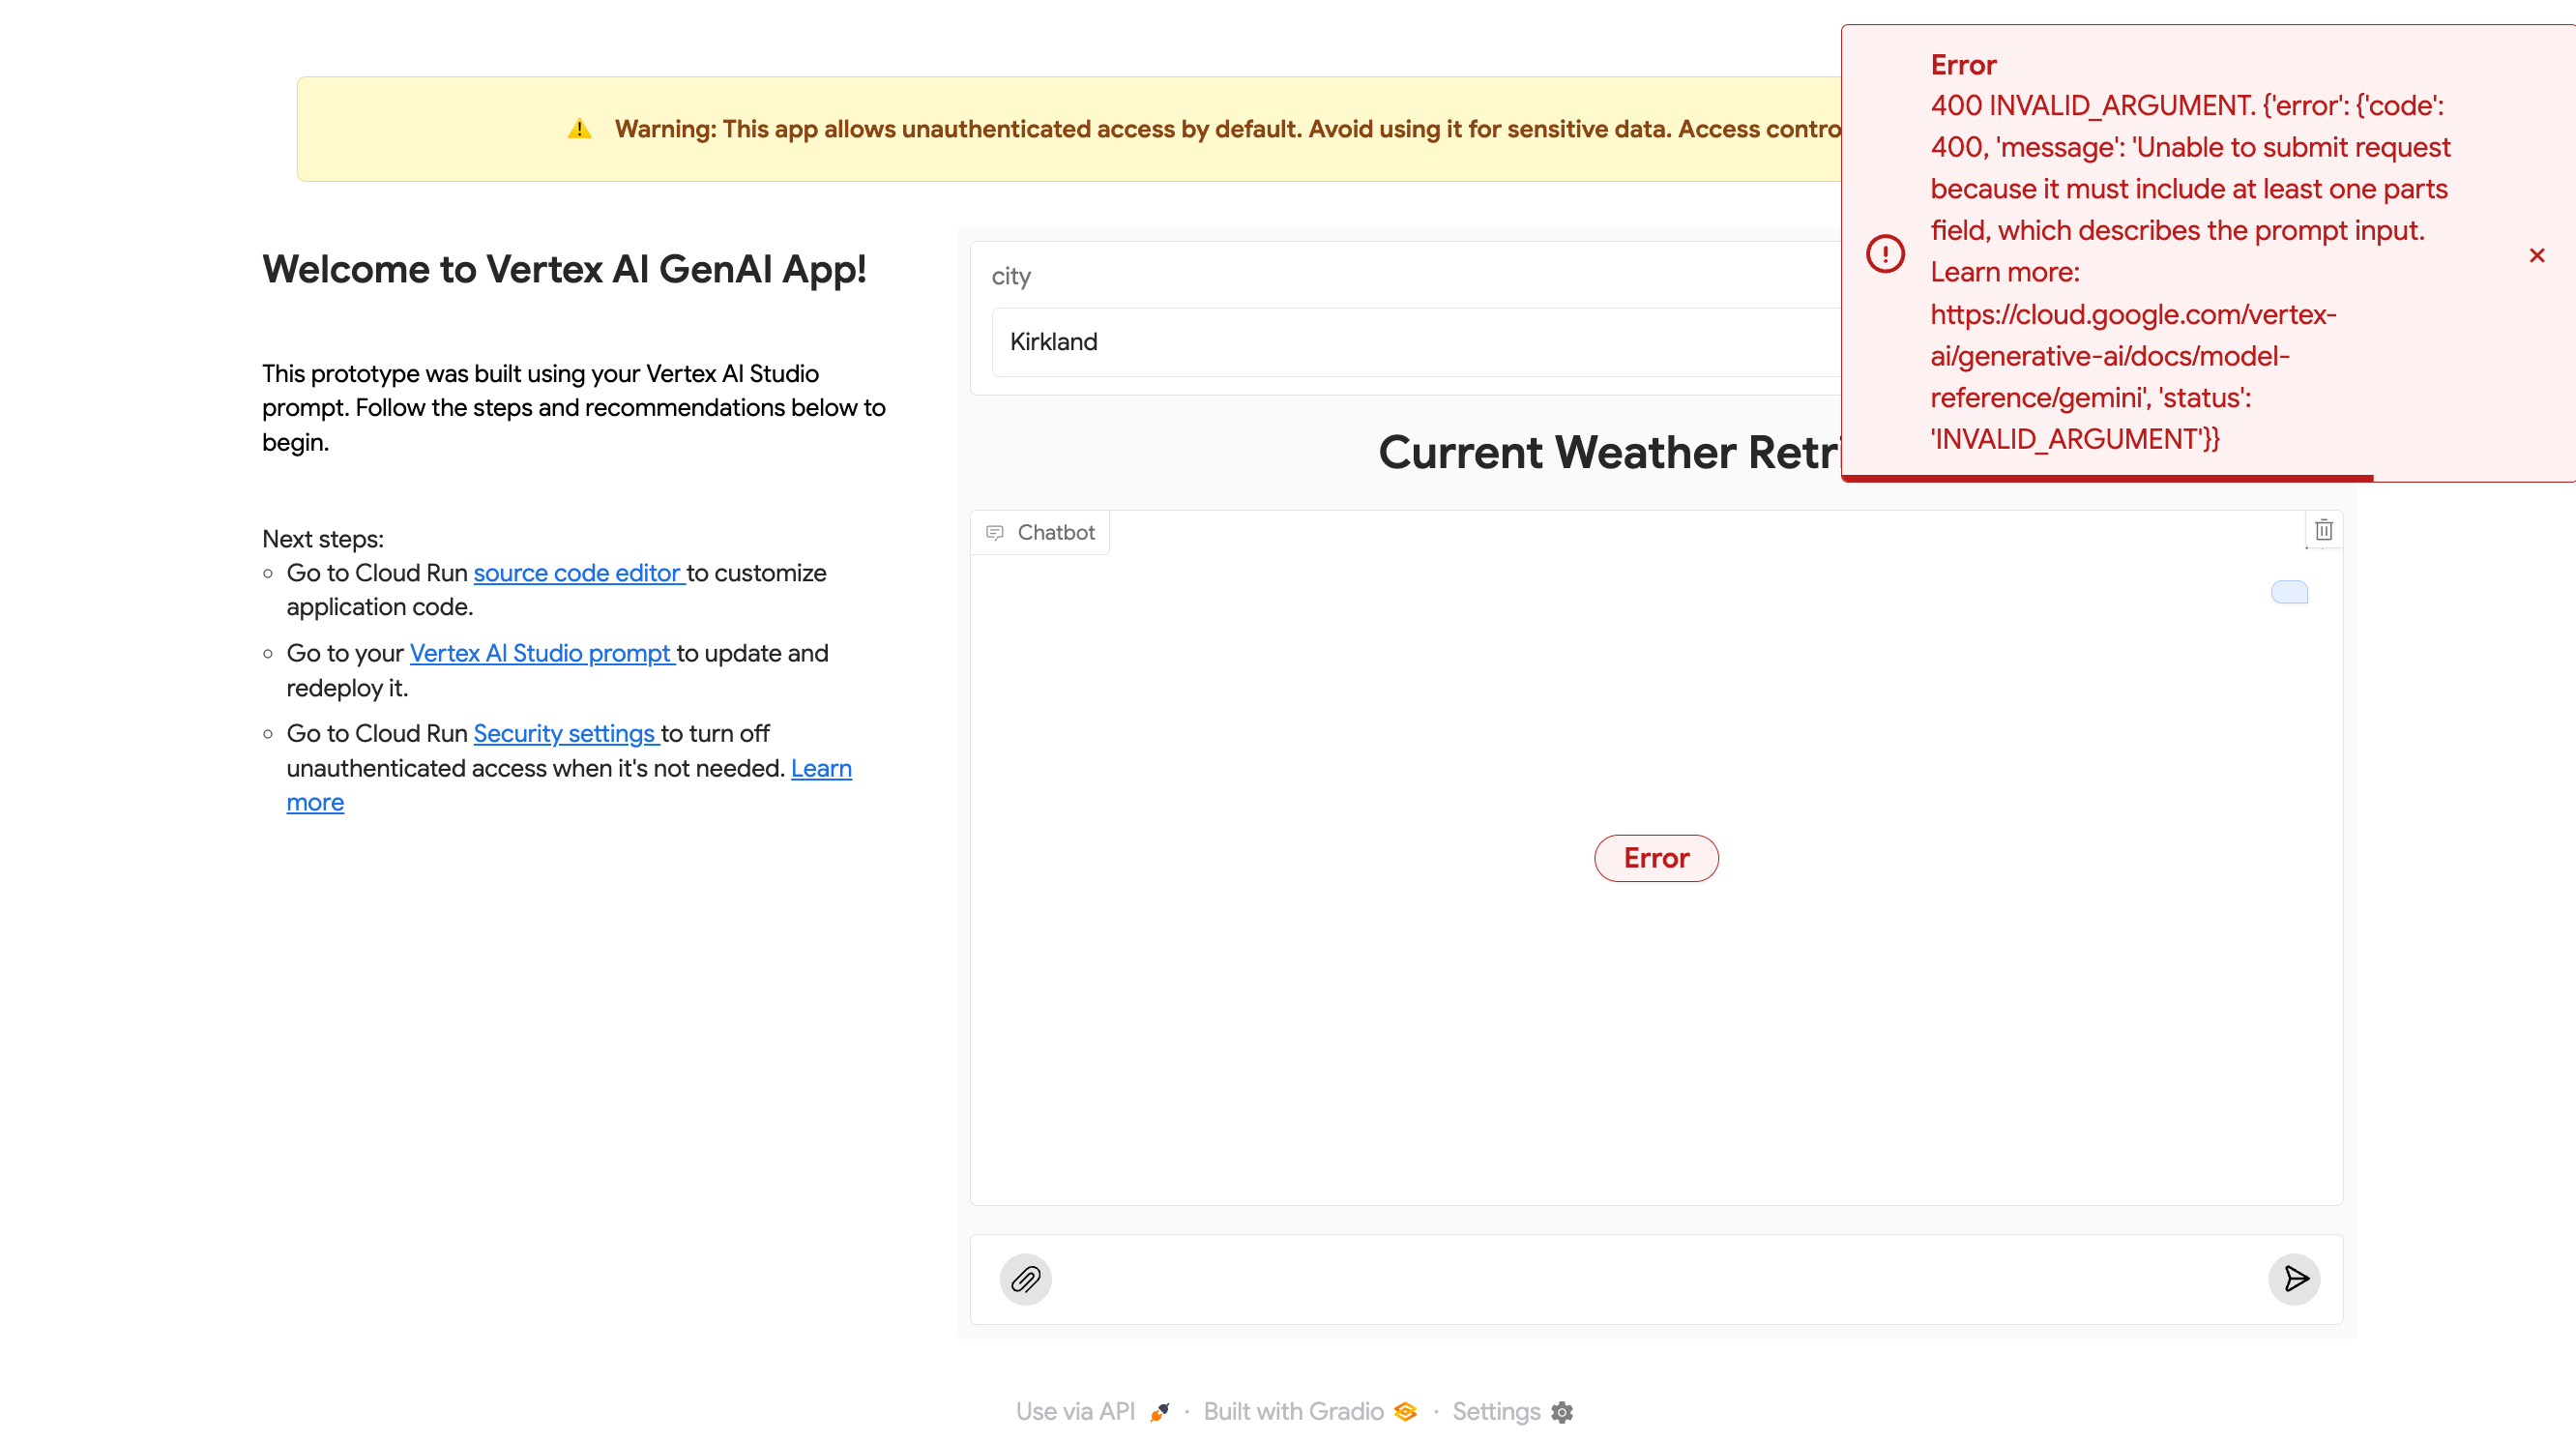
400 Invalid argument: empty input
The following error happens when you have inputs in the prompt variable, but the chat is empty; a 400 error message will appear. You can fix this by typing anything non-empty and resubmitting.
400 Invalid argument: mimeType is not supported
If you choose a file type that the model does not support, it will return a 400 error. This is expected, and you will have to use other types of files supported by the model. See the documentation for multimodal support for each model.
Next steps
Check out more features in Vertex AI Studio in the documentation or the Introduction to Vertex AI Studio Google Cloud Skills Boost course.
Check out pricing for Cloud Run.
Check out authentication in Cloud Run.