Controlled Customization lets you to create new images based on a source image or a source image signal (canny edge or scribble). This page shows you how to send two types of Controlled Customization requests:
Imagen 3 Controlled Customization (GA feature)
Imagen 2 Controlled Customization - canny edge or scribble source image signal (Preview feature)
Use cases
Imagen 3 Controlled Customization offers free-style prompting, which can give you the impression that the model can do more than it is trained to do. The following sections describe use cases and examples for Imagen 3 Controlled Customization.
The model has been trained on use cases that we provide, and we expect good results when you use Imagen 3 Controlled Customization. If you push the model to respond in unexpected ways, we don't expect good results.
Examples of intended use cases
The following are use cases that Imagen 3 Controlled Customization is trained to do and produces good results for:
Generate an image that follows the prompt and the canny edge control images.
Generate an image that follows the prompt and the scribble images.
Stylize a photo of a person while preserving the facial expression.
Examples of unintended use cases
The following are use cases that Imagen 3 Controlled Customization isn't trained to do and produces poor results for:
Generate an image using a style specified in the prompt.
Generate an image from text that follows a specific style provided by a reference image, with some level of control on the image composition using a control image.
Generate an image from text that follows a specific style provided by a reference image, with some level of control on the image composition using a control scribble.
Generate an image from text that follows a specific style provided by the reference image, with some level of control on the image composition using a control image. The person in the image has a specific facial expression.
Stylize a photo of two or more people, and preserve their facial expressions.
Stylize a photo of a pet, and turn it into a drawing. Preserve or specify the composition of the image (for example, watercolor).
Before you begin
- Sign in to your Google Cloud account. If you're new to Google Cloud, create an account to evaluate how our products perform in real-world scenarios. New customers also get $300 in free credits to run, test, and deploy workloads.
-
In the Google Cloud console, on the project selector page, select or create a Google Cloud project.
Roles required to select or create a project
- Select a project: Selecting a project doesn't require a specific IAM role—you can select any project that you've been granted a role on.
-
Create a project: To create a project, you need the Project Creator
(
roles/resourcemanager.projectCreator), which contains theresourcemanager.projects.createpermission. Learn how to grant roles.
-
Verify that billing is enabled for your Google Cloud project.
-
Enable the Vertex AI API.
Roles required to enable APIs
To enable APIs, you need the Service Usage Admin IAM role (
roles/serviceusage.serviceUsageAdmin), which contains theserviceusage.services.enablepermission. Learn how to grant roles. -
Set up authentication for your environment.
Select the tab for how you plan to use the samples on this page:
Console
When you use the Google Cloud console to access Google Cloud services and APIs, you don't need to set up authentication.
REST
To use the REST API samples on this page in a local development environment, you use the credentials you provide to the gcloud CLI.
Install the Google Cloud CLI. After installation, initialize the Google Cloud CLI by running the following command:
gcloud initIf you're using an external identity provider (IdP), you must first sign in to the gcloud CLI with your federated identity.
For more information, see Authenticate for using REST in the Google Cloud authentication documentation.
Customization prompt writing
The prompt you use with Imagen 3 Customization might affect the quality of your generated images. Use the following prompt templates as a starting point for writing customization prompts. You might need to send several requests to get your targeted output.
| Use case | Reference images | Prompt template | Example |
|---|---|---|---|
| Controlled customization | Scribble map (1) | Generate an image that aligns with the scribble map [1] to match the description: ${STYLE_PROMPT} ${PROMPT}. | Generate an image that aligns with the scribble map [1] to match the description: The image should be in the style of an impressionistic oil painting with relaxed brushstrokes. It possesses a naturally-lit ambience and noticeable brushstrokes. A side-view of a car. The car is parked on a wet, reflective road surface, with city lights reflecting in the puddles. |
| Controlled customization | Canny control image (1) | Generate an image aligning with the edge map [1] to match the description: ${STYLE_PROMPT} ${PROMPT} | Generate an image aligning with the edge map [1] to match the description: The image should be in the style of an impressionistic oil painting, with relaxed brushstrokes. It posses a naturally-lit ambience and noticeable brushstrokes. A side-view of a car. The car is parked on a wet, reflective road surface, with city lights reflecting in the puddles. |
| Person image stylization with FaceMesh input |
Subject image (1-3) FaceMesh control image (1) |
Create an image about SUBJECT_DESCRIPTION [1] in the pose of the CONTROL_IMAGE [2] to match the description: a portrait of SUBJECT_DESCRIPTION [1] ${PROMPT} | Create an image about a woman with short hair [1] in the pose of the control image [2] to match the description: a portrait of a woman with short hair [1] in 3D-cartoon style with a blurred background. A cute and lovely character, with a smiling face, facing the camera, pastel color tone, high quality, 4k, masterpiece, super details, skin texture, texture mapping, soft shadows, soft realistic lighting, vibrant colors |
| Person image stylization with FaceMesh input |
Subject image (1-3) FaceMesh control image (1) |
Create a ${STYLE_PROMPT} image about SUBJECT_DESCRIPTION [1] in the pose of the CONTROL_IMAGE [2] to match the description: a portrait of SUBJECT_DESCRIPTION [1] ${PROMPT} | Create a 3D-cartoon style image about a woman with short hair [1] in the pose of the control image [2] to match the description: a portrait of a woman with short hair [1] in 3D-cartoon style with a blurred background. A cute and lovely character with a smiling face, facing the camera, pastel color tone, high quality, 4k, masterpiece, super details, skin texture, texture mapping, soft shadows, soft realistic lighting, vibrant colors |
Send a Imagen 3 Controlled Customization request
Use the following samples to send a Imagen 3 Controlled Customization request:
REST
Before using any of the request data, make the following replacements:
- PROJECT_ID: Your Google Cloud project ID.
- LOCATION: Your project's region. For example,
us-central1,europe-west2, orasia-northeast3. For a list of available regions, see Generative AI on Vertex AI locations. - TEXT_PROMPT: The text prompt guides what images the model
generates. To use Imagen 3 Controlled Customization, include the
referenceIdof the control reference image you provide in the format [$referenceId]. For example:- Generate an image aligning with the scribble map [1] to match the description: [image description].
- BASE64_CONTROL_IMAGE: The base control image (sketch). The
image must be specified as a base64-encoded byte
string.
ForCONTROL_TYPE_SCRIBBLE: The expected scribble control image has black background and white scribble line.
ForCONTROL_TYPE_CANNY: The expected canny edge control image has black background and white canny edges.
- CONTROL_TYPE: The type of the control signal. Use
CONTROL_TYPE_CANNYfor canny edge. UseCONTROL_TYPE_SCRIBBLEfor scribble. enableControlImageComputation: Set tofalseif you provide your own control image. In this case,B64_BASE_IMAGEshould be the control signal image. Set totrueif you want to let Imagen compute the control image from the reference image. In this case,B64_BASE_IMAGEshould be the raw RGB image.- IMAGE_COUNT: The number of generated images. Accepted integer values: 1-4. Default value: 4.
HTTP method and URL:
POST https://LOCATION-aiplatform.googleapis.com/v1/projects/PROJECT_ID/locations/LOCATION/publishers/google/models/imagen-3.0-capability-001:predict
Request JSON body:
{
  "instances": [
    {
      "prompt": "TEXT_PROMPT",
      "referenceImages": [
        {
          "referenceType": "REFERENCE_TYPE_CONTROL",
          "referenceId": 1,
          "referenceImage": {
            "bytesBase64Encoded": "BASE64_CONTROL_IMAGE"
          },
          "controlImageConfig": {
            "controlType": "CONTROL_TYPE",
            "enableControlImageComputation": false
          }
        }
      ]
    }
  ],
  "parameters": {
    "sampleCount": IMAGE_COUNT
  }
}
To send your request, choose one of these options:
curl
Save the request body in a file named request.json,
and execute the following command:
curl -X POST \
     -H "Authorization: Bearer $(gcloud auth print-access-token)" \
     -H "Content-Type: application/json; charset=utf-8" \
     -d @request.json \
     "https://LOCATION-aiplatform.googleapis.com/v1/projects/PROJECT_ID/locations/LOCATION/publishers/google/models/imagen-3.0-capability-001:predict"
PowerShell
Save the request body in a file named request.json,
and execute the following command:
$cred = gcloud auth print-access-token
$headers = @{ "Authorization" = "Bearer $cred" }

Invoke-WebRequest `
    -Method POST `
    -Headers $headers `
    -ContentType: "application/json; charset=utf-8" `
    -InFile request.json `
    -Uri "https://LOCATION-aiplatform.googleapis.com/v1/projects/PROJECT_ID/locations/LOCATION/publishers/google/models/imagen-3.0-capability-001:predict" | Select-Object -Expand Content
"sampleCount": 2. The response returns two prediction objects, with
the generated image bytes base64-encoded.
{
  "predictions": [
    {
      "bytesBase64Encoded": "BASE64_IMG_BYTES",
      "mimeType": "image/png"
    },
    {
      "mimeType": "image/png",
      "bytesBase64Encoded": "BASE64_IMG_BYTES"
    }
  ]
}
Python
Scribble
Canny edge
Send an Imagen 2 Controlled Customization request
| Input image | Other parameters | Output image |
|---|---|---|
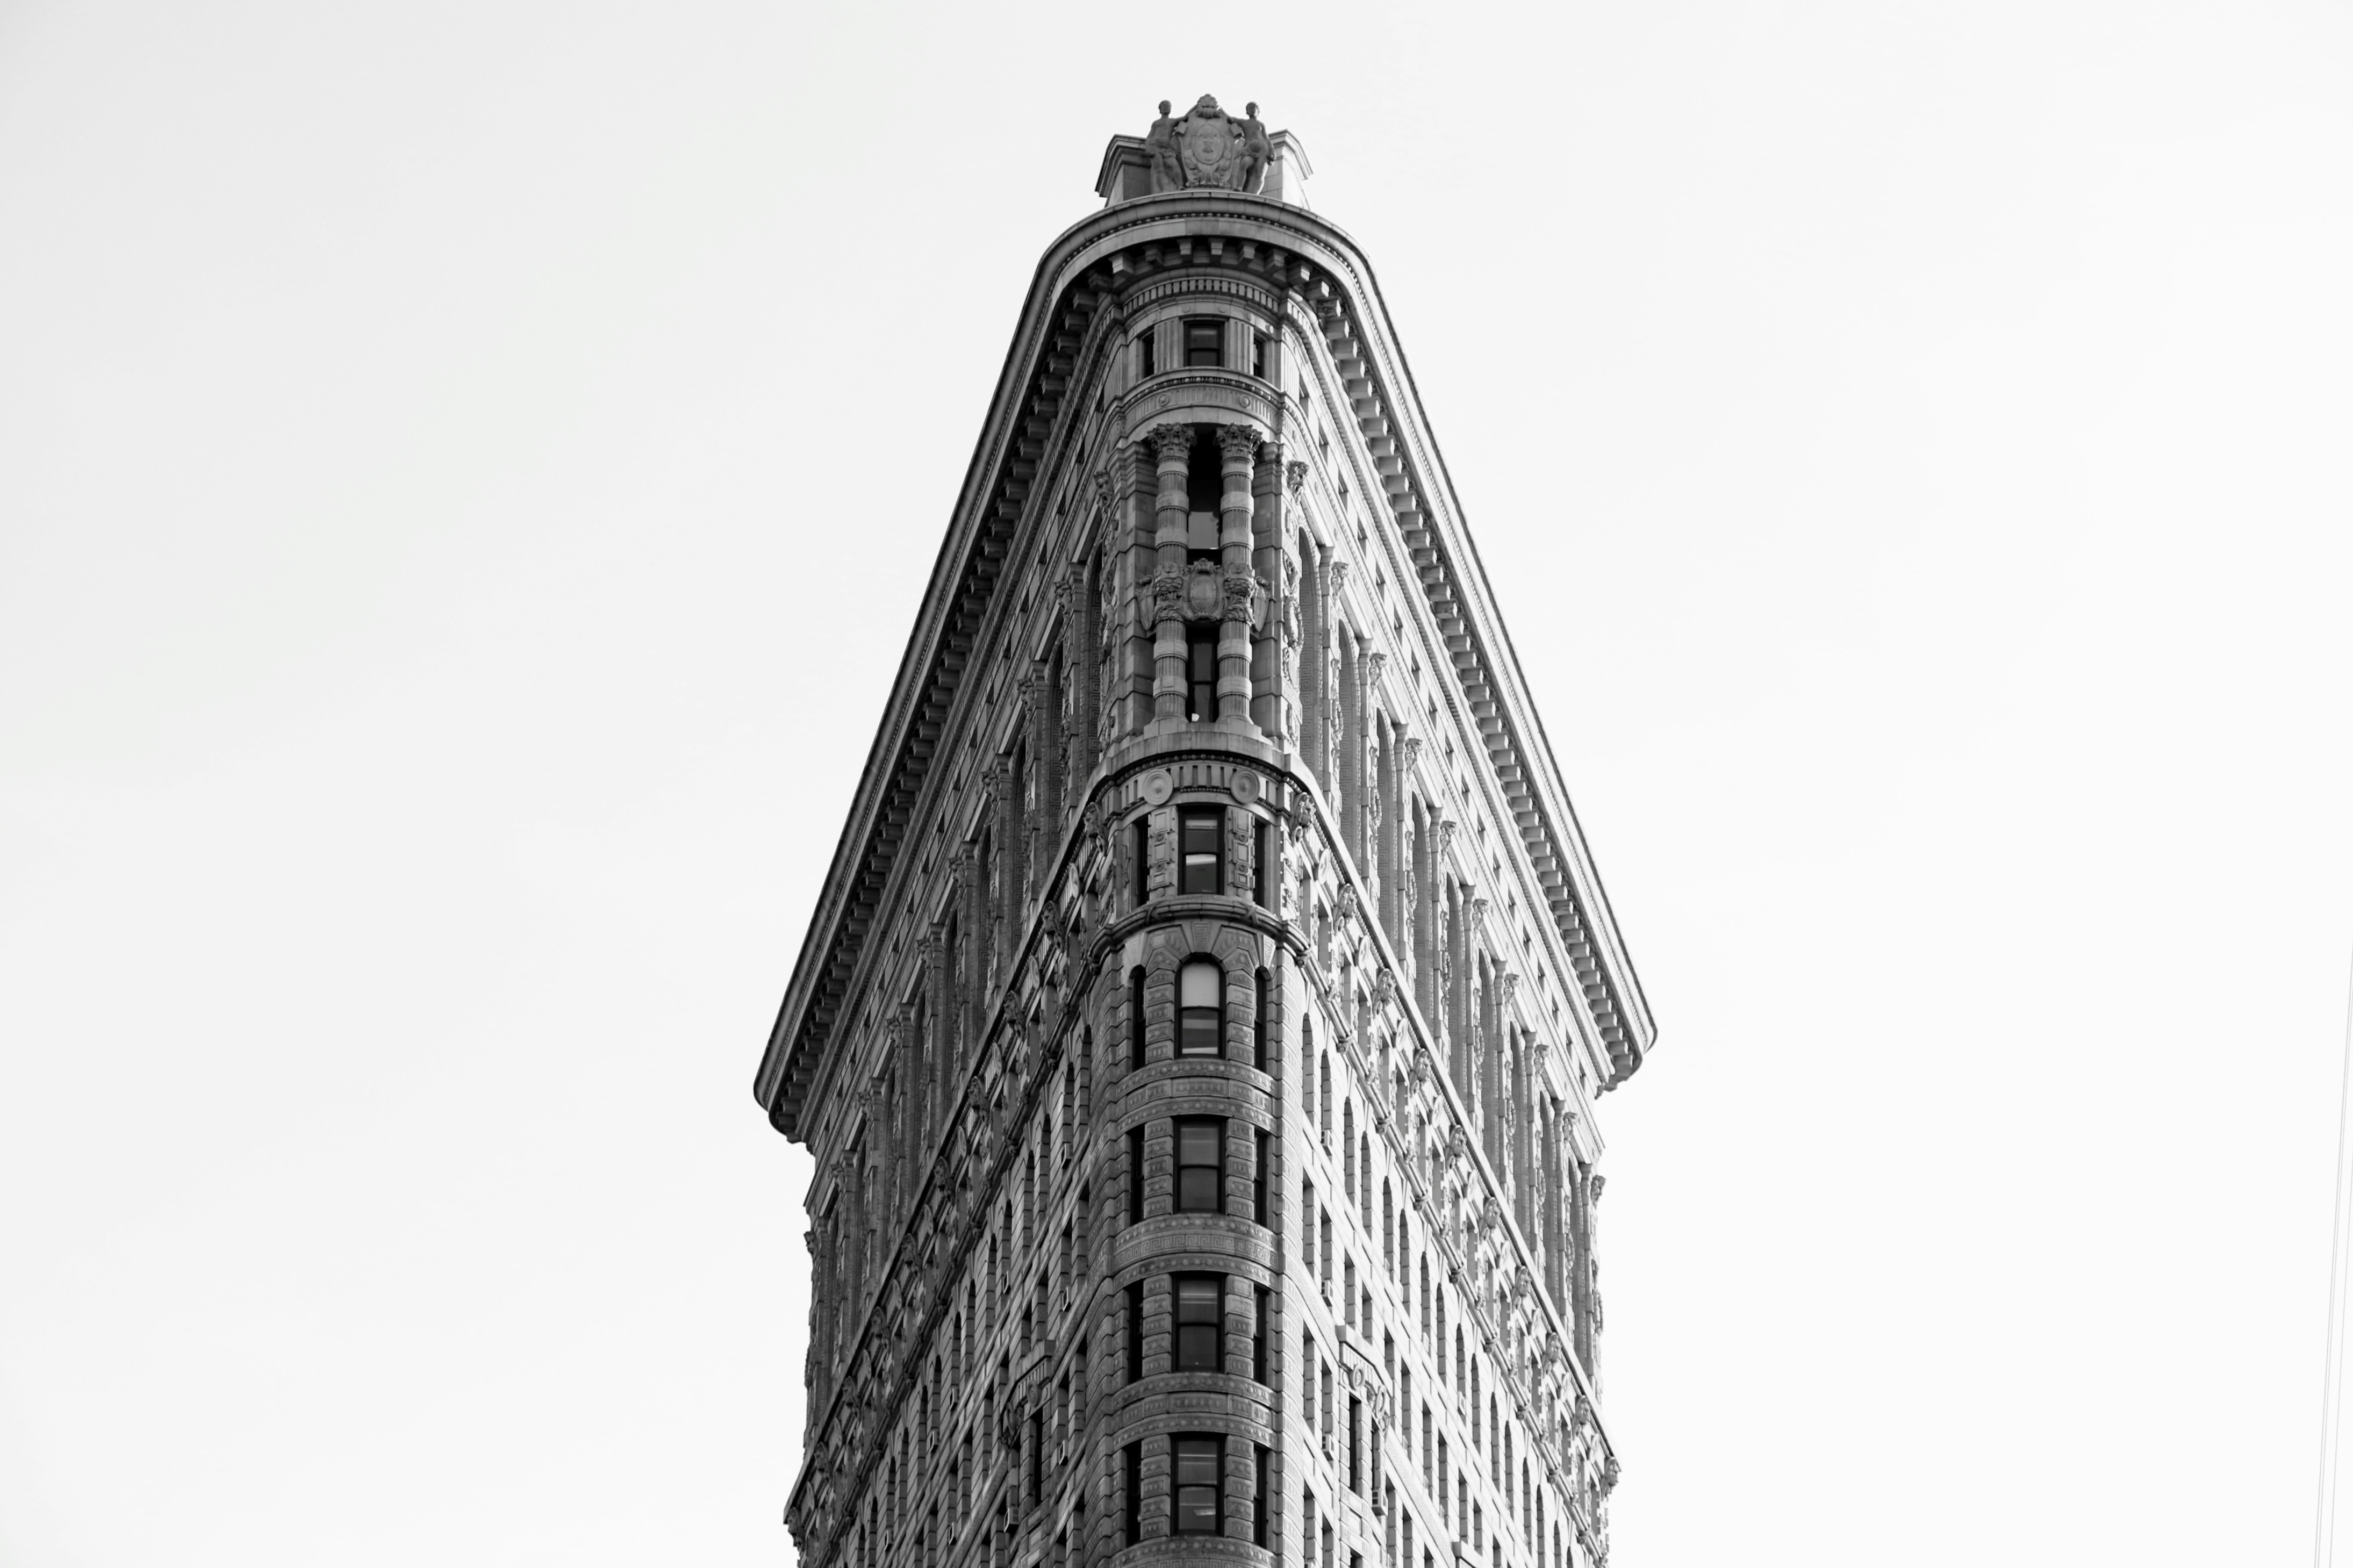
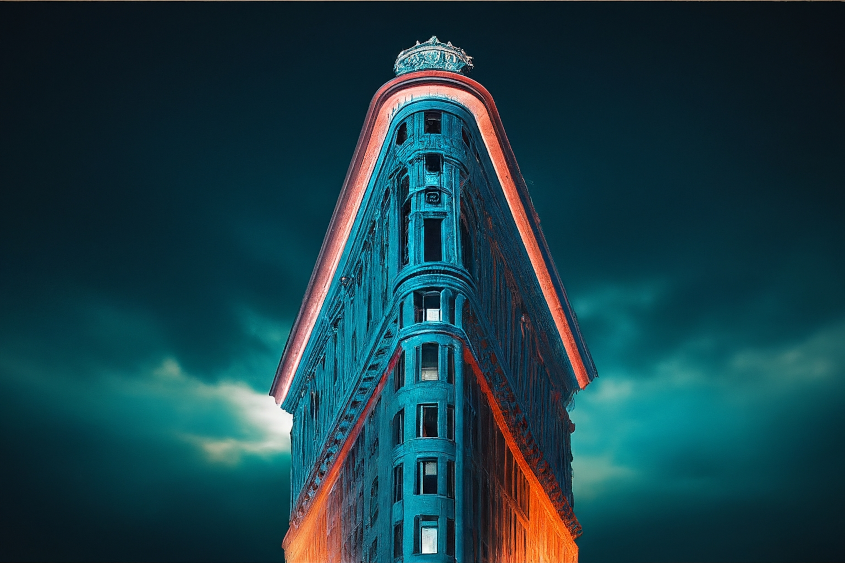
|
Prompt: "digital art version" Negative prompt: "black and white" Guide image type: Standard RGB Control condition: canny edge Imagen Control scale: 0.95 |
|
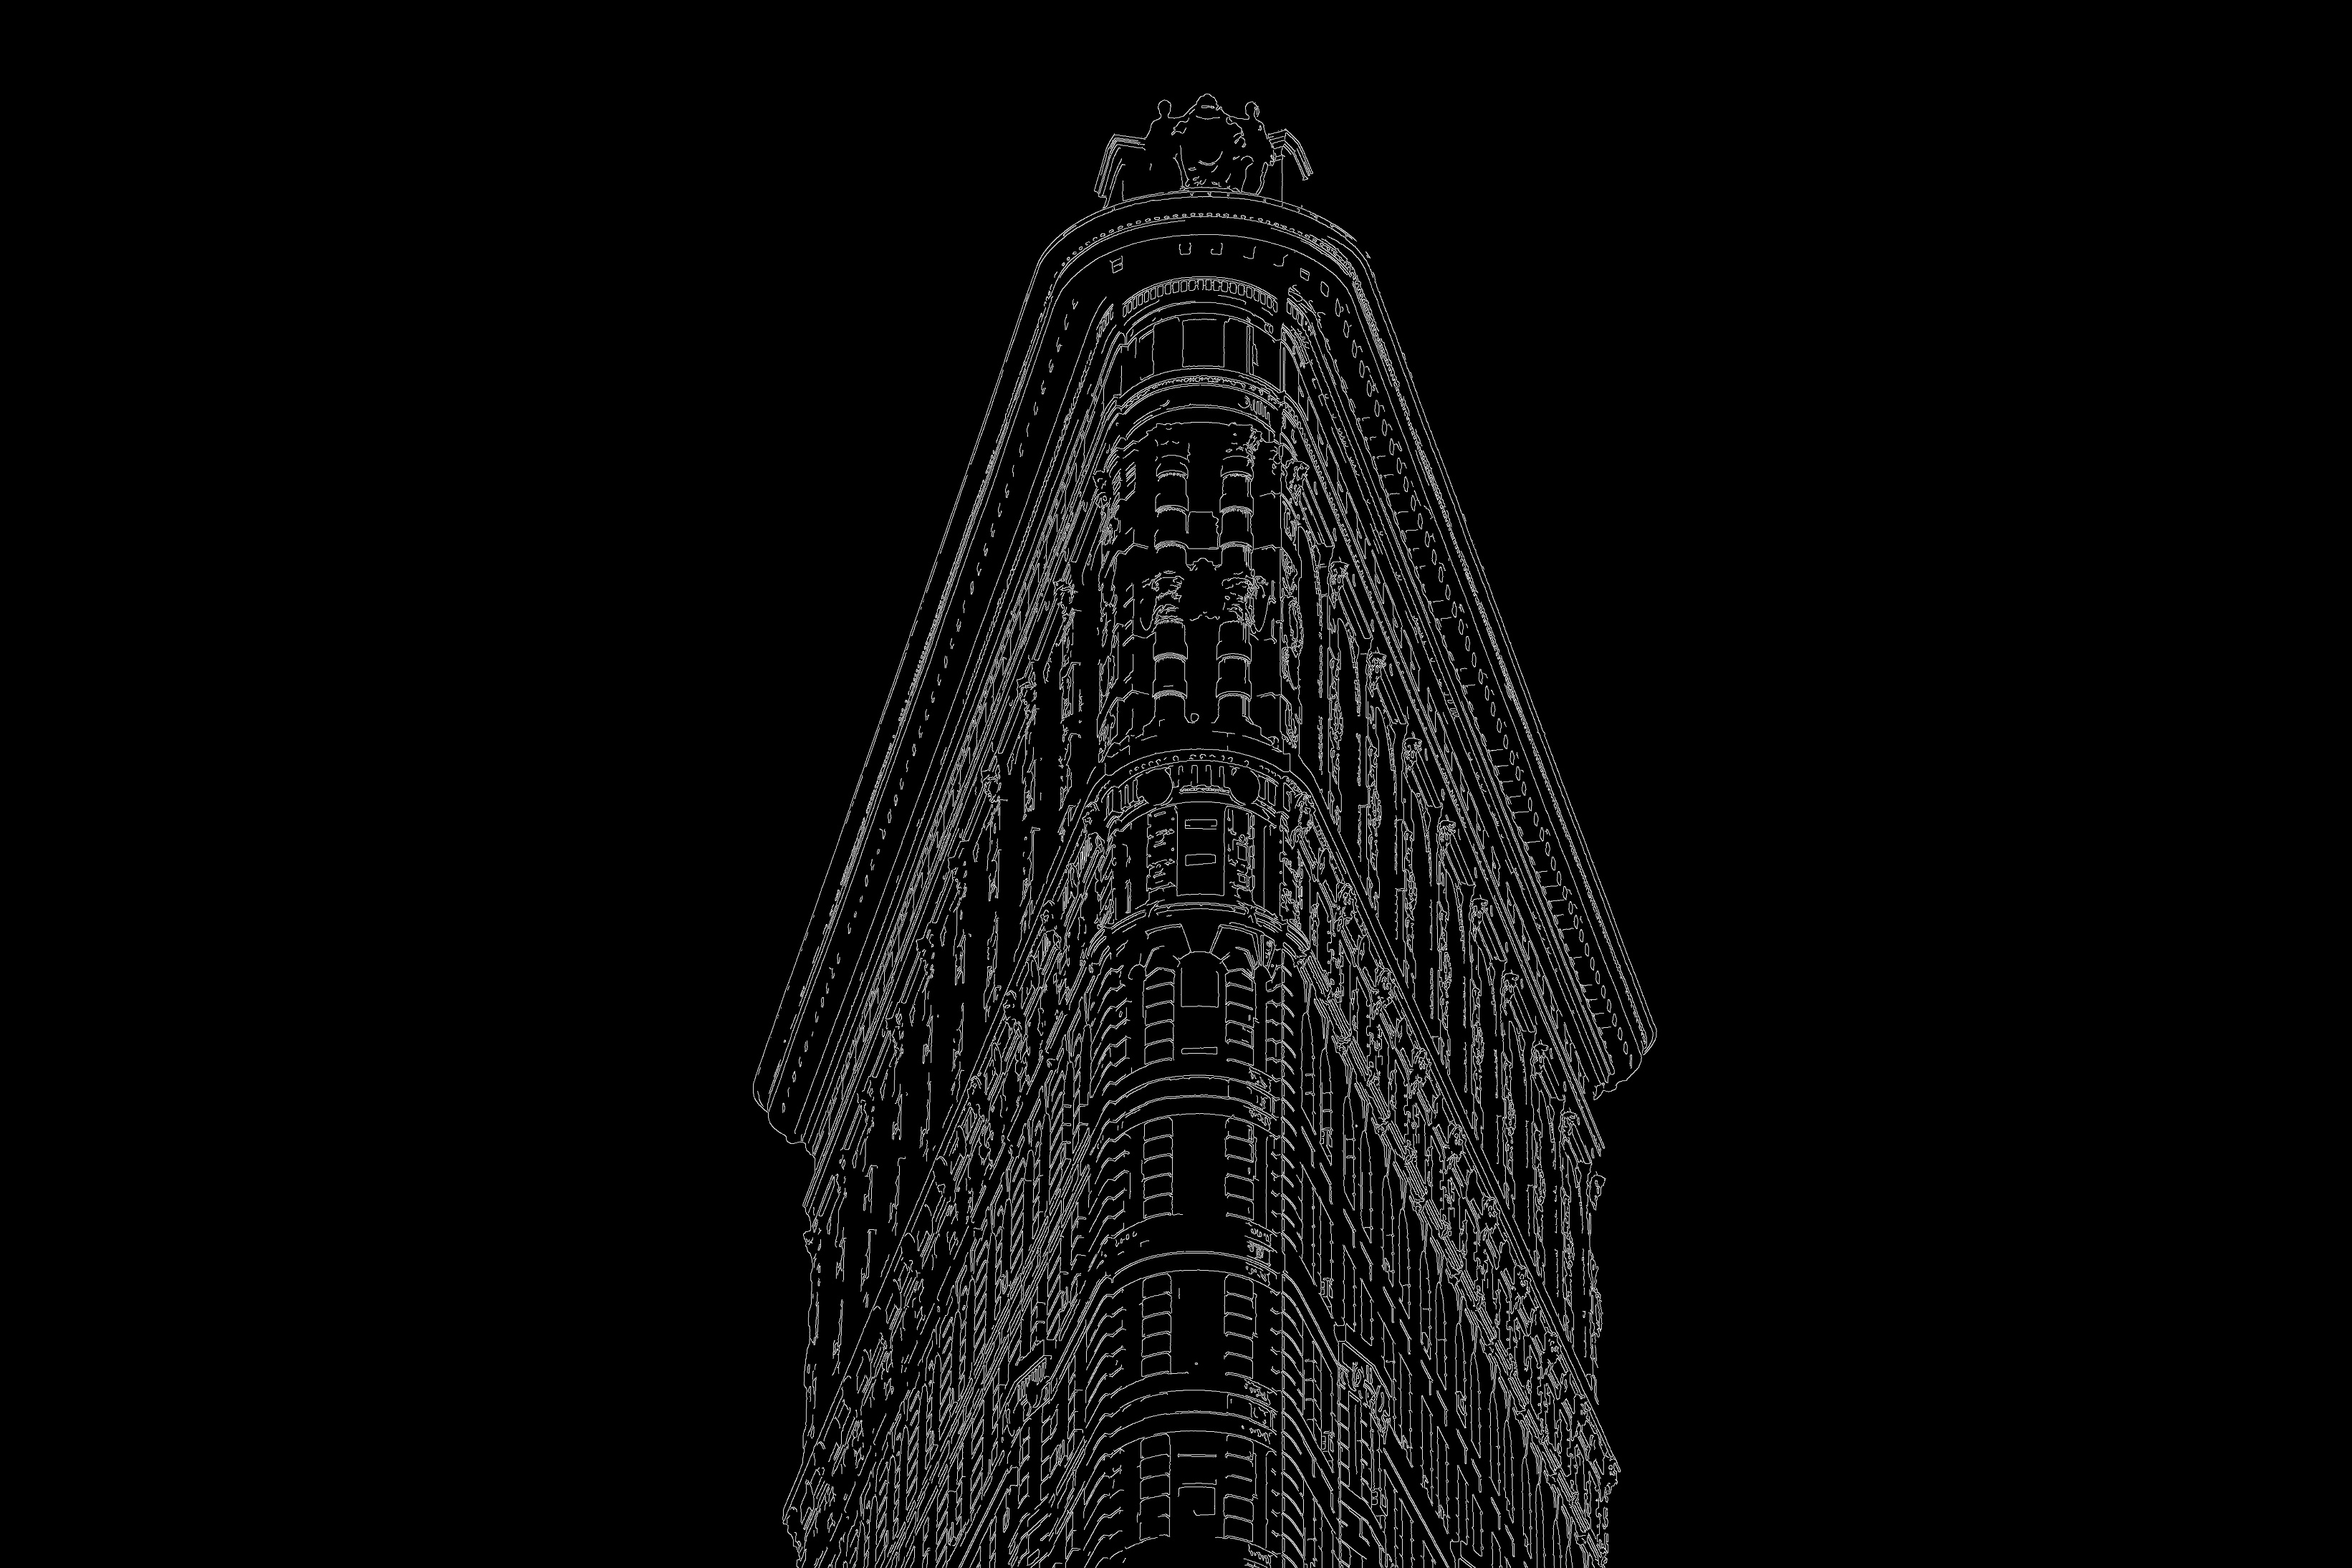
(canny edge detection applied). |
Prompt: "digital art version" Negative prompt: "black and white" Guide image type: canny edge Imagen Control scale: 0.95 |
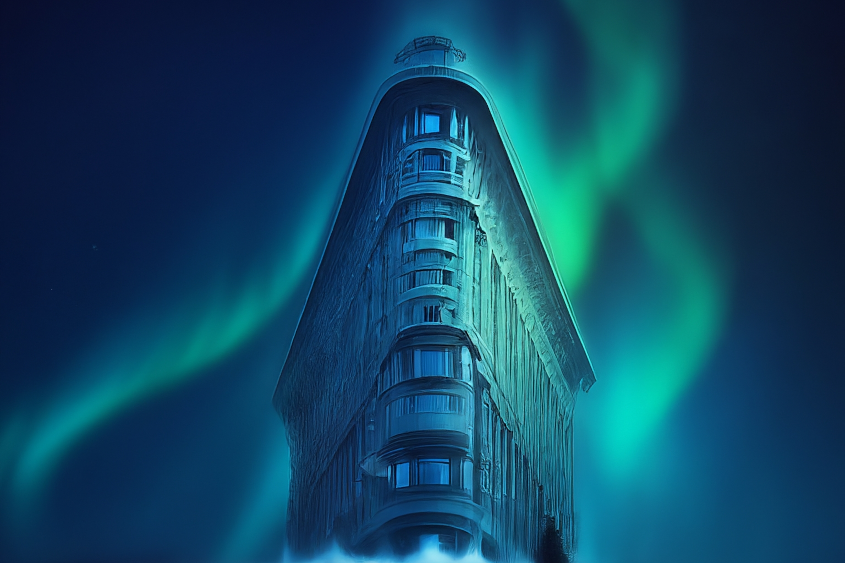
|
Use the following samples to send a Imagen 2 Controlled Customization request:
Console
-
In the Google Cloud console, go to the Vertex AI > Media Studio page.
-
In the lower task panel, click Edit image.
-
Click Upload to select your locally-stored image to edit.
-
In the Mode section of the Parameters panel, click Control.
-
Optional. Modify the Number of results, provide a Negative prompt, or modify the Advanced options > Region.
-
In the Advanced options section, select the Guide image type: Standard RGB, Canny edge, or Scribble.
-
In the Advanced options section, select the Control condition: Canny edge or Scribble.
-
In the prompt field (Write your prompt...), provide a text prompt.
-
Click Generate.
REST
Before using any of the request data, make the following replacements:
- PROJECT_ID: Your Google Cloud project ID.
- TEXT_PROMPT: The text prompt that guides what images the model generates. This field is required for both generation and editing.
- B64_BASE_IMAGE: The base image to edit or upscale. The image must be specified as a base64-encoded byte string. Size limit: 10 MB.
- EDIT_IMAGE_COUNT: The number of edited images. Default value: 4.
- NEGATIVE_PROMPT: A negative prompt to help generate the images. For example: "animals" (removes animals), "blurry" (makes the image clearer), "text" (removes text), or "cropped" (removes cropped images).
-
CONDITION:
string. The type of control image signal provided. Values:cannyEdgesorscribble. -
CONTROL_SCALE:
float. The strength of the control image signal. Values:0.0-1.0. Default value:0.95. Recommended range:0.9-1.0. -
SAMPLING_STEPS:
integer. The number of sampling steps. Values:1-30. Default:16. -
COMPUTE_CONDITION_MAP:
boolean. Whether to compute a condition map from your base input image. When set tofalse, the service expects the input image to be a scribble or canny edges, and the image is provided directly to the model. When set totrue, the service expects the input image to be an RGB image, and the service computes canny edges or scribble information from your input image based onconditionName. The service then provides the processed condition map to the model for image editing. When you provide scribble images, they should have a black background and white lines depict the object to be generated. Default:false.
HTTP method and URL:
POST https://us-central1-aiplatform.googleapis.com/v1/projects/PROJECT_ID/locations/us-central1/publishers/google/models/imagen-2.0-edit-preview-0627:predict
Request JSON body:
{
  "instances": [
    {
      "prompt": "TEXT_PROMPT",
      "image": {
        "bytesBase64Encoded": "B64_BASE_IMAGE"
      }
    }
  ],
  "parameters": {
    "sampleCount": EDIT_IMAGE_COUNT,
    "negativePrompt": "NEGATIVE_PROMPT",
    "controlPluginConfig":  {
      "conditions": [
        {
          "conditionName": "CONDITION",
          "controlScale": CONTROL_SCALE,
          "samplingSteps": SAMPLING_STEPS,
          "computeConditionMap": COMPUTE_CONDITION_MAP
        }
      ]
    }
  }
}
To send your request, choose one of these options:
curl
Save the request body in a file named request.json,
and execute the following command:
curl -X POST \
     -H "Authorization: Bearer $(gcloud auth print-access-token)" \
     -H "Content-Type: application/json; charset=utf-8" \
     -d @request.json \
     "https://us-central1-aiplatform.googleapis.com/v1/projects/PROJECT_ID/locations/us-central1/publishers/google/models/imagen-2.0-edit-preview-0627:predict"
PowerShell
Save the request body in a file named request.json,
and execute the following command:
$cred = gcloud auth print-access-token
$headers = @{ "Authorization" = "Bearer $cred" }

Invoke-WebRequest `
    -Method POST `
    -Headers $headers `
    -ContentType: "application/json; charset=utf-8" `
    -InFile request.json `
    -Uri "https://us-central1-aiplatform.googleapis.com/v1/projects/PROJECT_ID/locations/us-central1/publishers/google/models/imagen-2.0-edit-preview-0627:predict" | Select-Object -Expand Content
"sampleCount": 2. The response returns two prediction objects, with
the generated image bytes base64-encoded.
{
  "predictions": [
    {
      "bytesBase64Encoded": "BASE64_IMG_BYTES",
      "mimeType": "image/png"
    },
    {
      "mimeType": "image/png",
      "bytesBase64Encoded": "BASE64_IMG_BYTES"
    }
  ]
}
Product usage
To view usage standards and content restrictions associated with Imagen on Vertex AI, see the usage guidelines.
Model versions
There are multiple image generation models that you can use. For more information, see Imagen models.
What's next
Read articles about Imagen and other Generative AI on Vertex AI products:
- A developer's guide to getting started with Imagen 3 on Vertex AI
- New generative media models and tools, built with and for creators
- New in Gemini: Custom Gems and improved image generation with Imagen 3
- Google DeepMind: Imagen 3 - Our highest quality text-to-image model