Einige Produkte und Funktionen werden derzeit umbenannt. Auch die Funktionen für generative Playbooks und Abläufe werden zu einer einzigen konsolidierten Console migriert. Weitere Informationen
Mit Sammlungen den Überblick behalten
Sie können Inhalte basierend auf Ihren Einstellungen speichern und kategorisieren.
Mit einer Integration werden Endnutzerinteraktionen für Sie abgewickelt.
Sie müssen nur einen Agent erstellen, optional einen Webhook implementieren und die Integration konfigurieren.
In dieser Anleitung erfahren Sie, wie Sie mit der Integration von Dialogflow CX Messenger eine einfache Textchat-Benutzeroberfläche für Ihren Agent bereitstellen.
Hinweise
Wenn Sie keine Integration verwenden möchten, können Sie diese Kurzanleitung überspringen.
Bevor Sie diese Anleitung lesen, sollten Sie mit Folgendem vertraut sein:
Klicken Sie im linken Seitenleistenmenü auf Integrations.
Klicken Sie unter Dialogflow CX Messenger auf Verbinden.
Ein Konfigurationsdialogfeld wird geöffnet.
Wenn die Integration für diesen Kundenservicemitarbeiter bereits eingerichtet wurde, wird ein einbetzbarer HTML-Code angezeigt.
Unabhängig davon, ob Sie eine Authentifizierung wünschen oder nicht, klicken Sie unten im Dialogfeld auf die Schaltfläche Deaktivieren, damit Sie die Einstellungen im nächsten Schritt neu konfigurieren können.
Wählen Sie eine Umgebung aus
Wählen Sie Unauthenticated API (Nicht authentifizierte API) aus.
Wählen Sie einen Stil aus.
Optional: Domaineinschränkung
Klicken Sie auf Unauthentifizierte API aktivieren.
Im Dialogfeld wird der HTML-Code angezeigt, der in Ihre Website eingebettet werden kann.
Kopieren Sie diesen Code.
Klicken Sie auf Fertig.
Einbetten
Fügen Sie den oben kopierten Einbettungscode in eine Webseite auf Ihrer Website ein.
Die HTML-Elemente <script> und <df-messenger> sollten sich im <body>-Element Ihrer Seite befinden.
Wenn du eine authentifizierte Integration verwendest, setze das Attribut oauth-client-id für <df-messenger> auf deine OAuth-Client-ID. Wenn Sie die Identitäten von Endnutzern für die Tool-Authentifizierung verwenden möchten, legen Sie für das Attribut access-token-name einen beliebigen Namen fest.
Verwenden Sie dann ein Inhaber-Token mit dem Wert $session.params.ACCESS_TOKEN_NAME für die Tool-Authentifizierung.
Aktualisieren Sie alle anderen Attribute, die aktualisiert werden müssen.
Um responsive Layouts zuzulassen, fügen Sie Ihrem <head>-Element auch Folgendes hinzu:
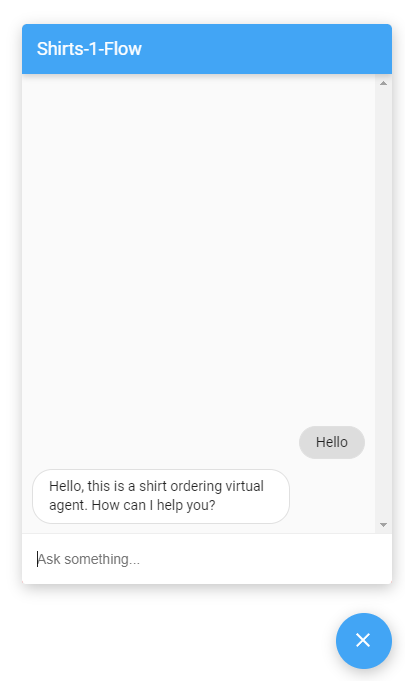
Nach dem Einbetten können Sie über die Webseite mit dem Kundenservicemitarbeiter interagieren, indem Sie rechts unten auf das Chatsymbol klicken.
Anpassen
Sie können das Aussehen und Verhalten dieser Benutzeroberfläche auf vielfältige Weise anpassen.
Weitere Informationen finden Sie in der Dialogflow CX Messenger-Dokumentation.
[[["Leicht verständlich","easyToUnderstand","thumb-up"],["Mein Problem wurde gelöst","solvedMyProblem","thumb-up"],["Sonstiges","otherUp","thumb-up"]],[["Schwer verständlich","hardToUnderstand","thumb-down"],["Informationen oder Beispielcode falsch","incorrectInformationOrSampleCode","thumb-down"],["Benötigte Informationen/Beispiele nicht gefunden","missingTheInformationSamplesINeed","thumb-down"],["Problem mit der Übersetzung","translationIssue","thumb-down"],["Sonstiges","otherDown","thumb-down"]],["Zuletzt aktualisiert: 2025-08-18 (UTC)."],[[["\u003cp\u003eThis guide details how to use the Dialogflow CX Messenger integration to create a text-based chat interface for your agent.\u003c/p\u003e\n"],["\u003cp\u003eSetting up the integration requires you to have already completed agent setup, flow basics, and general setup steps, and it also requires billing to be enabled.\u003c/p\u003e\n"],["\u003cp\u003eThe process involves navigating the Dialogflow CX console, selecting your agent, and configuring the Dialogflow CX Messenger integration for unauthenticated access.\u003c/p\u003e\n"],["\u003cp\u003eYou can embed the chat interface by pasting the provided HTML code into the \u003ccode\u003e<body>\u003c/code\u003e of your website, and modify some settings according to your preferences.\u003c/p\u003e\n"],["\u003cp\u003eOnce embedded, users can interact with the agent via a chat icon that will appear in the lower right corner of the page.\u003c/p\u003e\n"]]],[],null,["# Interactions with an integration\n\nWith an\n[integration](/dialogflow/cx/docs/concept/integration),\nend-user interactions are handled for you.\nYou just need to build an agent, optionally implement a webhook,\nand configure the integration.\n\nThis guide shows you how to use the\n[Dialogflow CX Messenger](/dialogflow/cx/docs/concept/integration/dialogflow-messenger)\nintegration to provide a simple text chat user interface\nfor your agent.\n\nBefore you begin\n----------------\n\nIf you don't plan on using an integration, you can skip this quickstart.\n\nYou should do the following before reading this guide:\n\n1. Read [flow basics](/dialogflow/cx/docs/basics).\n2. Perform [setup steps](/dialogflow/cx/docs/quick/setup).\n3. Perform steps in the [Build an agent using flows](/dialogflow/cx/docs/quick/build-agent) quickstart guide. Steps below continue working on the same agent. If you no longer have that agent, you can [download the agent](/static/dialogflow/cx/docs/data/agent-shirts-1-flow.zip) and [restore it](/dialogflow/cx/docs/concept/agent#export).\n\nSetup\n-----\n\n| **Note:** The steps below create an integration that allows unauthenticated agent query access. See the [Dialogflow CX Messenger documentation](/dialogflow/cx/docs/concept/integration/dialogflow-messenger) for instructions to create an authenticated integration.\n\n\n| **Note:** Make sure [billing is enabled](/dialogflow/cx/docs/quick/setup#billing) on your project before testing the integration.\n\nTo set up unauthenticated access to your Dialogflow CX Messenger agent:\n\n1. Go to the [Dialogflow CX console](https://dialogflow.cloud.google.com/cx/projects).\n2. Choose your Google Cloud project.\n3. Select your agent.\n4. Select the **Manage** tab.\n5. Click **Integrations** in the left sidebar menu.\n6. Click **Connect** on **Dialogflow CX Messenger**.\n7. A configuration dialog opens.\n8. If the integration was previously setup for this agent, you will see embeddable HTML code. Regardless of whether you want what authenticated or unauthenticated, click the **Disable...** button at the bottom of the dialog, so you can reconfigure the settings in the next step.\n9. Select an **Environment**.\n10. Select **Unauthenticated API**.\n11. Select a style.\n12. Optionally restrict domain access.\n13. Click **Enable the unauthenticated API**.\n14. The dialog will show the embeddable HTML code that can be embedded on your website. Copy this code.\n15. Click **Done**.\n\n\u003cbr /\u003e\n\nEmbed\n-----\n\n\nPaste the embed code you copied above in a webpage on your website.\nThe `\u003cscript\u003e` and `\u003cdf-messenger\u003e` HTML elements\nshould be in the `\u003cbody\u003e` element of your page.\n\nIf you are using an authenticated integration,\nset the `oauth-client-id` attribute for `\u003cdf-messenger\u003e`\nto your Oauth client id. And if you want to use end-users' identities for [tool\nauthentication](/dialogflow/cx/docs/concept/playbook/tool#openapi_tool_api_authentication),\nset the `access-token-name` attribute with any name you like.\nThen use Bearer Token with value `$session.params.`\u003cvar class=\"edit\" label=\"the access token name you set\" translate=\"no\"\u003eACCESS_TOKEN_NAME\u003c/var\u003e\nfor tool authentication.\n\nUpdate any other attributes that require updating.\n\nTo allow for responsive layouts,\nalso add the following to your `\u003chead\u003e` element: \n\n \u003cmeta name=\"viewport\" content=\"width=device-width, initial-scale=1\"\u003e\n\n\u003cbr /\u003e\n\nOnce embedded,\nyou can interact with your agent through the webpage\nby clicking the chat icon in the lower right corner.\n\nCustomize\n---------\n\nYou can customize the appearance and behavior of this user interface\nin many ways.\nSee the\n[Dialogflow CX Messenger documentation](/dialogflow/cx/docs/concept/integration/dialogflow-messenger)\nfor more information."]]