Einige Produkte und Funktionen werden derzeit umbenannt. Auch die Funktionen für generative Playbooks und Abläufe werden zu einer einzigen konsolidierten Console migriert. Weitere Informationen
Mit Sammlungen den Überblick behalten
Sie können Inhalte basierend auf Ihren Einstellungen speichern und kategorisieren.
In diesem Leitfaden erfahren Sie, wie Sie einen webhook verwenden, damit Ihr Agent dynamischer sein kann.
Cloud Functions werden aufgrund ihrer Einfachheit zum Hosten des Webhooks verwendet. Es gibt jedoch viele andere Möglichkeiten, einen Webhook-Dienst zu hosten.
Im Beispiel wird auch die Programmiersprache Go verwendet. Sie können jedoch jede von Cloud Functions unterstützte Sprache verwenden.
Sie müssen den Code für diesen Leitfaden nicht bearbeiten.
Der Beispiel-Webhook-Code führt Folgendes aus:
Liest Parameterwerte aus der Webhook-Anfrage.
Schreibt einen Parameterwert in die Webhook-Antwort.
Stellt eine Textantwort in der Webhook-Antwort bereit.
Hinweise
Wenn Sie keine Webhooks verwenden möchten, können Sie diesen Schnellstart überspringen.
Bevor Sie diese Anleitung lesen, sollten Sie mit Folgendem vertraut sein:
Cloud Functions können mit der Google Cloud Console erstellt werden (Dokumentation ansehen, Console öffnen).
So erstellen Sie eine Funktion für diesen Leitfaden:
Es ist wichtig, dass sich der Konversations-Agent (Dialogflow CX) und die Funktion im selben Projekt befinden.
So erhalten Konversations-Agents (Dialogflow CX) am einfachsten sicheren Zugriff auf Ihre Funktion.
Rufen Sie die Projektauswahl auf, um Ihr Projekt auszuwählen.
Klicken Sie auf Funktion erstellen und legen Sie die folgenden Felder fest:
Umgebung: 1. Generation
Funktionsname: shirts-agent-webhook
Region: Wenn Sie für Ihren Kundenservicemitarbeiter eine Region angegeben haben, verwenden Sie dieselbe Region.
HTTP-Triggertyp: HTTP
URL: Klicken Sie hier auf die Schaltfläche „Kopieren“ und speichern Sie den Wert.
Sie benötigen diese URL, wenn Sie den Webhook konfigurieren.
Authentifizierung: Authentifizierung verlangen
HTTPS erforderlich: angeklickt
Klicken Sie auf Speichern.
Klicken Sie auf Weiter. Sie benötigen keine speziellen Laufzeit-, Build-, Verbindungs- oder Sicherheitseinstellungen.
Legen Sie die Werte für die folgenden Felder fest:
Laufzeit: Wählen Sie die neueste Go-Laufzeit aus.
Quellcode: Inline-Editor
Einstiegspunkt: HandleWebhookRequest
Ersetzen Sie den Code durch Folgendes:
//PackagecxwhcontainsanexampleDialogflowCXwebhookpackagecxwhimport("encoding/json""fmt""log""net/http")typefulfillmentInfostruct{Tagstring`json:"tag"`}typesessionInfostruct{Sessionstring`json:"session"`Parametersmap[string]interface{}`json:"parameters"`}typetextstruct{Text[]string`json:"text"`}typeresponseMessagestruct{Texttext`json:"text"`}typefulfillmentResponsestruct{Messages[]responseMessage`json:"messages"`}//webhookRequestisusedtounmarshalaWebhookRequestJSONobject.Notethat//notallmembersneedtobedefined--justthosethatyouneedtoprocess.//Asanalternative,youcouldusethetypesprovidedbytheDialogflowprotocolbuffers://https://pkg.go.dev/google.golang.org/genproto/googleapis/cloud/dialogflow/cx/v3#WebhookRequesttypewebhookRequeststruct{FulfillmentInfofulfillmentInfo`json:"fulfillmentInfo"`SessionInfosessionInfo`json:"sessionInfo"`}//webhookResponseisusedtomarshalaWebhookResponseJSONobject.Notethat//notallmembersneedtobedefined--justthosethatyouneedtoprocess.//Asanalternative,youcouldusethetypesprovidedbytheDialogflowprotocolbuffers://https://pkg.go.dev/google.golang.org/genproto/googleapis/cloud/dialogflow/cx/v3#WebhookResponsetypewebhookResponsestruct{FulfillmentResponsefulfillmentResponse`json:"fulfillmentResponse"`SessionInfosessionInfo`json:"sessionInfo"`}//confirmhandleswebhookcallsusingthe"confirm"tag.funcconfirm(requestwebhookRequest)(webhookResponse,error){//Createatextmessagethatutilizesthe"size"and"color"//parametersprovidedbytheend-user.//Thistextmessageisusedintheresponsebelow.t:=fmt.Sprintf("You can pick up your order for a %s%s shirt in 5 days.",request.SessionInfo.Parameters["size"],request.SessionInfo.Parameters["color"])//Createsessionparametersthatarepopulatedintheresponse.//The"cancel-period"parameterisreferencedbytheagent.//Thisexamplehardcodesthevalue2,butarealsystem//mightlookupthisvalueinadatabase.p:=map[string]interface{}{"cancel-period":"2"}//Buildandreturntheresponse.response:=webhookResponse{FulfillmentResponse:fulfillmentResponse{Messages:[]responseMessage{{Text:text{Text:[]string{t},},},},},SessionInfo:sessionInfo{Parameters:p,},}returnresponse,nil}//handleErrorhandlesinternalerrors.funchandleError(whttp.ResponseWriter,errerror){w.WriteHeader(http.StatusInternalServerError)fmt.Fprintf(w,"ERROR: %v",err)}//HandleWebhookRequesthandlesWebhookRequestandsendstheWebhookResponse.funcHandleWebhookRequest(whttp.ResponseWriter,r*http.Request){varrequestwebhookRequestvarresponsewebhookResponsevarerrerror//ReadinputJSONiferr=json.NewDecoder(r.Body).Decode(&request);err!=nil{handleError(w,err)return}log.Printf("Request: %+v",request)//Getthetagfromtherequest,andcallthecorresponding//functionthathandlesthattag.//Thisexampleonlyhasonepossibletag,//butmostagentswouldhavemany.switchtag:=request.FulfillmentInfo.Tag;tag{case"confirm":response,err=confirm(request)default:err=fmt.Errorf("Unknown tag: %s",tag)}iferr!=nil{handleError(w,err)return}log.Printf("Response: %+v",response)//Sendresponseiferr=json.NewEncoder(w).Encode(&response);err!=nil{handleError(w,err)return}}
Klicken Sie auf Bereitstellen.
Warten Sie, bis die Statusanzeige anzeigt, dass die Funktion erfolgreich bereitgestellt wurde.
Sehen Sie sich in der Zwischenzeit den Code an, den Sie gerade bereitgestellt haben.
Codekommentare beschreiben wichtige Details.
Webhook erstellen
Nachdem der Webhook als Cloud-Funktion vorhanden ist, verknüpfen Sie ihn mit Ihrem Agenten.
So erstellst du den Webhook für deinen Agenten:
Webhook-URL: Geben Sie die Webhook-URL an, die Sie beim Erstellen der Funktion gespeichert haben.
Untertyp: Standard.
Für alle anderen Felder werden Standardwerte verwendet.
Klicken Sie auf Speichern.
Webhook verwenden
Nachdem der Webhook für den Kundenservicemitarbeiter verfügbar ist, kannst du ihn bei der Auftragsausführung verwenden.
Die Seite Bestellbestätigung enthält eine Eingabeauftragsausführung, die derzeit eine statische Textantwort hat.
So aktualisierst du die Auftragsausführung, damit dein Webhook verwendet wird:
Wählen Sie den Tab Erstellen aus.
Klicken Sie auf die Seite Bestellbestätigung, um sie in der Agent Builder-Grafik zu maximieren.
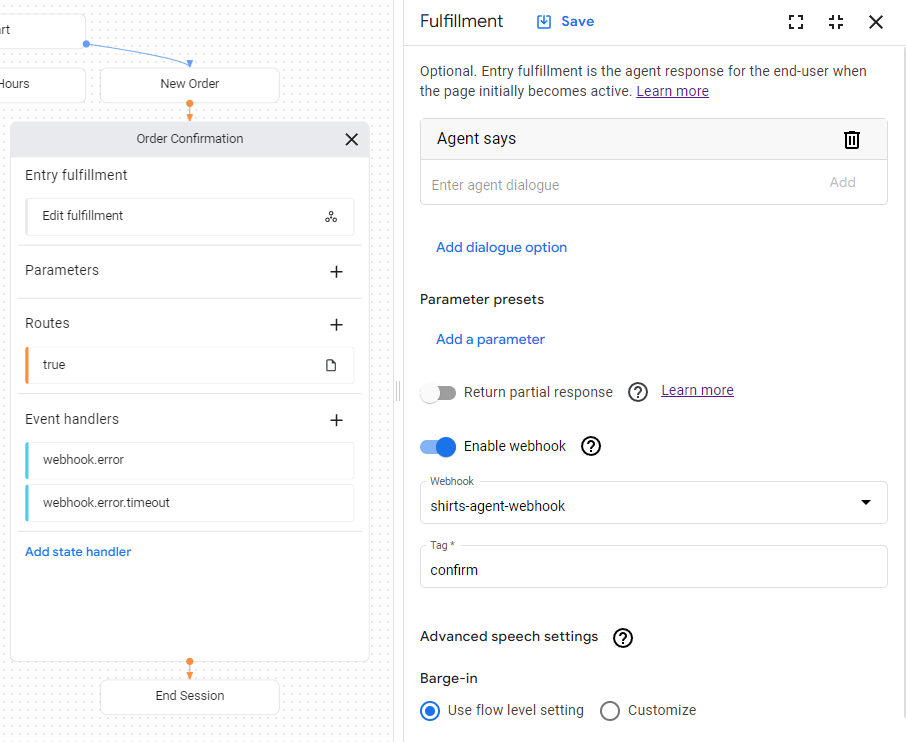
Klicken Sie auf der Seite auf das Feld Entry Fulfillment (Eintragsausführung), um den Bereich für die Auftragsausführung zu öffnen.
Löschen Sie die vorhandene Textantwort unter der Überschrift Kundenservicemitarbeiter sagt.
Wenn Sie den Mauszeiger auf den Text bewegen, wird die Schaltfläche „Löschen“ delete angezeigt.
Klicken Sie auf Webhook aktivieren.
Wählen Sie im Drop-down-Menü Webhook die Option shirts-agent-webhook aus.
Geben Sie im Feld Tag den Wert confirm ein.
Klicken Sie auf Speichern.
Schließen Sie den Bereich für die Auftragsausführung.
Der bereitgestellte Webhook-Code sendet eine Antwort, durch die ein Parameter namens cancel-period erstellt wird.
Aktualisieren Sie den Agenten, damit er in der endgültigen Antwort des Kundenservicemitarbeiters für dieselbe Seite Bestellbestätigung auf diesen Parameter verweist:
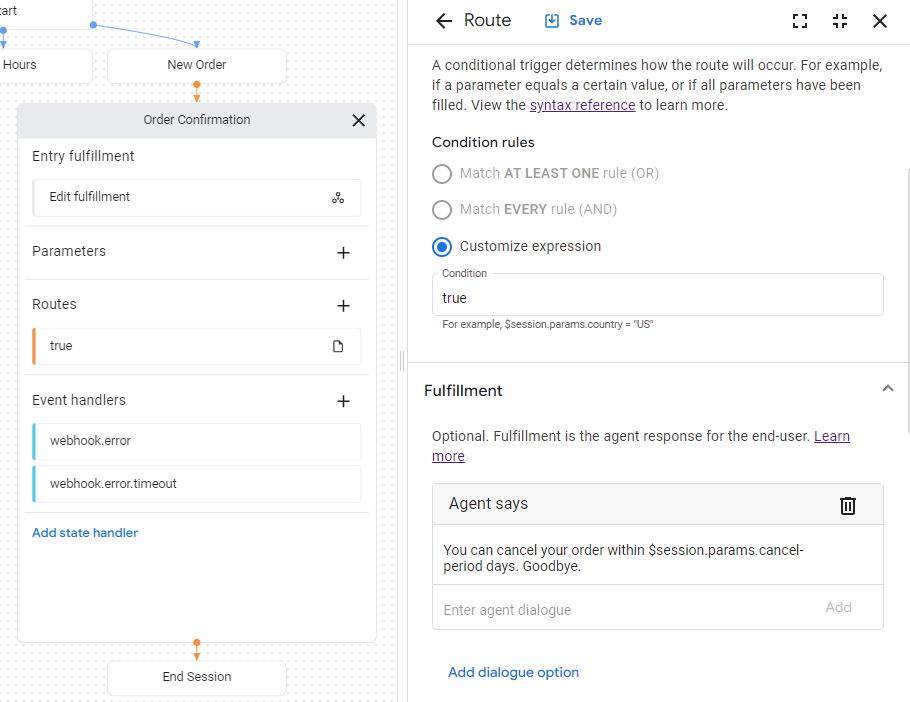
Klicken Sie auf die Bedingung route, die mit einer true gekennzeichnet ist, um das Steuerfeld „Route“ zu öffnen.
Scrollen Sie im Steuerfeld für die Route nach unten zum Abschnitt Ausführung und fügen Sie unter der Überschrift Kundenservicemitarbeiter sagt die folgende Textantwort hinzu:
You can cancel your order within $session.params.cancel-period days. Goodbye.
Klicken Sie auf Speichern.
Schließen Sie den Bereich „Route“.
Agent im Simulator testen
Ihr Agent und Webhook können jetzt mit dem Simulator getestet werden:
Klicken Sie auf Test-Kundenservicemitarbeiter.
Geben Sie I want to buy a large red shirt ein und drücken Sie die Eingabetaste.
Da Sie sowohl eine Größe als auch eine Farbe angegeben haben, hat der Kundenservicemitarbeiter alles, was er zum Erstellen einer T-Shirt-Bestellung benötigt. Daher wird direkt zur Seite Bestellbestätigung weitergeleitet.
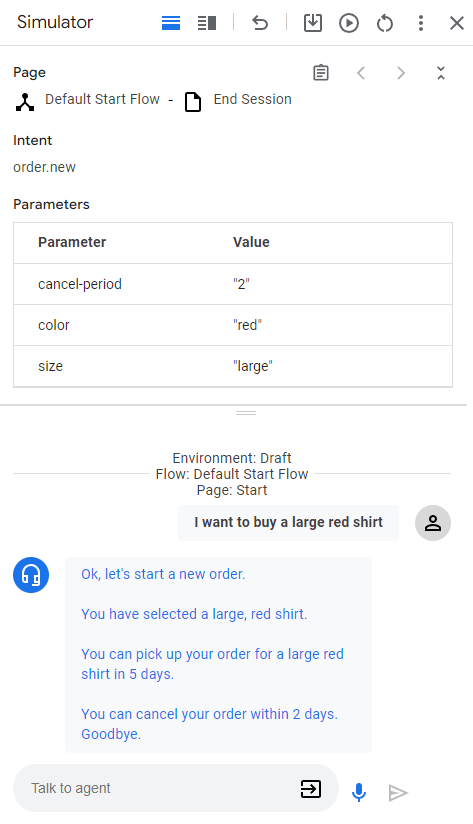
Im Folgenden werden die Antworten des Kundenservicemitarbeiters beschrieben:
Antwort
Erklärung
Okay, starten wir einen neuen Auftrag.
Als die Seite Neue Bestellung aktiv wurde, wurde die Auftragsausführung aufgerufen. Die Antwort wurde von dieser Auftragsausführung ausgelöst.
Sie haben ein großes rotes Hemd ausgewählt.
Wenn alle Formularparameter für die Seite Neue Bestellung angegeben wurden, wird die Bedingungsroute aufgerufen, die das Ausfüllen des Formulars prüft. Die Antwort wurde von der Auftragsausführung für diese Route ausgelöst. Diese Route führt ebenfalls zur Seite Bestellbestätigung.
Sie können Ihre Bestellung für ein rotes Hemd in Größe L in 5 Tagen abholen.
Die Auftragsausführung für die Seite Bestellbestätigung ruft den Webhook auf. Siehe Funktion confirm im Webhook-Code. Diese Funktion erstellt diese Textantwort und verwendet die in der Webhook-Anfrage angegebenen Parameter.
Sie können Ihre Bestellung innerhalb von zwei Tagen stornieren. Auf Wiedersehen.
Die Seite Bestellbestätigung enthält eine Bedingungsroute mit einer Bedingung, die immer wahr ist. Diese Antwort wird durch die Auftragsausführung für diese Route ausgelöst. Hinweis: In der Antwort wird der Parameter verwendet, der vom Webhook in der Webhook-Antwort festgelegt wurde.
[[["Leicht verständlich","easyToUnderstand","thumb-up"],["Mein Problem wurde gelöst","solvedMyProblem","thumb-up"],["Sonstiges","otherUp","thumb-up"]],[["Schwer verständlich","hardToUnderstand","thumb-down"],["Informationen oder Beispielcode falsch","incorrectInformationOrSampleCode","thumb-down"],["Benötigte Informationen/Beispiele nicht gefunden","missingTheInformationSamplesINeed","thumb-down"],["Problem mit der Übersetzung","translationIssue","thumb-down"],["Sonstiges","otherDown","thumb-down"]],["Zuletzt aktualisiert: 2025-08-18 (UTC)."],[[["\u003cp\u003eThis guide demonstrates how to integrate a webhook with a Dialogflow CX agent to enhance its dynamic capabilities using Cloud Functions for hosting.\u003c/p\u003e\n"],["\u003cp\u003eThe example webhook code, written in Go, is designed to read parameter values from the incoming request, write a parameter value to the response, and deliver a text response.\u003c/p\u003e\n"],["\u003cp\u003eCreating a webhook involves setting up a Cloud Function with specific settings, such as HTTP trigger and authentication, and then associating it with a Dialogflow CX agent through its webhook configuration.\u003c/p\u003e\n"],["\u003cp\u003eThe webhook is utilized within the agent's fulfillment settings by enabling the webhook and specifying a tag, which in this case is "confirm", to trigger the webhook's functionality.\u003c/p\u003e\n"],["\u003cp\u003eBy using a webhook, an agent can provide dynamic responses, such as confirming an order with specific shirt details, and setting session parameters like a "cancel-period" that the agent can then reference.\u003c/p\u003e\n"]]],[],null,["# Create a webhook\n\nThis guide shows you how to use a\n[webhook](/dialogflow/cx/docs/concept/webhook),\nso your agent can be more dynamic.\n[Cloud Functions](/functions/docs)\nare used to host the webhook due to their simplicity,\nbut there are many other ways that you could host a webhook service.\nThe example also uses the Go programming language,\nbut you can use any\n[language supported by Cloud Functions](/functions/docs/concepts/exec).\nYou will not need to edit the code for this guide.\n\nThe example webhook code does the following:\n\n- Reads parameter values from the webhook request.\n- Writes a parameter value to the webhook response.\n- Provides a text response in the webhook response.\n\nBefore you begin\n----------------\n\nIf you don't plan on using webhooks, you can skip this quickstart.\n\nYou should do the following before reading this guide:\n\n1. Read [flow basics](/dialogflow/cx/docs/basics).\n2. Perform [setup steps](/dialogflow/cx/docs/quick/setup).\n3. Perform steps in the [Build an agent using flows](/dialogflow/cx/docs/quick/build-agent) quickstart guide. Steps below continue working on the same agent. If you no longer have that agent, you can [download the agent](/static/dialogflow/cx/docs/data/agent-shirts-1-flow.zip) and [restore it](/dialogflow/cx/docs/concept/agent#export).\n\nCreate the Cloud Function\n-------------------------\n\nCloud Functions can be created with the Google Cloud console ([visit documentation](https://support.google.com/cloud/answer/3465889?ref_topic=3340599), [open console](https://console.cloud.google.com/)).\nTo create a function for this guide:\n\n1. It is important that your Conversational Agents (Dialogflow CX) agent and the function are both in the same project. This is the easiest way for Conversational Agents (Dialogflow CX) to have [secure access to your function](/dialogflow/cx/docs/concept/webhook#cloud-run). To select your project, [go to the project selector](https://console.cloud.google.com/projectselector2/home/dashboard).\n2. Go to the [Cloud Functions overview page](https://console.cloud.google.com/functions/list).\n3. Click **Create Function** , and set the following fields:\n - **Environment**: 1st gen\n - **Function name**: shirts-agent-webhook\n - **Region**: If you specified a region for your agent, use the same region.\n - **HTTP Trigger type**: HTTP\n - **URL**: Click the copy button here and save the value. You will need this URL when configuring the webhook.\n - **Authentication**: Require authentication\n - **Require HTTPS**: checked\n4. Click **Save**.\n5. Click **Next** (You do not need special runtime, build, connections, or security settings).\n6. Set the following fields:\n - **Runtime**: Select the latest Go runtime.\n - **Source code**: Inline Editor\n - **Entry point**: HandleWebhookRequest\n7. Replace the code with the following:\n\n ```python\n // Package cxwh contains an example Dialogflow CX webhook\n package cxwh\n\n import (\n \t\"encoding/json\"\n \t\"fmt\"\n \t\"log\"\n \t\"net/http\"\n )\n\n type fulfillmentInfo struct {\n \tTag string `json:\"tag\"`\n }\n\n type sessionInfo struct {\n \tSession string `json:\"session\"`\n \tParameters map[string]interface{} `json:\"parameters\"`\n }\n\n type text struct {\n \tText []string `json:\"text\"`\n }\n\n type responseMessage struct {\n \tText text `json:\"text\"`\n }\n\n type fulfillmentResponse struct {\n \tMessages []responseMessage `json:\"messages\"`\n }\n\n // webhookRequest is used to unmarshal a WebhookRequest JSON object. Note that\n // not all members need to be defined--just those that you need to process.\n // As an alternative, you could use the types provided by the Dialogflow protocol buffers:\n // https://pkg.go.dev/google.golang.org/genproto/googleapis/cloud/dialogflow/cx/v3#WebhookRequest\n type webhookRequest struct {\n \tFulfillmentInfo fulfillmentInfo `json:\"fulfillmentInfo\"`\n \tSessionInfo sessionInfo `json:\"sessionInfo\"`\n }\n\n // webhookResponse is used to marshal a WebhookResponse JSON object. Note that\n // not all members need to be defined--just those that you need to process.\n // As an alternative, you could use the types provided by the Dialogflow protocol buffers:\n // https://pkg.go.dev/google.golang.org/genproto/googleapis/cloud/dialogflow/cx/v3#WebhookResponse\n type webhookResponse struct {\n \tFulfillmentResponse fulfillmentResponse `json:\"fulfillmentResponse\"`\n \tSessionInfo sessionInfo `json:\"sessionInfo\"`\n }\n\n // confirm handles webhook calls using the \"confirm\" tag.\n func confirm(request webhookRequest) (webhookResponse, error) {\n \t// Create a text message that utilizes the \"size\" and \"color\"\n \t// parameters provided by the end-user.\n \t// This text message is used in the response below.\n \tt := fmt.Sprintf(\"You can pick up your order for a %s %s shirt in 5 days.\",\n \t\trequest.SessionInfo.Parameters[\"size\"],\n \t\trequest.SessionInfo.Parameters[\"color\"])\n\n \t// Create session parameters that are populated in the response.\n \t// The \"cancel-period\" parameter is referenced by the agent.\n \t// This example hard codes the value 2, but a real system\n \t// might look up this value in a database.\n \tp := map[string]interface{}{\"cancel-period\": \"2\"}\n\n \t// Build and return the response.\n \tresponse := webhookResponse{\n \t\tFulfillmentResponse: fulfillmentResponse{\n \t\t\tMessages: []responseMessage{\n \t\t\t\t{\n \t\t\t\t\tText: text{\n \t\t\t\t\t\tText: []string{t},\n \t\t\t\t\t},\n \t\t\t\t},\n \t\t\t},\n \t\t},\n \t\tSessionInfo: sessionInfo{\n \t\t\tParameters: p,\n \t\t},\n \t}\n \treturn response, nil\n }\n\n // handleError handles internal errors.\n func handleError(w http.ResponseWriter, err error) {\n \tw.WriteHeader(http.StatusInternalServerError)\n \tfmt.Fprintf(w, \"ERROR: %v\", err)\n }\n\n // HandleWebhookRequest handles WebhookRequest and sends the WebhookResponse.\n func HandleWebhookRequest(w http.ResponseWriter, r *http.Request) {\n \tvar request webhookRequest\n \tvar response webhookResponse\n \tvar err error\n\n \t// Read input JSON\n \tif err = json.NewDecoder(r.Body).Decode(&request); err != nil {\n \t\thandleError(w, err)\n \t\treturn\n \t}\n \tlog.Printf(\"Request: %+v\", request)\n\n \t// Get the tag from the request, and call the corresponding\n \t// function that handles that tag.\n \t// This example only has one possible tag,\n \t// but most agents would have many.\n \tswitch tag := request.FulfillmentInfo.Tag; tag {\n \tcase \"confirm\":\n \t\tresponse, err = confirm(request)\n \tdefault:\n \t\terr = fmt.Errorf(\"Unknown tag: %s\", tag)\n \t}\n \tif err != nil {\n \t\thandleError(w, err)\n \t\treturn\n \t}\n \tlog.Printf(\"Response: %+v\", response)\n\n \t// Send response\n \tif err = json.NewEncoder(w).Encode(&response); err != nil {\n \t\thandleError(w, err)\n \t\treturn\n \t}\n }\n ```\n8. Click **Deploy**.\n\n9. Wait until the status indicator shows that the function\n has successfully deployed.\n While waiting, examine the code you just deployed.\n Code comments describe important details.\n\nCreate the webhook\n------------------\n\nNow that the webhook exists as a Cloud function,\nyou will associate this webhook with your agent.\nTo create the webhook for your agent:\n\n1. Open the [Dialogflow CX console](https://dialogflow.cloud.google.com/cx/projects).\n2. Choose your Google Cloud project.\n3. Select your agent.\n4. Select the **Manage** tab.\n5. Click **Webhooks**.\n6. Click **Create**.\n7. Complete the following fields:\n - **Display name**: shirts-agent-webhook\n - **Webhook URL**: Provide the webhook URL you saved when creating the function.\n - **Subtype**: Standard.\n - All other fields use default values.\n8. Click **Save**.\n\nUse the webhook\n---------------\n\nNow that the webhook is available to the agent,\nyou will make use of the webhook in\n[fulfillment](/dialogflow/cx/docs/concept/fulfillment).\nThe **Order Confirmation** page has an entry fulfillment,\nwhich currently has a static text response.\nTo update the fulfillment to use your webhook:\n\n1. Select the **Build** tab.\n2. Click the **Order Confirmation** page to expand the page on the agent builder graph.\n3. Click the **Entry Fulfillment** field on the page to open the fulfillment panel.\n4. Delete the existing text response under the **Agent says** heading. When you hover the text, the delete *delete* button appears.\n5. Click **Enable webhook**.\n6. Select the `shirts-agent-webhook` option from the **Webhook** dropdown menu.\n7. Enter `confirm` for the **Tag** field.\n8. Click **Save**.\n9. Close the fulfillment panel.\n\nThe deployed webhook code sends a response\nthat creates a\n[parameter](/dialogflow/cx/docs/concept/parameter)\nnamed `cancel-period`.\nUpdate the agent to reference this parameter in the final agent response\nfor the same **Order Confirmation** page:\n\n1. Click the condition [route](/dialogflow/cx/docs/concept/handler) shown with a `true` condition to open the route panel.\n2. Scroll down to the **Fulfillment** section of the route panel, and add the following text response under the **Agent says** heading: `You can cancel your order within $session.params.cancel-period days. Goodbye.`\n3. Click **Save**.\n4. Close the route panel.\n\nTest the agent in the simulator\n-------------------------------\n\nYour agent and webhook are ready to test with the\n[simulator](/dialogflow/cx/docs/concept/console#simulator):\n\n1. Click **Test Agent**.\n2. Enter `I want to buy a large red shirt` and press enter.\n\nSince you provided both a size and color,\nyou gave the agent everything it needs to create a shirt order,\nso it transitions directly to the **Order Confirmation** page.\n\nThe following describes the agent responses:"]]