This tutorial guides you through the different approaches that you can use to migrate a Microsoft SQL Server database on Amazon Elastic Compute Cloud (AWS EC2) to Compute Engine.
This page discusses the following approaches:
- Migrate using full backup and restore
- Migrate using a BACPAC file
- Migrate using Always-on availability groups
- Migrate using distributed availability groups
Each migration method presents different advantages and disadvantages. The most suitable migration strategy is contingent on your own specific circumstances and priorities. We recommend that you choose a migration method that works best for you based on the following considerations:
Availability: Consider whether a migration approach is supported by all versions and licenses of your SQL Server database.
Database size: The size of the database can significantly impact the feasible migration options as larger databases may necessitate different strategies than smaller ones. Consider the data transfer duration, potential downtime, and resource requirements while choosing a migration approach.
Downtime tolerance: The acceptable level of downtime during the migration is a crucial factor. Some methods enable minimal to near-zero downtime, while others require a more extended downtime. Consider a migration approach that offers a downtime acceptable to you.
Complexity: The complexity of the database schema, application dependencies, and the overall environment can influence the migration approach. Ensure that the migration method that you choose supports the migration of non-database objects such as SQL agent jobs, linked servers, permissions, and user objects.
Cost: The financial aspect of the migration can also be a consideration. Different migration methods come with varying costs associated with data transfer, compute resources, and other services. Consider a migration method that works best for you.
Data security and compliance: Ensure that the chosen migration method adheres to your data security and compliance requirements. Consider data encryption, access controls, and any industry-specific requirements that apply to your data.
Objectives
This tutorial shows you how to complete the following tasks to migrate your SQL Server database from AWS EC2 to Compute Engine:
- Deploy a SQL Server instance on Compute Engine
- Migrate using Full backup and restore
- Migrate using a BACPAC file
- Migrate using Always-on availability groups
- Migrate using distributed availability groups
Costs
This tutorial uses billable components of Google Cloud, including:
Use the pricing calculator to generate a cost estimate based on your projected usage.
Before you begin
Complete the following tasks before you begin:
-
In the Google Cloud console, on the project selector page, select or create a Google Cloud project.
Roles required to select or create a project
- Select a project: Selecting a project doesn't require a specific IAM role—you can select any project that you've been granted a role on.
-
Create a project: To create a project, you need the Project Creator
(
roles/resourcemanager.projectCreator), which contains theresourcemanager.projects.createpermission. Learn how to grant roles.
-
Verify that billing is enabled for your Google Cloud project.
-
In the Google Cloud console, activate Cloud Shell.
Prepare the project and network
To prepare your Google Cloud project and Virtual Private Cloud (VPC) for the deployment of SQL Server for migration, do the following:
In the Google Cloud console, click Activate Cloud Shell
 to open Cloud Shell.
Set your default project ID:
gcloud config set project
PROJECT_IDReplace
PROJECT_IDwith the ID of your Google Cloud project.Set your default region:
gcloud config set compute/region
REGIONReplace
REGIONwith the ID of the region you want to deploy in.Set your default zone:
gcloud config set compute/zone
ZONEReplace
ZONEwith the ID of the zone you want to deploy in. Ensure that the zone is valid in the region you specified in the previous step.
Create a SQL Server instance on Compute Engine
Before you migrate your SQL Server database to Compute Engine, you must create a virtual machine (VM) on Compute Engine to host it.
Use the following command to create a SQL Server instance on Compute Engine:
2022 Standard
gcloud compute instances create sql-server-std-migrate-vm \ --project=PROJECT_ID\ --zoneZONE\ --machine-type n4-standard-8 \ --subnetSUBNET_NAME\ --create-disk=auto-delete=yes,boot=yes,device-name=node-1,image=projects/windows-sql-cloud/global/images/sql-2022-standard-windows-2022-dc-v20250213,mode=rw,size=50,type=projects/PROJECT_ID/zones/ZONE/diskTypes/pd-balanced \ --scopes=https://www.googleapis.com/auth/compute,https://www.googleapis.com/auth/servicecontrol,https://www.googleapis.com/auth/service.management.readonly,https://www.googleapis.com/auth/logging.write,https://www.googleapis.com/auth/monitoring.write,https://www.googleapis.com/auth/trace.append,https://www.googleapis.com/auth/devstorage.read_write
Replace the following:
PROJECT_ID: with the ID of your Google Cloud project.ZONE: with the ID of the zone.SUBNET_NAME: with the name of your VPC subnet.
2022 Enterprise
gcloud compute instances create sql-server-ent-migrate-vm \ --project=PROJECT_ID\ --zoneZONE\ --machine-type n4-standard-8 \ --subnetSUBNET_NAME\ --create-disk=auto-delete=yes,boot=yes,device-name=node-1,image=projects/windows-sql-cloud/global/images/sql-2022-enterprise-windows-2022-dc-v20250213,mode=rw,size=50,type=projects/PROJECT_ID/zones/ZONE/diskTypes/pd-balanced \ --scopes=https://www.googleapis.com/auth/compute,https://www.googleapis.com/auth/servicecontrol,https://www.googleapis.com/auth/service.management.readonly,https://www.googleapis.com/auth/logging.write,https://www.googleapis.com/auth/monitoring.write,https://www.googleapis.com/auth/trace.append,https://www.googleapis.com/auth/devstorage.read_write
Replace the following:
PROJECT_ID: with the ID of your Google Cloud project.ZONE: with the ID of the zone.SUBNET_NAME: with the name of your VPC subnet.
For more information about creating SQL Server instances on Compute Engine, see Create a SQL Server instance.
Configure and connect to your SQL Server VM
To configure your SQL Server VM and connect to it, use the following steps:
Set the initial Windows password for your account:
In the Google Cloud console, go to the VM Instances page.
Click the name of the SQL server VM.
Click the Set Windows password button.
Enter a password and click Set once prompted to set the new Windows password.
Save the username and password.
Connect to the SQL Server VM:
Use the public IP address of the SQL Server VM from the VM Instances page and credentials saved from the previous step to connect to your SQL Server VM using Microsoft Remote Desktop (RDP).
Run SQL Server Management Studio (SSMS) as an administrator.
Verify that the Trust server certificate checkbox is selected and click Connect.
Your SQL Server VM is now ready to be used for database migration. To create new user logins to connect and manage your SQL Server VM, see Create a login.
Full database backup and restore
A full database backup and restore is the most common and straightforward method of database migration. With this approach, a full backup of the SQL Server database is taken from the source environment and is then restored on the destination Google Cloud environment. While this method is relatively straightforward, it can be time-consuming for large databases due to the time it takes to create and restore the backup.
This section discusses how you can use SSMS to export your SQL Server database using a sample AdventureWorks2022 database.
Create a full database backup
To create a full database backup, use the following steps:
Log into your AWS EC2 VM using Microsoft RDP.
Connect to SQL Server using SSMS.
Expand the databases folder in the Object Explorer.
Right-click on the database name, click Tasks from the menu.
Click Back Up to open the database backup wizard.
Verify the database name to backup and the backup type is set to Full.
Click Add under the destination for the full backup.
Click ellipses icon (...) to select the folder and name of the backup file.
Click OK to set the filename and OK again to set the destination.
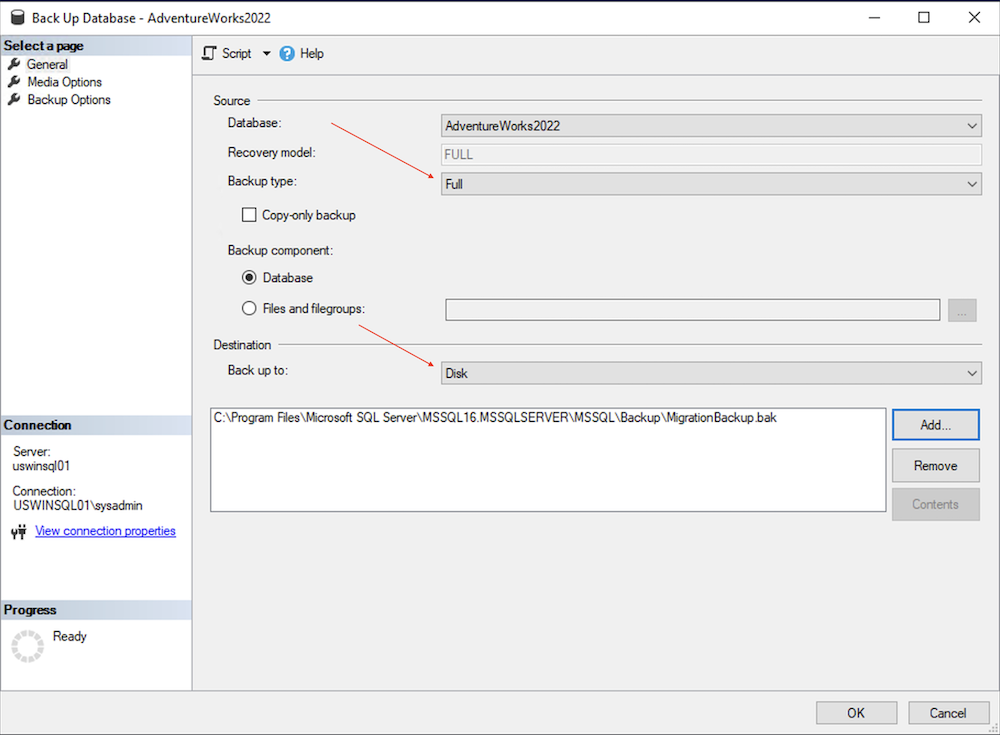
Click OK to start the database backup and wait for the backup to complete.
After the backup process is complete a backup file is created. You can now use this backup file to migrate the database contents to a Compute Engine VM.
Click OK to exit the database backup wizard.
Transfer the backup file to a Compute Engine VM
To migrate the your SQL Server database content, you must transfer the backup file created in the previous step to the Compute Engine VM that you created. For information on the various transfer options, see Transfer files to Windows VMs.
Restore your SQL Server database from the backup file
To restore the database from the backup file, use the following steps:
Log into your Compute Engine VM using RDP.
Connect to SQL Server using SSMS.
In the Object Explorer, right-click the Databases folder and click Restore Database.
For the Source, click Device and the ellipses icon (...) to open the Select backup device page.
Verify that the backup media type is set to File and click Add to select the backup file.
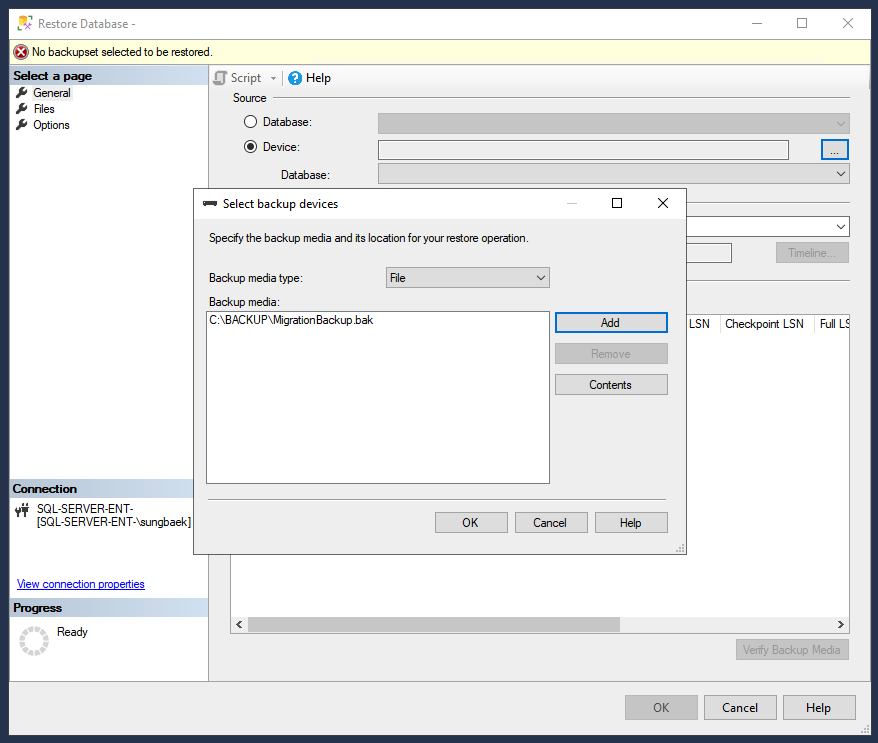
Click OK to set the backup file as the restoration device.
Click OK to restore the database.
When the process is complete, your database is migrated to the destination SQL Server on Compute Engine.
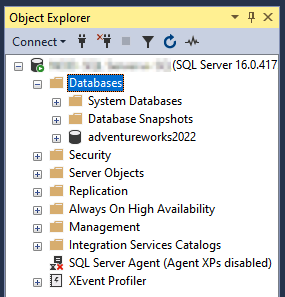
To verify if the process has completed successfully, you can expand the databases folder in the Object Explorer and verify if you can see the migrated database.
Migrate using a BACPAC file
A backup package (BACPAC) file is a logical representation of a SQL Server database. It can be exported from the source AWS environment and then imported into the destination Google Cloud environment. This method is typically faster than a full backup and restore for smaller databases but may not be suitable for very large databases or those with complex dependencies.
The following section discuss how you can migrate your SQL Server database using a BACPAC file.
Create a BACPAC export
To create a BACPAC export, use the following steps:
Log into the AWS EC2 VM using Microsoft RDP.
Connect to SQL Server using SSMS.
Expand the databases folder in the Object Explorer.
Right-click on the database name and click Tasks.
Click Export Data-tier Application to open the export wizard.
Click Next.
Click Browse in the Save to local disk option and select the BACPAC file.
Click the Advanced tab and select the schema(s) that you want to export.
Click Next to advance to the summary.
Click Finish to export the BACPAC file and wait for the export to complete.
Click Close to exit the wizard.
Transfer the BACPAC file created in the previous steps to your destination VM on Compute Engine. For information on the transfer options, see Transfer files to Windows VMs.
Restore your SQL Server database from a BACPAC file
To restore the database from the BACPAC file, follow these steps:
Log into the Compute Engine VM using RDP.
Connect to SQL Server using SSMS.
In the Object Explorer, right-click the Databases folder and click Import Data-tier Application.
Click Next.
Click Browse and select the BACPAC file that you want to restore, and then click Next.
Verify the New database name and click Next.
Click Finish and wait for the import to complete.
Click Close to exit the wizard.
To verify if the process has completed successfully, you can expand the databases folder in the Object Explorer and verify if you can see the migrated database.
Migrate using Always-on availability groups
An AOAG is a high availability and disaster recovery feature of SQL Server. You can use an AOAG to migrate existing AOAG clusters, standalone SQL Servers, and Windows Server failover clusters (WSFC). With this method, a replica of the database is created in the destination Google Cloud environment and the data is synchronized between the source and target. Once synchronization is complete, the replica on the destination Google Cloud environment can be made primary. This method minimizes downtime but requires additional configuration and setup. For straight forward migrations with significant downtime tolerance, other methods may be simpler and more cost-effective.
Before you begin
Ensure the following before you begin the migration:
To ensure secure and seamless transition of data, establish a peering connection between AWS and Google Cloud. For more information, see Create HA VPN connections between Google Cloud and AWS.
Ensure that the source database is running in standalone mode, and both the source and destination servers are joined to an Active Directory (AD). If the source database is already part of a WSFC cluster using an AOAG, see Migrate using distributed availability groups.
Ensure that all encryption keys on the source SQL Server database are installed on all SQL Server instances that will join the AOAG.
Prepare your SQL Server to be part of an AOAG
To be able to add SQL Servers to an AOAG, you must enable the AOAG feature on all SQL Server instances that you want to add to the group.
To enable the AOAG feature on all SQL Server VMs that you want to add to an AOAG, use the following steps:
Enable AOAG on your SQL Server.
Log into your SQL Server VM using RDP.
Open Powershell in administrator mode.
Run the following command to enabled AOAG on your SQL Server.
Enable-SqlAlwaysOn -ServerInstance $env:COMPUTERNAME -Force
Run the following command to open a firewall port for data replication.
netsh advfirewall firewall add rule name="Allow SQL Server replication" dir=in action=allow protocol=TCP localport=5022
Repeat step 1 for all the SQL Server VMs that you want to add to the AOAG.
Create a new user for your SQL Server on your AD.
$Credential = Get-Credential -UserName sql_server -Message 'Enter password'
New-ADUser `
-Name "sql_server" `
-Description "SQL Admin account." `
-AccountPassword $Credential.Password `
-Enabled $true -PasswordNeverExpires $true
Perform the following steps on all SQL Server instances that is part of AOAG:
- Open SQL Server Configuration Manager.
- In the navigation pane, select SQL Server Services.
- In the list of services, right-click SQL Server (MSSQLSERVER) and select Properties.
- Under Log on as, change the account as follows:
- Account name:
DOMAIN\sql_serverwhere DOMAIN is the NetBIOS name of your AD domain. - Password: Enter the password you chose in the previous step 2 of this section.
- Account name:
Click OK.
When prompted to restart SQL Server, select Yes.
Your SQL Server is now running under a domain user account.
Set up the mirroring endpoint for your SQL Server database
To create the endpoint for your AOAG, use the following steps:
If the source SQL Server database is encrypted with Transparent data encryption (TDE), take this step to backup, transfer, and install the certificates and keys to the destination SQL Server.
Log into the source database on AWS using SSMS.
Run the following T-SQL command to create the endpoint for the availability group.
USE [master] GO CREATE LOGIN [
NET_DOMAIN\sql_server] FROM WINDOWS GO USE [DATABASE_NAME] GO CREATE USER [NET_DOMAIN\sql_server] FOR LOGIN [NET_DOMAIN\sql_server] GO USE [master] GO CREATE ENDPOINT migration_endpoint STATE=STARTED AS TCP (LISTENER_PORT=5022) FOR DATABASE_MIRRORING (ROLE=ALL); GO GRANT CONNECT ON ENDPOINT::[migration_endpoint] TO [NET_DOMAIN\sql_server] GOReplace
NET_DOMAINwith the NetBIOS name of your AD domain, andDATABASE_NAMEwith the name of the database to migrate.Connect to the destination SQL Server on Google Cloud using SSMS and execute the following T-SQL command to create the database mirroring endpoint.
CREATE LOGIN [
NET_DOMAIN\sql_server] FROM WINDOWS GO CREATE ENDPOINT migration_endpoint STATE=STARTED AS TCP (LISTENER_PORT=5022) FOR DATABASE_MIRRORING (ROLE=ALL); GO GRANT CONNECT ON ENDPOINT::[migration_endpoint] TO [NET_DOMAIN\sql_server] GOReplace
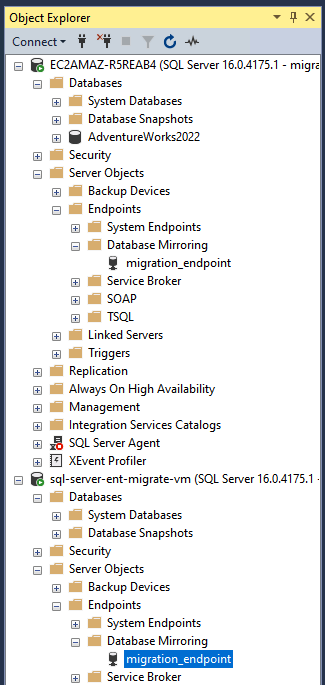
NET_DOMAINwith the NetBIOS name of your AD domain.Verify the endpoints by navigating to Server Objects > Endpoints > Database Mirroring in the Object Explorer in SSMS.
Create the AOAG
To create an AOAG, use the following steps:
Log into the source database on AWS using SSMS.
Run the following T-SQL command to set the database recovery mode to full and take a full backup.
USE [master] GO ALTER DATABASE [
DATABASE_NAME] SET RECOVERY FULL; BACKUP DATABASE [DATABASE_NAME] TO DISK = N'C:\Program Files\Microsoft SQL Server\MSSQL16.MSSQLSERVER\MSSQL\Backup\DATABASE_NAME.bak';Replace
DATABASE_NAMEwith the name of the database to migrate.Run the following T-SQL command to create the AOAG.
USE [master]
GO

CREATE AVAILABILITY GROUP [migration-ag]
WITH (
    AUTOMATED_BACKUP_PREFERENCE = SECONDARY,
    DB_FAILOVER = OFF,
    DTC_SUPPORT = NONE,
    REQUIRED_SYNCHRONIZED_SECONDARIES_TO_COMMIT = 0
)
FOR DATABASE [DATABASE_NAME]
REPLICA ON
N'SOURCE_SERVERNAME' WITH (
    ENDPOINT_URL = 'TCP://SOURCE_HOSTNAME:5022',
    AVAILABILITY_MODE = ASYNCHRONOUS_COMMIT,
    FAILOVER_MODE = MANUAL,
    BACKUP_PRIORITY = 50,
    SEEDING_MODE = AUTOMATIC,
    SECONDARY_ROLE(ALLOW_CONNECTIONS = READ_ONLY)
),
N'DEST_SERVERNAME' WITH (
    ENDPOINT_URL = 'TCP://DEST_HOSTNAME:5022',
    AVAILABILITY_MODE = ASYNCHRONOUS_COMMIT,
    FAILOVER_MODE = MANUAL,
    BACKUP_PRIORITY = 50,
    SEEDING_MODE = AUTOMATIC,
    SECONDARY_ROLE(ALLOW_CONNECTIONS = READ_ONLY)
);
GO
Replace the following:
DATABASE_NAME: with the name of the database to migrate.SOURCE_SERVERNAME: with the servername of the source database.DEST_SERVERNAME: with the servername of the destination database.SOURCE_HOSTNAME: with the Fully Qualified Domain Name (FQDN) of the source.DEST_HOSTNAME: with the FQDN of the target.
Run the following T-SQL command on the destination database to add it to the AOAG.
USE [master]
GO

ALTER AVAILABILITY GROUP [migration-ag] JOIN WITH (CLUSTER_TYPE = EXTERNAL);
ALTER AVAILABILITY GROUP [migration-ag] GRANT CREATE ANY DATABASE;
GO
Verify the newly created AOAG and database state in the Object Explorer or by running the following T-SQL command.
SELECT * FROM sys.dm_hadr_availability_group_states
GO

The SQL Server AOAG is now configured and keeps synchronizing between AWS and Google Cloud. As the next step, you must configure a WSFC and a listener for high availability and disaster recovery. For more information, see Windows Server Failover Clustering with SQL Server and What is an availability group listener.
Migrate using distributed availability groups
A distributed availability group is a special type of availability group that spans two separate availability groups. It is designed to provide high availability and disaster recovery capabilities across geographically dispersed locations. This architecture enables seamless data replication and failover between the primary and secondary availability groups, ideal for data migration. For more detailed information see Distributed availability groups.
The following sections discuss how you can migrate your SQL Server database using distributed availability groups.
Before you begin
Ensure that you have a WSFC with SQL Server using an availability group with a Virtual Network Name (VNN) listener, running on AWS.
Prepare the destination environment
To prepare the destination environment, use the following steps:
To configure a WSFC with SQL Server using an availability group using an internal load balancer on Google Cloud, see Configure SQL Server Always-on availability groups with synchronous commit using an internal load balancer.
In Object Explorer, verify that
bookshelf-aghas been created and is replicating thebookshelfdatabase. Once verified, use the next steps to remove both the availability group and the database from both nodes in your failover cluster.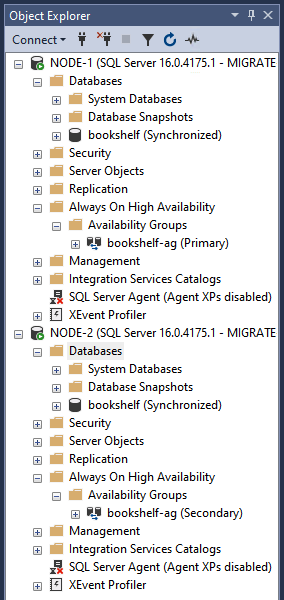
Connect to
node-1in SSMS and save the IP address of thebookshelflistener.SELECT * FROM sys.availability_group_listeners
Run the following T-SQL command to remove the
bookshelf-agavailability group and thebookshelfdatabase.USE master GO DROP AVAILABILITY GROUP [bookshelf-ag] GO ALTER DATABASE [bookshelf] SET SINGLE_USER WITH ROLLBACK IMMEDIATE GO DROP DATABASE [bookshelf] GO
Run the following T-SQL on
node-2in SSMS to remove the replicated database.USE master GO DROP DATABASE [bookshelf] GO
Create a distributed availability group
To create a new availability group to use for the distributed availability group, use the following steps:
Run the following T-SQL command on
node-1.USE master GO CREATE AVAILABILITY GROUP [gcp-dest-ag] FOR REPLICA ON N'NODE-1' WITH ( ENDPOINT_URL = N'TCP://NODE-1:5022', FAILOVER_MODE = MANUAL, AVAILABILITY_MODE = SYNCHRONOUS_COMMIT, BACKUP_PRIORITY = 50, SECONDARY_ROLE(ALLOW_CONNECTIONS = NO), SEEDING_MODE = AUTOMATIC ), N'NODE-2' WITH ( ENDPOINT_URL = N'TCP://NODE-2:5022', FAILOVER_MODE = MANUAL, AVAILABILITY_MODE = SYNCHRONOUS_COMMIT, BACKUP_PRIORITY = 50, SECONDARY_ROLE(ALLOW_CONNECTIONS = NO), SEEDING_MODE = AUTOMATIC ); GOCreate a listener.
USE master; GO ALTER AVAILABILITY GROUP [gcp-dest-ag] ADD LISTENER N'gcp-dest-lsnr' ( WITH IP ( (N'
LISTENER_IP', N'255.255.255.0') ), PORT = 1433); GOReplace
LISTENER_IPwith the IP address of the listener.Connect to
node-2using SSMS and run the following T-SQL command to add it to thegcp-dest-agavailability group.USE master GO ALTER AVAILABILITY GROUP [gcp-dest-ag] JOIN; ALTER AVAILABILITY GROUP [gcp-dest-ag] GRANT CREATE ANY DATABASE;
Connect to the primary replica of the source SQL Server on AWS using SSMS and run the following T-SQL command to create a distributed availability group.
USE [master] GO CREATE AVAILABILITY GROUP [distributed-ag] WITH (DISTRIBUTED) AVAILABILITY GROUP ON '
AWS_AG' WITH ( LISTENER_URL = 'tcp://AWS_LISTENER:5022', AVAILABILITY_MODE = ASYNCHRONOUS_COMMIT, FAILOVER_MODE = MANUAL, SEEDING_MODE = AUTOMATIC ), 'gcp-dest-ag' WITH ( LISTENER_URL = 'tcp://gcp-dest-lsnr:5022', AVAILABILITY_MODE = ASYNCHRONOUS_COMMIT, FAILOVER_MODE = MANUAL, SEEDING_MODE = AUTOMATIC ) GOReplace
AWS_AGwith the name of the availabity group in AWS andAWS_LISTENERwith the listener of the AWS availability group.Run the following T-SQL command in SSMS on
node-1to add it to the distributed availability group.USE [master] GO ALTER AVAILABILITY GROUP [distributed-ag] JOIN AVAILABILITY GROUP ON '
AWS_AG' WITH ( LISTENER_URL = 'tcp://AWS_LISTENER:5022', AVAILABILITY_MODE = ASYNCHRONOUS_COMMIT, FAILOVER_MODE = MANUAL, SEEDING_MODE = AUTOMATIC ), 'gcp-dest-ag' WITH ( LISTENER_URL = 'tcp://gcp-dest-lsnr:5022', AVAILABILITY_MODE = ASYNCHRONOUS_COMMIT, FAILOVER_MODE = MANUAL, SEEDING_MODE = AUTOMATIC ) GOReplace
AWS_AGwith the name of the availabity group in AWS andAWS_LISTENERwith the listener of the AWS availability group.Run the following T-SQL command on `node-1' to verify that all the availability groups are healthy and replicating across the distributed availability group to the new SQL Server cluster on Google Cloud
SELECT * FROM sys.dm_hadr_availability_group_states
GO
Clean up
After you finish the tutorial, you can clean up the resources that you created so that they stop using quota and incurring charges. The following sections describe how to delete or turn off these resources.
Deleting the project
The easiest way to eliminate billing is to delete the project that you created for the tutorial.
To delete the project:
- In the Google Cloud console, go to the Manage resources page.
- In the project list, select the project that you want to delete, and then click Delete.
- In the dialog, type the project ID, and then click Shut down to delete the project.