This tutorial describes how to enable Persistent Disk Asynchronous Replication (PD Async Replication) across two Google Cloud regions as a disaster recovery (DR) solution, and how to bring up the DR instances in case of a disaster.
For the purposes of this document, a disaster is an event in which a primary database high-availability (HA) cluster fails or becomes unavailable. A primary database can fail when the region it's located in fails or becomes inaccessible.
This tutorial is intended for database architects, administrators, and engineers.
Objectives
- Enable asynchronous Persistent Disk replication for all SQL Server AlwaysOn availability group cluster nodes running on Google Cloud.
- Simulate a disaster event and perform a complete disaster-recovery process to validate the disaster-recovery configuration.
Costs
In this document, you use the following billable components of Google Cloud:
To generate a cost estimate based on your projected usage,
use the pricing calculator.
When you finish the tasks that are described in this document, you can avoid continued billing by deleting the resources that you created. For more information, see Clean up.
Before you begin
For this tutorial, you need a Google Cloud project. You can create a new one, or select a project you already created:
-
In the Google Cloud console, on the project selector page, select or create a Google Cloud project.
Roles required to select or create a project
- Select a project: Selecting a project doesn't require a specific IAM role—you can select any project that you've been granted a role on.
-
Create a project: To create a project, you need the Project Creator
(
roles/resourcemanager.projectCreator), which contains theresourcemanager.projects.createpermission. Learn how to grant roles.
-
Verify that billing is enabled for your Google Cloud project.
-
In the Google Cloud console, activate Cloud Shell.
Disaster recovery in Google Cloud
In Google Cloud, DR is about providing continuity of processing, especially when a region fails or becomes inaccessible. There are multiple deployment options for DR site and they will be dictated by the recovery point objective (RPO) and recovery time objective (RTO) requirements. This tutorial covers one of the options where virtual machine (VM) disks are replicated from the primary to the DR region.
Disaster recovery for asynchronous Persistent Disk replication
Persistent Disk Asynchronous Replication (PD Async Replication) provides low RPO and RTO block storage replication for cross-region active-passive DR.
PD Async Replication is a storage option that provides asynchronous replication of data between two regions. In the unlikely event of a regional outage, PD Async Replication lets you to failover your data to a secondary region and restart your workloads in that region.
PD Async Replication replicates data from a disk that is attached to a running workload known as the primary disk, to a separate disk located in another region. The disk receiving replicated data is referred to as the secondary disk.
To ensure that the replicas of all disks attached to each SQL Server node contain data from the same point in time, the disks are added to a consistency group. Consistency groups enable you to perform DR and DR testing across multiple disks.
Disaster recovery architecture
For PD Async Replication, the following diagram shows a minimal architecture that supports database HA in a primary region, and disk replication from the primary region to the DR region.
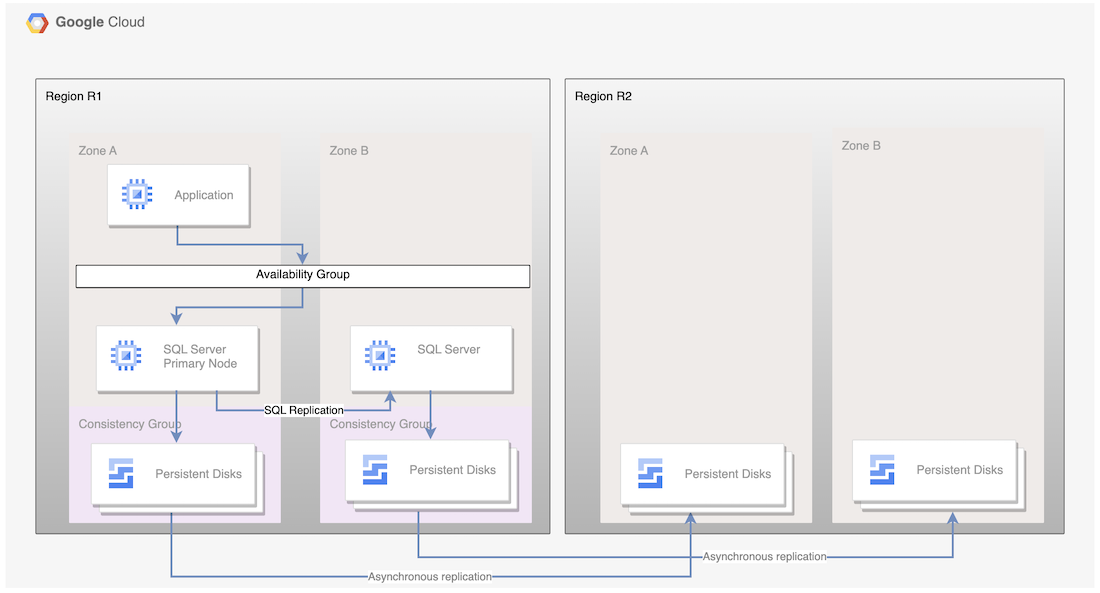
Figure 1. Disaster recovery architecture with Microsoft SQL Server and PD Async Replication
This architecture works as follows:
- Two instances of Microsoft SQL Server, a primary instance and a standby instance, are part of an availability group, and are located in the same region (R1) but different zones (zones A and B). The two instances in R1 coordinate their states using the synchronous-commit mode. The synchronous mode is used because it supports high availability and maintains a consistent data state.
- Disks from both the SQL nodes are added to consistency groups and replicated to the DR region R2. Data is replicated asynchronously by the underlying infrastructure.
- Only disks are replicated to the R2 region. During DR, new VMs are created and the existing replicated disks are attached to the VMs in order to bring the nodes online.
Disaster recovery process
The DR process starts when a region becomes unavailable. The DR process prescribes the operational steps that must be taken, either manually or automatically, to mitigate the region failure and establish a running primary instance in an available region.
A basic database DR process consists of the following steps:
- The first region (R1), which is running the primary database instance, becomes unavailable.
- The operations team recognizes and formally acknowledges the disaster and decides whether a failover is required.
- If a failover is required, disk replication from the primary to the DR region is terminated. A new VM is created from the disk replicas and brought online.
- The new primary database in the DR region (R2) is validated and brought online enabling connectivity.
- Users resume processing on the new primary database and access the primary instance in R2.
Although this basic process establishes a working primary database again, it doesn't establish a complete HA architecture, where the new primary has a standby node.
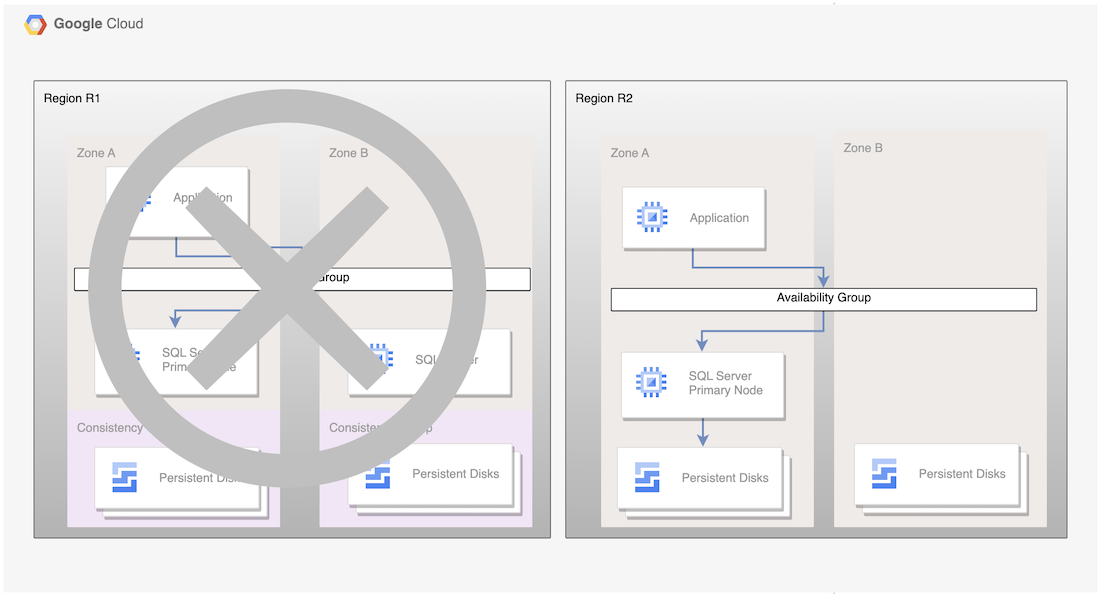
Figure 2. SQL Server deployment after Disaster recovery with Persistent Disk Asynchronous Replication
Fallback to a recovered region
When the primary region (R1) is brought back online, you can plan and execute the fail-back process. The failback process consists of all the steps outlined in this tutorial but, in this case, R2 is the source and R1 is the recovery region.
Choose a SQL Server edition
This tutorial supports the following versions of Microsoft SQL Server:
- SQL Server 2016 Enterprise Edition
- SQL Server 2017 Enterprise Edition
- SQL Server 2019 Enterprise Edition
- SQL Server 2022 Enterprise Edition
The tutorial uses the AlwaysOn availability groups feature in SQL Server.
If you don't require a HA Microsoft SQL Server primary database, and a single database instance suffices as your primary, you can use the following versions of SQL Server:
- SQL Server 2016 Standard Edition
- SQL Server 2017 Standard Edition
- SQL Server 2019 Standard Edition
- SQL Server 2022 Standard Edition
The 2016, 2017, 2019, and 2022 versions of SQL Server have Microsoft SQL Server Management Studio installed in the image; you don't need to install it separately. However, in a production environment, we recommend that you install one instance of Microsoft SQL Server Management Studio on a separate VM in each region. If you set up an HA environment, you should install Microsoft SQL Server Management Studio once for each zone to ensure that it remains available if another zone becomes unavailable.
Set up disaster recovery for Microsoft SQL Server
This tutorial uses the sql-ent-2022-win-2022 image for Microsoft SQL Server
Enterprise.
For a complete list of images, see OS Images.
Set up a two-instance high availability cluster
To set up disk replication to DR region for SQL Server, first
create a two-instance HA cluster in a region.
One instance serves as the primary, and the other instance serves as the
standby. To accomplish this step, follow the instructions in
Configuring SQL Server AlwaysOn availability groups.
This tutorial uses us-central1 for the primary region (referred to as R1).
If you followed the steps in
Configuring SQL Server AlwaysOn availability groups,
you will have created two SQL Server instances in the same region (us-central1). You will have deployed a primary SQL Server instance (node-1) in
us-central1-a, and a standby instance (node-2) in us-central1-b.
Enable disk asynchronous replication
Once all VMs have been created and configured enable disk copy between regions by creating consistency group for all disks attached to the VMs. Data is copied from source disks to newly created blank disks in designated region.
Create a consistency group for both SQL nodes and the domain controller. One of the limitations for a zonal disk is that consistency groups can't span across zones.
gcloud compute resource-policies create disk-consistency-group node-1-disk-const-grp \
--region=$REGION

gcloud compute resource-policies create disk-consistency-group node-2-disk-const-grp \
--region=$REGION

gcloud compute resource-policies create disk-consistency-group witness-disk-const-grp \
--region=$REGION
Add the disks from primary and standby VMs to the corresponding consistency groups.
gcloud compute disks add-resource-policies node-1 \
--zone=$REGION-a \
--resource-policies=node-1-disk-const-grp

gcloud compute disks add-resource-policies node-1-datadisk \
--zone=$REGION-a \
--resource-policies=node-1-disk-const-grp

gcloud compute disks add-resource-policies node-2 \
--zone=$REGION-b \
--resource-policies=node-2-disk-const-grp

gcloud compute disks add-resource-policies node-2-datadisk \
--zone=$REGION-b \
--resource-policies=node-2-disk-const-grp

gcloud compute disks add-resource-policies witness \
--zone=$REGION-c \
--resource-policies=witness-disk-const-grp
Create blank secondary disks in the paired region
DR_REGION="us-west1"
gcloud compute disks create node-1-replica \
  --zone=$DR_REGION-a \
  --size=50 \
  --primary-disk=node-1 \
  --primary-disk-zone=$REGION-a

gcloud compute disks create node-1-datadisk-replica \
  --zone=$DR_REGION-a \
  --size=$PD_SIZE \
  --primary-disk=node-1-datadisk \
  --primary-disk-zone=$REGION-a

gcloud compute disks create node-2-replica \
  --zone=$DR_REGION-b \
  --size=50 \
  --primary-disk=node-2 \
  --primary-disk-zone=$REGION-b

gcloud compute disks create node-2-datadisk-replica \
  --zone=$DR_REGION-b \
  --size=$PD_SIZE \
  --primary-disk=node-2-datadisk \
  --primary-disk-zone=$REGION-b

gcloud compute disks create witness-replica \
  --zone=$DR_REGION-c \
  --size=50 \
  --primary-disk=witness \
  --primary-disk-zone=$REGION-c
Start disk replication. Data is replicated from the primary disk to the newly created blank disk in the DR region.
gcloud compute disks start-async-replication node-1 \
  --zone=$REGION-a \
  --secondary-disk=node-1-replica \
  --secondary-disk-zone=$DR_REGION-a

gcloud compute disks start-async-replication node-1-datadisk \
  --zone=$REGION-a \
  --secondary-disk=node-1-datadisk-replica \
  --secondary-disk-zone=$DR_REGION-a

gcloud compute disks start-async-replication node-2 \
  --zone=$REGION-b \
  --secondary-disk=node-2-replica \
  --secondary-disk-zone=$DR_REGION-b

gcloud compute disks start-async-replication node-2-datadisk \
  --zone=$REGION-b \
  --secondary-disk=node-2-datadisk-replica \
  --secondary-disk-zone=$DR_REGION-b

gcloud compute disks start-async-replication witness \
  --zone=$REGION-c \
  --secondary-disk=witness-replica \
  --secondary-disk-zone=$DR_REGION-c
Data should be replicating between regions at this point.
The replication status for each disk should say Active.
Simulate a disaster recovery
In this section, you test the disaster recovery architecture set up in this tutorial.
Simulate an outage and execute a disaster recovery failover
During a DR failover, you create new VMs in the DR region and attach the replicated disks to them. To simplify the failover, you can use a different Virtual Private Cloud (VPC) in the DR region for recovery, in order to use the same IP address.
Before starting failover, ensure that node-1 is the primary node for the
AlwaysOn availability group you created. Bring up the domain controller and the
primary SQL Server node in order to avoid any data synchronization issues, as
the two nodes are protected by two separate consistency groups.
To simulate an outage, use the following steps:
Create a recovery VPC.
DRVPC_NAME="default-dr"
DRSUBNET_NAME="default-recovery"

gcloud compute networks create $DRVPC_NAME \
--subnet-mode=custom
CIDR = $(gcloud compute networks subnets describe default \
--region=$REGION --format=value\(ipCidrRange\))

gcloud compute networks subnets create $DRSUBNET_NAME \
--network=$DRVPC_NAME --range=$CIDR --region=$DR_REGION
Terminate data replication.
PROJECT=$(gcloud config get-value project)
gcloud compute disks stop-group-async-replication projects/$PROJECT/regions/$REGION/resourcePolicies/node-1-disk-const-grp \
--zone=$REGION-a

gcloud compute disks stop-group-async-replication projects/$PROJECT/regions/$REGION/resourcePolicies/node-2-disk-const-grp \
--zone=$REGION-b

gcloud compute disks stop-group-async-replication projects/$PROJECT/regions/$REGION/resourcePolicies/witness-disk-const-grp \
--zone=$REGION-c
Stop source VMs in the primary region.
gcloud compute instances stop node-1 \
  --zone=$REGION-a

gcloud compute instances stop node-2 \
  --zone=$REGION-b

gcloud compute instances stop witness \
  --zone=$REGION-c
Create VMs in the DR region using disk replicas. These VMs will have the IP address of the source VM.
NODE1IP=$(gcloud compute instances describe node-1 --zone $REGION-a --format=value\(networkInterfaces[0].networkIP\))
NODE2IP=$(gcloud compute instances describe node-2 --zone $REGION-a --format=value\(networkInterfaces[0].networkIP\))
WITNESSIP=$(gcloud compute instances describe witness --zone $REGION-a --format=value\(networkInterfaces[0].networkIP\))

gcloud compute instances create node-1 \
  --zone=$DR_REGION-a \
  --machine-type $MACHINE_TYPE \
  --network=$DRVPC_NAME \
  --subnet=$DRSUBNET_NAME \
  --private-network-ip $NODE1IP\
  --disk=boot=yes,device-name=node-1-replica,mode=rw,name=node-1-replica \
  --disk=auto-delete=yes,boot=no,device-name=node-1-datadisk-replica,mode=rw,name=node-1-datadisk-replica

gcloud compute instances create witness \
  --zone=$DR_REGION-c \
  --machine-type=n2-standard-2 \
  --network=$DRVPC_NAME \
  --subnet=$DRSUBNET_NAME \
  --private-network-ip $WITNESSIP \
  --disk=boot=yes,device-name=witness-replica,mode=rw,name=witness-replica
We've simulated an outrage and failed over to the DR region. Now we can test whether the secondary instance is working correctly or not.
Verify SQL Server connectivity
After VMs have been created, verify that databases have been recovered successfully and server is functioning as expected. In order to test the database you will run a select query from recovered database.
- Connect to the SQL Server VM by using Remote Desktop.
- Open the SQL Server Management Studio.
- In the Connect to server dialog, verify the server name is set to
NODE-1, and select Connect. In the file menu, select File > New > Query with the current connection.
USE [bookshelf];
SELECT * FROM Books;
Clean up
To avoid incurring charges to your Google Cloud account for the resources used in this tutorial:
Delete the project
- In the Google Cloud console, go to the Manage resources page.
- In the project list, select the project that you want to delete, and then click Delete.
- In the dialog, type the project ID, and then click Shut down to delete the project.
What's next
- Explore reference architectures, diagrams, and best practices about Google Cloud. Take a look at our Cloud Architecture Center.