使用文本提示生成图片

您可以使用 Imagen on Vertex AI 根据您在 Google Cloud 控制台中提供或在请求中发送给 Vertex AI API 的文本提示生成新图片。

如需详细了解如何编写用于生成和修改图片的文本提示,请参阅提示指南

查看 Imagen for Generation 模型卡片

试用图片生成功能 (Vertex AI Studio)

位置

位置是您可以在请求中指定的区域,用于控制静态数据的存储位置。如需查看可用区域的列表,请参阅 Vertex AI 上的生成式 AI 位置

安全过滤

向 Imagen 发送图片生成请求时,系统会检查输入数据和输出内容是否包含令人反感的内容。这意味着,如果文本提示输入内容令人反感,则可以将其屏蔽。同样,系统还可能会屏蔽令人反感的输出图片,从而影响您在回答中获得的生成图片数量。

如需详细了解安全过滤和屏蔽内容处理,请参阅 Imagen 的 Responsible AI 和使用指南

性能和限制

使用 Imagen 模型生成图片时,存在以下限制:

限制
(Imagen 3)
每项目每分钟的 API 请求数上限 Imagen 3: 20

Imagen 3 Fast:200
每个请求返回的图片数量上限(文本转图片生成) 4
请求中上传或发送的图片大小上限 (MB) 10 MB
支持返回的图片分辨率(像素)
  • 1024x1024 像素(宽高比为 1:1)
  • 896x1280(宽高比为 3:4)
  • 1280x896(宽高比为 4:3)
  • 768x1408(宽高比为 9:16)
  • 1408x768(宽高比为 16:9)
输入词元数量上限(文本到图片生成提示文本) 480 个词元

模型版本

图片生成模型有多种版本可供您使用。如需了解有关 Imagen 模型版本控制的一般信息,请参阅 Imagen 模型和生命周期

以下模型及其关联的功能可用于生成图片:

模型 模型资源名称和版本 发布阶段 特征 宽高比 支持的语言 结算
Imagen 3 Imagen 3:

imagen-3.0-generate-002(最新模型)

imagen-3.0-generate-001


Imagen 3 Fast:imagen-3.0-fast-generate-001

这是一种低延迟模型变体,可用于原型设计或低延迟应用场景。


Imagen 3 自定义修改imagen-3.0-capability-001(已获批准的用户)
正式版

支持的功能:

  • 图片生成
  • 数字化水印和验证
  • 用户可配置的安全设置
  • 使用提示重写器增强提示(仅限 imagen-3.0-generate-002 模型)
  • 图片自定义(少量样本学习):
    • 主题自定义(产品、人物和宠物)
    • 风格自定义
    • 受控自定义(涂鸦和 Canny 边缘)
    • 指示自定义(风格转移)
  • 图片编辑(基于蒙版):
    • 修复(插入或移除)
    • 扩绘
    • 修改产品图片
  • 1:1 - 1024x1024 像素(方形)
  • 3:4  - 896x1280
  • 4:3  - 1280x896
  • 9:16 - 768x1408
  • 16:9 - 1408x768

正式版:

  • 英语

预览版:

  • 中文(简体)
  • 中文(繁体)
  • 印地语
  • 日语
  • 韩语
  • 葡萄牙语
  • 西班牙语

是的,价格适用于生成。Imagen 3 模型的价格采用新 SKU,因此价格与其他模型不同。

如需查看所有功能和发布阶段,请参阅 Imagen 概览
如需查看与每项功能关联的价格,请参阅价格页面

准备工作

  1. Sign in to your Google Cloud account. If you're new to Google Cloud, create an account to evaluate how our products perform in real-world scenarios. New customers also get $300 in free credits to run, test, and deploy workloads.
  2. In the Google Cloud console, on the project selector page, select or create a Google Cloud project.

    Go to project selector

  3. Make sure that billing is enabled for your Google Cloud project.

  4. Enable the Vertex AI API.

    Enable the API

  5. In the Google Cloud console, on the project selector page, select or create a Google Cloud project.

    Go to project selector

  6. Make sure that billing is enabled for your Google Cloud project.

  7. Enable the Vertex AI API.

    Enable the API

  8. 为您的环境设置身份验证。

    Select the tab for how you plan to use the samples on this page:

    Console

    When you use the Google Cloud console to access Google Cloud services and APIs, you don't need to set up authentication.

    Java

    如需在本地开发环境中使用本页面上的 Java 示例,请安装并初始化 gcloud CLI,然后使用您的用户凭据设置应用默认凭据。

    1. Install the Google Cloud CLI.
    2. To initialize the gcloud CLI, run the following command:

      gcloud init
    3. If you're using a local shell, then create local authentication credentials for your user account:

      gcloud auth application-default login

      You don't need to do this if you're using Cloud Shell.

    Google Cloud

    Node.js

    如需在本地开发环境中使用本页面上的 Node.js 示例,请安装并初始化 gcloud CLI,然后使用您的用户凭据设置应用默认凭据。

    1. Install the Google Cloud CLI.
    2. To initialize the gcloud CLI, run the following command:

      gcloud init
    3. If you're using a local shell, then create local authentication credentials for your user account:

      gcloud auth application-default login

      You don't need to do this if you're using Cloud Shell.

    Google Cloud

    Python

    如需在本地开发环境中使用本页面上的 Python 示例,请安装并初始化 gcloud CLI,然后使用您的用户凭据设置应用默认凭据。

    1. Install the Google Cloud CLI.
    2. To initialize the gcloud CLI, run the following command:

      gcloud init
    3. If you're using a local shell, then create local authentication credentials for your user account:

      gcloud auth application-default login

      You don't need to do this if you're using Cloud Shell.

    Google Cloud

    REST

    如需在本地开发环境中使用本页面上的 REST API 示例,请使用您提供给 gcloud CLI 的凭据。

      Install the Google Cloud CLI, then initialize it by running the following command:

      gcloud init

    如需了解详情,请参阅 Google Cloud 身份验证文档中的使用 REST 时进行身份验证

使用文本生成图片

您可以仅使用描述性文本作为输入来生成新图片。以下示例展示了生成图片的基本说明,但您也可以使用其他参数,具体取决于您的应用场景。

控制台

  1. 在 Google Cloud 控制台中,打开 Vertex AI 信息中心内的 Vertex AI Studio > 媒体标签页。

    打开 Vertex AI Studio 标签页
  2. 编写提示字段中,输入要生成的图片的说明。如需详细了解如何编写有效的提示,请参阅提示指南

    • 例如:“清晨水中的小船水彩插图”
  3. 可选。在参数面板的模型选项框中,选择要使用的模型版本。如需了解详情,请参阅模型版本

  4. 可选。更改标准参数和高级参数

  5. 如需生成图片,请点击 生成

    使用文本生成的图片示例
    图片生成视图:“清晨水中的小船水彩插图”

REST

如需详细了解 imagegeneration 模型请求,请参阅 imagegeneration 模型 API 参考文档

在使用任何请求数据之前,请先进行以下替换:

  • PROJECT_ID:您的 Google Cloud 项目 ID
  • MODEL_VERSION:要使用的 imagegeneration 模型版本。可用的值:
    • Imagen 3:
      • imagen-3.0-generate-002(最新模型)
      • imagen-3.0-generate-001
      • imagen-3.0-fast-generate-001 - 低延迟模型版本。
    • 默认模型版本:
      • imagegeneration - 使用默认模型版本 v.006。最佳实践是应始终指定模型版本,尤其是在生产环境中。

    如需详细了解模型版本和功能,请参阅模型版本

  • LOCATION:您的项目的区域。 例如 us-central1europe-west2asia-northeast3。如需查看可用区域的列表,请参阅 Vertex AI 上的生成式 AI 位置
  • TEXT_PROMPT:用于指导模型生成什么图片的文本提示。生成和修改都需要此字段。
  • IMAGE_COUNT:生成的图片数量。 接受的整数值:1-8 (imagegeneration@002)、1-4(所有其他模型版本)。默认值:4。
  • 其他可选参数

    根据您的应用场景,使用以下可选变量。在 "parameters": {} 对象中添加以下部分或全部参数。此列表展示了常见的可选参数,但并非详尽无遗。如需详细了解可选参数,请参阅 Imagen API 参考文档:生成图片

    "parameters": {
      "sampleCount": IMAGE_COUNT,
      "addWatermark": ADD_WATERMARK,
      "aspectRatio": "ASPECT_RATIO",
      "enhancePrompt": ENABLE_PROMPT_REWRITING,
      "includeRaiReason": INCLUDE_RAI_REASON,
      "includeSafetyAttributes": INCLUDE_SAFETY_ATTRIBUTES,
      "outputOptions": {
        "mimeType": "MIME_TYPE",
        "compressionQuality": COMPRESSION_QUALITY
      },
      "personGeneration": "PERSON_SETTING",
      "safetySetting": "SAFETY_SETTING",
      "seed": SEED_NUMBER,
      "storageUri": "OUTPUT_STORAGE_URI"
    }
    
    • ADD_WATERMARK:布尔值。可选。是否为生成的图片启用水印。将该字段设置为 true 时生成的任何图片都包含数字 SynthID,您可以使用此 ID 来验证带水印的图片。如果您省略此字段,则系统会使用默认值 true;您必须将该值设置为 false 才能停用此功能。仅当 seed 字段设置为 false 时,您才可以使用该字段来获取确定性输出。
    • ASPECT_RATIO:字符串。可选。用于控制宽高比的生成模式参数。支持的宽高比值及其预期用途:
      • 1:1(默认,方形)
      • 3:4(广告、社交媒体)
      • 4:3(电视、摄影)
      • 16:9(横向)
      • 9:16(纵向)
    • ENABLE_PROMPT_REWRITING:布尔值。可选。一个参数,使用基于 LLM 的重写提示功能,以提供更高质量的图片,从而更好地反映原始提示的意图。停用此功能可能会影响图片质量和提示遵循度。默认值:true
    • INCLUDE_RAI_REASON:布尔值。可选。是否在输入或输出被屏蔽的回答中启用 Responsible AI 过滤的原因代码。默认值:false
    • INCLUDE_SAFETY_ATTRIBUTES:布尔值。可选。是否针对未经过滤的输入和输出在回答中启用安全属性列表的四舍五入 Responsible AI 分数。安全属性类别:"Death, Harm & Tragedy""Firearms & Weapons""Hate""Health""Illicit Drugs""Politics""Porn""Religion & Belief""Toxic""Violence""Vulgarity""War & Conflict"。默认值为 false
    • MIME_TYPE:字符串。可选。图片内容的 MIME 类型。可用的值:
      • image/jpeg
      • image/gif
      • image/png
      • image/webp
      • image/bmp
      • image/tiff
      • image/vnd.microsoft.icon
    • COMPRESSION_QUALITY:整数。可选。仅适用于 JPEG 输出文件。模型为以 JPEG 文件格式生成的图片保留的细节级别。值:0100,数字越大表示压缩程度越高。默认值:75
    • PERSON_SETTING:字符串。可选。用于控制模型允许的人物类型或人脸生成的安全设置。可用的值:
      • allow_adult(默认):仅允许生成成年人(名人除外)。不允许针对任何设置生成名人。
      • dont_allow:禁止在生成的图片中包含人物或人脸。
    • SAFETY_SETTING:字符串。可选。用于控制生成的图片的安全过滤器阈值的设置。可用的值:
      • block_low_and_above:最高安全阈值,使过滤的生成图片的数量最多。之前的值:block_most
      • block_medium_and_above(默认值):中等安全阈值,用于平衡潜在有害内容和安全内容的过滤设置。之前的值:block_some
      • block_only_high:安全阈值,可减少因安全过滤器而被屏蔽的请求数量。此设置可能会增加 Imagen 生成的不良内容。 之前的值:block_few
    • SEED_NUMBER:整数。可选。您提供的任何非负整数,以使输出图片具有确定性。提供相同的种子编号会生成相同的输出图片。 如果您使用的模型支持数字水印,则必须设置 "addWatermark": false 才能使用此字段。接受的整数值:1 - 2147483647
    • OUTPUT_STORAGE_URI:字符串。可选。用于存储输出图片的 Cloud Storage 存储桶。如果未提供,则回答中会返回 base64 编码的图片字节。示例值:gs://image-bucket/output/

HTTP 方法和网址:

POST https://LOCATION-aiplatform.googleapis.com/v1/projects/PROJECT_ID/locations/LOCATION/publishers/google/models/MODEL_VERSION:predict

请求 JSON 正文:

{
  "instances": [
    {
      "prompt": "TEXT_PROMPT"
    }
  ],
  "parameters": {
    "sampleCount": IMAGE_COUNT
  }
}

如需发送请求,请选择以下方式之一:

curl

将请求正文保存在名为 request.json 的文件中,然后执行以下命令:

curl -X POST \
-H "Authorization: Bearer $(gcloud auth print-access-token)" \
-H "Content-Type: application/json; charset=utf-8" \
-d @request.json \
"https://LOCATION-aiplatform.googleapis.com/v1/projects/PROJECT_ID/locations/LOCATION/publishers/google/models/MODEL_VERSION:predict"

PowerShell

将请求正文保存在名为 request.json 的文件中,然后执行以下命令:

$cred = gcloud auth print-access-token
$headers = @{ "Authorization" = "Bearer $cred" }

Invoke-WebRequest `
-Method POST `
-Headers $headers `
-ContentType: "application/json; charset=utf-8" `
-InFile request.json `
-Uri "https://LOCATION-aiplatform.googleapis.com/v1/projects/PROJECT_ID/locations/LOCATION/publishers/google/models/MODEL_VERSION:predict" | Select-Object -Expand Content
以下示例响应适用于包含 "sampleCount": 2 的请求。响应返回两个预测对象,其中生成的图片字节采用 base64 编码。
{
  "predictions": [
    {
      "bytesBase64Encoded": "BASE64_IMG_BYTES",
      "mimeType": "image/png"
    },
    {
      "mimeType": "image/png",
      "bytesBase64Encoded": "BASE64_IMG_BYTES"
    }
  ]
}

如果您使用的是支持提示增强功能的模型,则回答中会包含一个额外的 prompt 字段,其中包含用于生成的增强型提示:

{
  "predictions": [
    {
      "mimeType": "MIME_TYPE",
      "prompt": "ENHANCED_PROMPT_1",
      "bytesBase64Encoded": "BASE64_IMG_BYTES_1"
    },
    {
      "mimeType": "MIME_TYPE",
      "prompt": "ENHANCED_PROMPT_2",
      "bytesBase64Encoded": "BASE64_IMG_BYTES_2"
    }
  ]
}

Python

在尝试此示例之前,请按照《Vertex AI 快速入门:使用客户端库》中的 Python 设置说明执行操作。 如需了解详情,请参阅 Vertex AI Python API 参考文档

如需向 Vertex AI 进行身份验证,请设置应用默认凭据。 如需了解详情,请参阅为本地开发环境设置身份验证

在此示例中,您将对 ImageGenerationModel 调用 generate_images 方法,并在本地保存生成的图片。然后,您可以选择使用笔记本中的 show() 方法显示生成的图片。如需详细了解模型版本和功能,请参阅模型版本


import vertexai
from vertexai.preview.vision_models import ImageGenerationModel

# TODO(developer): Update and un-comment below lines
# PROJECT_ID = "your-project-id"
# output_file = "input-image.png"
# prompt = "" # The text prompt describing what you want to see.

vertexai.init(project=PROJECT_ID, location="us-central1")

model = ImageGenerationModel.from_pretrained("imagen-3.0-generate-002")

images = model.generate_images(
    prompt=prompt,
    # Optional parameters
    number_of_images=1,
    language="en",
    # You can't use a seed value and watermark at the same time.
    # add_watermark=False,
    # seed=100,
    aspect_ratio="1:1",
    safety_filter_level="block_some",
    person_generation="allow_adult",
)

images[0].save(location=output_file, include_generation_parameters=False)

# Optional. View the generated image in a notebook.
# images[0].show()

print(f"Created output image using {len(images[0]._image_bytes)} bytes")
# Example response:
# Created output image using 1234567 bytes

Java

在尝试此示例之前,请按照《Vertex AI 快速入门:使用客户端库》中的 Java 设置说明执行操作。 如需了解详情,请参阅 Vertex AI Java API 参考文档

如需向 Vertex AI 进行身份验证,请设置应用默认凭据。 如需了解详情,请参阅为本地开发环境设置身份验证

在此示例中,您将 imagen-3.0-generate-001 模型指定为 EndpointName 的一部分。EndpointName 会传递给对 PredictionServiceClient 调用的 predict 方法。该服务会生成图片,然后将其保存在本地。如需详细了解模型版本和功能,请参阅模型版本


import com.google.api.gax.rpc.ApiException;
import com.google.cloud.aiplatform.v1.EndpointName;
import com.google.cloud.aiplatform.v1.PredictResponse;
import com.google.cloud.aiplatform.v1.PredictionServiceClient;
import com.google.cloud.aiplatform.v1.PredictionServiceSettings;
import com.google.gson.Gson;
import com.google.protobuf.InvalidProtocolBufferException;
import com.google.protobuf.Value;
import com.google.protobuf.util.JsonFormat;
import java.io.IOException;
import java.nio.file.Files;
import java.nio.file.Path;
import java.util.Base64;
import java.util.Collections;
import java.util.HashMap;
import java.util.Map;

public class GenerateImageSample {

  public static void main(String[] args) throws IOException {
    // TODO(developer): Replace these variables before running the sample.
    String projectId = "my-project-id";
    String location = "us-central1";
    String prompt = ""; // The text prompt describing what you want to see.

    generateImage(projectId, location, prompt);
  }

  // Generate an image using a text prompt using an Imagen model
  public static PredictResponse generateImage(String projectId, String location, String prompt)
      throws ApiException, IOException {
    final String endpoint = String.format("%s-aiplatform.googleapis.com:443", location);
    PredictionServiceSettings predictionServiceSettings =
        PredictionServiceSettings.newBuilder().setEndpoint(endpoint).build();

    // Initialize client that will be used to send requests. This client only needs to be created
    // once, and can be reused for multiple requests.
    try (PredictionServiceClient predictionServiceClient =
        PredictionServiceClient.create(predictionServiceSettings)) {

      final EndpointName endpointName =
          EndpointName.ofProjectLocationPublisherModelName(
              projectId, location, "google", "imagen-3.0-generate-001");

      Map<String, Object> instancesMap = new HashMap<>();
      instancesMap.put("prompt", prompt);
      Value instances = mapToValue(instancesMap);

      Map<String, Object> paramsMap = new HashMap<>();
      paramsMap.put("sampleCount", 1);
      // You can't use a seed value and watermark at the same time.
      // paramsMap.put("seed", 100);
      // paramsMap.put("addWatermark", false);
      paramsMap.put("aspectRatio", "1:1");
      paramsMap.put("safetyFilterLevel", "block_some");
      paramsMap.put("personGeneration", "allow_adult");
      Value parameters = mapToValue(paramsMap);

      PredictResponse predictResponse =
          predictionServiceClient.predict(
              endpointName, Collections.singletonList(instances), parameters);

      for (Value prediction : predictResponse.getPredictionsList()) {
        Map<String, Value> fieldsMap = prediction.getStructValue().getFieldsMap();
        if (fieldsMap.containsKey("bytesBase64Encoded")) {
          String bytesBase64Encoded = fieldsMap.get("bytesBase64Encoded").getStringValue();
          Path tmpPath = Files.createTempFile("imagen-", ".png");
          Files.write(tmpPath, Base64.getDecoder().decode(bytesBase64Encoded));
          System.out.format("Image file written to: %s\n", tmpPath.toUri());
        }
      }
      return predictResponse;
    }
  }

  private static Value mapToValue(Map<String, Object> map) throws InvalidProtocolBufferException {
    Gson gson = new Gson();
    String json = gson.toJson(map);
    Value.Builder builder = Value.newBuilder();
    JsonFormat.parser().merge(json, builder);
    return builder.build();
  }
}

Node.js

在尝试此示例之前,请按照《Vertex AI 快速入门:使用客户端库》中的 Node.js 设置说明执行操作。 如需了解详情,请参阅 Vertex AI Node.js API 参考文档

如需向 Vertex AI 进行身份验证,请设置应用默认凭据。 如需了解详情,请参阅为本地开发环境设置身份验证

在此示例中,您将对 PredictionServiceClient 调用 predict 方法。该服务会生成图片,然后将其保存在本地。如需详细了解模型版本和功能,请参阅模型版本

/**
 * TODO(developer): Update these variables before running the sample.
 */
const projectId = process.env.CAIP_PROJECT_ID;
const location = 'us-central1';
const prompt = 'a dog reading a newspaper';

const aiplatform = require('@google-cloud/aiplatform');

// Imports the Google Cloud Prediction Service Client library
const {PredictionServiceClient} = aiplatform.v1;

// Import the helper module for converting arbitrary protobuf.Value objects
const {helpers} = aiplatform;

// Specifies the location of the api endpoint
const clientOptions = {
  apiEndpoint: `${location}-aiplatform.googleapis.com`,
};

// Instantiates a client
const predictionServiceClient = new PredictionServiceClient(clientOptions);

async function generateImage() {
  const fs = require('fs');
  const util = require('util');
  // Configure the parent resource
  const endpoint = `projects/${projectId}/locations/${location}/publishers/google/models/imagen-3.0-generate-001`;

  const promptText = {
    prompt: prompt, // The text prompt describing what you want to see
  };
  const instanceValue = helpers.toValue(promptText);
  const instances = [instanceValue];

  const parameter = {
    sampleCount: 1,
    // You can't use a seed value and watermark at the same time.
    // seed: 100,
    // addWatermark: false,
    aspectRatio: '1:1',
    safetyFilterLevel: 'block_some',
    personGeneration: 'allow_adult',
  };
  const parameters = helpers.toValue(parameter);

  const request = {
    endpoint,
    instances,
    parameters,
  };

  // Predict request
  const [response] = await predictionServiceClient.predict(request);
  const predictions = response.predictions;
  if (predictions.length === 0) {
    console.log(
      'No image was generated. Check the request parameters and prompt.'
    );
  } else {
    let i = 1;
    for (const prediction of predictions) {
      const buff = Buffer.from(
        prediction.structValue.fields.bytesBase64Encoded.stringValue,
        'base64'
      );
      // Write image content to the output file
      const writeFile = util.promisify(fs.writeFile);
      const filename = `output${i}.png`;
      await writeFile(filename, buff);
      console.log(`Saved image ${filename}`);
      i++;
    }
  }
}
await generateImage();

使用参数生成图片

生成图片时,您可以根据使用场景设置多个标准和高级参数。

添加或验证图片水印

默认情况下,数字水印会添加到由支持水印生成的模型版本生成的所有图片中。此功能会为图片添加不可见的数字水印(称为 SynthID)。然后,您可以验证图片是否包含数字水印。

生成带水印的图片

使用以下示例生成带数字水印的图片。

控制台

  1. 在 Google Cloud 控制台中,打开 Vertex AI 信息中心内的 Vertex AI Studio > 媒体标签页。

    打开 Vertex AI Studio 标签页
  2. 编写提示字段中,输入要生成的图片的说明。如需详细了解如何编写有效的提示,请参阅提示指南

    • 例如:“清晨水中的小船水彩插图”
  3. 可选。在参数面板的模型选项框中,选择要使用的模型版本。如需了解详情,请参阅模型版本

  4. 可选。更改标准参数和高级参数

  5. 如需生成图片,请点击 生成

  6. 模型版本 006 及更高版本:数字水印会自动添加到生成的图片中。您无法使用 Google Cloud 控制台停用用于生成图片的数字水印。

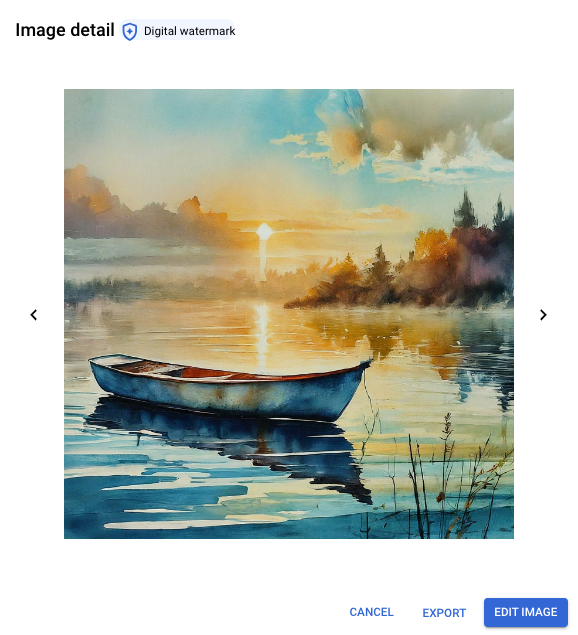
    您可以选择图片以前往图片详情窗口。带水印的图片包含 数字水印标记。您还可以明确验证图片水印。

    使用文本生成的带水印图片示例
    使用提示中的 Imagen 2 生成的带水印图片的图片详细信息视图:“清晨水中的小船水彩插图”。

REST

如需详细了解 imagegeneration 模型请求,请参阅 imagegeneration 模型 API 参考文档

在使用任何请求数据之前,请先进行以下替换:

  • PROJECT_ID:您的 Google Cloud 项目 ID
  • MODEL_VERSION:要使用的 imagegeneration 模型版本。可用的值:
    • imagen-3.0-generate-002(最新模型)
    • imagen-3.0-generate-001
    • imagen-3.0-fast-generate-001 - 低延迟模型版本。
    • imagegeneration@006

    如需详细了解模型版本和功能,请参阅模型版本

  • LOCATION:您的项目的区域。 例如 us-central1europe-west2asia-northeast3。如需查看可用区域的列表,请参阅 Vertex AI 上的生成式 AI 位置
  • TEXT_PROMPT:用于指导模型生成什么图片的文本提示。生成和修改都需要此字段。
  • IMAGE_COUNT:生成的图片数量。 接受的整数值:1-8 (imagegeneration@002)、1-4(所有其他模型版本)。默认值:4。
  • ADD_WATERMARK:布尔值。可选。是否为生成的图片启用水印。将该字段设置为 true 时生成的任何图片都包含数字 SynthID,您可以使用此 ID 来验证带水印的图片。如果您省略此字段,则系统会使用默认值 true;您必须将该值设置为 false 才能停用此功能。仅当 seed 字段设置为 false 时,您才可以使用该字段来获取确定性输出。

HTTP 方法和网址:

POST https://LOCATION-aiplatform.googleapis.com/v1/projects/PROJECT_ID/locations/LOCATION/publishers/google/models/MODEL_VERSION:predict

请求 JSON 正文:

{
  "instances": [
    {
      "prompt": "TEXT_PROMPT"
    }
  ],
  "parameters": {
    "sampleCount": IMAGE_COUNT,
    "addWatermark": ADD_WATERMARK
  }
}

如需发送请求,请选择以下方式之一:

curl

将请求正文保存在名为 request.json 的文件中,然后执行以下命令:

curl -X POST \
-H "Authorization: Bearer $(gcloud auth print-access-token)" \
-H "Content-Type: application/json; charset=utf-8" \
-d @request.json \
"https://LOCATION-aiplatform.googleapis.com/v1/projects/PROJECT_ID/locations/LOCATION/publishers/google/models/MODEL_VERSION:predict"

PowerShell

将请求正文保存在名为 request.json 的文件中,然后执行以下命令:

$cred = gcloud auth print-access-token
$headers = @{ "Authorization" = "Bearer $cred" }

Invoke-WebRequest `
-Method POST `
-Headers $headers `
-ContentType: "application/json; charset=utf-8" `
-InFile request.json `
-Uri "https://LOCATION-aiplatform.googleapis.com/v1/projects/PROJECT_ID/locations/LOCATION/publishers/google/models/MODEL_VERSION:predict" | Select-Object -Expand Content
以下示例响应适用于包含 "sampleCount": 2 的请求。响应返回两个预测对象,其中生成的图片字节采用 base64 编码。 数字水印会自动添加到图片中,因此回答与无水印回答相同。
{
  "predictions": [
    {
      "mimeType": "image/png",
      "bytesBase64Encoded": "BASE64_IMG_BYTES"
    },
    {
      "bytesBase64Encoded": "BASE64_IMG_BYTES",
      "mimeType": "image/png"
    }
  ]
}

Python 版 Vertex AI SDK


import vertexai
from vertexai.preview.vision_models import ImageGenerationModel

# TODO(developer): Update and un-comment below lines
# PROJECT_ID = "your-project-id"
# output_file = "input-image.png"
# prompt = "" # The text prompt describing what you want to see.

vertexai.init(project=PROJECT_ID, location="us-central1")

model = ImageGenerationModel.from_pretrained("imagen-3.0-generate-002")

images = model.generate_images(
    prompt=prompt,
    # Optional parameters
    number_of_images=1,
    language="en",
    # You can't use a seed value and watermark at the same time.
    # add_watermark=False,
    # seed=100,
    aspect_ratio="1:1",
    safety_filter_level="block_some",
    person_generation="allow_adult",
)

images[0].save(location=output_file, include_generation_parameters=False)

# Optional. View the generated image in a notebook.
# images[0].show()

print(f"Created output image using {len(images[0]._image_bytes)} bytes")
# Example response:
# Created output image using 1234567 bytes

Node.js

/**
 * TODO(developer): Update these variables before running the sample.
 */
const projectId = process.env.CAIP_PROJECT_ID;
const location = 'us-central1';
const prompt = 'a dog reading a newspaper';

const aiplatform = require('@google-cloud/aiplatform');

// Imports the Google Cloud Prediction Service Client library
const {PredictionServiceClient} = aiplatform.v1;

// Import the helper module for converting arbitrary protobuf.Value objects
const {helpers} = aiplatform;

// Specifies the location of the api endpoint
const clientOptions = {
  apiEndpoint: `${location}-aiplatform.googleapis.com`,
};

// Instantiates a client
const predictionServiceClient = new PredictionServiceClient(clientOptions);

async function generateImage() {
  const fs = require('fs');
  const util = require('util');
  // Configure the parent resource
  const endpoint = `projects/${projectId}/locations/${location}/publishers/google/models/imagen-3.0-generate-001`;

  const promptText = {
    prompt: prompt, // The text prompt describing what you want to see
  };
  const instanceValue = helpers.toValue(promptText);
  const instances = [instanceValue];

  const parameter = {
    sampleCount: 1,
    // You can't use a seed value and watermark at the same time.
    // seed: 100,
    // addWatermark: false,
    aspectRatio: '1:1',
    safetyFilterLevel: 'block_some',
    personGeneration: 'allow_adult',
  };
  const parameters = helpers.toValue(parameter);

  const request = {
    endpoint,
    instances,
    parameters,
  };

  // Predict request
  const [response] = await predictionServiceClient.predict(request);
  const predictions = response.predictions;
  if (predictions.length === 0) {
    console.log(
      'No image was generated. Check the request parameters and prompt.'
    );
  } else {
    let i = 1;
    for (const prediction of predictions) {
      const buff = Buffer.from(
        prediction.structValue.fields.bytesBase64Encoded.stringValue,
        'base64'
      );
      // Write image content to the output file
      const writeFile = util.promisify(fs.writeFile);
      const filename = `output${i}.png`;
      await writeFile(filename, buff);
      console.log(`Saved image ${filename}`);
      i++;
    }
  }
}
await generateImage();

验证带水印的图片

使用以下示例验证图片是否带有水印。

控制台

  1. 在 Google Cloud 控制台中,打开 Vertex AI 信息中心内的 Vertex AI Studio > 媒体标签页。

    打开 Vertex AI Studio 标签页

  2. 在下方面板中,点击验证

  3. 点击上传图片

  4. 选择本地保存的生成的图片。

    控制台中生成的图片的已验证水印示例

REST

在使用任何请求数据之前,请先进行以下替换:

  • PROJECT_ID:您的 Google Cloud 项目 ID
  • LOCATION:您的项目的区域。 例如 us-central1europe-west2asia-northeast3。如需查看可用区域的列表,请参阅 Vertex AI 上的生成式 AI 位置
  • B64_IMAGE:要验证是否包含数字水印的图片。图片必须指定为 base64 编码的字节字符串。大小上限:10 MB。

HTTP 方法和网址:

POST https://LOCATION-aiplatform.googleapis.com/v1/projects/PROJECT_ID/locations/LOCATION/publishers/google/models/imageverification@001:predict

请求 JSON 正文:

{
  "instances": [
    {
      "image": {
        "bytesBase64Encoded": "B64_IMAGE"
      }
    }
  ],
  "parameters": {
    "watermarkVerification": true
  }
}

如需发送请求,请选择以下方式之一:

curl

将请求正文保存在名为 request.json 的文件中,然后执行以下命令:

curl -X POST \
-H "Authorization: Bearer $(gcloud auth print-access-token)" \
-H "Content-Type: application/json; charset=utf-8" \
-d @request.json \
"https://LOCATION-aiplatform.googleapis.com/v1/projects/PROJECT_ID/locations/LOCATION/publishers/google/models/imageverification@001:predict"

PowerShell

将请求正文保存在名为 request.json 的文件中,然后执行以下命令:

$cred = gcloud auth print-access-token
$headers = @{ "Authorization" = "Bearer $cred" }

Invoke-WebRequest `
-Method POST `
-Headers $headers `
-ContentType: "application/json; charset=utf-8" `
-InFile request.json `
-Uri "https://LOCATION-aiplatform.googleapis.com/v1/projects/PROJECT_ID/locations/LOCATION/publishers/google/models/imageverification@001:predict" | Select-Object -Expand Content
以下示例回答适用于包含数字水印的图片的请求。“决定”字段可以返回以下任意值:ACCEPTREJECT
{
  "predictions": [
    {
      "decision": "ACCEPT"
    }
  ]
}

Python 版 Vertex AI SDK


import vertexai
from vertexai.preview.vision_models import (
    Image,
    WatermarkVerificationModel,
)

# TODO(developer): Update and un-comment below lines
# PROJECT_ID = "your-project-id"
# input_file = "input-image.png"

vertexai.init(project=PROJECT_ID, location="us-central1")

verification_model = WatermarkVerificationModel.from_pretrained(
    "imageverification@001"
)
image = Image.load_from_file(location=input_file)

watermark_verification_response = verification_model.verify_image(image)

print(
    f"Watermark verification result: {watermark_verification_response.watermark_verification_result}"
)
# Example response:
# Watermark verification result: ACCEPT
# or "REJECT" if the image does not contain a digital watermark.

Node.js

/**
 * TODO(developer): Update these variables before running the sample.
 */
const projectId = process.env.CAIP_PROJECT_ID;
const location = 'us-central1';
const inputFile = 'resources/dog_newspaper.png'; // has watermark

const aiplatform = require('@google-cloud/aiplatform');

// Imports the Google Cloud Prediction Service Client library
const {PredictionServiceClient} = aiplatform.v1;

// Import the helper module for converting arbitrary protobuf.Value objects
const {helpers} = aiplatform;

// Specifies the location of the api endpoint
const clientOptions = {
  apiEndpoint: `${location}-aiplatform.googleapis.com`,
};

// Instantiates a client
const predictionServiceClient = new PredictionServiceClient(clientOptions);

async function verifyImageWatermark() {
  const fs = require('fs');
  // Configure the parent resource
  const endpoint = `projects/${projectId}/locations/${location}/publishers/google/models/imageverification@001`;

  const imageFile = fs.readFileSync(inputFile);
  // Convert the image data to a Buffer and base64 encode it.
  const encodedImage = Buffer.from(imageFile).toString('base64');

  const instance = {
    image: {
      bytesBase64Encoded: encodedImage,
    },
  };
  const instanceValue = helpers.toValue(instance);
  const instances = [instanceValue];

  const request = {
    endpoint,
    instances,
  };

  // Predict request
  const [response] = await predictionServiceClient.predict(request);
  const predictions = response.predictions;
  if (predictions.length === 0) {
    console.log('No decision was generated. Check the request image.');
  } else {
    predictions.forEach(prediction => {
      // "ACCEPT" if the image contains a digital watermark
      // "REJECT" if the image does not contain a digital watermark
      console.log(prediction.structValue.fields.decision.stringValue);
    });
  }
}
await verifyImageWatermark();

配置 Responsible AI (RAI) 安全设置

您可以在图片生成模型中使用几个 Responsible AI (RAI) 过滤参数。例如,您可以让模型报告阻止内容的 RAI 过滤代码、使用 RAI 过滤器停用人员或人脸生成、设置内容过滤级别,或返回输入和输出的安全属性列表的四舍五入 RAI 分数。

如需详细了解 Responsible AI (RAI)、其相关参数及其示例输出,请参阅了解和配置 Responsible AI for Imagen

以下示例展示了如何为图片生成设置可用的 RAI 参数。

控制台

  1. 在 Google Cloud 控制台中,打开 Vertex AI 信息中心内的 Vertex AI Studio > 媒体标签页。

    打开 Vertex AI Studio 标签页

  2. 添加文本提示并选择输入参数。

  3. 如果未展开,请点击高级选项

  4. 点击安全设置

  5. 选择您的安全设置:

    • 生成人物/面孔:选择一项设置:
      • Allow (All ages)
      • Allow (Adults only)
      • Don't allow
    • 安全过滤器阈值:选择一项设置:
      • Block low and above
      • Block medium and above
      • Block only high
  6. 点击保存

  7. 点击 生成

REST

在使用任何请求数据之前,请先进行以下替换:

  • PROJECT_ID:您的 Google Cloud 项目 ID
  • LOCATION:您的项目的区域。 例如 us-central1europe-west2asia-northeast3。如需查看可用区域的列表,请参阅 Vertex AI 上的生成式 AI 位置
  • TEXT_PROMPT:用于指导模型生成什么图片的文本提示。生成和修改都需要此字段。
  • IMAGE_COUNT:生成的图片数量。 接受的整数值:1-8 (imagegeneration@002)、1-4(所有其他模型版本)。默认值:4。
  • SAFETY_SETTING:字符串。可选。用于控制生成的图片的安全过滤器阈值的设置。可用的值:
    • block_low_and_above:最高安全阈值,使过滤的生成图片的数量最多。之前的值:block_most
    • block_medium_and_above(默认值):中等安全阈值,用于平衡潜在有害内容和安全内容的过滤设置。之前的值:block_some
    • block_only_high:安全阈值,可减少因安全过滤器而被屏蔽的请求数量。此设置可能会增加 Imagen 生成的不良内容。 之前的值:block_few
  • PERSON_SETTING:字符串。可选。用于控制模型允许的人物类型或人脸生成的安全设置。可用的值:
    • allow_adult(默认):仅允许生成成年人(名人除外)。不允许针对任何设置生成名人。
    • dont_allow:禁止在生成的图片中包含人物或人脸。
  • INCLUDE_RAI_REASON:布尔值。可选。是否在输入或输出被屏蔽的回答中启用 Responsible AI 过滤的原因代码。默认值:false
  • INCLUDE_SAFETY_ATTRIBUTES:布尔值。可选。是否针对未经过滤的输入和输出在回答中启用安全属性列表的四舍五入 Responsible AI 分数。安全属性类别:"Death, Harm & Tragedy""Firearms & Weapons""Hate""Health""Illicit Drugs""Politics""Porn""Religion & Belief""Toxic""Violence""Vulgarity""War & Conflict"。默认值为 false

HTTP 方法和网址:

POST https://LOCATION-aiplatform.googleapis.com/v1/projects/PROJECT_ID/locations/LOCATION/publishers/google/models/imagegeneration@006:predict

请求 JSON 正文:

{
  "instances": [
    {
      "prompt": "TEXT_PROMPT"
    }
  ],
  "parameters": {
    "sampleCount": IMAGE_COUNT,
    "safetySetting": "SAFETY_SETTING",
    "personGeneration": "PERSON_SETTING",
    "includeRaiReason": INCLUDE_RAI_REASON,
    "includeSafetyAttributes": INCLUDE_SAFETY_ATTRIBUTES
  }
}

如需发送请求,请选择以下方式之一:

curl

将请求正文保存在名为 request.json 的文件中,然后执行以下命令:

curl -X POST \
-H "Authorization: Bearer $(gcloud auth print-access-token)" \
-H "Content-Type: application/json; charset=utf-8" \
-d @request.json \
"https://LOCATION-aiplatform.googleapis.com/v1/projects/PROJECT_ID/locations/LOCATION/publishers/google/models/imagegeneration@006:predict"

PowerShell

将请求正文保存在名为 request.json 的文件中,然后执行以下命令:

$cred = gcloud auth print-access-token
$headers = @{ "Authorization" = "Bearer $cred" }

Invoke-WebRequest `
-Method POST `
-Headers $headers `
-ContentType: "application/json; charset=utf-8" `
-InFile request.json `
-Uri "https://LOCATION-aiplatform.googleapis.com/v1/projects/PROJECT_ID/locations/LOCATION/publishers/google/models/imagegeneration@006:predict" | Select-Object -Expand Content
您收到的回答取决于您设定的安全设置。 如需了解详情,请参阅了解和配置 Responsible AI (RAI) for Imagen

使用提示重写器增强提示

Imagen 3 模型版本 002 具有提示重写器功能,该功能使用基于 LLM 的重写提示工具。此工具通常会在提供的提示中添加更多详细信息,以提供更高质量的图片,从而更好地反映所提供的提示。如果您停用此功能,您收到的图片的质量和遵从提示的程度可能会受到影响。默认情况下,此功能处于启用状态。

仅当原始提示的长度少于 30 个字词时,API 响应才会传送重写的提示。

控制台

  1. 在 Google Cloud 控制台中,打开 Vertex AI 信息中心内的 Vertex AI Studio > 媒体标签页。

    打开 Vertex AI Studio 标签页

  2. 添加文本提示并选择输入参数。

  3. 参数面板中,使用 toggle_on 启用提示增强功能开关选项,将提示增强功能保留为启用状态或停用此功能。

  4. 点击 生成

REST

如需详细了解 imagegeneration 模型请求,请参阅 imagegeneration 模型 API 参考文档

在使用任何请求数据之前,请先进行以下替换:

  • PROJECT_ID:您的 Google Cloud 项目 ID
  • MODEL_VERSION:要使用的图片生成模型版本。支持提示增强功能的可用值:
    • imagen-3.0-generate-002

    如需详细了解模型版本和功能,请参阅模型版本

  • LOCATION:您的项目的区域。 例如 us-central1europe-west2asia-northeast3。如需查看可用区域的列表,请参阅 Vertex AI 上的生成式 AI 位置
  • TEXT_PROMPT:用于引导模型生成什么图片的文本提示。在生成图片之前,使用基于 LLM 的重写提示工具,通过更详细的描述性语言增强此基础提示。
  • IMAGE_COUNT:生成的图片数量。 接受的整数值:1-4。 默认值:4。
  • enhancePrompt - 用于启用基于 LLM 的提示增强功能的布尔值。默认情况下,此值设置为 true

HTTP 方法和网址:

POST https://LOCATION-aiplatform.googleapis.com/v1/projects/PROJECT_ID/locations/LOCATION/publishers/google/models/MODEL_VERSION:predict

请求 JSON 正文:

{
  "instances": [
    {
      "prompt": "TEXT_PROMPT"
    }
  ],
  "parameters": {
    "sampleCount": IMAGE_COUNT,
    "enhancePrompt": true
  }
}

如需发送请求,请选择以下方式之一:

curl

将请求正文保存在名为 request.json 的文件中,然后执行以下命令:

curl -X POST \
-H "Authorization: Bearer $(gcloud auth print-access-token)" \
-H "Content-Type: application/json; charset=utf-8" \
-d @request.json \
"https://LOCATION-aiplatform.googleapis.com/v1/projects/PROJECT_ID/locations/LOCATION/publishers/google/models/MODEL_VERSION:predict"

PowerShell

将请求正文保存在名为 request.json 的文件中,然后执行以下命令:

$cred = gcloud auth print-access-token
$headers = @{ "Authorization" = "Bearer $cred" }

Invoke-WebRequest `
-Method POST `
-Headers $headers `
-ContentType: "application/json; charset=utf-8" `
-InFile request.json `
-Uri "https://LOCATION-aiplatform.googleapis.com/v1/projects/PROJECT_ID/locations/LOCATION/publishers/google/models/MODEL_VERSION:predict" | Select-Object -Expand Content
启用提示增强功能后,回答中会包含一个额外的 prompt 字段,用于显示增强的提示及其关联的生成图片:
  {
    "predictions": [
      {
        "mimeType": "MIME_TYPE",
        "prompt": "ENHANCED_PROMPT_1",
        "bytesBase64Encoded": "BASE64_IMG_BYTES_1"
      },
      {
        "mimeType": "MIME_TYPE",
        "prompt": "ENHANCED_PROMPT_2",
        "bytesBase64Encoded": "BASE64_IMG_BYTES_2"
      }
    ]
  }

例如,以下示例回答适用于具有 "sampleCount": 2"prompt": "A raccoon wearing formal clothes, wearing a top hat. Oil painting in the style of Vincent Van Gogh." 的请求。该回答返回两个预测对象,每个对象都包含增强的提示和生成的图片字节(采用 base64 编码)。

{
  "predictions": [
    {
      "mimeType": "image/png",
      "prompt": "An oil painting in the style of Vincent van Gogh, depicting a raccoon adorned
        in a finely tailored tuxedo, complete with a crisp white shirt and a bow tie. The raccoon
        also sports a classic top hat, perched jauntily on its head. The painting uses thick,
        swirling brushstrokes characteristic of van Gogh, with vibrant hues of blue, yellow, and
        green in the background, contrasting with the dark tones of the raccoon's attire. The light
        source is subtly placed, casting a dramatic shadow of the raccoon's attire onto the surface
        it sits upon, further enhancing the depth and dimensionality of the composition. The
        overall impression is one of a whimsical and sophisticated character, a raccoon elevated to
        a higher class through its formal attire, rendered in van Gogh's iconic style.",
      "bytesBase64Encoded": "BASE64_IMG_BYTES"
    },
    {
      "mimeType": "image/png",
      "prompt": "An oil painting in the style of Vincent van Gogh featuring a raccoon in a
        dapper suit, complete with a black jacket, crisp white shirt, and a black bow tie. The
        raccoon is wearing a black top hat, adding a touch of elegance to its ensemble. The
        painting is rendered with characteristic van Gogh brushwork, utilizing thick, impasto
        strokes of color. The background is a swirl of blues, greens, and yellows, creating a
        vibrant yet slightly chaotic atmosphere that contrasts with the raccoon's formal attire.
        The lighting is dramatic, casting sharp shadows and highlighting the textures of the fabric
        and the raccoon's fur, enhancing the sense of realism within the fantastical scene. The
        composition focuses on the raccoon's proud posture, highlighting the whimsical contrast of
        a wild animal dressed in formal attire, captured in the unique artistic language of van
        Gogh. ",
      "bytesBase64Encoded": "BASE64_IMG_BYTES"
    }
  ]
}

文本提示语言

此可选参数可让您设置输入文本的语言,以便生成图片或修改图片。

根据印地语提示生成的书籍图片
根据提示生成的图片:ऊपर से देखा गया किताबों का ढेर। सबसे ऊपरी पुस्तक में एक पक्षी का जलरंग चित्रण है। किताब पर VERTEX AI मोटे अक्षरों में लिखा हुआ है*

* 从上面看到的一堆书。最上面的一本书包含鸟的水彩插图。书上以粗体文字写着 Vertex AI
根据韩语提示所得的女性图片
根据提示生成的图片:어두운 노란색과 청록색으로 이루어진 밝은 색의 옷을입고 귀걸이를 끼고있는 여자 포스트 모던 패션 사진

一位身穿深黄色和深蓝绿色服饰的女士,戴着耳环,体现后现代时尚的摄影

准备工作

在使用此功能之前,请完成以下步骤:

  1. 使用以下命令创建 Vertex AI 的服务身份,以便在项目中使用:

    gcloud beta services identity create --service=aiplatform.googleapis.com --project=PROJECT_ID
    
  2. 请求功能访问权限。如需申请权限,请向Google Cloud 可信测试员访问权限:GenApp Builder 群组发送电子邮件。在消息中引用多语言提示,并添加您的项目编号。审核流程通常需要几个小时。

设置文本提示语言

支持以下输入文本提示语言值:

  • 中文(简体)(zh/zh-CN)
  • 中文(繁体)(zh-TW)
  • 英语(en,默认值)
  • 印地语 (hi)
  • 日语 (ja)
  • 韩语 (ko)
  • 葡萄牙语 (pt)
  • 西班牙语 (es)

控制台

如果您的提示使用支持的语言之一,Imagen 会自动检测并翻译您的文本,并返回您生成或修改的图片。

如果您的提示采用不受支持的语言,Imagen 将逐字使用文本来执行请求。这可能会导致意外输出。

REST

如需详细了解 imagegeneration 模型请求,请参阅 imagegeneration 模型 API 参考文档

在使用任何请求数据之前,请先进行以下替换:

  • PROJECT_ID:您的 Google Cloud 项目 ID
  • TEXT_PROMPT:用于指导模型生成什么图片的文本提示。生成和修改都需要此字段。
  • PROMPT_LANGUAGE:字符串。可选。与文本提示语言对应的语言代码。 在此示例中,该语言代码为 hi。可用的值:
    • auto - 自动检测。如果 Imagen 检测到受支持的语言,则提示(可选择性地选择否定提示)会翻译为英语。如果检测到的语言不受支持,Imagen 会逐字使用输入文本,这可能会导致意外输出。系统不会返回错误代码。
    • en - 英语(如果省略,则为默认值)
    • es - 西班牙语
    • hi - 印地语
    • ja - 日语
    • ko - 韩语
    • pt - 葡萄牙语
    • zh-TW - 中文(繁体)
    • zhzh-CN - 中文(简体)

HTTP 方法和网址:

POST https://us-central1-aiplatform.googleapis.com/v1/projects/PROJECT_ID/locations/us-central1/publishers/google/models/imagegeneration@005:predict

请求 JSON 正文:

{
  "instances": [
    {
      "prompt": "सूर्यास्त के समय एक समुद्र तट। उड़ते पक्षी, हवा में लहराते नारियल के पेड़। लोग समुद्र तट पर सैर का आनंद ले रहे हैं।"
    }
  ],
  "parameters": {
    "language": "PROMPT_LANGUAGE"
  }
}

如需发送请求,请选择以下方式之一:

curl

将请求正文保存在名为 request.json 的文件中,然后执行以下命令:

curl -X POST \
-H "Authorization: Bearer $(gcloud auth print-access-token)" \
-H "Content-Type: application/json; charset=utf-8" \
-d @request.json \
"https://us-central1-aiplatform.googleapis.com/v1/projects/PROJECT_ID/locations/us-central1/publishers/google/models/imagegeneration@005:predict"

PowerShell

将请求正文保存在名为 request.json 的文件中,然后执行以下命令:

$cred = gcloud auth print-access-token
$headers = @{ "Authorization" = "Bearer $cred" }

Invoke-WebRequest `
-Method POST `
-Headers $headers `
-ContentType: "application/json; charset=utf-8" `
-InFile request.json `
-Uri "https://us-central1-aiplatform.googleapis.com/v1/projects/PROJECT_ID/locations/us-central1/publishers/google/models/imagegeneration@005:predict" | Select-Object -Expand Content
以下示例响应适用于包含 "sampleCount": 2 的请求。响应返回两个预测对象,其中生成的图片字节采用 base64 编码。
{
  "predictions": [
    {
      "bytesBase64Encoded": "BASE64_IMG_BYTES",
      "mimeType": "image/png"
    },
    {
      "mimeType": "image/png",
      "bytesBase64Encoded": "BASE64_IMG_BYTES"
    }
  ]
}

宽高比

根据您计划如何使用生成的图片,可能有一个最适合的宽高比。请选择最适合您的应用场景的宽高比。

支持的宽高比及其预期用途:

宽高比 预期用途 图片分辨率(像素) 示例图片
1:1 默认,方形,常规用途 1024x1024 (Imagen v.002)

1536x1536 (Imagen 2 v.005、v.006)

1024x1024 (Imagen 3)
控制台中生成的图片示例
提示:意大利面的俯拍照片,美食杂志封面风格,棚拍照片。
3:4 电视、媒体、电影 1344x1792 (Imagen 2 v.006)

896x1280 (Imagen 3)
控制台中生成的图片示例
提示: 商业照片拍摄、香水广告、在浅色背景上放置的薰衣草香味瓶
4:3 电视、媒体、电影 1792x1344 (Imagen 2 v.006)

1280x896 (Imagen 3)
控制台中生成的图片示例
提示: 商业摄影、绿色和灰色高帮运动鞋、4k、戏剧角度
9:16 纵向,较高对象,移动设备 1134x2016(Imagen 2 v.005、v.006)

768x1408 (Imagen 3)
控制台中生成的图片示例
提示:纽约市的摩天大楼,未来主义渲染,概念,数字艺术。
16:9 风光 2016x1134 (Imagen 2 v.006)

1408x768 (Imagen 3)
控制台中生成的图片示例
提示: nature photography, a beach in hawaii with the ocean in the background, lens flare, sunset

控制台

  1. 按照使用文本生成图片说明,打开 Vertex AI Studio 并输入文本提示。

  2. 参数面板中,从宽高比菜单中选择一个宽高比。

  3. 点击 生成

REST

宽高比是 JSON 请求正文的 parameters 对象中的可选字段。

  1. 按照使用文本生成图片中的说明替换其他请求正文变量。

  2. 替换以下内容:

    • ASPECT_RATIO:字符串。可选。用于控制宽高比的生成模式参数。支持的宽高比值及其预期用途:
      • 1:1(默认,方形)
      • 3:4(广告、社交媒体)
      • 4:3(电视、摄影)
      • 16:9(横向)
      • 9:16(纵向)
    {
      "instances": [
        ...
      ],
      "parameters": {
        "sampleCount": IMAGE_COUNT,
        "aspectRatio": "ASPECT_RATIO"
      }
    }
    
  3. 按照使用文本生成图片的说明发送 REST 请求。

结果数量

使用结果数参数来限制为您发送的每个请求(生成或编辑)返回的图片数量。

控制台

  1. 按照使用文本生成图片说明,打开 Vertex AI Studio 并输入文本提示。

  2. 参数面板的结果数量字段中,选择有效的整数值。

  3. 点击 生成

REST

如需详细了解 imagegeneration 模型请求,请参阅 imagegeneration 模型 API 参考文档

结果数量是 JSON 请求正文的 parameters 对象中的一个字段。

  1. 按照使用文本生成图片中的说明替换其他请求正文变量。

  2. 请替换以下内容:

    • IMAGE_COUNT:生成的图片数量。 接受的整数值:1-8 (imagegeneration@002)、1-4(所有其他模型版本)。默认值:4。
    {
      "instances": [
        ...
      ],
      "parameters": { 
        "sampleCount": IMAGE_COUNT
      }
    }
    
  3. 按照使用文本生成图片的说明发送 REST 请求。

否定提示

否定性提示是指有关您要在生成的图片中省略的内容的说明。例如,请考虑提示“雨夜中的街道空无一人”。该模型可以将“人”解释为包含而不是省略内容的指令。要生成更好的结果,您可以使用提示“雨夜中的街道”并显示否定提示“人”

Imagen 会生成这些图片(无论是否有否定提示):

纯文本提示

  • 文本提示:“一份披萨”

三张示例披萨图片

文本提示和否定提示

  • 文本提示:“一份披萨”
  • 否定提示:“意大利辣香肠

三份披萨示例,无意大利辣香肠

控制台

  1. 按照使用文本生成图片说明,打开 Vertex AI Studio 并输入文本提示。

  2. 参数面板的否定提示字段中输入否定提示。

  3. 点击 生成

REST

如需详细了解 imagegeneration 模型请求,请参阅 imagegeneration 模型 API 参考文档

否定提示是 JSON 请求正文的 parameters 对象中的可选字段。

  1. 按照使用文本生成图片中的说明替换其他请求正文变量。

  2. 请替换以下内容:

    • NEGATIVE_PROMPT:有助于生成图片的否定提示。例如:“animals”(移除动物)、“blurry”(可使图片更清晰)、“text”(移除文本)或“cropped”(移除剪裁后的图片)。
    {
      "instances": [
        ...
      ],
      "parameters": {
        "sampleCount": IMAGE_COUNT,
        "negativePrompt": "NEGATIVE_PROMPT"
      }
    }
    
  3. 按照使用文本生成图片的说明发送 REST 请求。

种子编号

种子编号是您为请求添加的数字,以使生成的图片具有确定性。通过在请求中添加种子编号可确保您每次都获得相同的生成图片。例如,您可以提供提示,将结果数量设置为 1,并在每次使用所有相同的输入值时通过种子编号获取相同的图片。如果您发送相同的请求,并将结果数设置为 8,您将收到相同的八张图片。但是,图片不一定以相同顺序返回。

控制台

  1. 按照使用文本生成图片说明,打开 Vertex AI Studio 并输入文本提示。

  2. 参数面板中,点击 高级选项可展开部分。

  3. 种子字段中,输入种子编号。

  4. 点击 生成

REST

如需详细了解 imagegeneration 模型请求,请参阅 imagegeneration 模型 API 参考文档

种子编号是 JSON 请求正文的 parameters 对象中的可选字段。

  1. 按照使用文本生成图片中的说明替换其他请求正文变量。

  2. 替换以下内容:

    • SEED_NUMBER:整数。可选。您提供的任何非负整数,以使输出图片具有确定性。提供相同的种子编号会生成相同的输出图片。 如果您使用的模型支持数字水印,则必须设置 "addWatermark": false 才能使用此字段。接受的整数值:1 - 2147483647
    {
      "instances": [
        ...
      ],
      "parameters": {
        "sampleCount": IMAGE_COUNT,
        "seed": SEED_NUMBER,
        // required for model version 006 and greater only when using a seed number
        "addWatermark": false
      }
    }
    
  3. 按照使用文本生成图片的说明发送 REST 请求。

预定义样式

您要生成的图片样式。您可以使用此功能创建常用样式(例如数字艺术、水彩画或赛博朋克)的图片。

控制台

  1. 按照使用文本生成图片说明,打开 Vertex AI Studio 并输入文本提示。

  2. 参数面板的样式部分中,从菜单中选择一种样式。

  3. 点击 生成

REST

如需详细了解 imagegeneration 模型请求,请参阅 imagegeneration 模型 API 参考文档

预定义样式是 JSON 请求正文的 parameters 对象中的可选字段。

  1. 按照使用文本生成图片中的说明替换其他请求正文变量。

  2. 请替换以下内容:

    • IMAGE_STYLE:可用的预定义样式之一:
      • photograph
      • digital_art
      • landscape
      • sketch
      • watercolor
      • cyberpunk
      • pop_art
    {
      "instances": [
        ...
      ],
      "parameters": {
        "sampleCount": IMAGE_COUNT,
        "sampleImageStyle": "IMAGE_STYLE"
      }
    }
    
  3. 按照使用文本生成图片的说明发送 REST 请求。

放大图片

使用放大功能来增加现有、生成或编辑后的图片的大小,而不会降低质量。

控制台

  1. 按照使用文本生成图片说明生成图片。

  2. 选择要放大的图片。

  3. 点击 导出

  4. 选择放大图片

  5. 缩放比例中选择一个值。

  6. 点击 导出以保存放大的图片。

REST

如需详细了解 imagegeneration 模型请求,请参阅 imagegeneration 模型 API 参考文档

纵向扩容模式是 JSON 请求正文的 parameters 对象中的可选字段。使用 API 放大图片时,请指定 "mode": "upscale"upscaleConfig

在使用任何请求数据之前,请先进行以下替换:

  • LOCATION:您的项目的区域。例如 us-central1europe-west2asia-northeast3。如需查看可用区域的列表,请参阅 Vertex AI 上的生成式 AI 位置
  • PROJECT_ID:您的 Google Cloud 项目 ID
  • B64_BASE_IMAGE:要修改或放大的基础图片。图片必须指定为 base64 编码的字节字符串。大小上限:10 MB。
  • IMAGE_SOURCE:您要修改或放大的图片的 Cloud Storage 位置。例如:gs://output-bucket/source-photos/photo.png
  • UPSCALE_FACTOR:可选。图片的放大系数。如果未指定,系统将根据输入图片的较长边和 sampleImageSize 确定放大系数。可用值:x2x4

HTTP 方法和网址:

POST https://LOCATION-aiplatform.googleapis.com/v1/projects/PROJECT_ID/locations/LOCATION/publishers/google/models/imagegeneration@002:predict

请求 JSON 正文:

{
  "instances": [
    {
      "prompt": "",
      "image": {
        // use one of the following to specify the image to upscale
        "bytesBase64Encoded": "B64_BASE_IMAGE"
        "gcsUri": "IMAGE_SOURCE"
        // end of base image input options
      },
    }
  ],
  "parameters": {
    "sampleCount": 1,
    "mode": "upscale",
    "upscaleConfig": {
      "upscaleFactor": "UPSCALE_FACTOR"
    }
  }
}

如需发送请求,请选择以下方式之一:

curl

将请求正文保存在名为 request.json 的文件中,然后执行以下命令:

curl -X POST \
-H "Authorization: Bearer $(gcloud auth print-access-token)" \
-H "Content-Type: application/json; charset=utf-8" \
-d @request.json \
"https://LOCATION-aiplatform.googleapis.com/v1/projects/PROJECT_ID/locations/LOCATION/publishers/google/models/imagegeneration@002:predict"

PowerShell

将请求正文保存在名为 request.json 的文件中,然后执行以下命令:

$cred = gcloud auth print-access-token
$headers = @{ "Authorization" = "Bearer $cred" }

Invoke-WebRequest `
-Method POST `
-Headers $headers `
-ContentType: "application/json; charset=utf-8" `
-InFile request.json `
-Uri "https://LOCATION-aiplatform.googleapis.com/v1/projects/PROJECT_ID/locations/LOCATION/publishers/google/models/imagegeneration@002:predict" | Select-Object -Expand Content

您应该收到类似以下内容的 JSON 响应:

{
  "predictions": [
    {
      "mimeType": "image/png",
      "bytesBase64Encoded": "iVBOR..[base64-encoded-upscaled-image]...YII="
    }
  ]
}

后续步骤

阅读有关 Imagen 和其他 Vertex AI 上的生成式 AI 产品的文章: