Overview
This guide shows you how to serve state-of-the-art large language models (LLMs) such as DeepSeek-R1 671B or Llama 3.1 405B on Google Kubernetes Engine (GKE) using graphical processing units (GPUs) across multiple nodes.
This guide demonstrates how to use portable open-source technologies—Kubernetes, vLLM, and the LeaderWorkerSet (LWS) API— to deploy and serve AI/ML workloads on GKE, taking advantage of GKE's granular control, scalability, resilience, portability, and cost-effectiveness.
Before reading this page, ensure that you're familiar with the following:
Background
This section describes the key technologies used in this guide, including the two LLMs used as examples in this guide—DeepSeek-R1 and Llama 3.1 405B.
DeepSeek-R1
DeepSeek-R1, a 671B parameter large language model by DeepSeek, is designed for logical inference, mathematical reasoning, and real-time problem-solving in various text-based tasks. GKE handles the computational demands of DeepSeek-R1, supporting its capabilities with scalable resources, distributed computing, and efficient networking.
To learn more, see the DeepSeek documentation.
Llama 3.1 405B
Llama 3.1 405B is a large language model by Meta that's designed for a wide range of natural language processing tasks, including text generation, translation, and question answering. GKE offers the robust infrastructure required to support the distributed training and serving needs of models of this scale.
To learn more, see the Llama documentation.
GKE managed Kubernetes service
Google Cloud offers a wide range of services, including GKE, which is well-suited to deploying and managing AI/ML workloads. GKE is a managed Kubernetes service that simplifies deploying, scaling, and managing containerized applications. GKE provides the necessary infrastructure, including scalable resources, distributed computing, and efficient networking, to handle the computational demands of LLMs.
To learn more about key Kubernetes concepts, see Start learning about Kubernetes. To learn more about the GKE and how it helps you scale, automate, and manage Kubernetes, see GKE overview.
GPUs
Graphical processing units (GPUs) let you accelerate specific workloads such as machine learning and data processing. GKE offers nodes equipped with these powerful GPUs, allowing you to configure your cluster for optimal performance in machine learning and data processing tasks. GKE provides a range of machine type options for node configuration, including machine types with NVIDIA H100, L4, and A100 GPUs.
To learn more, see About GPUs in GKE.
LeaderWorkerSet (LWS)
LeaderWorkerSet (LWS) is a Kubernetes deployment API that addresses common deployment patterns of AI/ML multi-node inference workloads. Multi-node serving leverages multiple Pods, each potentially running on a different node, to handle the distributed inference workload. LWS enables treating multiple Pods as a group, simplifying the management of distributed model serving.
vLLM and multi-host serving
When serving computationally intensive LLMs, we recommend using vLLM and running the workloads across GPUs.
vLLM is a highly optimized open source LLM serving framework that can increase serving throughput on GPUs, with features such as the following:
- Optimized transformer implementation with PagedAttention
- Continuous batching to improve the overall serving throughput
- Distributed serving on multiple GPUs
With especially computationally intensive LLMs that can't fit into a single GPU node, you can use multiple GPU nodes to serve the model. vLLM supports running workloads across GPUs with two strategies:
Tensor parallelism splits the matrix multiplications in the transformer layer across multiple GPUs. However, this strategy requires a fast network due to the communication needed between the GPUs, making it less suitable for running workloads across nodes.
Pipeline parallelism splits the model by layer, or vertically. This strategy does not require constant communication between GPUs, making it a better option when running models across nodes.
You can use both strategies in multi-node serving. For example, when using two nodes with eight H100 GPUs each, you can use both strategies:
- Two-way pipeline parallelism to shard the model across the two nodes
- Eight-way tensor parallelism to shard the model across the eight GPUs on each node
To learn more, refer to the vLLM documentation.
Objectives
- Prepare your environment with a GKE cluster in Autopilot or Standard mode.
- Deploy vLLM across multiple nodes in your cluster.
- Use vLLM to serve the model through
curl.
Before you begin
- Sign in to your Google Cloud account. If you're new to Google Cloud, create an account to evaluate how our products perform in real-world scenarios. New customers also get $300 in free credits to run, test, and deploy workloads.
-
In the Google Cloud console, on the project selector page, select or create a Google Cloud project.
Roles required to select or create a project
- Select a project: Selecting a project doesn't require a specific IAM role—you can select any project that you've been granted a role on.
-
Create a project: To create a project, you need the Project Creator role
(
roles/resourcemanager.projectCreator), which contains theresourcemanager.projects.createpermission. Learn how to grant roles.
-
Verify that billing is enabled for your Google Cloud project.
-
Enable the required API.
Roles required to enable APIs
To enable APIs, you need the Service Usage Admin IAM role (
roles/serviceusage.serviceUsageAdmin), which contains theserviceusage.services.enablepermission. Learn how to grant roles. -
Make sure that you have the following role or roles on the project: roles/container.admin, roles/iam.serviceAccountAdmin, roles/iam.securityAdmin
Check for the roles
-
In the Google Cloud console, go to the IAM page.
Go to IAM - Select the project.
-
In the Principal column, find all rows that identify you or a group that you're included in. To learn which groups you're included in, contact your administrator.
- For all rows that specify or include you, check the Role column to see whether the list of roles includes the required roles.
Grant the roles
-
In the Google Cloud console, go to the IAM page.
Go to IAM - Select the project.
- Click Grant access.
-
In the New principals field, enter your user identifier. This is typically the email address for a Google Account.
- In the Select a role list, select a role.
- To grant additional roles, click Add another role and add each additional role.
- Click Save.
-
- Create a Hugging Face account, if you don't already have one.
- Review the available GPU models and machine types to determine which machine type and region meets your needs.
- Check that your project has sufficient quota for
NVIDIA_H100_MEGA. This tutorial uses thea3-highgpu-8gmachine type, which is equipped with 8NVIDIA H100 80GB GPUs. For more information about GPUs and how to manage quotas, see About GPUs and Allocation quotas.
Get access to the model
You can use the Llama 3.1 405B or DeepSeek-R1 models.
DeepSeek-R1
Generate an access token
If you don't already have one, generate a new Hugging Face token:
- Click Your Profile > Settings > Access Tokens.
- Select New Token.
- Specify a Name of your choice and a Role of at least
Read. - Select Generate a token.
Llama 3.1 405B
Generate an access token
If you don't already have one, generate a new Hugging Face token:
- Click Your Profile > Settings > Access Tokens.
- Select New Token.
- Specify a Name of your choice and a Role of at least
Read. - Select Generate a token.
Prepare the environment
In this tutorial, you use Cloud Shell to manage resources hosted on
Google Cloud. Cloud Shell comes preinstalled with the software you'll need
for this tutorial, including
kubectl and
gcloud CLI.
To set up your environment with Cloud Shell, follow these steps:
In the Google Cloud console, launch a Cloud Shell session by clicking
 Activate Cloud Shell in the Google Cloud console. This launches a session in the
bottom pane of Google Cloud console.
Activate Cloud Shell in the Google Cloud console. This launches a session in the
bottom pane of Google Cloud console.Set the default environment variables:
gcloud config set project PROJECT_ID
gcloud config set billing/quota_project PROJECT_ID
export PROJECT_ID=$(gcloud config get project)
export CLUSTER_NAME=CLUSTER_NAME
export REGION=REGION
export ZONE=ZONE
export HF_TOKEN=HUGGING_FACE_TOKEN
export CLUSTER_VERSION=CLUSTER_VERSION
Replace the following values:
- PROJECT_ID: your Google Cloud project ID.
- CLUSTER_NAME: the name of your GKE cluster.
- CLUSTER_VERSION: the GKE version. For Autopilot support, use 1.33 or later.
- REGION: the region of your GKE cluster.
- ZONE: a zone that supports NVIDIA H100 Tensor Core GPUs.
Create a GKE cluster
You can serve models using vLLM across multiple GPU nodes in a GKE Autopilot or Standard cluster. We recommend that you use an Autopilot cluster for a fully managed Kubernetes experience. To choose the GKE mode of operation that's the best fit for your workloads, see Choose a GKE mode of operation.
Autopilot
In Cloud Shell, run the following command:
  gcloud container clusters create-auto ${CLUSTER_NAME} \
    --project=${PROJECT_ID} \
    --location=${REGION} \
    --cluster-version=${CLUSTER_VERSION}
Standard
Create a GKE Standard cluster with two CPU nodes:
gcloud container clusters create CLUSTER_NAME \
    --project=PROJECT_ID \
    --num-nodes=2 \
    --location=REGION \
    --machine-type=e2-standard-16
Create an A3 node pool with two nodes, with eight H100s each:
gcloud container node-pools create gpu-nodepool \
    --node-locations=ZONE \
    --num-nodes=2 \
    --machine-type=a3-highgpu-8g \
    --accelerator=type=nvidia-h100-80gb,count=8,gpu-driver-version=LATEST \
    --placement-type=COMPACT \
    --cluster=CLUSTER_NAME
    --location=${REGION}
Configure kubectl to communicate with your cluster
Configure kubectl to communicate with your cluster with the following command:
gcloud container clusters get-credentials CLUSTER_NAME --location=REGION
Create a Kubernetes Secret for Hugging Face credentials
Create a Kubernetes Secret that contains the Hugging Face token using the following command:
kubectl create secret generic hf-secret \
  --from-literal=hf_api_token=${HF_TOKEN} \
  --dry-run=client -o yaml | kubectl apply -f -
Install LeaderWorkerSet
To install LWS, run the following command:
kubectl apply --server-side -f https://github.com/kubernetes-sigs/lws/releases/latest/download/manifests.yaml
Validate that the LeaderWorkerSet controller is running in the lws-system
namespace, using the following command:
kubectl get pod -n lws-system
The output is similar to the following:
NAME                                     READY   STATUS    RESTARTS   AGE
lws-controller-manager-546585777-crkpt   1/1     Running   0          4d21h
lws-controller-manager-546585777-zbt2l   1/1     Running   0          4d21h
Deploy vLLM Model Server
To deploy the vLLM model server, follow these steps:
Apply the manifest, depending on LLM you want to deploy.
DeepSeek-R1
Inspect the
vllm-deepseek-r1-A3.yamlmanifest.Apply the manifest by running the following command:
kubectl apply -f vllm-deepseek-r1-A3.yaml
Llama 3.1 405B
Inspect the
vllm-llama3-405b-A3.yamlmanifest.Apply the manifest by running the following command:
kubectl apply -f vllm-llama3-405b-A3.yaml
Wait for the model checkpoint to finish downloading. This operation might take several minutes to complete.
View the logs from the running model server with the following command:
kubectl logs vllm-0 -c vllm-leaderThe output should look similar to the following:
INFO 08-09 21:01:34 api_server.py:297] Route: /detokenize, Methods: POST
INFO 08-09 21:01:34 api_server.py:297] Route: /v1/models, Methods: GET
INFO 08-09 21:01:34 api_server.py:297] Route: /version, Methods: GET
INFO 08-09 21:01:34 api_server.py:297] Route: /v1/chat/completions, Methods: POST
INFO 08-09 21:01:34 api_server.py:297] Route: /v1/completions, Methods: POST
INFO 08-09 21:01:34 api_server.py:297] Route: /v1/embeddings, Methods: POST
INFO:     Started server process [7428]
INFO:     Waiting for application startup.
INFO:     Application startup complete.
INFO:     Uvicorn running on http://0.0.0.0:8080 (Press CTRL+C to quit)
Serve the model
Set up port forwarding to the model by running the following command:
kubectl port-forward svc/vllm-leader 8080:8080
Interact with the model using curl
To interact with the model using curl, follow these instructions:
DeepSeek-R1
In a new terminal, send a request to the server:
curl http://localhost:8080/v1/completions \
-H "Content-Type: application/json" \
-d '{
    "model": "deepseek-ai/DeepSeek-R1",
    "prompt": "I have four boxes. I put the red box on the bottom and put the blue box on top. Then I put the yellow box on top the blue. Then I take the blue box out and put it on top. And finally I put the green box on the top. Give me the final order of the boxes from bottom to top. Show your reasoning but be brief",
    "max_tokens": 1024,
    "temperature": 0
}'
The output should be similar to the following:
{
"id": "cmpl-f2222b5589d947419f59f6e9fe24c5bd",
"object": "text_completion",
"created": 1738269669,
"model": "deepseek-ai/DeepSeek-R1",
"choices": [
  {
    "index": 0,
    "text": ".\n\nOkay, let's see. The user has four boxes and is moving them around. Let me try to visualize each step. \n\nFirst, the red box is placed on the bottom. So the stack starts with red. Then the blue box is put on top of red. Now the order is red (bottom), blue. Next, the yellow box is added on top of blue. So now it's red, blue, yellow. \n\nThen the user takes the blue box out. Wait, blue is in the middle. If they remove blue, the stack would be red and yellow. But where do they put the blue box? The instruction says to put it on top. So after removing blue, the stack is red, yellow. Then blue is placed on top, making it red, yellow, blue. \n\nFinally, the green box is added on the top. So the final order should be red (bottom), yellow, blue, green. Let me double-check each step to make sure I didn't mix up any steps. Starting with red, then blue, then yellow. Remove blue from the middle, so yellow is now on top of red. Then place blue on top of that, so red, yellow, blue. Then green on top. Yes, that seems right. The key step is removing the blue box from the middle, which leaves yellow on red, then blue goes back on top, followed by green. So the final order from bottom to top is red, yellow, blue, green.\n\n**Final Answer**\nThe final order from bottom to top is \\boxed{red}, \\boxed{yellow}, \\boxed{blue}, \\boxed{green}.\n</think>\n\n1. Start with the red box at the bottom.\n2. Place the blue box on top of the red box. Order: red (bottom), blue.\n3. Place the yellow box on top of the blue box. Order: red, blue, yellow.\n4. Remove the blue box (from the middle) and place it on top. Order: red, yellow, blue.\n5. Place the green box on top. Final order: red, yellow, blue, green.\n\n\\boxed{red}, \\boxed{yellow}, \\boxed{blue}, \\boxed{green}",
    "logprobs": null,
    "finish_reason": "stop",
    "stop_reason": null,
    "prompt_logprobs": null
  }
],
"usage": {
  "prompt_tokens": 76,
  "total_tokens": 544,
  "completion_tokens": 468,
  "prompt_tokens_details": null
}
}
Llama 3.1 405B
In a new terminal, send a request to the server:
curl http://localhost:8080/v1/completions \
-H "Content-Type: application/json" \
-d '{
    "model": "meta-llama/Meta-Llama-3.1-405B-Instruct",
    "prompt": "San Francisco is a",
    "max_tokens": 7,
    "temperature": 0
}'
The output should be similar to the following:
{"id":"cmpl-0a2310f30ac3454aa7f2c5bb6a292e6c",
"object":"text_completion","created":1723238375,"model":"meta-llama/Llama-3.1-405B-Instruct","choices":[{"index":0,"text":" top destination for foodies, with","logprobs":null,"finish_reason":"length","stop_reason":null}],"usage":{"prompt_tokens":5,"total_tokens":12,"completion_tokens":7}}
Set up the custom autoscaler
In this section, you set up horizontal Pod autoscaling to use custom Prometheus metrics. You use the Google Cloud Managed Service for Prometheus metrics from the vLLM server.
To learn more, see Google Cloud Managed Service for Prometheus. This should be enabled by default on the GKE cluster.
Set up the Custom Metrics Stackdriver Adapter on your cluster:
kubectl apply -f https://raw.githubusercontent.com/GoogleCloudPlatform/k8s-stackdriver/master/custom-metrics-stackdriver-adapter/deploy/production/adapter_new_resource_model.yamlAdd the Monitoring Viewer role to the service account that the Custom Metrics Stackdriver Adapter uses:
gcloud projects add-iam-policy-binding projects/PROJECT_ID \ --role roles/monitoring.viewer \ --member=principal://iam.googleapis.com/projects/PROJECT_NUMBER/locations/global/workloadIdentityPools/PROJECT_ID.svc.id.goog/subject/ns/custom-metrics/sa/custom-metrics-stackdriver-adapterSave the following manifest as
vllm_pod_monitor.yaml:Apply the manifest to the cluster:
kubectl apply -f vllm_pod_monitor.yaml
Create load on the vLLM endpoint
Create load on the vLLM server to test how GKE autoscales with a custom vLLM metric.
Set up port forwarding to the model:
kubectl port-forward svc/vllm-leader 8080:8080Run a bash script (
load.sh) to sendNnumber of parallel requests to the vLLM endpoint:#!/bin/bash # Set the number of parallel processes to run. N=PARALLEL_PROCESSES # Get the external IP address of the vLLM load balancer service. export vllm_service=$(kubectl get service vllm-service -o jsonpath='{.status.loadBalancer.ingress[0].ip}') # Loop from 1 to N to start the parallel processes. for i in $(seq 1 $N); do # Start an infinite loop to continuously send requests. while true; do # Use curl to send a completion request to the vLLM service. curl http://$vllm_service:8000/v1/completions -H "Content-Type: application/json" -d '{"model": "meta-llama/Llama-3.1-70B", "prompt": "Write a story about san francisco", "max_tokens": 100, "temperature": 0}' done & # Run in the background done # Keep the script running until it is manually stopped. waitReplace PARALLEL_PROCESSES with the number of parallel processes that you want to run.
Run the bash script:
nohup ./load.sh &
Verify that Google Cloud Managed Service for Prometheus ingests the metrics
After Google Cloud Managed Service for Prometheus scrapes the metrics and you're adding load to the vLLM endpoint, you can view metrics on Cloud Monitoring.
In the Google Cloud console, go to the Metrics explorer page.
Click < > PromQL.
Enter the following query to observe traffic metrics:
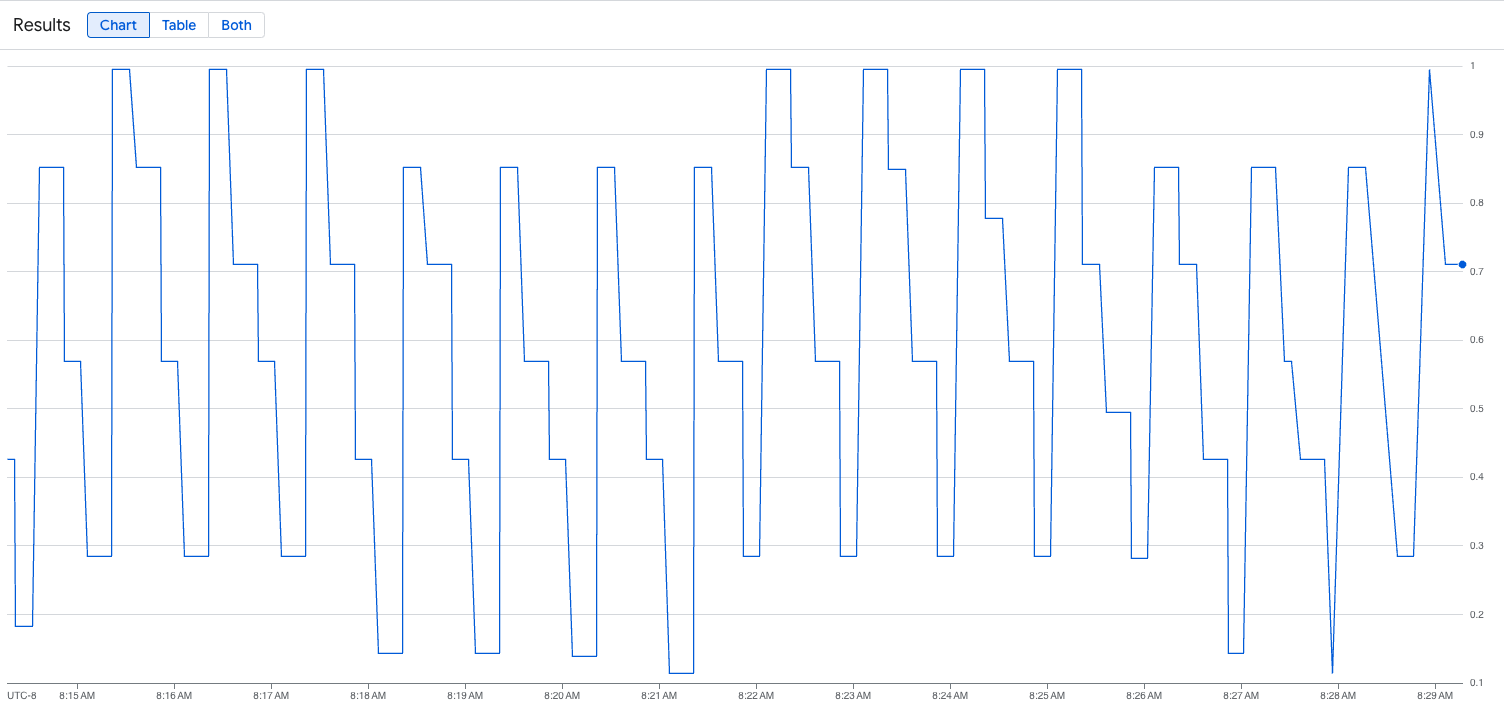
vllm:gpu_cache_usage_perc{cluster='CLUSTER_NAME'}
The following image is an example of a graph after the load script execution. This graph shows that Google Cloud Managed Service for Prometheus is ingesting the traffic metrics in response to the load added to the vLLM endpoint:
Deploy the Horizontal Pod Autoscaler configuration
When you decide which metric to autoscale on, we recommend the following metrics for vLLM:
num_requests_waiting: this metric relates to the number of requests waiting in the model server's queue. This number starts to noticeably grow when the kv cache is full.gpu_cache_usage_perc: this metric relates to KV cache utilization, which directly correlates to the number of requests that are processed for a given inference cycle on the model server.
We recommend that you use num_requests_waiting when you optimize for
throughput and cost, and when your latency targets are achievable with your
model server's maximum throughput.
We recommend that you use gpu_cache_usage_perc when you have
latency-sensitive workloads where queue-based scaling isn't fast enough to meet
your requirements.
For further explanation, see Best practices for autoscaling large language model (LLM) inference workloads with GPUs.
When you select an averageValue target for your HPA config, you need to determine which metric to autoscale on experimentally. For additional ideas on how to optimize your experiments, see Save on GPUs: Smarter autoscaling for your GKE inferencing workloads blog post. The profile-generator used in this blog post also works for vLLM.
To deploy the Horizontal Pod Autoscaler configuration using num_requests_waiting, follow these steps:
Save the following manifest as
vllm-hpa.yaml:The vLLM metrics in Google Cloud Managed Service for Prometheus follow the
vllm:metric_nameformat.Best practice: Use
num_requests_waitingfor scaling throughput. Usegpu_cache_usage_percfor latency-sensitive GPU use cases.Deploy the Horizontal Pod Autoscaler configuration:
kubectl apply -f vllm-hpa.yamlGKE schedules another Pod to deploy, which triggers the node pool autoscaler to add a second node before it deploys the second vLLM replica.
Watch the progress of the Pod autoscaling:
kubectl get hpa --watchThe output is similar to the following:
NAME      REFERENCE              TARGETS   MINPODS   MAXPODS   REPLICAS   AGE
lws-hpa   LeaderWorkerSet/vllm   0/1       1         2         1          6d1h
lws-hpa   LeaderWorkerSet/vllm   1/1       1         2         1          6d1h
lws-hpa   LeaderWorkerSet/vllm   0/1       1         2         1          6d1h
lws-hpa   LeaderWorkerSet/vllm   4/1       1         2         1          6d1h
lws-hpa   LeaderWorkerSet/vllm   0/1       1         2         2          6d1h
Speed up model load times with Google Cloud Hyperdisk ML
With these types of LLMs, vLLM can take a significant amount of time to download, load, and warm up on each new replica. For example, that process can take around 90 minutes with Llama 3.1 405B. You can reduce this time (to 20 minutes with Llama 3.1 405B) by downloading the model directly to a Hyperdisk ML volume and mounting that volume to each Pod. To complete this operation, this tutorial uses a Hyperdisk ML volume and a Kubernetes Job. A Job controller in Kubernetes creates one or more Pods and ensures that they successfully execute a specific task.
To speed up model load times, perform the following steps:
Save the following example manifest as
producer-pvc.yaml:kind: PersistentVolumeClaim apiVersion: v1 metadata: name: producer-pvc spec: # Specifies the StorageClass to use. Hyperdisk ML is optimized for ML workloads. storageClassName: hyperdisk-ml accessModes: - ReadWriteOnce resources: requests: storage: 800GiSave the following example manifest as
producer-job.yaml:DeepSeek-R1
Llama 3.1 405B
Follow the instructions in Accelerate AI/ML data loading with Hyperdisk ML, using the two files you created in the prior steps.
After this step, you have created and populated the Hyperdisk ML volume with the model data.
Deploy the vLLM multi-node GPU server deployment, which will use the newly created Hyperdisk ML volume for model data.
DeepSeek-R1
Llama 3.1 405B
Clean up
To avoid incurring charges to your Google Cloud account for the resources used in this tutorial, either delete the project that contains the resources, or keep the project and delete the individual resources.
Delete the deployed resources
To avoid incurring charges to your Google Cloud account for the resources that you created in this guide, run the following command:
ps -ef | grep load.sh | awk '{print $2}' | xargs -n1 kill -9
gcloud container clusters delete CLUSTER_NAME \
  --location=ZONE
What's next
- Learn more about GPUs in GKE.
- Explore the vLLM GitHub repository and documentation.
- Explore the LWS GitHub repository