Welcome to the first tutorial in a series that shows you how to take a monolith (or monolithic app), separate it into modules, containerize the modules, and deploy the container images to a Google Kubernetes Engine (GKE) cluster. Don't worry if you don't understand any of these terms. You'll learn what they mean as you progress through the series.
The learning path consists of the following tutorials:
- Overview
- Understand the monolith (this tutorial)
- Modularize the monolith
- Prepare the modular app for containerization
- Containerize the modular app
- Deploy the app to a GKE cluster
In this tutorial, you learn about the monolith by performing the following steps:
- Setting up the app on your local machine.
- Exploring its features in your browser.
- Reviewing the code.
What is a monolith?
Before you get the Cymbal Books sample monolith up and running, it's important to first understand what a monolith is.
A monolith is an app in which all the components are interconnected, and they can't be scaled independently. For example, if a number of users suddenly visit the app's login page, you can't scale only the login component independently. Instead, you need to scale the entire application, including unrelated components, such as the product catalog or order processing system.
In contrast, when an application is broken down into independent modules, each module can be scaled separately based on its resource needs. If you host the modular app on a GKE cluster, GKE can even automate the scaling for you.
The term monolithic doesn't mean poorly organized code. A monolith can be well-structured, and its components can be implemented in distinct areas of the code. What distinguishes a monolith is that these components can't run or scale independently.
Costs
You can complete this tutorial without incurring any charges. However, following the steps in the final tutorial of this series incurs charges on your Google Cloud account. Costs begin when you enable GKE and deploy the Cymbal Books app to a GKE cluster. These costs include per-cluster charges for GKE, as outlined on the Pricing page, and charges for running Compute Engine VMs.
To avoid unnecessary charges, ensure that you disable GKE or delete the project once you have completed this tutorial.
Before you begin
This tutorial requires Python version 3.13 on your local machine. To check which version of Python is on your machine, run this command:
python3 --version
If your Python version is earlier than 3.13, download and install the latest version from the official Python website.
Set up your environment
In this tutorial series, you run different versions of the application in different places:
- The monolithic version on your local machine
- The modular version on your local machine
- The containerized version in Cloud Shell and then in a GKE cluster
In this section, you set up a virtual environment on your local machine where the monolith can run.
Download the code
Open a terminal on your local machine.
Clone the tutorial's GitHub repository to your local machine:
git clone https://github.com/GoogleCloudPlatform/kubernetes-engine-samples.gitThe folder
kubernetes-engine-samples/quickstarts/monolith-to-microservicescontains the following three folders:monolith/,modular/, andcontainerized/. In this tutorial, you focus exclusively on the files in themonolith/folder.
Create and activate a virtual environment
A virtual environment provides an isolated space to run the app. It prevents the Python libraries that you need to install for the app from interfering with other Python projects on your system.
Follow these steps to create and activate a virtual environment:
In the terminal that you opened in the previous section, navigate to the following folder in the repository you cloned onto your machine earlier:
cd kubernetes-engine-samples/quickstarts/monolith-to-microservicesCreate a virtual environment called
book-review-env:python3 -m venv book-review-envCreating a virtual environment is a good idea because it's an area where you can run the app in isolation. This ensures that the app's dependencies and configurations don't conflict with other software or libraries on your system.
Activate the virtual environment by using the command for your operating system:
macOS and Linux
source book-review-env/bin/activateWindows
book-review-env\Scripts\activateInstall the Python dependencies for the monolith. Dependencies are external Python libraries that the app relies on to work properly. These libraries are listed in the
requirements.txtfile, and the following command installs all of them in your virtual environment:pip install -r monolith/requirements.txt
Run and explore Cymbal Books in the browser
The Cymbal Books app is intentionally straightforward and has the following features:
- A homepage that shows all the books in the library.
- A page that shows details about a book.
- A button on the details page that, when clicked, shows book reviews.
- The ability to display images of book covers.
The homepage displays three books, and a View Details button appears with each one:

Now that the virtual environment is active and the app's dependencies are installed in that environment, run the app by following these steps:
On your local machine, navigate to the monolith directory:
cd monolith/Start the app:
python3 mono.pyOpen your web browser and go to the app's homepage:
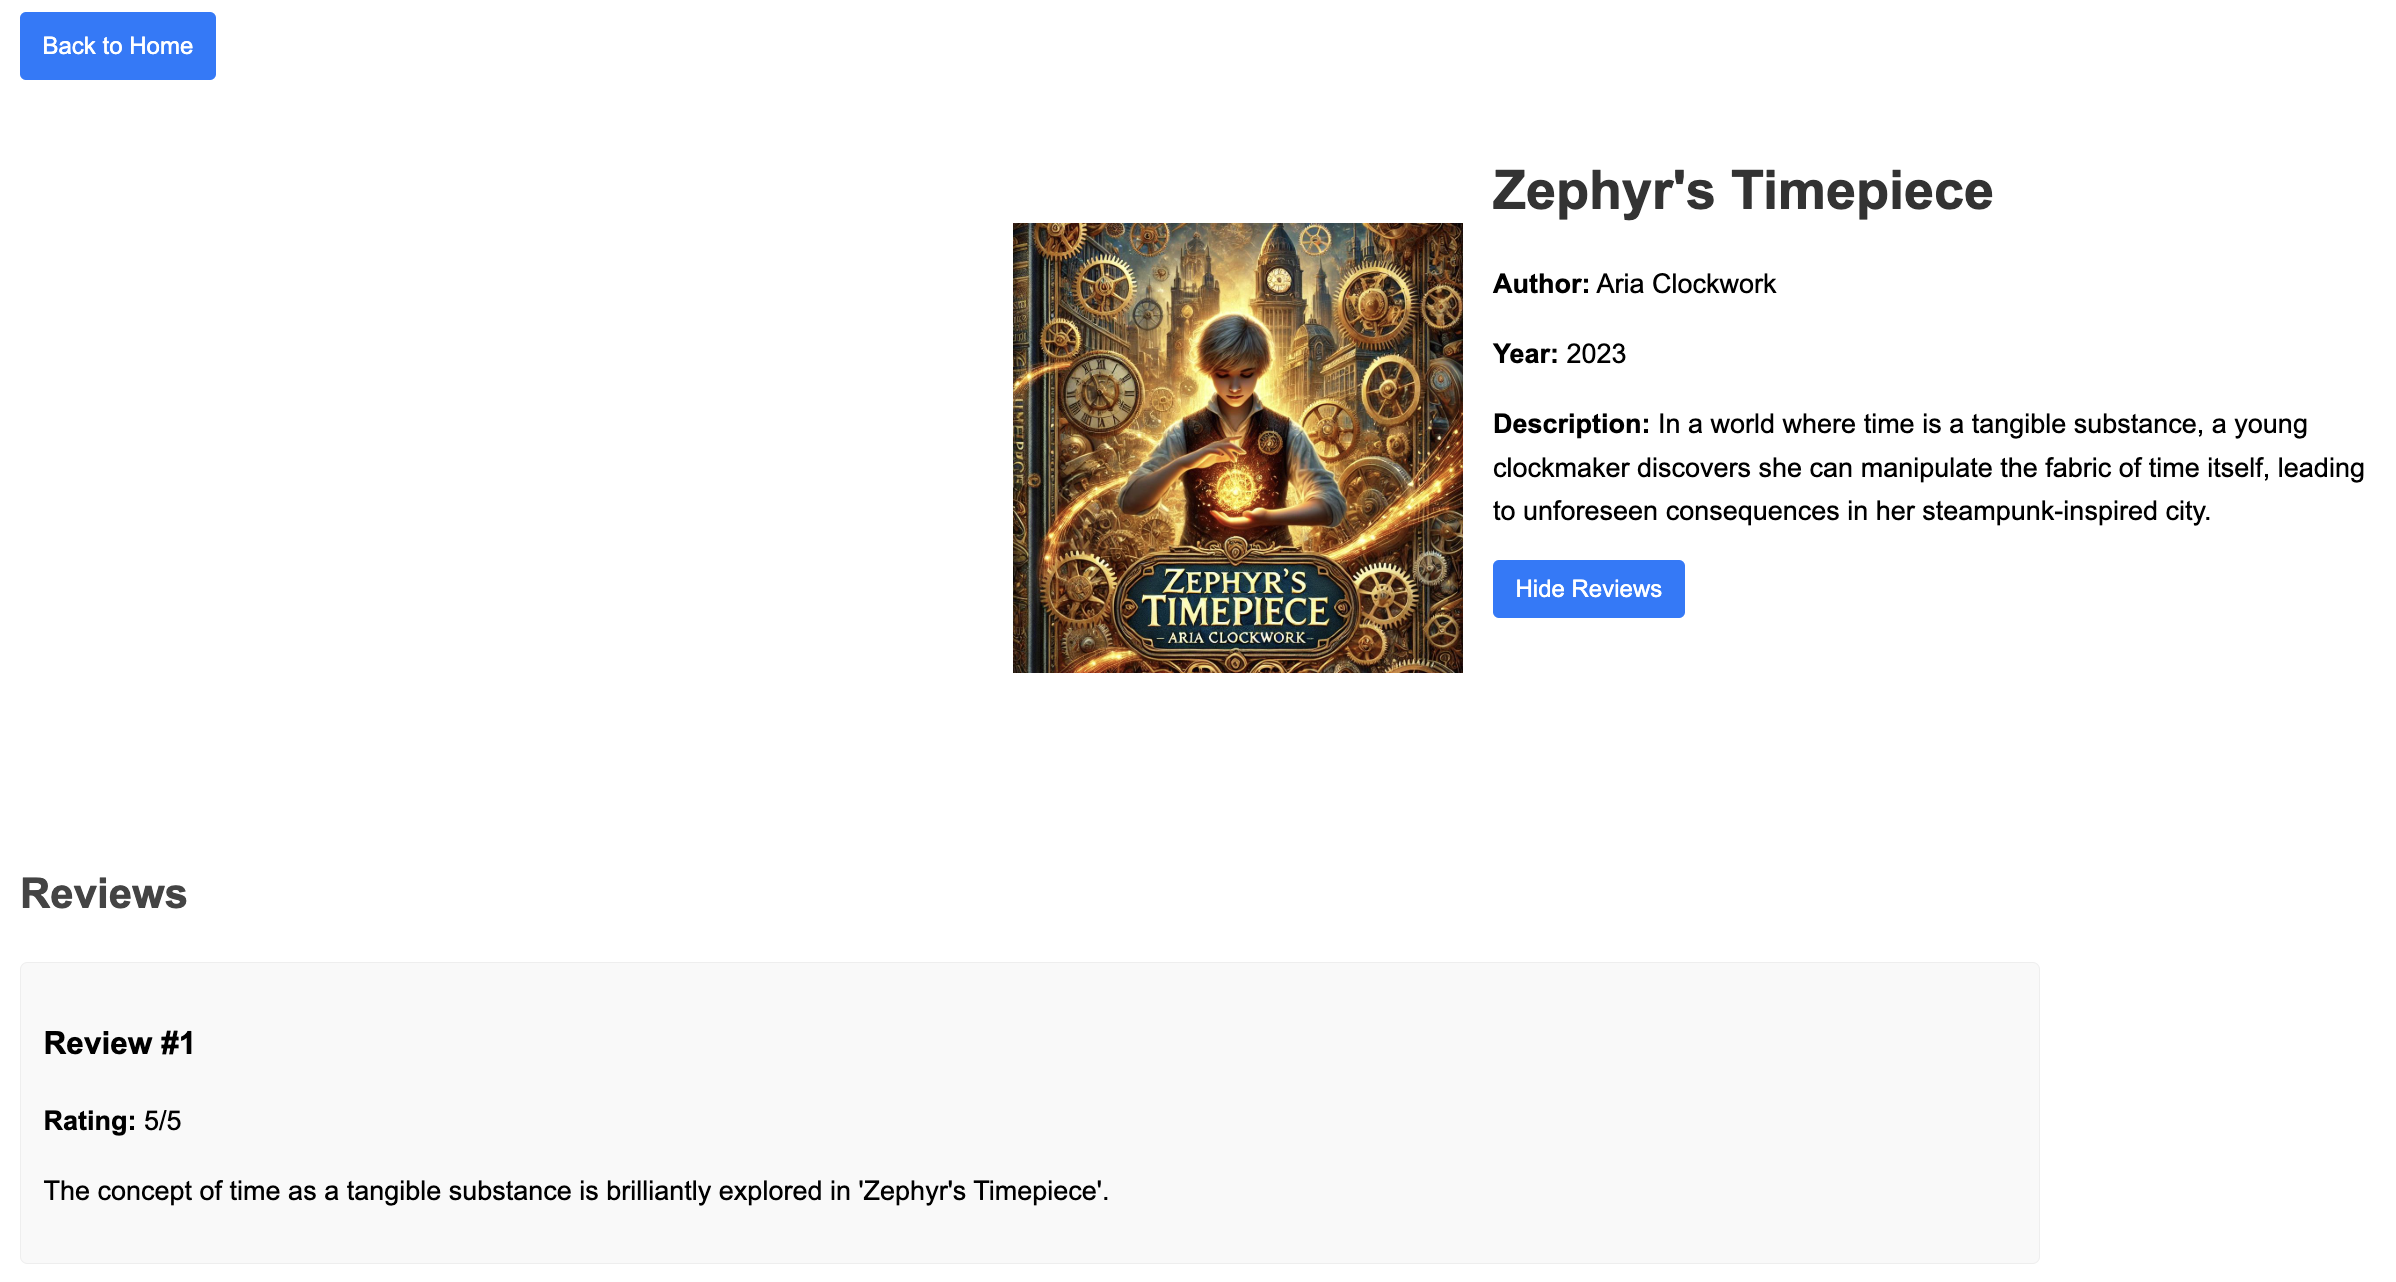
http://127.0.0.1:8080.To go to a book's details page, click View Details. The details page provides more information about a book, such as its author and year of publication.
To display a list of reviews for the book, on a details page, click Show Reviews. The following image shows the book details page for the book Zephyr's Timepiece and the first book review:
Explore the files in the /monolith folder
Take a moment to examine the files in the /monolith folder:
monolith/
├── mono.py
├── data/
│   ├── book-1.json
│   ├── book-2.json
│   ├── book-3.json
│   ├── reviews-1.json
│   ├── reviews-2.json
│   └── reviews-3.json
├── images/
│   ├── fungi_frontier.jpg
│   ├── melodic_mechanics.jpg
│   └── zephyrs_timepiece.jpg
├── static/
│   ├── styles_for_details.css
│   └── styles_for_home.css
└── templates/
    ├── book_details.html
    └── home.html
The key folders and files are as follows:
The
images/folder contains the following book cover images, which are displayed in the app:fungi_frontier.jpgmelodic_mechanics.jpgzephyrs_timepiece.jpg
The
data/folder contains the following JSON files. These files contain reviews of the three books in the Cymbal Books library, and details about each book:reviews-1.json,reviews-2.json,reviews-3.jsonbook-1.json,book-2.json,book-3.json
Although real-world apps often use databases, storing the app's data in JSON files simplifies its implementation. The Cymbal Book sample app uses JSON files so that you don't need to handle complex code. Instead, you can focus on the main goal of this tutorial series, which is to learn how to modularize and containerize the monolith.
You can ignore the following folders because the files in them are important to the app's layout and design, but they aren't directly relevant to the app's logic:
static/: contains CSS files that define the style of the app.templates/: contains HTML files that define the app's layout and content.
Understand the monolith as a Flask application
The monolith in this tutorial is built using Flask, which is a Python library for building web applications. However, Flask isn't typically used in production environments because it doesn't support concurrency, which can lead to performance bottlenecks under heavy load. A Flask application also lacks robust error handling and scalability features.
The Cymbal Books app uses Flask because its simplicity and minimal setup make it easier to understand the concepts of modularization and containerization. For production-grade applications that use Python, consider alternatives to Flask such as FastAPI or Django. You can also use frameworks that are tailored to other languages, such as Spring Boot for Java or Express.js for Node.js. These frameworks can offer better concurrency, scalability, and production-ready capabilities to meet the demands of real-world applications.
Examine mono.py
All of the monolith's logic is contained in a single file called mono.py. This
file creates a Flask application. A Flask application runs inside a web server,
listens for specific URLs, which are called endpoints, and responds to requests
that are made to those URLs. When someone requests one of these URLs—either by
visiting it in a web browser or making the request programmatically—Flask runs
the corresponding piece of code to handle that request.
The following screen capture shows the mono.py file. The boxes highlight the
app's route handlers. While one handler serves the user-facing
homepage, the others are primarily used for inter-module
communication—delivering data in JSON format or static image files. More details
about these endpoints are provided in the next sections.
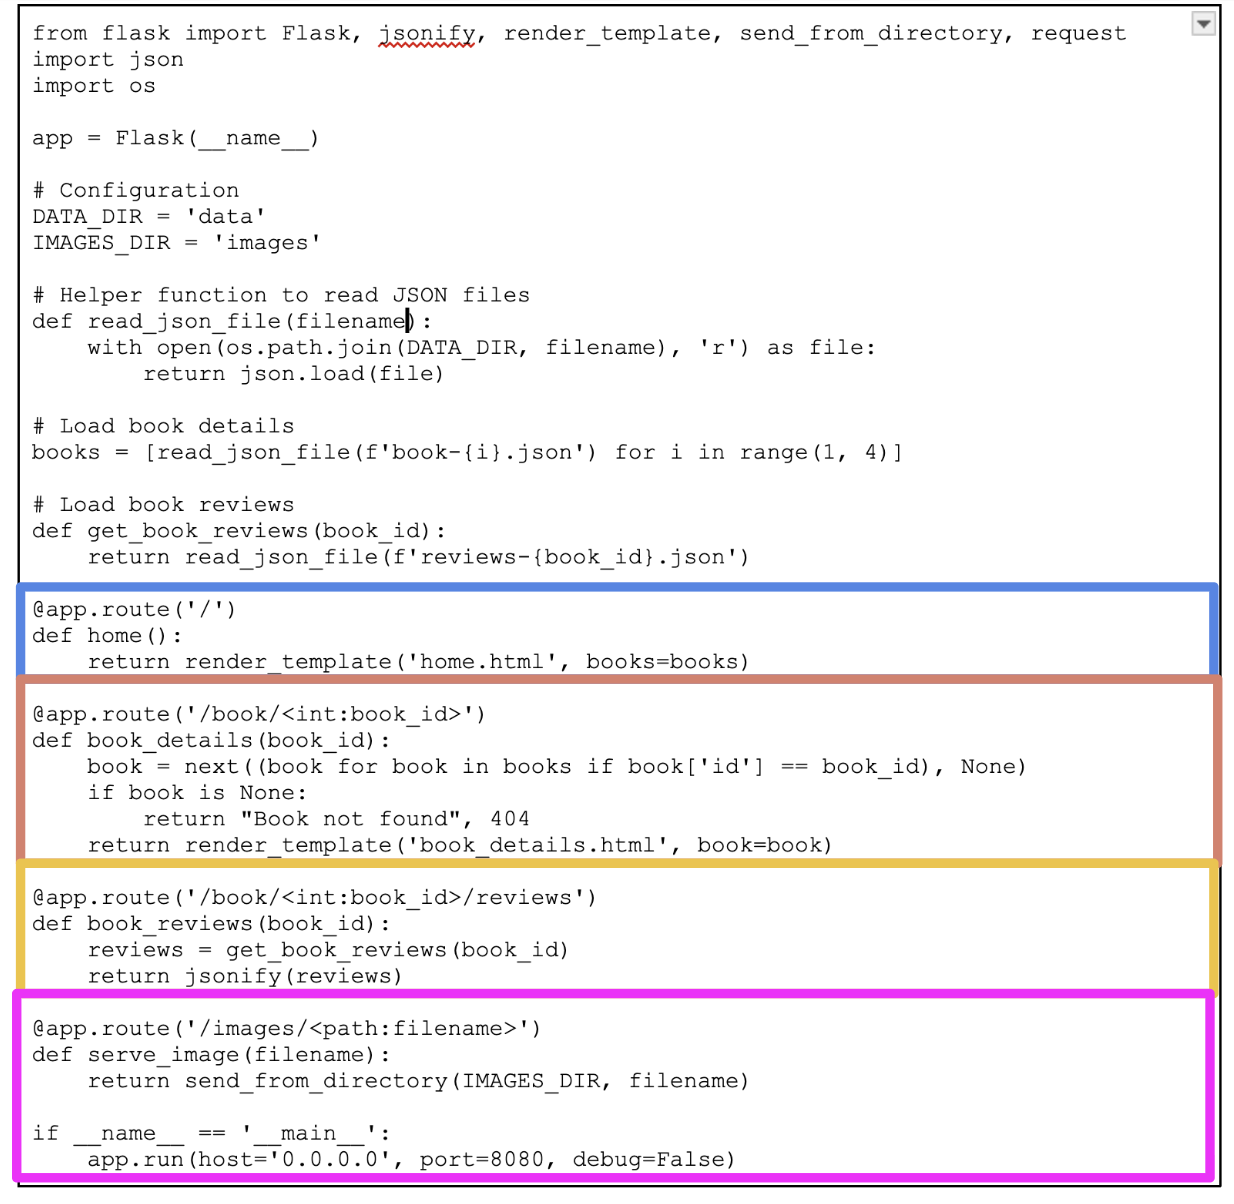
In the screen capture, the boxes highlight the app's route handlers. A route handler consists of two parts:
- The
@app.route()line that defines a URL pattern (such as/book/<id>/reviews). - The function that runs when the endpoint is called.
An endpoint is a URL that matches the pattern defined in the @app.route()
line.
For example, when a user clicks Show Reviews on a book details page, the app
makes a request to http://localhost:8080/book/1/reviews. The book reviews
route handler responds to this request by performing the following steps:
- Recognizes that this URL matches its pattern
/book/<id>/reviews. - Gets the reviews for book 1 from a JSON file.
- Sends those reviews back to the frontend in JSON format.
The book details component then displays these reviews in human-readable form on the webpage. The Cymbal Books monolith uses a Python library called Flask to simplify the implementation of route handlers. In the next tutorial, you see that Flask and the route handlers play a crucial role when you learn how the monolith is converted into a modular app.
Why the monolith's endpoints matter for modularization
Endpoints play a critical role in Flask applications, including the Cymbal Books app. However, their importance extends beyond the monolithic design because understanding endpoints is essential for breaking the app into independent modules. Here's why:
- Core features: Endpoints implement the app's main features, such as displaying pages or retrieving data. Each feature is tied to a specific endpoint.
- Modularization: Endpoints act as natural boundaries, or fault lines, for dividing the app into smaller modules. As you'll see in the next tutorial, each module in the modular version of the app corresponds to a feature with its own endpoints.
- Communication: In a modular design, endpoints enable autonomous modules
to communicate with each other. Understanding how endpoints are implemented
in
mono.pylays the groundwork for modularizing the Cymbal Books app into independent modules in the next tutorial.
Test the monolith's route handlers
To see what kind of data each route handler returns, visit the following endpoints in your browser:
- Homepage route handler: Visit
http://localhost:8080/to see a complete HTML page that displays the book catalog. - Book details route handler: Visit
http://localhost:8080/book/1to see an HTML page showing details about a particular book. The page fetches JSON data about a book from the server and presents it in a human-readable form using an HTML template. Try viewing details for other books by changing the ID number (1, 2, or 3) in the URL. - Book reviews route handler: Visit
http://localhost:8080/book/3/reviewsto see JSON data of the book's reviews. This data gets processed into a readable format when you clickShow Reviewson the book details page for Melodic Mechanics. - Image route handler: Visit
http://localhost:8080/images/fungi_frontier.jpgto see an image file. The homepage and the book details pages call this endpoint in order to display the cover images for books.
Summary
In this tutorial, you set up and ran the monolithic Cymbal Books app. You then learned that the monolith is implemented as a Flask application, which listens for specific URLs, called endpoints, and responds to requests that are made to those URLs.
What's next
In the next tutorial, Modularize the monolith, you see how to break up the monolith into independent modules.