You can use Data Cache only with GKE Standard clusters. This guide walks you through enabling GKE Data Cache when you create a new GKE Standard cluster or a node pool, and provisioning GKE attached disks with Data Cache acceleration.
About GKE Data Cache
With GKE Data Cache, you can use Local SSDs on your GKE nodes as a cache layer for your persistent storage, like Persistent Disks or Hyperdisks. Using Local SSDs reduces disk read latency and increase the queries per second (QPS) for your stateful workloads while minimizing memory requirements. GKE Data Cache supports all types of Persistent Disk or Hyperdisk as backing disks.
To use GKE Data Cache for your application, configure your GKE node pool with attached Local SSDs. You can configure GKE Data Cache to use all or part of the attached Local SSD. Local SSDs that are used by the GKE Data Cache solution are encrypted at rest by using standard Google Cloud encryption.
Benefits
GKE Data Cache offers the following benefits:
- Increased rate of queries handled per second for conventional databases, like MySQL or Postgres, and vector databases.
- Improved read performance for stateful applications by minimizing disk latency.
- Faster data hydration and rehydration because the SSDs are local to the node. Data hydration refers to the initial process of loading the necessary data from persistent storage onto the Local SSD. Data rehydration refers to the process of restoring the data on the Local SSDs after a node is recycled.
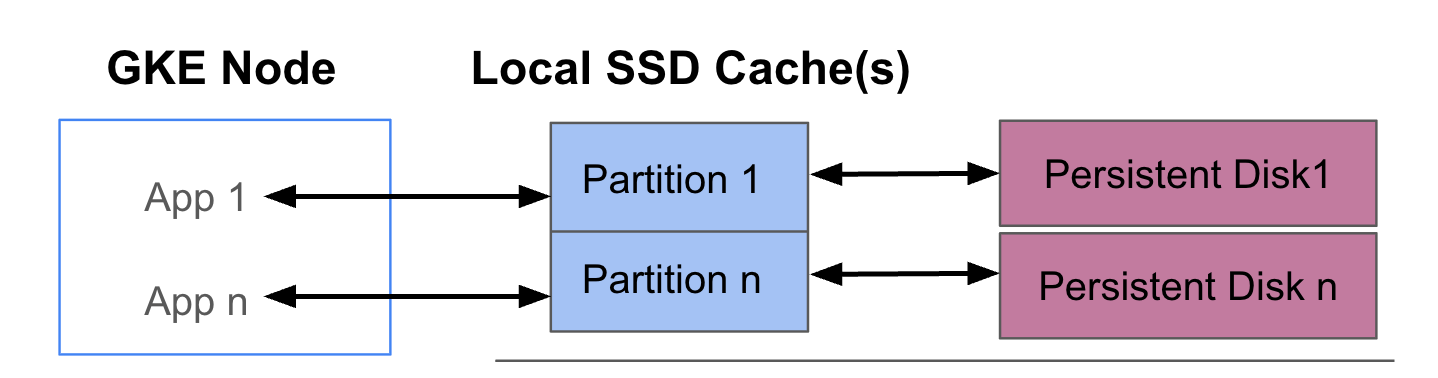
Deployment architecture
The following diagram shows an example of a GKE Data Cache configuration with two Pods that each run an app. The Pods run on the same GKE node. Each Pod uses a separate Local SSD and a backing persistent disk.
Deployment modes
You can set up GKE Data Cache in one of two modes:
- Writethrough (Recommended): When your application writes data, the data is
written synchronously to both the cache and the underlying persistent disk. The
writethroughmode prevents data loss, and is suitable for most production workloads. - Writeback: When your application writes data, the data is written only
to the cache. Then, the data is written to the persistent disk asynchronously
(in the background). The
writebackmode improves write performance, and is suitable for workloads that rely on speed. However this mode affects reliability. If the node unexpectedly shuts down, unflushed cache data will be lost.
Objectives
In this guide, you learn how to:
- Create an underlying GKE infrastructure to use GKE Data Cache.
- Create a dedicated node pool with attached Local SSDs.
- Create a StorageClass for dynamically provisioning a PersistentVolume (PV) when a Pod requests it through a PersistentVolumeClaim (PVC).
- Create a PVC to request a PV.
- Create a Deployment that uses a PVC to ensure that your application has access to persistent storage even after a Pod restarts, and during rescheduling.
Requirements and planning
Ensure that you meet the following requirements for using GKE Data Cache:
- Your GKE cluster must be running version 1.32.3-gke.1440000 or later.
- Your node pools must use machine types that support Local SSDs. For more information, see Machine series support.
Planning
Consider these aspects when you plan storage capacity for GKE Data Cache:
- The maximum number of Pods per node that'll use GKE Data Cache concurrently.
- The expected cache size requirements of Pods that'll use GKE Data Cache.
- The total capacity of Local SSDs available on your GKE nodes. For information about which machine types have Local SSDs attached by default and which machine types require you to attach Local SSDs, see Choose a valid number of Local SSD disks.
- For third or later-generation machine types (which have a default number of Local SSDs attached), note that the Local SSDs for Data Cache are reserved out of the total available Local SSDs on that machine.
- The file system overhead that can reduce the usable space on Local SSDs. For example, even if you have a node that has two Local SSDs with 750 GiB of total raw capacity, the available space for all Data Cache volumes might be less because of file system overhead. Some Local SSD capacity is reserved for system use.
Limitations
Incompatibility with Backup for GKE
To maintain data integrity in scenarios such as disaster recovery or application migration, you might need to back up and restore your data. If you use Backup for GKE to restore a PVC that is configured to use Data Cache, the restore process fails. This failure occurs because the restore process does not correctly propagate the necessary data cache parameters from the original StorageClass.
Pricing
You are billed for the total provisioned capacity of your Local SSDs and the attached persistent disks. You are charged per GiB per month.
For more information, see Disk pricing in the Compute Engine documentation.
Before you begin
Before you start, make sure that you have performed the following tasks:
- Enable the Google Kubernetes Engine API. Enable Google Kubernetes Engine API
- If you want to use the Google Cloud CLI for this task,
install and then
initialize the
gcloud CLI. If you previously installed the gcloud CLI, get the latest
version by running the
gcloud components updatecommand. Earlier gcloud CLI versions might not support running the commands in this document.
- Review the machine types that support Local SSDs for your node pool.
Configure GKE nodes for using Data Cache
To begin using GKE Data Cache for accelerated storage, your nodes must have the necessary Local SSD resources. This section shows commands to provision Local SSDs and enable GKE Data Cache when you create a new GKE cluster or add a new node pool to an existing cluster. You can't update an existing node pool to use Data Cache. If you want to use Data Cache on an existing cluster, add a new node pool to the cluster.
On a new cluster
To create a GKE cluster with Data Cache configured, use the following command:
gcloud container clusters create CLUSTER_NAME \
    --location=LOCATION \
    --machine-type=MACHINE_TYPE \
    --data-cache-count=DATA_CACHE_COUNT \
    # Optionally specify additional Local SSDs, or skip this flag
    --ephemeral-storage-local-ssd count=LOCAL_SSD_COUNT
Replace the following:
CLUSTER_NAME: the name of the cluster. Provide a unique name for the GKE cluster that you're creating.LOCATION: the Google Cloud region or zone for the new cluster.MACHINE_TYPE: the machine type to use from a second, third, or later-generation machine series for your cluster, such asn2-standard-2orc3-standard-4-lssd. This field is required because the Local SSD can't be used with the defaulte2-mediumtype. For more information, see available machine series.DATA_CACHE_COUNT: the number of Local SSD volumes to dedicate exclusively for Data Cache on each node in the default node pool. Each of these Local SSDs has a capacity of 375 GiB. The maximum number of volumes varies by machine type and region. Note that some Local SSD capacity is reserved for system use.(Optional)
LOCAL_SSD_COUNT: the number of Local SSD volumes to provision for other ephemeral storage needs. Use the--ephemeral-storage-local-ssd countflag if you want to provision additional Local SSDs that aren't used for Data Cache.Note the following for the third or later-generation machine types:
- Third or later-generation machine types have a specific number of Local SSDs attached by default. The number of Local SSDs that are attached to each node depends on the machine type you specify.
- If you plan to use the
--ephemeral-storage-local-ssd countflag for additional ephemeral storage, make sure to set the value ofDATA_CACHE_COUNTto a number that's less than the total available Local SSD disks on the machine. The total available Local SSD count includes the default attached disks and any new disks that you add using the--ephemeral-storage-local-ssd countflag.
This command creates a GKE cluster that runs on a second, third, or later-generation machine type for its default node pool, provisions Local SSDs for Data Cache, and optionally provisions additional Local SSDs for other ephemeral storage needs, if specified.
These settings apply only to the default node pool.
On an existing cluster
To use use Data Cache on an existing cluster, you must create a new node pool with Data Cache configured.
To create a GKE node pool with Data Cache configured, use the following command:
gcloud container node-pool create NODE_POOL_NAME \
    --cluster=CLUSTER_NAME \
    --location=LOCATION \
    --machine-type=MACHINE_TYPE \
    --data-cache-count=DATA_CACHE_COUNT \
    # Optionally specify additional Local SSDs, or skip this flag
    --ephemeral-storage-local-ssd count=LOCAL_SSD_COUNT
Replace the following:
NODE_POOL_NAME: the name of the node pool. Provide a unique name for the node pool that you're creating.CLUSTER_NAME: the name of an existing GKE cluster where you want to create the node pool.LOCATION: the same Google Cloud region or zone as your cluster.MACHINE_TYPE: the machine type to use from a second, third, or later-generation machine series for your cluster, such asn2-standard-2orc3-standard-4-lssd. This field is required, as Local SSD can't be used with the defaulte2-mediumtype. For more information, see available machine series.DATA_CACHE_COUNT: the number of Local SSD volumes to dedicate exclusively for Data Cache on each node in the node pool. Each of these Local SSDs has a capacity of 375 GiB. The maximum number of volumes varies by machine type and region. Note that some Local SSD capacity is reserved for system use.(Optional)
LOCAL_SSD_COUNT: the number of Local SSD volumes to provision for other ephemeral storage needs. Use the--ephemeral-storage-local-ssd countflag if you want to provision additional Local SSDs that aren't used for Data Cache.Note the following for the third or later-generation machine types:
- Third or later-generation machine types have a specific number of Local SSDs attached by default. The number of Local SSDs that are attached to each node depends on the machine type you specify.
- If you plan to use the
--ephemeral-storage-local-ssd countflag for additional ephemeral storage, make sure to set theDATA_CACHE_COUNTto less than the total available Local SSD disks on the machine. The total available Local SSD count includes the default attached disks and any new disks that you add using the--ephemeral-storage-local-ssd countflag.
This command creates a GKE node pool that runs on a second, third, or later-generation machine type, provisions Local SSDs for Data Cache, and optionally provisions additional Local SSDs for other ephemeral storage needs, if specified.
Provision Data Cache for persistent storage on GKE
This section provides an example of how to enable the performance benefits of GKE Data Cache for your stateful applications.
Create a node pool with Local SSDs for Data Cache
Start by creating a new node pool with attached Local SSDs in your GKE cluster. GKE Data Cache uses the Local SSDs to accelerate the attached persistent disks' performance.
The following command creates a node pool that uses a second-generation machine,
n2-standard-2:
gcloud container node-pools create datacache-node-pool \
    --cluster=CLUSTER_NAME \
    --location=LOCATION \
    --num-nodes=2 \
    --data-cache-count=1 \
    --machine-type=n2-standard-2
Replace the following:
CLUSTER_NAME: the name of the cluster. Specify the GKE cluster where you're creating the new node pool.LOCATION: the same Google Cloud region or zone as your cluster.
This command creates a node pool with the following specifications:
--num-nodes=2: sets the initial number of nodes in this pool to two.--data-cache-count=1: specifies one Local SSD per node dedicated to GKE Data Cache.
The total number of Local SSDs that are provisioned for this node pool is two because each node is provisioned with one Local SSD.
Create a Data Cache StorageClass
Create a Kubernetes StorageClass
that tells GKE how to dynamically provision a persistent volume
that uses Data Cache.
Use the following manifest to create and apply a StorageClass named pd-balanced-data-cache-sc:
kubectl apply -f - <<EOF
apiVersion: storage.k8s.io/v1
kind: StorageClass
metadata:
  name: pd-balanced-data-cache-sc
provisioner: pd.csi.storage.gke.io
parameters:
  type: pd-balanced
  data-cache-mode: writethrough
  data-cache-size: "100Gi"
volumeBindingMode: WaitForFirstConsumer
allowVolumeExpansion: true
EOF
StorageClass parameters for Data Cache include the following:
type: specifies the underlying disk type for the persistent volume. For more options, see the supported Persistent Disk types or Hyperdisk types.data-cache-mode: uses the recommendedwritethroughmode. For more information, see Deployment modes.data-cache-size: sets the Local SSD capacity to 100 GiB, which is used as a read cache for each PVC.
Request storage with a PersistentVolumeClaim (PVC)
Create a PVC that references the pd-balanced-data-cache-sc StorageClass that
you created. The PVC requests a persistent volume with Data Cache enabled.
Use the following manifest to create a PVC named pvc-data-cache that requests
a persistent volume of at least 300 GiB with ReadWriteOnce access.
kubectl apply -f - <<EOF
apiVersion: v1
kind: PersistentVolumeClaim
metadata:
  name: pvc-data-cache
spec:
  accessModes:
    - ReadWriteOnce
  resources:
    requests:
      storage: 300Gi
  storageClassName: pd-balanced-data-cache-sc
EOF
Create a Deployment that uses the PVC
Create a Deployment named postgres-data-cache that runs a Pod which uses the
pvc-data-cache PVC that you created earlier. The cloud.google.com/gke-data-cache-count
node selector ensures that the Pod is scheduled onto a node that has the Local SSD
resources that are necessary for using GKE Data Cache.
Create and apply the following manifest to configure a Pod that deploys a Postgres web server by using the PVC:
kubectl apply -f - <<EOF
apiVersion: apps/v1
kind: Deployment
metadata:
 name: postgres-data-cache
 labels:
   name: database
   app: data-cache
spec:
 replicas: 1
 selector:
   matchLabels:
     service: postgres
     app: data-cache
 template:
   metadata:
     labels:
       service: postgres
       app: data-cache
   spec:
     nodeSelector:
       cloud.google.com/gke-data-cache-disk: "1"
     containers:
     - name: postgres
       image: postgres:14-alpine
       volumeMounts:
       - name: pvc-data-cache-vol
         mountPath: /var/lib/postgresql/data2
         subPath: postgres
       env:
       - name: POSTGRES_USER
         value: admin
       - name: POSTGRES_PASSWORD
         value: password
     restartPolicy: Always
     volumes:
     - name: pvc-data-cache-vol
       persistentVolumeClaim:
         claimName: pvc-data-cache
EOF
Confirm that the Deployment was successfully created:
kubectl get deployment
It might take a few minutes for the Postgres container to complete provisioning
and display a READY status.
Verify Data Cache provisioning
After you create your Deployment, confirm that the persistent storage with Data Cache is correctly provisioned.
To verify that your
pvc-data-cacheis successfully bound to a persistent volume, run the following command:kubectl get pvc pvc-data-cacheThe output is similar to the following:
NAME             STATUS   VOLUME                                     CAPACITY   ACCESS MODES   STORAGECLASS                VOLUMEATTRIBUTESCLASS   AGE
pvc-data-cache   Bound    pvc-e9238a16-437e-45d7-ad41-410c400ae018   300Gi      RWO            pd-balanced-data-cache-sc   <unset>                 10m
To confirm that the Logical Volume Manager (LVM) Group for Data Cache was created on the node, follow these steps:
Get the Pod name of the PDCSI driver on that node:
NODE_NAME=$(kubectl get pod --output json |  jq '.items[0].spec.nodeName' | sed 's/\"//g')
kubectl get po -n kube-system -o wide | grep ^pdcsi-node | grep $NODE_NAME
From the output, copy the name of the
pdcsi-nodePod.View PDCSI driver logs for LVM Group creation:
PDCSI_POD_NAME="PDCSI-NODE_POD_NAME"
kubectl logs -n kube-system $PDCSI_POD_NAME gce-pd-driver | grep "Volume group creation"
Replace
PDCSI-NODE_POD_NAMEwith the actual Pod name that you copied in the previous step.The output is similar to the following:
Volume group creation succeeded for LVM_GROUP_NAME
This message confirms that the LVM configuration for Data Cache is set up correctly on the node.
Clean up
To avoid incurring charges to your Google Cloud account, delete the storage resources you created in this guide.
Delete the Deployment.
kubectl delete deployment postgres-data-cacheDelete the PersistentVolumeClaim.
kubectl delete pvc pvc-data-cacheDelete the node pool.
gcloud container node-pools delete datacache-node-pool \
    --cluster CLUSTER_NAME
Replace
CLUSTER_NAMEwith the name of the cluster where you created the node pool that uses Data Cache.
What's next
- See Troubleshooting storage in GKE.
- Read more about the Persistent Disk CSI driver on GitHub.