This is the second tutorial in a learning path that teaches you how to modularize and containerize a monolithic app.
The learning path consists of the following tutorials:
- Overview
- Understand the monolith
- Modularize the monolith (this tutorial)
- Prepare the modular app for containerization
- Containerize the modular app
- Deploy the app to a GKE cluster
In the previous tutorial, Understand the monolith, you learned about a monolithic app called Cymbal Books. You ran the monolith on your local machine and learned that different parts of the monolith communicate with each other through their endpoints.
In this tutorial, you see how to divide the monolith into modules to prepare it for containerization. You don't need to perform the modularization steps yourself because the code has already been updated for you. Your job is to follow the tutorial and explore the modular version of the app in the repository to see how it differs from the original monolith.
Costs
You can complete this tutorial without incurring any charges. However, following the steps in the final tutorial of this series incurs charges on your Google Cloud account. Costs begin when you enable GKE and deploy the Cymbal Books app to a GKE cluster. These costs include per-cluster charges for GKE, as outlined on the Pricing page, and charges for running Compute Engine VMs.
To avoid unnecessary charges, ensure that you disable GKE or delete the project once you have completed this tutorial.
Before you begin
Before starting this tutorial, make sure you've completed the first tutorial, Understand the monolith. In this tutorial, you run the modular version of Cymbal Books on your local machine. To do that, you need to have already set up your environment. If you already completed the first tutorial, you cloned a GitHub repository. All three versions of the Cymbal Books app are located in that repository, inside the following folders:
monolith/modular/containerized/
Check that these folders are on your machine before you continue. Also, ensure
that the virtual environment book-review-env is active. If you need a reminder
about how to activate it, refer to
Create and activate a virtual environment from
the first tutorial. Activating the environment ensures that the modular version
of the app has everything it needs to run.
What is modularization?
In this tutorial, you learn how to modularize the monolithic app in order to prepare it for containerization. Modularization is the process of turning a monolith into a modular app. As you learned in the previous tutorial, the distinguishing characteristic of a monolith is that its components can't run or scale independently. A modular app is different: its functionality is divided into modules that can run and scale independently.
Although modularization and containerization are often done together, they're treated as separate steps in this series of tutorials to help you understand each concept clearly. This tutorial explains how to modularize a monolith, and a later tutorial explains how to containerize the modular app.
Incremental modularization
In production environments, you typically modularize one component at a time. You modularize the component, integrate the module with the monolith, and make sure that everything works before you work on the next component. This hybrid state, where some components are modularized while others remain part of the monolith, is called a microlith. However, in this tutorial, all the app's components are modularized at the same time to provide a complete example of how to modularize an app.
How to modularize the monolith
In this section, you learn how the Cymbal Books monolith was broken into separate modules. Steps are provided to help you understand the modularization process so that you can apply it to your own apps. However, you don't need to perform these steps in this tutorial because the cloned repository already includes the modular version of the app:
- Identify the distinct functions of the app
- Create the modules
- Enable communication between the modules
- Give each module access to only the data it needs
Identify the distinct functions of the app
The first step in modularizing the Cymbal Books monolith is to identify its main functions. In the Cymbal Books sample application, the monolith has the following four distinct functions:
- Serving the homepage
- Serving book details
- Serving book reviews
- Serving book cover images
Create the modules
As you saw in the previous tutorial, the monolith is a single Flask app that implements the four functions, which were identified in the previous section, as route handlers. To modularize the app, you take each route handler and put it into its own Flask app. Instead of one Flask app with four route handlers, you have four Flask apps, each with a single route handler inside it.
The following diagram illustrates this transformation from a single Flask app into four separate Flask apps:
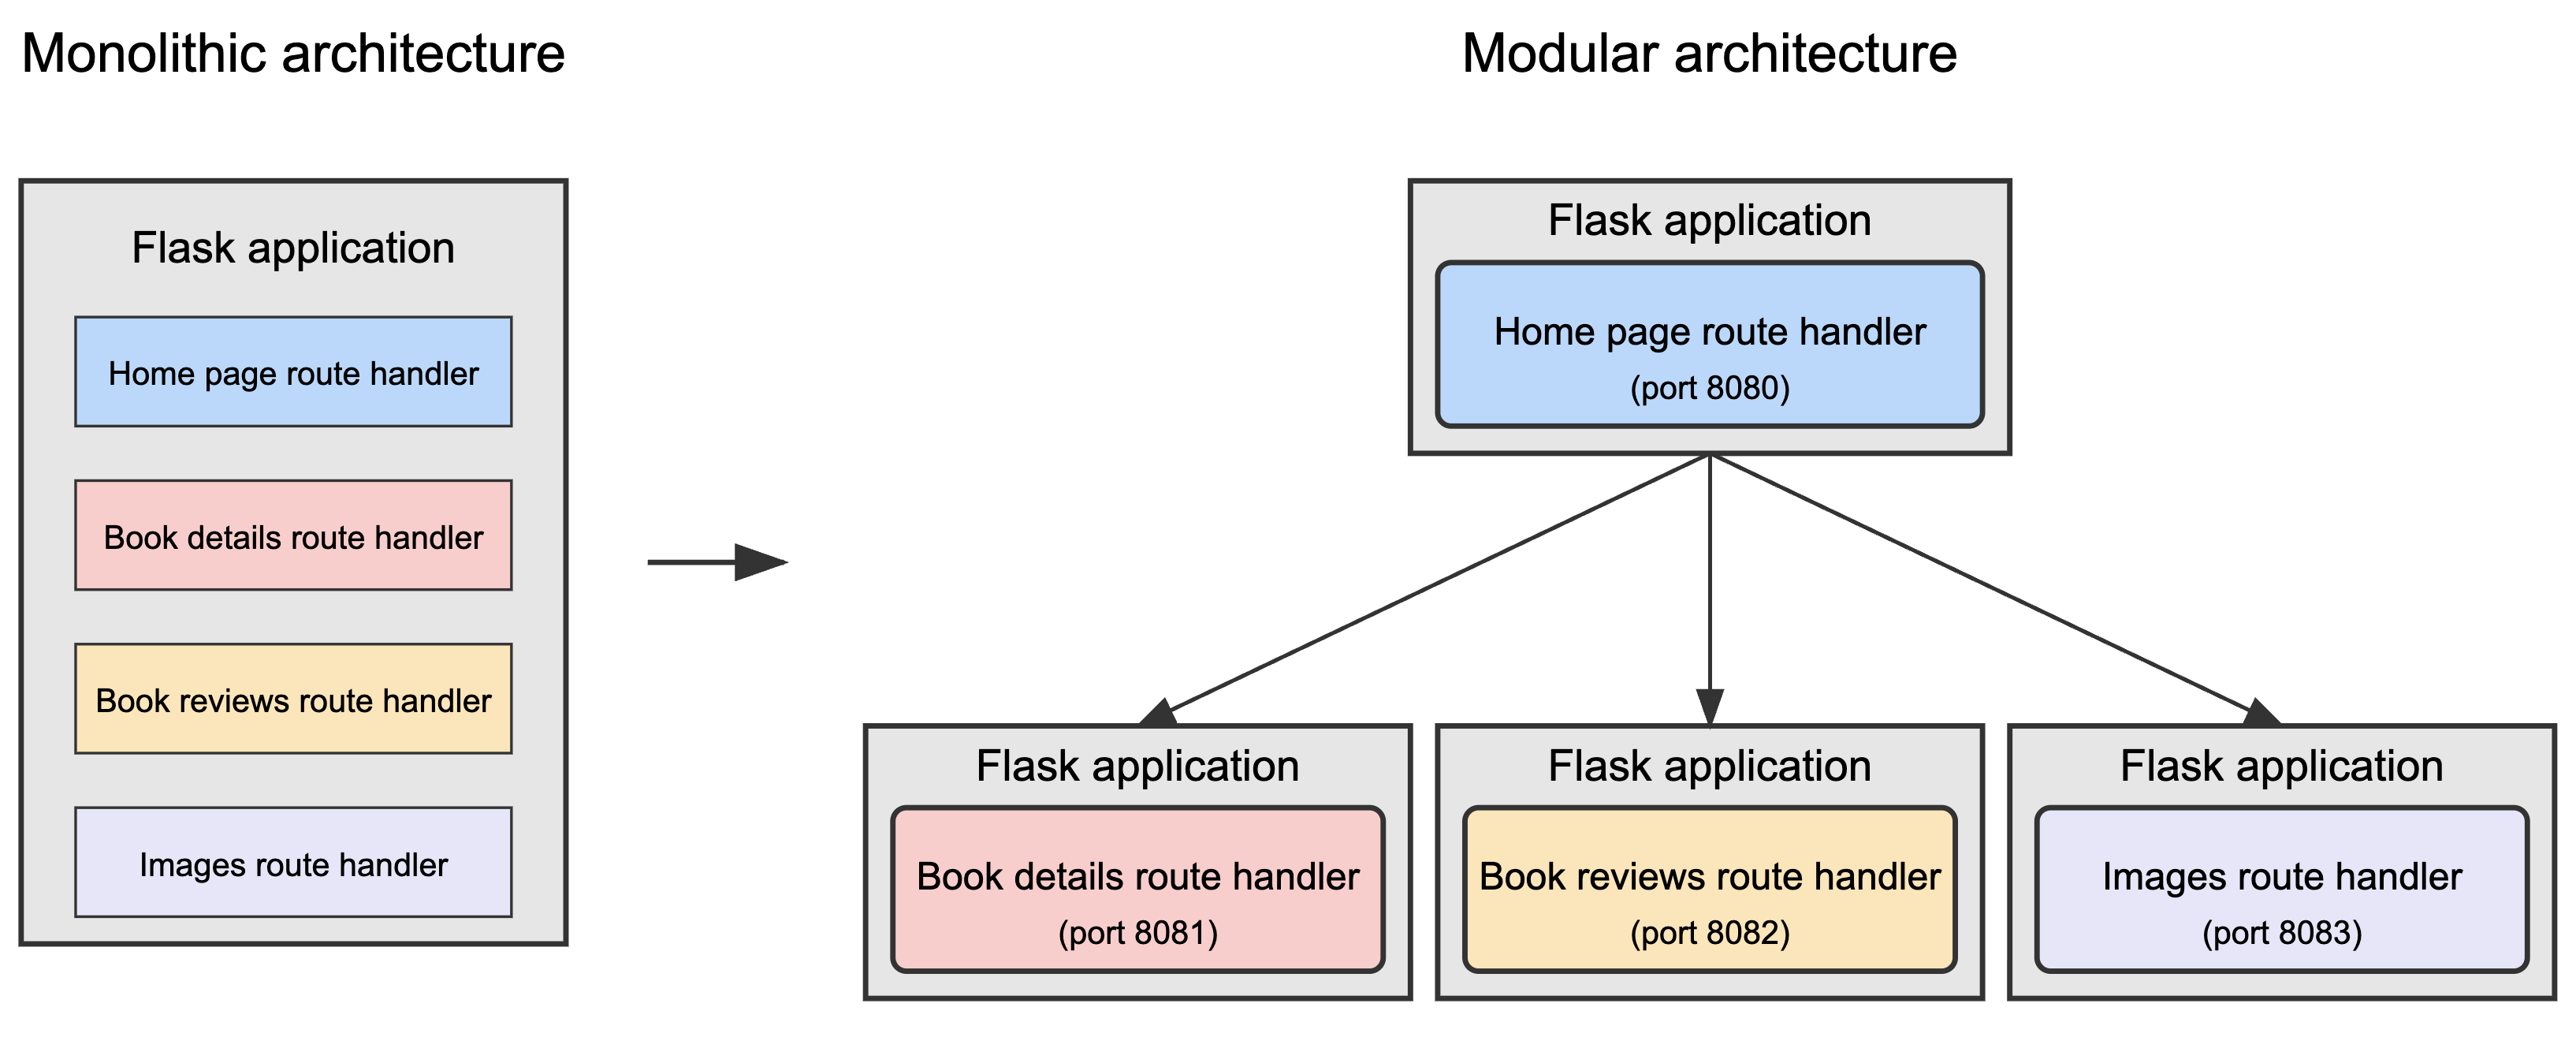
In the modular app, each Flask app runs independently and listens on a different port (8080, 8081, 8082, 8083), as shown in the diagram. This setup is needed because, when you test the modular app later in this tutorial, you'll run all the modules on the same machine. Each app needs a different port number to avoid conflicts.
The homepage module has two responsibilities: it serves the homepage and communicates with the other modules to gather data that needs to be displayed in a web page. Each of the other modules is focused on a single function: serving reviews, details, or images. These modules don't communicate with each other—they only respond to requests from the homepage module.
Although the homepage module has an additional coordination role, the app is still truly modular because you can update any module without affecting the other modules. The single large Flask application has been broken down into four pieces, each of which handles a specific part of the application's functionality.
Enable communication between the modules
After creating the modules, the next step is to ensure that they can communicate
with each other. In the Cymbal Books app, this communication logic has already
been implemented for you. In the modular/ folder of the code you downloaded,
you can see that each of the app's main features —serving the homepage,
book details, reviews, and images—is implemented as a separate Flask app.
Each of these apps defines its own HTTP endpoint, and the modules communicate by
sending HTTP requests to those endpoints.
Modularizing the Cymbal Books monolith was straightforward. The monolith has well-defined components that are implemented as route handlers, and each route handler has a well-defined endpoint. When these route handlers are placed into separate Flask applications, they retain their ability to communicate through their endpoints. The straightforward act of putting the route handlers into separate Flask apps both creates the modules and enables the modules to communicate with each other.
A common approach for inter-module communication is to implement REST APIs, which allow modules to send HTTP requests to each other. That's how it works in Cymbal Books: each module defines REST endpoints using Flask's built-in tools. Another popular approach is gRPC, which allows modules to call each other's functions directly.
Why communication is straightforward in Cymbal Books
Each module in the modular app is a separate Flask application that runs inside a web server. For example, the homepage module serves the homepage, the book details module serves book details. Communication between the modules is straightforward because web servers are designed to handle HTTP requests and responses. Each module exposes endpoints that other modules can use to request data.
Give each module access to only the data it needs
To properly modularize the monolith, you need to ensure that each module has access to only the data that it needs. This principle, known as data isolation, is a critical element in creating a truly modular architecture.
A frequent mistake people make during modularization is allowing multiple modules to access the same data, such as a single database. This type of implementation creates problems such as the following:
- Tight coupling: if the structure of the shared data changes—for example, a database table is renamed or a column is added—every module that relies on that data must be updated. Proper modularization avoids this problem.
- Fault tolerance issues: when multiple modules use the same data source, runtime failures in one module—such as invalid queries or overwhelming traffic—can disrupt other modules. A failure in one part of the system can cascade into failures in other parts of the system.
- Performance bottlenecks: a single, shared data source can become a bottleneck, which means that it might slow down the whole application when multiple modules try to interact with it.
To avoid these problems, each module should have its own data source.
If Cymbal Books had used a database to store its data, you would need to either replicate or partition the database to enforce data isolation and ensure that each module accesses only the data it needs. Replication involves maintaining separate copies of the database for each module, while partitioning restricts access to specific tables or rows. Both approaches prevent modules from interfering with each other's data.
The following diagram compares the monolithic book app's architecture with the book app's modular architecture:
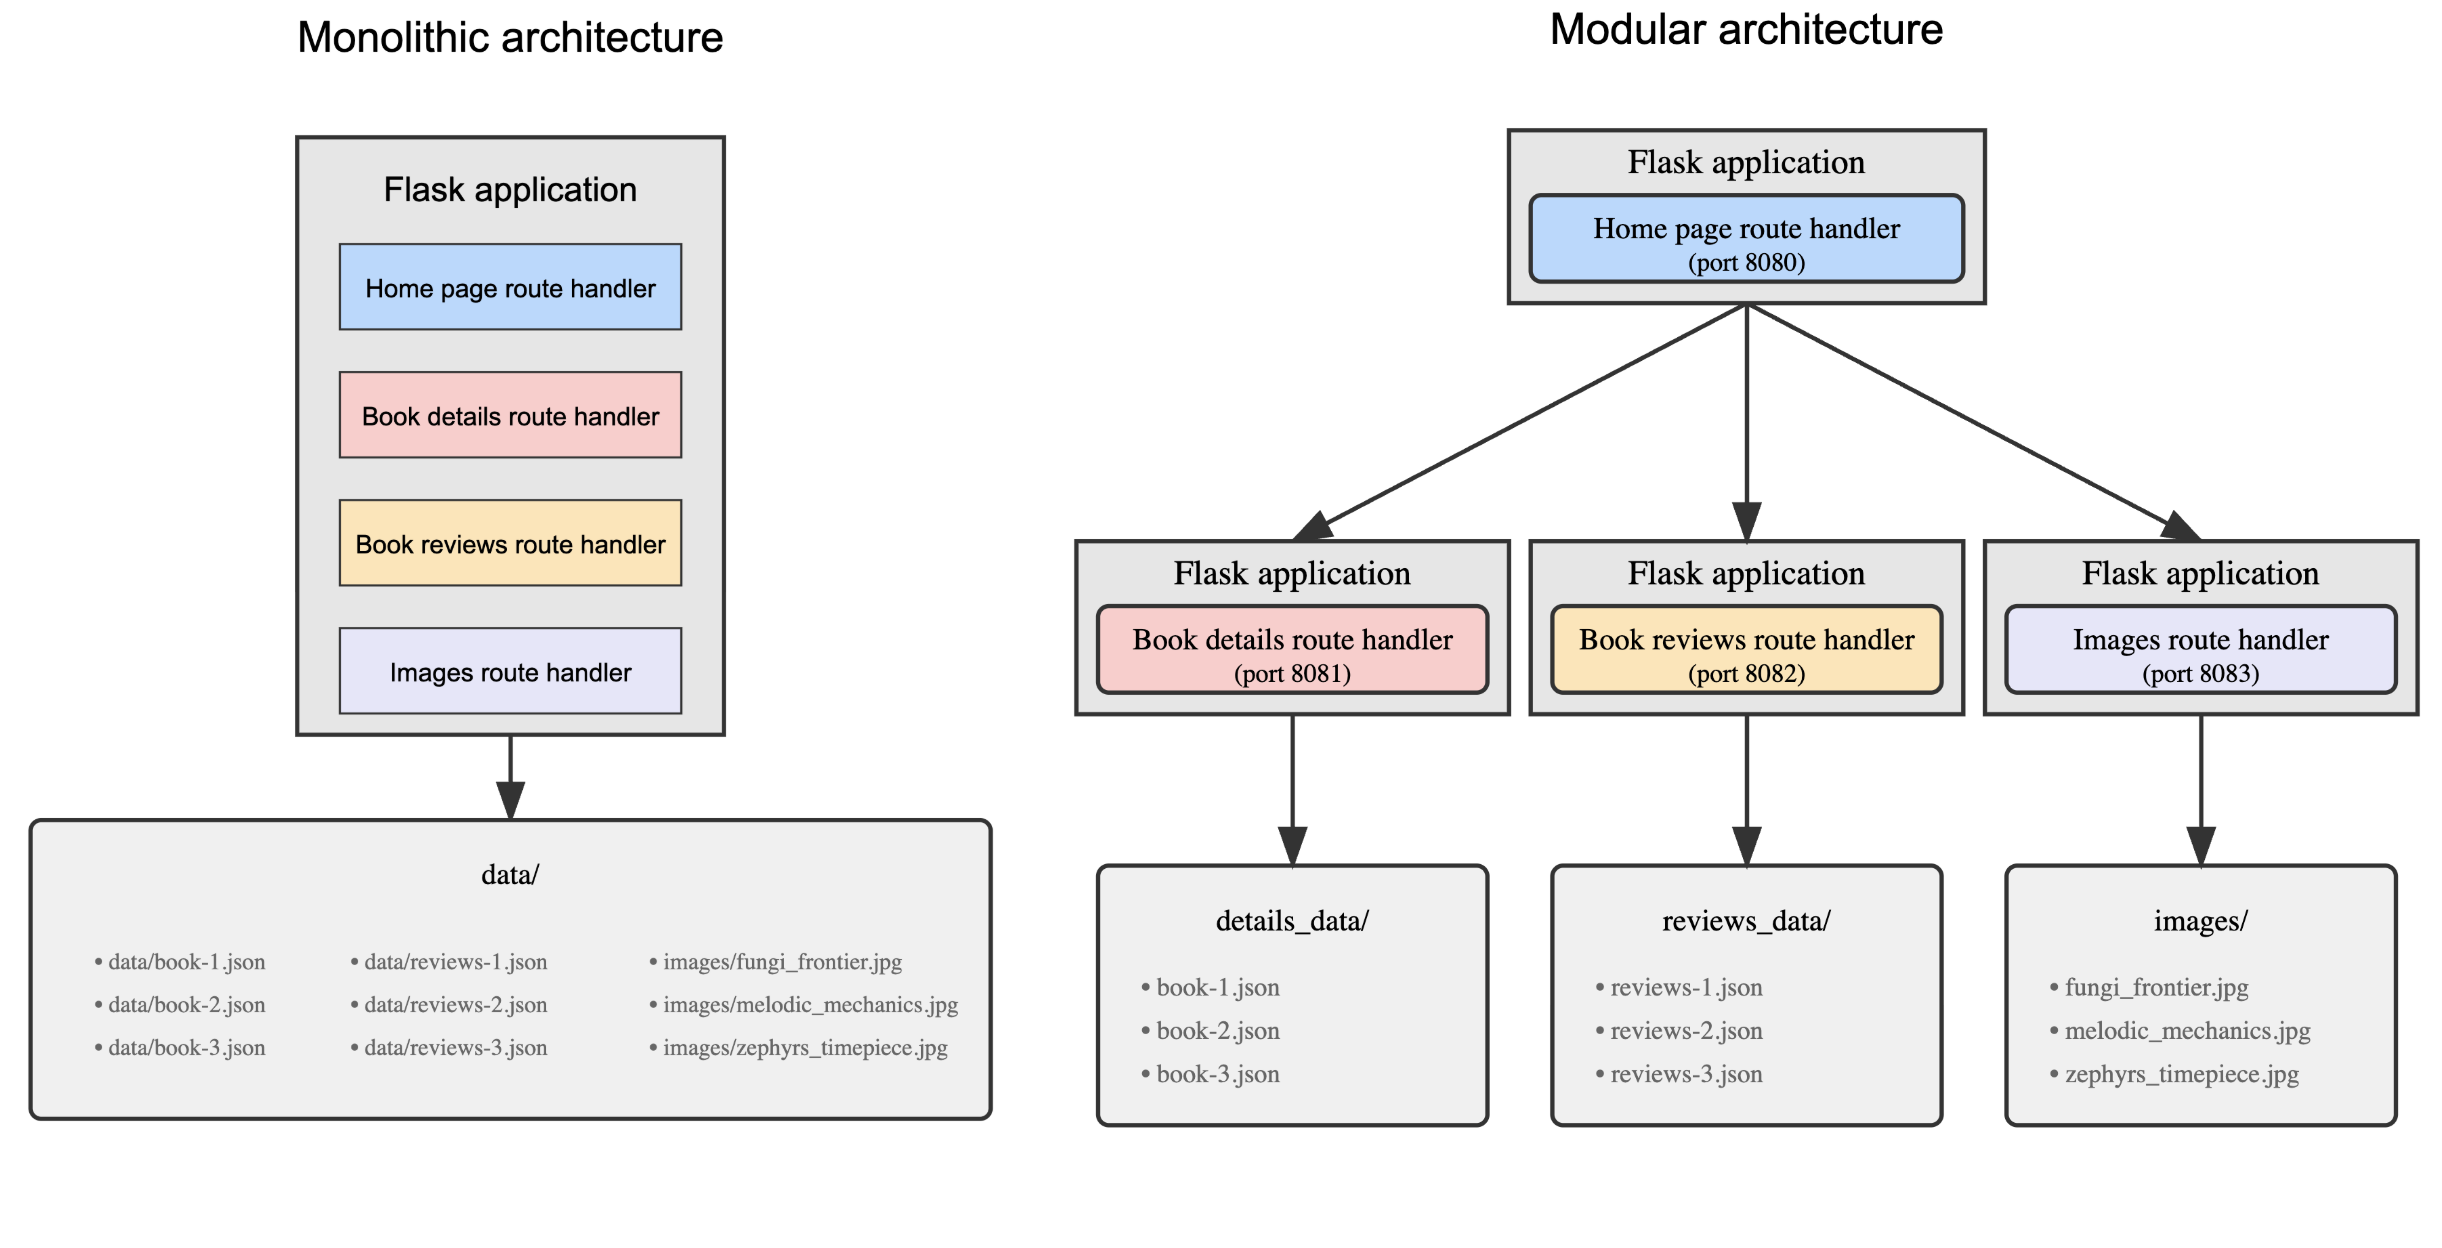
The monolith's implementation doesn't follow the principle of data isolation
because the monolith's functions access a single data/ directory.
In contrast, the modular app achieves some degree of data isolation by splitting data into separate directories, and ensuring that each module interacts only with its designated data:
- The book details module gets data only from the
details_data/directory. - The book reviews module gets data only from the
reviews_data/directory. - The images module gets data only from the
images/directory.
In a later tutorial, you see how containerizing the app can further enhance data isolation.
What you just saw
In the software development industry, you often encounter the terms microservices and distributed systems. This section explains how these terms relate to the modular implementation of Cymbal Books.
Microservices
Microservices are autonomous modules that perform specific tasks. These modules communicate with other modules through interfaces such as endpoints.
Each module in the modular version of Cymbal Books fits this definition, and can therefore be referred to as a microservice. When the modular app is containerized in a later tutorial, the code that runs inside a container can also be referred to as a microservice because it's the same code that runs inside a module.
Distributed systems
A distributed system consists of independent modules that communicate over a network to achieve a common goal. These modules can run on different machines, but they work together as a single system.
The modular Cymbal Books app fits this definition as well: its modules run independently and exchange data over HTTP, but together they function as a single system. In the next section, you run all the modules on a single machine for simplicity — but that isn't required. Each module could just as easily run on a different server, which is why the modular version of the Cymbal Books app can be classified as a distributed system.
Test the modular implementation
Now that you've seen how the Cymbal Books monolith is transformed into a modular app whose modules are Flask apps, you can test the application and see that each module runs independently.
In this tutorial, you run the modules on the same machine. However, you could also run each module on a separate server: because each module is autonomous, it can communicate with the other modules through their endpoints.
Set up your environment
Follow these steps to prepare for testing:
In your terminal, navigate to the
modulardirectory in the cloned repository:cd modularEnsure that the virtual environment
book-review-envis active. If you need a reminder about activation steps, refer to Create and activate a virtual environment.
Start the Flask app
The /modular folder contains a bash script that starts all the Flask
applications simultaneously. Each module of the app listens on a unique port
such as 8080 or 8081:
- Homepage Flask app (home.py): port 8080
- Book details Flask app (book_details.py): port 8081
- Book reviews Flask app (book_reviews.py): port 8082
- Images Flask app (images.py): port 8083
Each module needs to listen on a unique port number because the modules all run on the same machine. If each module was on a different server, each one could listen on the same port number without creating port conflicts.
Run the bash script with this command:
bash ./start_services.sh
The script creates a separate log file for each Flask app (for example,
home.py.log, book_details.py.log) to help you identify any startup issues.
When the script completes successfully, you see this message:
All services have been started. Access the app at http://localhost:8080/
Test each Flask app
Test the modules by visiting the following URLs in your browser:
- Homepage:
http://localhost:8080/displays the homepage of the modularized Cymbal Books application. This page retrieves book details, reviews, and images by making requests to the other modules. - Book details:
http://localhost:8081/book/1returns the details of the book with ID 1. This response is JSON data which the app then formats and displays in a more human-readable way. - Book reviews:
http://localhost:8082/book/1/reviewsfetches and returns the reviews for the book with ID 1. The reviews are in JSON format. The homepage module requests this data and integrates it into the book details page. - Images:
http://localhost:8083/images/fungi_frontier.jpgserves the book cover image for Fungi Frontier. If the URL is correct, the image should load directly in your browser.
Stop the Flask apps
When you finish testing, stop all Flask apps with this command:
kill $(cat home.py.pid book_details.py.pid book_reviews.py.pid images.py.pid)
Summary
This tutorial showed you how to modularize the Cymbal Books monolith. The process consists of these steps:
- Identifying the app's distinct components
- Creating the modules
- Ensuring that each module has access to only the data it needs
You then tested the modular implementation on your local machine.
What's next
In the next tutorial,
Prepare the modular app for containerization, you learn
how to prepare the modular app for containerization by updating the endpoints to
use Kubernetes Service names instead of localhost.