本教學課程說明如何使用透過 Compute Engine 執行的 NVIDIA TensorRT5 GPU,以大規模工作負載執行深度學習推論。
在開始之前,請先瞭解下列基礎知識:
- 深度學習推論是機器學習流程的一個階段,在此階段中,經過訓練的模型會用於辨識、處理及分類結果。
- NVIDIA TensorRT 是一個已針對執行深度學習工作負載進行最佳化的平台。
- GPU 可用來加快資料密集型工作負載的速度,例如機器學習和資料處理。Compute Engine 提供多種 NVIDIA GPU。本教學課程使用 T4 GPU,因為 T4 GPU 是專為深度學習推論工作負載所設計。
目標
本教學課程將涵蓋下列程序:
- 使用預先訓練的圖準備模型。
- 使用不同的最佳化模式測試模型的推論速度。
- 將自訂模型轉換為 TensorRT。
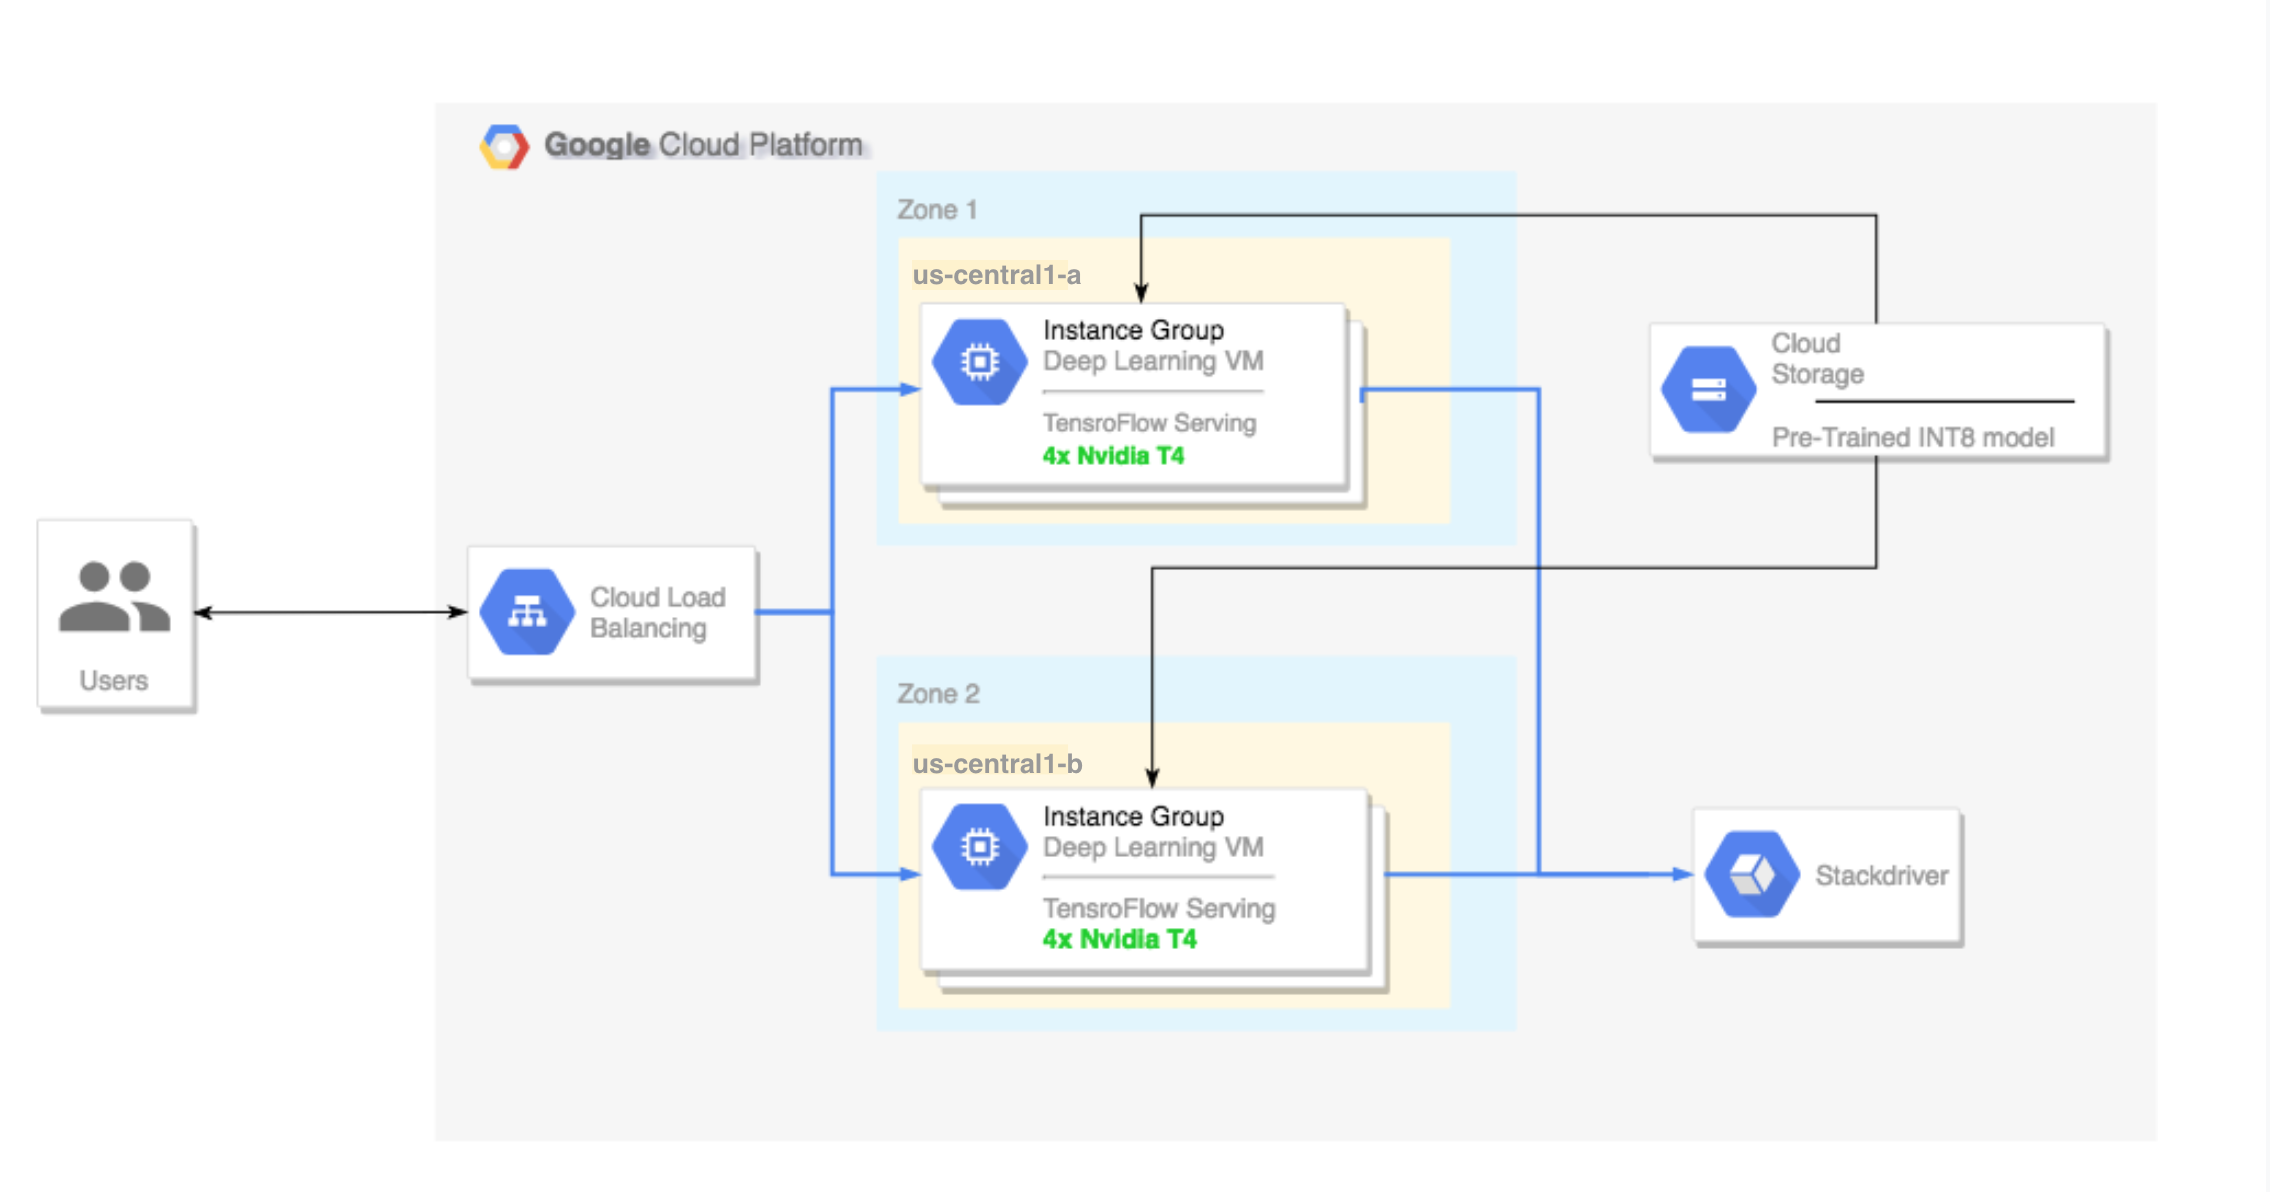
- 設定多區域叢集。這個多區域叢集的設定如下:
- 以深度學習 VM 映像檔為建構基礎。TensorFlow、TensorFlow Serving 和 TensorRT5 皆已預先安裝這類映像檔。
- 已啟用自動調度資源功能。在本教學課程中,系統是根據 GPU 使用率自動調度資源。
- 已啟用負載平衡功能。
- 已啟用防火牆。
- 在多區域叢集中執行推論工作負載。
必要條件
專案設定
- Sign in to your Google Cloud account. If you're new to Google Cloud, create an account to evaluate how our products perform in real-world scenarios. New customers also get $300 in free credits to run, test, and deploy workloads.
-
In the Google Cloud console, on the project selector page, select or create a Google Cloud project.
Roles required to select or create a project
- Select a project: Selecting a project doesn't require a specific IAM role—you can select any project that you've been granted a role on.
-
Create a project: To create a project, you need the Project Creator
(
roles/resourcemanager.projectCreator), which contains theresourcemanager.projects.createpermission. Learn how to grant roles.
-
Verify that billing is enabled for your Google Cloud project.
-
Enable the Compute Engine and Cloud Machine Learning APIs.
Roles required to enable APIs
To enable APIs, you need the Service Usage Admin IAM role (
roles/serviceusage.serviceUsageAdmin), which contains theserviceusage.services.enablepermission. Learn how to grant roles. -
In the Google Cloud console, on the project selector page, select or create a Google Cloud project.
Roles required to select or create a project
- Select a project: Selecting a project doesn't require a specific IAM role—you can select any project that you've been granted a role on.
-
Create a project: To create a project, you need the Project Creator
(
roles/resourcemanager.projectCreator), which contains theresourcemanager.projects.createpermission. Learn how to grant roles.
-
Verify that billing is enabled for your Google Cloud project.
-
Enable the Compute Engine and Cloud Machine Learning APIs.
Roles required to enable APIs
To enable APIs, you need the Service Usage Admin IAM role (
roles/serviceusage.serviceUsageAdmin), which contains theserviceusage.services.enablepermission. Learn how to grant roles. - 安裝或更新至最新版 Google Cloud CLI。
- (選擇性設定) 設定預設地區和區域。
工具設定
如要在本教學課程中使用 Google Cloud CLI,請按照下列步驟操作:
準備模型
本節說明如何建立用於執行模型的虛擬機器 (VM) 執行個體,以及如何下載 TensorFlow 官方模型目錄中的模型。
建立 VM 執行個體。本教學課程是使用
tf-ent-2-10-cu113建立。如要瞭解最新映像檔版本,請參閱深度學習 VM 映像檔說明文件中的「選擇作業系統」。export IMAGE_FAMILY="tf-ent-2-10-cu113" export ZONE="us-central1-b" export INSTANCE_NAME="model-prep" gcloud compute instances create $INSTANCE_NAME \ --zone=$ZONE \ --image-family=$IMAGE_FAMILY \ --machine-type=n1-standard-8 \ --image-project=deeplearning-platform-release \ --maintenance-policy=TERMINATE \ --accelerator="type=nvidia-tesla-t4,count=1" \ --metadata="install-nvidia-driver=True"
選取模型。本教學課程使用 ResNet 模型。這種 ResNet 模型是透過 TensorFlow 中的 ImageNet 資料集訓練的。
如要將 ResNet 模型下載至 VM 執行個體,請執行以下指令:
wget -q http://download.tensorflow.org/models/official/resnetv2_imagenet_frozen_graph.pb
將 ResNet 模型的位置儲存在
$WORKDIR變數中。 請將MODEL_LOCATION改成包含下載模型的作業目錄。export WORKDIR=MODEL_LOCATION
執行推論速度測試
本節將說明下列程序:
- 設定 ResNet 模型。
- 使用不同的最佳化模式執行推論測試。
- 查看推論測試的結果。
測試流程總覽
TensorRT 可提高推論工作負載的效能速度,但最顯著的改善在於量化流程。
模型量化是降低模型權重精確度的流程。舉例來說,如果模型的初始權重是 FP32,您可以將精確度降低至 FP16、INT8 或甚至 INT4。在速度 (權重精確度) 和模型的準確率之間找出適當平衡是相當重要的事。幸好,TensorFlow 為此提供相關功能,可測量準確率,並與速度或總處理量、延遲時間、節點轉換率和總訓練時間等其他指標進行比較。
程序
設定 ResNet 模型。如要設定模型,請執行以下指令:
git clone https://github.com/tensorflow/models.git
cd models
git checkout f0e10716160cd048618ccdd4b6e18336223a172f
touch research/__init__.py
touch research/tensorrt/__init__.py
cp research/tensorrt/labellist.json .
cp research/tensorrt/image.jpg ..
執行測試。這項指令需要一些時間才能完成。
python -m research.tensorrt.tensorrt \
   --frozen_graph=$WORKDIR/resnetv2_imagenet_frozen_graph.pb \
   --image_file=$WORKDIR/image.jpg \
   --native --fp32 --fp16 --int8 \
   --output_dir=$WORKDIR
其中:
$WORKDIR是您下載的 ResNet 模型到其中的目錄。--native引數是要測試的不同量化模式。
查看結果。測試完成後,您可以比較各個最佳化模式的推論結果。
Predictions:
Precision:  native [u'seashore, coast, seacoast, sea-coast', u'promontory, headland, head, foreland', u'breakwater, groin, groyne, mole, bulwark, seawall, jetty',     u'lakeside, lakeshore', u'grey whale, gray whale, devilfish, Eschrichtius gibbosus, Eschrichtius robustus']
Precision:  FP32 [u'seashore, coast, seacoast, sea-coast', u'promontory, headland, head, foreland', u'breakwater, groin, groyne, mole, bulwark, seawall, jetty', u'lakeside,   lakeshore', u'sandbar, sand bar']
Precision:  FP16 [u'seashore, coast, seacoast, sea-coast', u'promontory, headland, head, foreland', u'breakwater, groin, groyne, mole, bulwark, seawall, jetty', u'lakeside,   lakeshore', u'sandbar, sand bar']
Precision:  INT8 [u'seashore, coast, seacoast, sea-coast', u'promontory, headland, head, foreland', u'breakwater, groin, groyne, mole, bulwark, seawall, jetty', u'grey         whale, gray whale, devilfish, Eschrichtius gibbosus, Eschrichtius robustus', u'lakeside, lakeshore']
如要查看完整結果,請執行以下指令:
cat $WORKDIR/log.txt
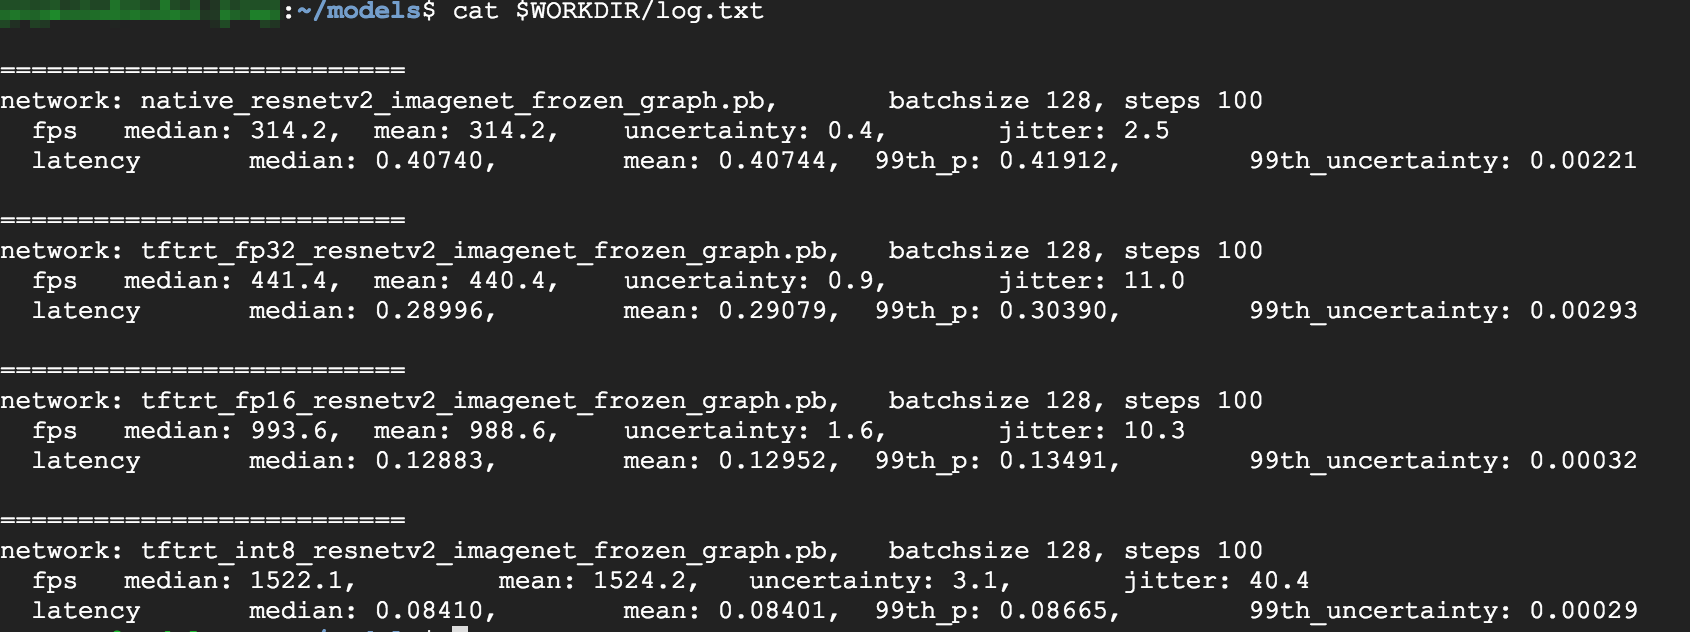
從結果可看出 FP32 和 FP16 是一樣的,表示如果您不介意使用 TensorRT 的話,絕對可以立即開始使用 FP16。INT8 的結果則稍差。
此外,您可以看出使用 TensorRT5 執行模型會顯示下列結果:
- 使用 FP32 最佳化模式時,總處理量提高了 40%,從 314 fps 變成 440 fps,同時延遲時間也減少了約 30%,從 0.40 毫秒變成 0.28 毫秒。
- 使用 FP16 最佳化模式而非原生 TensorFlow 圖時,速度提升了 214%,從 314 fps 變成 988 fps,同時延遲時間也降低 0.12 毫秒,降幅幾乎是 3 倍。
- 使用 INT8 時,您可以觀察到速度提升了 385%,從 314 fps 變成 1524 fps,同時延遲時間也降至 0.08 毫秒。
將自訂模型轉換為 TensorRT
您可以使用 INT8 模型進行這項轉換。
下載模型。您需要儲存的模型,才能將自訂模型轉換為 TensorRT 圖。如要取得儲存的 INT8 ResNet 模型,請執行以下指令:
wget http://download.tensorflow.org/models/official/20181001_resnet/savedmodels/resnet_v2_fp32_savedmodel_NCHW.tar.gz
tar -xzvf resnet_v2_fp32_savedmodel_NCHW.tar.gz
使用 TFTools 將模型轉換為 TensorRT 圖。如要使用 TFTools 轉換模型,請執行以下指令:
git clone https://github.com/GoogleCloudPlatform/ml-on-gcp.git
cd ml-on-gcp/dlvm/tools
python ./convert_to_rt.py \
   --input_model_dir=$WORKDIR/resnet_v2_fp32_savedmodel_NCHW/1538687196 \
   --output_model_dir=$WORKDIR/resnet_v2_int8_NCHW/00001 \
   --batch_size=128 \
   --precision_mode="INT8"
$WORKDIR/resnet_v2_int8_NCHW/00001目錄現在已經有 INT8 模型。如要確認一切是否已正確設定,請嘗試執行推論測試。
tensorflow_model_server --model_base_path=$WORKDIR/resnet_v2_int8_NCHW/ --rest_api_port=8888
將模型上傳至 Cloud Storage。您必須執行這個步驟,才能透過下一節中設定的多區域叢集使用模型。如要上傳模型,請完成下列步驟:
封存模型。
tar -zcvf model.tar.gz ./resnet_v2_int8_NCHW/
上傳封存檔。請將
GCS_PATH改成 Cloud Storage bucket 的路徑。export GCS_PATH=GCS_PATH gcloud storage cp model.tar.gz $GCS_PATH
如有需要,您可以透過以下網址從 Cloud Storage 取得 INT8 凍結圖:
gs://cloud-samples-data/dlvm/t4/model.tar.gz
設定多區域叢集
本節說明設定多區域叢集時必須遵循的步驟。
建立叢集
現在您在 Cloud Storage 平台上已有模型,即可建立叢集。
建立執行個體範本。執行個體範本是可用來建立新執行個體的實用資源。詳情請參閱執行個體範本一文。將
YOUR_PROJECT_NAME替換為您的專案 ID。export INSTANCE_TEMPLATE_NAME="tf-inference-template" export IMAGE_FAMILY="tf-ent-2-10-cu113" export PROJECT_NAME=YOUR_PROJECT_NAME gcloud beta compute --project=$PROJECT_NAME instance-templates create $INSTANCE_TEMPLATE_NAME \ --machine-type=n1-standard-16 \ --maintenance-policy=TERMINATE \ --accelerator=type=nvidia-tesla-t4,count=4 \ --min-cpu-platform=Intel\ Skylake \ --tags=http-server,https-server \ --image-family=$IMAGE_FAMILY \ --image-project=deeplearning-platform-release \ --boot-disk-size=100GB \ --boot-disk-type=pd-ssd \ --boot-disk-device-name=$INSTANCE_TEMPLATE_NAME \ --metadata startup-script-url=gs://cloud-samples-data/dlvm/t4/start_agent_and_inf_server_4.sh- 這個執行個體範本包含開機指令碼,這個開機指令碼是由中繼資料參數所指定。
- 系統每次使用這個範本建立執行個體時都會執行這個開機指令碼。
- 這個開機指令碼會執行下列步驟:
- 安裝監控執行個體 GPU 使用量的監控代理程式。
- 下載模型。
- 啟動推論服務。
- 開機指令碼中的
tf_serve.py包含推論邏輯。此範例包含一個以 TFServe 套件為基礎的極小 python 檔案。 - 如要查看開機指令碼,請參閱 startup_inf_script.sh。
- 這個執行個體範本包含開機指令碼,這個開機指令碼是由中繼資料參數所指定。
建立代管執行個體群組 (MIG)。需有這個代管執行個體群組,才能在特定區域中設定多個執行中的執行個體。這些執行個體是根據前一步驟中產生的執行個體範本所建立。
export INSTANCE_GROUP_NAME="deeplearning-instance-group"
export INSTANCE_TEMPLATE_NAME="tf-inference-template"
gcloud compute instance-groups managed create $INSTANCE_GROUP_NAME \
   --template $INSTANCE_TEMPLATE_NAME \
   --base-instance-name deeplearning-instances \
   --size 2 \
   --zones us-central1-a,us-central1-b
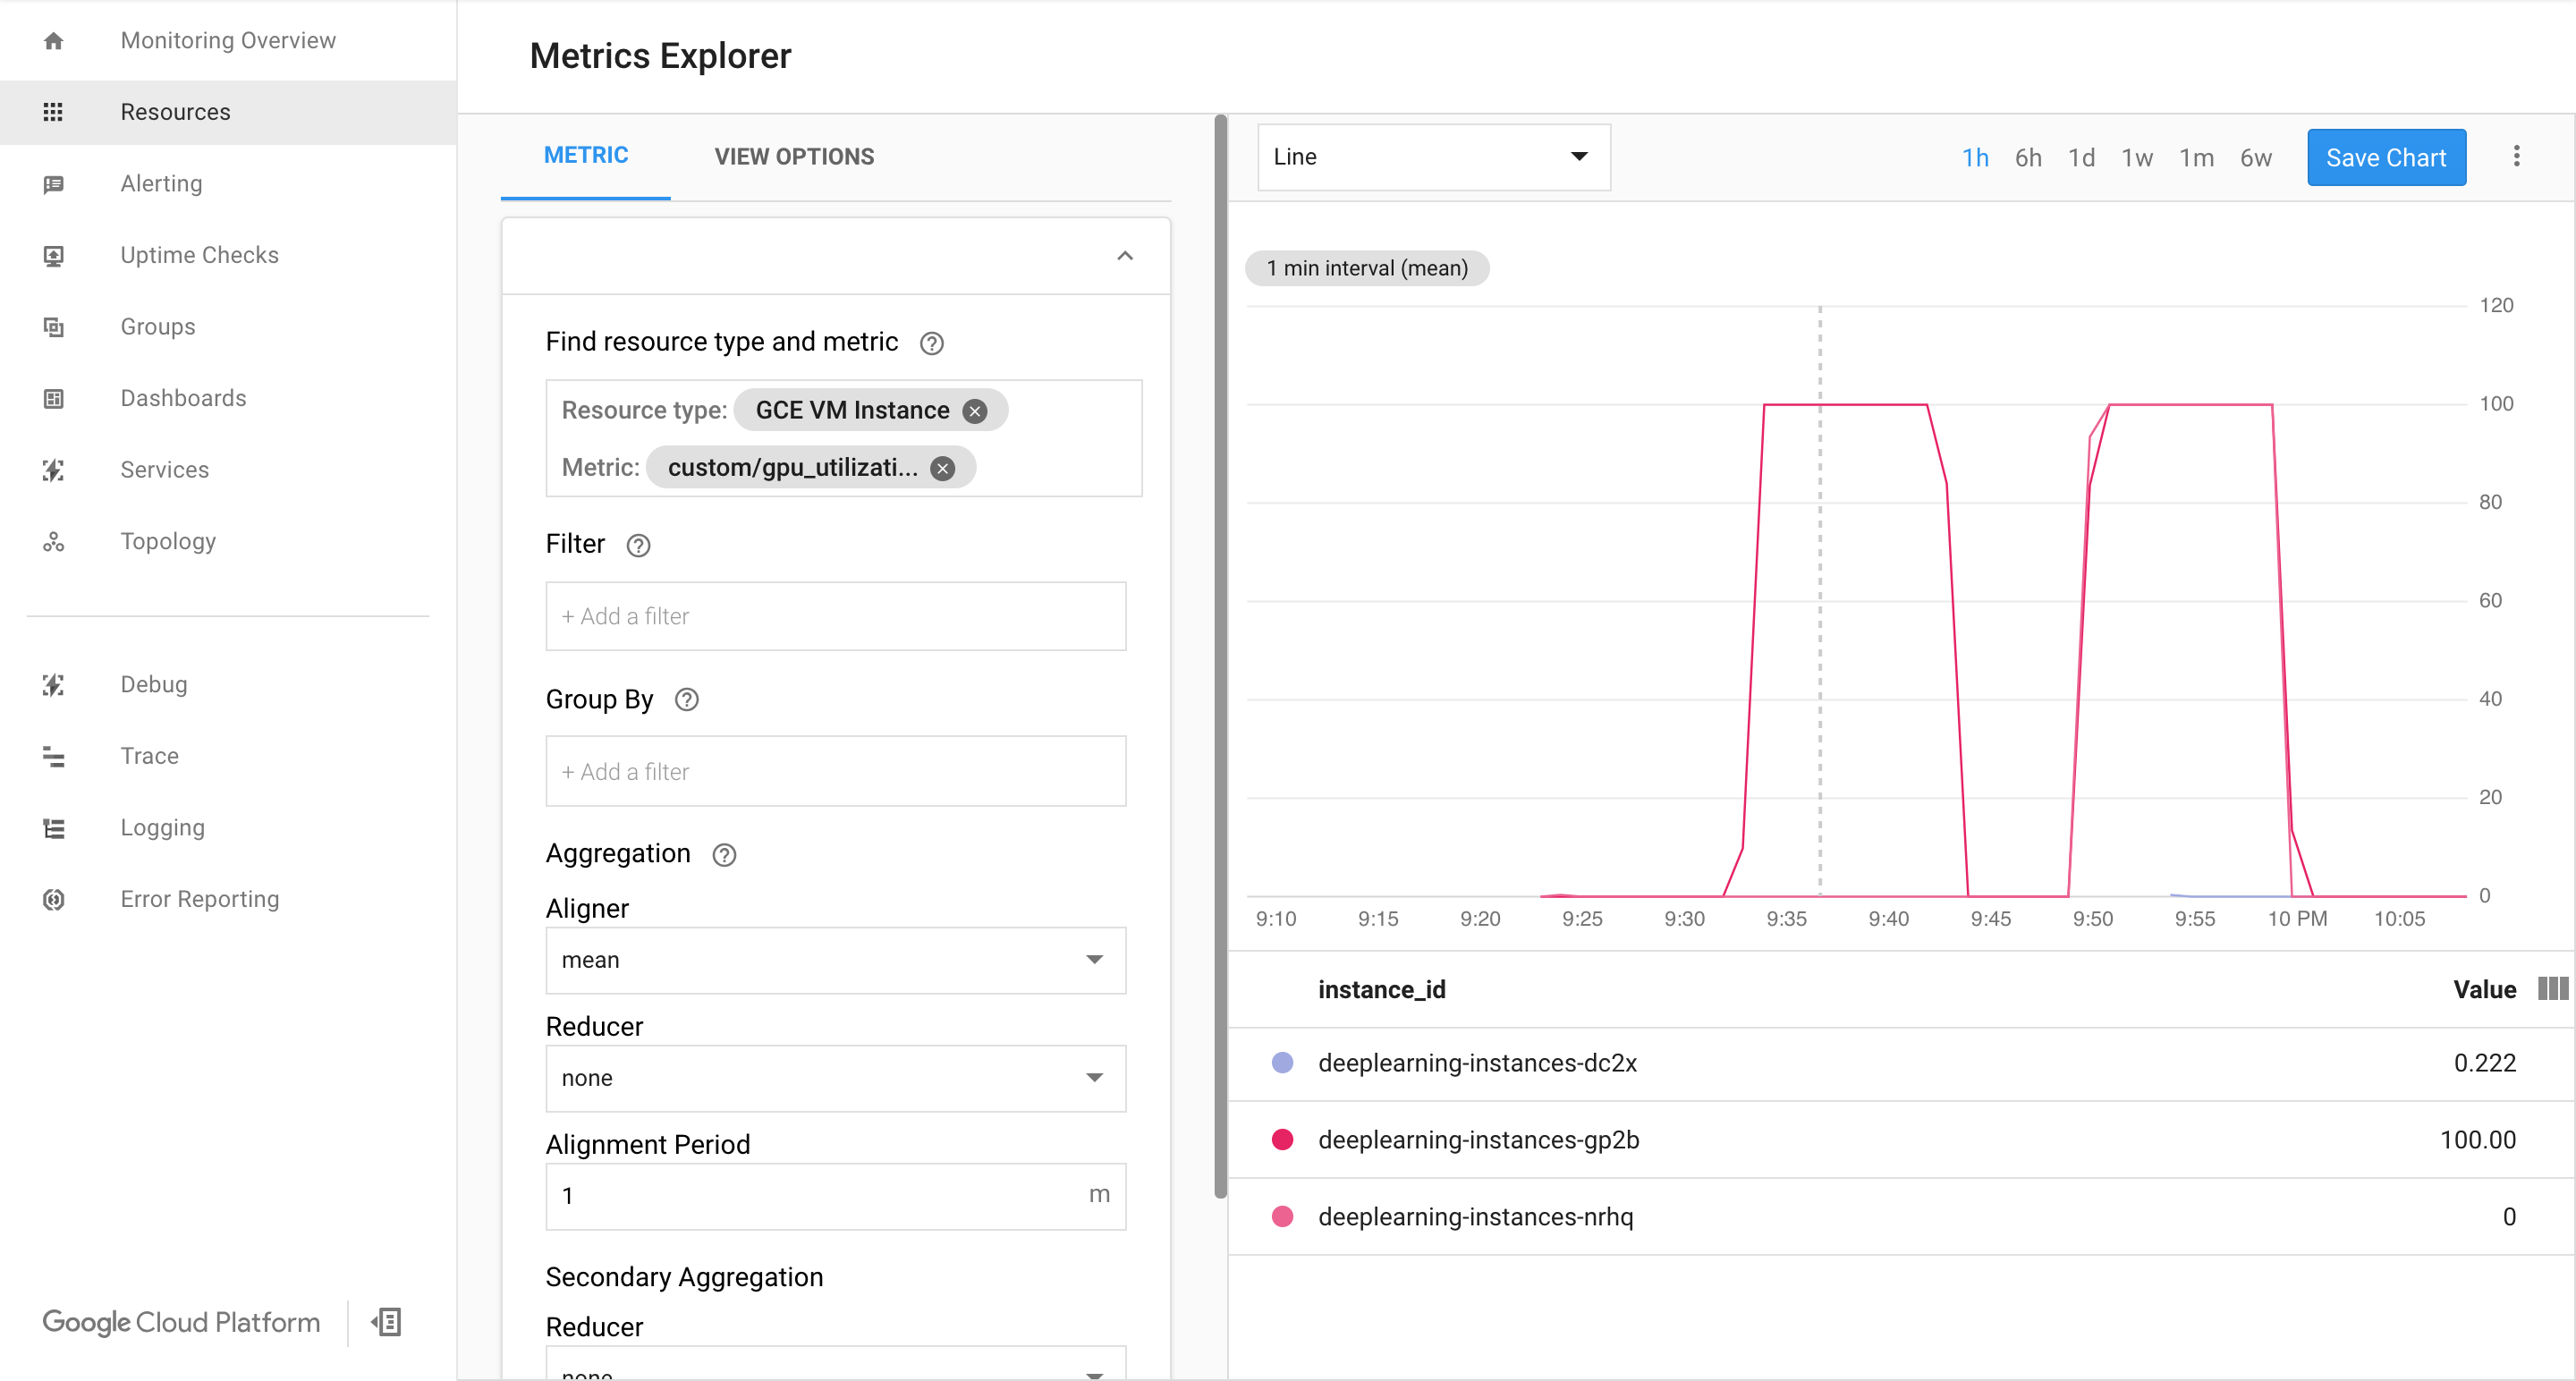
確認 Google Cloud Cloud Monitoring 頁面上有指標可供使用。
前往 Google Cloud 控制台的「Monitoring」頁面。
如果導覽窗格中顯示「Metrics Explorer」,請按一下「Metrics Explorer」。否則,請選取「資源」,然後選取「指標探索器」。
搜尋
gpu_utilization。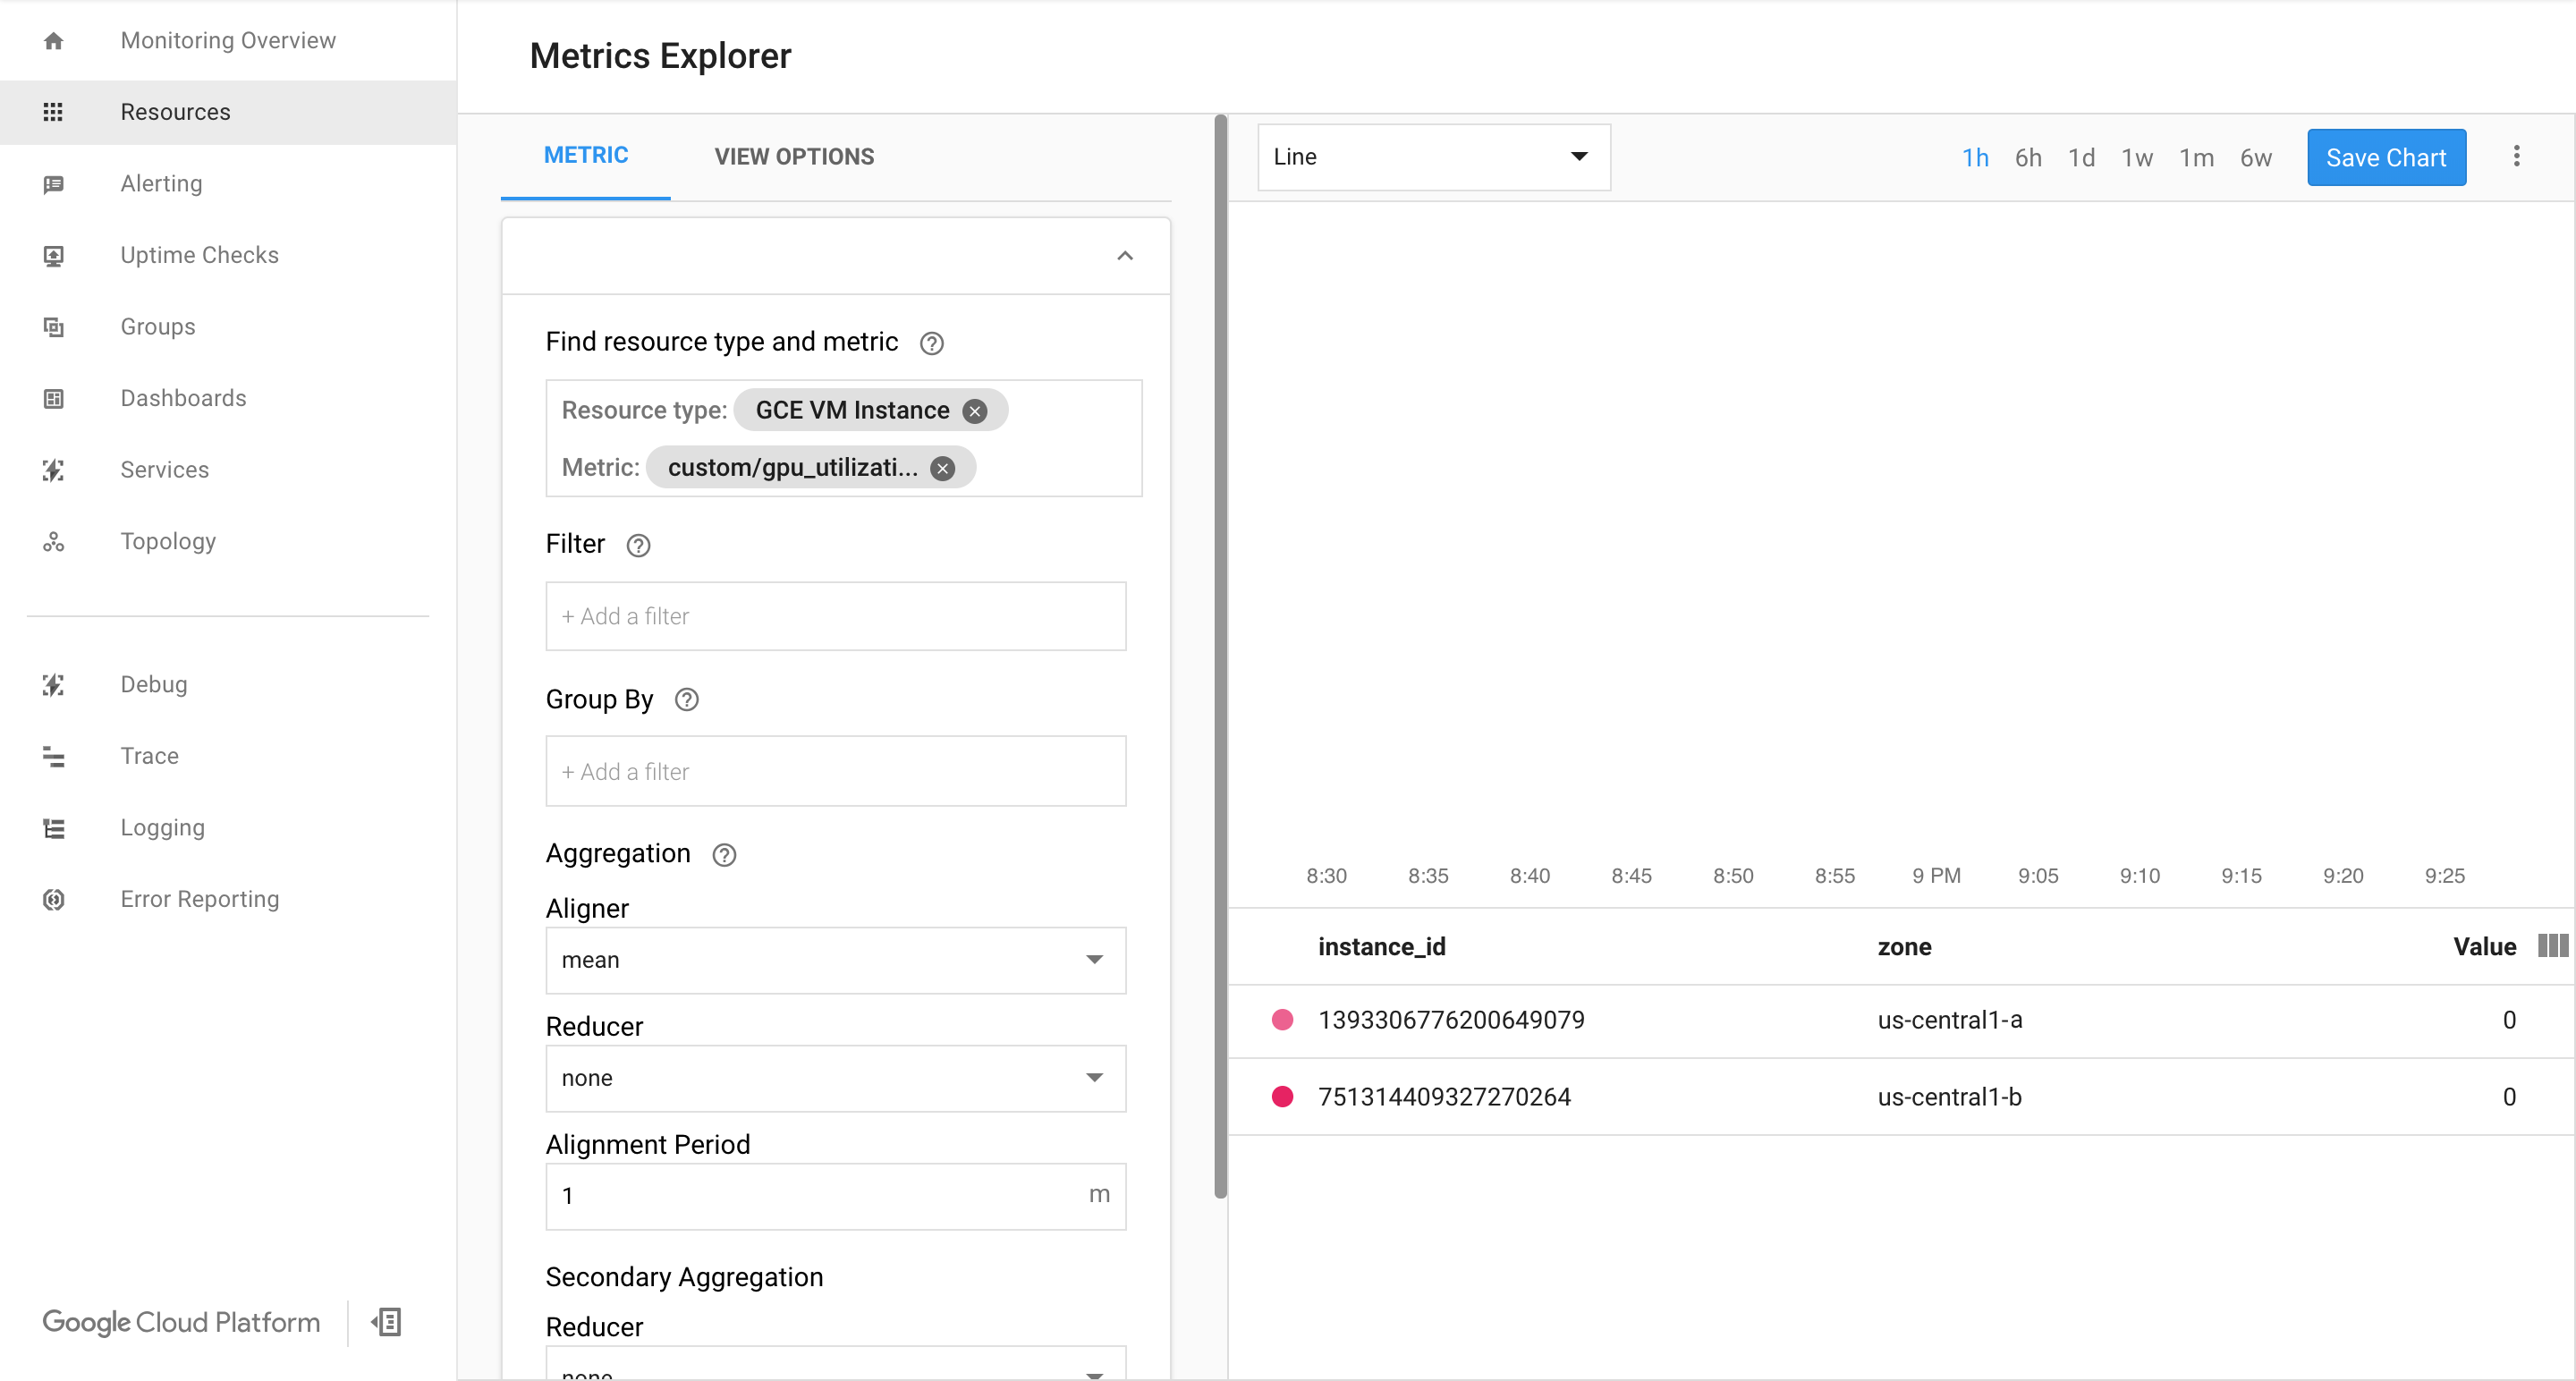
如果有資料進入,您應該會看到與以下類似的內容:


啟用自動調度資源
為代管執行個體群組啟用自動調度資源功能。
export INSTANCE_GROUP_NAME="deeplearning-instance-group"

gcloud compute instance-groups managed set-autoscaling $INSTANCE_GROUP_NAME \
   --custom-metric-utilization metric=custom.googleapis.com/gpu_utilization,utilization-target-type=GAUGE,utilization-target=85 \
   --max-num-replicas 4 \
   --cool-down-period 360 \
   --region us-central1
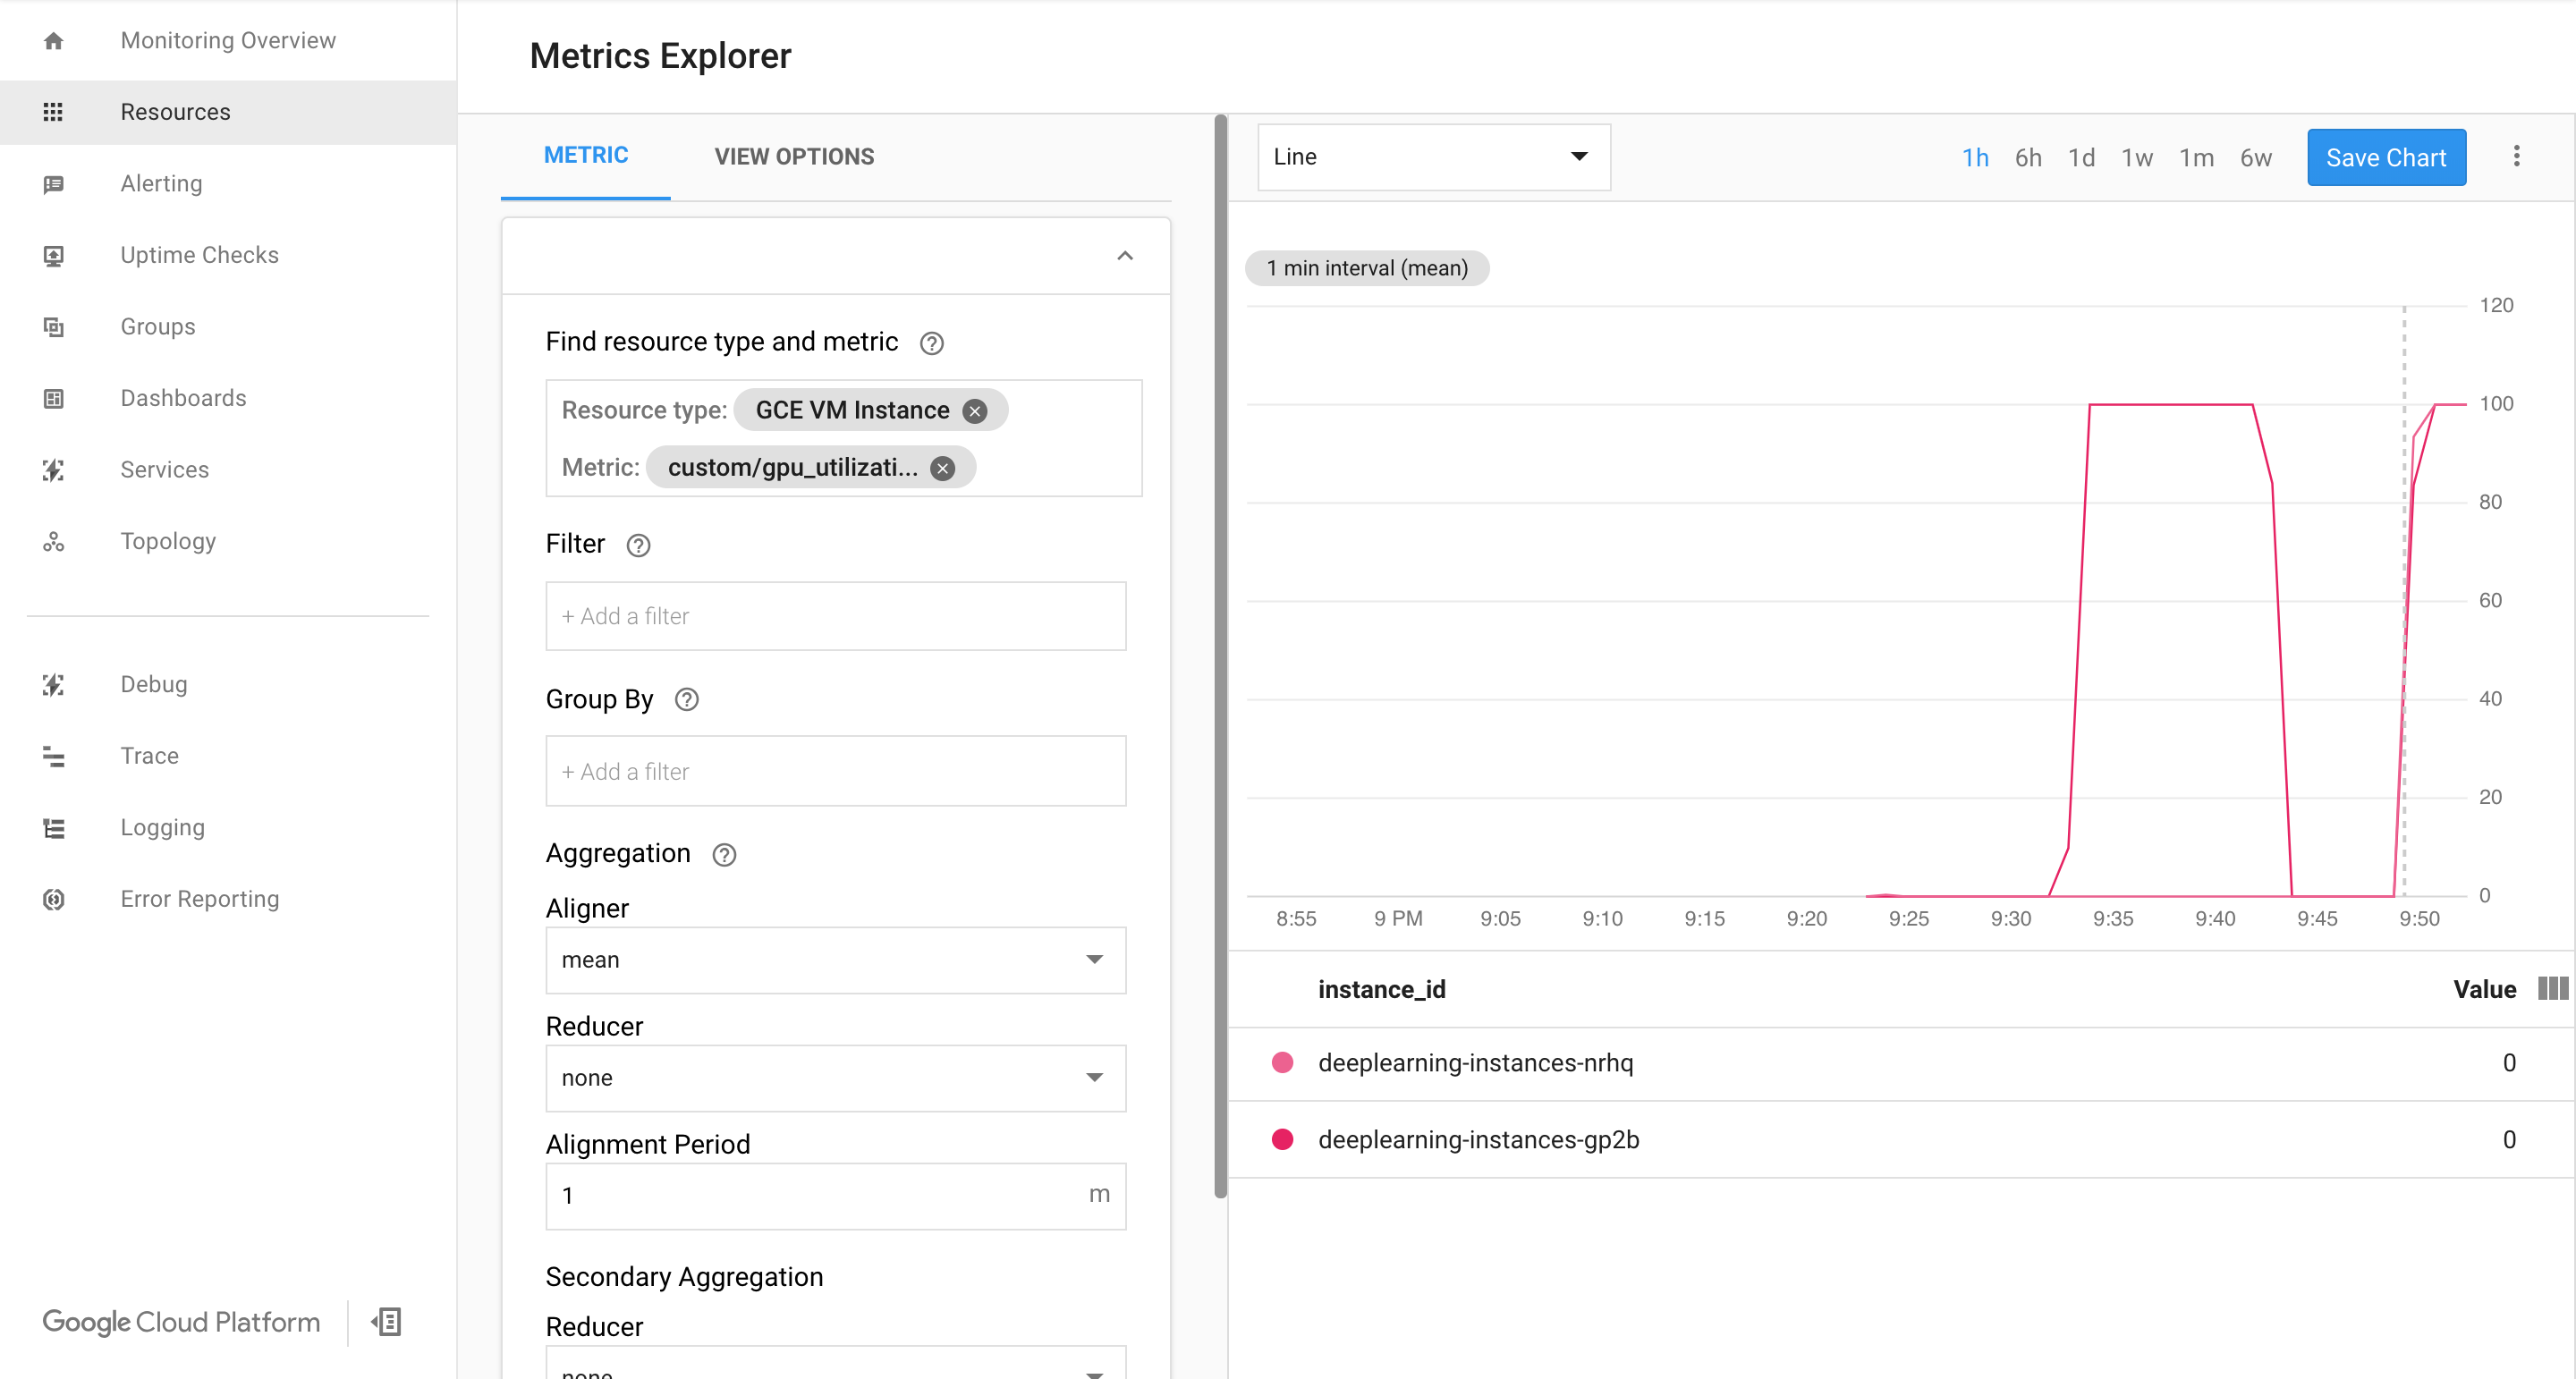
custom.googleapis.com/gpu_utilization是指標的完整路徑。這個範例將等級指定為 85,表示只要 GPU 使用率達到 85,平台就會在群組中建立新的執行個體。測試自動調度資源功能。如要測試自動調度資源功能,請執行下列步驟:
- 使用 SSH 連線至執行個體。詳情請參閱連線至執行個體一文。
使用
gpu-burn工具將 GPU 的負載提高至 100% 的使用率,並持續 600 秒:git clone https://github.com/GoogleCloudPlatform/ml-on-gcp.git cd ml-on-gcp/third_party/gpu-burn git checkout c0b072aa09c360c17a065368294159a6cef59ddf make ./gpu_burn 600 > /dev/null &
查看 Cloud Monitoring 頁面。並觀察自動調度資源功能的運作狀況。叢集會增加一個執行個體來向上擴充。
前往 Google Cloud 控制台的「Instance groups」(執行個體群組) 頁面。
按一下
deeplearning-instance-group代管執行個體群組。按一下 [Monitoring] (監控) 分頁標籤。
此時自動調度資源邏輯應會盡可能提高執行個體的數量來降低負載,但並未成功:
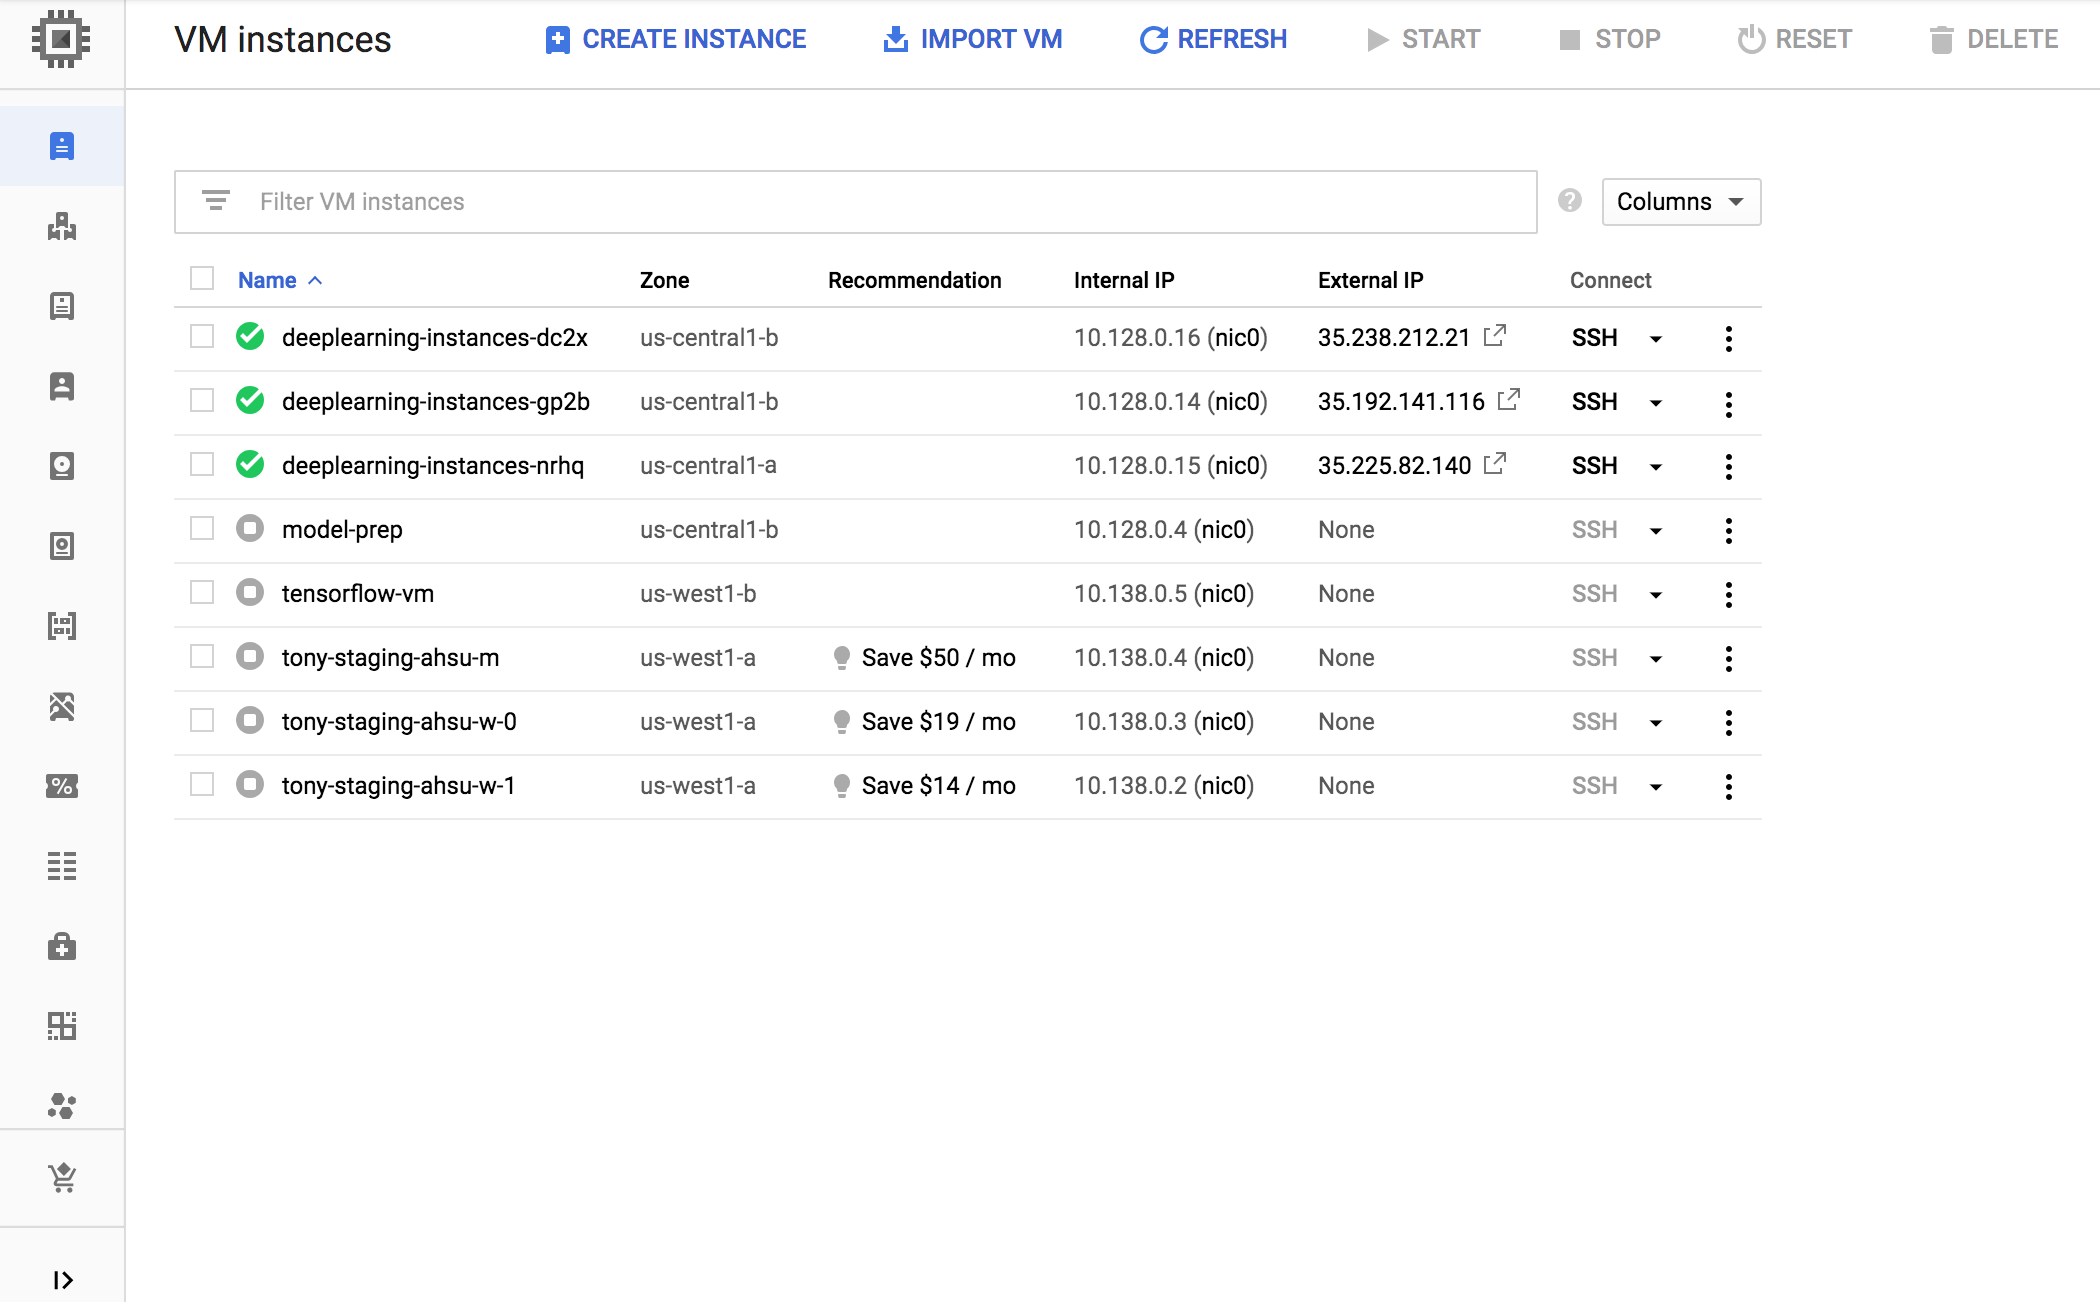
此時您可以停止過度使用執行個體,並觀察系統如何減少資源。
設定負載平衡器
讓我們整理一下您目前擁有的項目:
- 經過訓練並已使用 TensorRT5 (INT8) 最佳化的模型
- 代管執行個體群組。這些執行個體已啟用自動調度資源功能,會根據 GPU 使用率調度資源
接著您可以在執行個體前面建立負載平衡器。
建立健康狀態檢查。健康狀態檢查可用來判斷後端的特定主機是否可提供流量。
export HEALTH_CHECK_NAME="http-basic-check"

gcloud compute health-checks create http $HEALTH_CHECK_NAME \
   --request-path /v1/models/default \
   --port 8888
建立包含執行個體群組和健康狀態檢查的後端服務。
建立健康狀態檢查。
export HEALTH_CHECK_NAME="http-basic-check"
export WEB_BACKED_SERVICE_NAME="tensorflow-backend"

gcloud compute backend-services create $WEB_BACKED_SERVICE_NAME \
   --protocol HTTP \
   --health-checks $HEALTH_CHECK_NAME \
   --global
在新的後端服務中新增執行個體群組。
export INSTANCE_GROUP_NAME="deeplearning-instance-group"
export WEB_BACKED_SERVICE_NAME="tensorflow-backend"

gcloud compute backend-services add-backend $WEB_BACKED_SERVICE_NAME \
   --balancing-mode UTILIZATION \
   --max-utilization 0.8 \
   --capacity-scaler 1 \
   --instance-group $INSTANCE_GROUP_NAME \
   --instance-group-region us-central1 \
   --global
設定轉送網址。負載平衡器需要知道可將哪個網址轉送到後端服務。
export WEB_BACKED_SERVICE_NAME="tensorflow-backend"
export WEB_MAP_NAME="map-all"

gcloud compute url-maps create $WEB_MAP_NAME \
   --default-service $WEB_BACKED_SERVICE_NAME
建立負載平衡器。
export WEB_MAP_NAME="map-all"
export LB_NAME="tf-lb"

gcloud compute target-http-proxies create $LB_NAME \
   --url-map $WEB_MAP_NAME
在負載平衡器中新增外部 IP 位址。
export IP4_NAME="lb-ip4"

gcloud compute addresses create $IP4_NAME \
   --ip-version=IPV4 \
   --network-tier=PREMIUM \
   --global
找出分配的 IP 位址。
gcloud compute addresses list
設定轉送規則,指示 Google Cloud 將來自公開 IP 位址的所有要求轉送至負載平衡器。
export IP=$(gcloud compute addresses list | grep ${IP4_NAME} | awk '{print $2}')
export LB_NAME="tf-lb"
export FORWARDING_RULE="lb-fwd-rule"

gcloud compute forwarding-rules create $FORWARDING_RULE \
   --address $IP \
   --global \
   --load-balancing-scheme=EXTERNAL \
   --network-tier=PREMIUM \
   --target-http-proxy $LB_NAME \
   --ports 80
建立全域轉送規則後,您的設定可能需要幾分鐘才會生效。
啟用防火牆
檢查您是否有允許從外部來源連線至您 VM 執行個體的防火牆規則。
gcloud compute firewall-rules list
如果沒有的話,請先建立允許這類連線的防火牆規則。如要建立防火牆規則,請執行以下指令:
gcloud compute firewall-rules create www-firewall-80 \
   --target-tags http-server --allow tcp:80

gcloud compute firewall-rules create www-firewall-8888 \
   --target-tags http-server --allow tcp:8888
執行推論
您可以使用以下 Python 指令碼,將圖片轉換為可上傳至伺服器的格式。
from PIL import Image
import numpy as np
import json
import codecs


img = Image.open("image.jpg").resize((240, 240))
img_array=np.array(img)
result = {
      "instances":[img_array.tolist()]
       }
file_path="/tmp/out.json"
print(json.dump(result, codecs.open(file_path, 'w', encoding='utf-8'), separators=(',', ':'), sort_keys=True, indent=4))
執行推論。
curl -X POST $IP/v1/models/default:predict -d @/tmp/out.json