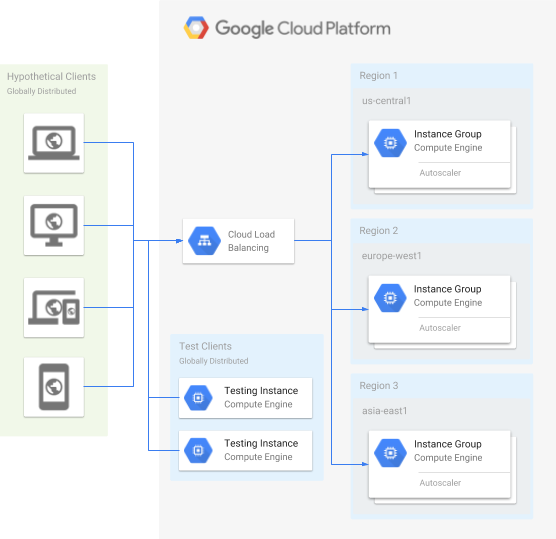
應用程式架構
應用程式包含以下 Compute Engine 元件:
- 執行個體範本:這類範本是用於在執行個體群組中建立各個執行個體。
- 執行個體群組:多個執行個體群組,會根據連入流量自動調度資源。
- 負載平衡器:HTTP 負載平衡器,會將流量分配至所有執行個體群組。
- 執行個體:多個測試執行個體,會從全球各地產生測試流量。
設定網路服務
建立執行個體群組
主控台
建立執行個體群組網路。
在 Google Cloud 控制台中,前往「VPC networks」(虛擬私有雲網路) 頁面。
按一下「建立虛擬私有雲網路」。
將「Name」(名稱) 設為
fortressnet。將「Subnet creation mode」(子網路建立模式) 設為 [Automatic] (自動)。
按一下頁面底部的 [建立]。
建立網路防火牆規則。這項規則會允許所有傳送至執行個體的 HTTP 要求。
前往 Google Cloud 控制台的「Firewall rules」(防火牆規則) 頁面。
按一下「建立防火牆規則」。
將「Name」(名稱) 設為
fortressnet-allow-http。在「Network」(網路) 中選取
fortressnet。在「Targets」(目標) 中選取
All instances in the network。將「Source IPv4 ranges」(來源 IPv4 範圍) 設為
0.0.0.0/0。在「Protocols and ports」(通訊協定和通訊埠) 中選擇「Specified protocols and ports」(指定通訊協定和通訊埠),然後選取「tcp」核取方塊並輸入
80。點選「建立」。
建立執行個體範本,並在其中加入開機指令碼,以便在每個執行個體上啟動簡易 Apache 網路伺服器。
前往 Google Cloud 控制台的「Instance Templates」(執行個體範本) 頁面。
點選「建立執行個體範本」。
將「Name」(名稱) 設為
fort-template。在「Machine configuration」(機器設定) 中選取
e2-micro(2 個 vCPU,1 GB 記憶體)。在「Advanced options」(進階選項) 專區中,展開「Networking」(網路),然後執行下列操作:
- 在「網路介面」部分,展開要編輯的網路介面。
- 在「Network」(網路) 中選取
fortressnet。
在「管理」部分,為「自動」輸入下列「開機指令碼」:
apt update && apt -y install apache2
點選「建立」。
利用執行個體範本建立多個地區性代管執行個體群組,並對各個執行個體群組設定自動調度資源。
前往 Google Cloud 控制台的「Instance groups」(執行個體群組) 頁面。
按一下「建立執行個體群組」,建立新的代管執行個體群組。
選取「New managed instance group (stateless)」(新增代管執行個體群組 (無狀態))。
將「Name」(名稱) 設為
us-central1-pool。在「Instance template」(執行個體範本) 中選取
fort-template。在「Location」(位置) 中選取「Multiple zones」(多可用區)。
在「Region」(區域) 中選取
us-central1。在「可用區」部分,保留預先定義的值。針對「Autoscaling mode」(自動調度資源模式),選取「On: add and remove instances to the group」(開啟:在群組中新增和移除執行個體)。
將「Minimum number of instances」(執行個體數量下限) 設為
1。將「Maximum number of instances」(執行個體數量上限) 設為
5。在「Autoscaling signals」(自動調度資源信號) 中,編輯預設選取項目 (CPU 使用率),然後將「Signal type」(信號類型) 設為「HTTP load balancing utilization」(HTTP 負載平衡使用率)。
將「目標 HTTP 負載平衡使用率」設為
80。按一下 [完成]。
點按「Create」(建立)。對話方塊會顯示訊息,指出您也必須將執行個體群組指派至 HTTP 負載平衡器的後端服務。
在確認對話方塊中,按一下「確認」。建立所有執行個體群組後,即可設定負載平衡器。
重複上述步驟建立另外兩個執行個體群組,過程中須留意以下差異:
- 將其中一個群組的「名稱」設為
europe-west1-pool,「地區」設為europe-west1。 - 將其中一個群組的「名稱」設為
asia-east1-pool,「地區」設為asia-east1。
- 將其中一個群組的「名稱」設為
(選用) 確認執行個體處於良好的健康狀態並能提供 HTTP 流量。 同時測試一或多個執行個體的外部 IP 位址。請稍候片刻,等待執行個體完成啟動程序。
前往 Google Cloud 控制台的「VM instances」(VM 執行個體) 頁面。
確認每個運作中的執行個體在執行個體群組名稱旁的「狀態」欄中都有顯示綠色勾號。
複製執行個體的「外部 IP」,並貼到網路瀏覽器中。
瀏覽器應該會顯示「Apache2 Debian Default Page」(Apache2 Debian 預設頁面) 網頁。
如果您並未看到上述內容,請稍等幾分鐘後再試一次。
gcloud
建立執行個體群組網路。
gcloud compute networks create fortressnet --subnet-mode auto
建立網路防火牆規則。這項規則會允許所有傳送至執行個體的 HTTP 要求。
gcloud compute firewall-rules create fortressnet-allow-http \
    --network fortressnet \
    --allow tcp:80
建立執行個體範本,並在其中加入開機指令碼,以便在每個執行個體上啟動簡易 Apache 網路伺服器。
gcloud compute instance-templates create fort-template \
    --machine-type e2-micro \
    --network fortressnet \
    --metadata startup-script='apt update && apt -y install apache2'
利用執行個體範本建立多個地區性代管執行個體群組,並對各個執行個體群組設定自動調度資源。
gcloud compute instance-groups managed create us-central1-pool \
    --region us-central1 \
    --template fort-template \
    --size 1
gcloud compute instance-groups managed set-autoscaling us-central1-pool \
    --region us-central1 \
    --min-num-replicas 1 \
    --max-num-replicas 5 \
    --scale-based-on-load-balancing \
    --target-load-balancing-utilization .8
gcloud compute instance-groups managed create europe-west1-pool \ --region europe-west1 \ --template fort-template \ --size 1 gcloud compute instance-groups managed set-autoscaling europe-west1-pool \ --region europe-west1 \ --min-num-replicas 1 \ --max-num-replicas 5 \ --scale-based-on-load-balancing \ --target-load-balancing-utilization .8gcloud compute instance-groups managed create asia-east1-pool \ --region asia-east1 \ --template fort-template \ --size 1 gcloud compute instance-groups managed set-autoscaling asia-east1-pool \ --region asia-east1 \ --min-num-replicas 1 \ --max-num-replicas 5 \ --scale-based-on-load-balancing \ --target-load-balancing-utilization .8(選用) 確認執行個體處於良好的健康狀態並能提供 HTTP 流量。 同時測試一或多個執行個體的外部 IP 位址。請稍候片刻,等待執行個體完成啟動程序。
列出執行個體。
gcloud compute instances list
在
STATUS一欄下方,確認執行個體處於RUNNING狀態。如要檢查執行個體,請在
EXTERNAL_IP一欄下方查詢執行個體的 IP 位址。curl http://EXTERNAL_IP | head
系統應該會顯示一些 HTML 文字,其中包括以下這列內容:
<title>Apache2 Debian Default Page: It works</title>。如果您並未看到上述內容,請稍等幾分鐘後再試一次。
設定負載平衡器
負載平衡器會將用戶端要求分配至多個後端。
主控台
選取負載平衡器類型
前往 Google Cloud 控制台的「Load balancing」(負載平衡)頁面。
- 點選「建立負載平衡器」。
- 在「Type of load balancer」(負載平衡器類型) 部分,選取「Application Load Balancer (HTTP/HTTPS)」(應用程式負載平衡器 (HTTP/HTTPS)),然後點選「Next」(下一步)。
- 在「公開或內部」部分選取「公開 (外部)」,接著點選「下一步」。
- 在「Global or single region deployment」(全域或單一區域部署) 部分,選取「Best for global workloads」(最適合全域工作負載),然後點選「Next」(下一步)。
- 在「Load balancer generation」(負載平衡器代別) 部分,選取「Global external Application Load Balancer」(全域外部應用程式負載平衡器),然後點選「Next」(下一步)。
- 按一下 [設定]。
基本設定
- 將「Load balancer name」(負載平衡器名稱) 設為
fortressnet-balancer。
後端設定
- 在「Create global external Application Load Balancer」(建立全域外部應用程式負載平衡器) 頁面上,按一下「Backend configuration」(後端設定)。
- 在「建立或選擇後端服務與後端 Bucket」下拉式選單中,依序選取「後端服務」和「建立後端服務」。 系統會隨即顯示「建立後端服務」對話方塊。
- 將後端服務的「Name」(名稱) 設為
fortressnet-backend-service。 - 在「New backend」(新增後端) 對話方塊下方,將「Instance group」(執行個體群組) 設為
asia-east1-pool。 - 「Balancing mode」(平衡模式) 請選取 [Rate] (速率)。
- 將每個執行個體的「Maximum RPS」(每秒要求數上限) 設為每秒
100個要求。 - 按一下 [完成]。
- 點選「新增後端」。
- 在「New backend」(新增後端) 對話方塊下方,將「Instance group」(執行個體群組) 設為
europe-west1-pool。 - 「Balancing mode」(平衡模式) 請選取 [Rate] (速率)。
- 將每個執行個體的「Maximum RPS」(每秒要求數上限) 設為每秒
100個要求。 - 按一下 [完成]。
- 點選「新增後端」。
- 在「New backend」(新增後端) 對話方塊下方,將「Instance group」(執行個體群組) 設為
us-central1-pool。 - 「Balancing mode」(平衡模式) 請選取 [Rate] (速率)。
- 將每個執行個體的「Maximum RPS」(每秒要求數上限) 設為每秒
100個要求。 - 按一下 [完成]。
- 在「健康狀態檢查」下方,選取 [建立健康狀態檢查]。
- 將「Name」(名稱) 設為
http-basic-check。 - 在「Protocol」(通訊協定) 中選取
HTTP。 - 將「Port」(通訊埠) 設為
80。 - 按一下 [儲存並繼續]。
- 點選「建立」。
主機與路徑規則
- 在「建立全域外部應用程式負載平衡器」頁面的左側面板上,按一下「主機與路徑規則」。
在這個範例中,由於所有流量都會遵循預設規則,因此不需要設定任何主機或路徑規則,只要接受系統預先填入的預設值即可。
前端設定
- 在「Create global external Application Load Balancer」(建立全域外部應用程式負載平衡器) 頁面的左側面板上,按一下「Frontend configuration」(前端設定)。
- 將「Name」(名稱) 設定為
fortressnet-http-rule。 - 針對「IP 版本」,選取 [IPv4]。
- 針對「IP 位址」,選取 [建立 IP 位址]。
- 在「預約新的靜態 IP 位址」對話方塊中,將「名稱」設為
fortressnet-ip。 - 按一下 [Reserve] (預約),然後稍等幾分鐘。
- 在「New Frontend IP and port」(新增的前端 IP 和通訊埠) 對話方塊底部,按一下 [Done] (完成)。
- 按一下 [Add frontend IP and port] (新增前端 IP 和通訊埠)。
- 將「Name」(名稱) 設定為
fortressnet-http-ipv6-rule。 - 針對「IP 版本」,選取 [IPv6]。
- 針對「IP 位址」,選取 [建立 IP 位址]。
- 在隨即開啟的對話方塊中,將「Name」(名稱) 設為
fortressnet-ipv6。 - 按一下 [Reserve] (預約),然後稍等幾分鐘。
- 在「New Frontend IP and port」(新增的前端 IP 和通訊埠) 對話方塊底部,按一下 [Done] (完成)。
檢查並完成
- 在「建立全域外部應用程式負載平衡器」頁面的左側面板上,按一下「檢查並完成」。
- 將您的設定與您打算建立的內容比較。
- 如果設定正確無誤,請按一下左側面板底部的 [Create] (建立),接著您會回到「Load balancing」(負載平衡) 畫面。建立完成的負載平衡器如果正在運作中,它的旁邊會顯示綠色勾號。
gcloud
後端設定
建立基本的健康狀態檢查,以便確認負載平衡器後端是否正在回應 HTTP 要求。
gcloud compute health-checks create http http-basic-check
建立全域後端服務,這項後端服務會接收負載平衡器傳送的 HTTP 流量。
gcloud compute backend-services create fortressnet-backend-service \
    --protocol HTTP \
    --health-checks http-basic-check \
    --global
將執行個體群組新增為後端服務的地區性後端。 這項設定會根據每個執行個體的每秒要求數上限,將流量分配至所有後端。
gcloud compute backend-services add-backend fortressnet-backend-service \
    --balancing-mode RATE \
    --max-rate-per-instance 100 \
    --instance-group us-central1-pool \
    --instance-group-region us-central1 \
    --global
gcloud compute backend-services add-backend fortressnet-backend-service \
    --balancing-mode RATE \
    --max-rate-per-instance 100 \
    --instance-group europe-west1-pool \
    --instance-group-region europe-west1 \
    --global
gcloud compute backend-services add-backend fortressnet-backend-service \
    --balancing-mode RATE \
    --max-rate-per-instance 100 \
    --instance-group asia-east1-pool \
    --instance-group-region asia-east1 \
    --global
主機與路徑規則
定義網址對應,網址對應會將不同網址轉送至不同的後端服務。由於本範例中只有一項後端服務,因此可直接將該後端服務設為所有網址的預設服務。
gcloud compute url-maps create fortressnet-balancer \
    --default-service fortressnet-backend-service
建立 HTTP Proxy 路徑。HTTP Proxy 路徑會接受 HTTP 要求,並根據網址對應加以轉送。在本範例中,HTTP Proxy 路徑會將所有要求傳送至您唯一的後端服務。
gcloud compute target-http-proxies create fortressnet-http-proxy \
    --url-map fortressnet-balancer
前端設定
建立兩個全域靜態外部 IP 位址,分別用於 IPv4 和 IPv6。這兩者將成為負載平衡器的全域外部 IP 位址。
gcloud compute addresses create fortressnet-ip \
    --ip-version IPV4 \
    --network-tier=PREMIUM \
    --global
gcloud compute addresses create fortressnet-ipv6 \
    --ip-version IPV6 \
    --network-tier=PREMIUM \
    --global
查詢負載平衡器的外部 IP 位址。
gcloud compute addresses list
針對外部 IP 位址建立通用轉送規則,這項規則會將 IPv4 和 IPv6 HTTP 要求轉送至您的 HTTP Proxy。
gcloud compute forwarding-rules create fortressnet-http-rule \
    --load-balancing-scheme=EXTERNAL \
    --network-tier=PREMIUM \
    --global \
    --target-http-proxy fortressnet-http-proxy \
    --ports 80 \
    --address LOAD_BALANCER_IP_ADDRESS
gcloud compute forwarding-rules create fortressnet-http-ipv6-rule \ --load-balancing-scheme=EXTERNAL \ --network-tier=PREMIUM \ --global \ --target-http-proxy fortressnet-http-proxy \ --ports 80 \ --address LOAD_BALANCER_IPV6_ADDRESS
(選用) 確認負載平衡器正在運作,過程中您可能會需要等待幾分鐘。
控制台
前往 Google Cloud 控制台的「Load balancing」(負載平衡)頁面。
等待
fortressnet-balancer在「後端」一欄下方顯示綠色勾號。按一下
fortressnet-balancer。在「Frontend」(前端) 的「IP:Port」(IP:通訊埠) 一欄下方,複製 IPv4 位址。 (IPv4 位址的格式應為
www.xxx.yyy.zzz,您不需複製結尾的通訊埠編號:nn。如果找不到「Frontend」(前端) 區段,請稍等幾分鐘後再試著重新載入網頁。在網路瀏覽器中輸入 IP 位址。
瀏覽器應該會顯示「Apache2 Debian Default Page」(Apache2 Debian 預設頁面) 網頁。
如果網頁顯示「404 錯誤 (找不到網頁)」,請試著再等幾分鐘。
gcloud
查詢負載平衡器的外部 IP 位址。
gcloud compute addresses list
查詢 IPv4 位址。(IPv4 位址的格式應為
www.xxx.yyy.zzz)。curl http://LOAD_BALANCER_IP_ADDRESS | head
系統應該會顯示一些 HTML 文字,其中包括以下這列內容:<title>Apache2 Debian Default Page: It works</title>。
如果看到 <title>Error 404 (Not Found)!!1</title>,請試著再等幾分鐘。
最佳做法:建立安全的防火牆,僅允許負載平衡器和健康狀態檢查傳送的內部流量。接著,將允許所有 HTTP 要求的原有防火牆刪除。這種做法可以防止個別執行個體對外部用戶端開放存取。
控制台
建立新的防火牆,僅允許負載平衡器和健康狀態檢查傳送的流量。
前往 Google Cloud 控制台的「Firewall rules」(防火牆規則) 頁面。
按一下「建立防火牆規則」。
將「Name」(名稱) 設為
fortressnet-allow-load-balancer。在「Network」(網路) 中選取
fortressnet。在「Targets」(目標) 中選取
All instances in the network。針對「來源 IP 範圍」,先輸入
130.211.0.0/22並按下 Enter 鍵,然後輸入35.191.0.0/16並再次按下 Enter 鍵。在「Protocols and ports」(通訊協定和通訊埠) 下方選取 [tcp],然後輸入
80。點選「建立」。
將允許所有流量的原有防火牆刪除。
- 選取
fortressnet-allow-http旁邊的勾號。 - 按一下頁面頂端的 [Delete] (刪除)。
- 在對話方塊中按一下 [刪除]。
- 選取
gcloud
建立新的防火牆,僅允許負載平衡器和健康狀態檢查傳送的流量。
gcloud compute firewall-rules create fortressnet-allow-load-balancer \
    --network fortressnet \
    --source-ranges 130.211.0.0/22,35.191.0.0/16 \
    --allow tcp:80
將允許所有流量的原有防火牆刪除。
gcloud compute firewall-rules delete fortressnet-allow-http -q
(選用) 確認自動調度資源和負載平衡正常運作
產生一些測試流量
假設歐洲現在是上午,您的網路服務在網際網路上突然出現使用者暴增的情況。以下步驟會根據這個假設,從歐洲瞬間產生大量的用戶端要求。
主控台
建立透過 Siege 負載測試工具安裝的執行個體。
前往 Google Cloud 控制台的「Create an instance」(建立執行個體) 頁面。
將「Name」(名稱) 設為
europe-loadtest。在「區域」部分,選取「
europe-west1」。如要進行進階設定,請展開「Advanced options」(進階選項) 部分,然後執行下列操作:
- 展開「管理」部分。
- 在「Automation」(自動化) 欄位中,輸入下列開機指令碼:
apt -y install siege
如要建立 VM,請按一下「建立」。
取得負載平衡器的 IPv4 位址。
前往 Google Cloud 控制台的「Load balancing」(負載平衡)頁面。
按一下「
fortressnet-balancer」。在「Frontend」(前端) 的「IP:Port」(IP:通訊埠) 一欄下方,複製 IPv4 位址。 (IPv4 位址的格式應為
www.xxx.yyy.zzz)。
透過 SSH 登入用於測試負載的執行個體。
前往 Google Cloud 控制台的「VM instances」(VM 執行個體) 頁面。
等待
europe-loadtest執行個體在「Name」(名稱) 一欄下方顯示綠色勾號。在「Connect」(連線) 一欄下方的
europe-loadtest上,按一下「SSH」。
啟動 Siege,並將負載平衡器的 IPv4 位址設為目標。
siege -c150 http://LOAD_BALANCER_IP_ADDRESS
gcloud
建立透過 Siege 負載測試工具安裝的執行個體。
gcloud compute instances create europe-loadtest \
    --network default \
    --zone europe-west1-c \
    --metadata startup-script='apt -y install siege'
取得負載平衡器的 IPv4 位址。
gcloud compute addresses list
開啟新的殼層工作階段,您可以在其中使用
gcloud指令。在新的殼層工作階段中,透過 SSH 登入用於測試負載的執行個體。
gcloud compute ssh --zone europe-west1-c europe-loadtest
啟動 Siege,並將負載平衡器的 IPv4 位址設為目標。
siege -c150 http://LOAD_BALANCER_IP_ADDRESS
執行 siege 指令後,您應該會在輸出結果中看到以下宣告:
The server is now under siege...
[alert] Zip encoding disabled; siege requires zlib support to enable it
** SIEGE 4.0.2
** Preparing 150 concurrent users for battle.
The server is now under siege...
監控負載平衡和自動調度資源
前往 Google Cloud 控制台的「Load balancing」(負載平衡)頁面。
按一下名為
fortressnet-balancer的負載平衡器。按一下 [Monitoring] (監控) 分頁標籤。
在「Backend」(後端) 下拉式選單中,選取
fortressnet-backend-service。
系統最多可能需要 10 分鐘才能顯示足夠的資料,您應該很快就會看到類似下圖的畫面:
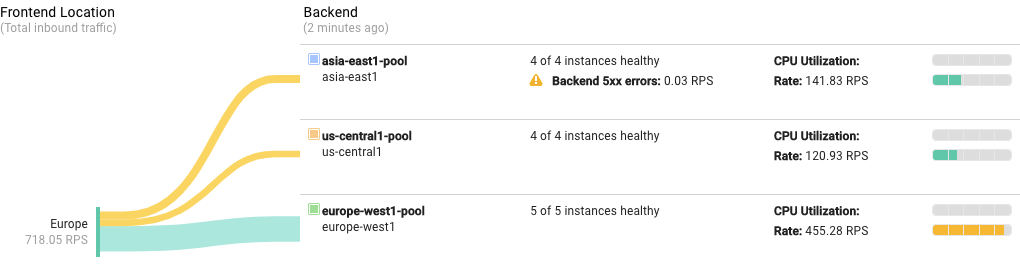
情況說明:
負載測試瞬間開始傳送龐大流量。起初,負載平衡器將要求平均分配至三個後端。要求數量很快就超出您設定的自動調度資源限制,這可能會導致伺服器傳回
Backend 5xx errors並顯示於監控畫面上。自動配置器開始依需求啟動額外的執行個體。系統會透過自動調度資源滿足容量需求。為了儘量縮短要求的延遲時間,Compute Engine 負載平衡器會嘗試將要求轉送至最接近用戶端的後端。由於此範例中的負載測試流量是源自歐洲,負載平衡器傾向將較多要求轉送至歐洲後端。因此,自動調度資源程序可能會啟動更多歐洲後端中的執行個體,藉此處理較大部分的要求。
從其他地區產生測試流量
假設亞洲現在現在是下午,這時您的網路服務也吸引了為數眾多網際網路使用者。以下步驟會根據這個假設,從亞洲產生大量要求。
控制台
如要建立另一個透過 Siege 負載測試工具安裝的執行個體,請按照下列步驟操作:
前往 Google Cloud 控制台的「VM instances」(VM 執行個體) 頁面。
點選「建立執行個體」。
將「Name」(名稱) 設為
asia-loadtest。在「區域」部分,選取「
asia-east1」。展開「Advanced options」(進階選項) 區段。
展開「管理」部分。
在「Automation」(自動化) 專區中,輸入以下開機指令碼:
apt -y install siege
點選「建立」。
如要取得負載平衡器的 IP 位址,請執行下列操作:
前往 Google Cloud 控制台的「Load balancing」(負載平衡)頁面。
按一下「
fortressnet-balancer」。在「Frontend」(前端) 的「IP:Port」(IP:通訊埠) 一欄下方,複製 IPv4 位址 (IPv4 位址的格式應為
www.xxx.yyy.zzz)。
透過 SSH 登入用於測試負載的執行個體。
- 等待
asia-loadtest執行個體在「Name」(名稱) 一欄下方顯示綠色勾號。 - 在「Connect」(連線) 一欄下方的
asia-loadtest上,按一下「SSH」。
- 等待
啟動 Siege,並將負載平衡器的 IPv4 位址設為目標。
siege -c150 http://LOAD_BALANCER_IP_ADDRESS
gcloud
在原有的殼層工作階段中,建立另一個透過 Siege 負載測試工具安裝的執行個體。
gcloud compute instances create asia-loadtest \
    --network default \
    --zone asia-east1-c \
    --metadata startup-script='apt -y install siege'
取得負載平衡器的 IPv4 位址。
gcloud compute addresses list
開啟新的殼層工作階段,您可以在其中使用
gcloud指令。在新的殼層工作階段中,透過 SSH 登入用於測試負載的執行個體。
gcloud compute ssh --zone asia-east1-c asia-loadtest
啟動 Siege,並將負載平衡器的 IPv4 位址設為目標。
siege -c150 http://LOAD_BALANCER_IP_ADDRESS
您應該同樣會在輸出結果中看到以下宣告:The server is now under siege...
[alert] Zip encoding disabled; siege requires zlib support to enable it
** SIEGE 4.0.2
** Preparing 150 concurrent users for battle.
The server is now under siege...
監控負載平衡和自動調度資源
返回前文提到過的負載平衡監控畫面。系統最多可能需要 10 分鐘才能顯示足夠的新資料,您應該很快就會看到類似下圖的畫面:
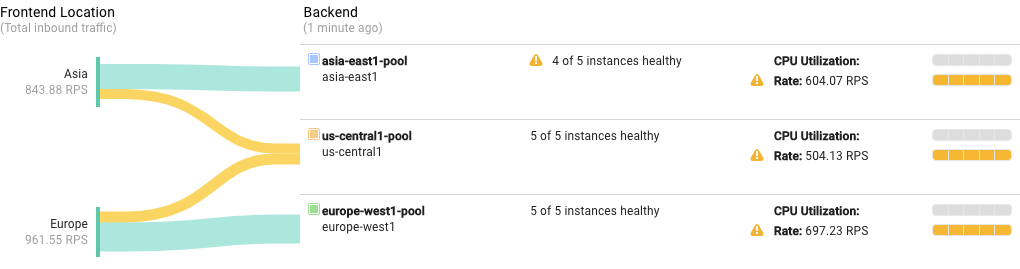
情況說明:
與先前的情況相似,負載測試瞬間開始傳送另一波龐大流量。起初,負載平衡器將要求平均分配至現有的三個後端。隨著要求數量超出您設定的自動調度資源限制,自動配置器開始依需求啟動額外的執行個體。
系統會透過自動調度資源滿足新的容量需求。負載平衡器同樣傾向將要求轉送至最近的可用後端。因此,亞洲後端會接收大部分源自亞洲的要求,歐洲後端會接收大部分源自歐洲的要求,而美國後端則會接收其餘的所有要求。