本文說明磁碟複本的運作方式,以及如何建立磁碟複本。磁碟複製功能可讓您立即複製現有磁碟,並立即使用。在下列情況下,您可以建立磁碟複本,以便建立現有磁碟的相同副本,並立即將其連接至 VM:
- 複製正式環境資料來建立測試環境,以便進行偵錯作業,且不會干擾正式環境
- 建立用於驗證資料庫備份的副本
- 將非開機磁碟資料移至新專案
- 在擴充 VM 時複製磁碟
為防災復原,請使用標準快照備份磁碟,而不要使用磁碟本機副本。如要定期擷取磁碟內容,但不建立新磁碟,請使用即時快照,因為比起本機副本,這類快照的儲存空間效率更高。如需其他磁碟保護選項,請參閱「資料保護選項」。
事前準備
-
如果尚未設定,請先設定驗證機制。「驗證」是指驗證身分,以便存取 Google Cloud 服務和 API 的程序。如要從本機開發環境執行程式碼或範例,請選取下列任一選項,以便對 Compute Engine 進行驗證:
Select the tab for how you plan to use the samples on this page:
Console
When you use the Google Cloud console to access Google Cloud services and APIs, you don't need to set up authentication.
gcloud
-
After installing the Google Cloud CLI, initialize it by running the following command:
gcloud initIf you're using an external identity provider (IdP), you must first sign in to the gcloud CLI with your federated identity.
- Set a default region and zone.
-
Install the Google Cloud CLI.
-
If you're using an external identity provider (IdP), you must first sign in to the gcloud CLI with your federated identity.
-
To initialize the gcloud CLI, run the following command:
gcloud init -
If you're using a local shell, then create local authentication credentials for your user account:
gcloud auth application-default login
You don't need to do this if you're using Cloud Shell.
If an authentication error is returned, and you are using an external identity provider (IdP), confirm that you have signed in to the gcloud CLI with your federated identity.
-
Install the Google Cloud CLI.
-
If you're using an external identity provider (IdP), you must first sign in to the gcloud CLI with your federated identity.
-
To initialize the gcloud CLI, run the following command:
gcloud init -
If you're using a local shell, then create local authentication credentials for your user account:
gcloud auth application-default login
You don't need to do this if you're using Cloud Shell.
If an authentication error is returned, and you are using an external identity provider (IdP), confirm that you have signed in to the gcloud CLI with your federated identity.
- Persistent Disk:所有類型的 Persistent Disk
- Google Cloud Hyperdisk:
- Hyperdisk Balanced
- Hyperdisk Balanced High Availability
- Hyperdisk Extreme
- Hyperdisk Throughput
- 複本的磁碟類型必須與來源磁碟相同。
- 您無法在其他區域建立現有區域磁碟的區域磁碟複本。
- 複本的大小必須至少與來源磁碟的大小相同。如果您使用 Google Cloud 控制台建立複本,就無法指定磁碟大小,且複本的大小會與來源磁碟相同。
- 如果您使用客戶提供的加密金鑰或客戶管理的加密金鑰來加密來源磁碟,則必須使用相同的金鑰來加密複本。詳情請參閱「建立加密來源磁碟的複本」。
- 在建立磁碟複本時,您無法刪除來源磁碟。
- 在建立複本時,已連結來源磁碟的運算執行個體將無法開機。
- 如果來源磁碟已標示要與所附 VM 一併刪除,則在建立複本時,您無法刪除該 VM。
- 每 30 秒最多只能建立一個指定來源磁碟或其複本。
- 您最多可以同時建立 1000 個特定來源磁碟或其複本的磁碟複本。超過此上限時,系統會傳回
internalError。不過,如果您建立磁碟複本,然後在日後刪除,則刪除的磁碟複本不會列入這項限制。 - 複製磁碟後,該磁碟或其副本的後續副本,都會計入原始來源磁碟的 1, 000 個同時磁碟副本限制,並計入每 30 秒最多建立一個副本的限制。
- 如果您是透過複製區域磁碟來建立區域磁碟,則每 15 分鐘最多可複製 1 TiB 的容量,且突發要求上限為 257 TiB。
- 您無法使用區域磁碟建立區域磁碟複本。
- 如要從區域來源磁碟建立地區磁碟複本,地區磁碟複本的其中一個複本區域必須與來源磁碟的區域相符。
- 建立後,地區磁碟複本平均在 3 分鐘內即可使用。不過,磁碟可能需要數十分鐘才能完全複製,並達到復原點目標 (RPO) 幾乎為零的狀態。
- 如果您是從映像檔建立區域磁碟,就無法使用該區域磁碟建立地區磁碟複本。
您無法透過複製區域磁碟來建立 Hyperdisk 平衡高可用性磁碟。如要從現有的區域磁碟建立 Hyperdisk 平衡高可用性磁碟,請完成「將區域磁碟變更為地區 Hyperdisk 平衡高可用性磁碟」一文中的步驟。
您無法複製 Hyperdisk ML 磁碟區。
在 Google Cloud 控制台中,前往「Disks」頁面。
在磁碟清單中,前往要複製的磁碟。
在「Actions」欄中,按一下 選單按鈕,然後選取「Clone disk」。
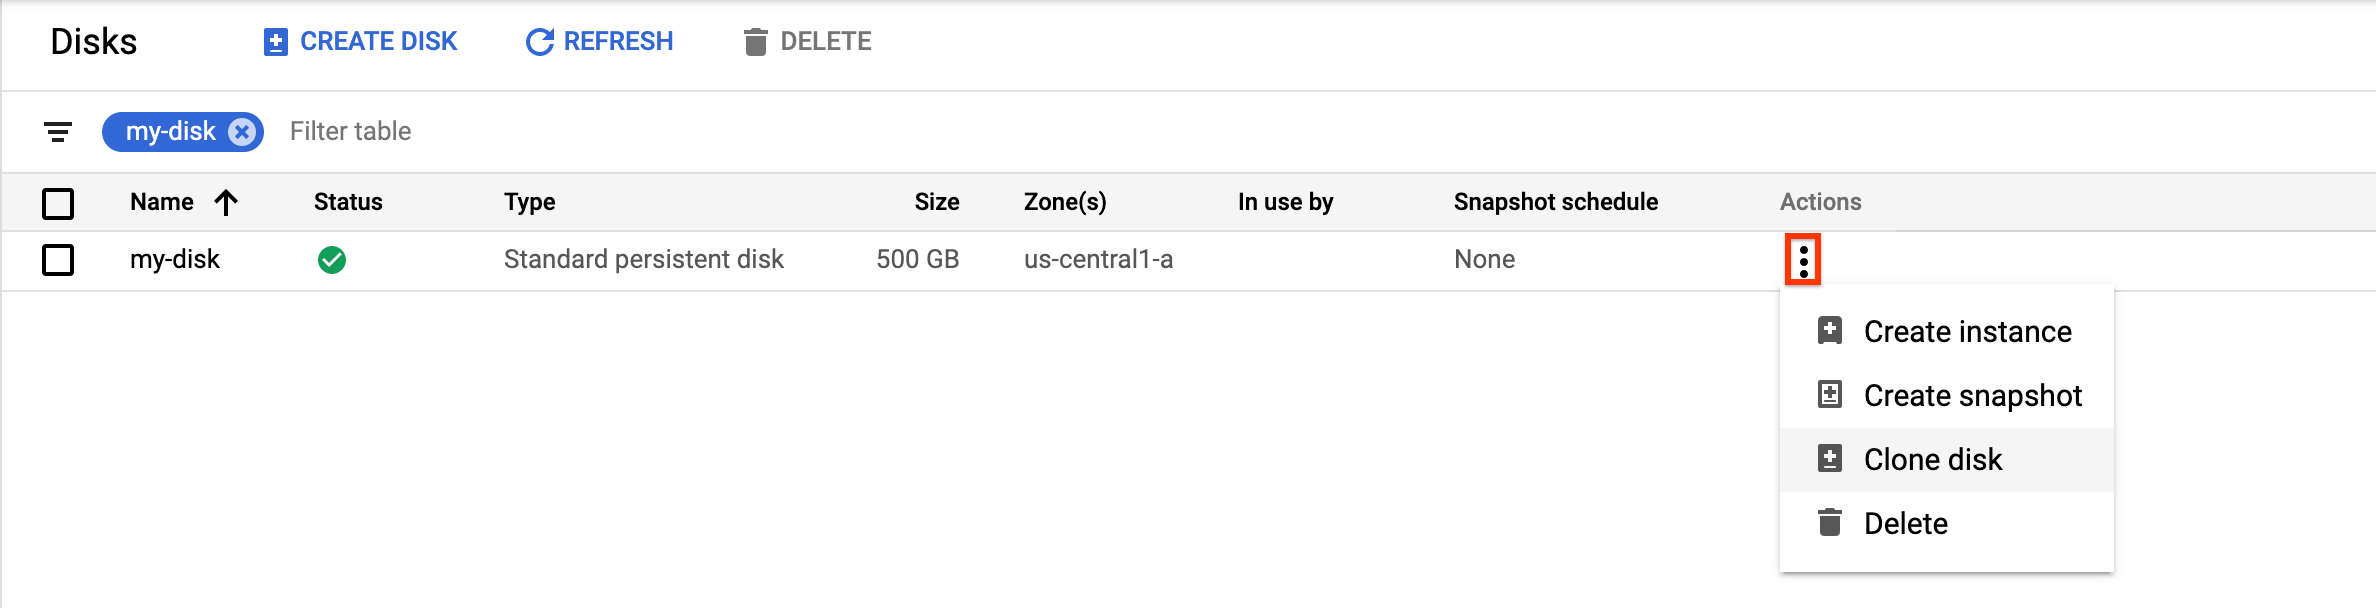
在隨即顯示的「Clone disk」面板中,執行下列操作:
- 在「Name」欄位中,指定複製磁碟的名稱。
- 在「Location」(位置) 中,確認已選取「Single zone」(單一可用區)。
- 在「Properties」下方,查看複製磁碟的其他詳細資料。
- 如要完成複製磁碟的建立程序,請按一下「Create」。
TARGET_DISK_NAME:新磁碟的名稱。PROJECT_ID:要複製磁碟的專案 ID。ZONE:來源和新磁碟的可用區。SOURCE_DISK_NAME:來源磁碟的名稱。PROJECT_ID:要複製磁碟的專案 ID。ZONE:來源和新磁碟的可用區。TARGET_DISK_NAME:新磁碟的名稱。SOURCE_DISK_NAME:來源磁碟的名稱在 Google Cloud 控制台中,前往「Disks」頁面。
在磁碟清單中,前往要複製的區域永久磁碟磁碟區。
在「Actions」欄中,按一下 選單按鈕,然後選取「Clone disk」。
在隨即顯示的「Clone disk」面板中,執行下列操作:
- 在「Name」欄位中,指定複製磁碟的名稱。
- 在「位置」中選取「區域」,然後選取新區域複本磁碟的次要複本可用區。
- 在「Properties」下方,查看複製磁碟的其他詳細資料。
- 如要完成複製磁碟的建立程序,請按一下「Create」。
TARGET_DISK_NAME:新區域磁碟克隆的名稱。CLONED_REGION:來源和複製磁碟的區域。SOURCE_DISK_NAME:要複製的區域磁碟名稱。SOURCE_DISK_ZONE:來源磁碟的可用區。這也是地區磁碟克隆的第一個副本區域。REPLICA_ZONE_2:新地區磁碟複本的第二個備用資源區。PROJECT_ID:要複製磁碟的專案 ID。PROJECT_ID:要複製磁碟的專案 ID。TARGET_DISK_NAME:新區域磁碟克隆的名稱。CLONED_REGION:來源和複製磁碟的區域。SOURCE_DISK_NAME:要複製的區域磁碟名稱。SOURCE_DISK_ZONE:來源磁碟的可用區。這也是地區磁碟克隆的第一個副本區域。REPLICA_ZONE_2:新地區磁碟複本的第二個備用資源區。在 Google Cloud 控制台中,前往「Disks」頁面。
在區域永久磁碟清單中,找出要複製的磁碟。
在「Actions」欄中,按一下 選單按鈕,然後選取「Clone disk」。
在隨即顯示的「Clone disk」面板中,執行下列操作:
- 在「Name」欄位中,指定複製磁碟的名稱。
- 在「Decryption and encryption」欄位中,提供來源磁碟加密金鑰。
- 在「Properties」下方,查看複製磁碟的其他詳細資料。
- 如要完成複製磁碟的建立程序,請按一下「Create」。
TARGET_DISK_NAME:新磁碟的名稱。PROJECT_ID:要複製磁碟的專案 ID。ZONE:來源和新磁碟的可用區。SOURCE_DISK_NAME:來源磁碟的名稱PROJECT_ID:要複製磁碟的專案 ID。ZONE:來源和新磁碟的可用區。TARGET_DISK_NAME:新磁碟的名稱。SOURCE_DISK_NAME:來源磁碟的名稱- 瞭解如何定期使用標準快照備份磁碟,以免不慎遺失資料。
- 瞭解如何使用即時快照備份磁碟。
- 瞭解如何使用地區永久磁碟,在兩個區域之間進行同步複製。
- 瞭解非同步複製。
Terraform
如要在本機開發環境中使用本頁面的 Terraform 範例,請先安裝並初始化 gcloud CLI,然後使用您的使用者憑證設定應用程式預設憑證。
詳情請參閱 Set up authentication for a local development environment。
Go
如要在本機開發環境中使用本頁面上的 Go 範例,請先安裝並初始化 gcloud CLI,然後使用您的使用者憑證設定應用程式預設憑證。
詳情請參閱 Set up authentication for a local development environment。
Java
如要在本機開發環境中使用本頁面上的 Java 範例,請先安裝並初始化 gcloud CLI,然後使用您的使用者憑證設定應用程式預設憑證。
詳情請參閱 Set up authentication for a local development environment。
Python
如要在本機開發環境中使用本頁面上的 Python 範例,請先安裝並初始化 gcloud CLI,然後使用您的使用者憑證設定應用程式預設憑證。
詳情請參閱 Set up authentication for a local development environment。
REST
如要在本機開發環境中使用本頁的 REST API 範例,請使用您提供給 gcloud CLI 的憑證。
After installing the Google Cloud CLI, initialize it by running the following command:
gcloud initIf you're using an external identity provider (IdP), you must first sign in to the gcloud CLI with your federated identity.
詳情請參閱 Google Cloud 驗證說明文件中的「驗證以使用 REST」。
磁碟複製的運作方式
複製磁碟時,您會建立新磁碟,其中包含來源磁碟上的所有資料。即使現有磁碟已連接至 VM 執行個體,您仍可建立磁碟複本。
複本的磁碟類型必須與來源磁碟的磁碟類型相同。不過,您可以修改複本的屬性,例如磁碟大小。您也可以刪除來源磁碟,而不會刪除複本。
支援的磁碟類型
您只能為下列磁碟類型建立磁碟複本:
限制
磁碟複本的限制取決於磁碟類型:
一般限制
下列限制適用於所有磁碟類型的複本:
永久磁碟複本的限制
永久磁碟的磁碟複本有下列限制:
Google Cloud Hyperdisk 複本的限制
錯誤訊息
如果超出複製頻率限制,要求就會失敗,並顯示以下錯誤訊息:
RATE LIMIT: ERROR: (gcloud.compute.disks.create) Could not fetch resource:
 - Operation rate exceeded for resource RESOURCE. Too frequent operations from the source resource.
建立磁碟副本
本節說明如何複製現有磁碟並建立磁碟克隆。
如需詳細步驟,請根據建立磁碟副本的類型,參閱本文件的下列任一章節:
建立可用區磁碟的複本
您可以使用 Google Cloud 控制台、Google Cloud CLI 或 REST,在來源磁碟所在的區域中,為現有磁碟建立區域磁碟複本。
主控台
gcloud
如要複製區域來源磁碟並建立新的區域磁碟,請執行
disks create指令,並指定--source-disk標記:gcloud compute disks create TARGET_DISK_NAME \ --description="cloned disk" \ --source-disk=projects/PROJECT_ID/zones/ZONE/disks/SOURCE_DISK_NAME更改下列內容:
Terraform
如要建立磁碟本機副本,請使用
google_compute_disk資源。如要瞭解如何套用或移除 Terraform 設定,請參閱「基本 Terraform 指令」。
Go
Go
在試用這個範例之前,請先按照 使用用戶端程式庫的 Compute Engine 快速入門中的操作說明設定 Go。詳情請參閱 Compute Engine Go API 參考資料說明文件。
如要向 Compute Engine 進行驗證,請設定應用程式預設憑證。詳情請參閱「為本機開發環境設定驗證機制」。
Java
Java
在試用這個範例之前,請先按照 使用用戶端程式庫的 Compute Engine 快速入門中的操作說明設定 Java。詳情請參閱 Compute Engine Java API 參考資料說明文件。
如要向 Compute Engine 進行驗證,請設定應用程式預設憑證。詳情請參閱「為本機開發環境設定驗證機制」。
Python
Python
在試用這個範例之前,請先按照 使用用戶端程式庫的 Compute Engine 快速入門中的操作說明設定 Python。詳情請參閱 Compute Engine Python API 參考資料說明文件。
如要向 Compute Engine 進行驗證,請設定應用程式預設憑證。詳情請參閱「為本機開發環境設定驗證機制」。
REST
如要複製區域來源磁碟並建立新的區域磁碟,請向
compute.disks.insert方法提出POST要求。在要求主體中指定name和sourceDisk參數。磁碟複本會繼承來源磁碟的所有省略屬性。POST https://compute.googleapis.com/compute/v1/projects/PROJECT_ID/zones/ZONE/disks { "name": "TARGET_DISK_NAME" "sourceDisk": "projects/PROJECT_ID/zones/ZONE/disks/SOURCE_DISK_NAME" }更改下列內容:
從區域磁碟建立地區磁碟副本
您可以複製現有的區域 Persistent Disk 磁碟區,建立新的地區 Persistent Disk 磁碟。如要將區域磁碟遷移至地區磁碟,Google 建議使用這個選項,而非建立區域磁碟的快照,然後將快照還原至新的地區磁碟。
主控台
gcloud
如要從區域磁碟建立地區磁碟複本,請執行
gcloud compute disks create指令,並指定--region和--replica-zones參數。gcloud compute disks create TARGET_DISK_NAME \ --description="zonal to regional cloned disk" \ --region=CLONED_REGION \ --source-disk=SOURCE_DISK_NAME \ --source-disk-zone=SOURCE_DISK_ZONE \ --replica-zones=SOURCE_DISK_ZONE,REPLICA_ZONE_2 \ --project=PROJECT_ID
更改下列內容:
Terraform
如要從區域磁碟建立地區磁碟的複本,您可以選擇建立區域磁碟的快照,然後複製快照。如要這麼做,請使用下列資源:
如要瞭解如何套用或移除 Terraform 設定,請參閱「基本 Terraform 指令」。
Go
Go
在試用這個範例之前,請先按照 使用用戶端程式庫的 Compute Engine 快速入門中的操作說明設定 Go。詳情請參閱 Compute Engine Go API 參考資料說明文件。
如要向 Compute Engine 進行驗證,請設定應用程式預設憑證。詳情請參閱「為本機開發環境設定驗證機制」。
Java
Java
在試用這個範例之前,請先按照 使用用戶端程式庫的 Compute Engine 快速入門中的操作說明設定 Java。詳情請參閱 Compute Engine Java API 參考資料說明文件。
如要向 Compute Engine 進行驗證,請設定應用程式預設憑證。詳情請參閱「為本機開發環境設定驗證機制」。
Python
Python
在試用這個範例之前,請先按照 使用用戶端程式庫的 Compute Engine 快速入門中的操作說明設定 Python。詳情請參閱 Compute Engine Python API 參考資料說明文件。
如要向 Compute Engine 進行驗證,請設定應用程式預設憑證。詳情請參閱「為本機開發環境設定驗證機制」。
REST
如要從區域磁碟建立地區磁碟複本,請向
compute.disks.insert方法提出POST要求,並指定sourceDisk和replicaZone參數。POST https://compute.googleapis.com/compute/v1/projects/PROJECT_ID/regions/CLONED_REGION/disks { "name": "TARGET_DISK_NAME" "sourceDisk": "projects/PROJECT_ID/zones/SOURCE_DISK_ZONE/disks/SOURCE_DISK_NAME" "replicaZone": "SOURCE_DISK_ZONE,REPLICA_ZONE_2" }更改下列內容:
建立加密來源磁碟的磁碟複本
您可以使用客戶提供的加密金鑰 (CSEK) 或客戶自行管理的加密金鑰來加密磁碟。
為 CSEK 加密磁碟建立磁碟本機副本
如果您使用 CSEK 加密來源磁碟,則必須使用相同的金鑰加密複本。
主控台
gcloud
如要為 CSEK 加密的來源磁碟建立磁碟複本,請執行
gcloud compute disks create指令,並使用--csek-key-file標記提供來源磁碟加密金鑰。如果您使用的是 RSA 包裝金鑰,請使用gcloud beta compute disks create指令。gcloud compute disks create TARGET_DISK_NAME \ --description="cloned disk" \ --source-disk=projects/PROJECT_ID/zones/ZONE/disks/SOURCE_DISK_NAME \ --csek-key-file example-key-file.json
更改下列內容:
Go
Go
在試用這個範例之前,請先按照 使用用戶端程式庫的 Compute Engine 快速入門中的操作說明設定 Go。詳情請參閱 Compute Engine Go API 參考資料說明文件。
如要向 Compute Engine 進行驗證,請設定應用程式預設憑證。詳情請參閱「為本機開發環境設定驗證機制」。
Java
Java
在試用這個範例之前,請先按照 使用用戶端程式庫的 Compute Engine 快速入門中的操作說明設定 Java。詳情請參閱 Compute Engine Java API 參考資料說明文件。
如要向 Compute Engine 進行驗證,請設定應用程式預設憑證。詳情請參閱「為本機開發環境設定驗證機制」。
Python
Python
在試用這個範例之前,請先按照 使用用戶端程式庫的 Compute Engine 快速入門中的操作說明設定 Python。詳情請參閱 Compute Engine Python API 參考資料說明文件。
如要向 Compute Engine 進行驗證,請設定應用程式預設憑證。詳情請參閱「為本機開發環境設定驗證機制」。
REST
如要為 CSEK 加密的來源磁碟建立磁碟複本,請向
compute.disks.insert方法提出POST要求,並使用diskEncryptionKey屬性提供來源磁碟加密金鑰。如果您使用的是 RSA 包裝金鑰,請使用方法的beta版本。POST https://compute.googleapis.com/compute/v1/projects/PROJECT_ID/zones/ZONE/disks { "name": "TARGET_DISK_NAME" "sourceDisk": "projects/PROJECT_ID/zones/ZONE/disks/SOURCE_DISK_NAME" "diskEncryptionKey": { "rsaEncryptedKey": "ieCx/NcW06PcT7Ep1X6LUTc/hLvUDYyzSZPPVCVPTVEohpeHASqC8uw5TzyO9U+Fka9JFHz0mBibXUInrC/jEk014kCK/NPjYgEMOyssZ4ZINPKxlUh2zn1bV+MCaTICrdmuSBTWlUUiFoDD6PYznLwh8ZNdaheCeZ8ewEXgFQ8V+sDroLaN3Xs3MDTXQEMMoNUXMCZEIpg9Vtp9x2oeQ5lAbtt7bYAAHf5l+gJWw3sUfs0/Glw5fpdjT8Uggrr+RMZezGrltJEF293rvTIjWOEB3z5OHyHwQkvdrPDFcTqsLfh+8Hr8g+mf+7zVPEC8nEbqpdl3GPv3A7AwpFp7MA==" }, }更改下列內容:
為 CMEK 加密磁碟建立磁碟本機副本
如果您使用 CMEK 加密來源磁碟,則必須使用相同的金鑰加密複本。
主控台
Compute Engine 會自動使用來源磁碟加密金鑰來加密複本。
gcloud
如要為 CMEK 加密的來源磁碟建立磁碟複本,請執行
gcloud compute disks create指令,並使用--kms-key標記提供來源磁碟加密金鑰。如果您使用的是 RSA 包裝金鑰,請使用gcloud beta compute disks create指令。gcloud compute disks create TARGET_DISK_NAME \ --description="cloned disk" \ --source-disk=projects/PROJECT_ID/zones/ZONE/disks/SOURCE_DISK_NAME \ --kms-key projects/KMS_PROJECT_ID/locations/REGION/keyRings/KEY_RING/cryptoKeys/KEY
更改下列內容:
Go
Go
在試用這個範例之前,請先按照 使用用戶端程式庫的 Compute Engine 快速入門中的操作說明設定 Go。詳情請參閱 Compute Engine Go API 參考資料說明文件。
如要向 Compute Engine 進行驗證,請設定應用程式預設憑證。詳情請參閱「為本機開發環境設定驗證機制」。
Java
Java
在試用這個範例之前,請先按照 使用用戶端程式庫的 Compute Engine 快速入門中的操作說明設定 Java。詳情請參閱 Compute Engine Java API 參考資料說明文件。
如要向 Compute Engine 進行驗證,請設定應用程式預設憑證。詳情請參閱「為本機開發環境設定驗證機制」。
Python
Python
在試用這個範例之前,請先按照 使用用戶端程式庫的 Compute Engine 快速入門中的操作說明設定 Python。詳情請參閱 Compute Engine Python API 參考資料說明文件。
如要向 Compute Engine 進行驗證,請設定應用程式預設憑證。詳情請參閱「為本機開發環境設定驗證機制」。
REST
如要為 CMEK 加密的來源磁碟建立磁碟本機副本,請向
compute.disks.insert方法提出POST要求,並使用kmsKeyName屬性提供來源磁碟加密金鑰。如果您使用的是 RSA 包裝金鑰,請使用方法的beta版本。POST https://compute.googleapis.com/compute/v1/projects/PROJECT_ID/zones/ZONE/disks { "name": "TARGET_DISK_NAME" "sourceDisk": "projects/PROJECT_ID/zones/ZONE/disks/SOURCE_DISK_NAME" "diskEncryptionKey": { "kmsKeyName": "projects/KMS_PROJECT_ID/locations/REGION/keyRings/KEY_RING/cryptoKeys/KEY" }, }更改下列內容:
後續步驟
除非另有註明,否則本頁面中的內容是採用創用 CC 姓名標示 4.0 授權,程式碼範例則為阿帕契 2.0 授權。詳情請參閱《Google Developers 網站政策》。Java 是 Oracle 和/或其關聯企業的註冊商標。
上次更新時間:2025-06-19 (世界標準時間)。
-