本機 SSD 是專為快取或暫存處理空間等暫存用途而設計,由於本機 SSD 位於運作 VM 的實體機器上,因此僅可在建立 VM 的過程中,建立本機 SSD。本機 SSD 無法做為啟動裝置使用。
如果是第三代機器系列和後續版本,建立 VM 時會新增一定數量的本機 SSD 磁碟。如要為這些 VM 新增本機 SSD 儲存空間,唯一方法是:
- 對於 C4、C4D、C3 和 C3D,本機 SSD 儲存空間僅適用於特定機型,例如
c3-standard-88-lssd。 - 在 Z3、A4、A4X、A3 和 A2 Ultra 系列中,每種機型都配備本機 SSD 儲存空間。
如果是 M3 和第一代/第二代機器類型,您必須在建立 VM 時指定本機 SSD 磁碟。
建立本機 SSD 磁碟後,您必須先格式化並掛接裝置,方可使用。
如要瞭解各種機型可用的本機 SSD 儲存空間大小,以及可附加至 VM 的本機 SSD 數量,請參閱「選擇有效的本機 SSD 數量」。
事前準備
- 使用本機 SSD 之前,請先查看本機 SSD 的限制。
- 請查看本機 SSD 磁碟的資料保存情境。
- 如要將本機 SSD 新增至已附加 GPU 的虛擬機器 (VM) 執行個體,請參閱 本機 SSD 適用於哪些 GPU 地區和區域。
-
如果尚未設定驗證,請先完成設定。
驗證可確認您的身分,以便存取 Google Cloud 服務和 API。如要從本機開發環境執行程式碼或範例,可以選取下列任一選項,向 Compute Engine 進行驗證:
Select the tab for how you plan to use the samples on this page:
Console
When you use the Google Cloud console to access Google Cloud services and APIs, you don't need to set up authentication.
gcloud
-
安裝 Google Cloud CLI。 安裝完成後,執行下列指令初始化 Google Cloud CLI:
gcloud init如果您使用外部識別資訊提供者 (IdP),請先 使用聯合身分登入 gcloud CLI。
- Set a default region and zone.
Terraform
如要在本機開發環境中使用本頁的 Terraform 範例,請安裝並初始化 gcloud CLI,然後使用使用者憑證設定應用程式預設憑證。
安裝 Google Cloud CLI。
如果您使用外部識別資訊提供者 (IdP),請先 使用聯合身分登入 gcloud CLI。
If you're using a local shell, then create local authentication credentials for your user account:
gcloud auth application-default login
You don't need to do this if you're using Cloud Shell.
If an authentication error is returned, and you are using an external identity provider (IdP), confirm that you have signed in to the gcloud CLI with your federated identity.
詳情請參閱 Set up authentication for a local development environment。
Go
如要在本機開發環境中使用本頁的 Go 範例,請安裝並初始化 gcloud CLI,然後使用使用者憑證設定應用程式預設憑證。
安裝 Google Cloud CLI。
如果您使用外部識別資訊提供者 (IdP),請先 使用聯合身分登入 gcloud CLI。
If you're using a local shell, then create local authentication credentials for your user account:
gcloud auth application-default login
You don't need to do this if you're using Cloud Shell.
If an authentication error is returned, and you are using an external identity provider (IdP), confirm that you have signed in to the gcloud CLI with your federated identity.
詳情請參閱 Set up authentication for a local development environment。
Java
如要在本機開發環境中使用本頁的 Java 範例,請安裝並初始化 gcloud CLI,然後使用使用者憑證設定應用程式預設憑證。
安裝 Google Cloud CLI。
如果您使用外部識別資訊提供者 (IdP),請先 使用聯合身分登入 gcloud CLI。
If you're using a local shell, then create local authentication credentials for your user account:
gcloud auth application-default login
You don't need to do this if you're using Cloud Shell.
If an authentication error is returned, and you are using an external identity provider (IdP), confirm that you have signed in to the gcloud CLI with your federated identity.
詳情請參閱 Set up authentication for a local development environment。
Python
如要在本機開發環境中使用本頁的 Python 範例,請安裝並初始化 gcloud CLI,然後使用使用者憑證設定應用程式預設憑證。
安裝 Google Cloud CLI。
如果您使用外部識別資訊提供者 (IdP),請先 使用聯合身分登入 gcloud CLI。
If you're using a local shell, then create local authentication credentials for your user account:
gcloud auth application-default login
You don't need to do this if you're using Cloud Shell.
If an authentication error is returned, and you are using an external identity provider (IdP), confirm that you have signed in to the gcloud CLI with your federated identity.
詳情請參閱 Set up authentication for a local development environment。
REST
如要在本機開發環境中使用本頁的 REST API 範例,請使用您提供給 gcloud CLI 的憑證。
安裝 Google Cloud CLI。
如果您使用外部識別資訊提供者 (IdP),請先 使用聯合身分登入 gcloud CLI。
詳情請參閱 Google Cloud 驗證說明文件中的「Authenticate for using REST」。
建立具有本機 SSD 的 VM
您可以使用 Google Cloud console、gcloud CLI 或 Compute Engine API,建立具有本機 SSD 磁碟儲存空間的 VM。
主控台
前往「Create an instance」(建立執行個體) 頁面。
指定 VM 的名稱、地區和可用區。視需要新增標記或標籤。
在「Machine configuration」(機器設定) 區段中,選擇包含目標機器類型的機器家族。
從「系列」清單中選取系列,然後選擇機器類型。
- 如果是 C4、C4D、C3 和 C3D,請選擇結尾為
-lssd的機型。 - Z3、A4、A4X、A3 和 A2 Ultra 的每種機型都隨附本機 SSD 儲存空間。
- 如果是 M3 或第一代和第二代機器系列,請選取機器類型,然後執行下列操作:
- 展開「Advanced options」(進階選項) 區段。
- 展開「Disks」(磁碟),按一下「Add Local SSD」(新增本機 SSD),然後執行下列操作:
- 在「設定本機 SSD」頁面中,選擇磁碟介面類型。
- 從「磁碟容量」清單中選取所需磁碟數量。
- 按一下 [儲存]。
- 如果是 C4、C4D、C3 和 C3D,請選擇結尾為
繼續執行 VM 建立程序。
使用本機 SSD 磁碟建立 VM 後,您必須先格式化並掛接每個裝置,才能使用磁碟。
gcloud
如要為 Z3、A4、A4X、A3 和 A2 Ultra 系列機型建立已連結本機 SSD 磁碟的 VM,請按照建立執行個體的操作說明,使用該系列任何可用的機型建立 VM。
如要為 C4、C4D、C3 和 C3D 系列機器建立已連結本機 SSD 磁碟的 VM,請按照建立執行個體的操作說明,但指定包含本機 SSD 磁碟 (
-lssd) 的執行個體類型。舉例來說,您可以建立具有兩個本機 SSD 分區的 C3 VM,並使用 NVMe 磁碟介面,如下所示:
gcloud compute instances create example-c3-instance \
   --zone ZONE \
   --machine-type c3-standard-8-lssd \
   --image-project IMAGE_PROJECT \
   --image-family IMAGE_FAMILY
如要為 M3 和第一代/第二代機器系列建立已連接本機 SSD 磁碟的 VM,請按照建立執行個體的操作說明,但使用
--local-ssd標記建立及連結本機 SSD 磁碟。如要建立多個本機 SSD 磁碟,請新增其他--local-ssd旗標。 或者也可以設定介面的值,以及每個--local-ssd旗標的裝置名稱。舉例來說,您可以建立具有四個本機 SSD 磁碟的 M3 VM,並指定磁碟介面類型,如下所示:
gcloud compute instances create VM_NAME \
   --machine-type m3-ultramem-64 \
   --zone ZONE \
   --local-ssd interface=INTERFACE_TYPE,device-name=DEVICE-NAME \
   --local-ssd interface=INTERFACE_TYPE,device-name=DEVICE-NAME \
   --local-ssd interface=INTERFACE_TYPE,device-name=DEVICE-NAME \
   --local-ssd interface=INTERFACE_TYPE \
   --image-project IMAGE_PROJECT \
   --image-family IMAGE_FAMILY
更改下列內容:
- VM_NAME:新 VM 的名稱
- ZONE:要在其中建立 VM 的可用區。如果您已設定 gcloud CLI
compute/zone屬性或CLOUDSDK_COMPUTE_ZONE環境變數,則不一定要使用這個旗標。 - INTERFACE_TYPE:您要用於本機 SSD 裝置的磁碟介面類型。如果建立 M3 VM,或是開機磁碟映像檔具有最佳化 NVMe 驅動程式,請指定
nvme。為其他圖片指定scsi。 - DEVICE-NAME:(選用) 名稱,指出要在客層作業系統符號連結 (符號連結) 中使用的磁碟名稱。
- IMAGE_FAMILY:要安裝在開機磁碟上的可用映像檔系列
- IMAGE_PROJECT:映像檔系列所屬的映像檔專案
如有需要,您可以將本機 SSD 連接至第一代或第二代 VM,在不同的磁碟分割區上一併使用
nvme和scsi。nvme裝置的效能取決於執行個體的開機磁碟映像檔。第三代 VM 僅支援 NVMe 磁碟介面。建立含有本機 SSD 的 VM 後,您必須先格式化並掛接每個裝置,方可使用。
Terraform
如要建立已連接本機 SSD 磁碟的 VM,可以使用
google_compute_instance資源。如要瞭解如何套用或移除 Terraform 設定,請參閱「基本 Terraform 指令」。
如要產生 Terraform 程式碼,可以使用 Google Cloud 控制台中的「對等程式碼」元件。- 前往 Google Cloud 控制台的「VM instances」(VM 執行個體) 頁面。
- 點選「建立執行個體」。
- 指定所需參數。
- 按一下頁面頂端或底部的「對等程式碼」,然後點選「Terraform」分頁標籤,即可查看 Terraform 程式碼。
Go
Go
在試用這個範例之前,請先按照Go使用用戶端程式庫的 Compute Engine 快速入門中的操作說明進行設定。 詳情請參閱 Compute Engine Go API 參考說明文件。
如要向 Compute Engine 進行驗證,請設定應用程式預設憑證。 詳情請參閱「為本機開發環境設定驗證」。
Java
Java
在試用這個範例之前,請先按照Java使用用戶端程式庫的 Compute Engine 快速入門中的操作說明進行設定。 詳情請參閱 Compute Engine Java API 參考說明文件。
如要向 Compute Engine 進行驗證,請設定應用程式預設憑證。 詳情請參閱「為本機開發環境設定驗證」。
Python
Python
在試用這個範例之前,請先按照Python使用用戶端程式庫的 Compute Engine 快速入門中的操作說明進行設定。 詳情請參閱 Compute Engine Python API 參考說明文件。
如要向 Compute Engine 進行驗證,請設定應用程式預設憑證。 詳情請參閱「為本機開發環境設定驗證」。
REST
使用
instances.insert method從映像檔系列或特定版本的作業系統映像檔建立 VM。- 如要為 Z3、A4、A4X、A3 和 A2 Ultra 系列機型建立已連結本機 SSD 磁碟的 VM,請建立使用該系列任何可用機型的 VM。
如果是 C4、C4D、C3 和 C3D 系列機器,如要建立已連接本機 SSD 磁碟的 VM,請指定包含本機 SSD 磁碟的執行個體類型 (
-lssd)。以下是範例要求酬載,會建立具有 Ubuntu 開機磁碟和兩個本機 SSD 磁碟的 C3 VM:
{
 "machineType":"zones/us-central1-c/machineTypes/c3-standard-8-lssd",
 "name":"c3-with-local-ssd",
 "disks":[
    {
       "type":"PERSISTENT",
       "initializeParams":{
          "sourceImage":"projects/ubuntu-os-cloud/global/images/family/ubuntu-2204-lts"
       },
       "boot":true
    }
 ],
 "networkInterfaces":[
    {
       "network":"global/networks/default"
}
 ]
}
如果是 M3 和第一代/第二代機器系列,如要建立已連接本機 SSD 磁碟的 VM,您可以在建立 VM 時使用
initializeParams屬性新增本機 SSD 裝置。請務必提供下列屬性:diskType:設為本機 SSDautoDelete:設定為 true。type:設為SCRATCH。
本機 SSD 裝置無法使用下列屬性:
diskNamesourceImage屬性diskSizeGb
以下是範例要求酬載,會建立具有開機磁碟和四個本機 SSD 磁碟的 M3 VM:
{
 "machineType":"zones/us-central1-f/machineTypes/m3-ultramem-64",
 "name":"local-ssd-instance",
 "disks":[
    {
     "type":"PERSISTENT",
     "initializeParams":{
        "sourceImage":"projects/ubuntu-os-cloud/global/images/family/ubuntu-2204-lts"
     },
     "boot":true
    },
    {
       "type":"SCRATCH",
       "initializeParams":{
          "diskType":"zones/us-central1-f/diskTypes/local-ssd"
       },
       "autoDelete":true,
       "interface": "NVME"
    },
    {
       "type":"SCRATCH",
       "initializeParams":{
          "diskType":"zones/us-central1-f/diskTypes/local-ssd"
       },
       "autoDelete":true,
       "interface": "NVME"
    },
    {
       "type":"SCRATCH",
       "initializeParams":{
          "diskType":"zones/us-central1-f/diskTypes/local-ssd"
       },
       "autoDelete":true,
       "interface": "NVME"
    },
    {
       "type":"SCRATCH",
       "initializeParams":{
          "diskType":"zones/us-central1-f/diskTypes/local-ssd"
       },
       "autoDelete":true,
       "interface": "NVME"
    },
 ],
 "networkInterfaces":[
    {
       "network":"global/networks/default"
    }
 ]
}
建立本機 SSD 磁碟後,您必須先格式化並掛接每個裝置,方可使用。
如要進一步瞭解如何使用 REST 建立執行個體,請參閱 Compute Engine API。
格式化並掛接本機 SSD 裝置
您可以個別格式化及掛接每個本機 SSD 磁碟,也可以將多個本機 SSD 磁碟合併成單一邏輯磁碟區。
格式化並掛接個別的本機 SSD 分區
如要將本機 SSD 連接至執行個體,最簡單的方式就是透過單一磁碟分區來格式化和掛接每部裝置。或者也可以將多個分區合併為單一邏輯磁碟區。
Linux 執行個體
在 Linux 執行個體上格式化和掛接新的本機 SSD。可使用任何您需要的磁碟分區格式與配置。在此範例中,會建立單一的
ext4磁碟分區。前往「VM instances」(VM 執行個體) 頁面。
在新連接本機 SSD 的執行個體旁,按一下「SSH」SSH按鈕。瀏覽器會開啟對於執行個體的終端機連線。
在終端機中,使用
find指令識別想要掛接的本機 SSD。$ find /dev/ | grep google-local-nvme-ssd處於 SCSI 模式的本機 SSD 會具有類似
google-local-ssd-0的標準名稱。處於 NVMe 模式的本機 SSD 會具有類似google-local-nvme-ssd-0的名稱,如以下輸出內容所示:$ find /dev/ | grep google-local-nvme-ssd /dev/disk/by-id/google-local-nvme-ssd-0
以 ext4 檔案系統格式化本機 SSD。此指令會刪除本機 SSD 中的全部現有資料。
$ sudo mkfs.ext4 -F /dev/disk/by-id/[SSD_NAME]將
[SSD_NAME]替換為您要格式化本機 SSD 的 ID。例如,指定google-local-nvme-ssd-0可格式化執行個體上的第一個 NVMe 本機 SSD。使用
mkdir指令建立目錄,您可在其中掛接裝置。$ sudo mkdir -p /mnt/disks/[MNT_DIR]將
[MNT_DIR]替換為要掛接本機 SSD 磁碟的目錄路徑。將本機 SSD 掛接至 VM。
$ sudo mount /dev/disk/by-id/[SSD_NAME] /mnt/disks/[MNT_DIR]更改下列內容:
[SSD_NAME]:要掛接的本機 SSD ID。[MNT_DIR]:您要掛接本機 SSD 的所在目錄。
設定對裝置的讀取與寫入存取權。在此範例中,授予所有使用者對裝置的寫入存取權。
$ sudo chmod a+w /mnt/disks/[MNT_DIR]將
[MNT_DIR]替換為您掛接本機 SSD 的所在目錄。
也可以選擇將本機 SSD 新增至
/etc/fstab檔案,讓裝置在執行個體重新啟動時自動重新掛接。若執行個體停止,則此項目不會在本機 SSD 上保存資料。如需完整詳細資料,請參閱「本機 SSD 資料保存」一文。指定項目
/etc/fstab檔案時,請務必加入nofail選項,讓執行個體即使在無本機 SSD 時仍可繼續啟動。舉例來說,如果您要建立開機磁碟的快照,並建立不含本機 SSD 磁碟的新執行個體,這時執行個體仍可繼續執行啟動程序,而不會永久暫停。建立
/etc/fstab項目。請使用blkid指令在裝置上尋找檔案系統的 UUID,並透過掛接選項編輯/etc/fstab檔案,以加入該 UUID。您可透過單一指令完成這個步驟。舉例來說,如要使用 NVMe 模式的本機 SSD,請使用下列指令:
$ echo UUID=`sudo blkid -s UUID -o value /dev/disk/by-id/google-local-nvme-ssd-0` /mnt/disks/[MNT_DIR] ext4 discard,defaults,nofail 0 2 | sudo tee -a /etc/fstab如要使用非 NVMe 模式 (例如 SCSI) 的本機 SSD,請使用下列指令:
$ echo UUID=`sudo blkid -s UUID -o value /dev/disk/by-id/google-local-ssd-0` /mnt/disks/[MNT_DIR] ext4 discard,defaults,nofail 0 2 | sudo tee -a /etc/fstab將
[MNT_DIR]替換為您掛接本機 SSD 的目錄。使用
cat指令驗證/etc/fstab項目是否正確:$ cat /etc/fstab
如果您是以這個執行個體的開機磁碟來建立快照,並使用該快照建立不含本機 SSD 的獨立執行個體,請編輯
/etc/fstab檔案,並移除這個本機 SSD 的項目。即使已有nofail選項,也請將/etc/fstab檔案與連接至執行個體的磁碟分割區保持同步處理,並在建立開機磁碟快照前移除這些項目。Windows 執行個體
使用 Windows 磁碟管理工具,即可在 Windows 執行個體上格式化和掛接本機 SSD。
請透過遠端桌面協定連結到執行個體。在此範例中,請前往 VM 執行個體頁面,然後在已連接本機 SSD 的執行個體旁,按一下「RDP」RDP按鈕。輸入使用者名稱和密碼後,會開啟一個伺服器桌面介面視窗。
在 Windows [Start] (開始) 按鈕上按一下滑鼠右鍵,然後選取 [Disk Management] (磁碟管理)。
![於 Windows [Start] (開始) 按鈕的右鍵功能表,選取 [Windows Disk Manager] (Windows 磁碟管理員) 工具。](https://cloud-dot-devsite-v2-prod.appspot.com/static/compute/images/start_disk_manager_windows.png?hl=zh-tw)
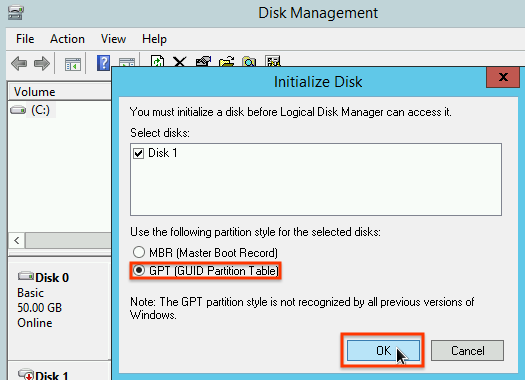
若之前尚未初始化本機 SSD,此工具會提示您選取新分區的分區配置。請選取 [GPT],然後按一下 [OK] (確定)。
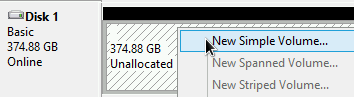
本機 SSD 初始化後,請在未配置的磁碟空間上按一下滑鼠右鍵,然後選取「新增簡單磁碟區」。
請按照「New Simple Volume Wizard」(新增簡單磁碟區精靈) 中的操作說明,設定新的磁碟區。您可以使用任何想要的磁碟分區格式,但在此範例中請選取
NTFS。此外,也請勾選 [Perform a quick format] (執行快速格式化),以加速執行格式化程序。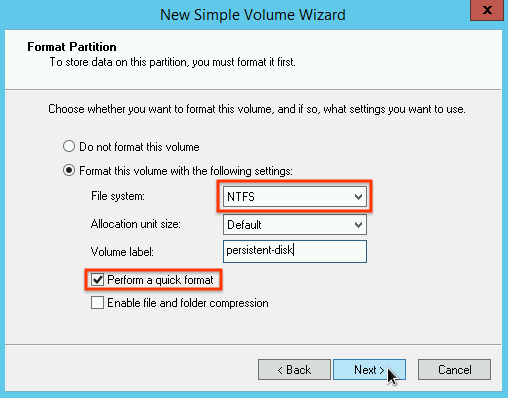
結束精靈並完成磁碟區格式化作業後,請檢查新的本機 SSD 確認其是否處於
Healthy狀態。
任務完成!現在已可將檔案寫入至本機 SSD。
格式化多個本機 SSD 分區,並掛接至單一邏輯磁碟區
本機 SSD 與永久 SSD 不同,每部連接至執行個體的每部裝置,容量皆固定為 375 GB。如要將多個本機 SSD 分區合併為單一邏輯磁碟區,您必須自行定義這些分區的磁碟區管理。
Linux 執行個體
使請用
mdadm建立 RAID 0 陣列。本範例會透過單一ext4檔案系統將陣列格式化,但您可套用任何偏好的檔案系統。前往「VM instances」(VM 執行個體) 頁面。
在新連接本機 SSD 的執行個體旁,按一下「SSH」SSH按鈕。瀏覽器會開啟對於執行個體的終端機連線。
在終端機中,安裝
mdadm工具。這個mdadm安裝程序包含會停止指令碼的使用者提示,因此請手動執行這個程序。Debian 與 Ubuntu:
$ sudo apt update && sudo apt install mdadm --no-install-recommendsCentOS 與 RHEL:
$ sudo yum install mdadm -ySLES 與 openSUSE:
$ sudo zypper install -y mdadm請使用
find指令識別想要一同掛接的所有本機 SSD。在本範例中,執行個體具有八個處於 NVMe 模式的本機 SSD 分割區:
$  find /dev/ | grep google-local-nvme-ssd

 /dev/disk/by-id/google-local-nvme-ssd-7
 /dev/disk/by-id/google-local-nvme-ssd-6
 /dev/disk/by-id/google-local-nvme-ssd-5
 /dev/disk/by-id/google-local-nvme-ssd-4
 /dev/disk/by-id/google-local-nvme-ssd-3
 /dev/disk/by-id/google-local-nvme-ssd-2
 /dev/disk/by-id/google-local-nvme-ssd-1
 /dev/disk/by-id/google-local-nvme-ssd-0
find不保證排序。只要輸出行的數量與預期的 SSD 分割區數量相符,裝置的列出順序不同也沒關係。處於 SCSI 模式的本機 SSD 會具有類似google-local-ssd的標準名稱。處於 NVMe 模式的本機 SSD 則會具有類似google-local-nvme-ssd的名稱。請使用
mdadm將多個本機 SSD 裝置合併至名為/dev/md0的單一陣列。本範例會合併處於 NVMe 模式的八個本機 SSD 裝置。至於處於 SCSI 模式的本機 SSD 裝置,請指定您以find指令取得的名稱:$ sudo mdadm --create /dev/md0 --level=0 --raid-devices=8 \ /dev/disk/by-id/google-local-nvme-ssd-0 \ /dev/disk/by-id/google-local-nvme-ssd-1 \ /dev/disk/by-id/google-local-nvme-ssd-2 \ /dev/disk/by-id/google-local-nvme-ssd-3 \ /dev/disk/by-id/google-local-nvme-ssd-4 \ /dev/disk/by-id/google-local-nvme-ssd-5 \ /dev/disk/by-id/google-local-nvme-ssd-6 \ /dev/disk/by-id/google-local-nvme-ssd-7 mdadm: Defaulting to version 1.2 metadata mdadm: array /dev/md0 started.
您可以使用
mdadm --detail確認陣列的詳細資料。新增--prefer=by-id旗標會列出使用/dev/disk/by-id路徑的裝置。sudo mdadm --detail --prefer=by-id /dev/md0
陣列中的每個裝置都會顯示類似以下的輸出內容。
 ...
 Number   Major   Minor   RaidDevice State
    0      259      0         0      active sync   /dev/disk/by-id/google-local-nvme-ssd-0
 ...
請以 ext4 檔案系統將整個
/dev/md0陣列格式化。$ sudo mkfs.ext4 -F /dev/md0請建立可掛接
/dev/md0的目錄。在此範例中,會建立/mnt/disks/ssd-array目錄:$ sudo mkdir -p /mnt/disks/[MNT_DIR]將
[MNT_DIR]替換為要掛接本機 SSD 陣列的目錄。將
/dev/md0陣列掛接至/mnt/disks/ssd-array目錄:$ sudo mount /dev/md0 /mnt/disks/[MNT_DIR]將
[MNT_DIR]替換為要掛接本機 SSD 陣列的目錄。設定對裝置的讀取與寫入存取權。在此範例中,授予所有使用者對裝置的寫入存取權。
$ sudo chmod a+w /mnt/disks/[MNT_DIR]將
[MNT_DIR]替換為您掛接本機 SSD 陣列的所在目錄。
也可以選擇將本機 SSD 新增至
/etc/fstab檔案,讓裝置在執行個體重新啟動時自動重新掛接。若執行個體停止,則此項目不會在本機 SSD 上保存資料。 詳情請參閱「本機 SSD 資料保存」一文。指定項目
/etc/fstab檔案時,請務必加入nofail選項,讓執行個體即使在無本機 SSD 時仍可繼續啟動。舉例來說,如果您要建立開機磁碟的快照,並建立不含本機 SSD 的新執行個體,這時執行個體仍可繼續執行啟動程序,而不會永久暫停。建立
/etc/fstab項目。請使用blkid指令在裝置上尋找檔案系統的 UUID,並透過掛接選項編輯/etc/fstab檔案,以加入該 UUID。指定nofail選項以允許系統啟動,即使本機 SSD 無法使用也允許。或者,可用單一指令完成此步驟。例如:$ echo UUID=`sudo blkid -s UUID -o value /dev/md0` /mnt/disks/[MNT_DIR] ext4 discard,defaults,nofail 0 2 | sudo tee -a /etc/fstab將
[MNT_DIR]替換為您掛接本機 SSD 陣列的所在目錄。如果您在
/etc/fstab檔案中使用/dev/md0等裝置名稱,而非 UUID,則需要編輯/etc/mdadm/mdadm.conf檔案,確保陣列會在開機時自動重新組裝。如要這樣做,請完成下列兩個步驟:- 確認磁碟陣列會在開機時自動掃描及重新組裝。
$ sudo mdadm --detail --scan | sudo tee -a /etc/mdadm/mdadm.conf - 更新
initramfs,讓陣列在早期啟動程序中可用。$ sudo update-initramfs -u
- 確認磁碟陣列會在開機時自動掃描及重新組裝。
使用
cat指令驗證/etc/fstab項目是否正確:$ cat /etc/fstab
如果您是以這個執行個體的開機磁碟來建立快照,並使用該快照建立不含本機 SSD 的獨立執行個體,請編輯
/etc/fstab檔案,並移除這個本機 SSD 陣列的項目。即使已有nofail選項,也請將/etc/fstab檔案與連接至執行個體的磁碟分割區保持同步處理,並在建立開機磁碟快照前移除這些項目。Windows 執行個體
使用 Windows 磁碟管理工具,即可在 Windows 執行個體上格式化和掛接本機 SSD 陣列。
請透過遠端桌面協定連結到執行個體。在此範例中,請前往 VM 執行個體頁面,然後在已連接本機 SSD 的執行個體旁,按一下「RDP」RDP按鈕。輸入使用者名稱和密碼後,會開啟一個伺服器桌面介面視窗。
在 Windows [Start] (開始) 按鈕上按一下滑鼠右鍵,然後選取 [Disk Management] (磁碟管理)。
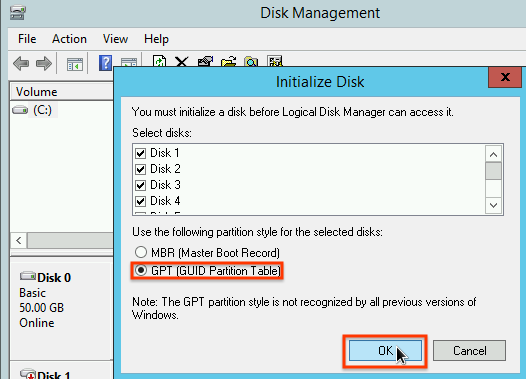
若之前尚未初始化本機 SSD,此工具會提示您選取新磁碟區的分區配置。請選取 [GPT],然後按一下 [OK] (確定)。
本機 SSD 初始化後,請在未配置的磁碟空間上按一下滑鼠右鍵,然後選取「新增等量磁碟區」。
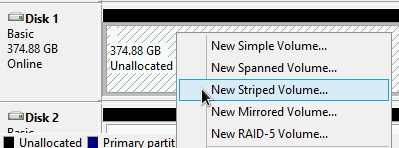
選取要加入等量陣列的本機 SSD 分割區。在本範例中,請選取要合併至單一本機 SSD 裝置的所有磁碟分割區。
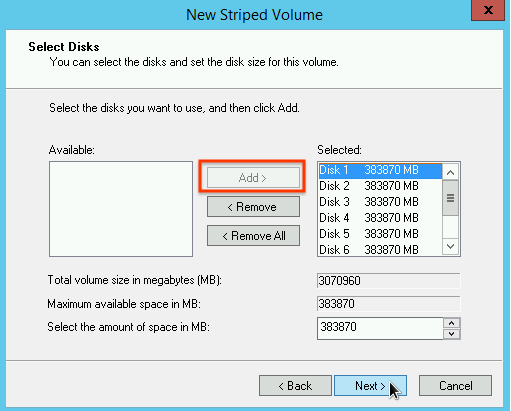
請按照「New Striped Volume Wizard」(新增等量磁碟區精靈) 中的操作說明,設定新磁碟區。您可以使用任何想要的磁碟分區格式,但在此範例中請選取
NTFS。此外,也請勾選 [Perform a quick format] (執行快速格式化),以加速執行格式化程序。 結束精靈並完成磁碟區格式化作業後,請檢查新的本機 SSD 確認其是否處於
Healthy狀態。
現在已可將檔案寫入至本機 SSD。
後續步驟
- 進一步瞭解 VM 的裝置名稱。
- 瞭解如何基準化本機 SSD 磁碟的效能
除非另有註明,否則本頁面中的內容是採用創用 CC 姓名標示 4.0 授權,程式碼範例則為阿帕契 2.0 授權。詳情請參閱《Google Developers 網站政策》。Java 是 Oracle 和/或其關聯企業的註冊商標。
上次更新時間:2025-10-19 (世界標準時間)。
-