Authorization and roles
Users must be authorized to access the Database Service. Authorization is required to access Database Service with both the GDC console and the Distributed Cloud CLI.
The following roles grant permissions to users:
project-viewer- Users with this role can access the GDC console.
project-db-viewer- Users with this role can view database clusters.
project-db-editor- Users with this role have the capabilities conferred by
project-db-viewerand can also edit database clusters. project-db-admin- Users with this role have the capability conferred by
project-db-editorand can also create and delete database clusters. project-bucket-object-viewer- Users with this role can use the storage browser in the Database Service interface in the GDC console. This interface is used to specify files for database imports and to specify destinations for files generated by database exports.
project-monitoring-viewer- Users with this role can access the monitoring instance. See Observe metrics for more information about observing Database Service metrics. You should only grant this role to users who need to access the monitoring instance.
project_mp_admin- Users with this role have the capabilities conferred by both
project_mp_editorandproject_mpb_editorroles, so they can create, edit, and delete both maintenance policies and maintenance policy bindings. project_mp_viewer- Users with this role can view maintenance policies.
project_mp_editor- Users with this role have the capabilities conferred by the
project_mp_viewerrole, and can also create, edit, and delete maintenance policies. project_mpb_viewer- Users with this role can view maintenance policy bindings.
project_mpb_editor- Users with this role have the capabilities conferred by the
project_mpb_viewerrole, and can also create, edit, and delete maintenance policy bindings.
Available database engines
The following database engines are available to use in a GDC environment:
| Database | Versions |
|---|---|
| AlloyDB Omni | 15 |
| Oracle | 19 |
| PostgreSQL | 13, 14, 15 |
Choose a database engine type and create a database cluster
If you want to enable backups for the database cluster, first create a
Distributed Cloud storage bucket or any bucket that is accessible with a S3-compatible endpoint, then create a backup repository named dbs-backup-repository. If using storage bucket outside of Distributed Cloud, it's your responsibility to ensure the bucket is properly encrypted.
The following is a sample BackupRepository custom resource created for Database Service backups:
apiVersion: backup.gdc.goog/v1
kind: BackupRepository
metadata:
  name: dbs-backup-repository
spec:
  secretReference:
    namespace: "object-storage-secret-ns"
    name: "object-storage-secret"
  endpoint: "https://objectstorage.google.gdch.test"
  type: S3
  s3Options:
    bucket: "fully-qualified-bucket-name"
    region: "us-east-1"
    forcePathStyle: true
  importPolicy: ReadWrite
A user with the Project DB Admin role must perform the following steps. Use either the GDC console or the Distributed Cloud CLI to create database clusters:
Console
- From the main menu, choose Database Service.
- Click Create Database Cluster.
In the Choose a database engine dialog, choose a database engine.
In the Configure your cluster dialog, specify the cluster ID, password, and database version. You can enable backups and configure the backup retention period.
If you chose the PostgreSQL database engine, you can enable high availability for your database cluster. If enabled, the Database Service provisions a standby instance in the same zone as your primary instance to protect against failure. See High availability for more information.
In the Configure your primary instance dialog, specify the CPU, memory, and storage capacity of the primary instance of the database cluster. We recommend you choose enough memory to hold your largest table.
Click Create. Creating the database cluster can take a few minutes. Check the status of the cluster from the Cluster overview page. The status changes from Creating to Ready when the cluster is ready.
gdcloud
Before using Distributed Cloud CLI, install and initialize it. Then, authenticate with your organization.
Run the following command to create a database cluster:
gdcloud database clusters create CLUSTER_NAME \
    --database-version DB_VERSION \
    --admin-password ADMIN_PASSWORD
Replace the following variables:
CLUSTER_NAMEwith the name for the new cluster.DB_VERSIONwith the version string for the new cluster. For example,POSTGRESQL_13,ORACLE_19_ENTERPRISEorALLOYDBOMNI_15ADMIN_PASSWORDwith the administrator password for the new cluster.
For more information on configuring the CPU, memory, and storage resources for the database cluster, configuring backup, enabling high availability, and for other available options, run:
gdcloud database clusters create --help
API
For AlloyDB or PostgreSQL databases:
apiVersion: v1
kind: Secret
metadata:
  name: db-pw-DBCLUSTER_NAME
  namespace: USER_PROJECT
type: Opaque
data:
  DBCLUSTER_NAME: "BASE64_PASSWORD"
---
apiVersion: DBENGINE_NAME.dbadmin.gdc.goog/v1
kind: DBCluster
metadata:
  name: DBCLUSTER_NAME
  namespace: USER_PROJECT
spec:
  primarySpec:
    adminUser:
      passwordRef:
        name: db-pw-DBCLUSTER_NAME
    version: "DB_VERSION"
    resources:
      memory: DB_MEMORY
      cpu: DB_CPU
      disks:
      - name: DataDisk
        size: DB_DATA_DISK
For Oracle databases:
apiVersion: v1
kind: Secret
metadata:
  name: db-pw-DBCLUSTER_NAME
  namespace: USER_PROJECT
type: Opaque
data:
  DBCLUSTER_NAME: "BASE64_PASSWORD"
---
apiVersion: oracle.dbadmin.gdc.goog/v1
kind: DBCluster
metadata:
  name: DBCLUSTER_NAME
  namespace: USER_PROJECT
spec:
  primarySpec:
    adminUser:
      passwordRef:
        name: db-pw-DBCLUSTER_NAME
    version: "DB_VERSION"
    cdbName: GCLOUD
    resources:
      memory: DB_MEMORY
      cpu: DB_CPU
      disks:
      - name: DataDisk
        size: DB_DATA_DISK
      - name: LogDisk
        size: DB_LOG_DISK
Replace the following variables:
DBCLUSTER_NAME, the name of the database cluster.USER_PROJECT, the name of the user project where the database cluster will be created.BASE64_PASSWORD, the base64 encoding of the database's administrator password.DBENGINE_NAME, the name of the database engine. This is one ofalloydbomni, orpostgresql.DB_VERSION, the version of the database engine.DB_MEMORY, the amount of memory allocated to the DB Cluster, for example5Gi.DB_CPU, the amount of CPUs allocated to the DB Cluster, for example2.DB_DATA_DISK, amount of space allocated to the DB Cluster, for example10 Gi.DB_LOG_DISK, the amount of space allocated to the log disk of the Oracle database (Oracle only).
List database clusters
Work through the following steps to list database clusters with the GDC console or the Distributed Cloud CLI:
Console
From the main menu, choose Database Service. The console takes you to a filterable list of your database clusters.
gdcloud CLI
Before using Distributed Cloud CLI, install and initialize it. Then, authenticate with your organization.
Run the following command to list database clusters:
gdcloud database clusters listThe output lists the namespace, name, database version, primary DNS endpoint, and status of each database cluster.
API
kubectl get DBCluster.DBENGINE_NAME.dbadmin.gdc.goog -n USER_PROJECT
Replace the following variables:
DBENGINE_NAME, the name of the database engine. This is one ofalloydbomni,postgresql, ororacle.USER_PROJECT. the name of the user project where the database cluster was created.
Start and stop database clusters
Stopping a database cluster pauses the cluster to save resources. You can stop and start database clusters with the GDC console or with the gdcloud CLI tool.
Console
- From the main menu of the GDC console, choose Database Service.
- Select the database cluster to start or stop.
- Click STOP or START.
gdcloud CLI
Use the following command to stop a database cluster:
gdcloud database clusters stop CLUSTER_NAME
Use the following command to start a database cluster:
gdcloud database clusters start CLUSTER_NAME
Replace the following:
- CLUSTER_NAME with the name of the database cluster to start or stop.
API
kubectl patch dbcluster.DBENGINE_NAME.dbadmin.gdc.goog DBCLUSTER_NAME -p '{"spec":{"primarySpec": {"isStopped": IS_STOPPED}}}' --type=merge -n USER_PROJECT
Replace the following variables:
DBENGINE_NAME, the name of the database engine. This is one ofalloydbomni,postgresql, ororacle.DBCLUSTER_NAME, the name of the database cluster.USER_PROJECT, the name of the user project where the database cluster was created.IS_STOPPEDto indicate whether the database cluster should be stopped (true) or not (false).
Update database cluster attributes
You can change the following database cluster attributes with the GDC console or the gdcloud CLI:
- Database password for the admin user
- External connections (enabled/disabled)
- Availability level (AlloyDB Omni and PostgreSQL only)
- Backup enabled and backup retention days
- Database flags
- CPU, memory, or storage allocated to the database cluster
For information on how to modify an attribute, see the workflow corresponding to the attribute type you want to update:
Console
High Availability
For AlloyDB Omni and PostgreSQL database clusters, enable or disable same zone high availability. See the Configure high availability section for more information.
Data Protection
For all database cluster types, you can enable or disable Data protection:
- Go to Data protection and click edit Edit to access the data protection settings form. If automated backups are enabled, you can also configure how long the backups are to be retained.
- After making changes, click Save to have the updates applied to your database cluster.
Connectivity
For all database cluster types, you can choose whether the database cluster can be accessed only from inside the GDC project, or if it is accessible from outside the project as well:
- Go to Connectivity and click edit Edit.
- Update your connectivity configurations.
Click Save to apply your changes.
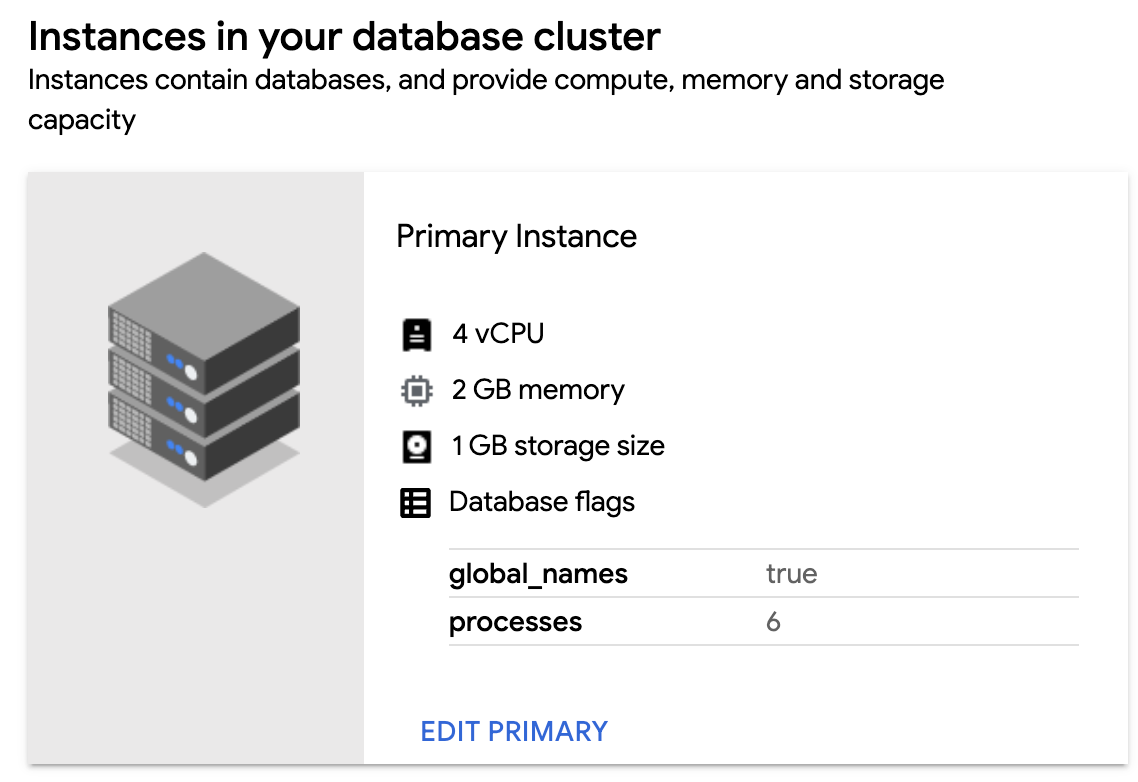
Instances
For all database cluster types, you can edit the primary instance properties:
- Go to Primary Instance and click edit Edit.
Choose between High Performance, Standard, Minimum, or Custom configurations. The Custom option lets you choose the number of CPUs, memory, and storage for your primary instance.
Updating your primary instance's CPU, memory, or storage will require a restart. Select Save and Restart to apply your changes.
For all database cluster types, this form also lets you add, modify, or remove database flags. The set of flags available is predetermined by GDC. See the Configure database flags section for more information.
gdcloud CLI
Use the following command to update a database cluster:
sh
gdcloud database clusters update CLUSTER_NAME [options]
Replace the following:
- CLUSTER_NAME with the name of the database cluster to update.
For the full list of options, see the command reference or run
sh
gdcloud database clusters update --help
API
Data Protection
For all database cluster types, you can enable data protection feature by creating a BackupPlan resource for that database cluster.
apiVersion: DBENGINE_NAME.dbadmin.gdc.goog/v1
kind: BackupPlan
metadata:
  name: DBCLUSTER_NAME-backupplan
  namespace: USER_PROJECT
spec:
  dbclusterRef: DBCLUSTER_NAME
  backupRetainDays: RETENTION_DAYS
Replace the following variables:
DBENGINE_NAME: the name of the database engine. This is one ofalloydbomni,postgresqlororacle.DBCLUSTER_NAME: the name of the database cluster to enable data protection for.USER_PROJECT: the name of the user project where the database cluster will be created.RETENTION_DAYS: the number of days for which the AlloyDB Omni Operator retains this backup. It must be an integer between 1 and 90.
You can also configure data protection settings like retention days by editing the corresponding BackupPlan resource.
To turn off data protection for a database cluster, delete the corresponding BackupPlan resource previously created.
Configure database flags
Database images that ship with GDC come with default settings. However, you can customize the default database engine to satisfy requirements for your applications. Database clusters provide predefined flags that you can set using the GDC console or gdcloud CLI:
Console
In the navigation menu, select Database Service.
From the database cluster list, click the database cluster you want to configure database flags for.
In the Instances in your database cluster section, click Edit Primary.
In the Flags section, click Add a Database Flag.
Choose your flag and enter the value. If the value you input is not valid, the GDC console gives you instructions on how to satisfy the required range or value type.
Click Done.
To set the configuration, click Save. For some flags to take effect, you must restart the database cluster. For this case, click Save and Restart.
To confirm your new flag is set, return to the Instances in your database cluster section of your database cluster and verify the new flag and value are visible.
To edit your database flags, return to the Flags section and modify the existing flags. Hover over a flag component and click the Delete icon to remove a database flag.
gdcloud
You can configure new database flags for your cluster or reset all existing flags back to their default values:
To configure a database flag for your database cluster, run:
gdcloud database clusters update CLUSTER_NAME \
    --database-flags DB_FLAGS
Replace the following:
CLUSTER_NAME: the name of the database cluster.DB_FLAGS: the comma-separated list of database flags to set on the database running in the database cluster. Each database flag and value are set as a key-value pair. Flags without a value can be defined without a string following the=character.
For example, the following command sets several database flags for the
test-db-cluster:gdcloud database clusters update test-db-cluster \ --database-flags max_allowed_packet=55555,skip_grant_tables=,log_output=1For a list of available database flags, see Available database flags.
To reset all your database flags to their default settings, run:
gdcloud database clusters update CLUSTER_NAME --clear-database-flagsReplace
CLUSTER_NAMEwith the name of the database cluster.
API
To configure database flags for your database cluster, run:
kubectl patch dbcluster.DBENGINE_NAME.dbadmin.gdc.goog DBCLUSTER_NAME -p '{"spec":{"primarySpec": {"parameters": DB_FLAGS}}}' --type=merge -n USER_PROJECTReplace the following variables:
DBENGINE_NAME: the name of the database engine. This is one ofalloydbomni,postgresql, ororacle.DBCLUSTER_NAME: the name of the database cluster.USER_PROJECT: the name of the user project where the database cluster was created.DB_FLAGS: the database configuration parameters to be added or updated. This should be JSON-formatted object of key-value pairs, where keys are the database parameter names and values are their respective settings. For example, the following sets several database flags:
"autovacuum": "on", "autovacuum_analyze_threshold": "2147483647", "dbs.enable_anon": "on"For a list of available database flags, see Available database flags.
To reset all your database flags to their default settings, run:
kubectl patch dbcluster.DBENGINE_NAME.dbadmin.gdc.goog DBCLUSTER_NAME --type=json -p='[{"op": "remove", "path": "/spec/primarySpec/parameters"}]' -n USER_PROJECTReplace the following variables:
DBENGINE_NAME: the name of the database engine. This is one ofalloydbomni,postgresql, ororacle.DBCLUSTER_NAME: the name of the database cluster.USER_PROJECT: the name of the user project where the database cluster was created.
Available database flags
The available database flags to configure for your database cluster are provided next based on the database engine you configured.
PostgreSQL database flags
| Flag | Range | Type | Need restart |
|---|---|---|---|
| max_connections | [1, 262143] | Integer | TRUE |
| temp_file_limit | [1048576, 2147483647] | Integer | FALSE |
| log_min_duration_statement | [-1, 2147483647] | Integer | FALSE |
| log_connections | on, off | Boolean | FALSE |
| log_lock_waits | on, off | Boolean | FALSE |
| log_disconnections | on, off | Boolean | FALSE |
| log_checkpoints | on, off | Boolean | FALSE |
| log_temp_files | [-1, 2147483647] | Integer | FALSE |
| log_statement | none, ddl, mod, all | Enum | FALSE |
| pgaudit.log | read, write, function, role, ddl, misc, misc_set, all, none , -read, -write, -function, -role, -ddl, -misc, -misc_set, -all, -none |
Repeated string | FALSE |
| work_mem | [64, 2147483647] | Integer | FALSE |
| autovacuum | on, off | Boolean | FALSE |
| maintenance_work_mem | [1024, 2147483647] | Integer | FALSE |
| random_page_cost | [0, 2147483647] | Float | FALSE |
| log_min_messages | debug5, debug4, debug3, debug2, debug1, info notice, warning, error, log, fatal, panic |
Enum | FALSE |
| idle_in_transaction_session_timeout | [0, 2147483647] | Integer | FALSE |
| max_wal_size | [2, 2147483647],. | Integer | FALSE |
| autovacuum_vacuum_scale_factor | [0, 100] | Float | FALSE |
| log_autovacuum_min_duration | [-1, 2147483647] | Integer | FALSE |
| autovacuum_vacuum_cost_limit | [-1, 10000] | Integer | FALSE |
| autovacuum_max_workers | [1, 262143] | Integer | TRUE |
| autovacuum_analyze_scale_factor | [0, 100] | Float | FALSE |
| track_activity_query_size | [100, 1048576] | Integer | TRUE |
| log_duration | on, off | Boolean | FALSE |
| autovacuum_vacuum_cost_delay | [-1, 100] | Integer | FALSE |
| checkpoint_completion_target | [0, 1] | Float | FALSE |
| log_statement_stats | on, off | Boolean | FALSE |
| max_worker_processes | [8, 4096] | Integer | TRUE |
| log_min_error_statement | debug5, debug4, debug3, debug2, debug1, info, notice, warning, error, log, fatal, panic |
Enum | FALSE |
| default_statistics_target | [1, 10000] | Integer | FALSE |
| checkpoint_timeout | [30, 86400] | Integer | FALSE |
| wal_buffers | [-1, 262143 ] | Integer | TRUE |
| effective_cache_size | [1, 2147483647] | Integer | FALSE |
| autovacuum_work_mem | [1, 2147483647] | Integer | FALSE |
| log_hostname | on, off | Boolean | FALSE |
| autovacuum_vacuum_threshold | [0, 2147483647] | Integer | FALSE |
| autovacuum_naptime | [1, 2147483] | Integer | FALSE |
| autovacuum_analyze_threshold | [0, 2147483647] | Integer | FALSE |
| pgaudit.log_client | on, off | Boolean | FALSE |
| pgaudit.log_parameter | on, off | Boolean | FALSE |
| pgaudit.log_level | debug5, debug4, debug3, debug2, debug1, info, notice, warning, error, log |
Enum | FALSE |
| pgaudit.log_relation | on, off | Boolean | FALSE |
| pgaudit.log_catalog | on, off | Boolean | FALSE |
| pgaudit.role | String | FALSE | |
| autovacuum_freeze_max_age | [100000, 2000000000] | Integer | TRUE |
| autovacuum_multixact_freeze_max_age | [10000, 2000000000] | Integer | TRUE |
| pgaudit.log_statement_once | on, off | Boolean | FALSE |
| anon.algorithm | String | FALSE | |
| anon.maskschema | String | FALSE | |
| anon.restrict_to_trusted_schemas | on, off | Boolean | FALSE |
| anon.salt | String | FALSE | |
| anon.sourceschema | String | FALSE | |
| dbs.enable_anon | on, off | Boolean | TRUE |
| dbs.enable_pg_bigm | on, off | Boolean | TRUE |
| dbs.enable_pg_cron | on, off | Boolean | TRUE |
| dbs.enable_pg_hint_plan | on, off | Boolean | TRUE |
| dbs.enable_pg_wait_sampling | on, off | Boolean | TRUE |
| pg_bigm.enable_recheck | on, off | Boolean | FALSE |
| pg_bigm.gin_key_limit | [0, 2147483647] | Integer | FALSE |
| pg_bigm.similarity_limit | [0, 1] | Float | FALSE |
| pg_hint_plan.debug_print | off, on, detailed, verbose, 0, 1, 2, 3, no, yes, false, true | Enum | TRUE |
| pg_hint_plan.enable_hint | on, off | Boolean | FALSE |
| pg_hint_plan.enable_hint_table | on, off | Boolean | FALSE |
| pg_hint_plan.message_level | debug5, debug4, debug3, debug2, debug1, debug, info, notice, warning, error, log | Enum | FALSE |
| pg_hint_plan.parse_messages | debug5, debug4, debug3, debug2, debug1, debug, info, notice, warning, error, log | Enum | FALSE |
| pg_stat_statements.max | [100, 2147483647] | Integer | TRUE |
| pg_stat_statements.save | on, off | Boolean | FALSE |
| pg_stat_statements.track | none, top, all | Enum | FALSE |
| pg_stat_statements.track_utility | on, off | Boolean | FALSE |
| pg_wait_sampling.history_period | [1, 2147483647] | Integer | FALSE |
| pg_wait_sampling.history_size | [1, 2147483647] | Integer | FALSE |
| pg_wait_sampling.profile_period | [1, 2147483647] | Integer | FALSE |
| pg_wait_sampling.profile_pid | on, off | Boolean | FALSE |
| pg_wait_sampling.profile_queries | on, off | Boolean | FALSE |
| pglogical.batch_inserts | on, off | Boolean | TRUE |
| pglogical.conflict_log_level | debug5, debug4, debug3 , debug2, debug1 , info, notice , warning, error , log, fatal , panic | Enum | FALSE |
| pglogical.conflict_resolution | error, apply_remote, keep_local, last_update_wins, first_update_wins | Enum | FALSE |
| pglogical.extra_connection_options | String | FALSE | |
| pglogical.synchronous_commit | on, off | Boolean | TRUE |
| pglogical.use_spi | on, off | Boolean | TRUE |
| pgtt.enabled | on, off | Boolean | FALSE |
| plv8.execution_timeout | [1, 65536] | Integer | FALSE |
| plv8.memory_limit | [256, 3096] | Integer | FALSE |
| plv8.start_proc | String | FALSE | |
| rdkit.agent_FP_bit_ratio | [0, 3] | Float | FALSE |
| rdkit.avalon_fp_size | [64, 9192] | Integer | FALSE |
| rdkit.dice_threshold | [0, 1] | Float | FALSE |
| rdkit.difference_FP_weight_agents | [-10, 10] | Integer | FALSE |
| rdkit.difference_FP_weight_nonagents | [1, 20] | Integer | FALSE |
| rdkit.do_chiral_sss | on, off | Boolean | FALSE |
| rdkit.do_enhanced_stereo_sss | on, off | Boolean | FALSE |
| rdkit.featmorgan_fp_size | [64, 9192] | Integer | FALSE |
| rdkit.hashed_atompair_fp_size | [64, 9192] | Integer | FALSE |
| rdkit.hashed_torsion_fp_size | [64, 9192] | Integer | FALSE |
| rdkit.ignore_reaction_agents | on, off | Boolean | FALSE |
| rdkit.init_reaction | on, off | Boolean | FALSE |
| rdkit.layered_fp_size | [64, 9192] | Integer | FALSE |
| rdkit.morgan_fp_size | [64, 9192] | Integer | FALSE |
| rdkit.move_unmmapped_reactants_to_agents | on, off | Boolean | FALSE |
| rdkit.rdkit_fp_size | [64, 9192] | Integer | FALSE |
| rdkit.reaction_difference_fp_size | [64, 9192] | Integer | FALSE |
| rdkit.reaction_difference_fp_type | [1, 3] | Integer | FALSE |
| rdkit.reaction_sss_fp_size | [64, 9192] | Integer | FALSE |
| rdkit.reaction_sss_fp_type | [1, 5] | Integer | FALSE |
| rdkit.sss_fp_size | [64, 4096] | Integer | FALSE |
| rdkit.tanimoto_threshold | [0, 1] | Float | FALSE |
| rdkit.threshold_unmapped_reactant_atoms | [0, 1] | Float | FALSE |
The following table specifies default values for flags different from the vendor default:
| Flag | Value/Formula | |
|---|---|---|
| shared_buffers | 1/3 * totalMemory(MiB) | |
| max_wal_size | 1504MB | |
| max_connections | Total memory >= ? | Value |
| 120GB | 1000 | |
| 60GB | 800 | |
| 15GB | 500 | |
| 7.5GB | 400 | |
| 6GB | 200 | |
| 3.75GB | 100 | |
| 1.7GB | 50 | |
| 0 | 25 | |
| effective_cache_size | 2/5 * totalMemory | |
| temp_file_limit | 1/10 * storageSize | |
| log_connections | on | |
| log_disconnections | on | |
| pgaudit.log | all, -misc | |
| log_hostname | on | |
| pgaudit.log_parameter | on | |
Oracle database flags
| Flag | Range | Type | Need restart |
|---|---|---|---|
| aq_tm_processes | [0, 40] | Integer | FALSE |
| background_core_dump | FULL, PARTIAL | Enum | FALSE |
| bitmap_merge_area_size | [0, 2147483647] | Integer | TRUE |
| control_management_pack_access | NONE, DIAGNOSTIC, DIAGNOSTIC+TUNING | Enum | FALSE |
| cursor_sharing | FORCE, EXACT, SIMILAR | Enum | FALSE |
| db_cache_size | [0, 10995116277760] | Integer | FALSE |
| db_files | [200, 20000] | Integer | TRUE |
| db_flashback_retention_target | [30, 2147483647] | Integer | FALSE |
| db_keep_cache_size | [0, 10995116277760] | Integer | FALSE |
| db_recovery_file_dest_size | [0, 10995116277760] | Integer | FALSE |
| event | String | TRUE | |
| large_pool_size | [0, 10995116277760] | Integer | FALSE |
| log_buffer | [2097152, 10995116277760] | Integer | TRUE |
| open_cursors | [5, 65535] | Integer | FALSE |
| pga_aggregate_limit | [0, 10995116277760] | Integer | FALSE |
| pga_aggregate_target | [10485760, 10995116277760] | Integer | FALSE |
| processes | [100, 20000] | Integer | TRUE |
| recyclebin | ON, OFF | Enum | TRUE |
| resource_limit | TRUE, FALSE | Boolean | FALSE |
| sec_max_failed_login_attempts | [1, 2147483647] | Integer | TRUE |
| sga_max_size | [377487360, 10995116277760] | Integer | TRUE |
| sga_target | [377487360, 10995116277760] | Integer | FALSE |
| shared_pool_size | [0, 10995116277760] | Integer | FALSE |
| undo_retention | [0, 2147483647] | Integer | FALSE |
| global_names | TRUE, FALSE | Boolean | FALSE |
| DBFIPS_140 | TRUE, FALSE | Boolean | TRUE |
| parallel_max_servers | [0, 32767] | Integer | FALSE |
| _fix_control | String | FALSE | |
| _sql_plan_directive_mgmt_control | [0, 65535] | Integer | FALSE |
| _optimizer_dsdir_usage_control | [0, 126] | Integer | FALSE |
| skip_unusable_indexes | TRUE, FALSE | Boolean | FALSE |
The following table specifies default values for flags different from the vendor default:
| Flag | Value/Formula |
|---|---|
| sga_target | 4/5* (totalMemory-1GiB) |
| pga_aggregate_target | 1/5* (totalMemory-1GiB) |
| open_cursors | 300 |
| processes | 300 |
| DBFIPS_140 | TRUE |
| global_names | TRUE |
AlloyDB Omni database flags
| Flag | Range | Type | Need restart |
|---|---|---|---|
| google_columnar_engine.enabled | on, off | Boolean | TRUE |
| google_columnar_engine.memory_size_in_mb | [128, 2147483647] | Integer | TRUE |
| anon.algorithm | String | FALSE | |
| anon.maskschema | String | FALSE | |
| anon.restrict_to_trusted_schemas | on, off | Boolean | FALSE |
| anon.salt | String | FALSE | |
| anon.sourceschema | String | FALSE | |
| dbs.enable_anon | on, off | Boolean | TRUE |
| dbs.enable_pg_bigm | on, off | Boolean | TRUE |
| dbs.enable_pg_cron | on, off | Boolean | TRUE |
| dbs.enable_pg_hint_plan | on, off | Boolean | TRUE |
| dbs.enable_pg_squeeze | on, off | Boolean | TRUE |
| dbs.enable_pg_wait_sampling | on, off | Boolean | TRUE |
| pg_bigm.enable_recheck | on, off | Boolean | FALSE |
| pg_bigm.gin_key_limit | [0, 2147483647] | Integer | FALSE |
| pg_bigm.similarity_limit | [0, 1] | Float | FALSE |
| pg_hint_plan.debug_print | off, on, detailed, verbose, 0, 1, 2, 3, no, yes, false, true | Enum | TRUE |
| pg_hint_plan.enable_hint | on, off | Boolean | FALSE |
| pg_hint_plan.enable_hint_table | on, off | Boolean | FALSE |
| pg_hint_plan.message_level | debug5, debug4, debug3, debug2, debug1, debug, info, notice, warning, error, log | Enum | FALSE |
| pg_hint_plan.parse_messages | debug5, debug4, debug3, debug2, debug1, debug, info, notice, warning, error, log | Enum | FALSE |
| pg_stat_statements.max | [100, 2147483647] | Integer | TRUE |
| pg_stat_statements.save | on, off | Boolean | FALSE |
| pg_stat_statements.track | none, top, all | Enum | FALSE |
| pg_stat_statements.track_utility | on, off | Boolean | FALSE |
| pg_wait_sampling.history_period | [1, 2147483647] | Integer | FALSE |
| pg_wait_sampling.history_size | [1, 2147483647] | Integer | FALSE |
| pg_wait_sampling.profile_period | [1, 2147483647] | Integer | FALSE |
| pg_wait_sampling.profile_pid | on, off | Boolean | FALSE |
| pg_wait_sampling.profile_queries | on, off | Boolean | FALSE |
| pgaudit.log | read, write, function, role, ddl, misc, misc_set, all, none , -read, -write, -function, -role, -ddl, -misc, -misc_set, -all, -none |
Repeated string | FALSE |
| pgaudit.log_client | on, off | Boolean | FALSE |
| pgaudit.log_parameter | on, off | Boolean | FALSE |
| pgaudit.log_level | debug5, debug4, debug3, debug2, debug1, info, notice, warning, error, log |
Enum | FALSE |
| pgaudit.log_relation | on, off | Boolean | FALSE |
| pgaudit.log_catalog | on, off | Boolean | FALSE |
| pgaudit.role | String | FALSE | |
| pgaudit.log_statement_once | on, off | Boolean | FALSE |
| pglogical.batch_inserts | on, off | Boolean | TRUE |
| pglogical.conflict_log_level | debug5, debug4, debug3 , debug2, debug1 , info, notice , warning, error , log, fatal , panic | Enum | FALSE |
| pglogical.conflict_resolution | error, apply_remote, keep_local, last_update_wins, first_update_wins | Enum | FALSE |
| pglogical.extra_connection_options | String | FALSE | |
| pglogical.synchronous_commit | on, off | Boolean | TRUE |
| pglogical.use_spi | on, off | Boolean | TRUE |
| pgtt.enabled | on, off | Boolean | FALSE |
| plv8.execution_timeout | [1, 65536] | Integer | FALSE |
| plv8.memory_limit | [256, 3096] | Integer | FALSE |
| plv8.start_proc | String | FALSE |
Configure database extensions
This section contains information about configuring the database extensions that Database Service supports.
Install an extension
Extensions can only be installed on the primary DBCluster. Once installed, the extension is replicated to standby instances.
Most of the extensions can be installed directly by connecting to the database cluster and running the CREATE EXTENSION command.
However, there are a few extensions that require additional configuration, hence users must set database flag, "dbs.enable_<extension-name>": "on" then connect to the database cluster and run the CREATE EXTENSION command.
Only database users who are members of the cloudsqlsuperuser or alloydbsuperuser role can run the CREATE EXTENSION command. By default, this includes the dbsadmin user.
Drop an extension
In order to drop an extension, the database user attempting to do so must be the owner of the extension. This implies that only the database user who initially created the extension has the authority to drop it. No other database user possesses the ability to drop the extension, ensuring controlled management of extensions.
Supported database extensions
The following table lists all of the supported extensions.
| Extension | Included with PostgreSQL | Included with AlloyDB Omni | Description |
|---|---|---|---|
| address_standardizer | Used to parse an address into constituent elements. Generally used to support geocoding address normalization step. | ||
| address_standardizer_data_us | Address Standardizer US dataset example | ||
| alloydb_ai_nl | Google Extension for AlloyDB AI & Natural Language | ||
| amcheck | Provides functions for verifying the logical consistency of the structure of relations, enabling the pg_amcheck application to check for corruption. | ||
| anon | Masks or replaces personally identifiable information (PII) or sensitive data from a PostgreSQL database. | ||
| autonic | Provides functions for auto incrementing fields | ||
| bloom | Provides a method to access indexes based on bloom filters. A bloom filter is a space-efficient data structure that you can use to test whether an element is a member of a set. | ||
| btree_gin | Provides sample GIN operator classes that implement B-tree equivalent behavior. | ||
| btree_gist | Provides GiST index operator classes that implement B-tree equivalent behavior. | ||
| citext | Provides a case-insensitive character string type citext. | ||
| cube | Implements a data type cube for representing multidimensional cubes. | ||
| dblink | Provides functions to connect to PostgreSQL databases from within a database session | ||
| dict_int | An add-on dictionary template for full-text search that controls the indexing of integers. | ||
| dict_xsyn | Text search dictionary template for extended synonym processing | ||
| earthdistance | Provides two approaches to calculating great circle distances on the surface of the Earth. | ||
| fuzzystrmatch | Provides several functions to determine similarities and distance between strings. | ||
| google_columnar_engine | Provides the columnar engine feature of AlloyDB, which handles HTAP (hybrid transactional analytical processing) and OLAP (online analytical processing) workloads very efficiently. | ||
| google_db_advisor | Provides the index advisor feature of AlloyDB, which recommends indexes to speed up query processing. | ||
| google_ml_integration | Provides functions you use to access Vertex AI endpoints to get predictions in SQL. | ||
| postgresql-hll | Provides a HyperLogLog (hll) data structure that estimates the cardinality of a set. | ||
| hstore | Implements the hstore data type for storing sets of key/value pairs within a single PostgreSQL value. | ||
| hypopg | Provides support for hypothetical indexes. | ||
| insert_username | Provides functions for storing the current user's name into a text field. You can use this function to track which user last modified a row in a database table. | ||
| intagg | Provides an integer aggregator and an enumerator. | ||
| intarray | Provides a set of functions and operators for manipulating null-free arrays of integers and performing indexed searches on them. | ||
| ip4r | Provides data types for IPv4/v6 addresses, and address ranges, plus index support. | ||
| isn | Provides data types for some international product numbering standards. | ||
| lo | Support for managing Large Objects (also called LOs or BLOBs). | ||
| ltree | Implements a data type ltree for representing labels of data stored in a hierarchical tree-like structure. | ||
| moddatetime | Provides functions for storing the current time into a timestamp field. You can use this to track the last time that a row in a database table is modified. |
||
| orafce | Provides functions and operators that emulate a subset of functions and packages from an Oracle database. Use these functions to port Oracle applications to PostgreSQL. | ||
| pageinspect | Inspects the contents of database pages at a low level. | ||
| pg_bigm | Enables full-text search, and allows a two-gram (bigram) index for faster full-text search. | ||
| pg_buffercache | Provides a means for examining what's happening in the shared buffer cache in real time. | ||
| pg_cron | Provides a cron-based job scheduler. This extension enables cron syntax to schedule PostgreSQL commands directly from the database. | ||
| pg_freespacemap | Examines the free space map (FSM). | ||
| pg_hint_plan | Lets you to improve PostgreSQL execution plans using hints, which are descriptions in SQL comments. | ||
| pg_partman | Lets you to create and manage time-based and serial-based table partition sets. | ||
| pg_prewarm | Provides a convenient way to load relation data into either the operating system buffer cache or the PostgreSQL buffer cache. | ||
| pg_proctab | Lets you to use pg_top, and generate reports from the operating system process table. | ||
| pg_repack | Lets you remove bloat from tables and indexes. Optionally, lets you perform an online CLUSTER (order tables by cluster index). | ||
| pg_similarity | Provides support for similarity queries on PostgreSQL. | ||
| pg_squeeze | Removes unused space from a table and optionally uses an index to sort records or rows (tuples) of the table. | ||
| pg_stat_statements | Provides a means for tracking execution statistics of all SQL statements executed. | ||
| pg_trgm | Provides functions and operators for determining the similarity of alphanumeric text based on trigram matching, as well as index operator classes that support fast searching for similar strings. | ||
| pg_visibility | Provides a way to examine the visibility map (VM) and the page-level visibility information of a table. | ||
| pg_wait_sampling | Collects sampling statistics of wait events, providing wait event data for processes on servers. | ||
| pgaudit | Provides detailed session and object audit logging using the standard logging facility provided by PostgreSQL. | ||
| pgcrypto | Provides cryptographic functions for PostgreSQL. | ||
| pgfincore | A set of functions to manage pages in operating system disk cache memory from PostgreSQL. | ||
| pglogical | Provides logical replication for PostgreSQL. | ||
| pgrouting | Extends PostGIS, enabling geospatial processing through network routing and analysis. | ||
| pgrowlocks | Provides row locking information for the specified table. | ||
| pgstattuple | Provides various functions to obtain tuple-level statistics. | ||
| pgtap | Provides a unit testing framework for PostgreSQL, written in PL/pgSQL and PL/SQL. | ||
| pgtt | Adds support for global temporary tables to your databases. | ||
| plpgsql | A loadable procedural language for creating functions, procedures and triggers. You also can use this language for direct execution of code in DO blocks. | ||
| plproxy | Procedural language handler that allows remote procedure calls among PostgreSQL databases, with optional sharding. | ||
| plv8 | Provides a procedural language for enabling JavaScript. | ||
| postgis | PostGIS geometry and geography spatial types and functions | ||
| postgres_ann | PostgreSQL ANN Search | ||
| postgis_raster | PostGIS raster types and functions | ||
| postgis_sfcgal | PostGIS SFCGAL functions | ||
| postgis_tiger_geocoder | PostGIS tiger geocoder and reverse geocoder | ||
| postgis_topology | PostGIS topology spatial types and functions | ||
| postgres_fdw | Allows foreign data wrappers to be created within instances or across instances. | ||
| prefix | Provides prefix-matching, plus index support. | ||
| rdkit | Provides functions for comparing, manipulating, and identifying molecular structures. | ||
| refint | Includes functions to check foreign key restraints, the referencing table, and the referenced table. | ||
| sslinfo | Provides information about the SSL certificate that the current client provided when it connected to the instance. | ||
| tablefunc | Includes various functions that return tables (multiple rows). | ||
| tcn | Provides a trigger function that notifies listeners of changes to the content of database tables. | ||
| temporal_tables | Provides support for temporal tables. A temporal table records the period of time when a row is valid from a database perspective. | ||
| tsm_system_rows | Provides the table sampling method SYSTEM_ROWS, which can be used in the TABLESAMPLE clause of a SELECT command. |
||
| tsm_system_time | Provides the table sampling method SYSTEM_TIME, which can be used in the TABLESAMPLE clause of a SELECT command. |
||
| unaccent | A text search dictionary that removes accents (diacritic signs) from lexemes. | ||
| uuid-ossp | Provides functions to generate universally unique identifiers (UUIDs) using one of several standard algorithms. | ||
| pgvector | An open-source extension for storing and searching vector embeddings in PostgreSQL databases. |
Configure high availability
The purpose of a high availability configuration is to reduce downtime when a database cluster instance becomes unavailable. This might happen when an instance runs out of memory. With high availability, your data continues to be available to client applications.
Within a site, the configuration is made up of a primary instance and a standby replica. All writes made to the primary instance are replicated to the standby replica before a transaction is reported as committed. In the event of an instance failure, you can request that the standby replica become the new primary instance. Application traffic is then rerouted to the new primary instance. This process is called a failover.
You can manually trigger a failover at any time. The failover involves the following process, in order:
GDC takes the primary instance offline.
GDC turns the standby replica into the new active database cluster.
GDC deletes the previous active database cluster.
GDC creates a new standby replica.
For AlloyDB Omni and PostgreSQL database clusters, you can enable or disable same zone high availability. For information on enabling high availability when creating a database cluster, see Choose a database engine type and create a database cluster.
Update an existing cluster
You can update your high availability settings for an existing database cluster:
Console
In the navigation menu, select Database Service.
From the database cluster list, click the database cluster to update.
Select edit Edit in the High availability section.

Select Enable same zone standby to either toggle on or off the availability of a standby instance in the same zone as your primary database cluster.
Click Save.
Verify your database cluster reflects your high availability update by viewing its status in the High availability column of the database cluster list.
gdcloud
Update your database cluster's high availability configuration:
gdcloud database clusters update CLUSTER_NAME \
    --availability-type HA_TYPE
Replace the following:
CLUSTER_NAME: the name of the database cluster.HA_TYPE: the high availability level for the database cluster. You can setzonalorzonal_ha. Thezonalvalue is set by default.
Verify your database cluster reflects your high availability update:
gdcloud database clusters list
API
Update your database cluster's high availability configuration:
  kubectl patch dbcluster.DBENGINE_NAME.dbadmin.gdc.goog DBCLUSTER_NAME \
    -n USER_PROJECT \
    -p '{"spec": {"availability": {"enableHighAvailability": HA_ENABLED}}}' \
    --type=merge
Replace the following variables:
DBENGINE_NAME: the name of the database engine. This is one ofalloydbomni,postgresql, ororacle.DBCLUSTER_NAME: the name of the database cluster.USER_PROJECT: the name of the user project where the database cluster was created.HA_ENABLED: the high availability level for the database cluster. You can settrueorfalse. Thefalsevalue is set by default.
Verify your database cluster reflects your high availability update:
kubectl get dbcluster.DBENGINE_NAME.dbadmin.gdc.goog DBCLUSTER_NAME \
  -n USER_PROJECT \
  -o yaml
Trigger a failover
If you have configured high availability for your database cluster, you can trigger a failover. To trigger a failover, complete the following steps:
Console
In the navigation menu, select Database Service.
From the database cluster list, click the database cluster to trigger a failover for. Your database cluster must have high availability enabled to be eligible for a failover.
Click Failover.
Type the cluster's ID for the confirmation phrase and click Failover to trigger the failover process.
gdcloud
Trigger the failover for the database cluster:
gdcloud database clusters failover CLUSTER_NAMEReplace
CLUSTER_NAMEwith the name of the database cluster.
API
  apiVersion: fleet.dbadmin.gdc.goog/v1
  kind: Failover
  metadata:
    name: FAILOVER_NAME
  spec:
    dbclusterRef: DBCLUSTER_NAME
Replace the following variables:
DBCLUSTER_NAME, the name of the database cluster.FAILOVER_NAME, the unique name of the failover, for examplefailover-sample.
Build generative AI applications using AlloyDB AI
This section describes how to invoke predictions and query and index embeddings using the pgvector extension. These machine learning-powered AI functions are available through AlloyDB AI, which is a suite of AlloyDB for PostgreSQL features that let you apply the semantic and predictive power of machine learning (ML) models to your data.
Learn more about AlloyDB AI at https://cloud.google.com//alloydb/docs/ai.
Invoke predictions
To integrate Vertex AI with AlloyDB Omni and run predictions on Vertex AI stored models, follow these steps.
Before you begin
- Enable Vertex AI online predictions in GDC.
Create a Kubernetes secret based on the service account key downloaded in the preceding steps by running the following command. Ensure that you create the Kubernetes secret in the same namespace as your
DBClusterresource.kubectl create secret generic SECRET_NAME \ --from-file=PATH_TO_SERVICE_ACCOUNT_KEY/private-key.json \ -n NAMESPACEReplace the following:
SECRET_NAME: the name of the secret used when you create aDBClustermanifest to enable AlloyDB Omni to access Distributed Cloud AI features. For example,vertex-ai-key-alloydb.PATH_TO_SERVICE_ACCOUNT_KEY: the path to the location where you downloaded theprivate-key.jsonservice account key.NAMESPACE: the namespace of the database cluster.
Install the AlloyDB Omni operator using steps listed in Choose a database engine type and create a database cluster.
Create a database cluster with AlloyDB AI and set
vertexAIKeyRefto the Kubernetes secret created in the preceding steps in thegoogleMLExtensionfield in theDBClustermanifest.apiVersion: v1 kind: Secret metadata: name: db-pw-DBCLUSTER_NAME namespace: USER_PROJECT type: Opaque data: DBCLUSTER_NAME: "BASE64_PASSWORD" --- apiVersion: DBENGINE_NAME.dbadmin.gdc.goog/v1 kind: DBCluster metadata: name: DBCLUSTER_NAME namespace: USER_PROJECT spec: primarySpec: adminUser: passwordRef: name: db-pw-DBCLUSTER_NAME features: googleMLExtension: config: vertexAIKeyRef: SECRET_NAME version: "DB_VERSION" resources: memory: DB_MEMORY cpu: DB_CPU disks: - name: DataDisk size: DB_DATA_DISKReplace the following variables:
DBCLUSTER_NAME: the name of the database cluster.USER_PROJECT: the name of the user project where the database cluster will be created.BASE64_PASSWORD: the base64 encoding of the database's administrator password.DBENGINE_NAME: the name of the database engine. Set toalloydbomni.DB_VERSION: the version of the database engine.DB_MEMORY: the amount of memory allocated to the database cluster, for example5Gi.DB_CPU: the amount of CPUs allocated to the database cluster, for example2.DB_DATA_DISK: the amount of space allocated to the database cluster, for example10 Gi.
Apply the manifest.
kubectl apply -f DB_CLUSTER_YAMLReplace the following:
DB_CLUSTER_YAML: the name of this database cluster manifest file—for example,alloydb-omni-db-cluster.yaml.
Install the
google_ml_integrationextension.CREATE EXTENSION google_ml_integration CASCADE;
Invoke a prediction
Invoke an online prediction using a Vertex AI model endpoint by running
the following ml_predict_row() SQL function:
  SELECT ml_predict_row('PREDICTION_ENDPOINT/PROJECT_NAMESPACE/ORGANIZATION/ZONE/DNS/DNS_SUFFIX', '{ "instances": [ INSTANCES ], "parameters":
  PARAMETERS');
Replace the following:
PREDICTION_ENDPOINT: the Vertex AI endpoint qualified namePROJECT_NAMESPACE: the namespace in which the Vertex AI endpoint is deployedORGANIZATION: the name of the organization in which the Vertex AI endpoint is deployedZONE: the zone in which your Vertex AI endpoint is deployedDNS: the DNS for your organizationDNS_SUFFIX: the suffix of the DNS objectINSTANCES: the inputs to the prediction call, in JSON formatPARAMETERS: the parameters to the prediction call, in JSON format
Query and index embeddings using pgvector
The pgvector PostgreSQL extension lets you use vector-specific operators and
functions when you store, index, and query text embeddings in your database.
AlloyDB provides optimizations for working with pgvector,
which let you create indexes that can speed up certain queries that
involve embeddings.
Learn more about using AlloyDB as an LLM, and generating and storing vector embeddings based on an LLM at https://cloud.google.com/alloydb/docs/ai/work-with-embeddings#index.
Create indexes and query vectors using ScaNN
This section shows you how to use stored embeddings to generate indexes and query
embeddings. You can create ScaNN indexes with AlloyDB.
Before you begin
Before you can start creating indexes, you must complete the following prerequisites.
Embedding vectors are added to a table in your AlloyDB database.
The
vectorextension version0.5.0or later that is based onpgvector, extended by Google for AlloyDB is installed.CREATE EXTENSION IF NOT EXISTS vector;To generate
ScaNNindexes, install thepostgres_annextension in addition to thevectorextension.CREATE EXTENSION IF NOT EXISTS postgres_ann;
Create a ScaNN index
You can create a ScaNN index for tables in your database.
AlloyDB postgres_ann, a
PostgreSQL extension developed by Google that implements a highly
efficient nearest-neighbor index powered by the ScaNN
algorithm.
The ScaNN index is a tree-based quantization index for approximate
nearest neighbor search. It provides a low index building time and small
memory footprint. In addition, it provides fast QPS based on the workload.
Two-level tree ScaNN index
To apply a two-level tree index using the ScaNN algorithm to a column containing stored vector embeddings, run the following DDL query:
CREATE INDEX INDEX_NAME ON TABLE
  USING scann (EMBEDDING_COLUMN DISTANCE_FUNCTION)
  WITH (num_leaves=NUM_LEAVES_VALUE);
Replace the following:
INDEX_NAME: the name of the index you want to create—for example,my-scann-index. The index names are shared across your database. Ensure that each index name is unique to each table in your database.TABLE: the table to add the index to.EMBEDDING_COLUMN: a column that storesvectordata.DISTANCE_FUNCTION: the distance function to use with this index. Choose one of the following:L2 distance:
l2Dot product:
dot_productCosine distance:
cosine
NUM_LEAVES_VALUE: the number of partitions to apply to this index. Set to any value between 1 to 1048576.
Three-level tree ScaNN index
To create a three-level tree index using the ScaNN algorithm to a column containing stored vector embeddings, run the following DDL query:
CREATE INDEX INDEX_NAME ON TABLE
  USING scann (EMBEDDING_COLUMN DISTANCE_FUNCTION)
  WITH (num_leaves=NUM_LEAVES_VALUE, max_num_levels = MAX_NUM_LEVELS);
Replace the following:
MAX_NUM_LEVELS: the maximum number of levels of the K-means clustering tree. Set to1(default) for two-level tree-based quantization and to2for three-level tree-based quantization.
After you create the index, you can run nearest-neighbor search queries that make use of the index by following the instructions in Make a nearest-neighbor query with given text.
The index parameters must be set to strike a right balance between QPS and recall.
To create this index on an embedding column that uses the real[] data type
instead of vector, cast the column into the vector data type:
CREATE INDEX INDEX_NAME ON TABLE
  USING scann (CAST(EMBEDDING_COLUMN AS vector(DIMENSIONS)) DISTANCE_FUNCTION)
  WITH (num_leaves=NUM_LEAVES_VALUE, max_num_levels = MAX_NUM_LEVELS);
Replace DIMENSIONS with the dimensional width of the
embedding column.
To view the indexing progress, use the pg_stat_progress_create_index view:
SELECT * FROM pg_stat_progress_create_index;
The phase column shows the current state of your index creation, and the
building index: tree training phase disappears after the index is created.
Run a query
After you have stored and indexed embeddings in your database, you can start
querying using the pgvector query
functionality. You cannot run
bulk search queries using the postgres_ann extension.
To find the nearest semantic neighbors for an embedding vector, you can run the following example query, where you set the same distance function that you used during the index creation.
  SELECT * FROM TABLE
    ORDER BY EMBEDDING_COLUMN DISTANCE_FUNCTION_QUERY ['EMBEDDING']
    LIMIT ROW_COUNT
Replace the following:
TABLE: the table containing the embedding to compare the text to.INDEX_NAME: the name of the index you want to use—for example,my-scann-index.EMBEDDING_COLUMN: the column containing the stored embeddings.DISTANCE_FUNCTION_QUERY: the distance function to use with this query. Choose one of the following based on the distance function used while creating the index:L2 distance:
<->Inner product:
<#>Cosine distance:
<=>
EMBEDDING: the embedding vector you want to find the nearest stored semantic neighbors of.ROW_COUNT: the number of rows to return.Specify
1if you want only the single best match.
You can use also use the embedding()function to translate the
text into a vector. You apply the vector to one of the
pgvector nearest-neighbor operator, <-> for L2 distance, to find the database rows with the
most semantically similar embeddings. Note that you must first register the text embedding Gecko model to use this function.
Because embedding() returns a real array, you must explicitly cast the
embedding() call to vector in order to use these values with pgvector
operators.
  CREATE EXTENSION google_ml_integration;
  CREATE EXTENSION IF NOT EXISTS vector;

  SELECT * FROM TABLE
    ORDER BY EMBEDDING_COLUMN::vector
    <-> embedding('MODEL_IDVERSION_TAG', 'TEXT')
    LIMIT ROW_COUNT
Replace the following:
MODEL_ID: the ID of the model to query.If you are using the Vertex AI Model Garden, then specify
textembedding-gecko@003as the model ID. These are the cloud-based models that Distributed Cloud can use for text embeddings.Optional:
VERSION_TAG: the version tag of the model to query. Prepend the tag with@.If you are using one of the
textembedding-geckoEnglish models with Vertex AI, then specify one of the version tags—for example,textembedding-gecko@003.Google strongly recommends that you always specify the version tag. If you don't specify the version tag, then AlloyDB always uses the latest model version, which might lead to unexpected results.
TEXT: the text to translate into a vector embedding.
Vector index metrics
This section lists the metrics related to the vector indexes that you generate in AlloyDB. You can view these metrics using the pg_stat_ann_indexes view that is available when you install the postgres_ann extension.
Usability metrics
The usability metrics include metrics that help you understand the state of index utilization with metrics such as, index configuration and number of index scans.
| Metric name | Data type | Description |
|---|---|---|
relid |
OID |
Unique identifier of the table that contains the vector index. |
indexrelid |
OID |
Unique identifier of the vector index. |
schemaname |
NAME |
Name of the schema to which index belongs. |
relname |
NAME |
Name of the table that contains the index. |
indexrelname |
NAME |
Name of the index. |
indextype |
NAME |
Type of the index. This value is always set to postgres_ann. |
indexconfig |
TEXT[] |
Configuration, such as leaves count and quantizer, defined for the index when it was created. |
indexsize |
TEXT |
Size of the index. |
indexscan |
BIGINT |
Number of index scans initiated on the index. |
Tuning metrics
Tuning metrics provide insights into your current index optimization, allowing you to apply recommendations for faster query performance.
| Metric name | Data type | Description |
|---|---|---|
insertcount |
BIGINT |
Number of insert operations on the index. This metric also includes any number of rows that existed before the index was created. |
updatecount |
BIGINT |
Number of update operations on the index. This metric doesn't take into account any HOT updates. |
deletecount |
BIGINT |
Number of delete operations on the index. |
distribution |
JSONB |
Vector distributions across all partitions for the index. The following fields show the distribution:
Note: Due to the inherent characteristics of the K-means clustering algorithm, there will always be some degree of variance in the distribution of vectors across partitions, even when the index is initially created. |
Tuning recommendation based on the metrics
- Mutation
- The
insertcount,updatecount, anddeletecountmetrics together show the changes or mutations in the vector for the index. - The index is created with a specific number of vectors and partitions. When operations such as insert, update, or delete are performed on the vector index, it only affects the initial set of partitions where the vectors reside. Consequently, the number of vectors in each partition fluctuates over time, potentially impacting recall, QPS, or both.
- If you encounter slowness or accuracy issues such as low QPS or poor recall, in your ANN search queries over time, then consider reviewing these metrics. A high number of mutations relative to the total number of vectors could indicate the need for reindexing.
- Distribution
- The
distributionmetric shows the vector distributions across all partitions. - When you create an index, it is created with a specific number of vectors and fixed partitions. The partitioning process and subsequent distribution occurs based on this consideration. If additional vectors are added, they are partitioned among the existing partitions, resulting in a different distribution compared to the distribution when the index was created. Since the final distribution does not consider all vectors simultaneously, the recall, QPS, or both might be affected.
- If you observe a gradual decline in the performance of your ANN search queries, such as slower response times or reduced accuracy in the results (measured by QPS or recall), then consider checking this metric and reindexing.
Call models using model endpoints in AlloyDB
Overview
The Model endpoint management preview lets you register a model endpoint, manage model endpoint metadata in your
database cluster, and then interact with the models using SQL queries. It provides the google_ml_integration extension that
includes functions to add and register the model endpoint metadata related to the models, and then use the
models to generate vector embeddings or invoke predictions.
Some of the example model types that you can register using model endpoint management are as follows:
- Vertex AI text embedding models
- Embedding models provided by third-party providers.
- Custom-hosted text embedding models
- Generic models with a JSON-based API—for example,
gemini-promodel from the Vertex AI Model Garden
How it works
You can use model endpoint management to register a model endpoint that complies to the following:
- Model input and output supports JSON format.
- Model can be called using the REST protocol.
When you register a model endpoint with the model endpoint management, it registers each endpoint with a unique model ID that you provided as a reference to the model. You can use this model ID to query models:
Generate embeddings to translate text prompts to numerical vectors. You can store generated embeddings as vector data when the
pgvectorextension is enabled in the database.Invoke predictions to call a model using SQL within a transaction.
Your applications can access the model endpoint management using the google_ml_integration
extension. This extension provides the following functions:
- The
google_ml.create_model()SQL function, which is used to register the model endpoint that is used in the prediction or embedding function. - The
google_ml.create_sm_secret()SQL function, which uses secrets in the Google Cloud Secret Manager, where the API keys are stored. - The
google_ml.embedding()SQL function, which is a prediction function that generates text embeddings. - The
google_ml.predict_row()SQL function that generates predictions when you call generic models that support JSON input and output format. - Other helper functions that handle generating custom URL, generating HTTP headers, or passing transform functions for your generic models.
- Functions to manage the registered model endpoints and secrets.
Key concepts
Before you start using the model endpoint management, understand the concepts required to connect to and use the models.
Model provider
Model provider indicates the supported model hosting providers. The following table shows the model provider value you must set based on the model provider you use:
| Model provider | Set in function as… |
|---|---|
| Vertex AI | google |
| Other models | custom |
The default model provider is custom.
Based on the provider type, the supported authentication method differs. The Vertex AI models use the Distributed Cloud service account to authenticate, while other providers can use the Secret Manager to authenticate.
Model type
Model type indicates the type of the AI model. The extension supports text embedding as
well as any generic model type. The supported model type you can set when
registering a model endpoint are text-embedding and generic. Setting model type is
optional when registering generic model endpoints as generic is the default model type.
- Text embedding models with built-in support
- The
model endpoint management provides built-in support for all versions of the
textembedding-geckomodel by Vertex AI. To register these model endpoints, use thegoogle_ml.create_model()function. Distributed Cloud automatically sets up default transform functions for these models. - The model type for these models is
text-embedding. - Other text embedding models
- For other text embedding models, you need to create transform functions to handle the input and output formats that the model supports. Optionally, you can use the HTTP header generation function that generates custom headers required by your model.
- The model type for these models is
text-embedding. - Generic models
- The model endpoint management also supports
registering of all other model types apart from text embedding models. To
invoke predictions for generic models, use the
google_ml.predict_row()function. You can set model endpoint metadata, such as a request endpoint and HTTP headers that are specific to your model. - You cannot pass transform functions when you are registering a generic model endpoint. Ensure that when you invoke predictions the input to the function is in the JSON format, and that you parse the JSON output to derive the final output.
- The model type for these models is
generic.
Authentication
Auth types indicate the authentication type that you can use to connect to the
model endpoint management using the google_ml_integration extension. Setting
authentication is optional and is required only if you need to authenticate to access your model.
For Vertex AI models, the Distributed Cloud service account is used for authentication. For other models,
API key or bearer token that is stored as a secret in the
Secret Manager can be used with the google_ml.create_sm_secret() SQL
function.
The following table shows the auth types that you can set:
| Authentication method | Set in function as… | Model provider |
|---|---|---|
| Distributed Cloud service agent | alloydb_service_agent_iam |
Vertex AI provider |
| Secret Manager | secret_manager |
third-party providers |
Prediction functions
The google_ml_integration extension includes the following prediction functions:
google_ml.embedding()- Used to call a registered text embedding model endpoint to
generate embeddings. It includes built-in support for the
textembedding-geckomodel by Vertex AI. - For text embedding models without built-in support, the input and output parameters are unique to a model and need to be transformed for the function to call the model. Create a transform input function to transform input of the prediction function to the model specific input, and a transform output function to transform model specific output to the prediction function output.
google_ml.predict_row()- Used to call a registered generic model endpoint, as long as they support JSON-based API, to invoke predictions.
Transform functions
Transform functions modify the input to a format that the model understands, and
convert the model response to the format that the prediction function expects. The
transform functions are used when registering the text-embedding model endpoint without
built-in support. The signature of the transform functions depends on the
prediction function for the model type.
You cannot use transform functions when registering a generic model endpoint.
The following shows the signatures for the prediction function for text embedding models:
// define custom model specific input/output transform functions.
CREATE OR REPLACE FUNCTION input_transform_function(model_id VARCHAR(100), input_text TEXT) RETURNS JSON;

CREATE OR REPLACE FUNCTION output_transform_function(model_id VARCHAR(100), response_json JSON) RETURNS real[];
HTTP header generation function
The HTTP header generation function generates the output in JSON key value pairs that are used as HTTP headers. The signature of the prediction function defines the signatures of the header generation function.
The following example shows the signature for the google_ml.embedding() prediction function.
CREATE OR REPLACE FUNCTION generate_headers(model_id VARCHAR(100), input TEXT) RETURNS JSON;
For the google_ml.predict_row() prediction function, the signature is as follows:
CREATE OR REPLACE FUNCTION generate_headers(model_id VARCHAR(100), input JSON) RETURNS JSON;
Register a model
To invoke predictions or generate embeddings using a model, register the model endpoint with model endpoint management.
For more information about the google_ml.create_model() function, see Model endpoint management reference.
Before you register a model endpoint with model endpoint management, you must enable the google_ml_integration extension and set up authentication based on the model provider, if your model endpoint requires authentication.
Make sure that you access your database with the postgres default username.
Set up authentication
The following sections show how to set up authentication before adding a Vertex AI model endpoint or model endpoints by other providers.
Set up authentication for Vertex AI
To use the Google Vertex AI model endpoints, you must add Vertex AI permissions to the service account that you used while installing AlloyDB Omni.
Set up authentication for other model providers
For all models except Vertex AI models, you can store your API keys or bearer tokens in Secret Manager. This step is optional if your model endpoint doesn't handle authentication through Secret Manager—for example, if your model endpoint uses HTTP headers to pass authentication information or doesn't use authentication at all.
This section explains how to set up authentication if you are using Secret Manager.
To create and use an API key or a bearer token, complete the following steps:
Create the secret in Secret Manager.
The secret name and the secret path is used in the
google_ml.create_sm_secret()SQL function.Grant permissions to the Distributed Cloud cluster to access the secret.
  gcloud secrets add-iam-policy-binding 'SECRET_ID' \
      --member="serviceAccount:SERVICE_ACCOUNT_ID" \
      --role="roles/secretmanager.secretAccessor"
Replace the following:
SECRET_ID: the secret ID in Secret Manager.SERVICE_ACCOUNT_ID: the ID of the service account that you created in the previous step. Ensure that this is the same account you used during AlloyDB Omni installation. This includes the fullPROJECT_ID.iam.gserviceaccount.comsuffix. For example:my-service@my-project.iam.gserviceaccount.comYou can also grant this role to the service account at the project level.
Generate embeddings
This section describes a preview that lets you experiment with registering an AI model endpoint and invoking predictions with model endpoint management.
After the model endpoints are added and registered in the model endpoint management, you can reference them using the model ID to generate embeddings.
Before you begin
Make sure that you have registered your model endpoint with model endpoint management.
Generate embeddings
Use the google_ml.embedding() SQL function to call the registered model endpoint with
the text embedding model type to generate embeddings.
To call the model and generate embeddings, use the following SQL query:
SELECT
  google_ml.embedding(
    model_id => 'MODEL_ID',
    content => 'CONTENT');
Replace the following:
MODEL_ID: the model ID you defined when registering the model endpoint.CONTENT: the text to translate into a vector embedding.
Examples
Some examples for generating embeddings using registered model endpoint are listed in this section.
Text embedding models with in-built support
To generate embeddings for a registered textembedding-gecko@002 model endpoint, run the following statement:
    SELECT
      google_ml.embedding(
        model_id => 'textembedding-gecko@002',
        content => 'AlloyDB is a managed, cloud-hosted SQL database service');
Invoke predictions
This section describes a preview that lets you experiment with registering an AI model endpoint and invoking predictions with model endpoint management.
After the model endpoints are added and registered in the model endpoint management, you can reference them using the model ID to invoke predictions.
Before you begin
Make sure that you have registered your model endpoint with model endpoint management.
Invoke predictions for generic models
Use the google_ml.predict_row() SQL function to call a registered generic model endpoint to invoke
predictions. You can use google_ml.predict_row() function with any model type.
SELECT
  google_ml.predict_row(
    model_id => 'MODEL_ID',
    request_body => 'REQUEST_BODY');
Replace the following:
MODEL_ID: the model ID you defined when registering the model endpoint.REQUEST_BODY: the parameters to the prediction function, in JSON format.
Examples
Some examples for invoking predictions using registered model endpoints are listed in this section.
To generate predictions for a registered gemini-pro model endpoint, run the following statement:
    SELECT
        json_array_elements(
        google_ml.predict_row(
            model_id => 'gemini-pro',
            request_body => '{
        "contents": [
            {
                "role": "user",
                "parts": [
                    {
                        "text": "For TPCH database schema as mentioned here https://www.tpc.org/TPC_Documents_Current_Versions/pdf/TPC-H_v3.0.1.pdf , generate a SQL query to find all supplier names which are located in the India nation."
                    }
                ]
            }
        ]
        }'))-> 'candidates' -> 0 -> 'content' -> 'parts' -> 0 -> 'text';
Model endpoint management API reference
This section lists parameters for different functions provided by the
google_ml_integration extension to register and manage model endpoints, and secrets with
model endpoint management.
You must set the
google_ml_integration.enable_model_support database flag to on before you
can start using the extension.
Models
Use this reference to understand parameters for functions that let you manage model endpoints.
google_ml.create_model() function
The following shows how to call the google_ml.create_model() SQL function used
to register model endpoint metadata:
  CALL
    google_ml.create_model(
      model_id => 'MODEL_ID',
      model_request_url => 'REQUEST_URL',
      model_provider => 'PROVIDER_ID',
      model_type => 'MODEL_TYPE',
      model_qualified_name => 'MODEL_QUALIFIED_NAME',
      model_auth_type => 'AUTH_TYPE',
      model_auth_id => 'AUTH_ID',
      generate_headers_fn => 'GENERATE_HEADER_FUNCTION',
      model_in_transform_fn => 'INPUT_TRANSFORM_FUNCTION',
      model_out_transform_fn => 'OUTPUT_TRANSFORM_FUNCTION');
| Parameter | Required | Description |
|---|---|---|
MODEL_ID |
required for all model endpoints | A unique ID for the model endpoint that you define. |
REQUEST_URL |
optional for other text embedding model endpoints with built-in support | The model-specific endpoint when adding other text embedding and generic model endpoints. For AlloyDB for PostgreSQL, provide an https URL.The request URL that the function generates for built-in model endpoints refers to your cluster's project and region or location. If you want to refer to another project, then ensure that you specify the model_request_url explicitly.For custom hosted model endpoints, ensure that the model endpoint is accessible from the network where Distributed Cloud is located. |
PROVIDER_ID |
required for text embedding model endpoints with built-in support | The provider of the model endpoint. The default value is custom.Set to one of the following:
|
MODEL_TYPE |
optional for generic model endpoints | The model type. Set to one of the following:
|
MODEL_QUALIFIED_NAME |
required for text embedding models with built-in support; optional for other model endpoints | The fully qualified name for text embedding models with built-in support. |
AUTH_TYPE |
optional unless the model endpoint has specific authentication requirement | The authentication type used by the model endpoint. You can set it to either alloydb_service_agent_iam for Vertex AI models or secret_manager for other providers, if they use Secret Manager for authentication. You don't need to set this value if you are using authentication headers. |
AUTH_ID |
don't set for Vertex AI model endpoints; required for all other model endpoints that store secrets in Secret Manager | The secret ID that you set and is subsequently used when registering a model endpoint. |
GENERATE_HEADER_FUNCTION |
optional | The name of the function that generates custom headers. The signature of this function depends on the prediction function that you use. |
INPUT_TRANSFORM_FUNCTION |
optional for text embedding model endpoints with built-in support; don't set for generic model endpoints | The function to transform input of the corresponding prediction function to the model-specific input. |
OUTPUT_TRANSFORM_FUNCTION |
optional for text embedding model endpoints with built-in support; don't set for generic model endpoints | The function to transform model specific output to the prediction function output. |
google_ml.alter_model()
The following shows how to call the google_ml.alter_model() SQL function used
to update model endpoint metadata:
    CALL
    google_ml.alter_model(
      model_id => 'MODEL_ID',
      model_request_url => 'REQUEST_URL',
      model_provider => 'PROVIDER_ID',
      model_type => 'MODEL_TYPE',
      model_qualified_name => 'MODEL_QUALIFIED_NAME',
      model_auth_type => 'AUTH_TYPE',
      model_auth_id => 'AUTH_ID',
      generate_headers_fn => 'GENERATE_HEADER_FUNCTION',
      model_in_transform_fn => 'INPUT_TRANSFORM_FUNCTION',
      model_out_transform_fn => 'OUTPUT_TRANSFORM_FUNCTION');
For information about the values that you must set for each parameter, see Create a model.
google_ml.drop_model() function
The following shows how to call the google_ml.drop_model() SQL function used
to drop a model endpoint:
CALL google_ml.drop_model('MODEL_ID');
| Parameter | Description |
|---|---|
MODEL_ID |
A unique ID for the model endpoint that you defined. |
google_ml.list_model() function
The following shows how to call the google_ml.list_model() SQL function used
to list model endpoint information:
SELECT google_ml.list_model('MODEL_ID');
| Parameter | Description |
|---|---|
MODEL_ID |
A unique ID for the model endpoint that you defined. |
google_ml.model_info_view view
The following shows how to call the google_ml.model_info_view view that is
used to list model endpoint information for all model endpoints:
SELECT * FROM google_ml.model_info_view;
Secrets
Use this reference to understand parameters for functions that let you manage secrets.
google_ml.create_sm_secret() function
The following shows how to call the google_ml.create_sm_secret() SQL function
used to add the secret created in Secret Manager:
    CALL
    google_ml.create_sm_secret(
      secret_id => 'SECRET_ID',
      secret_path => 'projects/project-id/secrets/SECRET_MANAGER_SECRET_ID/versions/VERSION_NUMBER');
| Parameter | Description |
|---|---|
SECRET_ID |
The secret ID that you set and is subsequently used when registering a model endpoint. |
PROJECT_ID |
The ID of your Google Cloud project that contains the secret. This project can be different from the project that contains your AlloyDB for PostgreSQL cluster. For AlloyDB Omni, the ID of your Google Cloud project that contains the secret. |
SECRET_MANAGER_SECRET_ID |
The secret ID set in Secret Manager when you created the secret. |
VERSION_NUMBER |
The version number of the secret ID. |
google_ml.alter_sm_secret() function
The following shows how to call the google_ml.alter_sm_secret() SQL function
used to update secret information:
  CALL
    google_ml.alter_sm_secret(
      secret_id => 'SECRET_ID',
      secret_path => 'projects/project-id/secrets/SECRET_MANAGER_SECRET_ID/versions/VERSION_NUMBER');
For information about the values that you must set for each parameter, see Create a secret.
google_ml.drop_sm_secret() function
The following shows how to call the google_ml.drop_sm_secret() SQL function
used to drop a secret:
CALL google_ml.drop_sm_secret('SECRET_ID');
| Parameter | Description |
|---|---|
SECRET_ID |
The secret ID that you set and was subsequently used when registering a model endpoint. |
Prediction functions
Use this reference to understand parameters for functions that let you generate embeddings or invoke predictions.
google_ml.embedding() function
The following shows how to generate embeddings:
SELECT
  google_ml.embedding(
    model_id => 'MODEL_ID',
    contents => 'CONTENT');
| Parameter | Description |
|---|---|
MODEL_ID |
A unique ID for the model endpoint that you define. |
CONTENT |
The text to translate into a vector embedding. |
google_ml.predict_row() function
The following shows how to invoke predictions:
SELECT
  google_ml.predict_row(
    model_id => 'MODEL_ID',
    request_body => 'REQUEST_BODY');
| Parameter | Description |
|---|---|
MODEL_ID |
A unique ID for the model endpoint that you define. |
REQUEST_BODY |
The parameters to the prediction function, in JSON format. |
Transform functions
Use this reference to understand parameters for input and output transform functions.
Input transform function
The following shows the signature for the prediction function for text embedding model endpoints:
CREATE OR REPLACE FUNCTION INPUT_TRANSFORM_FUNCTION(model_id VARCHAR(100), input_text TEXT) RETURNS JSON;
| Parameter | Description |
|---|---|
INPUT_TRANSFORM_FUNCTION |
The function to transform input of the corresponding prediction function to the model endpoint-specific input. |
Output transform function
The following shows the signature for the prediction function for text embedding model endpoints:
CREATE OR REPLACE FUNCTION OUTPUT_TRANSFORM_FUNCTION(model_id VARCHAR(100), response_json JSON) RETURNS real[];
| Parameter | Description |
|---|---|
OUTPUT_TRANSFORM_FUNCTION |
The function to transform model endpoint-specific output to the prediction function output. |
Transform functions example
To better understand how to create transform functions for your model endpoint, consider a custom-hosted text embedding model endpoint that requires JSON input and output.
The following example cURL request creates embeddings based on the prompt and the model endpoint:
  curl -m 100 -X POST https://cymbal.com/models/text/embeddings/v1 \
    -H "Content-Type: application/json"
    -d '{"prompt": ["AlloyDB Embeddings"]}'
The following example response is returned:
[[ 0.3522231  -0.35932037  0.10156056  0.17734447 -0.11606089 -0.17266059
   0.02509351  0.20305622 -0.09787305 -0.12154685 -0.17313677 -0.08075467
   0.06821183 -0.06896557  0.1171584  -0.00931572  0.11875633 -0.00077482
   0.25604948  0.0519384   0.2034983  -0.09952664  0.10347155 -0.11935943
  -0.17872004 -0.08706985 -0.07056875 -0.05929353  0.4177883  -0.14381726
   0.07934926  0.31368294  0.12543282  0.10758053 -0.30210832 -0.02951015
   0.3908268  -0.03091059  0.05302926 -0.00114946 -0.16233777  0.1117468
  -0.1315904   0.13947351 -0.29569918 -0.12330773 -0.04354299 -0.18068913
   0.14445548  0.19481727]]
Based on this input and response, we can infer the following:
The model expects JSON input through the
promptfield. This field accepts an array of inputs. As thegoogle_ml.embedding()function is a row level function, it expects one text input at a time. Thus,you need to create an input transform function that builds an array with single element.The response from the model is an array of embeddings, one for each prompt input to the model. As the
google_ml.embedding()function is a row level function, it returns single input at a time. Thus, you need to create an output transform function that can be used to extract the embedding from the array.
The following example shows the input and output transform functions that is used for this model endpoint when it is registered with model endpoint management:
input transform function
CREATE OR REPLACE FUNCTION cymbal_text_input_transform(model_id VARCHAR(100), input_text TEXT)
RETURNS JSON
LANGUAGE plpgsql
AS $$
DECLARE
  transformed_input JSON;
  model_qualified_name TEXT;
BEGIN
  SELECT json_build_object('prompt', json_build_array(input_text))::JSON INTO transformed_input;
  RETURN transformed_input;
END;
$$;
output transform function
CREATE OR REPLACE FUNCTION cymbal_text_output_transform(model_id VARCHAR(100), response_json JSON)
RETURNS REAL[]
LANGUAGE plpgsql
AS $$
DECLARE
  transformed_output REAL[];
BEGIN
SELECT ARRAY(SELECT json_array_elements_text(response_json->0)) INTO transformed_output;
RETURN transformed_output;
END;
$$;
HTTP header generation function
The following shows signature for the header generation function that can be
used with the google_ml.embedding() prediction function when registering other
text embedding model endpoints.
CREATE OR REPLACE FUNCTION GENERATE_HEADERS(model_id VARCHAR(100), input_text TEXT) RETURNS JSON;
For the google_ml.predict_row() prediction function, the signature is as
follows:
CREATE OR REPLACE FUNCTION GENERATE_HEADERS(model_id TEXT, input JSON) RETURNS JSON;
| Parameter | Description |
|---|---|
GENERATE_HEADERS |
The function to generate custom headers. You can also pass the authorization header generated by the header generation function while registering the model endpoint. |
Header generation function example
To better understand how to create a function that generates output in JSON key value pairs that are used as HTTP headers, consider a custom-hosted text embedding model endpoint.
The following example cURL request passes the version HTTP header which is
used by the model endpoint:
  curl -m 100 -X POST https://cymbal.com/models/text/embeddings/v1 \
      -H "Content-Type: application/json" \
      -H "version: 2024-01-01" \
      -d '{"prompt": ["AlloyDB Embeddings"]}'
The model expects text input through the version field and returns the version
value in JSON format. The following example shows the header generation function
that is used for this text embedding model endpoint when it is registered with model
endpoint management:
CREATE OR REPLACE FUNCTION header_gen_fn(model_id VARCHAR(100), input_text TEXT)
RETURNS JSON
LANGUAGE plpgsql
AS $$
BEGIN
  RETURN json_build_object('version', '2024-01-01')::JSON;
END;
$$;
Header generation function using API Key
The following examples show how to set up authentication using the API key.
embedding model
CREATE OR REPLACE FUNCTION header_gen_func(
  model_id VARCHAR(100),
  input_text TEXT
)
RETURNS JSON
LANGUAGE plpgsql
AS $$
#variable_conflict use_variable
BEGIN
  RETURN json_build_object('Authorization', 'API_KEY')::JSON;
END;
$$;
Replace the API_KEY with the API key of the model provider.
generic model
CREATE OR REPLACE FUNCTION header_gen_func(
  model_id VARCHAR(100),
  response_json JSON
)
RETURNS JSON
LANGUAGE plpgsql
AS $$
#variable_conflict use_variable
DECLARE
transformed_output REAL[];
BEGIN
  -- code to add Auth token to API request
RETURN json_build_object('x-api-key', 'API_KEY', 'model-version', '2023-06-01')::JSON;
END;
$$;
Replace the API_KEY with the API key of the model provider.
Request URL generation
Use the request URL generation function to infer the request URLs for the model endpoints with built-in support. The following shows the signature for this function:
CREATE OR REPLACE FUNCTION GENERATE_REQUEST_URL(provider google_ml.model_provider, model_type google_ml.MODEL_TYPE, model_qualified_name VARCHAR(100), model_region VARCHAR(100) DEFAULT NULL)
| Parameter | Description |
|---|---|
GENERATE_REQUEST_URL |
The function to generate request URL generated by the extension for model endpoints with built-in support. |
Supported models
You can use model endpoint management to register any text embedding or generic model endpoint. Model endpoint management also includes pre-registered Vertex AI models and models with built-in support.
Pre-registered Vertex AI models
| Model type | Model ID | Extension version |
|---|---|---|
generic |
|
version 1.4.2 and later |
text_embedding |
|
version 1.3 and later |
Models with built-in support
Vertex AI
| Qualified model name | Model type |
|---|---|
text-embedding-gecko@001 |
text-embedding |
text-embedding-gecko@003 |
text-embedding |
text-embedding-004 |
text-embedding |
text-embedding-preview-0815 |
text-embedding |
text-multilingual-embedding-002 |
text-embedding |
Delete database clusters
You can delete database clusters with the GDC console or the Distributed Cloud CLI.
Console
- From the main menu of the GDC console, choose Database Service.
- Select the database cluster to delete.
- Click DELETE.
- Optional: If backup was previously enabled, select Delete all backups. This results in a permanent deletion. Otherwise, backups will be automatically deleted once the project's retention period expires.
- Confirm deletion by typing the cluster's ID.
- Click DELETE to finish.
gdcloud CLI
Use the following command to delete a database cluster:
gdcloud database clusters delete CLUSTER_NAME
Replace the following:
- CLUSTER_NAME with the name of the database cluster to delete.
API
kubectl patch dbcluster.DBENGINE_NAME.dbadmin.gdc.goog DBCLUSTER_NAME -p '{"spec":{"isDeleted": true}}' --type=merge -n USER_PROJECT
kubectl delete dbcluster.DBENGINE_NAME.dbadmin.gdc.goog DBCLUSTER_NAME -n USER_PROJECT # for database clusters with backup enabled, this will permanently delete the database.
Replace the following variables:
DBENGINE_NAME, the name of the database engine. This is one ofalloydbomni,postgresql, ororacle.USER_PROJECT, the name of the user project where the database cluster was created.DBCLUSTER_NAME, the name of the database cluster.
For database clusters without backup, only the first step is needed. For databases with backup, running the first command only will delete the database while keeping its backups (and therefore the database cluster is still recoverable). These backups will be deleted after their retention time if no action is taken. The second command can be used to immediately delete the database cluster and all of its backups.
Connect to a database cluster
By default, a database cluster only allows connection from within the user cluster and the same project.
To enable connections to all database clusters in your project from another project, see Enable cross-project connections.
To enable connections to a database cluster from IP addresses outside your GDC organization, see Enable external connections.
Sign in to the GDC console with an account bound to the
project-db-admin role to find the following information for connecting to your
database cluster. This information is in the Connectivity section of the
Database Service page.
These steps include an example for connecting to the database using psql. The
exact steps will vary depending on the client software you choose.
Console
Navigate to the Connectivity section of the Database Service page for the database cluster. This page includes:
- The password of the administrator account (the username is
dbsadmin) - Hostname and port number of the database cluster's primary endpoint
- If the database cluster allows external connection from outside of the organization.
- A
psqlcommand for connecting to the cluster (for PostgreSQL and AlloyDB Omni database clusters) - A string for connecting to the cluster with Java Database Connectivity (JDBC) (for Oracle database clusters)
- A link to download the certificate authority (CA) certificate of the database cluster
- The password of the administrator account (the username is
Download the CA certificate from the GDC console in the Connectivity section of the Database Service page for your database cluster.
Configure your client to use the CA certificate to verify the database. For
psqlclients, set thePGSSLROOTCERTenv variable to the path of the certificate file and thePGSSLMODEenv variable to your preference:export PGSSLROOTCERT=path/to/accounts_cert.pem export PGSSLMODE="verify-full"Connect to the database from your client software. If you're using
psql, run the following command:PGPASSWORD=DB_PASSWORD psql -h DB_HOSTNAME -p PORT -U USERNAME -d postgres
Replace the following variables:
path/to/: the path to theaccounts_cert.pemcertificate.DB_PASSWORD: the password from the console.DB_HOSTNAME: the database hostname from the console.DB_PORT: the database port number from the console.DB_USERNAME: the database username from the console.
API
Retrieve the database endpoint from the database cluster status:
kubectl get dbcluster.DBENGINE_NAME.dbadmin.gdc.goog DBCLUSTER_NAME -n USER_PROJECT -o=jsonpath='{.status.primary.url}'Download the CA certificate from the Kubernetes secret:
kubectl get secret dbs-certificates -n USER_PROJECT -o json | jq -r '.data."dbs-DBENGINE_SHORT_NAME-cert-DBCLUSTER_NAME"' | base64 -d > path/to/ca.crtConfigure your client to use the CA certificate to verify the database. For
psqlclients, you can set thePGSSLROOTCERTenv variable to the path of the certificate file and thePGSSLMODEenv variable to your preference:export PGSSLROOTCERT=path/to/accounts_cert.pem export PGSSLMODE="verify-full"Connect to the database from your client software. If you're using
psql, run the following command:PGPASSWORD=DB_PASSWORD psql -h DB_HOSTNAME -p DB_PORT -U DB_USERNAME -d postgres
Replace the following variables:
DBENGINE_NAME: the name of the database engine. This is one ofalloydbomni,postgresql, ororacle.USER_PROJECT: the name of the user project where the database cluster was created.DBENGINE_SHORT_NAME: the abbreviated name of the database engine. This is one ofal(AlloyDB Omni),pg(PostgreSQL), orora(Oracle).DBCLUSTER_NAME: the name of the database cluster.path/to/: the path to the database CA certificate.DB_PASSWORD: database password for administrator user.DB_HOSTNAME: the hostname from the database cluster status.DB_PORT: the database port number from the database cluster status.DB_USERNAME: with the database username (default isdbsadmin).
Create a user
To create a user, connect to the database cluster and complete the following steps:
- At the
psqlprompt, create the user:CREATE USER USER_NAME WITH PASSWORD PASSWORD ATTRIBUTE1 ATTRIBUTE2...;
Enter the password when prompted.
For more information about role attributes, see the PostgreSQL documentation.
- You can confirm the user creation by displaying the user table:
SELECT * FROM pg_roles;
Clone a database cluster
You can clone a database cluster to create a new database cluster that contains the same data as the original cluster. Cloning is a good way to make database clusters for testing purposes.
You can specify any point in time to base the clone on. You aren't limited to cloning the present state of a database cluster. The database service clones a new database cluster at the exact point in time you specify.
You can clone a database cluster with the GDC console or with the gdcloud CLI tool:
Console
- From the main menu of the GDC console, choose Database Service.
- Select the database cluster to clone.
- Click add_box CLONE.
- In the Create a clone dialog, specify the point in time to clone from and specify an ID for the new database cluster.
- Click CLONE. This takes you to the Database cluster overview page for the new cluster where you can monitor its status.
gdcloud CLI
Use the following command to clone a database cluster:
gdcloud database clusters clone SOURCE \
   DESTINATION --point-in-time POINT_IN_TIME
Replace the following:
- SOURCE with the name of the database cluster to create a clone from.
- DESTINATION with the name of the new database cluster to create.
- POINT_IN_TIME with the timestamp of the point in time to use as
the basis of the clone. Use the
RFC 3339 timestamp
format (
yyyy-MM-dd'T'HH:mm:ss'Z').
API
To clone a database cluster, create a Restore resource:
apiVersion: DBENGINE_NAME.dbadmin.gdc.goog/v1
kind: Restore
metadata:
  name: NEW_DBCLUSTER_NAME_restore
spec:
  sourceDBCluster: DBCLUSTER_NAME
  pointInTime: POINT_IN_TIME
  clonedDBClusterConfig:
    dbclusterName: NEW_DBCLUSTER_NAME
Replace the following:
DBENGINE_NAME: the name of the database cluster to clone from.NEW_DBCLUSTER_NAME: the name of the new database cluster to create.POINT_IN_TIME: the timestamp of the point in time to use as the basis of the clone. Use the RFC 3339 timestamp format (yyyy-MM-dd'T'HH:mm:ss'Z').
Plan maintenance windows
GDC offers you the ability to configure maintenance windows to schedule times for automatic updates. Maintenance windows are designed to target times where a brief downtime causes the lowest impact to your database clusters. You can schedule maintenance windows based on day of the week and hour, and length in which the maintenance window is open. For example, you could set a maintenance window to start at 3:00 AM on Tuesdays that spans eight hours.
You can also plan maintenance exclusions, which prevents disruptions to your workloads during date ranges where, due to unique circumstances, you don't want to allow the set maintenance window.
Create a maintenance window
To create a maintenance window for your database cluster, complete the following steps:
Console
From the navigation menu of the GDC console, choose Database Service.
Select the database cluster that you want to plan maintenance settings for.
In the Maintenance section, click edit Edit.
Select the Start time and Length for the maintenance window. Also select the days of the week to apply the maintenance window for.
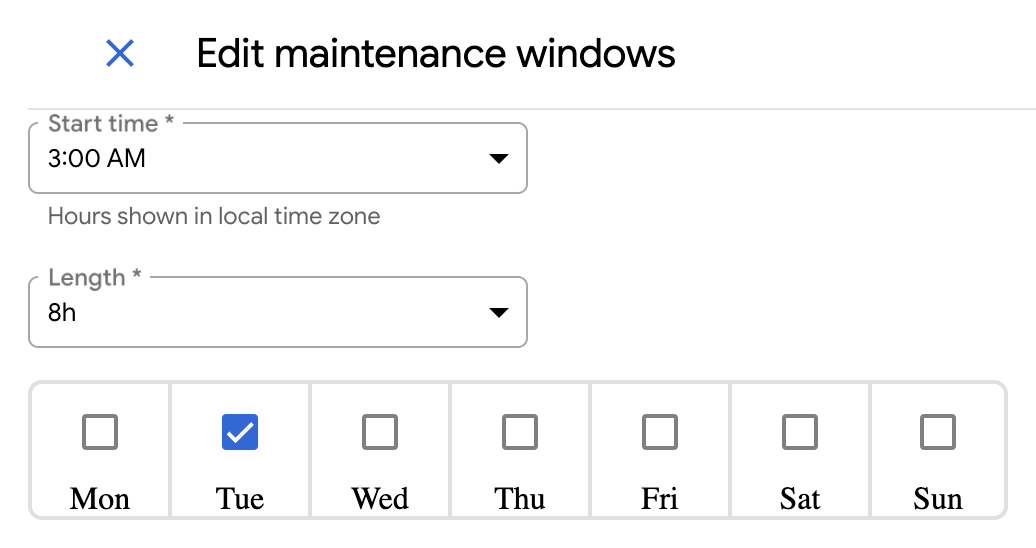
To apply a maintenance exclusion, click Add Maintenance Exclusion.
Give the exclusion a name and define the time window to exclude for your maintenance window.
Click Save.
gdcloud
To create a maintenance window for your database cluster, run:
gdcloud maintenance policies create POLICY_NAME \
    --project PROJECT_ID \
    --weekly-cycle-days DAYS_OF_WEEK \
    --weekly-cycle-start-time START_TIME \
    --weekly-cycle-duration DURATION
Replace the following:
POLICY_NAME: The name of the maintenance policy.PROJECT_ID: The ID of the project in which to create the maintenance policy.DAYS_OF_WEEK: Comma-separated list of days of the week when maintenance can begin. Accepted values are RFC-822 formatted days of the week, such asMon.START_TIME: The time of the day, in UTC timezone, when maintenance can begin. The value must follow thehh:mmformat, such as20:36.DURATION: The maximum duration that the maintenance can last for, such as2h3m.
To apply a maintenance exclusion to your maintenance window, run:
gdcloud maintenance policies update POLICY_NAME \
    --project PROJECT_ID \
    --add-exclusion-name EXCLUSION_NAME \
    --add-exclusion-start START_TIME \
    --add-exclusion-end END_TIME
Replace the following:
POLICY_NAME: The name of the maintenance policy.PROJECT_ID: The ID of the project in which to create the maintenance policy.EXCLUSION_NAME: The name of the new maintenance exclusion to add.START_TIME: The start date and time for the new maintenance exclusion. Accepted values must follow the RFC-3339 formatted timestamp, such as2006-01-02T15:04:05Z.END_TIME: The end date and time for the new maintenance exclusion. Accepted values must follow the RFC-3339 formatted timestamp, such as2006-01-02T15:04:05Z.
Verify the maintenance policy exists and reflects your intended configuration:
gdcloud maintenance policies list --project PROJECT_IDTo attach the maintenance policy to your database cluster, run:
gdcloud maintenance policy-bindings create POLICY_BINDING_NAME \
    --project PROJECT_ID \
    --policy-name POLICY_NAME \
    --resource-name RESOURCE_NAME
Replace the following:
POLICY_BINDING_NAME: The name of the policy binding resource.PROJECT_ID: The ID of the project in which to create the maintenance policy.POLICY_NAME: The name of the maintenance policy created in the previous step.RESOURCE_NAME: The resource name to bind to. For example, for a database cluster namemy-cluster, the resource name for each of the available database engines would be the following:- AlloyDB Omni:
DBCluster.alloydbomni.dbadmin.gdc.goog/my-cluster - Oracle:
DBCluster.oracle.dbadmin.gdc.goog/my-cluster - PostGreSQL:
DBClusters.postgresql.dbadmin.gdc.goog/my-cluster
- AlloyDB Omni:
Verify the policy binding exists, and its
Validcondition isTrue:gdcloud maintenance policy-bindings list --project PROJECT_IDReplace
PROJECT_IDwith the ID of the project in which to create the maintenance policy.
Remove a maintenance window
To remove a maintenance window for your database cluster, complete the following steps:
Console
From the navigation menu of the GDC console, choose Database Service.
Select the database cluster that you want to plan maintenance settings for.
In the Maintenance section, click edit Edit.
In the Length field, select 24h.
Select all the days of the week.
Click Save.
This removes the defined maintenance window and allows maintenance updates to start at any time.
gdcloud
To remove a maintenance window from your database cluster, run:
gdcloud maintenance policies delete POLICY_NAME \
    --project PROJECT_ID
Replace the following:
POLICY_NAME: The name of the maintenance policy.PROJECT_ID: The ID of the project in which the maintenance policy exists.
Remove the maintenance policy binding from the database cluster:
gdcloud maintenance policy-bindings delete POLICY_BINDING_NAME \
    --project PROJECT_ID
Replace the following:
POLICY_BINDING_NAME: The name of the maintenance policy binding.PROJECT_ID: The ID of the project in which the maintenance policy exists.
Manage maintenance exclusions
If you created a maintenance exclusion for your maintenance window, you can edit or remove the exclusion without affecting the maintenance window. To edit or remove a maintenance exclusion, complete the following steps:
Console
From the navigation menu of the GDC console, choose Database Service.
Select the database cluster that you want to manage a maintenance exclusion for.
In the Maintenance section, click edit Edit.
Edit the date ranges and start times of the exclusion. If you want to delete the exclusion, click delete Delete.
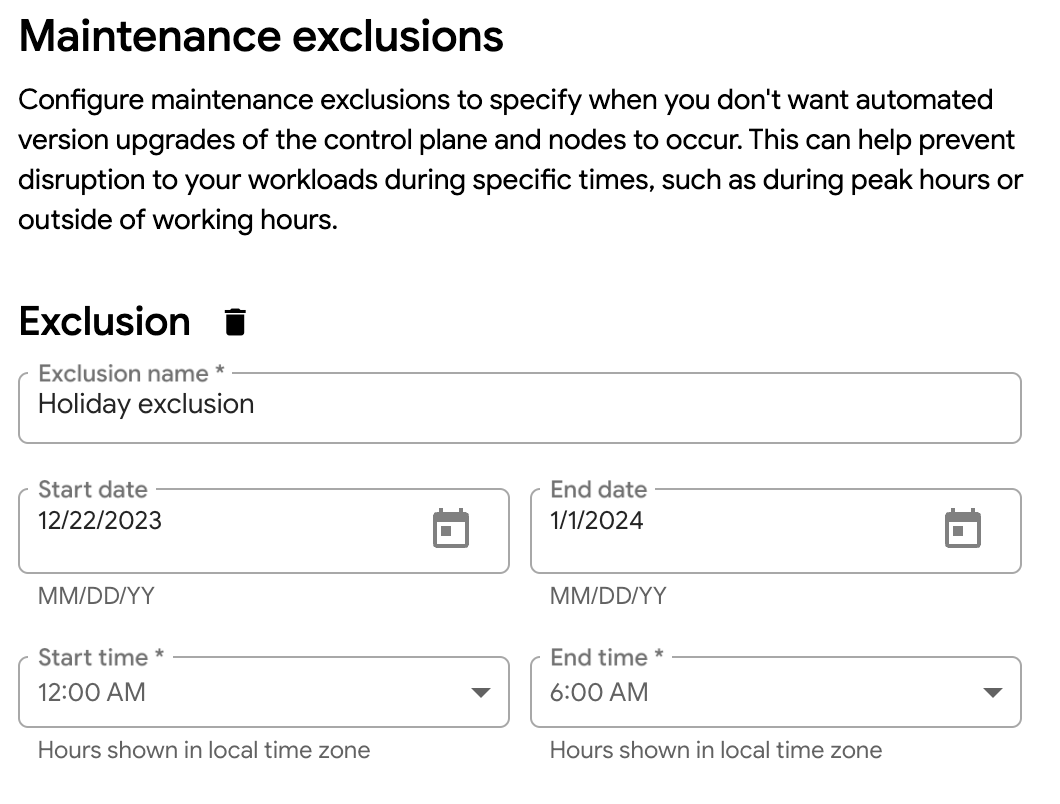
Click Save to save your maintenance exclusion modifications to the maintenance window.
gdcloud
The gdcloud CLI only supports adding and deleting maintenance exclusions. Therefore, you must delete the existing exclusion and add a new one if you want to modify your exclusion date range or times.
To delete a maintenance exclusion, run:
gdcloud maintenance policies update POLICY_NAME \
    --project PROJECT_ID \
    --remove-exclusion-name EXCLUSION_NAME
Replace the following:
POLICY_NAME: The name of the maintenance policy.PROJECT_ID: The ID of the project in which to delete the maintenance policy's exclusion.EXCLUSION_NAME: The name of the maintenance exclusion to delete.
To add a new maintenance exclusion to apply any previous exclusion edits, run:
gdcloud maintenance policies update POLICY_NAME \
    --project PROJECT_ID \
    --add-exclusion-name EXCLUSION_NAME \
    --add-exclusion-start START_TIME \
    --add-exclusion-end END_TIME
Replace the following:
POLICY_NAME: The name of the maintenance policy.PROJECT_ID: The ID of the project in which the maintenance policy exists.EXCLUSION_NAME: The name of the new maintenance exclusion to add.START_TIME: The start date and time for the new maintenance exclusion. Accepted values must follow the RFC-3339 formatted timestamp, such as2006-01-02T15:04:05Z.END_TIME: The end date and time for the new maintenance exclusion. Accepted values must follow the RFC-3339 formatted timestamp, such as2006-01-02T15:04:05Z.
Enable cross-project connections
By default, a database cluster only allows connections from within the user cluster and the same project. To allow connections from workloads in another project to all database clusters in your project:
Console
- Sign in to the GDC console with an account bound to the
project-networkpolicy-adminrole to create firewall rules. - From the main menu of the GDC console, choose Firewall.
- In the User created rules section, click Create.
- In Firewall rule details, create a name for your firewall rule.
- In the Direction of traffic dialog, choose INGRESS.
- In the Target dialog, choose Service and then select dbs.
- In the From dialog, choose Another project and select the project ID from which you would like to allow connectivity.
- Click Create.
- Wait for the Status column of the new rule to show Ready.
API
Create a ProjectNetworkPolicy resource to allow connections from a client
project.
apiVersion: networking.gdc.goog/v1
kind: ProjectNetworkPolicy
metadata:
  name: dbs-allow-from-CLIENT_PROJECT
  namespace: USER_PROJECT
spec:
  subject:
    managedServices:
      matchTypes:
      - dbs
    subjectType: ManagedService
  ingress:
  - from:
    - projects:
        matchNames:
        - CLIENT_PROJECT
  policyType: Ingress
Replace the following:
CLIENT_PROJECT: the name of the project from which you would like to allow connectivity.USER_PROJECT: the name of the user project where the database cluster was created.
Enable external connections
By default, a database cluster only allows connections from within the user cluster and the same project. To allow external connections from IP addresses outside of your Google Distributed Cloud air-gapped organization:
Console
- Sign in to the GDC console with an account bound to the
project-networkpolicy-adminrole to create firewall rules. - From the main menu of the GDC console, choose Firewall.
- In the User created rules section, click Create.
- In Firewall rule details, create a name for your firewall rule.
- In the Direction of traffic dialog, choose INGRESS.
- In the Target dialog, choose Service and then select dbs.
- In the From dialog, choose Outside the organization and input the CIDR range from which you would like to allow external connectivity.
- Click Create.
- Wait for the Status column of the new rule to show Ready.
- Sign in to the GDC console with an account bound to the
project-db-admin - From the main menu of the GDC console, choose Database Service.
- Select the database cluster that you want to enable external connections to.
- Check the Allow external connections line of the Connectivity section of the Database cluster overview to see whether external connections are already allowed.
- In the Connectivity section of the Database cluster overview, click edit Edit.
- Select the Allow external connections checkbox.
- Click SAVE.
API
Create a
ProjectNetworkPolicyresource to allow external connections:apiVersion: networking.gdc.goog/v1 kind: ProjectNetworkPolicy metadata: name: allow-external-dbs namespace: USER_PROJECT spec: ingress: - from: - ipBlock: cidr: CIDR_RANGE policyType: Ingress subject: managedServices: matchTypes: - dbs subjectType: ManagedService ```Update the database cluster to enable connections external to the organization:
kubectl patch dbcluster.DBENGINE_NAME.dbadmin.gdc.goog DBCLUSTER_NAME -p '{"spec":{"allowExternalIncomingTraffic":true}}' --type=merge -n USER_PROJECT
Replace the following:
USER_PROJECT: the name of the user project where the database cluster was created.CIDR_RANGE: the CIDR range from which you would like to allow external connectivity.DBENGINE_NAME: the name of the database engine. This is one ofalloydbomni,postgresqlororacle.DBCLUSTER_NAME: the name of the database cluster.
Sign and upload a server certificate
When you create a database cluster, a server certificate that is signed by the default GDC CA will be generated and configured for use by your database server. To sign and upload a certificate for your database that is issued by your own PKI, perform the following procedure. Your organization's default issuer must be in BYO certificate mode to use this feature.
API
After you have created the database cluster and it is ready, save the generated certificate signing request as a file.
kubectl get certificate.pki.security.gdc.goog \
dbs-DBENGINE_SHORT_NAME-cert-request-DBCLUSTER_NAME \
-n USER_PROJECT -o jsonpath='{.status.byoCertStatus.csrStatus.csr}' \
| base64 -d > DBCLUSTER_NAME.csr
Create a CSR extensions file containing the SANs for your database cluster.
export SAN=$(openssl req -in DBCLUSTER_NAME.csr -noout -text | grep 'DNS:' | sed -s 's/^[ ]*//')echo "keyUsage=digitalSignature,keyEncipherment extendedKeyUsage=serverAuth,clientAuth subjectAltName=${SAN:?}" > DBCLUSTER_NAME-csr.extUsing the CSR and extension file, generate the certificate signed by your CA. The code sample uses
opensslbut this step can be completed with other tools.openssl x509 -req -in DBCLUSTER_NAME.csr -days 365 \ -CA CA_CERTIFICATE_FILE -CAkey CA_PRIVATE_KEY_FILE \ -CAcreateserial -extfile DBCLUSTER_NAME-csr.ext \ -out DBCLUSTER_NAME-signed.crtUpdate the certificate resource with the signed certificate and CA certificate.
echo "spec:
  byoCertificate:
    certificate: $(base64 -w0 DBCLUSTER_NAME-signed.crt)
    ca: $(base64 -w0 CA_CERTIFICATE_FILE)" > patch.txt
kubectl patch certificate.pki.security.gdc.goog \ dbs-DBENGINE_SHORT_NAME-cert-request-DBCLUSTER_NAME \ -n USER_PROJECT --patch-file patch.txt --type='merge'Verify that the certificate has reached a ready state after the upload.
kubectl get certificate.pki.security.gdc.goog \
dbs-DBENGINE_SHORT_NAME-cert-request-DBCLUSTER_NAME \
-n USER_PROJECT -o json | jq -r ' .status.conditions[] | select( .type as $id | "Ready" | index($id))'
The output should be similar to the following:
{
  "lastTransitionTime": "2024-05-03T08:42:10Z",
  "message": "Certificate is issued",
  "observedGeneration": 2,
  "reason": "Issued",
  "status": "True",
  "type": "Ready"
}
Only if you are using an Oracle database, stop and restart the database cluster so the listener's SSL configuration is reloaded.
Replace the following:
DBENGINE_SHORT_NAME: the abbreviated name of the database engine. This is one ofal(AlloyDB Omni),pg(PostgreSQL), orora(Oracle).DBCLUSTER_NAME: the name of the database cluster.USER_PROJECT: the name of the user project where the database cluster was created.CA_CERTIFICATE_FILE: the path to the database CA certificate file.CA_PRIVATE_KEY_FILE: the path to the database CA private key file.
Export a database cluster
You can export a database cluster to a data dump file using either the GDC console or the Distributed Cloud CLI:
Console
- From the main menu, choose Database Service.
- Select the database cluster you want to export. This takes you to the Database cluster overview page for that cluster.
- Click EXPORT. The Export data panel opens.
- In the Export data panel, specify the storage location to export to.
- Click EXPORT. On screen messages indicate the status of the export process.
gdcloud CLI
- Before using Distributed Cloud CLI, install and initialize it. Then, authenticate with your organization.
Run the following command to export a database file to a dump file:
gdcloud database export sql DATABASE_CLUSTER \
     s3://BUCKET_NAME/SAMPLE.dmp --project=PROJECT_NAME
Replace the following:
- DATABASE_CLUSTER with the name of the database cluster to export.
- BUCKET_NAME/SAMPLE.dmp with the destination for the exported dump file.
- PROJECT_NAME with the name of the project that the database cluster is in.
API
apiVersion: DBENGINE_NAME.dbadmin.gdc.goog/v1
kind: Export
metadata:
  name: EXPORT_NAME
  namespace: USER_PROJECT
spec:
  dbclusterRef: DBCLUSTER_NAME
  exportLocation:
    s3Options:
      bucket: BUCKET_NAME
      key: dbs-export
    type: S3
Replace the following variables:
DBENGINE_NAME: the name of the database engine. This is one ofalloydbomni,postgresqlororacle.EXPORT_NAME: the name of the export operation.USER_PROJECT: the name of the user project where the database cluster to be exported is created.DBCLUSTER_NAME: the name of the database cluster.BUCKET_NAME: the name of the object storage bucket to store the exported files.
Import from a dump file
Before importing data, you must:
Create a database cluster to import the data to.
Upload the dump file to a storage bucket. See Upload objects to storage buckets for instructions.
The Database Service import service account must have access to the dump file. The service account is named
postgresql-import-DATABASE_CLUSTER_NAMEororacle-import-DATABASE_CLUSTER_NAME, depending on the type of database you are importing.Replace
DATABASE_CLUSTER_NAMEwith the name of the database cluster where you are importing data.
You can import a dump file into a database cluster using either the GDC console or the Distributed Cloud CLI:
Console
Open the Database cluster overview page in the GDC console to see the cluster that contains the database you are importing.
Click Import. The Import data to accounts panel opens.
In the Source section of the Import data to accounts panel, specify the location of the SQL data dump file you uploaded previously.
In the Destination field, specify an existing destination database for the import.
Click Import. A banner on the GDC console shows the status of the import.
gdcloud CLI
Before using Distributed Cloud CLI, install and initialize it. Then, authenticate with your organization.
Run the following command to import a dump file into a database:
gdcloud database import sql DATABASE_CLUSTER s3://BUCKET_NAME/sample.dmp \
    --project=PROJECT_NAME
Replace the following:
- DATABASE_CLUSTER with the name of the database cluster to import data into.
- BUCKET_NAME/SAMPLE.dmp with the location of the dump file.
- PROJECT_NAME with the name of the project that the database cluster is in.
API
apiVersion: DBENGINE_NAME.dbadmin.gdc.goog/v1
kind: Import
metadata:
  name: IMPORT_NAME
  namespace: USER_PROJECT
spec:
  dbclusterRef: DBCLUSTER_NAME
  dumpStorage:
    s3Options:
      bucket: BUCKET_NAME
      key: DUMP_FILE_PATH
    type: S3
Replace the following variables:
DBENGINE_NAME: the name of the database engine. This is one ofalloydbomni,postgresqlororacle.IMPORT_NAME: the name of the import operation.USER_PROJECT: the name of the user project where the database cluster to import is created.DBCLUSTER_NAME: the name of the database cluster.BUCKET_NAME: the name of the object storage bucket that stores the import files.DUMP_FILE_PATH: the name of the object storage path to the stored files.
Preserve database clusters before an upgrade
Depending on specific GDC releases, existing database clusters may not be migrated forward from previous GDC versions. In these cases, before applying the release, you must confirm that there is no critical data that must be preserved. For data that must be preserved, follow these steps to migrate them forward:
Before applying the release, you must confirm that there is no critical data that must be preserved. For data that must be preserved, follow these steps to migrate them forward:
- List database clusters and identify the ones that must be preserved.
- For each database cluster, export the data and store it in a GDC bucket.
- Optional: To avoid additional changes, completely delete the database cluster before applying the new GDC version.
- After the upgrade is complete, recreate the database cluster and import the dump file into it.
Manage advanced migration
Advanced migration is a solution for migrating data for large-sized databases with less downtime. This feature is only available for AlloyDB Omni and PostgreSQL.
A user with the Project DB Admin role must perform the following steps. Use either the GDC console or the Distributed Cloud CLI to manage migrations:
Console
- From the main menu, choose Database Service.
- Click Create Migration.
- In the Get started dialog, review requirements for the source and connectivity.
- In the Specify your source database dialog, specify the source database hostname or IP address, username, password, encryption type, and certificate.
- In the Configure your cluster dialog, specify the Cluster ID, password, database version, CPU, memory, and storage capacity of the target database cluster. Ensure you choose enough memory to hold your largest table.
- Click Create. Creating the migration and target database cluster can take a few minutes.
The status changes from
ReconcilingtoReadywhen the cluster is ready. The migration status changes toUnsyncedwhen migration is set up successfully. Use the following options to manage your migration:- Start: This starts the migration and changes the migration status to
Running. - Stop: This stops the migration and changes the migration status to
Stopped. - Promote: This promotes the target database cluster to a stand alone database.
- Delete: This deletes the migration and target database cluster created for this migration.
- Start: This starts the migration and changes the migration status to
Periodically rotate the source database replication user password with the following steps:
- Go to Source database and click edit Edit.
- Make the changes to rotate the replication user password.
- Click Save to apply your changes.
After the change is applied, the migration backend uses the new password.
gdcloud
Before using Distributed Cloud CLI, install and initialize it. Then, authenticate with your organization.
Create a migration:
gdcloud database connection-profiles create DB_ENGINE_TYPE SOURCE_CONNECTION_PROFILE \
    --username REPLICATION_USERNAME \
    --password REPLICATION_PASSWORD \
    --ca-certificate CA_CERT_FILE_PATH

gdcloud database migrations create MIGRATION_NAME \
    --source SOURCE_CONNECTION_PROFILE \
    --destination DESTINATION_DBCLUSTER

gdcloud database clusters create DESTINATION_DBCLUSTER \
    --database-version DB_VERSION \
    --admin-password ADMIN_PASSWORD
Replace the following variables:
DB_ENGINE_TYPE, the db engine type for migration. Supported values are:postgresqloralloydbomniSOURCE_CONNECTION_PROFILE, the name for the new connection profile.REPLICATION_USERNAME, the name for the replication user of the source database.REPLICATION_PASSWORD, the password for the replication user of the source database.CA_CERT_FILE_PATH, the path for the source database CA certificate.MIGRATION_NAME, the name for the new migration.DESTINATION_DBCLUSTER, the name for the target database cluster.DB_VERSION, the version string for the new cluster. For example,POSTGRESQL_13.ADMIN_PASSWORD, the administrator user password for the new cluster.
Start a migration:
gdcloud database migrations start MIGRATION_NAMEStop a migration:
gdcloud database migrations stop MIGRATION_NAMEPromote a migration:
gdcloud database migrations promote MIGRATION_NAMEList existing connection-profiles:
gdcloud database connection-profiles list DB_ENGINE_TYPEList the existing migration:
gdcloud database migrations list --destination DESTINATION_DBCLUSTER
API
For AlloyDB or PostgreSQL source databases:
Create a secret to store source database CA certificate:
apiVersion: v1
data:
  ca.crt:  SOURCE_DB_CA_CERT
kind: Secret
metadata:
  annotations:
    propagation.gdch.gke.io/target-namespace:  USER_PROJECT
  name: es-crt-EXTERNAL_SERVER_NAME
  namespace: USER_PROJECT
type: Opaque
Create a secret to store source database migration user password:
apiVersion: v1
data:
  password: SOURCE_DB_USER_PASSWORD
kind: Secret
metadata:
  annotations:
    propagation.gdch.gke.io/target-namespace: USER_PROJECT
  name: es-pw-EXTERNAL_SERVER_NAME
  namespace: USER_PROJECT
type: Opaque
Create an externalserver:
apiVersion: DBENGINE_NAME.dbadmin.gdc.goog/v1
kind: ExternalServer
metadata:
  name: EXTERNAL_SERVER_NAME
  namespace: USER_PROJECT
spec:
  host: SOURCE_DB_HOST
  port: 5432
  username: SOURCE_DB_USERNAME
  password:
    name: es-pw-EXTERNAL_SERVER_NAME
    namespace: USER_PROJECT
  certRef:
    name: es-crt-EXTERNAL_SERVER_NAME
    namespace: USER_PROJECT
Create an migration:
apiVersion: DBENGINE_NAME.dbadmin.gdc.goog/v1
kind: Migration
metadata:
  name: MIGRATION_NAME
  namespace: USER_PROJECT
spec:
  source:
    reference:
      apiVersion: DBENGINE_NAME.dbadmin.gdc.goog/v1
      kind: ExternalServer
      name: EXTERNAL_SERVER_NAME
  target:
    reference:
      apiVersion: DBENGINE_NAME.dbadmin.gdc.goog/v1
      kind: DBCluster
      name: DBCLUSTER_NAME
  control: MIGRATION_CONTROL
Replace the following variables:
EXTERNAL_SERVER_NAME: the name of the externalserver representing the source database.USER_PROJECT: the name of the user project where the externalserver is created.DBENGINE_NAME: the name of the database engine. This is one ofalloydbomniorpostgresql.SOURCE_DB_CA_CERT: the ca certificate of the source database.SOURCE_DB_USER_PASSWORD: the migration user password of the source database.SOURCE_DB_USERNAME: the migration username of the source database.SOURCE_DB_HOST: the migration host address of the source database.MIGRATION_NAME: the name of the migration operation.DBCLUSTER_NAME: the name of the migration target database cluster.MIGRATION_CONTROL: the controls of migration operation. It should be one ofstartorstopwhen migration is created. It should bepromoteto promote migration target database cluster.
Observe metrics
You can observe Database Service metrics with the monitoring instance. See Monitoring and visualizing metrics for general information about the monitoring and visualizing processes for Application Operators (AO) in GDC.
You must create a database cluster before you can observe its metrics.
View diagnostic logs
Navigate to the monitoring instance UI to access the database diagnostic logs for a database cluster.
Click the explore Explore button from the menu to open the Explore page.
Enter a query to search for Database Service logs using LogQL.
Using the Label filters drop-down menu, create a filter for
service_name=ods.Click the add Operations button and select Line contains. Enter the database cluster's name in the text box.
Click the add Operations button again and select Line contains. Enter PROJECT_NAME in the text box.
Click the Run query button.
View metrics
Navigate to the monitoring instance UI to access the metrics for a database cluster.
From the drop-down menu, select prometheus as the data source to retrieve metrics.
Application operators can access Database Service metrics that have the
ods_prefix. Enterods_in the Select a metric text box in the Metrics browser panel to view all Database Service metric types.Application operators can also access metrics with the
pg_prefix.