This page explains how to migrate your NoSQL database from Cassandra to Spanner.
Cassandra and Spanner are both large-scale distributed databases built for applications that require high scalability and low latency. While both databases can support demanding NoSQL workloads, Spanner provides advanced features for data modeling, querying, and transactional operations. Spanner supports the Cassandra Query Language (CQL).
For more information about how Spanner meets NoSQL database criteria, see Spanner for non-relational workloads.
Migration constraints
For a successful migration from Cassandra to the Cassandra endpoint on Spanner, review Spanner for Cassandra users to learn how Spanner architecture, data model, and data types differ from Cassandra. Carefully consider the functional differences between Spanner and Cassandra before you begin your migration.
Migration process
The migration process is broken down into the following steps:
- Convert your schema and data model.
- Set up dual writes for incoming data.
- Bulk export your historical data from Cassandra to Spanner.
- Validate data to ensure data integrity throughout the migration process.
- Point your application to Spanner instead of Cassandra.
- Optional. Perform reverse replication from Spanner to Cassandra.
Convert your schema and data model
The first step in migrating your data from Cassandra to Spanner is adapting the Cassandra data schema to Spanner's schema, while handling differences in data types and modeling.
Table declaration syntax is fairly similar across Cassandra and Spanner. You specify the table name, column names and types, and the primary key which uniquely identifies a row. The key difference is that Cassandra is hash-partitioned and makes a distinction between the two parts of the primary key: the hashed partition key and the sorted clustering columns, whereas Spanner is range-partitioned. You can think of Spanner's primary key as only having clustering columns, with partitions automatically maintained behind the scenes. Like Cassandra, Spanner supports composite primary keys.
We recommend the following steps to convert your Cassandra data schema to Spanner:
- Review Cassandra overview to understand the similarities and differences between Cassandra and Spanner data schemas and to learn how to map different data types.
- Use the Cassandra to Spanner schema tool to extract and convert your Cassandra data schema to Spanner.
- Before starting your data migration, ensure your Spanner tables have been created with the appropriate data schemas.
Set up live migration for incoming data
To perform a zero-downtime migration from Cassandra to Spanner, set up live migration for incoming data. Live migration focuses on minimizing downtime and ensuring continuous application availability by using real-time replication.
Start with the live migration process before the bulk migration. The following diagram shows the architectural view of a live migration.
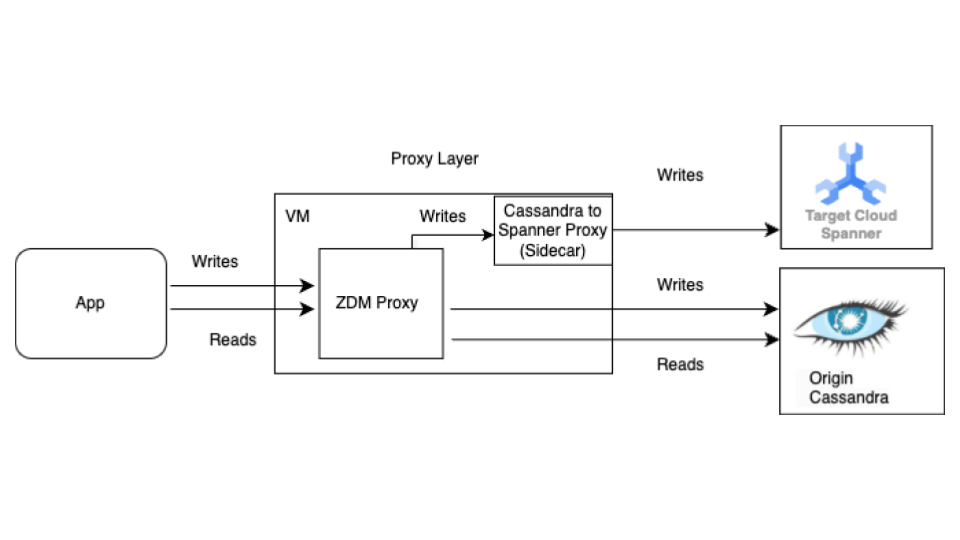
The live migration architecture has the following key components:
- Origin: Your source Cassandra database.
- Target: The destination Spanner database you're migrating to. It's assumed that you have already provisioned your Spanner instance and database with a schema that's compatible with your Cassandra schema (with necessary adaptations for Spanner's data model and features).
Datastax ZDM Proxy: The ZDM Proxy is a dual writes proxy built by DataStax for Cassandra to Cassandra migrations. The proxy mimics a Cassandra cluster which lets an application use the proxy without application changes. This tool is what your application talks to and internally uses to perform dual writes to the source and target databases. While it's typically used with Cassandra clusters as both the origin and target, our setup configures it to use the Cassandra- Spanner Proxy (running as a sidecar) as the target. This ensures that every incoming read is only forwarded to the origin and returns the origin response back to the application. In addition, each incoming write is directed to both the origin and target.
- If writes to both the origin and target are successful, the application receives a success message.
- If writes to the origin fails and writes to the target succeeds, the application receives the origin's failure message.
- If writes to the target fails and writes to the origin succeeds, the application receives the target's failure message.
- If writes to both the origin and target fail, the application receives the origin's failure message.
Cassandra-Spanner Proxy: A sidecar application that intercepts Cassandra Query Language ( CQL) traffic destined for Cassandra and translates it into Spanner API calls. It lets applications and tools interact with Spanner using the Cassandra client.
Client application: The application that reads and writes data to the source Cassandra cluster.
Proxy setup
The first step to perform a live migration is to deploy and configure the proxies. The Cassandra-Spanner Proxy runs as a sidecar to the ZDM Proxy. The sidecar proxy acts as the target for the ZDM Proxy write operations to Spanner.
Single instance testing using Docker
You can run a single instance of the proxy locally or on a VM for initial testing using Docker.
Prerequisites
- Confirm that the VM where the proxy runs has network connectivity to the application, the origin Cassandra database, and the Spanner database.
- Install Docker.
- Confirm that there is a service account key file with necessary permissions to write to your Spanner instance and database.
- Set up your Spanner instance, database, and schema.
- Ensure the Spanner Database name is the same as the Origin Cassandra keyspace name.
- Clone the spanner-migration-tool repository.
Download and configure the ZDM Proxy
- Go to the
sources/cassandradirectory. - Ensure the
entrypoint.shandDockerfilefiles are in the same directory as the Dockerfile. Run the following command to build a local image:
docker build -t zdm-proxy:latest .
Run the ZDM Proxy
- Ensure the
zdm-config.yamlandkeyfilesare present locally where the the following command is run. - Open the sample zdm-config yaml file.
- Review the detailed list of flags that ZDM accepts.
Use the following command to run the container:
sudo docker run --restart always  -d -p 14002:14002 \
-v zdm-config-file-path:/zdm-config.yaml  \
-v local_keyfile:/var/run/secret/keys.json \
-e SPANNER_PROJECT=SPANNER_PROJECT_ID \
-e SPANNER_INSTANCE=SPANNER_INSTANCE_ID \
-e SPANNER_DATABASE=SPANNER_DATABASE_ID   \
-e GOOGLE_APPLICATION_CREDENTIALS="/var/run/secret/keys.json" \
-e ZDM_CONFIG=/zdm-config.yaml \
zdm-proxy:latest
Verify the proxy setup
Use the
docker logscommand to check the proxy logs for any errors during startup:docker logs container-idRun the
cqlshcommand to verify the proxy is set up correctly:cqlsh VM-IP 14002Replace VM-IP with the IP address for your VM.
Production setup using Terraform:
For a production environment, we recommend using the provided Terraform templates to orchestrate the deployment of the Cassandra- Spanner proxy.
Prerequisites
- Install Terraform.
- Confirm that the application has default credentials with appropriate permissions to create resources.
- Confirm that the service key file has the relevant permissions to write to Spanner. This file is used by the proxy.
- Set up your Spanner instance, database, and schema.
- Confirm that the Dockerfile,
entrypoint.sh, and the service key file are in the same directory as themain.tffile.
Configure Terraform variables
- Ensure you have the Terraform template for the proxy deployment.
- Update the
terraform.tfvarsfile with the variables for your setup.
Template deployment using Terraform
The Terraform script does the following:
- Creates container-optimized VMs based on a specified count.
- Creates
zdm-config.yamlfiles for each VM, and allots a topology index to it. ZDM Proxy requires multi-VM setups to configure the topology using thePROXY_TOPOLOGY_ADDRESSESandPROXY_TOPOLOGY_INDEXfields in the configurationyamlfile. - Transfers the relevant files to each VM, remotely runs Docker Build, and launches the containers.
To deploy the template, do the following:
Use the
terraform initcommand to initialize Terraform:terraform initRun the
terraform plancommand to see what changes Terraform plans to make on your infrastructure:terraform plan -var-file="terraform.tfvars"When the resources look good, run the
terraform applycommand:terraform apply -var-file="terraform.tfvars"After the Terraform script stops, run the
cqlshcommand to ensure the VMs are accessible.cqlsh VM-IP 14002Replace VM-IP with the IP address for your VM.
Point your client applications to the ZDM Proxy
Modify your client application's configuration, setting the contact points as the VMs running the proxies instead of your origin Cassandra cluster.
Test your application thoroughly. Verify that write operations are being applied to both the origin Cassandra cluster and, by checking your Spanner database, that they are also reaching Spanner using the Cassandra-Spanner Proxy. Reads are served from the origin Cassandra.
Bulk export your data to Spanner
Bulk data migration involves transferring large volumes of data between databases, often requiring careful planning and execution to minimize downtime and ensure data integrity. Techniques include ETL (Extract, Transform, Load) processes, direct database replication, and specialized migration tools, all aimed at efficiently moving data while preserving its structure and accuracy.
We recommend using Spanner's SourceDB To Spanner Dataflow template to bulk migrate your data from Cassandra to Spanner. Dataflow is the Google Cloud distributed extract, transform, and load (ETL) service that provides a platform for running data pipelines to read and process large amounts of data in parallel over multiple machines. The SourceDB To Spanner Dataflow template is designed to perform highly parallelized reads from Cassandra, transform the source data as needed, and write to Spanner as a target database.
Perform the steps in the Cassandra to Spanner Bulk Migration instructions using the Cassandra configuration file.
Validate data to ensure integrity
Data validation during database migration is crucial for ensuring data accuracy and integrity. It involves comparing data between your source Cassandra and target Spanner databases to identify discrepancies, such as missing, corrupted, or mismatched data. General data validation techniques include checksums, row counts, and detailed data comparisons, all aimed at guaranteeing that the migrated data is an accurate representation of the original.
After the bulk data migration is complete, and while dual writes are still active, you need to validate data consistency and fix discrepancies. Differences between Cassandra and Spanner can occur during the dual write phase for various reasons, including:
- Failed dual writes. A write operation might succeed in one database but fail in the other due to transient network issues or other errors.
- Lightweight transactions (LWT). If your application uses LWT (compare and set) operations, these might succeed on one database but fail on the other due to differences in the datasets.
- High query per second (QPS) on a single primary key. Under very high write loads to the same partition key, the order of events might differ between the origin and target due to different network round trip times, potentially leading to inconsistencies.
Bulk job and dual writes running in parallel: Bulk migration running in parallel with dual writes might cause divergence due to various race conditions, such as the following:
- Extra rows on Spanner: if the bulk migration runs while dual writes are active, the application might delete a row that was already read by the bulk migration job and written to the target.
- Race conditions between bulk and dual writes: there might be other miscellaneous race conditions where the bulk job reads a row from Cassandra and the data from the row becomes stale when incoming writes update the row on Spanner after the dual writes finish.
- Partial column updates: updating a subset of columns on an existing row creates an entry on Spanner with other columns as null. Since bulk updates don't overwrite existing rows, this causes rows to diverge between Cassandra and Spanner.
This step focuses on validating and reconciling data between the origin and target databases. Validation involves comparing the origin and target to identify inconsistencies, while reconciliation focuses on resolving these inconsistencies to achieve data consistency.
Compare data between Cassandra and Spanner
We recommend that you perform validations on both row counts and the actual content of the rows.
Choosing how to compare data (both count and row matching) depends on your application's tolerance for data inconsistencies and your requirements for exact validation.
There are two ways to validate data:
Active validation is performed while dual writes are active. In this scenario, the data in your databases are still being updated. It might not be possible to achieve an exact match in row counts or row content between Cassandra and Spanner. The goal is to ensure that any differences are only due to active load on the databases and not due to any other errors. If the discrepancies are within these limits, you can proceed with the cutover.
Static validation requires downtime. If your requirements call for strong, static validation with a guarantee of exact data consistency, you might need to stop all writes to both databases temporarily. You can then validate data and reconcile differences on your Spanner database.
Choose the validation timing and the appropriate tools based on your specific requirements for data consistency and acceptable downtime.
Compare the number of rows in Cassandra and Spanner
One method of data validation is by comparing the number of rows in tables in the source and target databases. There are a few ways to perform count validations:
When migrating with small datasets (less than 10 million rows per table), you can use this count matching script to count rows in Cassandra and Spanner. This approach returns exact counts in a short time. The default timeout in Cassandra is 10 seconds. Consider bumping up the driver request timeout and server side timeout if the script times out before finishing the count.
When migrating large datasets (greater than 10 million rows per table), keep in mind that while Spanner count queries scale well, Cassandra queries tend to timeout. In such cases, we recommend using the DataStax Bulk Loader tool to get count rows from Cassandra tables. For Spanner counts, using the SQL
count(*)function is sufficient for most large scale loads. We recommend that you run the Bulk Loader for every Cassandra table and fetch counts from the Spanner table and compare the two. This can be done either manually or using a script.
Validate for a row mismatch
We recommend that you compare rows from the origin and target databases to identify mismatches between rows. There are two ways to perform row validations. The one you use depends on your application's requirements:
- Validate a random set of rows.
- Validate the entire dataset.
Validate a random sample of rows
Validating an entire dataset is expensive and time consuming for large workloads. In these cases, you can use sampling to validate a random subset of the data to check for mismatches in rows. One way to do this is to pick random rows in Cassandra and fetch the corresponding rows in Spanner, then compare the values (or the row hash).
The advantages to this method is that you finish faster than checking an entire dataset, and it's straightforward to run. The disadvantage is that since it's a subset of the data, there might still be differences in the data present for edge cases.
To sample random rows from Cassandra, you need to do the following:
- Generate random numbers in the token range [
-2^63,2^63 - 1]. - Fetch rows
WHERE token(PARTITION_KEY) > GENERATED_NUMBER.
The validation.go sample
script
randomly fetches rows and validates them with rows in the Spanner
database.
Validate the entire dataset
To validate an entire dataset, fetch all the rows in the origin Cassandra database. Use the primary keys to fetch all of the corresponding Spanner database rows. You can then compare the rows for differences. For large datasets, you can use a MapReduce-based framework, such as Apache Spark or Apache Beam, to reliably and efficiently validate the entire dataset.
The advantage to this is that full validation provides higher confidence in data consistency. The disadvantages are that it adds read load on Cassandra and it requires an investment to build complex tooling for large datasets. It might also take much longer to finish the validation on a large dataset.
A way to do this is to partition the token ranges and query the Cassandra ring in parallel. For each Cassandra row, the equivalent Spanner row is fetched using the partition key. These two rows are then compared for discrepancies. For pointers to follow when building validator jobs, see Tips to validate Cassandra using row matching.
Reconcile data or row count inconsistencies
Depending on the data consistency requirement, you can copy rows from Cassandra to Spanner to reconcile discrepancies identified during the validation phase. One way to do reconciliation is extending the tool used for full dataset validation, and copying the correct row from Cassandra to the target Spanner database if a mismatch is found. For more information, see Implementation considerations.
Point your application to Spanner instead of Cassandra
After you validate the accuracy and integrity of your data post migration, choose a time for migrating your application to point to Spanner instead of Cassandra (or to the proxy adapter used for live data migration). This is called the cutover.
To perform the cutover, use the following steps:
Create a configuration change for your client application that lets it connect directly to your Spanner instance using one of the following methods:
- Connect Cassandra to the Cassandra Adapter running as a sidecar.
- Change the driver jar with the endpoint client.
Apply the change you prepared in the previous step to point your application to Spanner.
Set up monitoring for your application to monitor for errors or performance issues. Monitor Spanner metrics using Cloud Monitoring. For more information, see Monitor instances with Cloud Monitoring.
After a successful cutover and stable operation, decommission the ZDM Proxy and the Cassandra-Spanner Proxy instances.
Perform reverse replication from Spanner to Cassandra
You can perform reverse replication using the Spanner to
SourceDB Dataflow
template.
Reverse replication is useful when you encounter unforeseen issues with
Spanner and need to fall back to the original Cassandra
database with minimal disruption to the service.
Tips to validate Cassandra using row matching
It's slow and inefficient to perform full table scans in Cassandra (or
any other database) using SELECT *. To solve this problem, divide the
Cassandra dataset into manageable partitions and process the partitions
concurrently. To do this, you need to do the following:
- Split the dataset into token ranges
- Query partitions in parallel
- Read data within each partition
- Fetch corresponding rows from Spanner
- Design validation tools for extensibility
- Report and log mismatches
Split the dataset into token ranges
Cassandra distributes data across nodes based on partition key tokens.
The token range for a Cassandra cluster spans from -2^63 to 2^63 -
1. You can define a fixed number of equally sized token ranges to divide the
entire keyspace into smaller partitions. We recommend that you split the token
range with a configurable partition_size parameter that you can tune for
quickly processing the entire range.
Query partitions in parallel
After you define the token ranges, you can launch multiple parallel processes or
threads, each responsible for validating data within a specific range. For each
range, you can construct CQL queries using the
token() function
on your partition key (pk).
A sample query for a given token range would look like the following:
SELECT *
FROM your_keyspace.your_table
WHERE token(pk) >= partition_min_token AND token(pk) <= partition_max_token;
By iterating through your defined token ranges and executing these queries in parallel against your origin Cassandra cluster (or through the ZDM proxy configured to read from Cassandra), you efficiently read data in a distributed manner.
Read data within each partition
Each parallel process executes the range-based query and retrieves a subset of the data from Cassandra. Check the amount of data retrieved partition to ensure balance between parallelism and memory usage.
Fetch corresponding rows from Spanner
For each row fetched from Cassandra, retrieve the corresponding row from your target Spanner database using the source row key.
Compare rows to identify mismatches
After you have both the Cassandra row and the corresponding Spanner row (if it exists), you need to compare their fields to identify any mismatches. This comparison should take into account potential data type differences and any transformations applied during the migration. We recommend that you define clear criteria for what constitutes a mismatch based on your application's requirements.
Design validation tools for extensibility
Design your validation tool with the possibility of extending it for reconciliation. For example, you can add capabilities to write the correct data from Cassandra to Spanner for identified mismatches.
Report and log mismatches
We recommend that you log any identified mismatches with sufficient context to allow for investigation and reconciliation. This might include the primary keys, the specific fields that differ, and the values from both Cassandra and Spanner. You might also want to aggregate statistics on the number and types of mismatches found.
Enable and disable TTL on Cassandra data
This section describes how to enable and disable time to live (TTL) on Cassandra data in Spanner tables. For an overview, see Time to live (TTL).
Enable TTL on Cassandra data
For examples in this section, assume you have a table with the following schema:
CREATE TABLE Singers (
  SingerId INT64 OPTIONS (cassandra_type = 'bigint'),
  AlbumId INT64 OPTIONS (cassandra_type = 'int'),
) PRIMARY KEY (SingerId);
To enable row-level TTL on an existing table, do the following:
Add the timestamp column for storing the expiration timestamp for each row. In this example, the column is named
ExpiredAt, but you can use any name.ALTER TABLE Singers ADD COLUMN ExpiredAt TIMESTAMP;Add the row deletion policy to automatically delete rows older than the expiration time.
INTERVAL 0 DAYmeans rows are deleted immediately upon reaching the expiration time.ALTER TABLE Singers ADD ROW DELETION POLICY (OLDER_THAN(ExpiredAt, INTERVAL 0 DAY));Set
cassandra_ttl_modetorowto enable the row-level TTL.ALTER TABLE Singers SET OPTIONS (cassandra_ttl_mode = 'row');Optionally, set
cassandra_default_ttlto configure the default TTL value. The value is in seconds.ALTER TABLE Singers SET OPTIONS (cassandra_default_ttl = 10000);
Disable TTL on Cassandra data
For examples in this section, assume you have a table with the following schema:
CREATE TABLE Singers (
SingerId INT64 OPTIONS ( cassandra_type = 'bigint' ),
AlbumId INT64 OPTIONS ( cassandra_type = 'int' ),
ExpiredAt TIMESTAMP,
) PRIMARY KEY (SingerId),
ROW DELETION POLICY (OLDER_THAN(ExpiredAt, INTERVAL 0 DAY)), OPTIONS (cassandra_ttl_mode = 'row');
To disable row-level TTL on an existing table, do the following:
Optionally, set
cassandra_default_ttlto zero to clean up the default TTL value.ALTER TABLE Singers SET OPTIONS (cassandra_default_ttl = 0);Set
cassandra_ttl_modetononeto disable the row-level TTL.ALTER TABLE Singers SET OPTIONS (cassandra_ttl_mode = 'none');Remove the row deletion policy.
ALTER TABLE Singers DROP ROW DELETION POLICY;Remove the expiration timestamp column.
ALTER TABLE Singers DROP COLUMN ExpiredAt;
Implementation considerations
- Frameworks and libraries: For scalable custom validation, use MapReduce-based frameworks like Apache Spark or Dataflow (Beam). Choose a supported language (Python, Scala, Java) and use connectors for Cassandra and Spanner, for example, using a proxy. These frameworks enable efficient parallel processing of large datasets for comprehensive validation.
- Error handling and retries: Implement robust error handling to manage potential issues like network connectivity problems or temporary unavailability of either database. Consider implementing retry mechanisms for transient failures.
- Configuration: Make the token ranges, connection details for both databases, and comparison logic configurable.
- Performance tuning: Experiment with the number of parallel processes and the size of the token ranges to optimize the validation process for your specific environment and data volume. Monitor the load on both your Cassandra and Spanner clusters during validation.
What's Next
- See a comparison between Spanner and Cassandra in the Cassandra overview.
- Learn how to Connect to Spanner using the Cassandra Adapter.