This page describes how to use point-in-time recovery (PITR) to retain and recover data in Spanner for GoogleSQL-dialect databases and PostgreSQL-dialect databases.
To learn more, see Point-in-time recovery.
Prerequisites
This guide uses the database and schema as defined in the Spanner quickstart. You can either run through the quickstart to create the database and schema, or modify the commands for use with your own database.
Set the retention period
To set your database's retention period:
Console
Go to the Spanner Instances page in the Google Cloud console.
Click the instance containing the database to open its Overview page.
Click the database to open its Overview page.
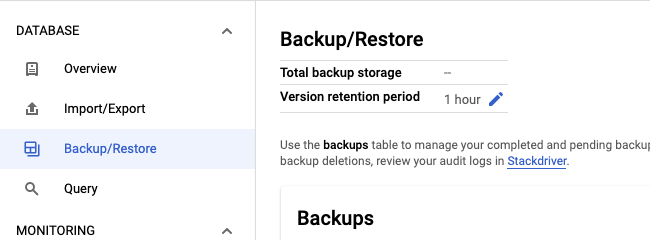
Select the Backup/Restore tab.

Click the pencil icon in the Version retention period field.
Enter a quantity and unit of time for the retention period and then click Update.
gcloud
Update the database's schema with the ALTER DATABASE statement. For example:
gcloud spanner databases ddl update example-db \
    --instance=test-instance \
    --ddl='ALTER DATABASE `example-db` \
SET OPTIONS (version_retention_period="7d");'To view the retention period, get your database's DDL:
gcloud spanner databases ddl describe example-db \
    --instance=test-instance
Here's the output:
ALTER DATABASE example-db SET OPTIONS (
  version_retention_period = '7d'
);
...
Client libraries
C#
C++
Go
Java
Node.js
PHP
Python
Ruby
Usage notes:
- The retention period must be between 1 hour and 7 days, and can be specified
in days, hours, minutes, or seconds. For example, the values
1d,24h,1440m, and86400sare equivalent. - If you have enabled logging for the Spanner API in your project, the event is logged as UpdateDatabaseDdl and is visible in the Logs Explorer.
- To revert to the default retention period of 1 hour, you can set the
version_retention_perioddatabase option toNULLfor GoogleSQL databases orDEFAULTfor PostgreSQL databases. - When you extend the retention period, the system doesn't backfill previous versions of data. For example, if you extend the retention period from one hour to 24 hours, then you must wait 23 hours for the system to accumulate old data before you can recover data from 24 hours in the past.
Get the retention period and earliest version time
The Database resource includes two fields:
version_retention_period: the period in which Spanner retains all versions of data for the database.earliest_version_time: the earliest timestamp at which earlier versions of the data can be read from the database. This value is continuously updated by Spanner and becomes stale the moment it's queried. If you are using this value to recover data, make sure to account for the time from the moment when the value is queried to the moment when you initiate the recovery.
Console
Go to the Spanner Instances page in the Google Cloud console.
Click the instance containing the database to open its Overview page.
Click the database to open its Overview page.
Select the Backup/Restore tab to open the Backup/Restore page and display the retention period.

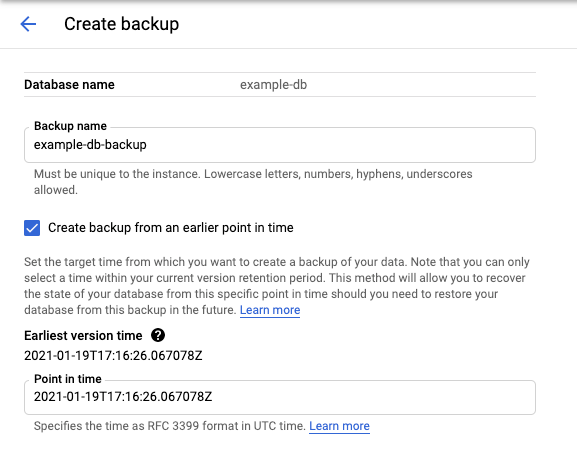
Click Create to open the Create a backup page and display the earliest version time.

gcloud
You can get these fields by calling describe databases or list databases. For example:
gcloud spanner databases describe example-db \
    --instance=test-instance
Here's the output:
createTime: '2020-09-07T16:56:08.285140Z'
earliestVersionTime: '2020-10-07T16:56:08.285140Z'
name: projects/my-project/instances/test-instance/databases/example-db
state: READY
versionRetentionPeriod: 3d
Recover a portion of your database
Perform a stale read and specify the needed recovery timestamp. Make sure that the timestamp you specify is more recent than the database's
earliest_version_time.gcloud
Use execute-sql For example:
gcloud spanner databases execute-sql example-db \
    --instance=test-instance
    --read-timestamp=2020-09-11T10:19:36.010459-07:00\
    --sql='SELECT * FROM SINGERS'
Client libraries
See perform stale read.
Store the results of the query. This is required because you can't write the results of the query back into the database in the same transaction. For small amounts of data, you can print to console or store in-memory. For larger amounts of data, you may need to write to a local file.
Write the recovered data back to the table that needs to be recovered. For example:
gcloud
gcloud spanner rows update --instance=test-instance
    --database=example-db --table=Singers \
    --data=SingerId=1,FirstName='Marc'
For more information, see updating data using gcloud.
Client libraries
For more information, see updating data using DML or updating data using mutations.
Optionally, if you want to do some analysis on the recovered data before writing back, you can manually create a temporay table in the same database, write the recovered data to this temporary table first, do the analysis, and then read the data you want to recover from this temporary table and write it to the table that needs to be recovered.
Recover an entire database
You can recover the entire database using either Backup and Restore or Import and Export and specifying a recovery timestamp.
Backup and restore
Create a backup and set the
version_timeto the needed recovery timestamp.Console
Go to the Database details page in the Cloud console.
In the Backup/Restore tab, click Create.
Check the Create backup from an earlier point in time box.

gcloud
gcloud spanner backups create example-db-backup-1 \
    --instance=test-instance \
    --database=example-db \
    --retention-period=1y \
    --version-time=2021-01-22T01:10:35Z --async
For more information, see Create a backup using gcloud.
Client libraries
C#
C++
Go
Java
Node.js
PHP
Python
Ruby
Restore from the backup to a new database. Note that Spanner preserves the retention period setting from the backup to the restored database.
Console
Go to the Instance details page in the Cloud console.
In the Backup/Restore tab, select a backup and click Restore.
gcloud
gcloud spanner databases restore --async \
  --destination-instance=destination-instance --destination-database=example-db-restored \
  --source-instance=test-instance --source-backup=example-db-backup-1
For more information, see Restoring a database from a backup.
Client libraries
C#
C++
Go
Java
Node.js
PHP
Python
Ruby
Import and export
- Export the database, specifying the
snapshotTimeparameter to the needed recovery timestamp.Console
Go to the Instance details page in the Cloud console.
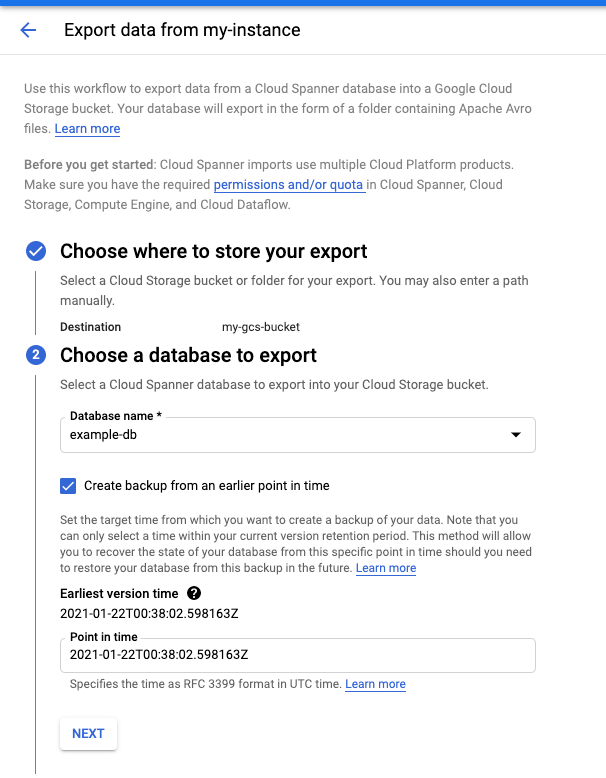
In the Import/Export tab, click Export.
Check the Export database from an earlier point in time box.

For detailed instructions, see export a database.
gcloud
Use the Spanner to Avro Dataflow template to export the database.
gcloud dataflow jobs run JOB_NAME \
   --gcs-location='gs://cloud-spanner-point-in-time-recovery/Import Export Template/export/templates/Cloud_Spanner_to_GCS_Avro'
   --region=DATAFLOW_REGION \
   --parameters='instanceId=test-instance,databaseId=example-db,outputDir=YOUR_GCS_DIRECTORY,snapshotTime=2020-09-01T23:59:40.125245Z'
Usage notes:
- You can track the progress of your import and export jobs in the Dataflow Console.
- Spanner guarantees that the exported data is externally and transactionally consistent at the specified timestamp.
- Specify the timestamp in RFC 3339 format. For example, 2020-09-01T23:59:30.234233Z.
- Make sure that the timestamp you specify is more recent than the database's
earliest_version_time. If data no longer exists at the specified timestamp, you get an error.
Import to a new database.
Console
Go to the Instance details page in the Cloud console.
In the Import/Export tab, click Import.
For detailed instructions, see Importing Spanner Avro Files.
gcloud
Use the Cloud Storage Avro to Spanner Dataflow template to import the Avro files.
gcloud dataflow jobs run JOB_NAME \
   --gcs-location='gs://cloud-spanner-point-in-time-recovery/Import Export Template/import/templates/GCS_Avro_to_Cloud_Spanner' \
   --region=DATAFLOW_REGION \
   --staging-location=YOUR_GCS_STAGING_LOCATION \
   --parameters='instanceId=test-instance,databaseId=example-db,inputDir=YOUR_GCS_DIRECTORY'
Estimate the storage increase
Before increasing a database's version retention period, you can estimate the expected increase in database storage utilization by totaling the transaction bytes for the needed period of time. For example the following query calculates the number of GiB written in the past 7 days (168h) by reading from the transaction statistics tables.
GoogleSQL
SELECT
  SUM(bytes_per_hour) / (1024 * 1024 * 1024 ) as GiB
FROM (
  SELECT
    ((commit_attempt_count - commit_failed_precondition_count - commit_abort_count) * avg_bytes)
    AS bytes_per_hour, interval_end
  FROM
    spanner_sys.txn_stats_total_hour
  ORDER BY
    interval_end DESC
  LIMIT
    168);
PostgreSQL
SELECT
  bph /  (1024 * 1024 * 1024 ) as GiB
FROM (
  SELECT
    SUM(bytes_per_hour) as bph
  FROM (
    SELECT
      ((commit_attempt_count - commit_failed_precondition_count - commit_abort_count) * avg_bytes)
      AS bytes_per_hour, interval_end
    FROM
      spanner_sys.txn_stats_total_hour
    ORDER BY
      interval_end DESC
    LIMIT
      168)
sub1) sub2;
Note that the query provides a rough estimate and can be inaccurate for a few reasons:
- The query doesn't account for the timestamp that must be stored for each version of old data. If your database consists of many small data types, the query may underestimate the storage increase.
- The query includes all write operations, but only update operations create previous versions of data. If your workload includes a lot of insert operations, the query may overestimate the storage increase.
