In diesem Dokument wird beschrieben, wie Sie Testläufe für Ihre Integrationen konfigurieren. Informationen zu Testläufen, unterstützten Testkonfigurationen und Einschränkungen finden Sie unter Einführung in Testläufe.
Hinweise
Bitten Sie Ihren Administrator, Ihnen die IAM-Rolle Application Integration Editor (roles/integrations.integrationEditor) für das Projekt zuzuweisen, um die Berechtigung zu erhalten, die Sie zum Konfigurieren von Testläufen benötigen.
Weitere Informationen zum Zuweisen von Rollen finden Sie unter Zugriff auf Projekte, Ordner und Organisationen verwalten.
Diese vordefinierte Rolle enthält die Berechtigung integrations.googleapis.com/testCases.create, die zum Konfigurieren von Testläufen erforderlich ist.
Prüfen Sie, ob sich Ihre Integration im Status DRAFT befindet. Wenn sich Ihre Integration im Status PUBLISHED befindet, klicken Sie auf Bearbeitung aktivieren. In der Integration wird eine neue Version im Status DRAFT für Sie erstellt.
Die folgende Abbildung zeigt die Bearbeitungssperre im Integrationseditor.
Achten Sie darauf, dass in der Integration ein Testlauf vorhanden ist. Informationen zum Erstellen eines Testlaufs finden Sie unter Testläufe erstellen.
Testkonfigurationen für Trigger konfigurieren
Wählen Sie eine der folgenden Optionen aus, um die Testkonfigurationen für den Trigger zu konfigurieren:
Rufen Sie in der Google Cloud Console die Seite Application Integration auf.
Die Seite Integrationen wird angezeigt. Dort sind alle Integrationen aufgeführt, die im Google Cloud -Projekt verfügbar sind.
Wählen Sie eine vorhandene Integration aus, für die Sie einen Test erstellen möchten.
Dadurch wird die Integration auf der Seite Integrationseditor geöffnet.
Klicken Sie auf Testlauf und dann auf Testläufe öffnen. Der Bereich Testfälle wird mit einer Liste der Testfälle für die aktuelle Integrationsversion angezeigt.
Wählen Sie den Testlauf aus der Liste aus.
Auf der Seite „Integrationseditor“ wird im Designer-Arbeitsbereich Testlaufmodus ist aktiv angezeigt. Das folgende Bild zeigt den Bereich Konfiguration testen für den Trigger:
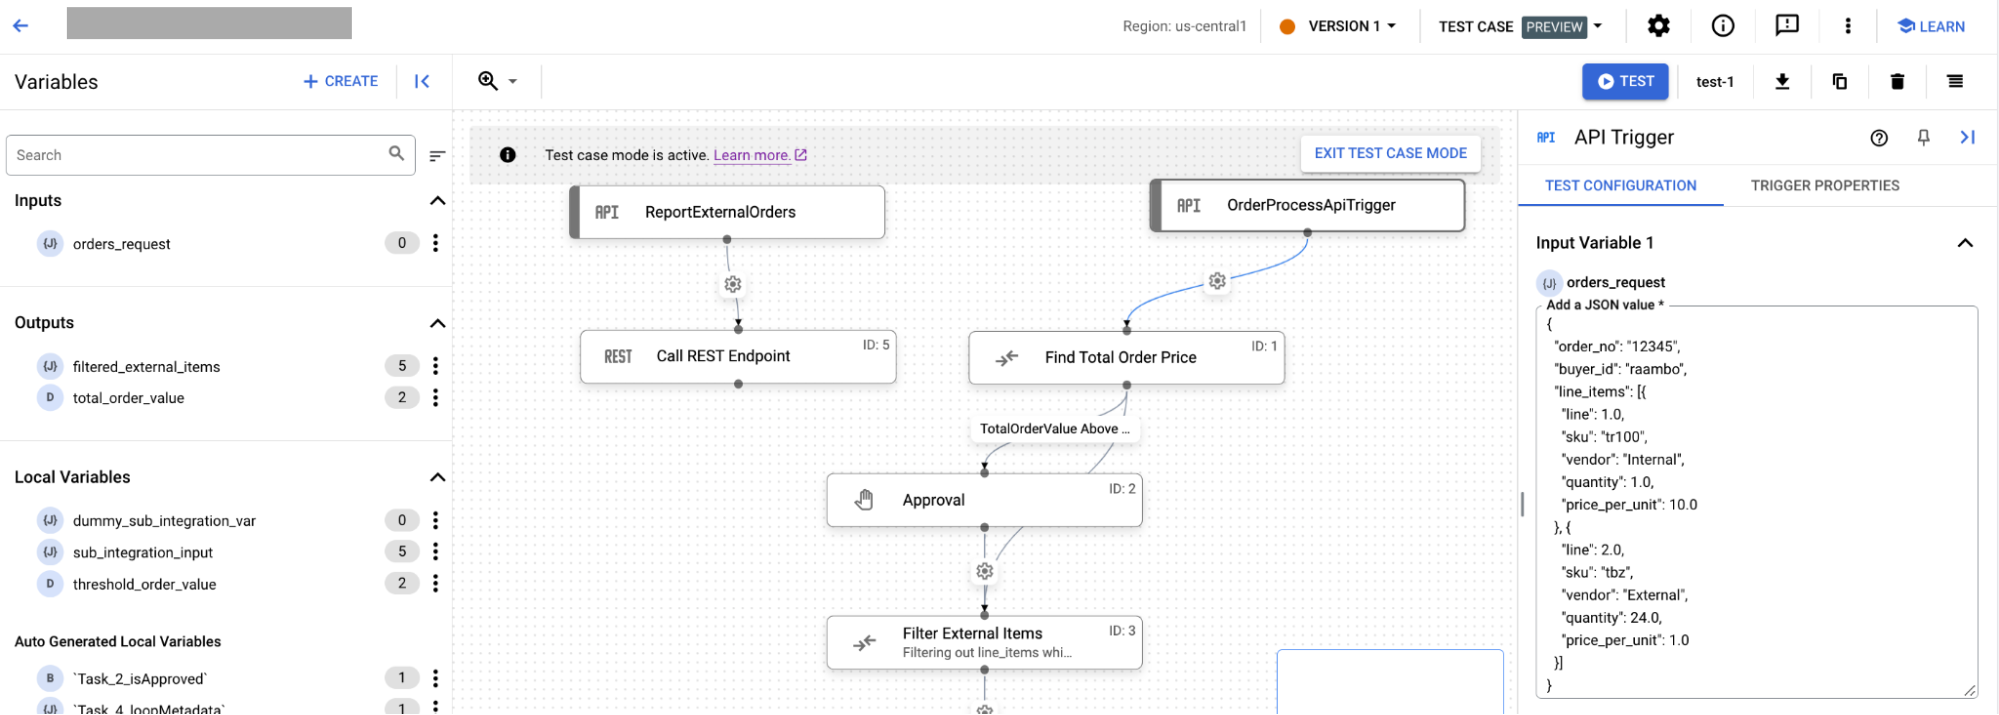
Klicken Sie auf der Seite „Integrationseditor“ auf den Trigger, um den Bereich für die Triggerkonfiguration zu öffnen. Führen Sie anschließend folgende Schritte aus:
Wenn Ihre Integration Eingabevariablen hat, werden diese auf dem Tab Konfiguration testen angezeigt. Die Werte, die Sie in die Variablen eingeben, werden automatisch gespeichert.
Klicken Sie auf den Tab Triggereigenschaften, um die Triggereigenschaften aufzurufen.
Testkonfigurationen für Aufgaben konfigurieren
Wählen Sie eine der folgenden Optionen aus, um die Testattribute für die Integrationsaufgabe zu konfigurieren:
Rufen Sie in der Google Cloud Console die Seite Application Integration auf.
Die Seite Integrationen wird angezeigt. Dort sind alle Integrationen aufgeführt, die im Google Cloud -Projekt verfügbar sind.
Wählen Sie eine vorhandene Integration aus, für die Sie einen Test erstellen möchten.
Dadurch wird die Integration auf der Seite Integrationseditor geöffnet.
Klicken Sie auf Testlauf und dann auf Testläufe öffnen. Der Bereich Testfälle wird mit einer Liste der Testfälle für die aktuelle Integrationsversion angezeigt.
Wählen Sie den Testlauf aus der Liste aus.
Auf der Seite „Integrationseditor“ wird im Designer-Arbeitsbereich Testlaufmodus ist aktiv angezeigt.
Klicken Sie auf der Seite „Integrationseditor“ auf die Aufgabe, um den Bereich für die Testkonfiguration zu öffnen. Die folgende Abbildung zeigt den Bereich Konfiguration testen für die Aufgabe:
Führen Sie auf dem Tab Testkonfiguration die folgenden Schritte aus:
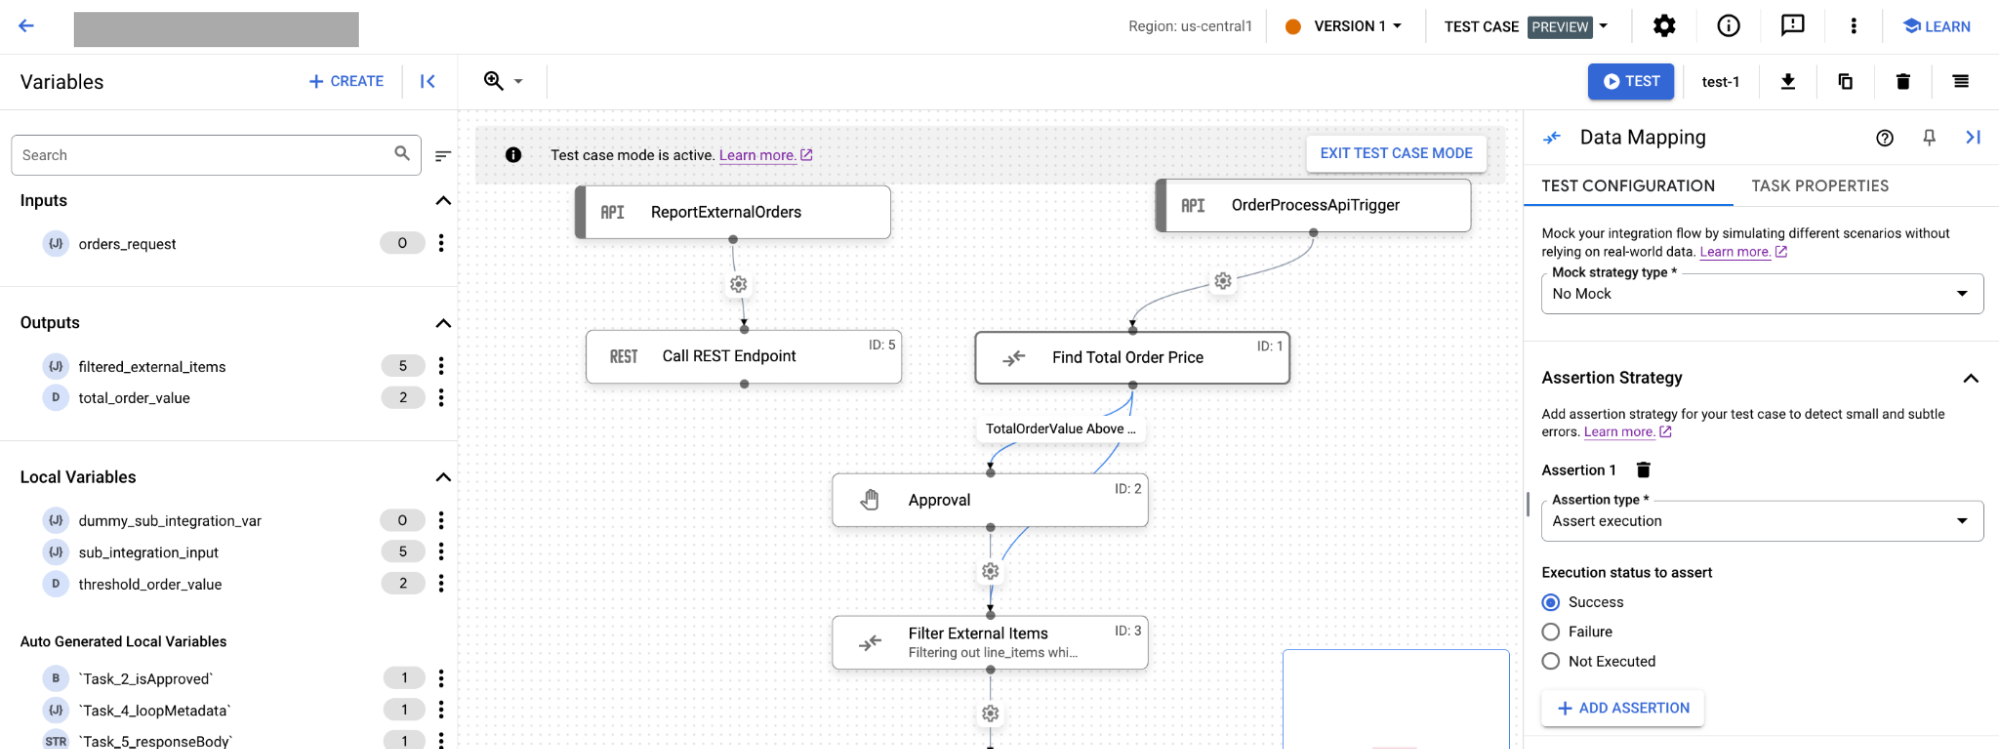
Wählen Sie unter Mock-Strategietyp eine der folgenden Mock-Strategien aus:
Wenn Sie Kein Mock auswählen, wird Ihre Aufgabe in der Hauptintegration so ausgeführt, wie es in der tatsächlichen Integration der Fall wäre. Standardmäßig ist für Aufgaben der Strategietyp Kein Mock ausgewählt.
Wenn Sie Mock-Ausführung auswählen, müssen Sie für Status der Mock-Ausführung eine der folgenden Optionen auswählen:
Überspringen:Die Aufgabe wird als erfolgreich abgeschlossen markiert.
Fehler:Die Aufgabe ist als fehlgeschlagen markiert.
Wenn Sie Mock-Ausgabe auswählen, müssen Sie für Aufgabenausgabeliste die Ausgabe der Aufgaben für den nächsten Knoten in der Integration angeben.
Führen Sie im Abschnitt Assertion strategy (Assertion-Strategie) folgende Schritte aus:
Wählen Sie im Feld Assertion type (Assertionstyp) eine der folgenden Optionen aus:
Wenn Sie Ausführung bestätigen auswählen, wählen Sie eine der folgenden Optionen für Zu bestätigender Ausführungsstatus aus:
Erfolg
Fehler
Nicht ausgeführt
Wenn Sie Parameter bestätigen auswählen, gehen Sie so vor:
Wählen Sie unter Zu bestätigende Parameter aus, ob Sie Parameter einschließlich Ein- und Ausgabeparameter bestätigen möchten.
Wählen Sie den Operator aus, mit dem der bestätigte Parameter mit dem eingegebenen Wert verglichen werden soll. Für den Vergleich des bestätigten Parameters können die folgenden Operationen verwendet werden:
Ist gleich
Ist nicht gleich
Enthält
Geben Sie im Feld Wert den Wert ein, mit dem der Parameter verglichen werden soll.
Optional: Wenn Sie weitere Zusicherungen hinzufügen möchten, klicken Sie auf + Zusicherung hinzufügen.
[[["Leicht verständlich","easyToUnderstand","thumb-up"],["Mein Problem wurde gelöst","solvedMyProblem","thumb-up"],["Sonstiges","otherUp","thumb-up"]],[["Schwer verständlich","hardToUnderstand","thumb-down"],["Informationen oder Beispielcode falsch","incorrectInformationOrSampleCode","thumb-down"],["Benötigte Informationen/Beispiele nicht gefunden","missingTheInformationSamplesINeed","thumb-down"],["Problem mit der Übersetzung","translationIssue","thumb-down"],["Sonstiges","otherDown","thumb-down"]],["Zuletzt aktualisiert: 2025-08-25 (UTC)."],[[["\u003cp\u003eThis document provides instructions on how to configure test cases for integrations within Application Integration, covering both triggers and tasks.\u003c/p\u003e\n"],["\u003cp\u003eTo configure test cases, users must have the \u003ccode\u003eApplication Integration Editor\u003c/code\u003e IAM role, and their integration must be in the \u003ccode\u003eDRAFT\u003c/code\u003e state, accessible via the integrations page.\u003c/p\u003e\n"],["\u003cp\u003eTest configurations for triggers allow users to set input variables and view trigger properties, while test configurations for tasks allow selecting mock strategies and setting assertions.\u003c/p\u003e\n"],["\u003cp\u003eUsers have options to mock or skip tasks in test scenarios, or to assert their execution status or input/output parameters, all based on the selected testing criteria.\u003c/p\u003e\n"],["\u003cp\u003eThe guide also gives key information on how to create, copy, delete, run, upload and download test cases as well as view test case execution logs.\u003c/p\u003e\n"]]],[],null,["# Configure test cases\n\nSee the [supported connectors](/integration-connectors/docs/connector-reference-overview) for Application Integration.\n\nConfigure test cases\n====================\n\n|\n| **Preview\n| --- Test cases**\n|\n|\n| This feature is subject to the \"Pre-GA Offerings Terms\" in the General Service Terms section\n| of the [Service Specific Terms](/terms/service-terms#1).\n|\n| Pre-GA features are available \"as is\" and might have limited support.\n|\n| For more information, see the\n| [launch stage descriptions](/products#product-launch-stages).\n\nThis document describes how to configure test cases for your integrations. For information about test cases, supported test configurations, and its limitations, see [Introduction to test cases](/application-integration/docs/test-cases).\n\nBefore you begin\n----------------\n\n-\n\n To get the permission that\n you need to configure test cases,\n\n ask your administrator to grant you the\n\n\n [Application Integration Editor](/iam/docs/roles-permissions/integrations#integrations.integrationEditor) (`roles/integrations.integrationEditor`)\n IAM role on project.\n\n\n For more information about granting roles, see [Manage access to projects, folders, and organizations](/iam/docs/granting-changing-revoking-access).\n\n\n This predefined role contains the\n ` integrations.googleapis.com/testCases.create`\n permission,\n which is required to\n configure test cases.\n\n\n You might also be able to get\n this permission\n with [custom roles](/iam/docs/creating-custom-roles) or\n other [predefined roles](/iam/docs/roles-overview#predefined).\n- Ensure that your integration is in the `DRAFT` state. If your integration is in the `PUBLISHED` state, click **Enable Editing** . A new version in the `DRAFT` state is created in the integration for you. The following figure shows the edit lock in the integration editor.\n\n \u003cbr /\u003e\n\n\n- Ensure that you have a test case in the integration. For information about how to create a test case, see [Create Test Cases](/application-integration/docs/create-test-cases).\n\nConfigure test configurations for triggers\n------------------------------------------\n\nTo configure the test configurations for the trigger, select one of the following options:\n\n1. In the Google Cloud console, go to the **Application Integration** page.\n\n [Go to Application Integration](https://console.cloud.google.com/integrations)\n2. In the navigation menu, click **Integrations** .\n\n The **Integrations** page appears listing all the integrations available in the Google Cloud project.\n3. Select an existing integration for which you want to create a test. This opens the integration in the *integration editor*.\n\n4. Click **Test Case** and then click **Open test cases** . The **Test Cases** pane appears with a list of test cases for the current integration version.\n5. Select the test case from the list. In the Integration editor page, the designer canvas displays **Test case mode is active** . The following image shows the **Test configuration** pane for the trigger:\n\n\n6. In the Integration editor page, click the trigger to open the trigger configuration pane. Then, do the following:\n - If you have input variables for your integration, then the **Test configuration** tab shows those input variables. The values that you enter in the variables are saved automatically.\n - To view the trigger properties, click the **Trigger properties** tab.\n\nConfigure test configurations for tasks\n---------------------------------------\n\nTo configure the test properties for the integrations task, select one of the following options:\n\n1. In the Google Cloud console, go to the **Application Integration** page.\n\n [Go to Application Integration](https://console.cloud.google.com/integrations)\n2. In the navigation menu, click **Integrations** .\n\n The **Integrations** page appears listing all the integrations available in the Google Cloud project.\n3. Select an existing integration for which you want to create a test. This opens the integration in the *integration editor*.\n\n4. Click **Test Case** and then click **Open test cases** . The **Test Cases** pane appears with a list of test cases for the current integration version.\n5. Select the test case from the list. In the Integration editor page, the designer canvas displays **Test case mode is active**.\n\n6. In the Integration editor page, click the task to open the test configuration pane. The following image shows the **Test configuration** pane for the task:\n\n\n In the **Test configuration** tab, follow these steps:\n 1. From the **Mock strategy type** , select one of the following mock strategies:\n - If you select **No mock** , then your task executes from the main integration as it should in the actual integration. By default, **No mock** strategy type is selected for tasks.\n - If you select **Mock execution** , then for **Mock execution status** , you must select one of the following:\n - **Skip:** Task is marked as successfully completed\n - **Failure:** Task is marked as failed\n - If you select **Mock Output** , then for **Task Output list**, you must provide the output of the tasks for the next node in the integration.\n 2. In the **Assertion strategy** section, do the following:\n 1. From the **Assertion type** field, select one of the following options:\n - If you select **Assert execution** , then select one of the following options for **Execution status to assert** :\n - **Success**\n - **Failure**\n - **Not executed**\n - If you select **Assert parameters** , then do the following:\n 1. From the **Parameters to assert** select if you want to assert parameters including input and output parameters.\n 2. Select the **Operator** for comparing the asserted parameter with the entered value. The operations to compare the asserted parameter can be one of the following:\n - Equals\n - Not equals\n - Contains\n 3. In the **Value** field, enter the value to which you want to compare the parameter.\n 2. Optional: To add more assertions, click **+ Add Assertion**.\n\nWhat's next\n-----------\n\n- Learn about [test cases](/application-integration/docs/test-cases).\n- Learn how to do the following:\n\n - [Create test cases](/application-integration/docs/create-test-cases).\n - [Copy](/application-integration/docs/manage-test-cases#copy) and [delete](/application-integration/docs/manage-test-cases#delete) test cases.\n - [Run a test case](/application-integration/docs/run-test-cases) and [view test case execution logs](/application-integration/docs/integration-execution-logs#view-integration-execution-logs).\n - [Upload and download test cases](/application-integration/docs/upload-download-test-cases)."]]