Invoke a sub-integration using a For Each Loop task
This quickstart shows you how to create an integration that uses a For Each Loop task to invoke a sub-integration. The sub-integration takes the input from the main integration and sends emails to the recipients using the Send Email task.
Create the sub-integration
- In the Google Cloud console, go to the Application Integration page.
- Click Integrations from the left navigation menu to open the Integrations page.
- Click Create integration.
- Enter a name and a description for the integration.
For this quickstart, enter the name
ForEachSendEmailSubIntegrationand the descriptionQuickstart sub-integration. - Select a region for the integration.
- Click Create to open the integration editor.
Add an API trigger in the sub-integration
Triggers are required to start the sequence of tasks that make up an integration. In this quickstart, you use an API trigger to start the integration.
To add and configure the API trigger, perform the following steps:
- In the integration editor, click Triggers to view the list of available triggers.
- Click and place the API trigger element in the integration editor.
Create an input variable in the sub-integration
The sub-integration uses a variable to store the details received in JSON format from the main integration. To create a new input variable, perform the following steps:
- Click (Toggle panel) in the designer navigation bar to bring up the Variables pane.
- Click +Create to create a variable.
In the Create Variable pane, do the following:
a. Name: Enter
order_details.b. Data Type: Select JSON.
c. Click Infer from the default value.
d. In Default Value, enter the following JSON.
  {
    "orderId": "1",
    "customerName": "Harry Ford",
    "emailId": "YOUR_EMAIL_ID",
    "shippingAddress": {
      "city": "New York",
      "country": "USA",
      "zipcode": "103487"
      },
    "items": [{
      "itemid": "111-222-333",
      "itemName": "Smartphone",
      "itemPrice": 999.0,
      "quantity": 1.0
      }, {
      "itemid": "444-555-666",
      "itemName": "Mobile Cover",
      "itemPrice": 49.0,
      "quantity": ""
      }],
    "paymentDetails": {
      "mode": "COD",
      "status": ""
      },
    "expectedDelivery": "15 March 2023"
  }
In this sample JSON object, replace
YOUR_EMAIL_IDwith the email ID that you want to use to test the integration.e. Click Use as an input to integration.
f. Click Create.
Add and configure a Data Mapping task
The Data Mapping task lets you perform variable assignments in your integration, get and set properties of json objects, and apply nested transform functions to values. The variables used by the Data Mapping task can be either integration variables or task variables.
To add and configure a Data Mapping task, perform the following steps:
- In the integration editor, click Tasks to view the list of available tasks.
- Click and place the Data Mapping element in the integration editor.
- Click the Data Mapping element in the integration editor to open the task configuration pane.
- Click Open Data Mapping Editor.
- Configure the Input as follows:
- In the Input section, click Variable or Value.
- In Variable, enter
itemand then select order_details.items. - Click Save.
- Add a mapping function to order_details.items. Click the + symbol next to order_details.items. In the list of functions, scroll and select FOR_EACH(Any) -> JSON.
- Enter the FOR_EACH function input parameter. Click Variable or Value and select ~obj1.
- Click Save.
- Add a mapping function to obj1. Click + in the FOR EACH row within the parentheses after the obj1 element that you just added. In the list of functions, scroll and select GET PROPERTY(String) -> JSON.
- Click Variable or Value and in Value enter
itemName. - Click Save.
- Click + Add a function in the row after GET PROPERTY and select TO_STRING() -> String.
- Click + Add a function in the last row and select TO_STRING() -> String.
- Configure the Output as follows:
- Create a new output variable. In the Output section, click create a new one.
- In the Create Variable pane, enter the name
items, retain the default values for all the other fields, and click Create.
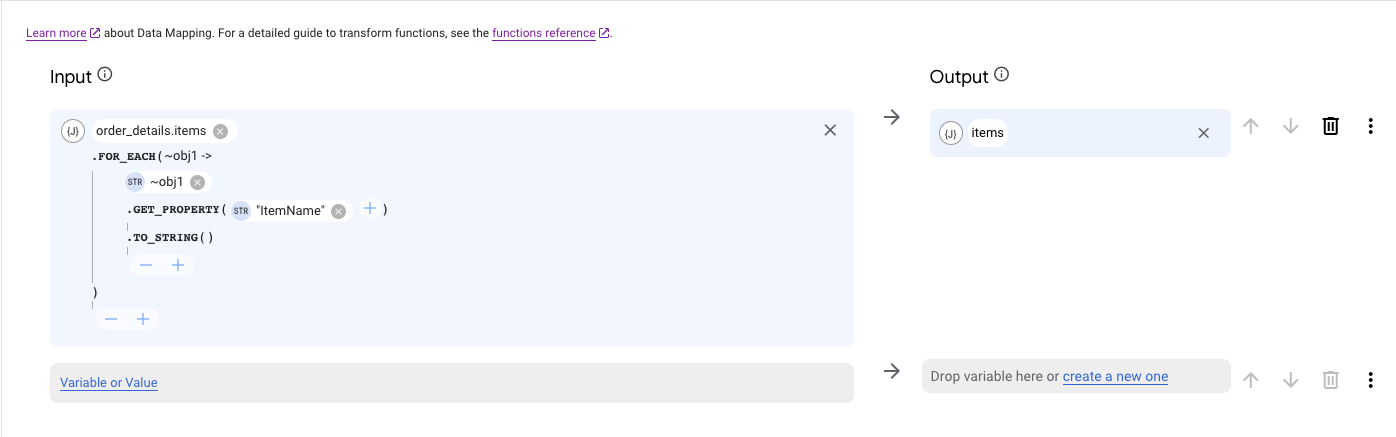
- Verify that your data mapping configuration is similar to the following image.
- Close the Data Mapping Editor to return to the integration editor.
Add and configure a Send Email task
To add and configure the Send Email task to send an email to each of the recipients, perform the following steps.
- In the integration editor, click Add a task/trigger.
- Go to Tasks and click and place the Send Email element in the integration editor.
- Click the Send Email task element in the integration editor to open the task configuration pane.
Set the following Task Input fields:
- To Recipient(s): Click Variable and select order_details.emailId.
- Subject: Enter the subject for the email. For this quickstart, enter
Order delivery notification. - Body in Plain Text: Enter the following text:
Hi $order_details.customerName$! Your order with Order Id: $order_details.orderId$ with items: $items$ has been successfully placed. Expected delivery by: $order_details.expectedDelivery$.
Connect the elements in the sub-integration
Now that you have added and configured the required tasks and triggers in the sub-integration, add a connection (edge) between the elements. An edge denotes the flow of control from one element to the next.
- Add an edge from the API trigger element to the Data Mapping element. Hover over a control point on the API trigger element, then drag a line to a control point on the Data Mapping element.
- Similarly, add an edge from the Data Mapping element to the Send Email element.
Test and publish the sub-integration
- To test this sub-integration, click Test in the integration editor toolbar and then click Test integration in the Test Integration dialog. The sub-integration runs with the default value as input and sends an email to the email address specified in the Send Email task. You should see a success message when the test completes.
- To publish this sub-integration, click Publish in the integration editor toolbar.
Create the main integration
- In the navigation menu, click Integrations to go back to the Integrations page.
- Click Create integration.
- Enter a name and (optionally) a description for the integration. For this quickstart, enter the name
ForEachSendEmailand the descriptionQuickstart main integration. - Select a Region for the integration from the list of supported regions. Make sure that you create the main integration in the same region as the sub-integration.
- Click Create.
Add an API trigger in the main integration
- In the integration editor, click Triggers to view the list of available tasks and triggers.
- Click and place the API trigger element in the integration editor.
Create an input variable in the main integration
In the main integration, an input variable is used to store the data that is passed through the For Each Loop to the sub-integration. You can create this variable now, or in the next step when you add and configure the For Each Loop task. For this quickstart, create the variable now.
- Click (Toggle panel) in the designer navigation bar to bring up the Variables pane.
In the Create Variable pane, do the following:
a. Name: Enter
order_requests.b. Data Type: Select JSON.
c. Click Infer from the default value.
d. In Default Value, enter the following JSON:
  [{
    "orderId": "1",
    "customerName": "Harry Ford",
    "emailId": "YOUR_EMAIL_ID",
    "shippingAddress": {
      "city": "New York",
      "country": "USA",
      "zipcode": "103487"
    },
    "items": [{
      "itemid": "111-222-333",
      "itemName": "Smartphone",
      "itemPrice": 999.0,
      "quantity": 1.0
    }, {
      "itemid": "444-555-666",
      "itemName": "Mobile Cover",
      "itemPrice": 49.0,
      "quantity": ""
    }],
    "paymentDetails": {
      "mode": "COD",
      "status": ""
    },
   "expectedDelivery": "15 March 2023"
  }, {
    "orderId": "2",
    "customerName": "Tim Harvey",
    "emailId": "YOUR_EMAIL_ID",
    "shippingAddress": {
      "city": "Los Angeles",
      "country": "USA",
      "zipcode": "210738"
    },
    "items": [{
      "itemid": "222-333-444",
      "itemName": "Laptop",
      "itemPrice": 5999.0,
      "quantity": 1.0
   }],
    "paymentDetails": {
      "mode": "Online Payment",
      "status": "Success"
    },
    "expectedDelivery": "21 Feb 2023"
  }]
In this sample JSON object, replace both occurrences of
YOUR_EMAIL_IDwith the email ID that you want to use to test the integration.e. Click Use as an input to integration.
f. Click Create.
Add and configure a For Each Loop task
- In the integration editor, click Tasks.
- Click and place the For Each Loop element in the integration editor.
- Click the For Each Loop task element in the integration editor to open the task configuration pane.
- In the configuration pane, do the following:
- List to iterate: Select the input variable that you created, order_requests.
- API trigger ID: Select the API trigger in your sub-integration. For this quickstart, select api_trigger/ForEachSendEmailSubIntegration_API_1.
- Integration name: Select the name of the sub-integration that you want to invoke. For this quickstart, select ForEachSendEmailSubIntegration.
- Iteration element sub-integration mapping: Select order_details.
Connect the elements in the main integration
- Add an edge from the API trigger element to the For Each Loop element. Hover over a control point on the API trigger element, then drag a line to a control point on the For Each Loop element.
Test and publish the main integration
The final task is to test and publish the main integration.
- Click Test in the integration editor toolbar and then click Test integration in the Test Integration dialog. You should see a success message when the test completes.
To publish this integration, click Publish in the integration editor toolbar.
Upon successful completion, the integration sends an email to the email address specified in the Send Email task. Confirm receipt of the email in your email client.
Quotas and limits
For information about quotas and limits, see Quotas and limits.