See the supported connectors for Application Integration.
Error catcher trigger
The Error Catcher trigger lets you invoke an error catcher that is defined or customized to handle the failure of an identified trigger, task, or edge condition in your integration.
Add an Error Catcher trigger
To add an Error Catcher trigger in your integration, perform the following steps:- In the Google Cloud console, go to the Application Integration page.
- In the navigation menu, click Integrations
The Integrations List page appears listing all the integrations available in the Google Cloud project.
- Select an existing integration or click Create integration to create a new one.
If you are creating a new integration:
- Enter a name and description in the Create Integration pane.
- Select a region for the integration.
- Select a service account for the integration. You can change or update the service account details of an integration any time from the Integration summary pane in the integration toolbar.
- Click Create.
The newly created integration opens in the integration editor.
- In the integration editor navigation bar, click Triggers to view the list of available triggers.
- Click and place the Error Catcher trigger element in the integration designer.
Configure the Error Catcher trigger
Click the Error Catcher trigger element in the integration designer to view the trigger configuration pane.
The Configuration tab displays the Error catcher ID, which is auto-generated when you add the trigger in your integration designer. You can optionally edit the auto-generated ID if needed. No further configuration is required for this trigger.
Create the error catcher logic
Once you have added the Error Catcher trigger in the integration designer, you can create your custom error catcher logic using the available tasks in Application Integration. Click and place the desired integration tasks elements in the integration designer and connect them with your Error Catcher trigger.
Attach the error catcher
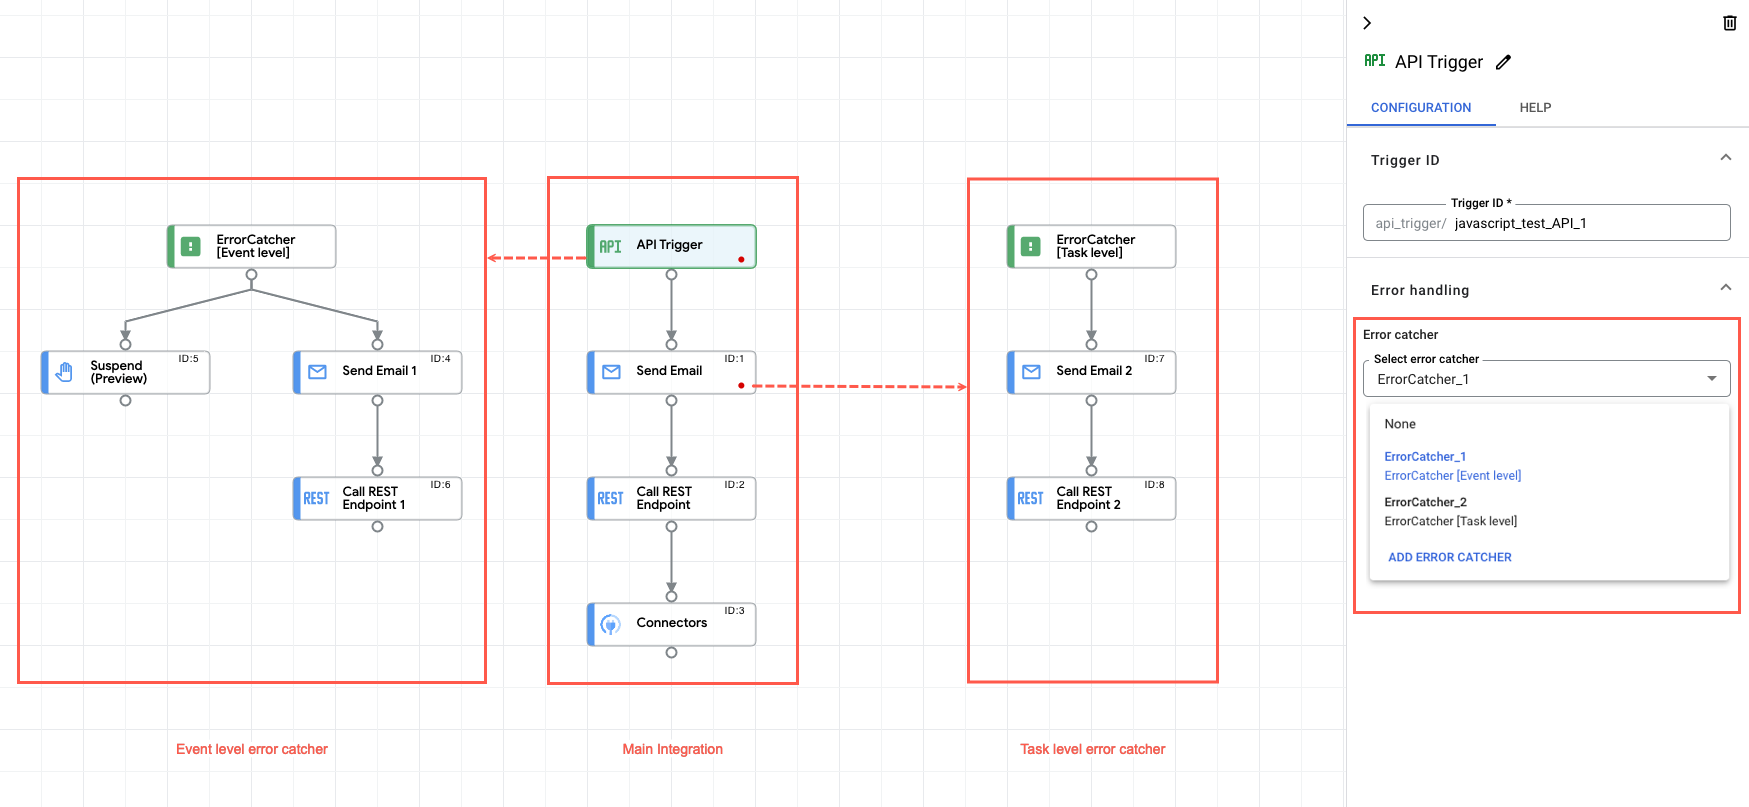
Once you have created your custom error catcher logic, you can use it to handle the errors or execution failures at both, the task and event levels. To use or attach an error catcher in your main integration, perform the following steps:
- Click the existing trigger or task in your main integration to open the trigger or task configuration pane.
- In the configuration pane, expand the Error handling section and go to Error catcher.
- Click Select error catcher and select the Error Catcher trigger ID that you want to use.
A red indicator appears on the respective trigger or task element indicating that the element is attached to an error catcher.
The following image shows a sample integration flow that uses error catcher:
Quotas and limits
For information about quotas and limits, see Quotas and limits.
What's next
- Learn about all tasks and triggers.
- Learn how to test and publish an integration.
- Learn about error handling.
- Learn about integration execution logs.