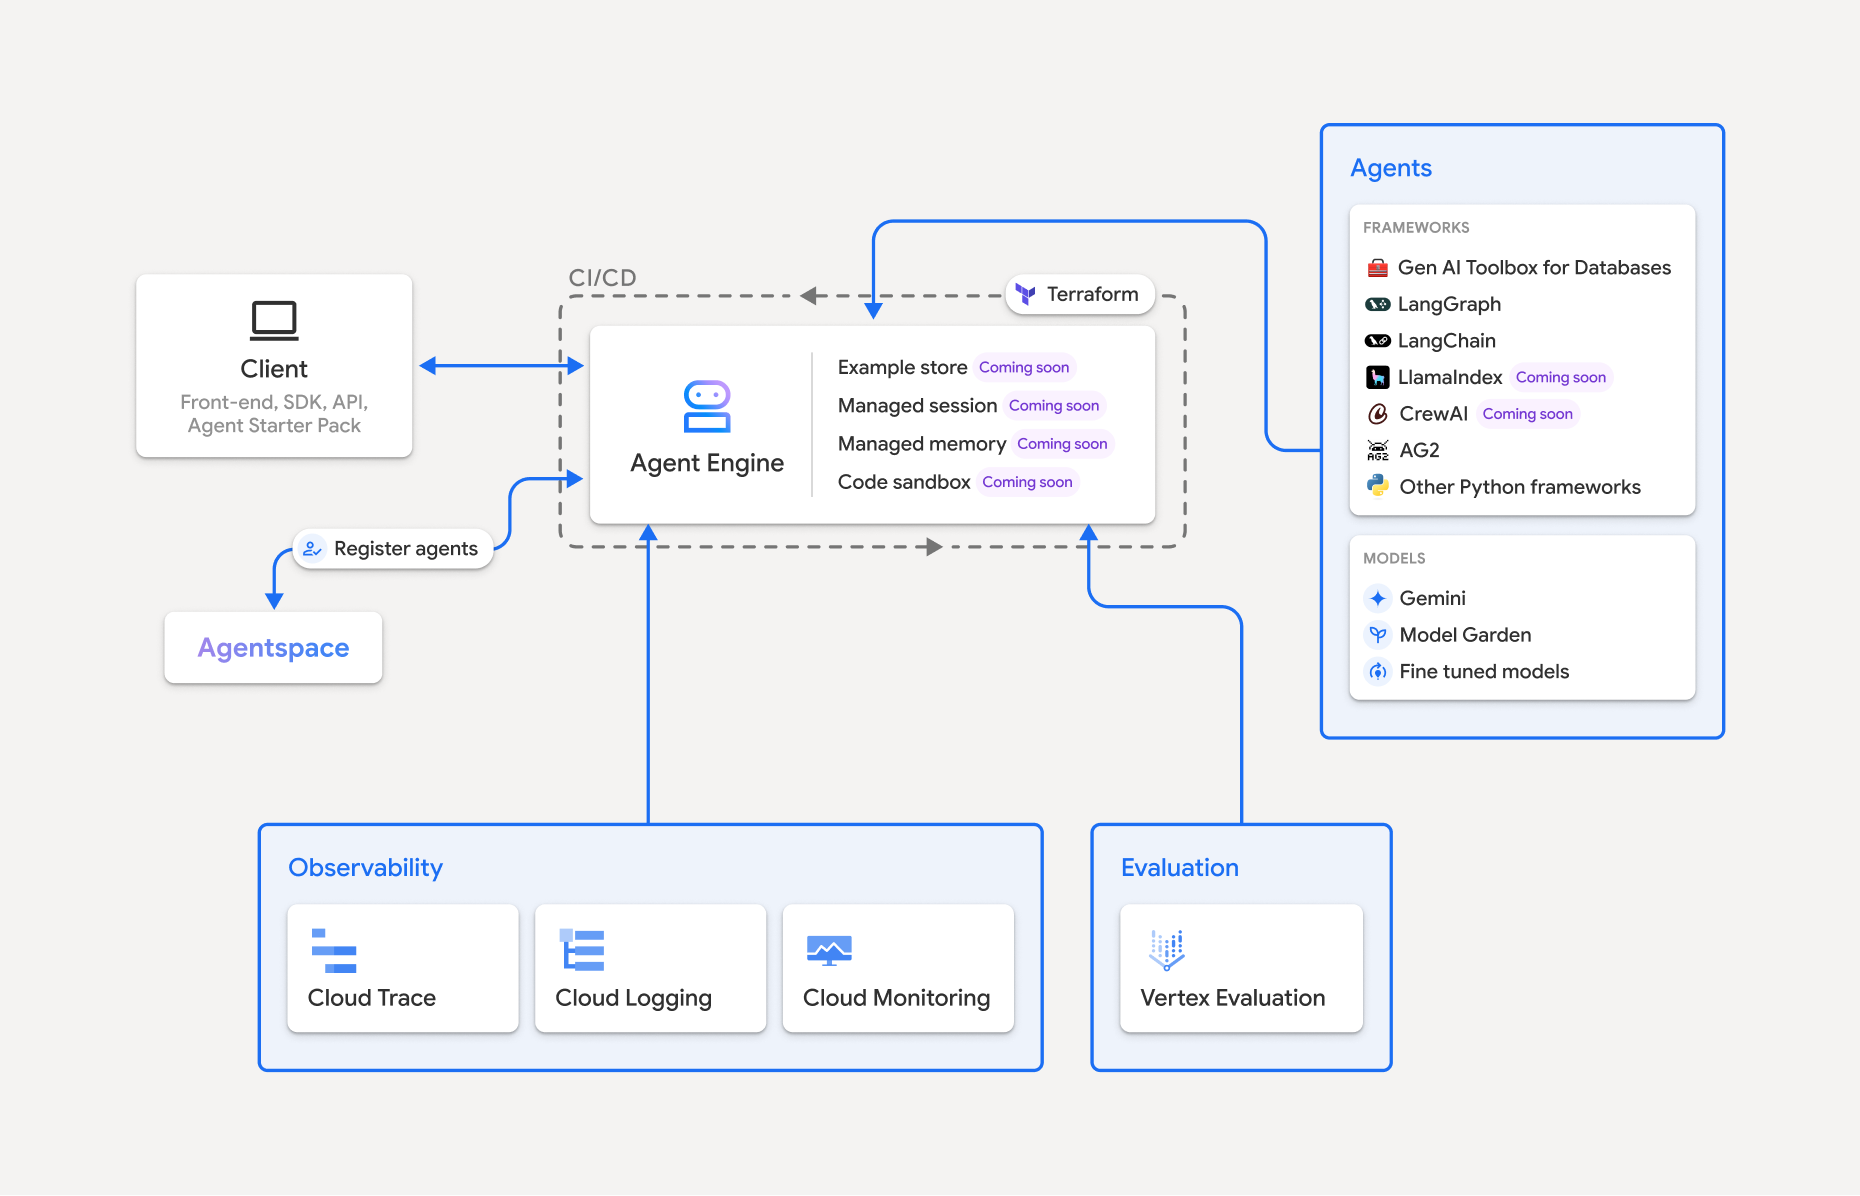
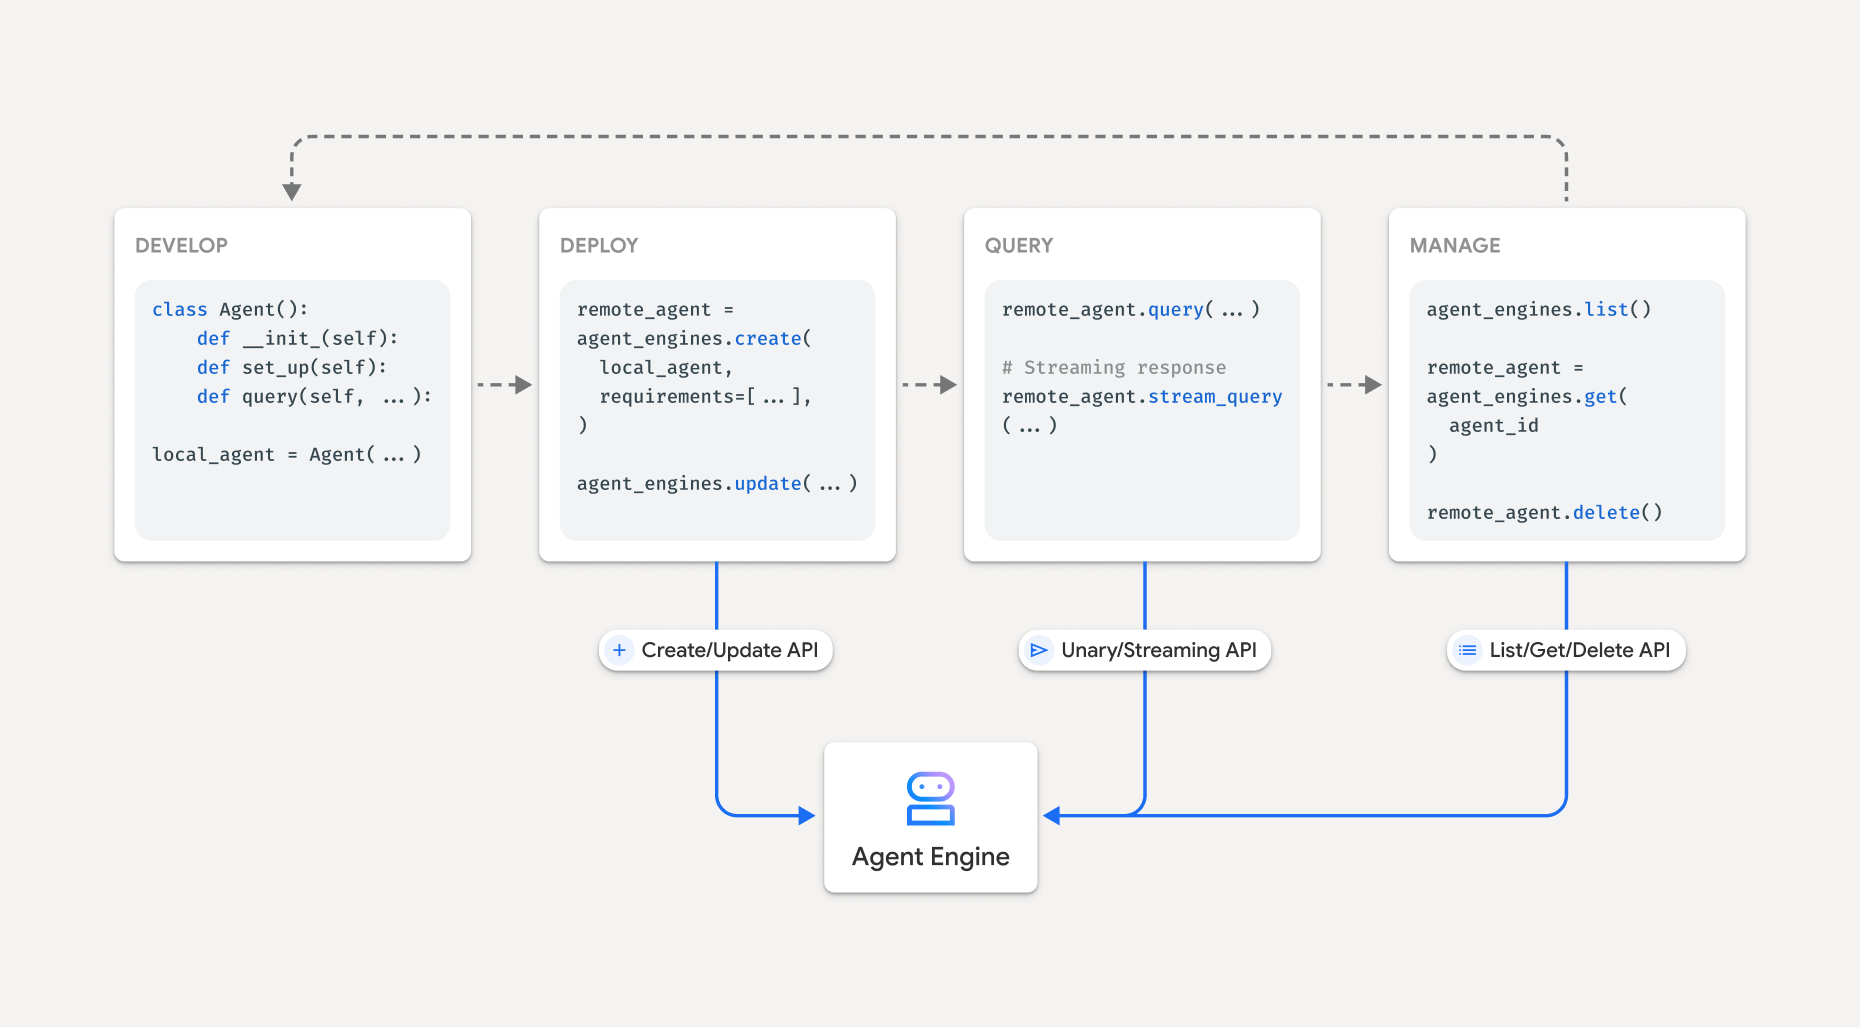
Vertex AI で LangChain を使用して作成できる小さなアプリケーションの例として、指定した日付の 2 つの通貨間の為替レートを返すアプリケーションを作成してみましょう。
独自の Python クラスを定義することも(アプリケーション テンプレートをカスタマイズするを参照)、Vertex AI SDK for Python の LangchainAgent
クラスをエージェントに使用することもできます。次の手順では、LangchainAgent
のビルド済みテンプレートを使用してこのアプリケーションを作成する方法について説明します。
- モデルを定義して構成する
- ツールを定義して使用する
- (省略可)チャットの履歴を保存する
- (省略可)プロンプト テンプレートをカスタマイズする
- (省略可)オーケストレーションをカスタマイズする
始める前に
このチュートリアルを実行する前に、環境の設定の手順に沿って環境が設定されていることを確認してください。
ステップ 1. モデルを定義して構成する
モデルを定義して構成する手順は次のとおりです。
使用するモデル バージョンを定義する必要があります。
model = "gemini-1.5-flash-001"
(省略可)モデルの安全性設定を構成できます。Gemini で安全性設定に使用できるオプションの詳細については、安全性属性を構成するをご覧ください。
安全設定を構成する方法の例を次に示します。
from langchain_google_vertexai import HarmBlockThreshold, HarmCategory safety_settings = { HarmCategory.HARM_CATEGORY_UNSPECIFIED: HarmBlockThreshold.BLOCK_NONE, HarmCategory.HARM_CATEGORY_DANGEROUS_CONTENT: HarmBlockThreshold.BLOCK_MEDIUM_AND_ABOVE, HarmCategory.HARM_CATEGORY_HATE_SPEECH: HarmBlockThreshold.BLOCK_ONLY_HIGH, HarmCategory.HARM_CATEGORY_HARASSMENT: HarmBlockThreshold.BLOCK_LOW_AND_ABOVE, HarmCategory.HARM_CATEGORY_SEXUALLY_EXPLICIT: HarmBlockThreshold.BLOCK_NONE, }
(省略可)モデル パラメータは次の方法で指定できます。
model_kwargs = { # temperature (float): The sampling temperature controls the degree of # randomness in token selection. "temperature": 0.28, # max_output_tokens (int): The token limit determines the maximum amount of # text output from one prompt. "max_output_tokens": 1000, # top_p (float): Tokens are selected from most probable to least until # the sum of their probabilities equals the top-p value. "top_p": 0.95, # top_k (int): The next token is selected from among the top-k most # probable tokens. This is not supported by all model versions. See # https://cloud.google.com/vertex-ai/generative-ai/docs/multimodal/image-understanding#valid_parameter_values # for details. "top_k": None, # safety_settings (Dict[HarmCategory, HarmBlockThreshold]): The safety # settings to use for generating content. # (you must create your safety settings using the previous step first). "safety_settings": safety_settings, }
これで、モデル構成を使用して LangchainAgent
を作成してクエリを実行できます。
agent = reasoning_engines.LangchainAgent(
model=model, # Required.
model_kwargs=model_kwargs, # Optional.
)
response = agent.query(input="What is the exchange rate from US dollars to Swedish currency?")
レスポンスは、次の例のような Python 辞書です。
{"input": "What is the exchange rate from US dollars to Swedish currency?",
"output": """I cannot provide the live exchange rate from US dollars to Swedish currency (Swedish krona, SEK).
**Here's why:**
* **Exchange rates constantly fluctuate.** Factors like global economics, interest rates, and political events cause
these changes throughout the day.
* **Providing inaccurate information would be misleading.**
**How to find the current exchange rate:**
1. **Use a reliable online converter:** Many websites specialize in live exchange rates. Some popular options include:
* Google Finance (google.com/finance)
* XE.com
* Bank websites (like Bank of America, Chase, etc.)
2. **Contact your bank or financial institution:** They can give you the exact exchange rate they are using.
Remember to factor in any fees or commissions when exchanging currency.
"""}
(省略可)高度なカスタマイズ
LangchainAgent
テンプレートは、Google Cloud で利用可能なすべての基盤モデルにアクセスできるため、デフォルトで ChatVertexAI
を使用します。ChatVertexAI
で使用できないモデルを使用するには、次のシグネチャの Python 関数を使用して model_builder=
引数を指定します。
from typing import Optional
def model_builder(
*,
model_name: str, # Required. The name of the model
model_kwargs: Optional[dict] = None, # Optional. The model keyword arguments.
**kwargs, # Optional. The remaining keyword arguments to be ignored.
):
LangChain でサポートされているチャットモデルとその機能の一覧については、チャットモデルをご覧ください。model=
と model_kwargs=
でサポートされる値のセットはチャットモデルごとに異なるため、詳細については、それぞれのドキュメントをご覧ください。
ChatVertexAI
デフォルトでインストールされます。
model_builder
引数を省略する場合は、LangchainAgent
テンプレートで使用します。次に例を示します。
agent = reasoning_engines.LangchainAgent(
model=model, # Required.
model_kwargs=model_kwargs, # Optional.
)
ChatAnthropic
まず、ドキュメントに沿ってアカウントを設定し、パッケージをインストールします。
次に、ChatAnthropic
を返す model_builder
を定義します。
def model_builder(*, model_name: str, model_kwargs = None, **kwargs):
from langchain_anthropic import ChatAnthropic
return ChatAnthropic(model_name=model_name, **model_kwargs)
最後に、次のコードを使用して LangchainAgent
テンプレートで使用します。
agent = reasoning_engines.LangchainAgent(
model="claude-3-opus-20240229", # Required.
model_builder=model_builder, # Required.
model_kwargs={
"api_key": "ANTHROPIC_API_KEY", # Required.
"temperature": 0.28, # Optional.
"max_tokens": 1000, # Optional.
},
)
ChatOpenAI
ChatOpenAI
は、Gemini の ChatCompletions API と組み合わせて使用できます。
まず、ドキュメントに沿ってパッケージをインストールします。
次に、ChatOpenAI
を返す model_builder
を定義します。
def model_builder(
*,
model_name: str,
model_kwargs = None,
project: str, # Specified via vertexai.init
location: str, # Specified via vertexai.init
**kwargs,
):
import google.auth
from langchain_openai import ChatOpenAI
# Note: the credential lives for 1 hour by default.
# After expiration, it must be refreshed.
creds, _ = google.auth.default(scopes=["https://www.googleapis.com/auth/cloud-platform"])
auth_req = google.auth.transport.requests.Request()
creds.refresh(auth_req)
if model_kwargs is None:
model_kwargs = {}
endpoint = f"https://{location}-aiplatform.googleapis.com"
base_url = f'{endpoint}/v1beta1/projects/{project}/locations/{location}/endpoints/openapi'
return ChatOpenAI(
model=model_name,
base_url=base_url,
api_key=creds.token,
**model_kwargs,
)
最後に、次のコードを使用して LangchainAgent
テンプレートで使用します。
agent = reasoning_engines.LangchainAgent(
model="google/gemini-1.5-pro-001", # Or "meta/llama3-405b-instruct-maas"
model_builder=model_builder, # Required.
model_kwargs={
"temperature": 0, # Optional.
"max_retries": 2, # Optional.
},
)
ステップ 2. ツールを定義して使用する
モデルを定義したら、次は、モデルが推論に使用するツールを定義します。ツールは、LangChain ツールまたは Python 関数にすることができます。定義済みの Python 関数を LangChain ツールに変換することもできます。このアプリケーションは関数定義を使用します。
関数を定義するときは、関数のパラメータ、関数の動作、関数の戻り値を明確に記述したコメントを含めることが重要です。この情報は、モデルが使用する関数を決定する際に使用されます。また、関数が正常に動作することを確認するために、ローカルでテストする必要があります。
次のコードを使用して、為替レートを返す関数を定義します。
def get_exchange_rate(
currency_from: str = "USD",
currency_to: str = "EUR",
currency_date: str = "latest",
):
"""Retrieves the exchange rate between two currencies on a specified date.
Uses the Frankfurter API (https://api.frankfurter.app/) to obtain
exchange rate data.
Args:
currency_from: The base currency (3-letter currency code).
Defaults to "USD" (US Dollar).
currency_to: The target currency (3-letter currency code).
Defaults to "EUR" (Euro).
currency_date: The date for which to retrieve the exchange rate.
Defaults to "latest" for the most recent exchange rate data.
Can be specified in YYYY-MM-DD format for historical rates.
Returns:
dict: A dictionary containing the exchange rate information.
Example: {"amount": 1.0, "base": "USD", "date": "2023-11-24",
"rates": {"EUR": 0.95534}}
"""
import requests
response = requests.get(
f"https://api.frankfurter.app/{currency_date}",
params={"from": currency_from, "to": currency_to},
)
return response.json()
アプリケーションで使用する前に関数をテストするには、次のコマンドを実行します。
get_exchange_rate(currency_from="USD", currency_to="SEK")
レスポンスの例を以下に示します。
{'amount': 1.0, 'base': 'USD', 'date': '2024-02-22', 'rates': {'SEK': 10.3043}}
LangchainAgent
テンプレートでツールを使用するには、tools=
引数のツールのリストに追加します。
agent = reasoning_engines.LangchainAgent(
model=model, # Required.
tools=[get_exchange_rate], # Optional.
model_kwargs=model_kwargs, # Optional.
)
アプリケーションに対してテストクエリを実行することで、アプリケーションをテストできます。米ドルとスウェーデン クローナを使用してアプリケーションをテストします。次のコマンドを実行します。
response = agent.query(
input="What is the exchange rate from US dollars to Swedish currency?"
)
レスポンスは、次のようなディクショナリ形式になります。
{"input": "What is the exchange rate from US dollars to Swedish currency?",
"output": "For 1 US dollar you will get 10.7345 Swedish Krona."}
(省略可)複数のツール
LangchainAgent
のツールは、他の方法で定義してインスタンス化することもできます。
接地ツール
まず、generate_models
パッケージをインポートしてツールを作成します。
from vertexai.generative_models import grounding, Tool
grounded_search_tool = Tool.from_google_search_retrieval(
grounding.GoogleSearchRetrieval()
)
次に、LangchainAgent
テンプレートでツールを使用します。
agent = reasoning_engines.LangchainAgent(
model=model,
tools=[grounded_search_tool],
)
agent.query(input="When is the next total solar eclipse in US?")
レスポンスは、次のようなディクショナリ形式になります。
{"input": "When is the next total solar eclipse in US?",
"output": """The next total solar eclipse in the U.S. will be on August 23, 2044.
This eclipse will be visible from three states: Montana, North Dakota, and
South Dakota. The path of totality will begin in Greenland, travel through
Canada, and end around sunset in the United States."""}
詳しくは、接地をご覧ください。
LangChain ツール
まず、ツールを定義するパッケージをインストールします。
pip install langchain-google-community
次に、パッケージをインポートしてツールを作成します。
from langchain_google_community import VertexAISearchRetriever
from langchain.tools.retriever import create_retriever_tool
retriever = VertexAISearchRetriever(
project_id="PROJECT_ID",
data_store_id="DATA_STORE_ID",
location_id="DATA_STORE_LOCATION_ID",
engine_data_type=1,
max_documents=10,
)
movie_search_tool = create_retriever_tool(
retriever=retriever,
name="search_movies",
description="Searches information about movies.",
)
最後に、LangchainAgent
テンプレートの内部でツールを使用します。
agent = reasoning_engines.LangchainAgent(
model=model,
tools=[movie_search_tool],
)
response = agent.query(
input="List some sci-fi movies from the 1990s",
)
次のようなレスポンスが返されます。
{"input": "List some sci-fi movies from the 1990s",
"output": """Here are some sci-fi movies from the 1990s:
* The Matrix (1999): A computer hacker learns from mysterious rebels about the true nature of his reality and his role in the war against its controllers.
* Star Wars: Episode I - The Phantom Menace (1999): Two Jedi Knights escape a hostile blockade to find a queen and her protector, and come across a young boy [...]
* Men in Black (1997): A police officer joins a secret organization that monitors extraterrestrial interactions on Earth.
[...]
"""}
完全な例については、ノートブックをご覧ください。
LangChain で利用可能なツールの例については、Google ツールをご覧ください。
Vertex AI Extensions
まず、拡張機能パッケージをインポートしてツールを作成します。
from typing import Optional
def generate_and_execute_code(
query: str,
files: Optional[list[str]] = None,
file_gcs_uris: Optional[list[str]] = None,
) -> str:
"""Get the results of a natural language query by generating and executing
a code snippet.
Example queries: "Find the max in [1, 2, 5]" or "Plot average sales by
year (from data.csv)". Only one of `file_gcs_uris` and `files` field
should be provided.
Args:
query:
The natural language query to generate and execute.
file_gcs_uris:
Optional. URIs of input files to use when executing the code
snippet. For example, ["gs://input-bucket/data.csv"].
files:
Optional. Input files to use when executing the generated code.
If specified, the file contents are expected be base64-encoded.
For example: [{"name": "data.csv", "contents": "aXRlbTEsaXRlbTI="}].
Returns:
The results of the query.
"""
operation_params = {"query": query}
if files:
operation_params["files"] = files
if file_gcs_uris:
operation_params["file_gcs_uris"] = file_gcs_uris
from vertexai.preview import extensions
# If you have an existing extension instance, you can get it here
# i.e. code_interpreter = extensions.Extension(resource_name).
code_interpreter = extensions.Extension.from_hub("code_interpreter")
return extensions.Extension.from_hub("code_interpreter").execute(
operation_id="generate_and_execute",
operation_params=operation_params,
)
次に、LangchainAgent
テンプレートでツールを使用します。
agent = reasoning_engines.LangchainAgent(
model=model,
tools=[generate_and_execute_code],
)
agent.query(
input="""Using the data below, construct a bar chart that includes only the height values with different colors for the bars:
tree_heights_prices = {
\"Pine\": {\"height\": 100, \"price\": 100},
\"Oak\": {\"height\": 65, \"price\": 135},
\"Birch\": {\"height\": 45, \"price\": 80},
\"Redwood\": {\"height\": 200, \"price\": 200},
\"Fir\": {\"height\": 180, \"price\": 162},
}
"""
)
次のようなレスポンスが返されます。
{"input": """Using the data below, construct a bar chart that includes only the height values with different colors for the bars:
tree_heights_prices = {
\"Pine\": {\"height\": 100, \"price\": 100},
\"Oak\": {\"height\": 65, \"price\": 135},
\"Birch\": {\"height\": 45, \"price\": 80},
\"Redwood\": {\"height\": 200, \"price\": 200},
\"Fir\": {\"height\": 180, \"price\": 162},
}
""",
"output": """Here's the generated bar chart:
```python
import matplotlib.pyplot as plt
tree_heights_prices = {
"Pine": {"height": 100, "price": 100},
"Oak": {"height": 65, "price": 135},
"Birch": {"height": 45, "price": 80},
"Redwood": {"height": 200, "price": 200},
"Fir": {"height": 180, "price": 162},
}
heights = [tree["height"] for tree in tree_heights_prices.values()]
names = list(tree_heights_prices.keys())
plt.bar(names, heights, color=['red', 'green', 'blue', 'purple', 'orange'])
plt.xlabel('Tree Species')
plt.ylabel('Height')
plt.title('Tree Heights')
plt.show()
```
"""}
詳細については、Vertex AI Extensions をご覧ください。
LangchainAgent
で作成したツールのすべて(または一部)を使用できます。
agent = reasoning_engines.LangchainAgent(
model=model,
tools=[
get_exchange_rate, # Optional (Python function)
grounded_search_tool, # Optional (Grounding Tool)
movie_search_tool, # Optional (Langchain Tool)
generate_and_execute_code, # Optional (Vertex Extension)
],
)
agent.query(input="When is the next total solar eclipse in US?")
(省略可)ツールの構成
Gemini では、ツールの使用に制約を設定できます。たとえば、モデルに自然言語によるレスポンスを生成させるのではなく、関数呼び出しのみを生成するように強制できます(「強制関数呼び出し」)。
from vertexai.preview.generative_models import ToolConfig
agent = reasoning_engines.LangchainAgent(
model="gemini-1.5-pro",
tools=[search_arxiv, get_exchange_rate],
model_tool_kwargs={
"tool_config": { # Specify the tool configuration here.
"function_calling_config": {
"mode": ToolConfig.FunctionCallingConfig.Mode.ANY,
"allowed_function_names": ["search_arxiv", "get_exchange_rate"],
},
},
},
)
agent.query(
input="Explain the Schrodinger equation in a few sentences",
)
詳しくは、ツールの構成をご覧ください。
ステップ 3. チャットの履歴を保存する
チャット メッセージを追跡してデータベースに追加するには、get_session_history
関数を定義し、エージェントの作成時に渡します。この関数は session_id
を受け取り、BaseChatMessageHistory
オブジェクトを返す必要があります。
session_id
は、これらの入力メッセージが属するセッションの識別子です。これにより、複数の会話を同時に維持できます。BaseChatMessageHistory
は、メッセージ オブジェクトを読み込み、保存できるクラスのインターフェースです。
データベースを設定する
LangChain でサポートされている Google の ChatMessageHistory
プロバイダの一覧については、メモリをご覧ください。
Firestore(ネイティブ)
まず、LangChain のドキュメントに沿ってデータベースを設定し、パッケージをインストールします。
次に、次のように get_session_history
関数を定義します。
def get_session_history(session_id: str):
from langchain_google_firestore import FirestoreChatMessageHistory
from google.cloud import firestore
client = firestore.Client(project="PROJECT_ID")
return FirestoreChatMessageHistory(
client=client,
session_id=session_id,
collection="TABLE_NAME",
encode_message=False,
)
エージェントを作成し、chat_history
として渡します。
agent = reasoning_engines.LangchainAgent(
model=model,
chat_history=get_session_history, # <- new
)
Bigtable
まず、LangChain のドキュメントに沿ってデータベースを設定し、パッケージをインストールします。
次に、次のように get_session_history
関数を定義します。
def get_session_history(session_id: str):
from langchain_google_bigtable import BigtableChatMessageHistory
return BigtableChatMessageHistory(
instance_id="INSTANCE_ID",
table_id="TABLE_NAME",
session_id=session_id,
)
エージェントを作成し、chat_history
として渡します。
agent = reasoning_engines.LangchainAgent(
model=model,
chat_history=get_session_history, # <- new
)
Spanner
まず、LangChain のドキュメントに沿ってデータベースを設定し、パッケージをインストールします。
次に、次のように get_session_history
関数を定義します。
def get_session_history(session_id: str):
from langchain_google_spanner import SpannerChatMessageHistory
return SpannerChatMessageHistory(
instance_id="INSTANCE_ID",
database_id="DATABASE_ID",
table_name="TABLE_NAME",
session_id=session_id,
)
エージェントを作成し、chat_history
として渡します。
agent = reasoning_engines.LangchainAgent(
model=model,
chat_history=get_session_history, # <- new
)
エージェントにクエリを実行する際は、session_id
を渡して、エージェントが過去の質問と回答を「記憶」できるようにしてください。
agent.query(
input="What is the exchange rate from US dollars to Swedish currency?",
config={"configurable": {"session_id": "SESSION_ID"}},
)
ステップ 4. プロンプト テンプレートをカスタマイズする
プロンプト テンプレートは、ユーザー入力をモデルの指示に変換するのに役立ちます。モデルのレスポンスをガイドし、コンテキストを理解して、関連性があり一貫性のある言語ベースの出力を生成するのに使用されます。詳しくは、ChatPromptTemplates をご覧ください。
デフォルトのプロンプト テンプレートは、順番にセクションに編成されています。
セクション | 説明 |
---|---|
(省略可)システム指示 | すべてのクエリに適用されるエージェント向けの手順。 |
(省略可)チャットの履歴 | 過去のセッションのチャット履歴に対応するメッセージ。 |
ユーザー入力 | エージェントが返信するユーザーからのクエリ。 |
エージェント スクラッチパッド | エージェントがツールを使用して推論を行い、ユーザーへのレスポンスを作成する際に作成したメッセージ(関数呼び出しなど)。 |
独自のプロンプト テンプレートを指定せずにエージェントを作成すると、デフォルトのプロンプト テンプレートが生成されます。このテンプレートの完全な形式は次のようになります。
from langchain_core.prompts import ChatPromptTemplate
from langchain.agents.format_scratchpad.tools import format_to_tool_messages
prompt_template = {
"user_input": lambda x: x["input"],
"history": lambda x: x["history"],
"agent_scratchpad": lambda x: format_to_tool_messages(x["intermediate_steps"]),
} | ChatPromptTemplate.from_messages([
("system", "{system_instruction}"),
("placeholder", "{history}"),
("user", "{user_input}"),
("placeholder", "{agent_scratchpad}"),
])
デフォルトのプロンプト テンプレートを独自のプロンプト テンプレートでオーバーライドし、エージェントの作成時に使用できます。次に例を示します。
custom_prompt_template = {
"user_input": lambda x: x["input"],
"history": lambda x: x["history"],
"agent_scratchpad": lambda x: format_to_tool_messages(x["intermediate_steps"]),
} | ChatPromptTemplate.from_messages([
("placeholder", "{history}"),
("user", "{user_input}"),
("placeholder", "{agent_scratchpad}"),
])
agent = reasoning_engines.LangchainAgent(
model=model,
prompt=custom_prompt_template,
chat_history=get_session_history,
tools=[get_exchange_rate],
)
agent.query(
input="What is the exchange rate from US dollars to Swedish currency?",
config={"configurable": {"session_id": "SESSION_ID"}},
)
ステップ 5. オーケストレーションをカスタマイズする
すべての LangChain コンポーネントは、オーケストレーション用の入力スキーマと出力スキーマを提供する Runnable インターフェースを実装します。LangchainAgent
は、クエリに応答するために実行可能ファイルをビルドする必要があります。デフォルトでは、LangchainAgent
はモデルをツールにバインドしてこのようなランナブルをビルドし、チャット履歴が有効になっている場合は RunnableWithMessageHistory
にラップされた AgentExecutor
を使用します。
次のいずれかを行う場合は、オーケストレーションをカスタマイズすることを検討してください。i)(オープンエンドの推論ではなく)確定的な一連のステップを実行するエージェントを実装する、ii)ReAct のような方法でエージェントにプロンプトを出して、各ステップにそのステップを実行した理由をアノテーションする。そのためには、LangchainAgent
を作成するときに、次のシグネチャの Python 関数を使用して runnable_builder=
引数を指定し、デフォルトの実行可能ファイルをオーバーライドする必要があります。
from typing import Optional
from langchain_core.language_models import BaseLanguageModel
def runnable_builder(
model: BaseLanguageModel,
*,
system_instruction: Optional[str] = None,
prompt: Optional["RunnableSerializable"] = None,
tools: Optional[Sequence["_ToolLike"]] = None,
chat_history: Optional["GetSessionHistoryCallable"] = None,
model_tool_kwargs: Optional[Mapping[str, Any]] = None,
agent_executor_kwargs: Optional[Mapping[str, Any]] = None,
runnable_kwargs: Optional[Mapping[str, Any]] = None,
**kwargs,
):
ここで
model
は、model_builder
から返されるチャットモデルに対応します(モデルを定義して構成するをご覧ください)。tools
とmodel_tool_kwargs
は、使用するツールと構成に対応します(ツールを定義して使用するをご覧ください)。chat_history
は、チャット メッセージを保存するデータベースに対応しています(チャットの履歴を保存するを参照)。system_instruction
とprompt
はプロンプト構成に対応しています(プロンプト テンプレートをカスタマイズするをご覧ください)。agent_executor_kwargs
とrunnable_kwargs
は、ビルドするランナブルのカスタマイズに使用できるキーワード引数です。
これにより、オーケストレーション ロジックをカスタマイズするためのさまざまなオプションが提供されます。
ChatModel
最も簡単なケースでは、オーケストレーションなしでエージェントを作成するには、LangchainAgent
の runnable_builder
をオーバーライドして model
を直接返します。
from langchain_core.language_models import BaseLanguageModel
def llm_builder(model: BaseLanguageModel, **kwargs):
return model
agent = reasoning_engines.LangchainAgent(
model=model,
runnable_builder=llm_builder,
)
ReAct
独自の prompt
に基づいて独自の ReAct エージェントでデフォルトのツール呼び出し動作をオーバーライドするには(プロンプト テンプレートをカスタマイズするを参照)、LangchainAgent
の runnable_builder
をオーバーライドする必要があります。
from typing import Sequence
from langchain_core.language_models import BaseLanguageModel
from langchain_core.prompts import BasePromptTemplate
from langchain_core.tools import BaseTool
from langchain import hub
def react_builder(
model: BaseLanguageModel,
*,
tools: Sequence[BaseTool],
prompt: BasePromptTemplate,
agent_executor_kwargs = None,
**kwargs,
):
from langchain.agents.react.agent import create_react_agent
from langchain.agents import AgentExecutor
agent = create_react_agent(model, tools, prompt)
return AgentExecutor(agent=agent, tools=tools, **agent_executor_kwargs)
agent = reasoning_engines.LangchainAgent(
model=model,
tools=[get_exchange_rate],
prompt=hub.pull("hwchase17/react"),
agent_executor_kwargs={"verbose": True}, # Optional. For illustration.
runnable_builder=react_builder,
)
LCEL の構文
LangChain Expression Language(LCEL)を使用して次のグラフを作成するには、
Input
/ \
Pros Cons
\ /
Summary
LangchainAgent
の runnable_builder
をオーバーライドする必要があります。
def lcel_builder(*, model, **kwargs):
from operator import itemgetter
from langchain_core.prompts import ChatPromptTemplate
from langchain_core.runnables import RunnablePassthrough
from langchain_core.output_parsers import StrOutputParser
output_parser = StrOutputParser()
planner = ChatPromptTemplate.from_template(
"Generate an argument about: {input}"
) | model | output_parser | {"argument": RunnablePassthrough()}
pros = ChatPromptTemplate.from_template(
"List the positive aspects of {argument}"
) | model | output_parser
cons = ChatPromptTemplate.from_template(
"List the negative aspects of {argument}"
) | model | output_parser
final_responder = ChatPromptTemplate.from_template(
"Argument:{argument}\nPros:\n{pros}\n\nCons:\n{cons}\n"
"Generate a final response given the critique",
) | model | output_parser
return planner | {
"pros": pros,
"cons": cons,
"argument": itemgetter("argument"),
} | final_responder
agent = reasoning_engines.LangchainAgent(
model=model,
runnable_builder=lcel_builder,
)
LangGraph
LangGraph を使用して次のグラフを作成するには、
Input
/ \
Pros Cons
\ /
Summary
LangchainAgent
の runnable_builder
をオーバーライドする必要があります。
def langgraph_builder(*, model, **kwargs):
from langchain_core.prompts import ChatPromptTemplate
from langchain_core.output_parsers import StrOutputParser
from langgraph.graph import END, MessageGraph
output_parser = StrOutputParser()
planner = ChatPromptTemplate.from_template(
"Generate an argument about: {input}"
) | model | output_parser
pros = ChatPromptTemplate.from_template(
"List the positive aspects of {input}"
) | model | output_parser
cons = ChatPromptTemplate.from_template(
"List the negative aspects of {input}"
) | model | output_parser
summary = ChatPromptTemplate.from_template(
"Input:{input}\nGenerate a final response given the critique",
) | model | output_parser
builder = MessageGraph()
builder.add_node("planner", planner)
builder.add_node("pros", pros)
builder.add_node("cons", cons)
builder.add_node("summary", summary)
builder.add_edge("planner", "pros")
builder.add_edge("planner", "cons")
builder.add_edge("pros", "summary")
builder.add_edge("cons", "summary")
builder.add_edge("summary", END)
builder.set_entry_point("planner")
return builder.compile()
agent = reasoning_engines.LangchainAgent(
model=model,
runnable_builder=langgraph_builder,
)
# Example query
agent.query(input={"role": "user", "content": "scrum methodology"})