Mit Sammlungen den Überblick behalten
Sie können Inhalte basierend auf Ihren Einstellungen speichern und kategorisieren.
Eine Continuous Integration-Suite (CI) besteht aus einer Reihe von Validierungsanweisungen, die mit Ihrem LookML-Projekt verknüpft sind. Ein Looker-Nutzer mit der Berechtigung manage_ci kann Folgendes in einer CI-Suite konfigurieren:
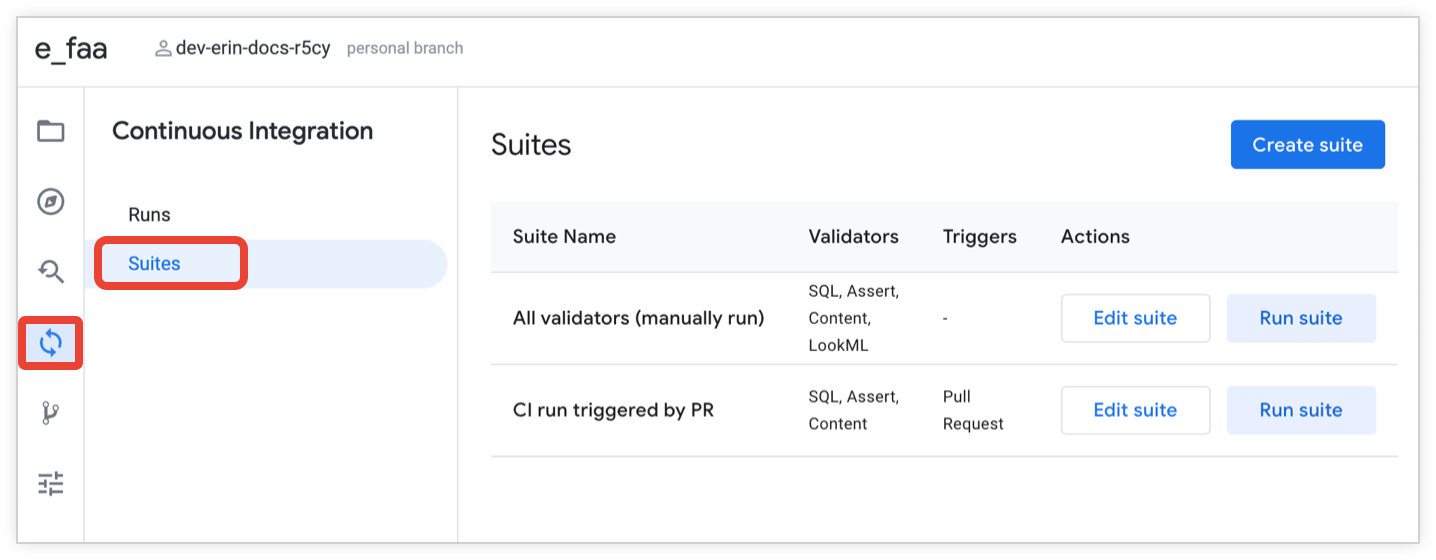
Sie können die Validator in der Looker IDE auf der Seite Suites konfigurieren und ausführen:
So erstellen Sie eine CI-Suite:
Klicken Sie in der Looker IDE in der Navigationsleiste der IDE auf das Symbol Continuous Integration.
Klicken Sie auf den Tab Suites, um die Seite Suites zu öffnen.
Auf der Seite Suites können Sie eine neue Suite erstellen oder eine vorhandene bearbeiten:
Klicken Sie auf die Schaltfläche Suite erstellen, um eine neue Suite zu erstellen.
Wenn Sie eine vorhandene Suite bearbeiten möchten, klicken Sie auf die Schaltfläche Suite bearbeiten.
Geben Sie einen Namen für den Suite-Namen ein. Wenn Sie eine vorhandene Suite bearbeiten, können Sie optional auf das Stiftsymbol klicken, um den Namen der Suite zu bearbeiten.
Optional: Aktivieren Sie die Option Bei Pull-Anfragen von Looker auslösen, wenn Sie automatische Validierungstests einrichten möchten, wenn ein Looker-Entwickler einen Pull-Request an Ihr Repository sendet. Weitere Informationen finden Sie im Abschnitt Trigger auf dieser Seite.
Wenn Sie das Auslösen von Pull-Requests für eine CI-Suite aktivieren, können Sie optional das Feld Nur für Zielzweig verwenden, um anzugeben, dass Pull-Requests nur für bestimmte Zweige im Repository einen Lauf der CI-Suite auslösen sollen. Weitere Informationen finden Sie im Abschnitt Trigger auf dieser Seite.
Optional können Sie die Ein-/Aus-Schaltflächen für Validator aktivieren, um einen Validator zu aktivieren und seine Optionen zu konfigurieren. Weitere Informationen finden Sie in den Dokumentationsseiten der einzelnen Validator:
Wenn Sie eine CI-Suite für die automatische Auslösung bei Pull-Anfragen konfigurieren möchten, aktivieren Sie die Option Bei Pull-Anfragen von Looker auslösen. Damit Pull-Anfragetrigger verwendet werden können, muss Ihr Looker-Administrator Ihr Git-Repository auf der Seite Continuous Integration Admin (Continuous Integration – Administrator) in Looker konfigurieren.
Wenn Sie Pull-Anfrage-Trigger für eine CI-Suite aktivieren, können Sie optional angeben, dass Pull-Anfragen nur für bestimmte Branches im Repository einen Lauf der CI-Suite auslösen sollen. Wenn Sie automatische Pull-Request-Trigger von CI-Ausführungen auf bestimmte Zweige in Ihrem Repository beschränken möchten, geben Sie in das Feld Nur für Zielzweig eine durch Kommas getrennte Liste der Zweige ein.
Wenn ein Repository beispielsweise drei Branches mit den Namen main, release_1 und dev hat, können Sie main, release_1 in das Feld Nur für Zielzweig eingeben. Das bedeutet, dass CI-Ausführungen ausgelöst werden, wenn ein Looker-Entwickler einen Pull-Request für den main- oder release_1-Zweig einreicht. Wenn ein Looker-Entwickler einen Pull-Request an den dev-Branch sendet, wird dadurch keine automatische Ausführung der CI-Suite ausgelöst.
Suite löschen
So löschen Sie eine CI-Suite:
Klicken Sie in der Looker IDE in der Navigationsleiste der IDE auf das Symbol Continuous Integration.
Klicken Sie auf den Tab Suites, um die Seite Suites zu öffnen.
Klicken Sie auf der Seite Suites für die jeweilige Suite auf die Schaltfläche Suite bearbeiten.
Klicken Sie auf der Seite der Suite auf die Schaltfläche Suite löschen.
Klicken Sie im Bestätigungsdialogfeld auf die Schaltfläche Suite löschen.
[[["Leicht verständlich","easyToUnderstand","thumb-up"],["Mein Problem wurde gelöst","solvedMyProblem","thumb-up"],["Sonstiges","otherUp","thumb-up"]],[["Schwer verständlich","hardToUnderstand","thumb-down"],["Informationen oder Beispielcode falsch","incorrectInformationOrSampleCode","thumb-down"],["Benötigte Informationen/Beispiele nicht gefunden","missingTheInformationSamplesINeed","thumb-down"],["Problem mit der Übersetzung","translationIssue","thumb-down"],["Sonstiges","otherDown","thumb-down"]],["Zuletzt aktualisiert: 2025-08-25 (UTC)."],[],[],null,["# Creating a Continuous Integration suite\n\n| **Preview:** This product or feature is subject to the \"Pre-GA Offerings Terms\" in the [General Service Terms](https://cloud.google.com/terms/service-terms#1) section of the Service Specific Terms. Pre-GA products and features are available \"as is\" and might have limited support. For more information, see the [launch stage descriptions](https://cloud.google.com/products#product-launch-stages).\n|\n| If you encounter an issue during the Public Preview of Continuous Integration, report it using the [Looker Continuous Integration - Preview Issue Tracker form](https://docs.google.com/forms/d/e/1FAIpQLSed30eICYruU45R8WZQH6hIui28xtdDnejfetzpLHQ5PK0ZeA/viewform?usp=dialog).\n\nA Continuous Integration (CI) suite is a set of validation instructions that is associated with your LookML project. A Looker user with the [`manage_ci`](/looker/docs/admin-panel-users-roles#manage_ci) permission can configure the following in a CI suite:\n\n- How a CI validation run is triggered ([manually from the Looker IDE](/looker/docs/ci-run-suite#manual-run) or [automatically when a pull request is submitted to your repository](/looker/docs/ci-run-suite#pr-run)).\n- Which CI validators to run.\n- Additional options for each validation test. See the documentation pages for each of the validators for details:\n - [SQL Validator](/looker/docs/ci-sql-validator)\n - [Assert Validator](/looker/docs/ci-assert-validator)\n - [Content Validator](/looker/docs/ci-content-validator)\n - [LookML Validator](/looker/docs/ci-lookml-validator)\n\nBefore you begin\n----------------\n\nBefore you can create a CI suite, you need the following:\n\n- A Looker instance that meets the [requirements for CI](/looker/docs/continuous-integration#requirements) and that is [enabled for CI](/looker/docs/continuous-integration#enable-ci).\n- A Looker user account with the [`manage_ci`](/looker/docs/admin-panel-users-roles#manage_ci) permission (this permission is included in the Admin [permission set](/looker/docs/admin-panel-users-roles#permission_sets)).\n\nCreating a CI suite\n-------------------\n\nYou can configure and run the validators on the **Suites** page in the Looker IDE:\n\nTo create a CI suite, follow these steps:\n\n1. From the [Looker IDE](/looker/docs/looker-ide), click the **Continuous Integration** icon from the IDE navigation bar.\n2. Click the **Suites** tab to open the **Suites** page.\n3. On the **Suites** page, you can create a new suite or edit an existing suite:\n - To create a new suite, click the **Create suite** button.\n - To edit an existing suite, click the **Edit suite** button for the suite.\n4. Enter a name for the **Suite name**. If you are editing an existing suite, you can optionally click the pencil icon to edit the suite name.\n5. (Optional) Enable the **Trigger on pull requests from Looker** toggle if you want to set up automatic validation testing whenever a Looker developer submits a pull request to your repository. See the [Triggers](#triggers) section of this page for more information.\n\n If you enable pull request triggering for a CI suite, you can optionally use the **Only for target branch** field to specify that pull requests only to specific branches in the repository should trigger a run of the CI suite. See the [Triggers](#triggers) section of this page for more information.\n6. Optionally, enable the validator toggles to turn on a validator and configure its options. See the documentation pages for each of the validators for details:\n\n - [SQL Validator](/looker/docs/ci-sql-validator)\n - [Assert Validator](/looker/docs/ci-assert-validator)\n - [Content Validator](/looker/docs/ci-content-validator)\n - [LookML Validator](/looker/docs/ci-lookml-validator)\n7. Save your changes:\n\n - If you are creating a new suite, click the **Create suite** button.\n - If you are editing an existing suite, click the **Update suite** button.\n\n### Triggers\n\nCI runs can be triggered in several ways:\n\n- Automatically, when a pull request is submitted to your LookML project's repository by a Looker developer.\n- Manually, [using the **Run suite** button](/looker/docs/ci-run-suite#manual-run) on the **Suites** page in the Looker IDE.\n- Manually, by [rerunning a previous CI run](/looker/docs/ci-run-suite#manual-rerun), from the **Runs** page of the Looker IDE.\n\nTo configure a CI suite for automatic triggering on pull request, enable the **Trigger on pull requests from Looker** toggle. To use pull request triggering, your Git repository must be configured by your Looker admin on the [**Continuous Integration** Admin](/looker/docs/admin-panel-platform-ci#github) page of Looker).\n| **Tip:** Even if you configure the CI suite to run automatically on pull requests, you can still initiate a [manual run](/looker/docs/ci-run-suite#manual-run) or [manually rerun a previous run](/looker/docs/ci-run-suite#manual-rerun) of the CI suite from the Looker IDE.\n\n\nIf you enable pull request triggers for a CI suite, you can optionally specify that pull requests only to specific branches in the repository should trigger a run of the CI suite. To limit automatic pull request triggers of CI runs to specific branches in your repository, enter a comma-separated list of the branches in the **Only for target branch** field.\n\nFor example, if a repository has three branches named `main`, `release_1`, and `dev`, you can enter `main, release_1` in the **Only for target branch** field. This means that CI runs will be triggered when a Looker developer submits a pull request to either the `main` or the `release_1` branch. If a Looker developer submits a pull request to the `dev` branch, this won't trigger an automatic run of the CI suite.\n\nDeleting a suite\n----------------\n\nTo delete a CI suite, perform the following steps:\n\n1. From the [Looker IDE](/looker/docs/looker-ide), click the **Continuous Integration** icon from the IDE navigation bar.\n2. Click the **Suites** tab to open the **Suites** page.\n3. On the **Suites** page, click the **Edit suite** button for the suite.\n4. On the suite's page, click the **Delete suite** button.\n5. In the confirmation dialog, click the **Delete suite** button."]]