A project is a collection of LookML files that describe how your database tables are related to each other and how Looker should interpret those tables. You can learn more about projects on the LookML projects and development model and LookML terms and concepts documentation pages. For information about accessing and editing existing projects, see the Accessing and editing project information documentation page.
A LookML project can contain more than one model file. However, if you want to specify permissions for users around seeing and editing LookML for a specific model file, you might want to create a new project. Although most permissions in Looker apply at the model level, there are some permissions that apply to the project level, including see_lookml, which lets you view LookML for a project, and develop, which lets you edit the LookML.
Looker users with the manage_models permission can create LookML models on a Looker instance.
Creating a project
To create a project, perform the following steps:
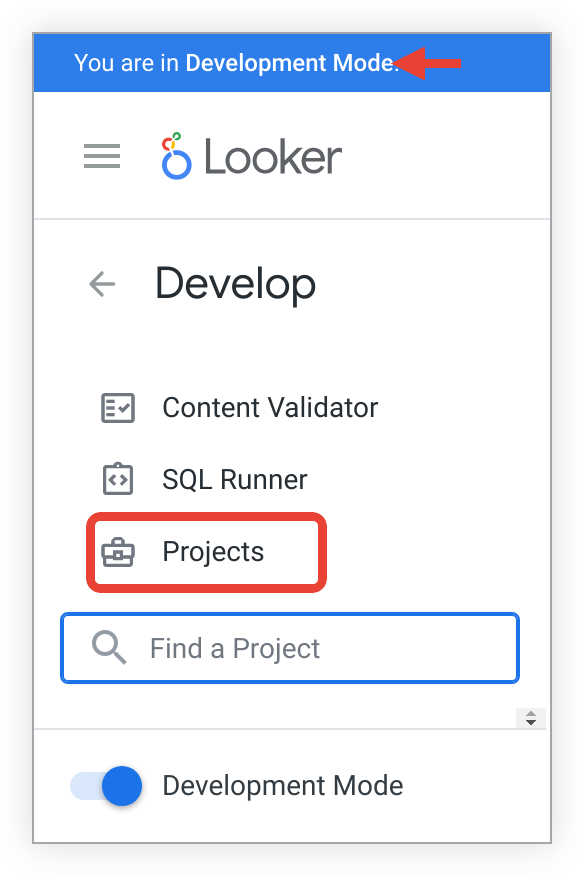
Select Projects from the Develop section of the navigation panel.
On the LookML Projects page, select New LookML Project to select the options for your project.
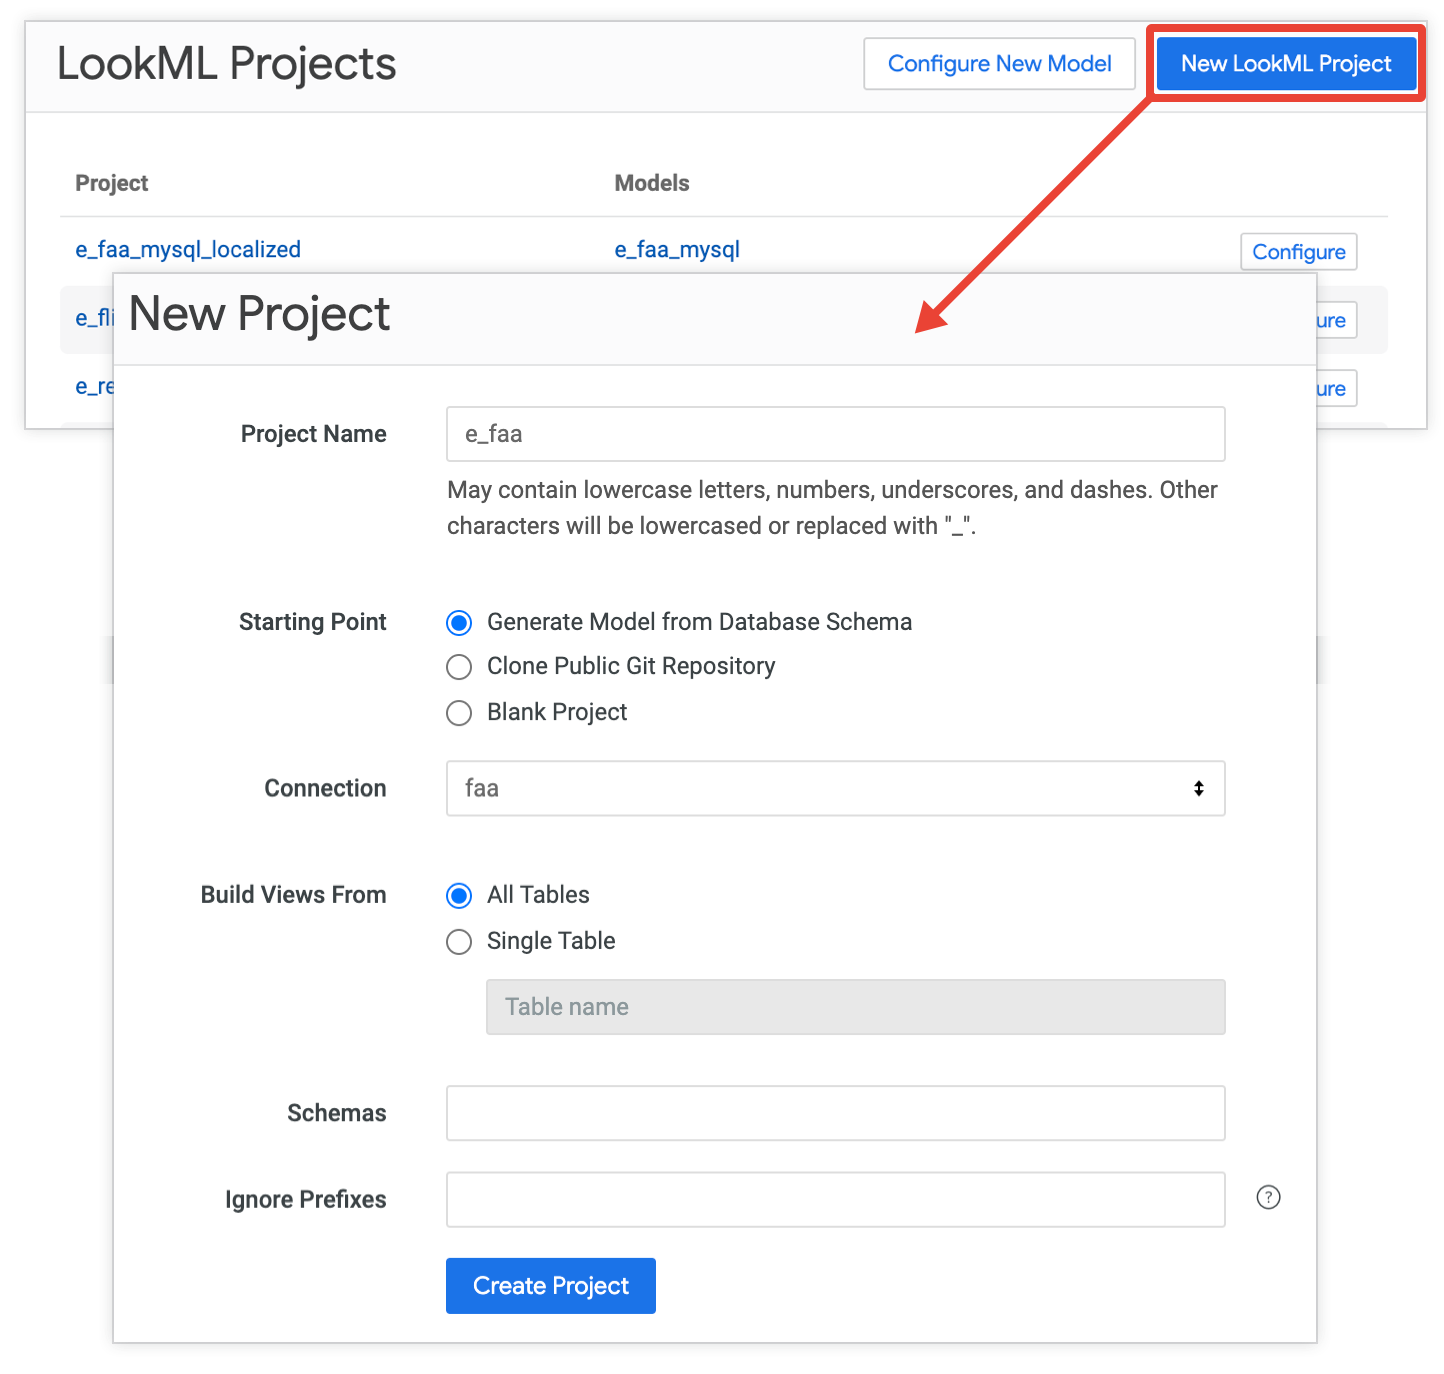
This action opens the New Project page, where you can specify settings for your project, including the project's name and starting point.
Looker can create a project in several ways, and the steps taken depend on the Starting Point option that you choose on the New Project page. The following sections describe how these starting points work:
- Automatically generating a model from your database
- Cloning a public Git repository
- Creating a blank project
Automatically generating a model from your database
From the New Project page, specify the following options to automatically generate a model from a database.
Project Name: Give your project a name. Project names are case-sensitive and only allow alphanumeric characters,
_,., and-. Choose the project name carefully and consider it a permanent ID for the project, since Looker uses the project name in the following ways:- To identify the project for API calls that have the
project_idparameter. - To identify the project in the Looker instance's internal database.
- To identify the project for local project import.
- To display the project on the LookML Projects page.
- To display the project in the Develop section of the Looker navigation panel.
- As part of the URL for project files. For example, on a Looker instance with a URL of
example.looker.com, the project manifest file for the project namedecommercecan be found at this URL:https://example.looker.com/projects/ecommerce/files/manifest.lkml.
- To identify the project for API calls that have the
Starting Point: Choose Generate Model from Database Schema.
Connection: From the drop-down menu, select the name of your database connection.
Build Views From: Select one of the following options:
- All Tables: The LookML generator creates a view file for each table in your database.
- Single Table: The LookML generator creates a view for one table in your database. If you choose this option, enter the name of the database table.
Schemas: To generate files for only one schema in your database, enter the name of the schema in the Schemas text field. You can list multiple schemas, separated by commas.
Ignore Prefixes: To leave table prefixes out of your view file names, enter your database's prefixes in the Ignore Prefixes field. This field is case-sensitive. You can list multiple prefixes, separated by commas. For example, your tables are titled
dwh_ordersandDBS_users. If you enterdwh, DBSin the Ignore Prefixes text field, then Looker creates view files namedordersandusers.
Finally, click Create Project to create a project that contains the generated model.
- The LookML generator creates one model file for the project as well as a view file for each table in the database (unless otherwise specified). Then, Looker opens the new project in the Looker IDE.
- The LookML generator creates IDE folders for your view and model files. If your database has more than one schema, the LookML generator creates a folder for schemas.
For BigQuery connections, if you generate a LookML project from your database, Looker autopopulates field descriptions with the descriptions from your BigQuery column metadata, if any.
The generator also creates an Explore for each database table. To start querying your data, use the Explore panel to select the name of an Explore.
Cloning a public Git repository from the New Project page
If you select Clone Public Git Repository as the starting point from the New Project page, Looker copies the files from a public Git repository into a new LookML project.
Looker supports cloning a public Git repository using the repository's HTTPS web URL.
To clone an existing public Git repository into a Looker project, follow these steps:
- Verify that you're in Development Mode.
- From the Develop section of the Looker navigation panel, select Projects.
On the LookML Projects page, depending on your instance's configuration, do one of the following:
- Click the New LookML Project button to open the New Project page.
- Click the New Model button to open the Create a Model page, and then in the information banner on the Create a Model page, click the click here link to open the New Project page.
In the Project Name field, give your project a name. Project names are case-sensitive and can't use spaces or certain special characters. Choose the project name carefully and consider it a permanent ID for the project, since Looker uses the project name in the following ways:
- To identify the project for API calls that have the
project_idparameter. - To identify the project in the Looker instance's internal database.
- To identify the project for local project import.
- To display the project on the LookML Projects page.
- To display the project in the Develop section of the Looker navigation panel.
- As part of the URL for project files. For example, on a Looker instance with a URL of
example.looker.com, the project manifest file for the project namedecommercecan be found at this URL:https://example.looker.com/projects/ecommerce/files/manifest.lkml.
- To identify the project for API calls that have the
For the Starting Point field, select Clone Public Git Repository.
In the Git Repository URL field, enter the URL for the public Git repository. Make sure that the URL is in the format
https://github.com/example/my-repository.git.Click Create Project. Looker clones the repository and opens the Looker IDE to the new LookML project with the project files from the cloned repository.
Once Looker has created your new LookML project, you must set up Git version control by connecting to a Git repository. See the Setting up and testing a Git connection documentation page for the procedures on connecting to Git using either HTTPS or SSH.
Depending on your situation, you may want to set up your Git connection to push changes to your own Git repository, or you may want to push changes back to the original, cloned Git repository:
- If you want to use the cloned files as a starting point for your own project independent of the public Git repository, set up your project's Git connection to point to your own Git repository and push your changes there.
- If you want to contribute updates back to the public Git repository that you cloned, and you have a personal access token with read-write access to the public repository, set up your project's Git connection to point to the public Git repository and push your changes there.
After setting up the Git connection to a repository, you can edit the files in the Looker IDE, and then use version control and deploy changes to production as with any standard LookML project.
Alternative method for cloning a public Git repository
The easiest way to clone a public Git repository is to use the New Project page in Looker.
Alternatively, you can fork the repository and connect it to a blank project in Looker by performing these steps:
- Navigate to your Git provider and fork the repository.
- In Looker, create a blank project as described in the Creating a blank project section of this page.
- Once you create the new blank LookML project, set up the project's Git connection to your Git repository fork by using either HTTPS or SSH.
After setting up the Git connection to your repository fork, you can edit the files in the Looker IDE, and then use version control and deploy changes to production as with any standard LookML project.
Creating a blank project
If you select Blank Project as the starting point from the New Project page, Looker creates an empty project so that you can create your LookML files from scratch.
To create a blank project, follow these steps:
- Verify that you're in Development Mode.
- From the Develop section of the Looker navigation panel, select Projects.
On the LookML Projects page, depending on your instance's configuration, do one of the following:
- Click the New LookML Project button to open the New Project page.
- Click the New Model button to open the Create a Model page, and then in the information banner on the Create a Model page, click the click here link to open the New Project page.
In the Project Name field, give your project a name. Project names are case sensitive and can't use spaces or certain special characters. Choose the project name carefully and consider it a permanent ID for the project, since Looker uses the project name in the following ways:
- To identify the project for API calls that have the
project_idparameter. - To identify the project in the Looker instance's internal database.
- To identify the project for local project import.
- To display the project on the LookML Projects page.
- To display the project in the Develop section of the Looker navigation panel.
- As part of the URL for project files. For example, on a Looker instance with a URL of
example.looker.com, the project manifest file for the project namedecommercecan be found at this URL:https://example.looker.com/projects/ecommerce/files/manifest.lkml.
- To identify the project for API calls that have the
For the Starting Point field, choose Blank Project.
Click Create Project. Looker creates the project and opens it in the Looker IDE.
Next steps
After a project is created, you can do the following:
- Manually create additional new models for your project.
- Edit existing LookML files.
- Configure models for use in production.
- Rename the project.
- Connect the Looker project to Git.