Informationen zu den unterstützten Connectors für Application Integration.
Beispielintegration testen
Wenn Sie Application Integration zum ersten Mal in Ihrem Google Cloud-Projekt einrichten, wird standardmäßig eine nicht veröffentlichte Beispielintegration mit dem Namen ExampleIntegration-EcomOrderProcessing erstellt.
Beispielintegration ansehen
So rufen Sie die Beispielintegration auf:
- Rufen Sie in der Google Cloud Console die Seite Application Integration auf.
- Klicken Sie im linken Navigationsmenü auf Integrationen, um die Seite Integrationen zu öffnen.
- Klicken Sie auf die Integration mit dem Namen ExampleIntegration-EcomOrderProcessing.
Die Beispielintegration wird im Integrationseditor geöffnet und sieht in etwa so aus:
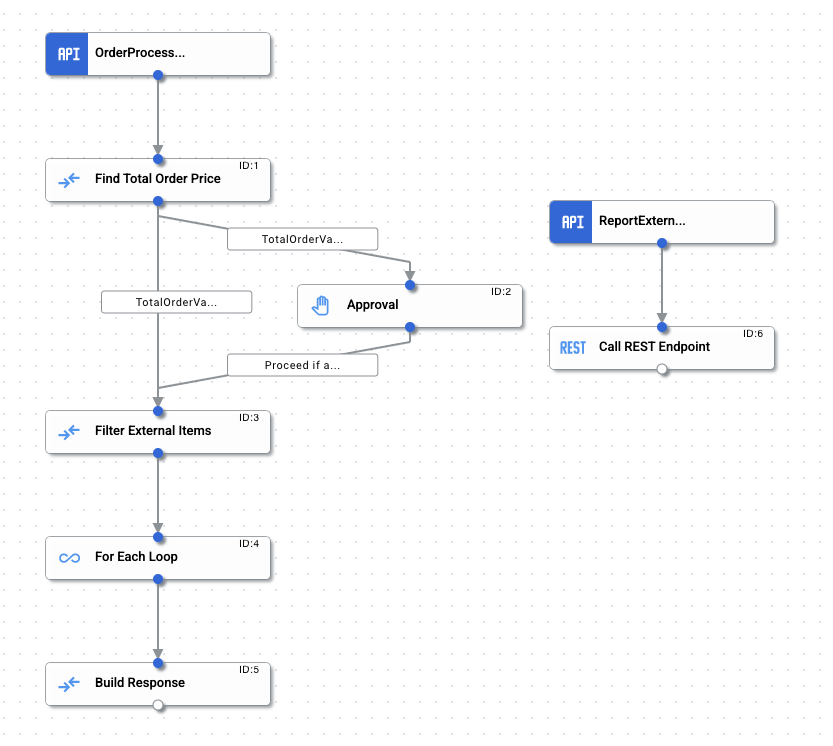
Beispiel für die E-Commerce-Integration
Mit dieser Beispielintegration können Sie die verschiedenen Trigger, Aufgaben und Konzepte der Anwendungsintegration praktisch kennenlernen.
Die Beispielintegration veranschaulicht ein einfaches E-Commerce-Back-End-Szenario, in dem die folgende Bestellabwicklung implementiert wird:
- Sie erhalten die folgende Nutzlast der Bestellanfrage von einem API-Endpunkt:
{
  "order_no": "12345",
  "buyer_id": "raambo",
  "line_items": [
    {
      "line": 1,
      "sku": "tr100",
      "vendor": "Internal",
      "quantity": 1,
      "price_per_unit": 10
    },
    {
      "line": 2,
      "sku": "tbz",
      "vendor": "External",
      "quantity": 24.0,
      "price_per_unit": 1
    }
  ]
}
- Extrahieren Sie die Bestellnutzlast und berechnen Sie den Gesamtbestellwert.
- Prüfen Sie, ob der Gesamtbestellwert mindestens 100 € beträgt. Falls ja, holen Sie eine zusätzliche Genehmigung ein, um fortzufahren.
- Prüfen Sie, ob einer der Bestellartikel einen externen Anbieter hat. Wenn ja, senden Sie die Details über einen REST API-Aufruf an den Anbieter.
- Senden Sie die Bestellantwort mit dem Gesamtbestellwert, den gefilterten Artikeln externer Anbieter und dem jeweiligen HTTP-Antwortstatus.
In der folgenden Tabelle sind alle Trigger, Aufgaben und Edge-Bedingungen aufgeführt, die in ExampleIntegration-EcomOrderProcessing verwendet werden:
| Komponente | Konfiguration | Beschreibung | |
|---|---|---|---|
| API-Trigger
(OrderProcessAPITrigger) |
Trigger-ID: api_trigger/ecom-order-processing_API_1
|
Die Integration wird für jede Bestellanfrage aufgerufen. | |
| Aufgabe „Datenabgleich“
(Gesamtpreis der Bestellung ermitteln) |
Eingabe | Ausgabe | Hier wird die JSON-Eingabevariable order_request extrahiert und mithilfe der Zuordnungsfunktion FOR_EACH werden alle Bestellartikel durchlaufen, um den Gesamtwert des Bestellpreises zu berechnen.
Der Wert des Gesamtbestellpreises wird berechnet, indem der Artikel
Der endgültige Wert wird dann in den Datentyp „double“ konvertiert und in der Ausgabevariablen |
orders_request.line_items .FOR_EACH(~obj1->~obj1 .GET_PROPERTY("quantity") .TO_DOUBLE() .MULTIPLY(~obj1 .GET_PROPERTY("price_per_unit") .TO_DOUBLE())) .TO_DOUBLE_ARRAY() .SUM() |
total_order_value
|
||
| Edge-Bedingung
(Total OrderValue Above Threshold) |
Zustand: $total_order_value$ >= $threshold_order_value$ |
Prüft, ob der Bestellwert mindestens 100 € beträgt. Ist das der Fall, wird die Steuerung an eine Genehmigungsaufgabe übergeben. | |
| Edge-Bedingung
(TotalOrderValue Below Threshold) |
Zustand: $total_order_value$ < $threshold_order_value$
|
Prüft, ob der Gesamtbestellwert unter 100 $liegt. Ist das der Fall, wird die Steuerung an die Aufgabe „Externe Elemente filtern“ übergeben. | |
| Aufgabe „Genehmigung“
(Genehmigung) |
Empfänger:Enter the approver's email address Zum Testen dieser Beispielintegration können Sie mit Ihrer E-Mail-Adresse den erfolgreichen Abschluss der Integration bestätigen. |
E-Mail-Anfrage zur Genehmigung an einen oder mehrere Integrationsnutzer senden. Die E-Mail enthält einen Link zur Integration, über den die Nutzer die Anfrage manuell genehmigen oder ablehnen können. | |
| Aufgabe „Datenabgleich“
(Externe Elemente filtern) |
Eingabe | Ausgabe | Hier wird die JSON-Eingabevariable order_request extrahiert und alle Bestellpositionen mit externen Anbietern werden mithilfe der Zuordnungsfunktion FILTER gefiltert.
Die gefilterten Werte werden dann in der Ausgabevariablen |
orders_request .GET_PROPERTY("line_items") .FILTER(~obj1->~obj1 .GET_PROPERTY("vendor") .TO_STRING() .EQUALS("External")) |
filtered_external_items
|
||
| Aufgabe „Für jede Schleife“
(Für jede Schleife) |
Liste zum Iterieren:filtered_external_items
API-Trigger-ID:
Integrationsname: |
Durchläuft die Variable filtered_external_items und ruft die Subintegration für jedes Element im Array auf. Außerdem wird die Antwort jeder Ausführung in rest_call_response_status erfasst, wobei jedes Element des Arrays die Antwort aus einer bestimmten Ausführung enthält.
|
|
| API-Trigger
(Externe Bestellungen melden) |
Trigger-ID: api_trigger/ecom-order-processing_API_2
|
Ruft die Subintegration für jedes Element in „filtered_external_items“ auf. | |
| Aufgabe "REST-Endpunkt aufrufen"
(REST-Endpunkt aufrufen) |
Basis-URL des Endpunkts: https://mocktarget.apigee.net/echo
HTTP-Methode:
Anfragetext: |
Führt einen REST-Aufruf an https://mocktarget.apigee.net/echo aus. | |
Beispielintegration veröffentlichen und testen
Klicken Sie in der Symbolleiste des Integrationseditors auf Veröffentlichen, um die Integration zu veröffentlichen.
Nach der Veröffentlichung Ihrer Integration können Sie die Ausführungslogs der veröffentlichten Integration aufrufen und prüfen. Klicken Sie auf ![]() Ausführungsprotokolle für diese Integration ansehen, um die Protokolle aufzurufen. Die Seite Ausführungslogs wird angezeigt.
Ausführungsprotokolle für diese Integration ansehen, um die Protokolle aufzurufen. Die Seite Ausführungslogs wird angezeigt.
Im Integrationseditor testen
So testen Sie die Beispielintegration:
- Klicken Sie in der Symbolleiste des Integrationseditors auf Testen und wählen Sie dann OrderProcessAPITrigger aus.
Der Bereich Integration testen wird angezeigt.
- Sie werden aufgefordert, die Eingabevariable
orders_requestzu bearbeiten. Für diesen Test können Sie den Wert fürquantityauf240aktualisieren. Die Eingabevariable „updateorders_request“ sollte in etwa so aussehen:{ "order_no": "12345", "buyer_id": "raambo", "line_items": [ { "line": 1, "sku": "tr100", "vendor": "Internal", "quantity": 1, "price_per_unit": 10 }, { "line": 2, "sku": "tbz", "vendor": "External", "quantity": 240, "price_per_unit": 1 } ] }
- Klicken Sie auf Integration testen.
Da die aktualisierte Menge von orders_request über 200 liegt, sendet die Beispielintegration eine E-Mail mit einer Genehmigungsanfrage an die E-Mail-Adresse, die im Feld Empfänger der Genehmigungsaufgabe angegeben ist. Der Vorgang für die Integrationsanfrage wird abgeschlossen, sobald die Genehmigung eingegangen ist.
Weitere Informationen zu Tests finden Sie unter Integrationen testen und veröffentlichen.
So prüfen Sie die Ausführungsprotokolle und sehen sich den Status und die Nutzlast der jeweiligen Integration an:
- Klicken Sie im Integrationseditor auf
 Ausführungsprotokolle für diese Integration ansehen. Die Seite Ausführungslogs wird angezeigt.
 - Auf der Seite Ausführungslogs können Sie Details zu jedem Versuch anzeigen, eine Integration auszuführen.
Jeder Eintrag enthält Details für den Ausführungsversuch. Beispiele:
- Name der Integration
- Ausführungs-ID
- Status
- Beginn
- Dauer
- Integrationsversion
- Trigger-ID
- Klicken Sie neben der ausgeführten Integration auf den Erweiterungspfeil (>), um eine erweiterte Liste von Aufgaben und Variablen in der Integration aufzurufen. Außerdem werden der Aufgabenstatus und die Nutzlasten von Variablen angezeigt.
Mit einem REST API-Aufruf testen
Testfall 1: Anfrage mit Standardeingaben senden
curl -X POST -H "Content-Type: application/json" -d '{"trigger_id":"api_trigger/ecom-order-processing_API_1"}' 'https://integrations.googleapis.com/v1/projects/PROJECT_ID/locations/LOCATION/integrations/INTEGRATION_NAME:execute' -H "Authorization: Bearer $(gcloud auth print-access-token)"
Testfall 2: Anfrage mit benutzerdefinierten Eingaben senden
curl -X POST -H "Content-Type: application/json" -d '{ "triggerId": "api_trigger/ecom-order-processing_API_1", "inputParameters": { "orders_request": { "jsonValue": "{\n \"order_no\": \"12345\",\n \"buyer_id\": \"raambo\",\n \"line_items\": [{\n \"line\": 1.0,\n \"sku\": \"tr100\",\n \"vendor\": \"Internal\",\n \"quantity\": 1.0,\n \"price_per_unit\": 10.0\n }, {\n \"line\": 2.0,\n \"sku\": \"tbz\",\n \"vendor\": \"External\",\n \"quantity\": 24.0,\n \"price_per_unit\": 2.0\n }]\n}" } } }' 'https://integrations.googleapis.com/v1/projects/PROJECT_ID/locations/LOCATION/integrations/INTEGRATION_NAME:execute' -H "Authorization: Bearer $(gcloud auth print-access-token)"
Ersetzen Sie Folgendes:
- PROJECT_ID: ID Ihres Google Cloud-Projekts.
- LOCATION: Der Integrationsort. Weitere Informationen finden Sie unter Standorte für Application Integration.
- INTEGRATION_NAME: Name der Integration.
Testausgabe
Die API gibt die Antwort zur Integrationsausführung mit allen Werten der Integrationsausgabevariablen zurück.
Kontingente und Limits
Weitere Informationen zu allen Kontingenten und Limits finden Sie unter Kontingente und Limits.