이 페이지에서는 에이전트에서 Cloud Trace를 사용 설정하고 trace를 확인하여 쿼리 응답 시간과 실행된 작업을 분석하는 방법을 보여줍니다.
trace는 에이전트가 각 쿼리에 응답할 때의 요청 타임라인입니다. 예를 들어 다음 Gantt 차트는 LangchainAgent의 샘플 trace를 보여줍니다.
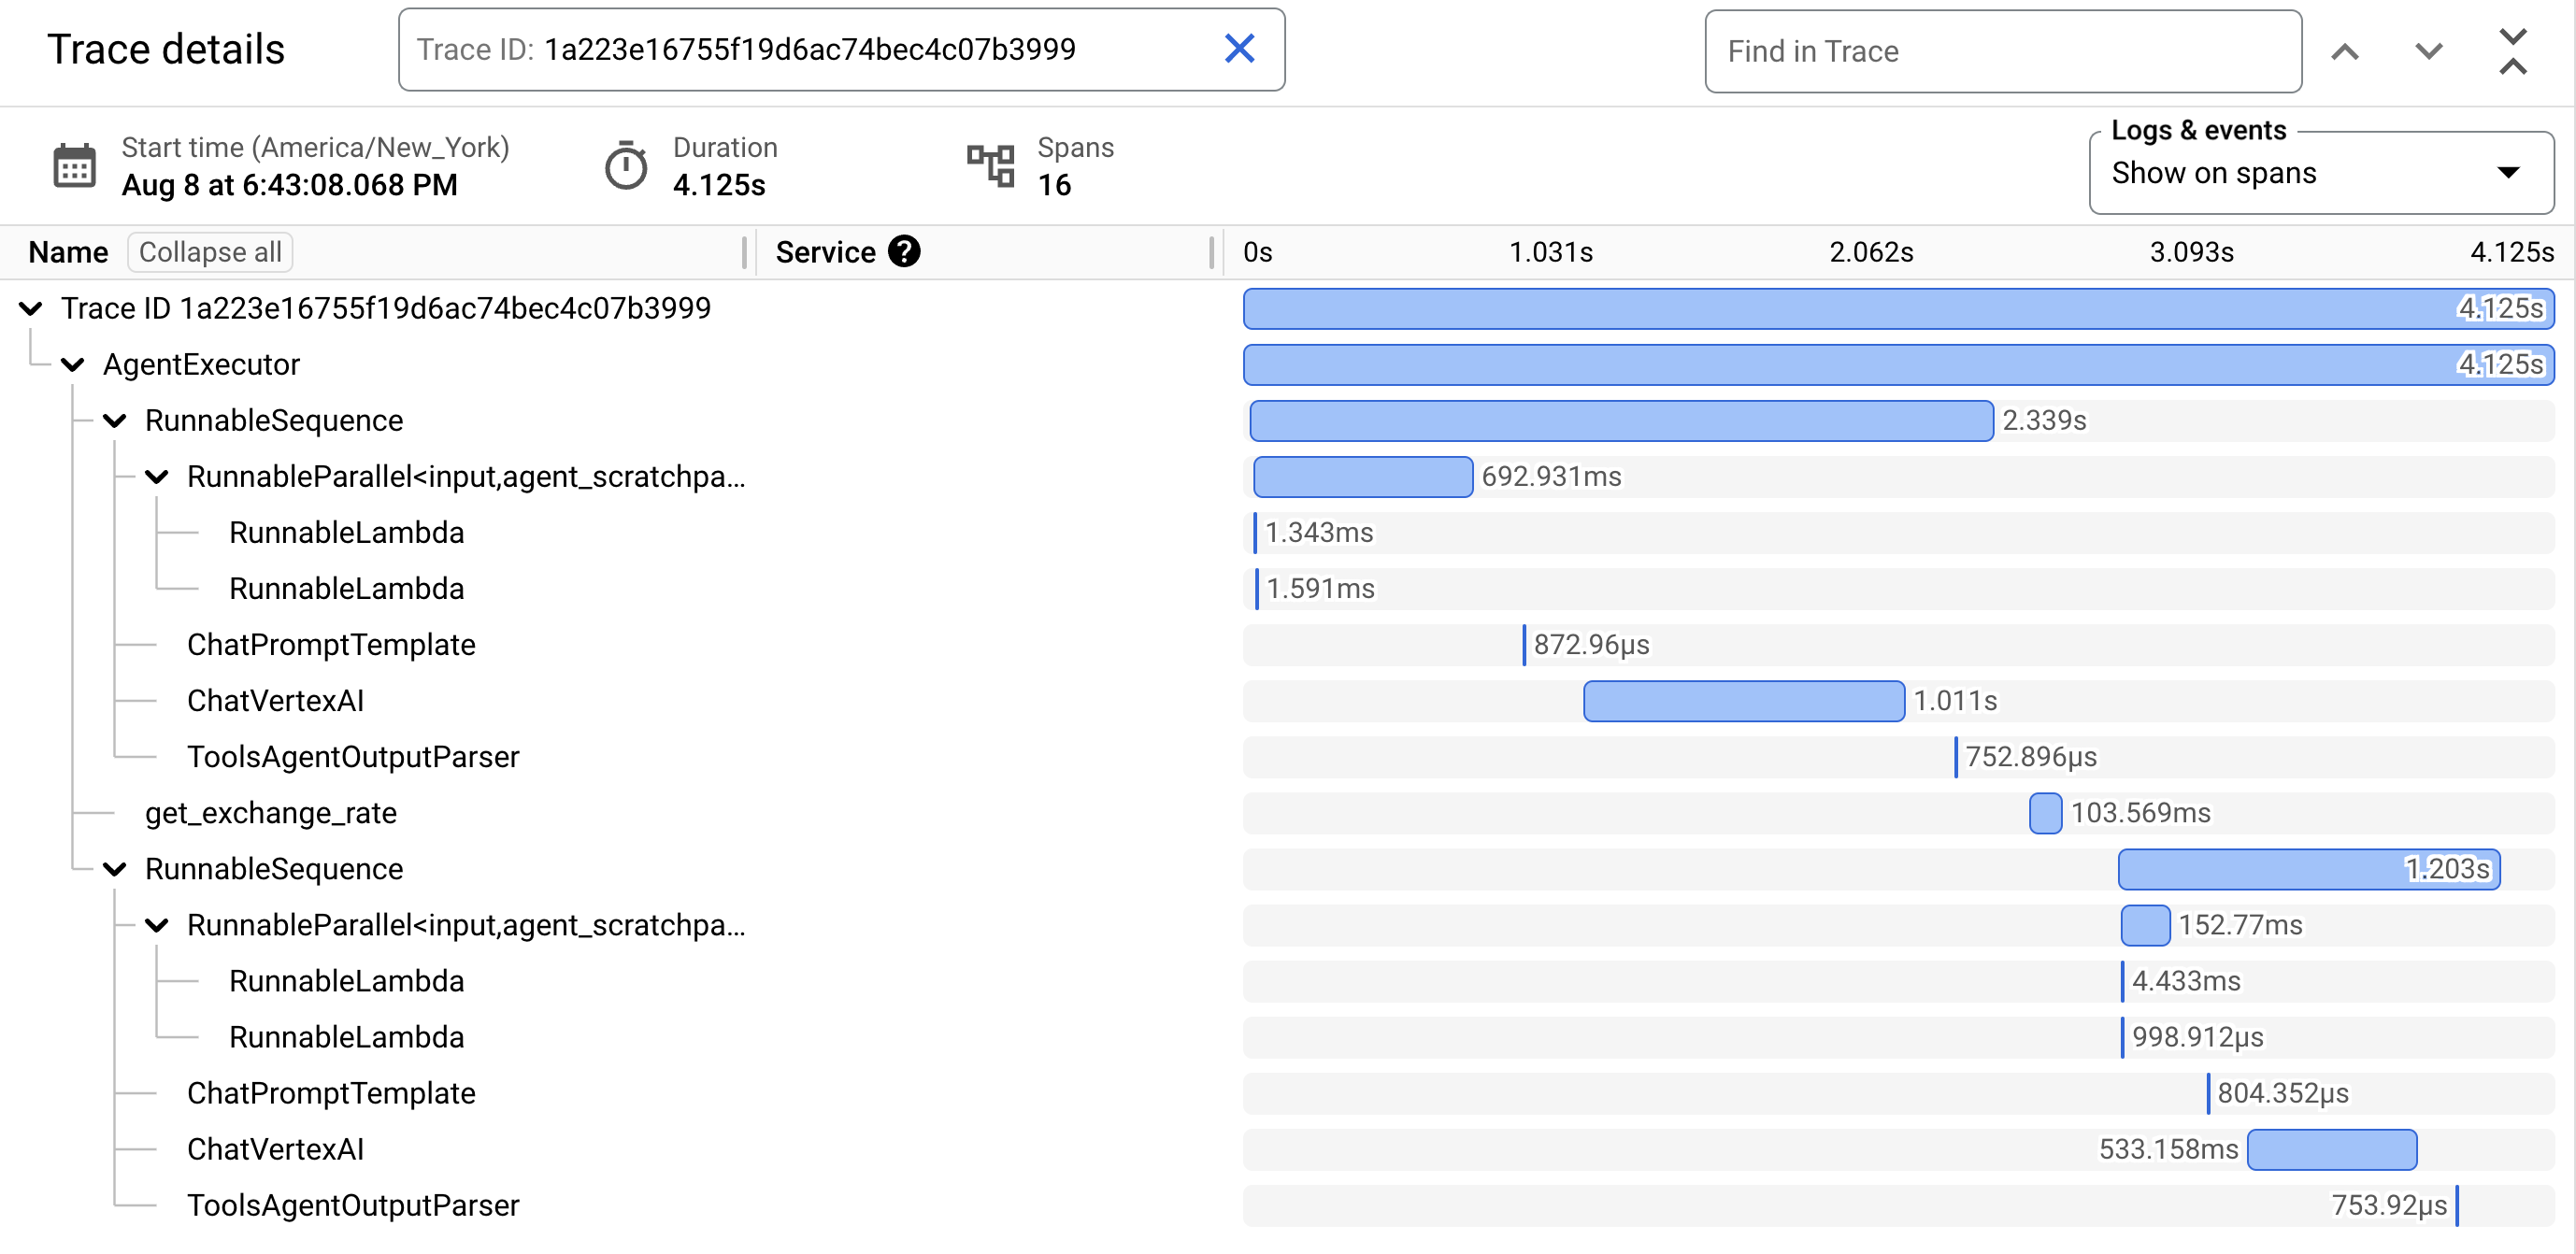
Gantt 차트의 첫 번째 행은 trace입니다. trace는 함수 호출이나 LLM과의 상호작용과 같은 단일 작업 단위를 나타내는 개별 스팬으로 구성되며, 첫 번째 스팬은 전체 요청을 나타냅니다. 각 스팬은 요청 내에서 특정 작업에 대한 세부정보를 제공합니다. 여기에는 작업 이름, 시작 및 종료 시간, 관련 속성이 포함됩니다. 예를 들어 다음 JSON은 대규모 언어 모델(LLM) 호출을 나타내는 단일 스팬을 보여줍니다.
  {
    "name": "llm",
    "context": {
        "trace_id": "ed7b336d-e71a-46f0-a334-5f2e87cb6cfc",
        "span_id": "ad67332a-38bd-428e-9f62-538ba2fa90d4"
    },
    "span_kind": "LLM",
    "parent_id": "f89ebb7c-10f6-4bf8-8a74-57324d2556ef",
    "start_time": "2023-09-07T12:54:47.597121-06:00",
    "end_time": "2023-09-07T12:54:49.321811-06:00",
    "status_code": "OK",
    "status_message": "",
    "attributes": {
        "llm.input_messages": [
            {
                "message.role": "system",
                "message.content": "You are an expert Q&A system that is trusted around the world.\nAlways answer the query using the provided context information, and not prior knowledge.\nSome rules to follow:\n1. Never directly reference the given context in your answer.\n2. Avoid statements like 'Based on the context, ...' or 'The context information ...' or anything along those lines."
            },
            {
                "message.role": "user",
                "message.content": "Hello?"
            }
        ],
        "output.value": "assistant: Yes I am here",
        "output.mime_type": "text/plain"
    },
    "events": [],
  }
자세한 내용은 trace 및 스팬 및 trace 컨텍스트에 대한 Cloud Trace 문서를 참조하세요.
에이전트의 trace 쓰기
에이전트의 trace를 작성하려면 다음 안내를 따르세요.
ADK
AdkApp에 대한 trace를 사용 설정하려면 에이전트 개발 키트 에이전트를 개발할 때 enable_tracing=True를 지정하세요.
예를 들면 다음과 같습니다.
  from vertexai.agent_engines import AdkApp
  from google.adk.agents import Agent

  agent = Agent(
      model=model,
      name=agent_name,
      tools=[get_exchange_rate],
  )

  app = AdkApp(
      agent=agent,          # Required.
      enable_tracing=True,  # Optional.
  )
LangchainAgent
LangchainAgent의 trace를 사용 설정하려면 LangChain 에이전트를 개발할 때 enable_tracing=True를 지정하세요.
예를 들면 다음과 같습니다.
from vertexai.agent_engines import LangchainAgent

agent = LangchainAgent(
    model=model,                # Required.
    tools=[get_exchange_rate],  # Optional.
    enable_tracing=True,        # [New] Optional.
)
LanggraphAgent
LanggraphAgent의 trace를 사용 설정하려면 LangGraph 에이전트를 개발할 때 enable_tracing=True를 지정하세요.
예를 들면 다음과 같습니다.
from vertexai.agent_engines import LanggraphAgent

agent = LanggraphAgent(
    model=model,                # Required.
    tools=[get_exchange_rate],  # Optional.
    enable_tracing=True,        # [New] Optional.
)
LlamaIndex
LlamaIndexQueryPipelineAgent의 trace를 사용 설정하려면 LlamaIndex 에이전트를 개발할 때 enable_tracing=True를 지정하세요.
예를 들면 다음과 같습니다.
from vertexai.preview import reasoning_engines

  def runnable_with_tools_builder(model, runnable_kwargs=None, **kwargs):
      from llama_index.core.query_pipeline import QueryPipeline
      from llama_index.core.tools import FunctionTool
      from llama_index.core.agent import ReActAgent

      llama_index_tools = []
      for tool in runnable_kwargs.get("tools"):
          llama_index_tools.append(FunctionTool.from_defaults(tool))
      agent = ReActAgent.from_tools(llama_index_tools, llm=model, verbose=True)
      return QueryPipeline(modules = {"agent": agent})

  agent = reasoning_engines.LlamaIndexQueryPipelineAgent(
      model="gemini-2.0-flash",
      runnable_kwargs={"tools": [get_exchange_rate]},
      runnable_builder=runnable_with_tools_builder,
      enable_tracing=True,        # Optional
  )
커스텀
커스텀 에이전트의 trace를 사용 설정하려면 OpenTelemetry를 사용한 추적에서 자세한 내용을 확인하세요.
이렇게 하면 Google Cloud 프로젝트 설정의 프로젝트 아래에 있는 Cloud Trace로 trace가 내보내집니다.
에이전트의 trace 보기
Trace 탐색기를 사용하여 trace를 볼 수 있습니다.
Google Cloud 콘솔에서 trace 데이터를 보거나 trace 범위를 선택할 수 있는 권한을 얻으려면 관리자에게 프로젝트에 대한 Cloud Trace 사용자(
roles/cloudtrace.user) IAM 역할을 부여해 달라고 요청하세요.Google Cloud 콘솔에서 Trace 탐색기로 이동합니다.
페이지 상단에서 Google Cloud 프로젝트(
PROJECT_ID에 해당)를 선택합니다.
자세한 내용은 Cloud Trace 문서를 참조하세요.
할당량 및 한도
일부 속성 값은 할당량 한도에 도달하면 잘릴 수 있습니다. 자세한 내용은 Cloud Trace 할당량을 참조하세요.
가격 책정
Cloud Trace에는 무료 등급이 있습니다. 자세한 내용은 Cloud Trace 가격 책정을 참조하세요.