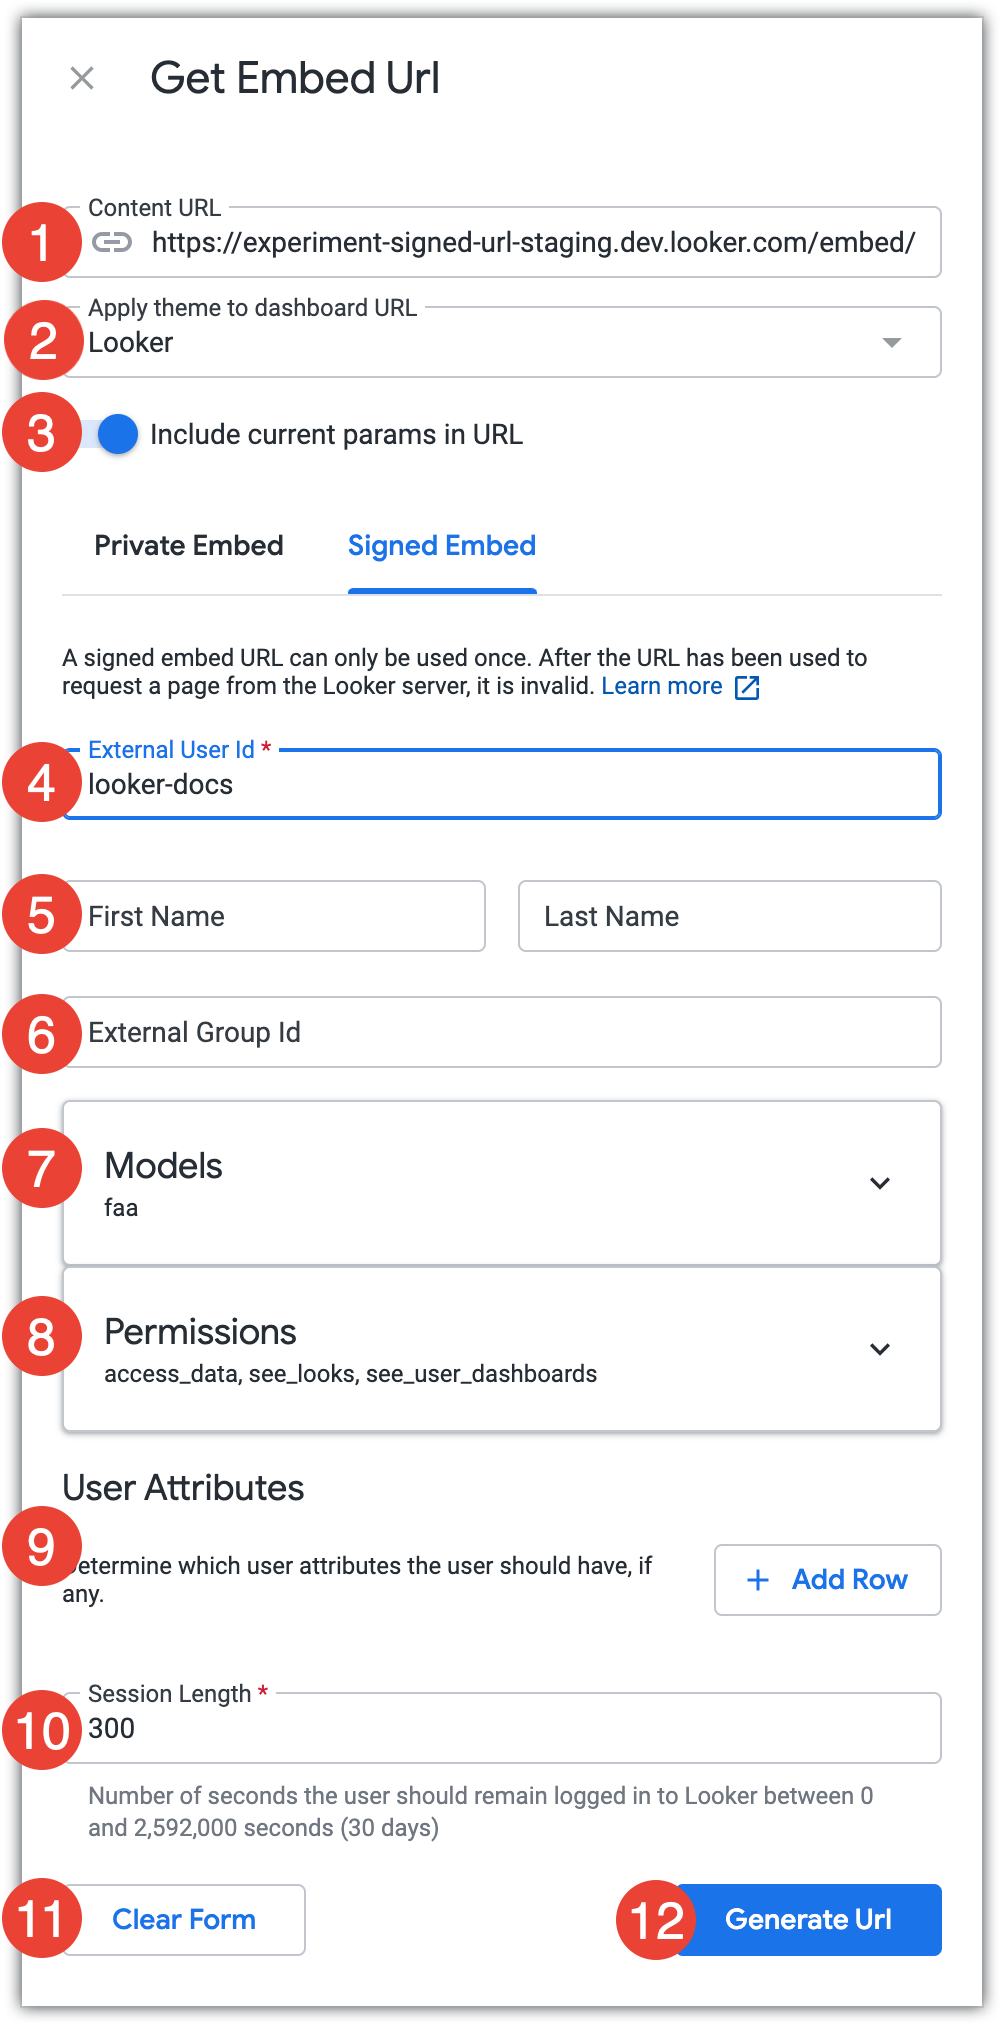
Kolom Content URL menampilkan URL konten lengkap, termasuk jalur /embed.
Kolom Terapkan tema ke URL dasbor/eksplorasi/tampilan memungkinkan Anda memilih tema yang akan ditambahkan ke URL sematan jika Anda membuat URL sematan dasbor, Eksplorasi, atau Tampilan dan instance Anda mengaktifkan tema kustom. Tema akan diterapkan saat dasbor atau Jelajah tersemat dilihat.
Tombol Sertakan parameter saat ini di URL memungkinkan Anda memilih apakah akan menerapkan parameter saat ini, seperti nilai filter, ke URL sematan. Jika diaktifkan, parameter tersebut akan diterapkan saat konten tersemat dilihat.
Masukkan ID unik untuk pengguna. Anda dapat menetapkan string apa pun kepada pengguna, selama string tersebut unik. Lihat definisi parameter external_user_id untuk mengetahui informasi selengkapnya.
Opsional: Masukkan nama depan dan nama belakang pengguna. Jika satu atau kedua kolom ini dibiarkan kosong, kolom tersebut akan mempertahankan nilai dari permintaan terakhir. Jika belum ada nilai yang ditetapkan, setiap kolom akan diberi nilai "Sematkan".
Opsional: Masukkan ID Grup Eksternal. Ini adalah ID unik untuk grup tempat pengguna berada di aplikasi yang menyematkan Looker.
Pengguna yang memiliki izin untuk menyimpan konten, dan membagikan ID grup eksternal, akan dapat menyimpan dan mengedit konten di folder Looker bersama yang disebut "Grup". ID grup eksternal adalah satu-satunya metode yang tersedia untuk membuat grup eksternal pengguna sematan. Tidak ada cara untuk mengonfigurasi grup pengguna sematan eksternal dari dalam UI Looker.
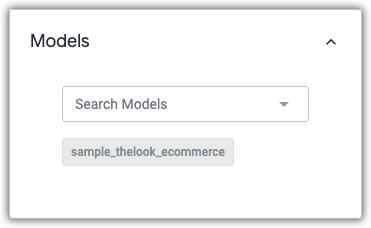
Model yang menjadi dasar dasbor, Tampilan, atau Jelajah tercantum di kolom Model. Pengguna akan diberi akses ke model tersebut. Untuk memberikan akses ke model tambahan kepada pengguna, dari kolom drop-down Search Models, klik kolom Models untuk meluaskannya, lalu pilih model tambahan yang aksesnya ingin Anda berikan kepada pengguna.
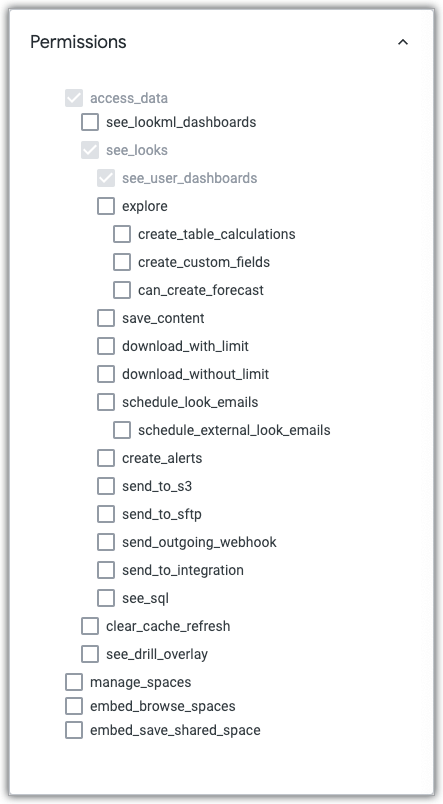
Izin minimum yang diperlukan pengguna untuk melihat konten tersemat akan dipilih secara default. Untuk memberikan izin tambahan kepada pengguna, klik kolom Izin untuk meluasnya, lalu pilih izin tambahan yang ingin Anda berikan kepada pengguna.
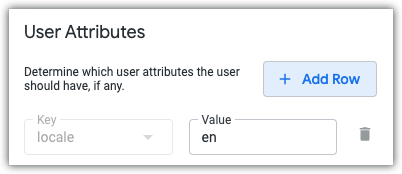
Untuk memberi pengguna satu atau beberapa atribut pengguna, klik Tambahkan Baris. Pilih atribut pengguna yang ingin Anda berikan kepada pengguna di kolom drop-down Kunci, lalu masukkan nilai pengguna untuk atribut pengguna tersebut di kolom Nilai. Anda dapat menambahkan atribut pengguna tambahan dengan mengklik Tambahkan Baris, atau menghapus atribut pengguna dengan mengklik ikon tempat sampah. Anda tidak dapat menambahkan beberapa atribut pengguna dengan nilai Kunci yang sama.
Di kolom Session Length, masukkan jumlah detik yang dapat berlalu sebelum sesi URL sematan yang ditandatangani harus dibatalkan validasinya.
Untuk mengembalikan semua nilai ke setelan default, klik Hapus Formulir. Semua nilai juga akan direset jika Anda keluar dari jendela Get Embed URL.
Klik Buat URL.
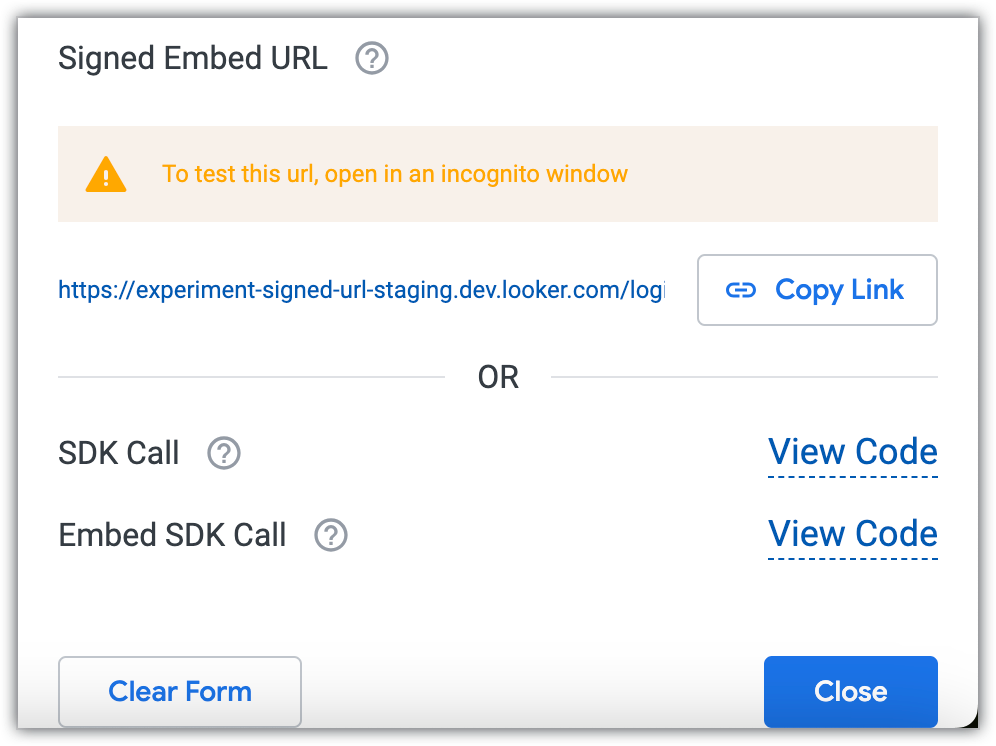
Dengan menggunakan parameter yang Anda tentukan, Looker akan membuat URL penyematan yang ditandatangani, panggilan SDK yang ditandatangani, dan panggilan embed SDK yang ditandatangani.
Untuk menyalin URL sematan yang ditandatangani yang dihasilkan ke papan klip, klik Salin Link.
Anda dapat melihat panggilan SDK atau panggilan embed SDK dengan mengklik Lihat Kode, yang akan membuka jendela kode.
Dari dalam jendela kode, untuk menyalin panggilan SDK yang dihasilkan atau hasil panggilan Embed SDK ke papan klip, klik Salin ke Papan Klip.
[[["Mudah dipahami","easyToUnderstand","thumb-up"],["Memecahkan masalah saya","solvedMyProblem","thumb-up"],["Lainnya","otherUp","thumb-up"]],[["Sulit dipahami","hardToUnderstand","thumb-down"],["Informasi atau kode contoh salah","incorrectInformationOrSampleCode","thumb-down"],["Informasi/contoh yang saya butuhkan tidak ada","missingTheInformationSamplesINeed","thumb-down"],["Masalah terjemahan","translationIssue","thumb-down"],["Lainnya","otherDown","thumb-down"]],["Terakhir diperbarui pada 2025-07-31 UTC."],[],[],null,["# Getting a signed embed URL\n\nTo generate a [signed embed URL](/looker/docs/single-sign-on-embedding), select the **Get embed URL** option from the [three-dot dashboard menu](/looker/docs/viewing-dashboards#three-dot_dashboard_menu) on a dashboard, or from the [Explore actions gear menu](/looker/docs/viewing-looks#the_look_explore_actions_gear_menu) on a Look or Explore, and then click the **Signed Embed** tab.\n| **Note:** You must have the [`manage_embed_settings` permission](/looker/docs/admin-panel-users-roles#manage_embed_settings) to generate a signed embed URL.\n\n1. The **Content URL** field shows the full content URL, including the `/embed` path.\n\n2. The **Apply theme to dashboard/explore/look URL** field lets you select a theme to be added to the embed URL if you are generating a dashboard, an Explore, or a Look embed URL and your instance has [custom themes](/looker/docs/themes-for-embedded-dashboards-and-explores) enabled. The theme will be applied when the embedded dashboard or Explore is viewed.\n\n3. The **Include current params in URL** switch lets you choose whether to apply current parameters, such as filter values, to the embed URL. If enabled, those parameters will be applied when the embedded content is viewed.\n\n4. Enter a unique identifier for the user. You can assign the user any string, as long as it is unique. See the [`external_user_id` parameter definition](/looker/docs/single-sign-on-embedding#external_user_id) for more information.\n\n5. Optional: Enter the user's first name and last name. If one or both of these fields are left blank, they will retain the value from the last request. If no value has ever been set, each field will be assigned the value \"Embed\".\n\n6. Optional: Enter an **External Group ID**. This is a unique identifier for the group that the user belongs to in the application that is embedding Looker.\n Users who have permission to save content, and share an external group ID, will be able to save and edit content in a shared Looker folder called \"Group\". An external group ID is the only available method for creating external groups of embed users. There is no way to configure external embed user groups from within the Looker UI.\n\n7. The [model](/looker/docs/lookml-terms-and-concepts#model) on which the dashboard, Look, or Explore is based is listed in the **Models** field. The user will be granted access to that model. To grant the user access to additional models, from the **Search Models** drop-down field, click the **Models** field to expand it, and then select the additional models to which you want to grant the user access.\n\n8. The minimum [permissions](/looker/docs/single-sign-on-embedding#permissions) that are required by the user to view the embedded content will be selected by default. To grant the user additional permissions, click the **Permissions** field to expand it, and then select any additional permissions that you want to grant to the user.\n\n9. To grant the user one or more [user attributes](/looker/docs/admin-panel-users-user-attributes), click **Add Row** . Select the user attribute that you want the user to have in the **Key** drop-down field, and then enter the user's value for that user attribute in the **Value** field. You can add additional user attributes by clicking **Add Row** , or you can remove a user attribute by clicking the trash can icon. You cannot add multiple user attributes with the same **Key** value.\n\n10. In the **Session Length** field, enter the number of seconds that can elapse before the signed embed URL session should be invalidated.\n\n11. To return all values to default settings, click **Clear Form** . All values will also reset if you navigate away from the **Get Embed URL** window.\n\n12. Click **Generate URL**.\n\nUsing the parameters that you specified, Looker will generate a signed embed URL, a signed [SDK](/looker/docs/api-sdk) call, and a signed [embed SDK](/looker/docs/embed-sdk-intro) call.\n\n- To copy the generated signed embed URL to the clipboard, click **Copy Link**.\n- You can view either the [SDK](/looker/docs/api-sdk) call or the [embed SDK](/looker/docs/embed-sdk-intro) call by clicking **View Code**, which will open a code window.\n- From within the code window, to copy the generated SDK call or Embed SDK call results to your clipboard, click **Copy to Clipboard**."]]