Tetap teratur dengan koleksi
Simpan dan kategorikan konten berdasarkan preferensi Anda.
Halaman ini menjelaskan cara menyiapkan koneksi di Looker ke Google Spanner.
Mengenkripsi traffic jaringan
Praktik terbaiknya adalah mengenkripsi traffic jaringan antara aplikasi Looker dan database Anda. Pertimbangkan salah satu opsi yang dijelaskan di halaman dokumentasi Mengaktifkan akses database yang aman.
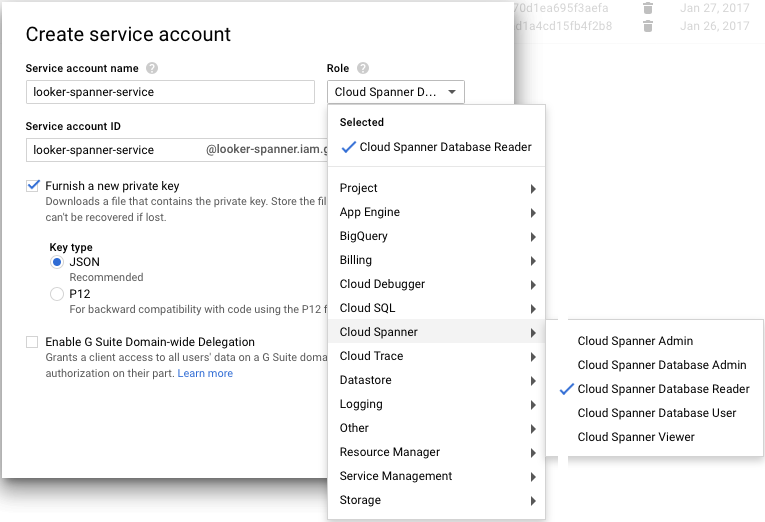
Dari menu, pilih IAM & Admin, lalu Service accounts.
Pilih Buat akun layanan dan isi kotak dialog sebagai berikut:
Nama akun layanan: Masukkan looker-spanner-service atau yang serupa.
Role: Pilih Cloud Spanner, lalu Cloud Spanner Database Reader.
Berikan kunci pribadi baru: Centang kotak Berikan kunci pribadi baru, lalu pilih JSON di bagian Jenis kunci.
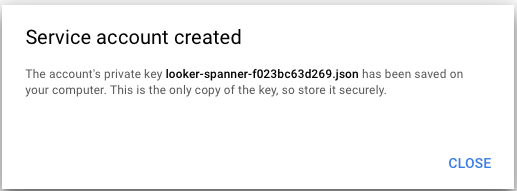
Klik Buat dan pantau hal berikut:
Alamat email yang terkait dengan akun layanan
Nama dan lokasi file kredensial JSON yang didownload
Membuat koneksi Looker ke database Anda
Di bagian Admin Looker, pilih Connections, lalu klik Add Connection.
Isi detail koneksi. Sebagian besar setelan umum untuk sebagian besar dialek database. Lihat halaman dokumentasi Menghubungkan Looker ke database Anda untuk mengetahui informasi selengkapnya. Beberapa setelan dijelaskan di bawah:
Dialek: Google Spanner.
Nama: Nama koneksi.
Project Name: Project ID untuk project Google yang berisi database Spanner.
Nama Instance: Nama instance yang berisi database Spanner.
Database: Nama database Spanner.
Schema: Biarkan kosong.
Koneksi maks per node: Jumlah maksimum total koneksi ke database Spanner di semua pengguna. Defaultnya adalah 30. Setelan ini dapat dibiarkan pada nilai defaultnya pada awalnya. Lihat halaman dokumentasi Menghubungkan Looker ke database Anda untuk mengetahui informasi selengkapnya.
Waktu Tunggu Kumpulan Koneksi: Jumlah detik yang akan ditunggu kueri sebelum waktu tunggu habis karena kumpulan koneksi penuh.
Untuk memverifikasi bahwa koneksi berhasil, klik Uji. Lihat halaman dokumentasi Menguji konektivitas database untuk mengetahui informasi pemecahan masalah.
Untuk menyimpan setelan ini, klik Hubungkan.
Dukungan fitur
Agar Looker mendukung beberapa fitur, dialek database Anda juga harus mendukungnya.
Google Spanner mendukung fitur berikut mulai Looker 25.12:
[[["Mudah dipahami","easyToUnderstand","thumb-up"],["Memecahkan masalah saya","solvedMyProblem","thumb-up"],["Lainnya","otherUp","thumb-up"]],[["Sulit dipahami","hardToUnderstand","thumb-down"],["Informasi atau kode contoh salah","incorrectInformationOrSampleCode","thumb-down"],["Informasi/contoh yang saya butuhkan tidak ada","missingTheInformationSamplesINeed","thumb-down"],["Masalah terjemahan","translationIssue","thumb-down"],["Lainnya","otherDown","thumb-down"]],["Terakhir diperbarui pada 2025-08-25 UTC."],[],[],null,["# Google Spanner\n\nThis page explains how to set up a connection in Looker to Google Spanner.\n\nEncrypting network traffic\n--------------------------\n\nIt is a best practice to encrypt network traffic between the Looker application and your database. Consider one of the options described on the [Enabling secure database access](/looker/docs/enabling-secure-db-access) documentation page.\n\nGetting the connection credentials\n----------------------------------\n\n1. Log in to the [Google Cloud console](https://console.cloud.google.com/).\n\n2. Select the appropriate project.\n\n3. From the menu, select **IAM \\& Admin** and then **Service accounts**.\n\n4. Select **Create service account** and fill in the dialog box as follows:\n\n - **Service account name** : Enter `looker-spanner-service` or something similar.\n - **Role** : Select **Cloud Spanner** and then **Cloud Spanner Database Reader**.\n - **Furnish a new private key** : Select the **Furnish a new private key** checkbox, and select **JSON** under **Key type**.\n\n5. Click **Create** and keep track of the following:\n\n - The email address associated with the service account\n - The name and location of the JSON credential file that was downloaded\n\nCreating the Looker connection to your database\n-----------------------------------------------\n\nIn the **Admin** section of Looker, select **Connections** , and then click **Add Connection**.\n\nFill out the connection details. The majority of the settings are common to most database dialects. See the [Connecting Looker to your database](/looker/docs/connecting-to-your-db) documentation page for information. Some of the settings are described next:\n\n- **Dialect** : **Google Spanner**.\n- **Name**: The name of the connection.\n- **Project Name**: The project ID for the Google project that contains the Spanner database.\n- **Instance Name**: The name of the instance that contains the Spanner database.\n- **Database**: The name of the Spanner database.\n- **Schema**: Leave this blank.\n- **Max connections per node** : The maximum number of total connections to the Spanner database across all users. The default is 30. This setting can be left at the default value initially. See the [Connecting Looker to your database](/looker/docs/connecting-to-your-db#max_connections) documentation page for more information.\n- **Connection Pool Timeout**: The number of seconds a query will wait before timing out because of a full connection pool.\n- **Additional JDBC parameters**: Any additional JDBC driver parameters.\n\nTo verify that the connection is successful, click **Test** . See the [Testing database connectivity](/looker/docs/testing-db-connectivity) documentation page for troubleshooting information.\n\nTo save these settings, click **Connect**.\n\nFeature support\n---------------\n\nFor Looker to support some features, your database dialect must also support them.\n\nGoogle Spanner supports the following features as of Looker 25.14:\n\nReferences\n----------\n\n- [Documented Spanner limits](/spanner/docs/limits)\n\n- [Google Spanner IAM documentation](/spanner/docs/iam)\n\nNext steps\n----------\n\nAfter you have connected your database to Looker, [configure sign-in options for your users](/looker/docs/getting-started-with-users)."]]