Alguns produtos e recursos estão sendo renomeados. Os recursos de playbook generativo e de fluxo também estão sendo migrados para um único console consolidado. Confira os detalhes.
Mantenha tudo organizado com as coleções
Salve e categorize o conteúdo com base nas suas preferências.
Este guia mostra como usar um webhook para que seu agente seja mais dinâmico.
O Cloud Functions é usado para hospedar o webhook devido à simplicidade, mas há muitas outras maneiras de hospedar um serviço de webhook.
O exemplo também usa a linguagem de programação Go,
mas você pode usar qualquer
linguagem compatível com o Cloud Functions.
Não é necessário editar o código para este guia.
O exemplo de código do webhook faz o seguinte:
Lê os valores do parâmetro da solicitação de webhook.
Grava um valor de parâmetro na resposta do webhook.
Fornece uma resposta de texto na resposta do webhook.
Antes de começar
Se você não planeja usar webhooks, pule este guia de início rápido.
É possível criar Cloud Functions com o console do Google Cloud (acesse a documentação, abra o console).
Para criar uma função para este guia:
É importante que os agentes de conversação (Dialogflow CX) e a função
estejam no mesmo projeto.
Essa é a maneira mais fácil para os agentes de conversação (Dialogflow CX) terem acesso seguro à sua função.
Para selecionar seu projeto,
acesse o seletor de projetos.
Clique em Criar função e defina os seguintes campos:
Ambiente: 1ª geração
Nome da função: shirts-agent-webhook
Região: se você especificou uma região para o agente, use a mesma.
Tipo de gatilho HTTP: HTTP
URL: clique no botão "Copiar" e salve o valor.
Você vai precisar desse URL ao configurar o webhook.
Autenticação: exija autenticação.
Requerer HTTPS: marcada
Clique em Salvar.
Clique em Próxima. Você não precisa de configurações especiais de ambiente de execução, build,
conexões ou segurança.
Defina os seguintes campos:
Ambiente de execução: selecione o ambiente de execução mais recente do Go.
Código-fonte: editor inline
Ponto de entrada: HandleWebhookRequest
Substitua o código por este:
//PackagecxwhcontainsanexampleDialogflowCXwebhookpackagecxwhimport("encoding/json""fmt""log""net/http")typefulfillmentInfostruct{Tagstring`json:"tag"`}typesessionInfostruct{Sessionstring`json:"session"`Parametersmap[string]interface{}`json:"parameters"`}typetextstruct{Text[]string`json:"text"`}typeresponseMessagestruct{Texttext`json:"text"`}typefulfillmentResponsestruct{Messages[]responseMessage`json:"messages"`}//webhookRequestisusedtounmarshalaWebhookRequestJSONobject.Notethat//notallmembersneedtobedefined--justthosethatyouneedtoprocess.//Asanalternative,youcouldusethetypesprovidedbytheDialogflowprotocolbuffers://https://pkg.go.dev/google.golang.org/genproto/googleapis/cloud/dialogflow/cx/v3#WebhookRequesttypewebhookRequeststruct{FulfillmentInfofulfillmentInfo`json:"fulfillmentInfo"`SessionInfosessionInfo`json:"sessionInfo"`}//webhookResponseisusedtomarshalaWebhookResponseJSONobject.Notethat//notallmembersneedtobedefined--justthosethatyouneedtoprocess.//Asanalternative,youcouldusethetypesprovidedbytheDialogflowprotocolbuffers://https://pkg.go.dev/google.golang.org/genproto/googleapis/cloud/dialogflow/cx/v3#WebhookResponsetypewebhookResponsestruct{FulfillmentResponsefulfillmentResponse`json:"fulfillmentResponse"`SessionInfosessionInfo`json:"sessionInfo"`}//confirmhandleswebhookcallsusingthe"confirm"tag.funcconfirm(requestwebhookRequest)(webhookResponse,error){//Createatextmessagethatutilizesthe"size"and"color"//parametersprovidedbytheend-user.//Thistextmessageisusedintheresponsebelow.t:=fmt.Sprintf("You can pick up your order for a %s%s shirt in 5 days.",request.SessionInfo.Parameters["size"],request.SessionInfo.Parameters["color"])//Createsessionparametersthatarepopulatedintheresponse.//The"cancel-period"parameterisreferencedbytheagent.//Thisexamplehardcodesthevalue2,butarealsystem//mightlookupthisvalueinadatabase.p:=map[string]interface{}{"cancel-period":"2"}//Buildandreturntheresponse.response:=webhookResponse{FulfillmentResponse:fulfillmentResponse{Messages:[]responseMessage{{Text:text{Text:[]string{t},},},},},SessionInfo:sessionInfo{Parameters:p,},}returnresponse,nil}//handleErrorhandlesinternalerrors.funchandleError(whttp.ResponseWriter,errerror){w.WriteHeader(http.StatusInternalServerError)fmt.Fprintf(w,"ERROR: %v",err)}//HandleWebhookRequesthandlesWebhookRequestandsendstheWebhookResponse.funcHandleWebhookRequest(whttp.ResponseWriter,r*http.Request){varrequestwebhookRequestvarresponsewebhookResponsevarerrerror//ReadinputJSONiferr=json.NewDecoder(r.Body).Decode(&request);err!=nil{handleError(w,err)return}log.Printf("Request: %+v",request)//Getthetagfromtherequest,andcallthecorresponding//functionthathandlesthattag.//Thisexampleonlyhasonepossibletag,//butmostagentswouldhavemany.switchtag:=request.FulfillmentInfo.Tag;tag{case"confirm":response,err=confirm(request)default:err=fmt.Errorf("Unknown tag: %s",tag)}iferr!=nil{handleError(w,err)return}log.Printf("Response: %+v",response)//Sendresponseiferr=json.NewEncoder(w).Encode(&response);err!=nil{handleError(w,err)return}}
Clique em Implantar.
Aguarde até que o indicador de status mostre que a função foi implantada.
Enquanto aguarda, examine o código que você acabou de implantar.
Os comentários de código descrevem detalhes importantes.
Criar o webhook
Agora que o webhook existe como uma função do Cloud, você vai associá-lo ao seu agente.
Para criar o webhook do agente:
URL do webhook: informe o URL do webhook que você salvou
ao criar a função.
Subtipo: padrão.
Todos os outros campos usam valores padrão.
Clique em Salvar.
Usar o webhook
Agora que o webhook está disponível para o agente,
você vai usá-lo no
fulfillment.
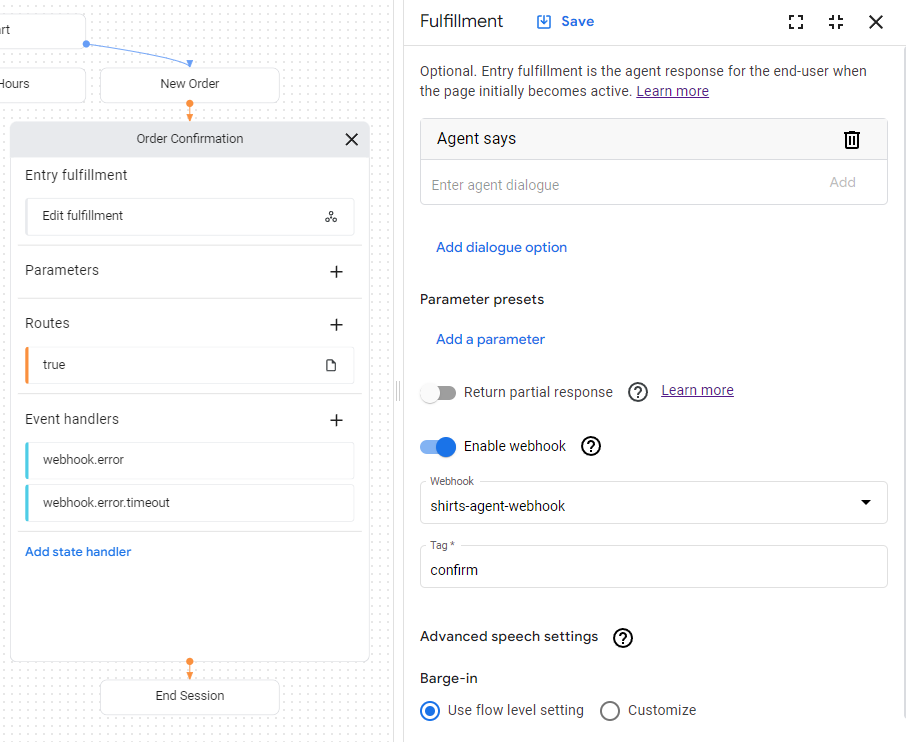
A página Confirmação do pedido tem um fulfillment de entrada,
que atualmente tem uma resposta de texto estático.
Para atualizar o fulfillment para usar seu webhook:
Selecione a guia Build.
Clique na página Order Confirmation para expandir a página
no gráfico do criador de agentes.
Clique no campo Fulfillment de entrada na página
para abrir o painel de fulfillment.
Exclua a resposta de texto existente no cabeçalho O agente diz.
Quando você passa o cursor sobre o texto, o
botão de exclusão delete
aparece.
Clique em Ativar webhook.
Selecione a opção shirts-agent-webhook
no menu suspenso Webhook.
Insira confirm no campo Tag.
Clique em Salvar.
Feche o painel de atendimento.
O código do webhook implantado envia uma resposta que cria um parâmetro chamado cancel-period.
Atualize o agente para referenciar esse parâmetro na resposta final do agente
para a mesma página de Confirmação de pedido:
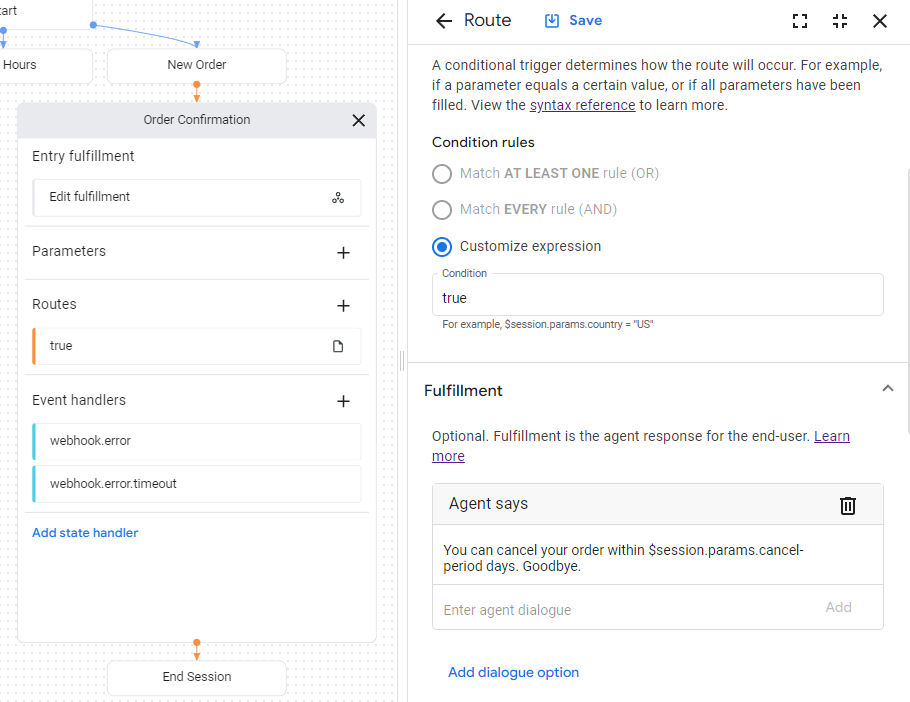
Clique na condição
route
mostrada com uma condição true para abrir o painel de rota.
Role para baixo até a seção Fulfillment do painel de rota
e adicione a seguinte resposta de texto no cabeçalho Agente diz:
You can cancel your order within $session.params.cancel-period days. Goodbye.
Clique em Salvar.
Feche o painel de rota.
Testar o agente no simulador
Seu agente e webhook estão prontos para teste com o
simulador:
Clique em Test Agent.
Digite I want to buy a large red shirt e pressione "Enter".
Como você forneceu um tamanho e uma cor,
você deu ao agente tudo o que ele precisa para criar um pedido de camisa,
então ele faz a transição diretamente para a página Confirmação do pedido.
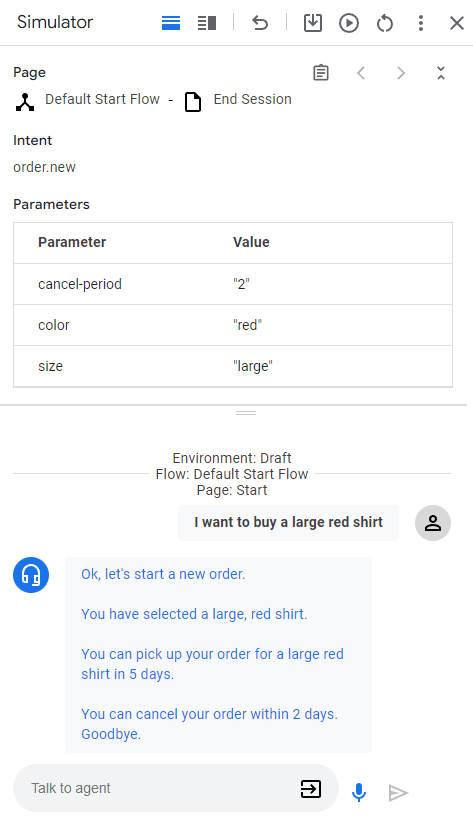
Confira a seguir as respostas dos agentes:
Resposta
Explicação
Vamos começar um novo pedido.
Quando a página Novo pedido ficou ativa, o fulfillment de entrada foi chamado. A resposta foi acionada por esse fulfillment.
Você selecionou uma camisa grande vermelha.
Quando todos os parâmetros do formulário são fornecidos para a página Novo pedido, a rota de verificação de condição para preenchimento do formulário é chamada. A resposta foi acionada pelo fulfillment dessa rota. Essa rota também faz a transição para a página de Confirmação do pedido.
Você vai receber o pedido de uma camisa vermelha grande em 5 dias.
O fulfillment de entrada da página Confirmação do pedido chama o webhook. Consulte a função confirm no código do webhook. Essa função cria essa resposta de texto e usa os parâmetros fornecidos na solicitação do webhook.
Você pode cancelar o pedido em até dois dias. Goodbye.
A página Confirmação do pedido tem uma rota de condição com uma condição que é sempre verdadeira. Essa resposta é acionada pelo fulfillment dessa rota. A resposta usa o parâmetro definido pelo webhook na resposta do webhook.
[[["Fácil de entender","easyToUnderstand","thumb-up"],["Meu problema foi resolvido","solvedMyProblem","thumb-up"],["Outro","otherUp","thumb-up"]],[["Difícil de entender","hardToUnderstand","thumb-down"],["Informações incorretas ou exemplo de código","incorrectInformationOrSampleCode","thumb-down"],["Não contém as informações/amostras de que eu preciso","missingTheInformationSamplesINeed","thumb-down"],["Problema na tradução","translationIssue","thumb-down"],["Outro","otherDown","thumb-down"]],["Última atualização 2025-08-18 UTC."],[[["\u003cp\u003eThis guide demonstrates how to integrate a webhook with a Dialogflow CX agent to enhance its dynamic capabilities using Cloud Functions for hosting.\u003c/p\u003e\n"],["\u003cp\u003eThe example webhook code, written in Go, is designed to read parameter values from the incoming request, write a parameter value to the response, and deliver a text response.\u003c/p\u003e\n"],["\u003cp\u003eCreating a webhook involves setting up a Cloud Function with specific settings, such as HTTP trigger and authentication, and then associating it with a Dialogflow CX agent through its webhook configuration.\u003c/p\u003e\n"],["\u003cp\u003eThe webhook is utilized within the agent's fulfillment settings by enabling the webhook and specifying a tag, which in this case is "confirm", to trigger the webhook's functionality.\u003c/p\u003e\n"],["\u003cp\u003eBy using a webhook, an agent can provide dynamic responses, such as confirming an order with specific shirt details, and setting session parameters like a "cancel-period" that the agent can then reference.\u003c/p\u003e\n"]]],[],null,["# Create a webhook\n\nThis guide shows you how to use a\n[webhook](/dialogflow/cx/docs/concept/webhook),\nso your agent can be more dynamic.\n[Cloud Functions](/functions/docs)\nare used to host the webhook due to their simplicity,\nbut there are many other ways that you could host a webhook service.\nThe example also uses the Go programming language,\nbut you can use any\n[language supported by Cloud Functions](/functions/docs/concepts/exec).\nYou will not need to edit the code for this guide.\n\nThe example webhook code does the following:\n\n- Reads parameter values from the webhook request.\n- Writes a parameter value to the webhook response.\n- Provides a text response in the webhook response.\n\nBefore you begin\n----------------\n\nIf you don't plan on using webhooks, you can skip this quickstart.\n\nYou should do the following before reading this guide:\n\n1. Read [flow basics](/dialogflow/cx/docs/basics).\n2. Perform [setup steps](/dialogflow/cx/docs/quick/setup).\n3. Perform steps in the [Build an agent using flows](/dialogflow/cx/docs/quick/build-agent) quickstart guide. Steps below continue working on the same agent. If you no longer have that agent, you can [download the agent](/static/dialogflow/cx/docs/data/agent-shirts-1-flow.zip) and [restore it](/dialogflow/cx/docs/concept/agent#export).\n\nCreate the Cloud Function\n-------------------------\n\nCloud Functions can be created with the Google Cloud console ([visit documentation](https://support.google.com/cloud/answer/3465889?ref_topic=3340599), [open console](https://console.cloud.google.com/)).\nTo create a function for this guide:\n\n1. It is important that your Conversational Agents (Dialogflow CX) agent and the function are both in the same project. This is the easiest way for Conversational Agents (Dialogflow CX) to have [secure access to your function](/dialogflow/cx/docs/concept/webhook#cloud-run). To select your project, [go to the project selector](https://console.cloud.google.com/projectselector2/home/dashboard).\n2. Go to the [Cloud Functions overview page](https://console.cloud.google.com/functions/list).\n3. Click **Create Function** , and set the following fields:\n - **Environment**: 1st gen\n - **Function name**: shirts-agent-webhook\n - **Region**: If you specified a region for your agent, use the same region.\n - **HTTP Trigger type**: HTTP\n - **URL**: Click the copy button here and save the value. You will need this URL when configuring the webhook.\n - **Authentication**: Require authentication\n - **Require HTTPS**: checked\n4. Click **Save**.\n5. Click **Next** (You do not need special runtime, build, connections, or security settings).\n6. Set the following fields:\n - **Runtime**: Select the latest Go runtime.\n - **Source code**: Inline Editor\n - **Entry point**: HandleWebhookRequest\n7. Replace the code with the following:\n\n ```python\n // Package cxwh contains an example Dialogflow CX webhook\n package cxwh\n\n import (\n \t\"encoding/json\"\n \t\"fmt\"\n \t\"log\"\n \t\"net/http\"\n )\n\n type fulfillmentInfo struct {\n \tTag string `json:\"tag\"`\n }\n\n type sessionInfo struct {\n \tSession string `json:\"session\"`\n \tParameters map[string]interface{} `json:\"parameters\"`\n }\n\n type text struct {\n \tText []string `json:\"text\"`\n }\n\n type responseMessage struct {\n \tText text `json:\"text\"`\n }\n\n type fulfillmentResponse struct {\n \tMessages []responseMessage `json:\"messages\"`\n }\n\n // webhookRequest is used to unmarshal a WebhookRequest JSON object. Note that\n // not all members need to be defined--just those that you need to process.\n // As an alternative, you could use the types provided by the Dialogflow protocol buffers:\n // https://pkg.go.dev/google.golang.org/genproto/googleapis/cloud/dialogflow/cx/v3#WebhookRequest\n type webhookRequest struct {\n \tFulfillmentInfo fulfillmentInfo `json:\"fulfillmentInfo\"`\n \tSessionInfo sessionInfo `json:\"sessionInfo\"`\n }\n\n // webhookResponse is used to marshal a WebhookResponse JSON object. Note that\n // not all members need to be defined--just those that you need to process.\n // As an alternative, you could use the types provided by the Dialogflow protocol buffers:\n // https://pkg.go.dev/google.golang.org/genproto/googleapis/cloud/dialogflow/cx/v3#WebhookResponse\n type webhookResponse struct {\n \tFulfillmentResponse fulfillmentResponse `json:\"fulfillmentResponse\"`\n \tSessionInfo sessionInfo `json:\"sessionInfo\"`\n }\n\n // confirm handles webhook calls using the \"confirm\" tag.\n func confirm(request webhookRequest) (webhookResponse, error) {\n \t// Create a text message that utilizes the \"size\" and \"color\"\n \t// parameters provided by the end-user.\n \t// This text message is used in the response below.\n \tt := fmt.Sprintf(\"You can pick up your order for a %s %s shirt in 5 days.\",\n \t\trequest.SessionInfo.Parameters[\"size\"],\n \t\trequest.SessionInfo.Parameters[\"color\"])\n\n \t// Create session parameters that are populated in the response.\n \t// The \"cancel-period\" parameter is referenced by the agent.\n \t// This example hard codes the value 2, but a real system\n \t// might look up this value in a database.\n \tp := map[string]interface{}{\"cancel-period\": \"2\"}\n\n \t// Build and return the response.\n \tresponse := webhookResponse{\n \t\tFulfillmentResponse: fulfillmentResponse{\n \t\t\tMessages: []responseMessage{\n \t\t\t\t{\n \t\t\t\t\tText: text{\n \t\t\t\t\t\tText: []string{t},\n \t\t\t\t\t},\n \t\t\t\t},\n \t\t\t},\n \t\t},\n \t\tSessionInfo: sessionInfo{\n \t\t\tParameters: p,\n \t\t},\n \t}\n \treturn response, nil\n }\n\n // handleError handles internal errors.\n func handleError(w http.ResponseWriter, err error) {\n \tw.WriteHeader(http.StatusInternalServerError)\n \tfmt.Fprintf(w, \"ERROR: %v\", err)\n }\n\n // HandleWebhookRequest handles WebhookRequest and sends the WebhookResponse.\n func HandleWebhookRequest(w http.ResponseWriter, r *http.Request) {\n \tvar request webhookRequest\n \tvar response webhookResponse\n \tvar err error\n\n \t// Read input JSON\n \tif err = json.NewDecoder(r.Body).Decode(&request); err != nil {\n \t\thandleError(w, err)\n \t\treturn\n \t}\n \tlog.Printf(\"Request: %+v\", request)\n\n \t// Get the tag from the request, and call the corresponding\n \t// function that handles that tag.\n \t// This example only has one possible tag,\n \t// but most agents would have many.\n \tswitch tag := request.FulfillmentInfo.Tag; tag {\n \tcase \"confirm\":\n \t\tresponse, err = confirm(request)\n \tdefault:\n \t\terr = fmt.Errorf(\"Unknown tag: %s\", tag)\n \t}\n \tif err != nil {\n \t\thandleError(w, err)\n \t\treturn\n \t}\n \tlog.Printf(\"Response: %+v\", response)\n\n \t// Send response\n \tif err = json.NewEncoder(w).Encode(&response); err != nil {\n \t\thandleError(w, err)\n \t\treturn\n \t}\n }\n ```\n8. Click **Deploy**.\n\n9. Wait until the status indicator shows that the function\n has successfully deployed.\n While waiting, examine the code you just deployed.\n Code comments describe important details.\n\nCreate the webhook\n------------------\n\nNow that the webhook exists as a Cloud function,\nyou will associate this webhook with your agent.\nTo create the webhook for your agent:\n\n1. Open the [Dialogflow CX console](https://dialogflow.cloud.google.com/cx/projects).\n2. Choose your Google Cloud project.\n3. Select your agent.\n4. Select the **Manage** tab.\n5. Click **Webhooks**.\n6. Click **Create**.\n7. Complete the following fields:\n - **Display name**: shirts-agent-webhook\n - **Webhook URL**: Provide the webhook URL you saved when creating the function.\n - **Subtype**: Standard.\n - All other fields use default values.\n8. Click **Save**.\n\nUse the webhook\n---------------\n\nNow that the webhook is available to the agent,\nyou will make use of the webhook in\n[fulfillment](/dialogflow/cx/docs/concept/fulfillment).\nThe **Order Confirmation** page has an entry fulfillment,\nwhich currently has a static text response.\nTo update the fulfillment to use your webhook:\n\n1. Select the **Build** tab.\n2. Click the **Order Confirmation** page to expand the page on the agent builder graph.\n3. Click the **Entry Fulfillment** field on the page to open the fulfillment panel.\n4. Delete the existing text response under the **Agent says** heading. When you hover the text, the delete *delete* button appears.\n5. Click **Enable webhook**.\n6. Select the `shirts-agent-webhook` option from the **Webhook** dropdown menu.\n7. Enter `confirm` for the **Tag** field.\n8. Click **Save**.\n9. Close the fulfillment panel.\n\nThe deployed webhook code sends a response\nthat creates a\n[parameter](/dialogflow/cx/docs/concept/parameter)\nnamed `cancel-period`.\nUpdate the agent to reference this parameter in the final agent response\nfor the same **Order Confirmation** page:\n\n1. Click the condition [route](/dialogflow/cx/docs/concept/handler) shown with a `true` condition to open the route panel.\n2. Scroll down to the **Fulfillment** section of the route panel, and add the following text response under the **Agent says** heading: `You can cancel your order within $session.params.cancel-period days. Goodbye.`\n3. Click **Save**.\n4. Close the route panel.\n\nTest the agent in the simulator\n-------------------------------\n\nYour agent and webhook are ready to test with the\n[simulator](/dialogflow/cx/docs/concept/console#simulator):\n\n1. Click **Test Agent**.\n2. Enter `I want to buy a large red shirt` and press enter.\n\nSince you provided both a size and color,\nyou gave the agent everything it needs to create a shirt order,\nso it transitions directly to the **Order Confirmation** page.\n\nThe following describes the agent responses:"]]