建構 Cloud Run 教學課程的 WebSocket 即時通訊服務


本教學課程將說明如何使用 WebSockets 建立多房間即時通訊服務,並透過永久連線進行雙向通訊。使用 WebSockets 時,用戶端和伺服器可以互相推送訊息,而無須輪詢伺服器以取得更新。

雖然您可以設定 Cloud Run 使用工作階段相依性,但這只會提供盡力相依性,也就是說,任何新要求都可能會被重新導向至其他執行個體。因此,聊天服務中的使用者訊息需要在所有例項之間同步,而非只在連線至單一例項的用戶端之間同步。

設計總覽

這個即時通訊服務範例會使用 Memorystore for Redis 執行個體,在所有執行個體中儲存及同步處理使用者訊息。Redis 使用 Pub/Sub 機制 (請勿與產品 Cloud Pub/Sub 混淆),將資料推送至已訂閱的用戶端,以便連結至任何執行個體,並避免 HTTP 輪詢更新。

不過,即使有推播更新,任何啟動的執行個體都只會收到推送至容器的新訊息。如要載入先前的訊息,您必須儲存訊息記錄,並從持續性儲存空間解決方案擷取這些記錄。這個範例會使用 Redis 的物件儲存庫傳統功能,快取及擷取訊息記錄。

架構圖
此圖表顯示每個 Cloud Run 執行個體的多個用戶端連線。每個執行個體都會透過無伺服器 VPC 存取連接器連線至 Memorystore for Redis 執行個體。

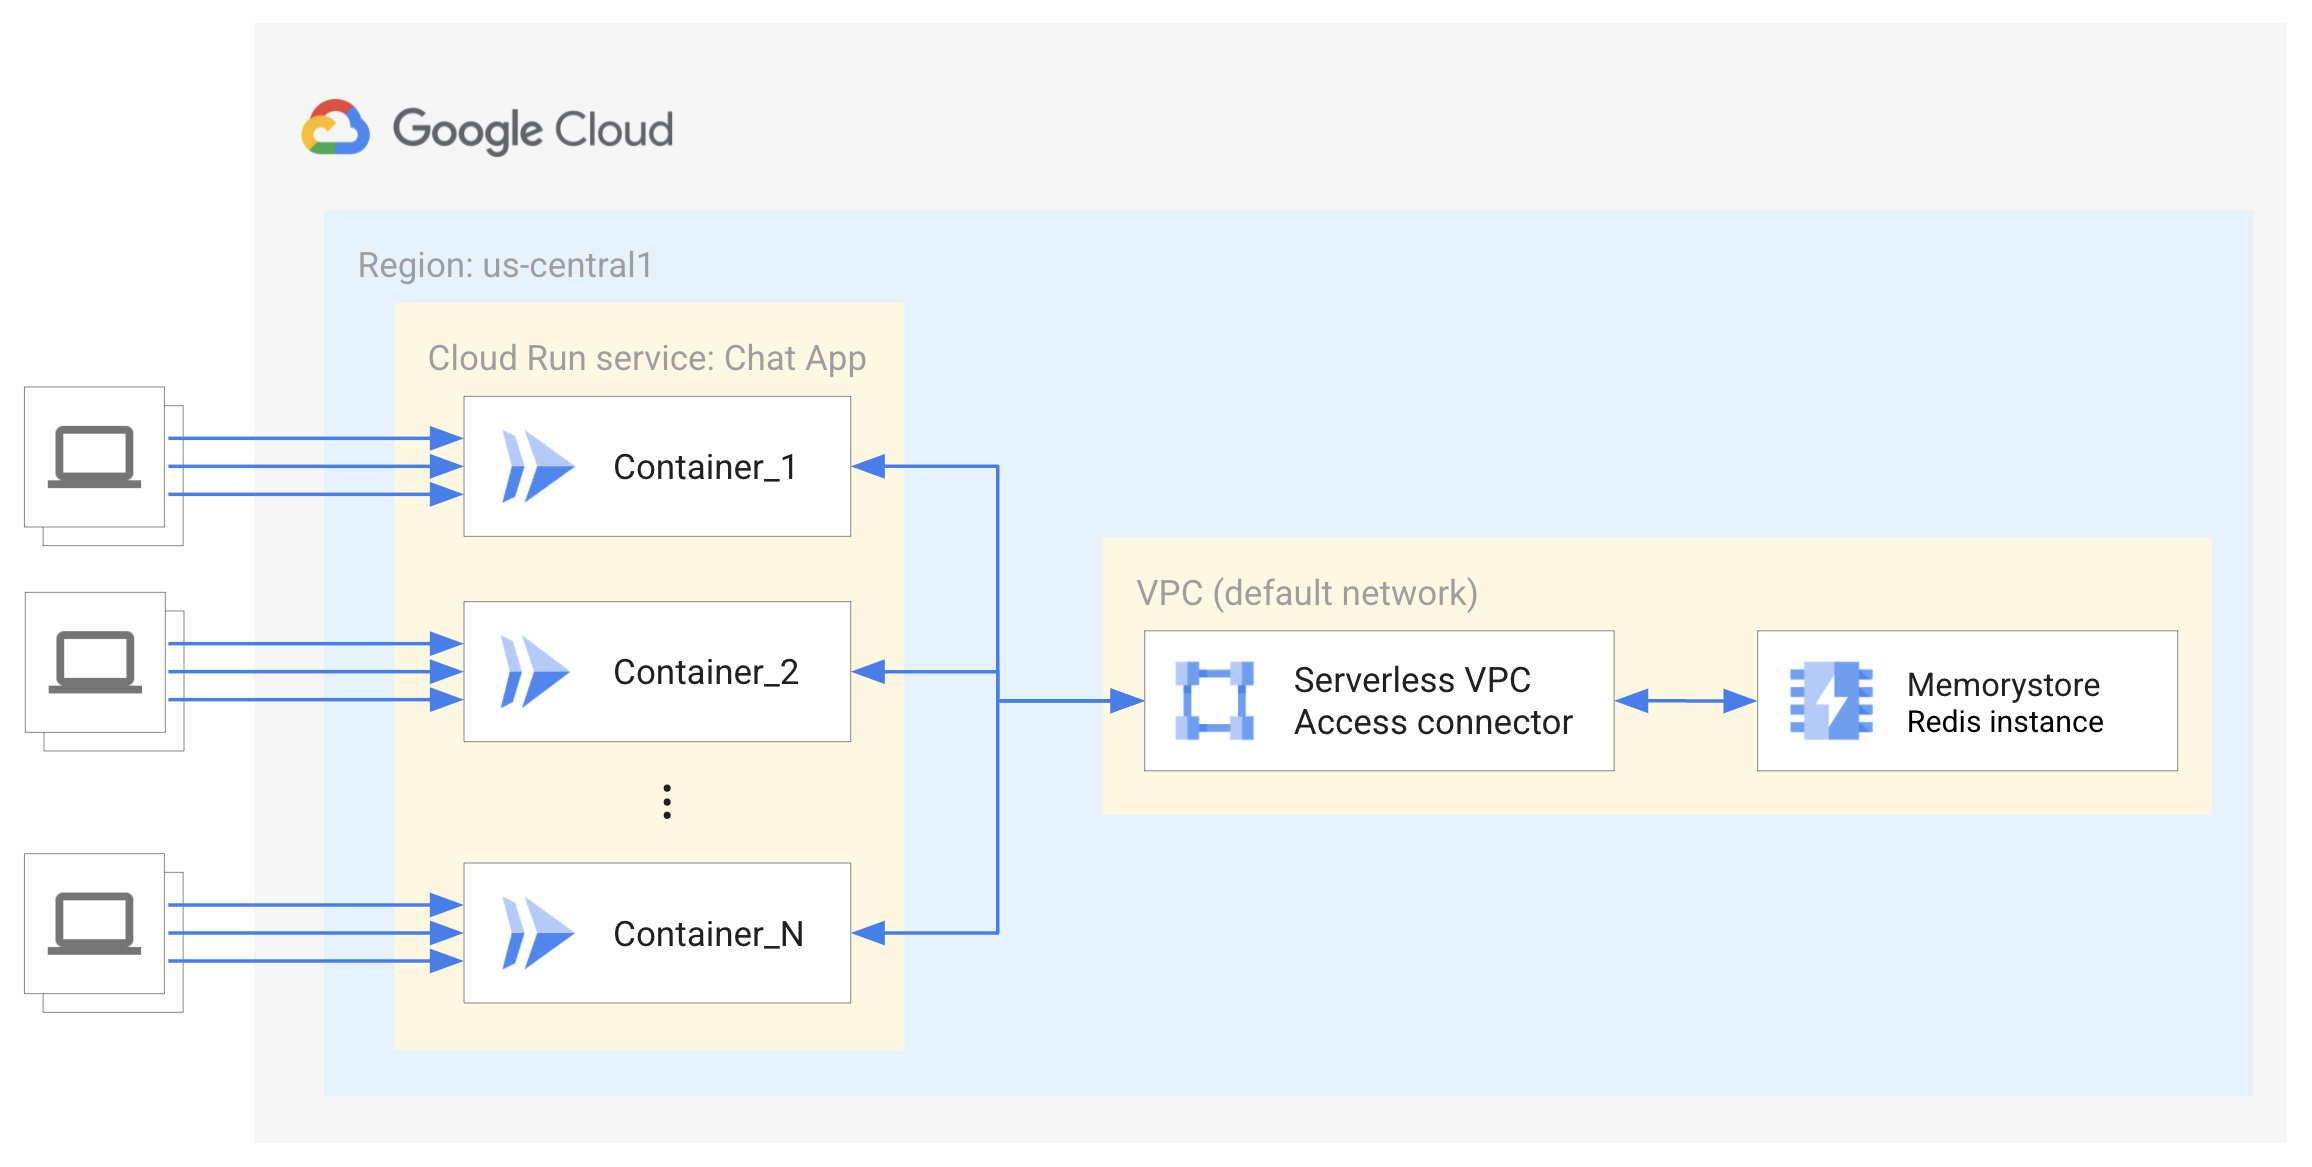
Redis 執行個體使用的是私人 IP,不會連結至網際網路,因此能夠受到保護。另外,執行個體的存取權也受到控管,只有與 Redis 執行個體在同一個虛擬私人網路上執行的服務可以存取。因此,Cloud Run 服務需要使用無伺服器虛擬私人雲端存取連接器才能連線至 Redis。進一步瞭解無伺服器虛擬私有雲存取

限制

  • 本教學課程不會顯示使用者驗證或工作階段快取。如要進一步瞭解使用者驗證,請參閱 Cloud Run 教學課程,瞭解如何驗證使用者

  • 本教學課程並未實作 Firestore 等資料庫,因此無法無限期儲存及擷取即時通訊訊息記錄。

  • 這個範例服務需要其他元素才能正式上線。建議使用標準級 Redis 執行個體,透過複製和自動容錯移轉功能提供高可用性

目標

  • 撰寫、建構及部署使用 WebSocket 的 Cloud Run 服務。

  • 連線至 Memorystore for Redis 執行個體,以便在各個執行個體中發布及訂閱新訊息。

  • 使用無伺服器虛擬私有雲存取連接器,將 Cloud Run 服務連結至 Memorystore。

費用

在本文件中,您會使用 Google Cloud的下列計費元件:

您可以使用 Pricing Calculator 根據預測用量產生預估費用。 新 Google Cloud 使用者可能符合申請免費試用的資格。

事前準備

  1. Sign in to your Google Cloud account. If you're new to Google Cloud, create an account to evaluate how our products perform in real-world scenarios. New customers also get $300 in free credits to run, test, and deploy workloads.
  2. In the Google Cloud console, on the project selector page, select or create a Google Cloud project.

    Go to project selector

  3. Make sure that billing is enabled for your Google Cloud project.

  4. In the Google Cloud console, on the project selector page, select or create a Google Cloud project.

    Go to project selector

  5. Make sure that billing is enabled for your Google Cloud project.

  6. Enable the Cloud Run, Memorystore for Redis, Serverless VPC Access, Artifact Registry, and Cloud Build APIs.

    Enable the APIs

  7. 安裝並初始化 gcloud CLI
  8. 必要的角色

    如要取得完成本教學課程所需的權限,請要求管理員為您授予專案的下列 IAM 角色:

    如要進一步瞭解如何授予角色,請參閱「管理專案、資料夾和機構的存取權」。

    您或許還可透過自訂角色或其他預先定義的角色取得必要權限。

設定 gcloud 預設值

如要針對 Cloud Run 服務設定 gcloud 的預設值:

  1. 設定您的預設專案:

    gcloud config set project PROJECT_ID

    PROJECT_ID 改為您為本教學課程建立的專案名稱。

  2. 為所選地區設定 gcloud:

    gcloud config set run/region REGION

    REGION 改為您所選擇的支援 Cloud Run 地區

Cloud Run 位置

Cloud Run 具有「地區性」,這表示執行 Cloud Run 服務的基礎架構位於特定地區,並由 Google 代管,可為該地區內所有區域提供備援功能。

選擇 Cloud Run 服務的執行地區時,請將延遲時間、可用性或耐用性需求做為主要考量。一般而言,您可以選擇最靠近使用者的地區,但您應考量 Cloud Run 服務所使用的其他 Google Cloud產品位置。使用分散在不同位置的 Google Cloud 產品,可能會影響服務的延遲時間和費用。

Cloud Run 可在下列地區使用:

採用級別 1 定價

採用級別 2 定價

如果您已建立 Cloud Run 服務,即可在 Google Cloud 控制台的 Cloud Run 資訊主頁中查看地區。

擷取程式碼範例

如要擷取要使用的程式碼範例:

  1. 將範例存放區複製到本機電腦中:

    Node.js

    git clone https://github.com/GoogleCloudPlatform/nodejs-docs-samples.git

    您也可以 下載 zip 格式的範例,然後解壓縮該檔案。

  2. 變更為包含 Cloud Run 範例程式碼的目錄:

    Node.js

    cd nodejs-docs-samples/run/websockets/

瞭解程式碼

Socket.io 是可在瀏覽器和伺服器之間進行即時雙向通訊的程式庫。雖然 Socket.io 並非 WebSocket 實作,但它確實會包裝這項功能,為多個通訊通訊協定提供更簡單的 API,並提供額外的功能,例如改善可靠性、自動重新連線,以及向所有或部分用戶端廣播。

用戶端整合

<script src="/socket.io/socket.io.js"></script>

用戶端會為每個連線例項化新的 Socket 例項。由於這個範例是透過伺服器端算繪,因此不需要定義伺服器網址。套接字例項可發出及監聽事件。

// Initialize Socket.io
const socket = io('', {
  transports: ['websocket'],
});
// Emit "sendMessage" event with message
socket.emit('sendMessage', msg, error => {
  if (error) {
    console.error(error);
  } else {
    // Clear message
    $('#msg').val('');
  }
});
// Listen for new messages
socket.on('message', msg => {
  log(msg.user, msg.text);
});

// Listen for notifications
socket.on('notification', msg => {
  log(msg.title, msg.description);
});

// Listen connect event
socket.on('connect', () => {
  console.log('connected');
});

伺服器端整合

在伺服器端,Socket.io 伺服器會完成初始化,並附加至 HTTP 伺服器。與用戶端類似,一旦 Socket.io 伺服器與用戶端建立連線,就會為每個連線建立一個通訊端例項,可用於發出及接收訊息。Socket.io 也提供簡單的介面,可用於建立「聊天室」或任意通道,讓 Socket 可加入和離開。

// Initialize Socket.io
const server = require('http').Server(app);
const io = require('socket.io')(server);

const {createAdapter} = require('@socket.io/redis-adapter');
// Replace in-memory adapter with Redis
const subClient = redisClient.duplicate();
io.adapter(createAdapter(redisClient, subClient));
// Add error handlers
redisClient.on('error', err => {
  console.error(err.message);
});

subClient.on('error', err => {
  console.error(err.message);
});

// Listen for new connection
io.on('connection', socket => {
  // Add listener for "signin" event
  socket.on('signin', async ({user, room}, callback) => {
    try {
      // Record socket ID to user's name and chat room
      addUser(socket.id, user, room);
      // Call join to subscribe the socket to a given channel
      socket.join(room);
      // Emit notification event
      socket.in(room).emit('notification', {
        title: "Someone's here",
        description: `${user} just entered the room`,
      });
      // Retrieve room's message history or return null
      const messages = await getRoomFromCache(room);
      // Use the callback to respond with the room's message history
      // Callbacks are more commonly used for event listeners than promises
      callback(null, messages);
    } catch (err) {
      callback(err, null);
    }
  });

  // Add listener for "updateSocketId" event
  socket.on('updateSocketId', async ({user, room}) => {
    try {
      addUser(socket.id, user, room);
      socket.join(room);
    } catch (err) {
      console.error(err);
    }
  });

  // Add listener for "sendMessage" event
  socket.on('sendMessage', (message, callback) => {
    // Retrieve user's name and chat room  from socket ID
    const {user, room} = getUser(socket.id);
    if (room) {
      const msg = {user, text: message};
      // Push message to clients in chat room
      io.in(room).emit('message', msg);
      addMessageToCache(room, msg);
      callback();
    } else {
      callback('User session not found.');
    }
  });

  // Add listener for disconnection
  socket.on('disconnect', () => {
    // Remove socket ID from list
    const {user, room} = deleteUser(socket.id);
    if (user) {
      io.in(room).emit('notification', {
        title: 'Someone just left',
        description: `${user} just left the room`,
      });
    }
  });
});

Socket.io 也提供 Redis 轉接器,可將事件廣播給所有用戶端,不論是哪部伺服器提供 Socket 服務皆可。Socket.io 只會使用 Redis 的 Pub/Sub 機制,不會儲存任何資料。

const {createAdapter} = require('@socket.io/redis-adapter');
// Replace in-memory adapter with Redis
const subClient = redisClient.duplicate();
io.adapter(createAdapter(redisClient, subClient));

Socket.io 的 Redis 轉接器可重複使用用於儲存聊天室訊息記錄的 Redis 用戶端。每個容器都會建立與 Redis 執行個體的連線,而 Cloud Run 可以建立大量的執行個體。這遠低於 Redis 可支援的 65,000 個連線。如果您需要支援這麼多流量,也需要評估無伺服器虛擬私有雲存取連接器的傳輸量

重新連線

Cloud Run 的逾時時間上限為 60 分鐘。因此,您需要新增重新連線邏輯,以防發生逾時。在某些情況下,Socket.io 會在發生中斷連線或連線錯誤事件後,自動嘗試重新連線。我們無法保證用戶端會重新連線至相同的執行個體。

// Listen for reconnect event
socket.io.on('reconnect', () => {
  console.log('reconnected');
  // Emit "updateSocketId" event to update the recorded socket ID with user and room
  socket.emit('updateSocketId', {user, room}, error => {
    if (error) {
      console.error(error);
    }
  });
});
// Add listener for "updateSocketId" event
socket.on('updateSocketId', async ({user, room}) => {
  try {
    addUser(socket.id, user, room);
    socket.join(room);
  } catch (err) {
    console.error(err);
  }
});

如果有有效的連線,執行個體就會持續存在,直到所有要求關閉或逾時為止。即使您使用 Cloud Run 工作階段相依性,系統仍可能將新要求負載平衡至有效容器,讓容器縮放。如果您擔心流量暴增後會持續保留大量容器,可以降低逾時值上限,以便更頻繁地清理未使用的 Socket。

運送服務

  1. 建立 Memorystore for Redis 執行個體:

    gcloud redis instances create INSTANCE_ID --size=1 --region=REGION

    INSTANCE_ID 替換為執行個體名稱 (例如 my-redis-instance),並將 REGION_ID 替換為所有資源和服務的區域 (例如 us-central1)。

    系統會從預設服務網路範圍中,自動為執行個體分配 IP 範圍。本教學課程會使用 1 GB 記憶體,用於 Redis 執行個體中的訊息本機快取。進一步瞭解如何決定 Memorystore 執行個體的初始大小,以符合您的用途。

  2. 設定無伺服器虛擬私有雲存取連接器:

    如要連線至 Redis 執行個體,Cloud Run 服務必須能存取 Redis 執行個體的授權虛擬私有雲網路。

    每個虛擬私有雲連接器都需具備自己的 /28 子網路,以便放置連接器執行個體。這個 IP 範圍不得與虛擬私人雲端網路中的任何現有 IP 位址保留項目重疊。舉例來說,10.8.0.0 (/28) 可用於大多數新專案,您也可以指定其他未使用的自訂 IP 範圍,例如 10.9.0.0 (/28)。您可以在Google Cloud 控制台中查看目前保留哪些 IP 範圍。

    gcloud compute networks vpc-access connectors create CONNECTOR_NAME \
      --region REGION \
      --range "10.8.0.0/28"

    CONNECTOR_NAME 替換為連接器的名稱。

    這個指令會在預設 VPC 網路中建立連接器,與 Redis 執行個體相同,機器大小為 e2-micro。增加連接器的機器大小雖然可以提高連接器的處理量,但也會增加成本。連接器也必須與 Redis 執行個體位於相同的地區。進一步瞭解設定無伺服器虛擬私有雲存取

  3. 使用 Redis 執行個體授權網路的 IP 位址定義環境變數:

     export REDISHOST=$(gcloud redis instances describe INSTANCE_ID --region REGION --format "value(host)")
  4. 建立服務帳戶,做為服務身分。根據預設,除了專案成員權限之外,這個角色沒有其他權限。

    gcloud iam service-accounts create chat-identity
    gcloud projects add-iam-policy-binding PROJECT_ID \
    --member=serviceAccount:chat-identity@PROJECT_ID.iam.gserviceaccount.com \
    --role=roles/serviceusage.serviceUsageConsumer
  5. 建構容器映像檔並部署至 Cloud Run:

    gcloud run deploy chat-app --source . \
        --vpc-connector CONNECTOR_NAME \
        --allow-unauthenticated \
        --timeout 3600 \
        --service-account chat-identity \
        --update-env-vars REDISHOST=$REDISHOST

    如有任何安裝必要 API 的提示,請在提示時回應 y。您只需要為專案執行這項操作一次。如果您未按照設定頁面所述設定預設值,請提供平台和區域來回應其他提示。進一步瞭解如何從原始碼部署

立即體驗

如要試用完整的服務,請按照下列步驟操作:

  1. 在瀏覽器中前往上方部署步驟提供的網址。

  2. 新增你的名稱和聊天室,即可登入。

  3. 傳送訊息到聊天室!

如果您選擇繼續開發這些服務,請注意,這些服務的 Identity and Access Management (IAM) 存取權僅限於 Google Cloud ,因此需要額外的 IAM 角色才能存取許多其他服務。

清除所用資源

如果您是為了這個教學課程建立新專案,請刪除專案。如果您使用現有專案,且希望保留該專案而不採用本教學課程中的變更,請刪除為教學課程建立的資源

刪除專案

如要避免付費,最簡單的方法就是刪除您為了本教學課程所建立的專案。

如要刪除專案:

  1. In the Google Cloud console, go to the Manage resources page.

    Go to Manage resources

  2. In the project list, select the project that you want to delete, and then click Delete.
  3. In the dialog, type the project ID, and then click Shut down to delete the project.

刪除教學課程資源

  1. 刪除您在本教學課程中部署的 Cloud Run 服務:

    gcloud run services delete SERVICE-NAME

    其中 SERVICE-NAME 是您選擇的服務名稱。

    您也可以從 Google Cloud 控制台刪除 Cloud Run 服務。

  2. 移除您在教學課程設定期間新增的 gcloud 預設區域設定:

     gcloud config unset run/region
    
  3. 移除專案設定:

     gcloud config unset project
    
  4. 刪除本教學課程中建立的其他 Google Cloud 資源:

後續步驟