ジョブビルダーを使用してパイプラインを実行する
このクイックスタートでは、Dataflow ジョブビルダーを使用して Dataflow ジョブを実行する方法について説明します。ジョブビルダーは、コードを記述せずに Google Cloud コンソールで Dataflow パイプラインを構築して実行するためのビジュアル UI です。
このクイックスタートでは、サンプル パイプラインをジョブビルダーに読み込み、ジョブを実行して、ジョブによって出力が生成されたことを確認します。
始める前に
- Sign in to your Google Cloud account. If you're new to Google Cloud, create an account to evaluate how our products perform in real-world scenarios. New customers also get $300 in free credits to run, test, and deploy workloads.
-
In the Google Cloud console, on the project selector page, select or create a Google Cloud project.
-
Verify that billing is enabled for your Google Cloud project.
-
Enable the Dataflow, Compute Engine, Cloud Logging, Cloud Storage, Google Cloud Storage JSON, and Resource Manager APIs.
-
In the Google Cloud console, on the project selector page, select or create a Google Cloud project.
-
Verify that billing is enabled for your Google Cloud project.
-
Enable the Dataflow, Compute Engine, Cloud Logging, Cloud Storage, Google Cloud Storage JSON, and Resource Manager APIs.
- Cloud Storage バケットを作成します。
- In the Google Cloud console, go to the Cloud Storage Buckets page.
- Click Create.
- On the Create a bucket page, enter your bucket information. To go to the next
step, click Continue.
- For Name your bucket, enter a unique bucket name. Don't include sensitive information in the bucket name, because the bucket namespace is global and publicly visible.
-
In the Choose where to store your data section, do the following:
- Select a Location type.
- Choose a location where your bucket's data is permanently stored from the Location type drop-down menu.
- If you select the dual-region location type, you can also choose to enable turbo replication by using the relevant checkbox.
- To set up cross-bucket replication, select
Add cross-bucket replication via Storage Transfer Service and
follow these steps:
Set up cross-bucket replication
- In the Bucket menu, select a bucket.
In the Replication settings section, click Configure to configure settings for the replication job.
The Configure cross-bucket replication pane appears.
- To filter objects to replicate by object name prefix, enter a prefix that you want to include or exclude objects from, then click Add a prefix.
- To set a storage class for the replicated objects, select a storage class from the Storage class menu. If you skip this step, the replicated objects will use the destination bucket's storage class by default.
- Click Done.
-
In the Choose how to store your data section, do the following:
- In the Set a default class section, select the following: Standard.
- To enable hierarchical namespace, in the Optimize storage for data-intensive workloads section, select Enable hierarchical namespace on this bucket.
- In the Choose how to control access to objects section, select whether or not your bucket enforces public access prevention, and select an access control method for your bucket's objects.
-
In the Choose how to protect object data section, do the
following:
- Select any of the options under Data protection that you
want to set for your bucket.
- To enable soft delete, click the Soft delete policy (For data recovery) checkbox, and specify the number of days you want to retain objects after deletion.
- To set Object Versioning, click the Object versioning (For version control) checkbox, and specify the maximum number of versions per object and the number of days after which the noncurrent versions expire.
- To enable the retention policy on objects and buckets, click the Retention (For compliance) checkbox, and then do the following:
- To enable Object Retention Lock, click the Enable object retention checkbox.
- To enable Bucket Lock, click the Set bucket retention policy checkbox, and choose a unit of time and a length of time for your retention period.
- To choose how your object data will be encrypted, expand the Data encryption section (), and select a Data encryption method.
- Select any of the options under Data protection that you
want to set for your bucket.
- Click Create.
このクイックスタートの手順を最後まで行うには、ユーザー アカウントに Dataflow 管理者ロールとサービス アカウント ユーザー ロールが必要です。Compute Engine のデフォルトのサービス アカウントには、Dataflow ワーカーロールが必要です。 Google Cloud コンソールで、必要なロールを追加するには:
- IAM ページに移動します。
[IAM] に移動 - プロジェクトを選択します。
- ユーザー アカウントを含む行で、(プリンシパルを編集します)アイコンをクリックします。
- [別のロールを追加] をクリックし、プルダウン リストで [Dataflow 管理者] を選択します。
- [別のロールを追加] をクリックし、プルダウン リストで [サービス アカウント ユーザー] を選択します。
- [保存] をクリックします。
- Compute Engine のデフォルトのサービス アカウントを含む行で、(プリンシパルを編集します)アイコンをクリックします。
- [別のロールを追加] をクリックし、プルダウン リストで [Dataflow ワーカー] を選択します。
- [別のロールを追加] をクリックし、プルダウン リストで [Storage オブジェクト管理者] を選択します。
[保存] をクリックします。
ロール付与の詳細については、コンソールを使用して IAM ロールを付与するをご覧ください。
- IAM ページに移動します。
- デフォルトでは、新しいプロジェクトはデフォルト ネットワークで開始されます。プロジェクトのデフォルト ネットワークが無効または削除されている場合、Compute ネットワーク ユーザーのロール(
roles/compute.networkUser)を含むユーザー アカウント用のプロジェクト内にネットワークが必要です。
サンプル パイプラインを読み込む
この手順では、シェイクスピアの『リア王』の単語数をカウントするサンプル パイプラインを読み込みます。
Google Cloud コンソールの [ジョブ] ページに移動します。
[テンプレートからジョブを作成] をクリックします
[ジョブビルダー] をクリックします。
[読み込み] をクリックします。
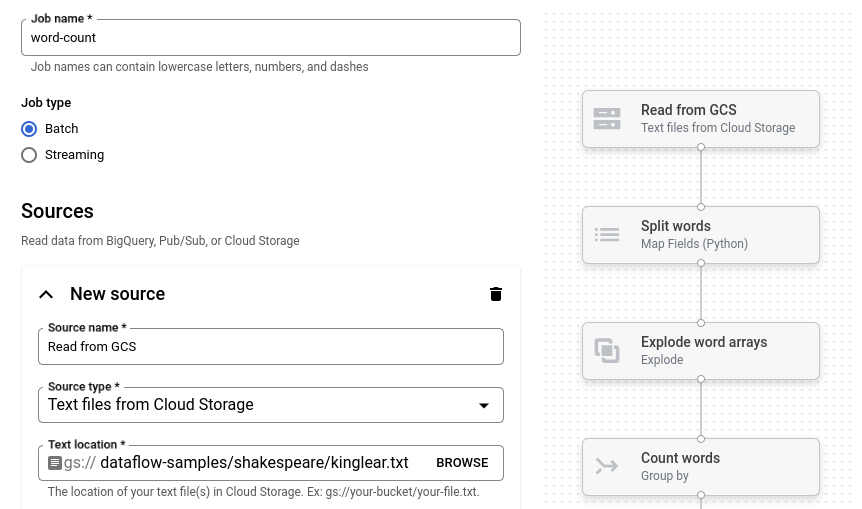
[単語数のカウント] をクリックします。ジョブビルダーに、パイプラインのグラフィック表現が渡されます。
ジョブビルダーにパイプラインの各ステップのカードが表示されます。ここには、そのステップの構成パラメータが示されます。たとえば、最初のステップでは、Cloud Storage からテキスト ファイルを読み取ります。ソースデータの場所が [テキストの場所] ボックスに設定されています。
出力場所を設定する
このステップでは、パイプラインが出力を書き込む Cloud Storage バケットを指定します。
[新しいシンク] というタイトルのカードを見つけます。スクロールが必要な場合があります。
[テキストの場所] ボックスで、[参照] をクリックします。
始める前にで作成した Cloud Storage バケットの名前を選択します。
[子リソースを表示] をクリックします。
[ファイル名] ボックスに「
words」と入力します。[選択] をクリックします。
ジョブを実行する
[ジョブを実行] をクリックします。ジョブビルダーは Dataflow ジョブを作成し、ジョブグラフに移動します。ジョブが開始すると、ジョブビルダーと同じように、ジョブグラフにパイプラインのグラフィック表示が表示されます。パイプラインの各ステップが実行されると、ジョブグラフでステータスが更新されます。
[ジョブ情報] パネルには、ジョブの全体的なステータスが表示されます。ジョブが正常に完了すると、[ジョブ ステータス] フィールドが Succeeded に更新されます。
ジョブの出力を調べる
ジョブが完了したら、次の手順でパイプラインからの出力を確認します。
Google Cloud コンソールで Cloud Storage の [バケット] ページに移動します。
バケットのリストで、始める前にで作成したバケットの名前をクリックします。
words-00000-of-00001というファイルをクリックします。[オブジェクトの詳細] ページで、認証済みの URL をクリックして、パイプライン出力を表示します。
出力は次のようになります。
brother: 20
deeper: 1
wrinkles: 1
'alack: 1
territory: 1
dismiss'd: 1
[....]
クリーンアップ
このページで使用したリソースについて、 Google Cloud アカウントに課金されないようにするには、次の手順を実施します。
プロジェクトを削除する
課金されないようにする最も簡単な方法は、クイックスタート用に作成した Google Cloud プロジェクトを削除することです。
- In the Google Cloud console, go to the Manage resources page.
- In the project list, select the project that you want to delete, and then click Delete.
- In the dialog, type the project ID, and then click Shut down to delete the project.
個々のリソースを削除する
このクイックスタートで使用した Google Cloud プロジェクトを残しておく場合は、Cloud Storage バケットを削除します。
- In the Google Cloud console, go to the Cloud Storage Buckets page.
- Click the checkbox for the bucket that you want to delete.
- To delete the bucket, click Delete, and then follow the instructions.