Run a pipeline by using the job builder
This quickstart shows you how to run a Dataflow job by using the Dataflow job builder. The job builder is a visual UI for building and running Dataflow pipelines in the Google Cloud console, without writing any code.
In this quickstart, you load an example pipeline into the job builder, run a job, and verify that the job created output.
Before you begin
Complete the following steps before running your pipeline.
Set up your project
- Sign in to your Google Cloud Platform account. If you're new to Google Cloud, create an account to evaluate how our products perform in real-world scenarios. New customers also get $300 in free credits to run, test, and deploy workloads.
-
In the Google Cloud console, on the project selector page, select or create a Google Cloud project.
Roles required to select or create a project
- Select a project: Selecting a project doesn't require a specific IAM role—you can select any project that you've been granted a role on.
-
Create a project: To create a project, you need the Project Creator
(
roles/resourcemanager.projectCreator), which contains theresourcemanager.projects.createpermission. Learn how to grant roles.
-
Verify that billing is enabled for your Google Cloud project.
-
Enable the Dataflow, Compute Engine, Cloud Logging, Cloud Storage, Google Cloud Storage JSON, and Resource Manager APIs.
Roles required to enable APIs
To enable APIs, you need the Service Usage Admin IAM role (
roles/serviceusage.serviceUsageAdmin), which contains theserviceusage.services.enablepermission. Learn how to grant roles. -
In the Google Cloud console, on the project selector page, select or create a Google Cloud project.
Roles required to select or create a project
- Select a project: Selecting a project doesn't require a specific IAM role—you can select any project that you've been granted a role on.
-
Create a project: To create a project, you need the Project Creator
(
roles/resourcemanager.projectCreator), which contains theresourcemanager.projects.createpermission. Learn how to grant roles.
-
Verify that billing is enabled for your Google Cloud project.
-
Enable the Dataflow, Compute Engine, Cloud Logging, Cloud Storage, Google Cloud Storage JSON, and Resource Manager APIs.
Roles required to enable APIs
To enable APIs, you need the Service Usage Admin IAM role (
roles/serviceusage.serviceUsageAdmin), which contains theserviceusage.services.enablepermission. Learn how to grant roles. - Create a Cloud Storage bucket:
- In the Google Cloud console, go to the Cloud Storage Buckets page.
- Click Create.
- On the Create a bucket page, enter your bucket information. To go to the next
step, click Continue.
- For Name your bucket, enter a unique bucket name. Don't include sensitive information in the bucket name, because the bucket namespace is global and publicly visible.
-
In the Choose where to store your data section, do the following:
- Select a Location type.
- Choose a location where your bucket's data is permanently stored from the Location type drop-down menu.
- If you select the dual-region location type, you can also choose to enable turbo replication by using the relevant checkbox.
- To set up cross-bucket replication, select
Add cross-bucket replication via Storage Transfer Service and
follow these steps:
Set up cross-bucket replication
- In the Bucket menu, select a bucket.
In the Replication settings section, click Configure to configure settings for the replication job.
The Configure cross-bucket replication pane appears.
- To filter objects to replicate by object name prefix, enter a prefix that you want to include or exclude objects from, then click Add a prefix.
- To set a storage class for the replicated objects, select a storage class from the Storage class menu. If you skip this step, the replicated objects will use the destination bucket's storage class by default.
- Click Done.
-
In the Choose how to store your data section, do the following:
- In the Set a default class section, select the following: Standard.
- To enable hierarchical namespace, in the Optimize storage for data-intensive workloads section, select Enable hierarchical namespace on this bucket.
- In the Choose how to control access to objects section, select whether or not your bucket enforces public access prevention, and select an access control method for your bucket's objects.
-
In the Choose how to protect object data section, do the
following:
- Select any of the options under Data protection that you
want to set for your bucket.
- To enable soft delete, click the Soft delete policy (For data recovery) checkbox, and specify the number of days you want to retain objects after deletion.
- To set Object Versioning, click the Object versioning (For version control) checkbox, and specify the maximum number of versions per object and the number of days after which the noncurrent versions expire.
- To enable the retention policy on objects and buckets, click the Retention (For compliance) checkbox, and then do the following:
- To enable Object Retention Lock, click the Enable object retention checkbox.
- To enable Bucket Lock, click the Set bucket retention policy checkbox, and choose a unit of time and a length of time for your retention period.
- To choose how your object data will be encrypted, expand the Data encryption section (), and select a Data encryption method.
- Select any of the options under Data protection that you
want to set for your bucket.
- Click Create.
Required roles
To get the permissions that you need to run this quickstart, ask your administrator to grant you the following IAM roles on your project:
-
Dataflow Developer (
roles/dataflow.developer) -
Service Account User (
roles/iam.serviceAccountUser)
For more information about granting roles, see Manage access to projects, folders, and organizations.
You might also be able to get the required permissions through custom roles or other predefined roles.
To ensure that the service accounts has the necessary permissions to run this quickstart, ask your administrator to grant the service accounts the following IAM roles on your project:
-
Dataflow Worker (
roles/dataflow.worker) -
Storage Object Admin (
roles/storage.objectAdmin)
For more information about granting roles, see Manage access to projects, folders, and organizations.
Your administrator might also be able to give the service accounts the required permissions through custom roles or other predefined roles.
VPC network
By default, each new project starts with a
default network.
If the default network for your project is disabled
or was deleted, you need to have a network in your project for which
your user account has the
Compute Network User role
(roles/compute.networkUser).
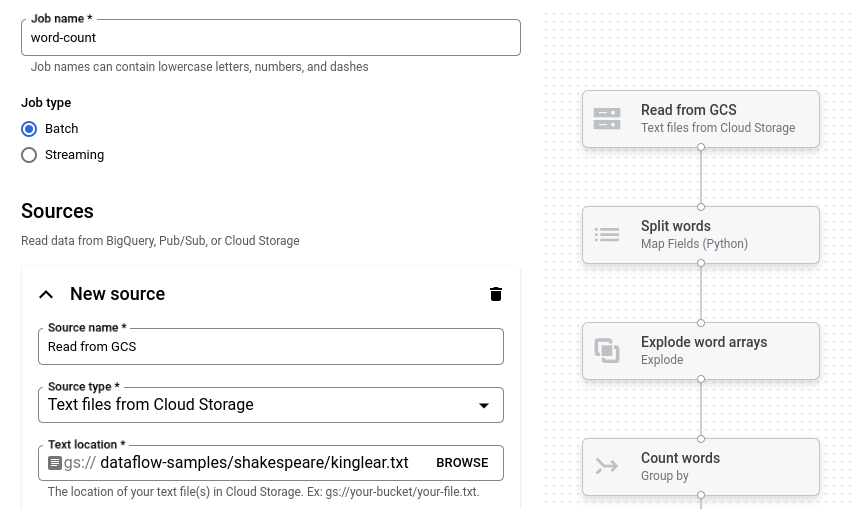
Load the example pipeline
In this step, you load an example pipeline that counts the words in Shakespeare's King Lear.
Go to the Jobs page in the Google Cloud console.
Click Create job from template.
Click Job builder.
Click Load Blueprints.
Click Word Count. The job builder is populated with a graphical representation of the pipeline.
For each pipeline step, the job builder displays a card that specifies the configuration parameters for that step. For example, the first step reads text files from Cloud Storage. The location of the source data is pre-populated in the Text location box.
Set the output location
In this step, you specify a Cloud Storage bucket where the pipeline writes output.
Locate the card titled New sink. You might need to scroll.
In the Text location box, click Browse.
Select the name of the Cloud Storage bucket that you created in Before you begin.
Click View child resources.
In the Filename box, enter
words.Click Select.
Run the job
Click Run job. The job builder creates a Dataflow job and then navigates to the job graph. When the job starts, the job graph shows a graphical representation of the pipeline, similar to the one shown in the job builder. As each step of the pipeline runs, the status is updated in the job graph.
The Job info panel shows the overall status of the job. If the job completes
successfully, the Job status field updates to Succeeded.
Examine the job output
When the job completes, perform the following steps to see the output from the pipeline:
In the Google Cloud console, go to the Cloud Storage Buckets page.
In the bucket list, click the name of the bucket that you created in Before you begin.
Click the file named
words-00000-of-00001.In the Object details page, click the authenticated URL to view the pipeline output.
The output should look similar to the following:
brother: 20
deeper: 1
wrinkles: 1
'alack: 1
territory: 1
dismiss'd: 1
[....]
Clean up
To avoid incurring charges to your Google Cloud account for the resources used on this page, follow these steps.
Delete the project
The easiest way to eliminate billing is to delete the Google Cloud project that you created for the quickstart.
- In the Google Cloud console, go to the Manage resources page.
- In the project list, select the project that you want to delete, and then click Delete.
- In the dialog, type the project ID, and then click Shut down to delete the project.
Delete the individual resources
If you want to keep the Google Cloud project that you used in this quickstart, then delete the Cloud Storage bucket:
- In the Google Cloud console, go to the Cloud Storage Buckets page.
- Click the checkbox for the bucket that you want to delete.
- To delete the bucket, click Delete, and then follow the instructions.