Esegui una pipeline utilizzando il builder di job
Questa guida rapida mostra come eseguire un job Dataflow utilizzando il builder dei job Dataflow. Il job builder è una UI visiva per creare ed eseguire pipeline Dataflow nella console Google Cloud , senza scrivere codice.
In questa guida rapida, caricherai una pipeline di esempio nel builder dei job, eseguirai un job e verificherai che il job abbia creato un output.
Prima di iniziare
- Sign in to your Google Cloud account. If you're new to Google Cloud, create an account to evaluate how our products perform in real-world scenarios. New customers also get $300 in free credits to run, test, and deploy workloads.
-
In the Google Cloud console, on the project selector page, select or create a Google Cloud project.
-
Make sure that billing is enabled for your Google Cloud project.
-
Enable the Dataflow, Compute Engine, Cloud Logging, Cloud Storage, Google Cloud Storage JSON, and Resource Manager APIs.
-
In the Google Cloud console, on the project selector page, select or create a Google Cloud project.
-
Make sure that billing is enabled for your Google Cloud project.
-
Enable the Dataflow, Compute Engine, Cloud Logging, Cloud Storage, Google Cloud Storage JSON, and Resource Manager APIs.
- Crea un bucket Cloud Storage:
- In the Google Cloud console, go to the Cloud Storage Buckets page.
- Click Create.
- On the Create a bucket page, enter your bucket information. To go to the next
step, click Continue.
- For Name your bucket, enter a unique bucket name. Don't include sensitive information in the bucket name, because the bucket namespace is global and publicly visible.
-
In the Choose where to store your data section, do the following:
- Select a Location type.
- Choose a location where your bucket's data is permanently stored from the Location type drop-down menu.
- If you select the dual-region location type, you can also choose to enable turbo replication by using the relevant checkbox.
- To set up cross-bucket replication, select
Add cross-bucket replication via Storage Transfer Service and
follow these steps:
Set up cross-bucket replication
- In the Bucket menu, select a bucket.
In the Replication settings section, click Configure to configure settings for the replication job.
The Configure cross-bucket replication pane appears.
- To filter objects to replicate by object name prefix, enter a prefix that you want to include or exclude objects from, then click Add a prefix.
- To set a storage class for the replicated objects, select a storage class from the Storage class menu. If you skip this step, the replicated objects will use the destination bucket's storage class by default.
- Click Done.
-
In the Choose how to store your data section, do the following:
- In the Set a default class section, select the following: Standard.
- To enable hierarchical namespace, in the Optimize storage for data-intensive workloads section, select Enable hierarchical namespace on this bucket.
- In the Choose how to control access to objects section, select whether or not your bucket enforces public access prevention, and select an access control method for your bucket's objects.
-
In the Choose how to protect object data section, do the
following:
- Select any of the options under Data protection that you
want to set for your bucket.
- To enable soft delete, click the Soft delete policy (For data recovery) checkbox, and specify the number of days you want to retain objects after deletion.
- To set Object Versioning, click the Object versioning (For version control) checkbox, and specify the maximum number of versions per object and the number of days after which the noncurrent versions expire.
- To enable the retention policy on objects and buckets, click the Retention (For compliance) checkbox, and then do the following:
- To enable Object Retention Lock, click the Enable object retention checkbox.
- To enable Bucket Lock, click the Set bucket retention policy checkbox, and choose a unit of time and a length of time for your retention period.
- To choose how your object data will be encrypted, expand the Data encryption section (), and select a Data encryption method.
- Select any of the options under Data protection that you
want to set for your bucket.
- Click Create.
Per completare i passaggi di questa guida rapida, il tuo account utente deve disporre del ruolo Amministratore Dataflow e del ruolo Service Account User. Il service account Compute Engine predefinito deve avere il ruolo Dataflow Worker. Per aggiungere i ruoli richiesti nella console Google Cloud :
- Vai alla pagina IAM.
Vai a IAM - Seleziona il progetto.
- Nella riga contenente il tuo account utente, fai clic su Modifica entità.
- Fai clic su Aggiungi un altro ruolo e seleziona Amministratore Dataflow dall'elenco a discesa.
- Fai clic su Aggiungi un altro ruolo e seleziona Utente account di servizio nell'elenco a discesa.
- Fai clic su Salva.
- Nella riga contenente il account di servizio predefinito di Compute Engine, fai clic su Modifica entità.
- Fai clic su Aggiungi un altro ruolo e seleziona Worker Dataflow dall'elenco a discesa.
- Fai clic su Aggiungi un altro ruolo e seleziona Amministratore oggetti di archiviazione nell'elenco a discesa.
Fai clic su Salva.
Per saperne di più sulla concessione dei ruoli, consulta Concedere un ruolo IAM utilizzando la console.
- Vai alla pagina IAM.
- Per impostazione predefinita, ogni nuovo progetto viene avviato con una
rete predefinita.
Se la rete predefinita per il tuo progetto è disattivata
o è stata eliminata, devi disporre di una rete nel tuo progetto per la quale il tuo account utente dispone del
ruolo Utente di rete Compute
(
roles/compute.networkUser).
Carica la pipeline di esempio
In questo passaggio, carichi una pipeline di esempio che conta le parole dell'opera Re Lear di Shakespeare.
Vai alla pagina Job nella console Google Cloud .
Fai clic su Crea job da modello.
Fai clic su Generatore di job.
Fai clic su Carica.
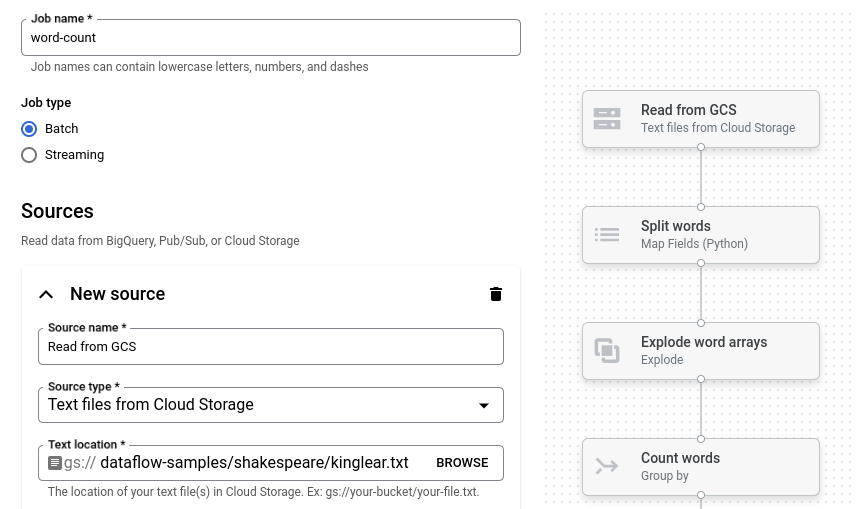
Fai clic su Conteggio parole. Il builder dedicato viene compilato con una rappresentazione grafica della pipeline.
Per ogni passaggio della pipeline, il generatore di job mostra una scheda che specifica i parametri di configurazione per quel passaggio. Ad esempio, il primo passaggio legge i file di testo da Cloud Storage. La posizione dei dati di origine è precompilata nella casella Posizione testo.
Impostare la posizione di output
In questo passaggio, specifichi un bucket Cloud Storage in cui la pipeline scrive l'output.
Individua la scheda intitolata Nuovo lavello. Potrebbe essere necessario scorrere.
Nella casella Posizione testo, fai clic su Sfoglia.
Seleziona il nome del bucket Cloud Storage che hai creato in Prima di iniziare.
Fai clic su Visualizza risorse figlio.
Nella casella Nome file, inserisci
words.Fai clic su Seleziona.
Esegui il job
Fai clic su Esegui job. Il generatore di job crea un job Dataflow e poi passa al grafico del job. Quando il job inizia, il grafico del job mostra una rappresentazione grafica della pipeline, simile a quella mostrata nel generatore di job. Man mano che viene eseguito ogni passaggio della pipeline, lo stato viene aggiornato nel grafico dei job.
Il riquadro Informazioni job mostra lo stato generale del job. Se il job viene completato
correttamente, il campo Stato job viene aggiornato a Succeeded.
Esamina l'output del job
Al termine del job, esegui i seguenti passaggi per visualizzare l'output della pipeline:
Nella console Google Cloud , vai alla pagina Bucket in Cloud Storage.
Nell'elenco dei bucket, fai clic sul nome del bucket che hai creato in Prima di iniziare.
Fai clic sul file denominato
words-00000-of-00001.Nella pagina Dettagli oggetto, fai clic sull'URL autenticato per visualizzare l'output della pipeline.
L'output dovrebbe essere simile al seguente:
brother: 20
deeper: 1
wrinkles: 1
'alack: 1
territory: 1
dismiss'd: 1
[....]
Esegui la pulizia
Per evitare che al tuo account Google Cloud vengano addebitati costi relativi alle risorse utilizzate in questa pagina, segui questi passaggi.
Elimina il progetto
Il modo più semplice per eliminare la fatturazione è quello di eliminare il progetto Google Cloud che hai creato per la guida rapida.
- In the Google Cloud console, go to the Manage resources page.
- In the project list, select the project that you want to delete, and then click Delete.
- In the dialog, type the project ID, and then click Shut down to delete the project.
Elimina le singole risorse
Se vuoi conservare il progetto Google Cloud che hai utilizzato in questa guida rapida, elimina il bucket Cloud Storage:
- In the Google Cloud console, go to the Cloud Storage Buckets page.
- Click the checkbox for the bucket that you want to delete.
- To delete the bucket, click Delete, and then follow the instructions.