Menjalankan pipeline menggunakan pembuat tugas
Panduan memulai ini menunjukkan cara menjalankan tugas Dataflow menggunakan pembuat tugas Dataflow. Builder tugas adalah UI visual untuk membangun dan menjalankan pipeline Dataflow di konsol Google Cloud , tanpa perlu menulis kode apa pun.
Dalam panduan memulai ini, Anda akan memuat contoh pipeline ke dalam pembuat tugas, menjalankan tugas, dan memverifikasi bahwa tugas tersebut menghasilkan output.
Sebelum memulai
- Sign in to your Google Cloud account. If you're new to Google Cloud, create an account to evaluate how our products perform in real-world scenarios. New customers also get $300 in free credits to run, test, and deploy workloads.
-
In the Google Cloud console, on the project selector page, select or create a Google Cloud project.
-
Verify that billing is enabled for your Google Cloud project.
-
Enable the Dataflow, Compute Engine, Cloud Logging, Cloud Storage, Google Cloud Storage JSON, and Resource Manager APIs.
-
In the Google Cloud console, on the project selector page, select or create a Google Cloud project.
-
Verify that billing is enabled for your Google Cloud project.
-
Enable the Dataflow, Compute Engine, Cloud Logging, Cloud Storage, Google Cloud Storage JSON, and Resource Manager APIs.
- Membuat bucket Cloud Storage:
- In the Google Cloud console, go to the Cloud Storage Buckets page.
- Click Create.
- On the Create a bucket page, enter your bucket information. To go to the next
step, click Continue.
- For Name your bucket, enter a unique bucket name. Don't include sensitive information in the bucket name, because the bucket namespace is global and publicly visible.
-
In the Choose where to store your data section, do the following:
- Select a Location type.
- Choose a location where your bucket's data is permanently stored from the Location type drop-down menu.
- If you select the dual-region location type, you can also choose to enable turbo replication by using the relevant checkbox.
- To set up cross-bucket replication, select
Add cross-bucket replication via Storage Transfer Service and
follow these steps:
Set up cross-bucket replication
- In the Bucket menu, select a bucket.
In the Replication settings section, click Configure to configure settings for the replication job.
The Configure cross-bucket replication pane appears.
- To filter objects to replicate by object name prefix, enter a prefix that you want to include or exclude objects from, then click Add a prefix.
- To set a storage class for the replicated objects, select a storage class from the Storage class menu. If you skip this step, the replicated objects will use the destination bucket's storage class by default.
- Click Done.
-
In the Choose how to store your data section, do the following:
- In the Set a default class section, select the following: Standard.
- To enable hierarchical namespace, in the Optimize storage for data-intensive workloads section, select Enable hierarchical namespace on this bucket.
- In the Choose how to control access to objects section, select whether or not your bucket enforces public access prevention, and select an access control method for your bucket's objects.
-
In the Choose how to protect object data section, do the
following:
- Select any of the options under Data protection that you
want to set for your bucket.
- To enable soft delete, click the Soft delete policy (For data recovery) checkbox, and specify the number of days you want to retain objects after deletion.
- To set Object Versioning, click the Object versioning (For version control) checkbox, and specify the maximum number of versions per object and the number of days after which the noncurrent versions expire.
- To enable the retention policy on objects and buckets, click the Retention (For compliance) checkbox, and then do the following:
- To enable Object Retention Lock, click the Enable object retention checkbox.
- To enable Bucket Lock, click the Set bucket retention policy checkbox, and choose a unit of time and a length of time for your retention period.
- To choose how your object data will be encrypted, expand the Data encryption section (), and select a Data encryption method.
- Select any of the options under Data protection that you
want to set for your bucket.
- Click Create.
Untuk menyelesaikan langkah-langkah dalam panduan memulai ini, akun pengguna Anda harus memiliki peran Admin Dataflow dan peran Pengguna Akun Layanan. Akun layanan default Compute Engine harus memiliki peran Dataflow Worker. Untuk menambahkan peran yang diperlukan di konsol Google Cloud :
- Buka halaman IAM.
Buka IAM - Pilih project Anda.
- Di baris yang berisi akun pengguna Anda, klik Edit akun utama
- Klik Tambahkan peran lain, lalu di menu drop-down, pilih Admin Dataflow.
- Klik Add another role, lalu di menu drop-down, pilih Service Account User.
- Klik Simpan.
- Di baris yang berisi akun layanan default Compute Engine, klik Edit principal.
- Klik Tambahkan peran lain, lalu di menu drop-down, pilih Dataflow Worker.
- Klik Tambahkan peran lain, lalu di menu drop-down, pilih Storage Object Admin.
Klik Simpan.
Untuk mengetahui informasi selengkapnya tentang cara memberikan peran, lihat Memberikan peran IAM menggunakan konsol.
- Buka halaman IAM.
- Secara default, setiap project baru dimulai dengan
jaringan default.
Jika jaringan default untuk project Anda dinonaktifkan
atau dihapus, Anda harus memiliki jaringan di project yang akun penggunanya memiliki
peran Compute Network User
(
roles/compute.networkUser).
Memuat contoh pipeline
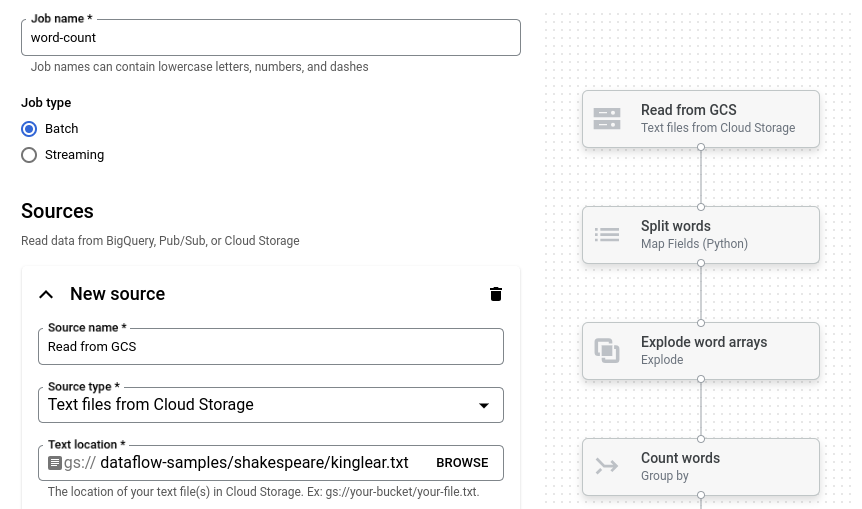
Pada langkah ini, Anda akan memuat contoh pipeline yang menghitung jumlah kata dalam King Lear karya Shakespeare.
Buka halaman Jobs di konsol Google Cloud .
Klik Buat tugas dari template.
Klik Job builder.
Klik Muat.
Klik Jumlah Kata. Penyusun tugas diisi dengan representasi grafis pipeline.
Untuk setiap langkah pipeline, builder tugas menampilkan kartu yang menentukan parameter konfigurasi untuk langkah tersebut. Misalnya, langkah pertama membaca file teks dari Cloud Storage. Lokasi data sumber sudah terisi otomatis di kotak Lokasi teks.
Menetapkan lokasi output
Pada langkah ini, Anda akan menentukan bucket Cloud Storage tempat pipeline menulis output.
Cari kartu berjudul Wastafel baru. Anda mungkin perlu men-scroll.
Di kotak Lokasi teks, klik Jelajahi.
Pilih nama bucket Cloud Storage yang Anda buat di bagian Sebelum memulai.
Klik Lihat resource turunan.
Di kotak Nama file, masukkan
words.Klik Pilih.
Menjalankan tugas
Klik Run job. Builder tugas membuat tugas Dataflow, lalu membuka grafik tugas. Saat tugas dimulai, grafik tugas akan menampilkan representasi grafis pipeline, yang mirip dengan yang ditampilkan di builder tugas. Saat setiap langkah pipeline berjalan, statusnya diperbarui dalam grafik tugas.
Panel Info tugas menampilkan status keseluruhan tugas. Jika tugas selesai
dengan berhasil, kolom Status tugas akan diperbarui menjadi Succeeded.
Periksa output tugas
Setelah tugas selesai, lakukan langkah-langkah berikut untuk melihat output dari pipeline:
Di Google Cloud konsol, buka halaman Bucket Cloud Storage.
Di daftar bucket, klik nama bucket yang Anda buat di bagian Sebelum memulai.
Klik file bernama
words-00000-of-00001.Di halaman Object details, klik URL yang diautentikasi untuk melihat output pipeline.
Output-nya akan terlihat seperti berikut:
brother: 20
deeper: 1
wrinkles: 1
'alack: 1
territory: 1
dismiss'd: 1
[....]
Pembersihan
Agar akun Google Cloud Anda tidak dikenai biaya untuk resource yang digunakan pada halaman ini, ikuti langkah-langkah berikut.
Menghapus project
Cara termudah untuk menghilangkan penagihan adalah dengan menghapus Google Cloud project yang Anda buat untuk panduan memulai.
- In the Google Cloud console, go to the Manage resources page.
- In the project list, select the project that you want to delete, and then click Delete.
- In the dialog, type the project ID, and then click Shut down to delete the project.
Menghapus resource satu per satu
Jika Anda ingin mempertahankan Google Cloud project yang Anda gunakan dalam panduan memulai ini, hapus bucket Cloud Storage:
- In the Google Cloud console, go to the Cloud Storage Buckets page.
- Click the checkbox for the bucket that you want to delete.
- To delete the bucket, click Delete, and then follow the instructions.