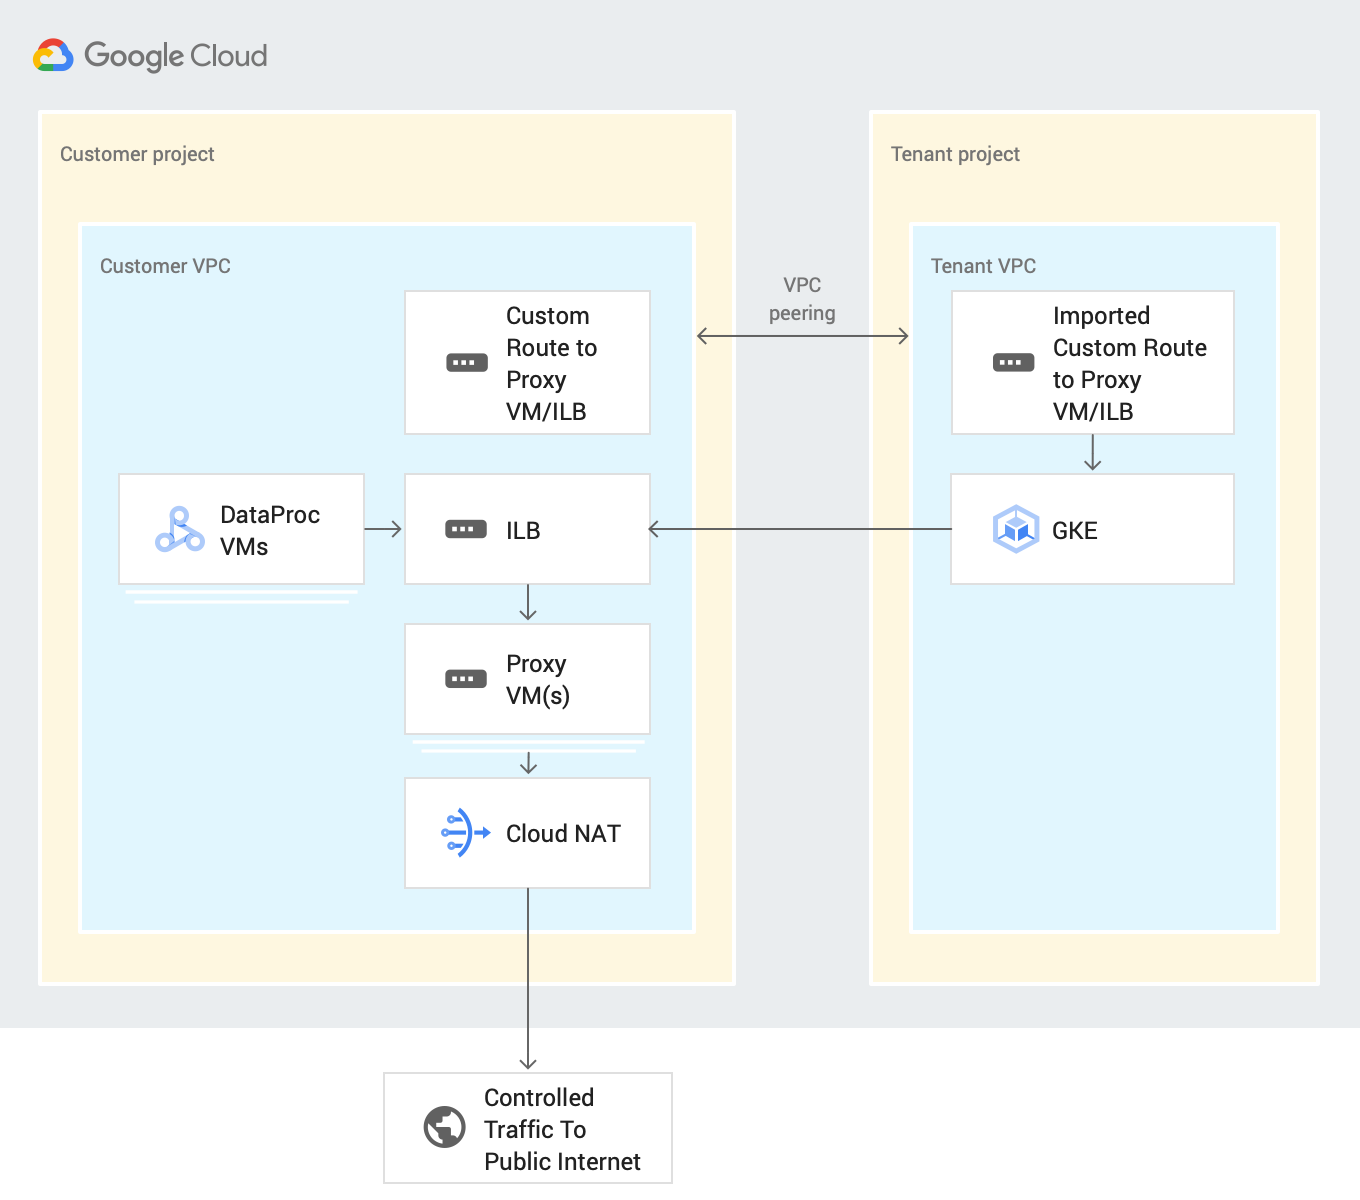
このセクションでは、開発フェーズとパイプライン実行フェーズの際に、プライベート Cloud Data Fusion インスタンスからの下り(外向き)の制御を確立するためのアーキテクチャの概要について説明します。
以下のシステムのアーキテクチャ図は、プライベート Cloud Data Fusion インスタンスがパイプラインを開発する際にパブリック インターネットに接続する方法を示しています。

パイプラインの開発または実行中に、SaaS アプリケーションとサードパーティのパブリック クラウド サービスへの接続を制御するには、すべての下り(外向き)トラフィックをお客様のプロジェクトを経由してルーティングします。このプロセスでは、次のリソースを使用します。
カスタム VPC ネットワーク ルート: カスタム VPC ネットワークは、インポートされたカスタムルートを経由して、ゲートウェイ VM にトラフィックをルーティングします。これにより、VPC ピアリングを使用してテナント プロジェクトの VPC にエクスポートされます。
プロキシ VM: プロキシ VM は、Cloud Data Fusion テナント プロジェクトの Google Cloud の下り(外向き)トラフィックを、パブリック インターネット経由で指定された宛先にルーティングします。お客様のプロジェクトにゲートウェイ VM を作成して、管理します。内部ロードバランサ(ILB)を使用して、高可用性(HA)設定で構成することをおすすめします。同じ VPC ネットワークを使用する複数のプライベート Cloud Data Fusion インスタンスがある場合、VPC 内で同じ VM を再利用できます。
始める前に
Cloud Data Fusion バージョン 6.4 以降では、プライベート インスタンスからパブリック ソースに接続できます。これらのバージョンのいずれかを使用するには、新しいプライベート Cloud Data Fusion インスタンスを作成するか、既存のインスタンスをアップグレードしてください。
インスタンスの VPC ネットワーク ピアリング接続を作成するときに、[ルートのエクスポート] を選択します。
パイプライン開発中に下り(外向き)制御を設定する
下り(外向き)の制御を使用すると、ネットワークから送信できる情報を制御またはフィルタリングできます。これは、VPC Service Controls 環境に役立ちます。このタスクを実行するための優先ネットワーク プロキシはありません。プロキシの例には、Squid プロキシ、HAProxy、Envoy などがあります。
このガイドの例では、Debian イメージを使用する VM インスタンスで HTTP フィルタリング用の HTTP プロキシを設定する方法について説明します。これらの例では、Squid プロキシ サーバーを使用しています。これは、プロキシ サーバーを設定する方法の 1 つです。
プロキシ VM を作成する
次の起動スクリプトと IP 転送を使用して、プライベート Cloud Data Fusion インスタンスと同じ VPC に VM を作成します。
このスクリプトは Squid プロキシをインストールし、HTTP トラフィックをインターセプトして .squid-cache.org ドメインと .google.com ドメインを許可するように構成します。これらのドメインは、Cloud Data Fusion インスタンスに接続するドメインに置き換えることができます。
Console
[VM インスタンス] ページに移動します。
[インスタンスを作成] をクリックします。
プライベート Cloud Data Fusion インスタンスでネットワーク ピアリングが設定されている同じ VPC を使用します。このシナリオでの VPC ネットワーク ピアリングの詳細については、始める前にをご覧ください。
Cloud Data Fusion インスタンスと同じネットワーク内で、インスタンスの IP 転送を有効にします。
[起動スクリプト] フィールドに、次のスクリプトを入力します。
#! /bin/bash
apt-get -y install squid3
cat <<EOF > /etc/squid/conf.d/debian.conf
#
# Squid configuration settings for Debian
#
logformat squid %ts.%03tu %6tr %>a %Ss/%03>Hs %<st %rm %ru %ssl::>sni %Sh/%<a %mt
logfile_rotate 10
debug_options rotate=10

# configure intercept port
http_port 3129 intercept

# allow only certain sites
acl allowed_domains dstdomain "/etc/squid/allowed_domains.txt"
http_access allow allowed_domains

# deny all other http requests
http_access deny all
EOF

# Create a file with allowed egress domains
# Replace these example domains with the domains that you want to allow
# egress from in Data Fusion pipelines
cat <<EOF > /etc/squid/allowed_domains.txt
.squid-cache.org
.google.com
EOF

/etc/init.d/squid restart

iptables -t nat -A PREROUTING -p tcp --dport 80 -j REDIRECT --to-port 3129

echo 1 > /proc/sys/net/ipv4/ip_forward
echo net.ipv4.ip_forward=1 > /etc/sysctl.d/11-gce-network-security.conf
iptables -t nat -A POSTROUTING -s 0.0.0.0/0 -p tcp --dport 443 -j MASQUERADE
gcloud
export CDF_PROJECT=<cdf-project>
export PROXY_VM=<proxy-vm>
export ZONE=<vm-zone>
export SUBNET=<subnet>
export VPC_NETWORK=<vpc-network>
export COMPUTE_ENGINE_SA=<compute-engine-sa>

gcloud beta compute --project=$CDF_PROJECT instances create $PROXY_VM --zone=$ZONE --machine-type=e2-medium --subnet=$SUBNET --no-address --metadata=startup-script=\#\!\ /bin/bash$'\n'apt-get\ -y\ install\ squid3$'\n'cat\ \<\<EOF\ \>\ /etc/squid/conf.d/debian.conf$'\n'\#$'\n'\#\ Squid\ configuration\ settings\ for\ Debian$'\n'\#$'\n'logformat\ squid\ \%ts.\%03tu\ \%6tr\ \%\>a\ \%Ss/\%03\>Hs\ \%\<st\ \%rm\ \%ru\ \%ssl::\>sni\ \%Sh/\%\<a\ \%mt$'\n'logfile_rotate\ 10$'\n'debug_options\ rotate=10$'\n'$'\n'\#\ configure\ intercept\ port$'\n'http_port\ 3129\ intercept$'\n'$'\n'\#\ allow\ only\ certain\ sites$'\n'acl\ allowed_domains\ dstdomain\ \"/etc/squid/allowed_domains.txt\"$'\n'http_access\ allow\ allowed_domains$'\n'$'\n'\#\ deny\ all\ other\ http\ requests$'\n'http_access\ deny\ all$'\n'EOF$'\n'$'\n'$'\n'\#\ Create\ a\ file\ with\ allowed\ egress\ domains$'\n'\#\ Replace\ these\ example\ domains\ with\ the\ domains\ that\ you\ want\ to\ allow\ $'\n'\#\ egress\ from\ in\ Data\ Fusion\ pipelines$'\n'cat\ \<\<EOF\ \>\ /etc/squid/allowed_domains.txt$'\n'.squid-cache.org$'\n'.google.com$'\n'EOF$'\n'$'\n'/etc/init.d/squid\ restart$'\n'$'\n'iptables\ -t\ nat\ -A\ PREROUTING\ -p\ tcp\ --dport\ 80\ -j\ REDIRECT\ --to-port\ 3129$'\n'echo\ 1\ \>\ /proc/sys/net/ipv4/ip_forward$'\n'echo\ net.ipv4.ip_forward=1\ \>\ /etc/sysctl.d/11-gce-network-security.conf$'\n'iptables\ -t\ nat\ -A\ POSTROUTING\ -s\ 0.0.0.0/0\ -p\ tcp\ --dport\ 443\ -j\ MASQUERADE --can-ip-forward --maintenance-policy=MIGRATE --service-account=$COMPUTE_ENGINE_SA --scopes=https://www.googleapis.com/auth/devstorage.read_only,https://www.googleapis.com/auth/logging.write,https://www.googleapis.com/auth/monitoring.write,https://www.googleapis.com/auth/servicecontrol,https://www.googleapis.com/auth/service.management.readonly,https://www.googleapis.com/auth/trace.append --tags=http-server,https-server --image=debian-10-buster-v20210420 --image-project=debian-cloud --boot-disk-size=10GB --boot-disk-type=pd-balanced --boot-disk-device-name=instance-1 --no-shielded-secure-boot --shielded-vtpm --shielded-integrity-monitoring --reservation-affinity=any

gcloud compute --project=$CDF_PROJECT firewall-rules create egress-allow-http --direction=INGRESS --priority=1000 --network=$VPC_NETWORK --action=ALLOW --rules=tcp:80 --source-ranges=0.0.0.0/0 --target-tags=https-server

gcloud compute --project=$CDF_PROJECT firewall-rules create egress-allow-https --direction=INGRESS --priority=1000 --network=$VPC_NETWORK --action=ALLOW --rules=tcp:443 --source-ranges=0.0.0.0/0 --target-tags=https-server
カスタムルートを作成する
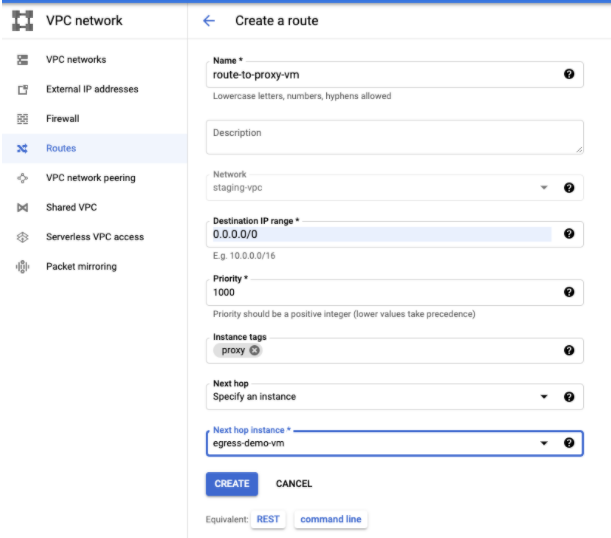
カスタム ルートを作成して、作成したゲートウェイ VM インスタンスに接続します。
Console
Google Cloud コンソールでルートを作成するには、静的ルートの追加をご覧ください。
ルートを構成する際に次の操作を行います。
1001と等しいかそれ以上で [優先度] を設定します。- プライベート Cloud Data Fusion インスタンスと同じプロジェクトと VPC を使用します。
- Cloud Data Fusion テナント プロジェクト VPC が VPC ネットワーク ピアリングを介してこのカスタムルートをインポートできるように、VPC ネットワーク ピアリング構成でルートをエクスポートできるようにします。
gcloud
gcloud CLI でルートを作成するには:
gcloud beta compute routes create $ROUTE --project=$CDF_PROJECT \
    --network=$VPC_NETWORK --priority=1001 \
    --destination-range=0.0.0.0/0 \
    --next-hop-instance=$PROXY_VM \
    --next-hop-instance-zone=$ZONE
パイプラインの実行のために下り(外向き)制御を設定する
設計環境の Preview と Wrangler で許可されたホスト名でパブリック インターネットにアクセスできるようになったら、パイプラインをデプロイします。デプロイされた Cloud Data Fusion パイプラインは、デフォルトで Dataproc クラスタで実行されます。
Dataproc クラスタからのすべてのパブリック インターネット トラフィックが 1 つ以上のプロキシ VM を通過するように、限定公開 DNS ゾーンとレコードを追加します。この手順は、Cloud NAT がフィルタリングをサポートしていないために必要となります。
DNS レコードには、プロキシ VM または ILB の IP アドレスを含めます。
パイプラインをデプロイする
設計フェーズでパイプラインを検証したら、パイプラインをデプロイします。デプロイされたパイプラインは、デフォルトで Dataproc クラスタで実行されます。
Dataproc クラスタからのすべてのパブリック インターネット トラフィックが 1 つ以上のプロキシ VM を通過するように、インスタンスタグ proxy と優先度 1000 のカスタムルートを Dataproc と同じ VPC に追加します。

現在、Cloud NAT は下り(外向き)フィルタリングをサポートしていないため、Dataproc タグを使用するようにパイプラインを変更します。
次のステップ
- Cloud Data Fusion のネットワーキングについて学習する。
