Tetap teratur dengan koleksi
Simpan dan kategorikan konten berdasarkan preferensi Anda.
Cloud Monitoring menyediakan kumpulan template dasbor yang diseleksi di GitHub yang khusus untuk berbagai layanan Google Cloud , misalnya Compute Engine, Cloud Storage, BigQuery, dan lainnya. Diagram
di dasbor ini menampilkan pilihan metrik yang relevan dengan layanan
tertentu. Anda dapat menginstal template ini di project Google Cloud sebagai
dasbor
kustom menggunakan Cloud Monitoring API atau menggunakan konsol Google Cloud .
Halaman ini menjelaskan cara menginstal template yang tersedia dari
konsolGoogle Cloud atau yang disimpan di
repositori monitoring-dashboard-samples GitHub.
Setiap template disimpan sebagai file JSON.
Halaman ini juga menjelaskan cara melihat dasbor diGoogle Cloud console.
Fitur ini hanya didukung untuk Google Cloud project.
Untuk konfigurasi App Hub, pilih project host App Hub atau project pengelolaan folder yang mengaktifkan aplikasi.
Menginstal template dasbor
Google Cloud console
Untuk menginstal template dasbor menggunakan konsol Google Cloud , lakukan hal berikut:
Jika Anda menggunakan kotak penelusuran untuk menemukan halaman ini, pilih hasil yang subjudulnya adalah Monitoring.
Di toolbar konsol Google Cloud ,
pilih project Google Cloud Anda. Untuk konfigurasi App Hub, pilih project host App Hub atau project pengelolaan folder yang mengaktifkan aplikasi.
Lakukan salah satu hal berikut:
Untuk menginstal template dari library yang tersedia di
konsolGoogle Cloud , lakukan hal berikut:
Klik Dashboard Templates.
Temukan dasbor yang ingin Anda instal.
Opsional: Untuk melihat pratinjau dasbor, pilih dasbor.
Klik playlist_addTambahkan dasbor ke daftar Anda, lalu selesaikan dialog.
Dialog ini memungkinkan Anda memilih nama dasbor,
dan menambahkan label ke dasbor.
Untuk menginstal dasbor dengan mengupload file JSON, lakukan hal berikut:
Opsional: Untuk menginstal template dasbor pilihan, download repositori GitHub:
Setelah file diupload, JSON dasbor akan diperbarui.
Jika Anda melihat pesan berikut, "Tidak dapat menyimpan dasbor:
Kolom mosaicLayout.tiles[0] memiliki nilai yang tidak valid", pilih
Petak di toolbar dasbor.
Opsional: Sesuaikan dasbor. Misalnya, Anda dapat memperbarui judul, menambahkan widget teks yang menunjukkan sumber dasbor, menghapus diagram yang tidak diinginkan, atau menambahkan diagram.
Untuk menyimpan dasbor yang telah diubah, klik Simpan di toolbar.
gcloud CLI
Untuk menginstal definisi dasbor menggunakan Google Cloud CLI, lakukan langkah-langkah berikut:
Pastikan definisi dasbor dapat diakses oleh sistem lokal Anda.
Untuk dasbor yang disimpan di repositori GitHub, Anda dapat menyimpan dasbor
tertentu, atau mendownload seluruh repositori:
Misalnya, di repositori GitHub, direktori monitoring-dashboard-samples/dashboards/compute berisi file bernama gce-vm-instance-monitoring.json.
Panggil dashboards.create dan berikan representasi JSON dasbor. Dalam panggilan API, induk adalah project tempat membuat monitor sintetis.
Untuk konfigurasi App Hub, pilih project host App Hub atau project pengelolaan folder yang mengaktifkan aplikasi. Kolom ini memiliki format berikut:
Setiap file di repositori akan membuat dasbor kustom baru. Misalnya,
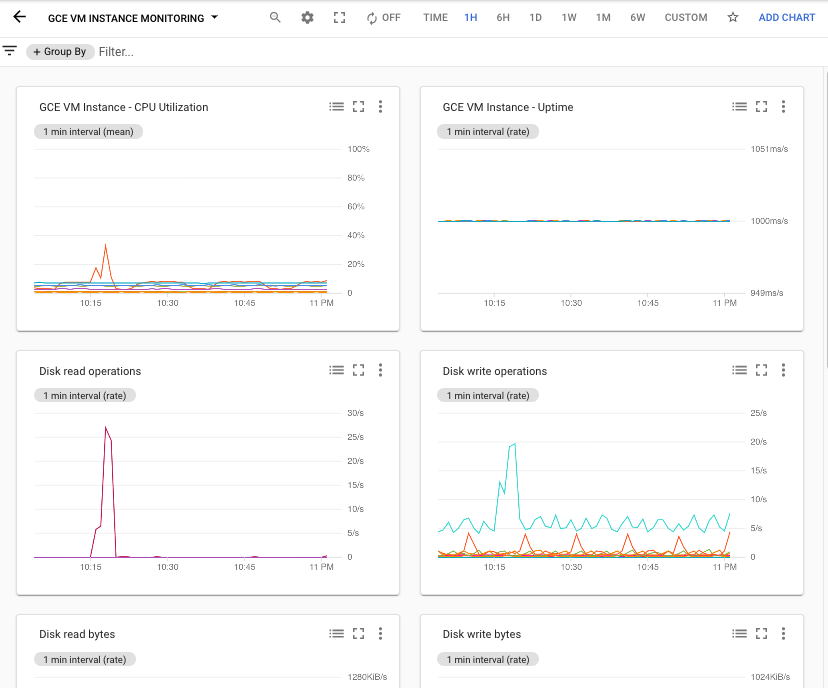
file gce-vm-instance-monitoring.json membuat dasbor dengan judul
"Pemantauan Instance VM GCE". Untuk melihat dasbor ini, lakukan tindakan berikut:
Jika Anda menggunakan kotak penelusuran untuk menemukan halaman ini, pilih hasil yang subjudulnya adalah Monitoring.
Di toolbar konsol Google Cloud ,
pilih project Google Cloud Anda. Untuk konfigurasi App Hub, pilih project host App Hub atau project pengelolaan folder yang mengaktifkan aplikasi.
Dalam daftar dasbor, klik "Pemantauan Instance VM GCE".
Jika memiliki banyak dasbor, sebaiknya filter untuk
dasbor kustom atau nama dasbor baru.
Screenshot berikut menunjukkan bagian dasbor yang diinstal:
Menambahkan atau menghapus label yang ditentukan pengguna
Label dapat membantu Anda menemukan dasbor berdasarkan jenis konten yang ditampilkannya. Misalnya, Anda dapat menambahkan label prod ke dasbor
yang menampilkan informasi tentang sistem produksi. Demikian pula, Anda dapat
menambahkan label staging untuk menunjukkan bahwa dasbor menampilkan informasi
tentang sistem staging.
Anda hanya dapat menambahkan label ke dasbor kustom. Saat dasbor menampilkan tombol Tambahkan label ke dasborsell, Anda dapat mengonfigurasi label yang diterapkan ke dasbor.
Untuk menambahkan atau menghapus label yang ditentukan pengguna ke dasbor kustom, lakukan tindakan berikut:
[[["Mudah dipahami","easyToUnderstand","thumb-up"],["Memecahkan masalah saya","solvedMyProblem","thumb-up"],["Lainnya","otherUp","thumb-up"]],[["Sulit dipahami","hardToUnderstand","thumb-down"],["Informasi atau kode contoh salah","incorrectInformationOrSampleCode","thumb-down"],["Informasi/contoh yang saya butuhkan tidak ada","missingTheInformationSamplesINeed","thumb-down"],["Masalah terjemahan","translationIssue","thumb-down"],["Lainnya","otherDown","thumb-down"]],["Terakhir diperbarui pada 2025-08-28 UTC."],[],[],null,["# Install a dashboard template\n\nCloud Monitoring provides a curated set of dashboard templates\non GitHub that are specific to a variety of Google Cloud services, for example\nCompute Engine, Cloud Storage, BigQuery, and others. The charts\non these dashboards present a selection of metrics relevant to a specific\nservice. You can install these templates in your Google Cloud project as\ncustom\ndashboards by using the Cloud Monitoring API or by using the Google Cloud console.\n\nThis page describes how to install a template that is available from the\nGoogle Cloud console or that is stored in the\nGitHub [`monitoring-dashboard-samples` repository](https://github.com/GoogleCloudPlatform/monitoring-dashboard-samples).\nEach template is stored as a JSON file.\nThis page also describes how to view the dashboard in the\nGoogle Cloud console.\n\nThis feature is supported only for Google Cloud projects.\nFor [App Hub](/app-hub/docs/overview)\nconfigurations, select the App Hub host project or\nthe app-enabled folder's management project.\n\nInstall a dashboard template\n----------------------------\n\n**Note:** Some of the dashboards templates stored in the GitHub [`monitoring-dashboard-samples` repository](https://github.com/GoogleCloudPlatform/monitoring-dashboard-samples) display custom metric data. To install these dashboards successfully, you must create the necessary user-defined metrics. For more information, consult the per-service documentation in the repository. \n\n### Google Cloud console\n\n\nTo install a dashboard template by using the Google Cloud console,\ndo the following:\n\n1. In the Google Cloud console, go to the **Dashboards** page:\n\n [Go to **Dashboards**](https://console.cloud.google.com/monitoring/dashboards)\n\n \u003cbr /\u003e\n\n If you use the search bar to find this page, then select the result whose subheading is\n **Monitoring**.\n2. In the toolbar of the Google Cloud console,\n select your Google Cloud project. For [App Hub](/app-hub/docs/overview)\n configurations, select the App Hub host project or\n the app-enabled folder's management project.\n\n3. Do one of the following:\n\n - To install a template from the library available in the\n Google Cloud console, do the following:\n\n 1. Click **Dashboard Templates**.\n 2. Find the dashboard that you want to install.\n 3. Optional: To preview the dashboard, select it.\n 4. Click *playlist_add* **Add dashboard to your list** and\n then complete the dialog.\n\n The dialog lets you select the name of the dashboard,\n and add labels to the dashboard.\n - To install a dashboard by uploading a JSON file, do the following:\n\n 1. Optional: To install a curated dashboard template, download the\n GitHub repository:\n\n ```\n git clone https://github.com/GoogleCloudPlatform/monitoring-dashboard-samples.git\n ```\n\n \u003cbr /\u003e\n\n 2. Click **Create Dashboard**.\n\n 3. In the dashboard toolbar, *settings* **Settings** , then\n **JSON** , and then select **JSON Editor**.\n\n For a new dashboard, the displayed code is similar to the following: \n\n ```\n {\n \"displayName\": \"New Dashboard\",\n \"mosaicLayout\": {\n \"columns\": 12,\n \"tiles\": []\n },\n \"dashboardFilters\": [],\n \"labels\": {}\n }\n ```\n 4. In the editor's toolbar, click\n **File Upload**.\n\n 5. Select the file that contains the template and then\n click **Open**.\n\n After the file is uploaded, the dashboard's JSON is updated.\n\n If you see the following message, \"Unable to save dashboard:\n Field mosaicLayout.tiles\\[0\\] has an invalid value\", then select\n **Grid** in the dashboard toolbar.\n 6. Optional: Customize the dashboard. For example, you can update the\n title, add a text widget that indicates the dashboard source, delete\n unwanted charts, or add charts.\n\n 7. To save your modified dashboard, in the toolbar, click **Save**.\n\n\u003cbr /\u003e\n\n### gcloud CLI\n\n\nTo install a dashboard definition by using the Google Cloud CLI, do the\nfollowing:\n\n1. Ensure the dashboard definition is accessible to your local system.\n\n For dashboards stored in the GitHub repository, you can save specific\n dashboards, or you can download the entire repository: \n\n git clone https://github.com/GoogleCloudPlatform/monitoring-dashboard-samples.git\n\n2. Identify the dashboards you want to install.\n\n For example, in the GitHub\n repository, the directory `monitoring-dashboard-samples/dashboards/compute`\n contains a file named `gce-vm-instance-monitoring.json`.\n3. Issue the [`gcloud monitoring dashboards create`](/sdk/gcloud/reference/monitoring/dashboards/create)\n command and provide the JSON representation of the dashboard.\n\n For example, to install the dashboard `gce-vm-instance-monitoring.json`,\n issue the following command: \n\n gcloud monitoring dashboards create --config-from-file=gce-vm-instance-monitoring.json --project=\u003cvar translate=\"no\"\u003ePROJECT_ID\u003c/var\u003e\n\n Before you run the previous command, replace the following:\n - \u003cvar translate=\"no\"\u003ePROJECT_ID\u003c/var\u003e: The identifier of the project. For [App Hub](/app-hub/docs/overview) configurations, select the App Hub host project or the app-enabled folder's management project.\n\n\u003cbr /\u003e\n\n### Cloud Monitoring API\n\n\nTo install a dashboard definition by using the Google Cloud CLI, do the\nfollowing:\n\n1. Ensure the dashboard definition is accessible to your local system.\n\n For dashboards stored in the GitHub repository, you can save specific\n dashboards, or you can download the entire repository: \n\n git clone https://github.com/GoogleCloudPlatform/monitoring-dashboard-samples.git\n\n2. Identify the dashboards you want to install.\n\n For example, in the GitHub\n repository, the directory `monitoring-dashboard-samples/dashboards/compute`\n contains a file named `gce-vm-instance-monitoring.json`.\n3. Call [`dashboards.create`](/monitoring/api/ref_v3/rest/v1/projects.dashboards/create) and provide the\n JSON representation of the dashboard. In the API call, the parent is\n the project in which to create the synthetic monitor.\n For [App Hub](/app-hub/docs/overview)\n configurations, select the App Hub host project or\n the app-enabled folder's management project. This field has the following format:\n\n projects/\u003cvar translate=\"no\"\u003ePROJECT_ID\u003c/var\u003e\n\nFor more information, see\n[Create and manage dashboards](/monitoring/dashboards/api-dashboard).\n\n\u003cbr /\u003e\n\nView the installed dashboard\n----------------------------\n\nEach file in the repository creates a new custom dashboard. For example,\nthe file `gce-vm-instance-monitoring.json` creates a dashboard with the title\n\"GCE VM Instance Monitoring\". To view this dashboard, do the following:\n\n1. In the Google Cloud console, go to the **Dashboards** page:\n\n [Go to **Dashboards**](https://console.cloud.google.com/monitoring/dashboards)\n\n \u003cbr /\u003e\n\n If you use the search bar to find this page, then select the result whose subheading is\n **Monitoring**.\n2. In the toolbar of the Google Cloud console, select your Google Cloud project. For [App Hub](/app-hub/docs/overview) configurations, select the App Hub host project or the app-enabled folder's management project.\n3. In the list of dashboards, click \"GCE VM Instance Monitoring\". If you have a lot of dashboards, then you might want to filter for custom dashboards or for the name of the new dashboard.\n\nThe following screenshot shows the part of the installed dashboard:\n\nAdd or remove user-defined labels\n---------------------------------\n\nLabels can help you locate dashboards based on the type of content\nthey display. For example, you might add the label `prod` to dashboards\nthat display information about production systems. Similarly, you might\nadd the label `staging` to indicate the dashboard displays information\nabout staging systems.\n\nYou can add labels only to custom dashboards. When a dashboard displays the\nsell **Add labels to dashboard** button, then you can\nconfigure which labels are applied to the dashboard.\n\nTo add or remove user-defined labels to a custom dashboard, do the following:\n\n1. In the Google Cloud console, go to the **Dashboards** page:\n\n [Go to **Dashboards**](https://console.cloud.google.com/monitoring/dashboards)\n\n \u003cbr /\u003e\n\n If you use the search bar to find this page, then select the result whose subheading is\n **Monitoring**.\n2. In the list of dashboards, locate the dashboard and then click sell **Add labels to dashboard**.\n3. Do one of the following:\n - To create a label and add it to your dashboard,\n in the **Create a new label** section, enter the name of the label\n in the textbox and then click **Create and apply**.\n\n - To configure which labels are added to your dashboard, click *arrow_drop_down* **Select labels to apply** , select the labels, and then click **Ok**.\n4. To save your changes, click **Confirm**."]]