本說明文件頁面說明如何設定自訂網域,以及如何設定 Looker (Google Cloud Core) 執行個體的存取權,該執行個體須符合下列條件:
- 執行個體已設定私人連線。
- 執行個體在建立時已設為使用私人服務存取權。
如要存取這類執行個體,請按照下列步驟操作:
設定自訂網域
Looker (Google Cloud Core) 執行個體建立完成後,即可設定自訂網域。
事前準備
自訂 Looker (Google Cloud Core) 執行個體的網域前,請先找出網域的 DNS 記錄儲存位置,以便更新記錄。
必要的角色
如要取得為 Looker (Google Cloud Core) 執行個體建立自訂網域所需的權限,請要求管理員授予您執行個體所在專案的 Looker 管理員 (roles/looker.admin) IAM 角色。如要進一步瞭解如何授予角色,請參閱「管理專案、資料夾和機構的存取權」。
建立自訂網域
在 Google Cloud 控制台中,按照下列步驟自訂 Looker (Google Cloud Core) 執行個體的網域:
- 在「執行個體」頁面中,按一下要設定自訂網域的執行個體名稱。
- 按一下「自訂網域」分頁標籤。
按一下「新增自訂網域」。

系統隨即會開啟「新增自訂網域」面板。
輸入要使用的網域主機名稱,最多 64 個字元,只能使用英文字母、數字和連字號,例如:
looker.examplepetstore.com。
按一下「Add a new custom domain」(新增自訂網域) 面板上的「DONE」(完成),返回「CUSTOM DOMAIN」(自訂網域) 分頁。
設定自訂網域後,該網域會顯示在 Google Cloud 控制台的 Looker (Google Cloud Core) 執行個體詳細資料頁面中,「自訂網域」分頁的「網域」欄。
存取自訂網域
如果傳送至私人連線 (PSA) Looker (Google Cloud Core) 執行個體的流量,來自與執行個體不同的區域,您可以使用一或多個私人 IP 反向 Proxy 伺服器和負載平衡器,安全地存取執行個體。
事前準備
如要取得設定私人連線自訂網域存取權所需的權限,請要求管理員在執行個體所在的專案中,授予您下列 IAM 角色:
-
Looker 管理員 (
roles/looker.admin) -
Compute 執行個體管理員 (v1) (
roles/compute.instanceAdmin.v1) -
DNS 管理員 (
roles/dns.admin) -
Compute 負載平衡器管理員 (
roles/compute.loadBalancerAdmin) -
Compute 網路管理員 (
roles/compute.networkAdmin) -
Compute 安全性管理員 (
roles/compute.securityAdmin) -
使用 Google OAuth:
OAuth 設定編輯器 (
roles/oauthconfig.editor)
如要進一步瞭解如何授予角色,請參閱「管理專案、資料夾和機構的存取權」。
網路總覽
下列各節說明如何建立備援 NGINX 或 Apache Proxy 伺服器設定 (含負載平衡器),將來自任何區域或地端的流量,轉送至自訂網域。下圖代表這個拓撲:

建立 VM、不公開區域和 A 記錄
請完成以下各節的步驟。
建立 VM
建立兩個僅有私人 IP 的 VM 執行個體,並使用 RHEL 作業系統。這些 VM 會做為 Proxy 伺服器。這些執行個體應與 Looker (Google Cloud Core) 執行個體位於同一個區域,但彼此位於不同區域。
建立不公開區域
建立 Cloud DNS 私人區域,讓 Looker (Google Cloud Core) 執行個體所在的 VPC 可以查看。虛擬私有雲和內部部署主機會使用 Cloud DNS 私人區域進行 DNS 解析,以連上 Looker (Google Cloud Core) 使用者介面。專區名稱應與自訂網域相符。
  gcloud dns managed-zones create NAME \
  --description=DESCRIPTION \
  --dns-name=DNS_SUFFIX \
  --networks=VPC_NETWORK_LIST \
  --labels=LABELS \
  --visibility=private
更改下列內容:
NAME:區域的名稱。DESCRIPTION:可用區的說明。DNS_SUFFIX:區域的 DNS 尾碼,例如examplepetstore.com。VPC_NETWORK_LIST:以半形逗號分隔的虛擬私有雲網路清單,這些網路已獲授權可查詢區域。請務必納入包含 Looker (Google Cloud Core) 執行個體的 VPC。LABELS:以半形逗號分隔的鍵/值配對清單 (選用),例如dept=marketing或project=project1;詳情請參閱 SDK 說明文件。
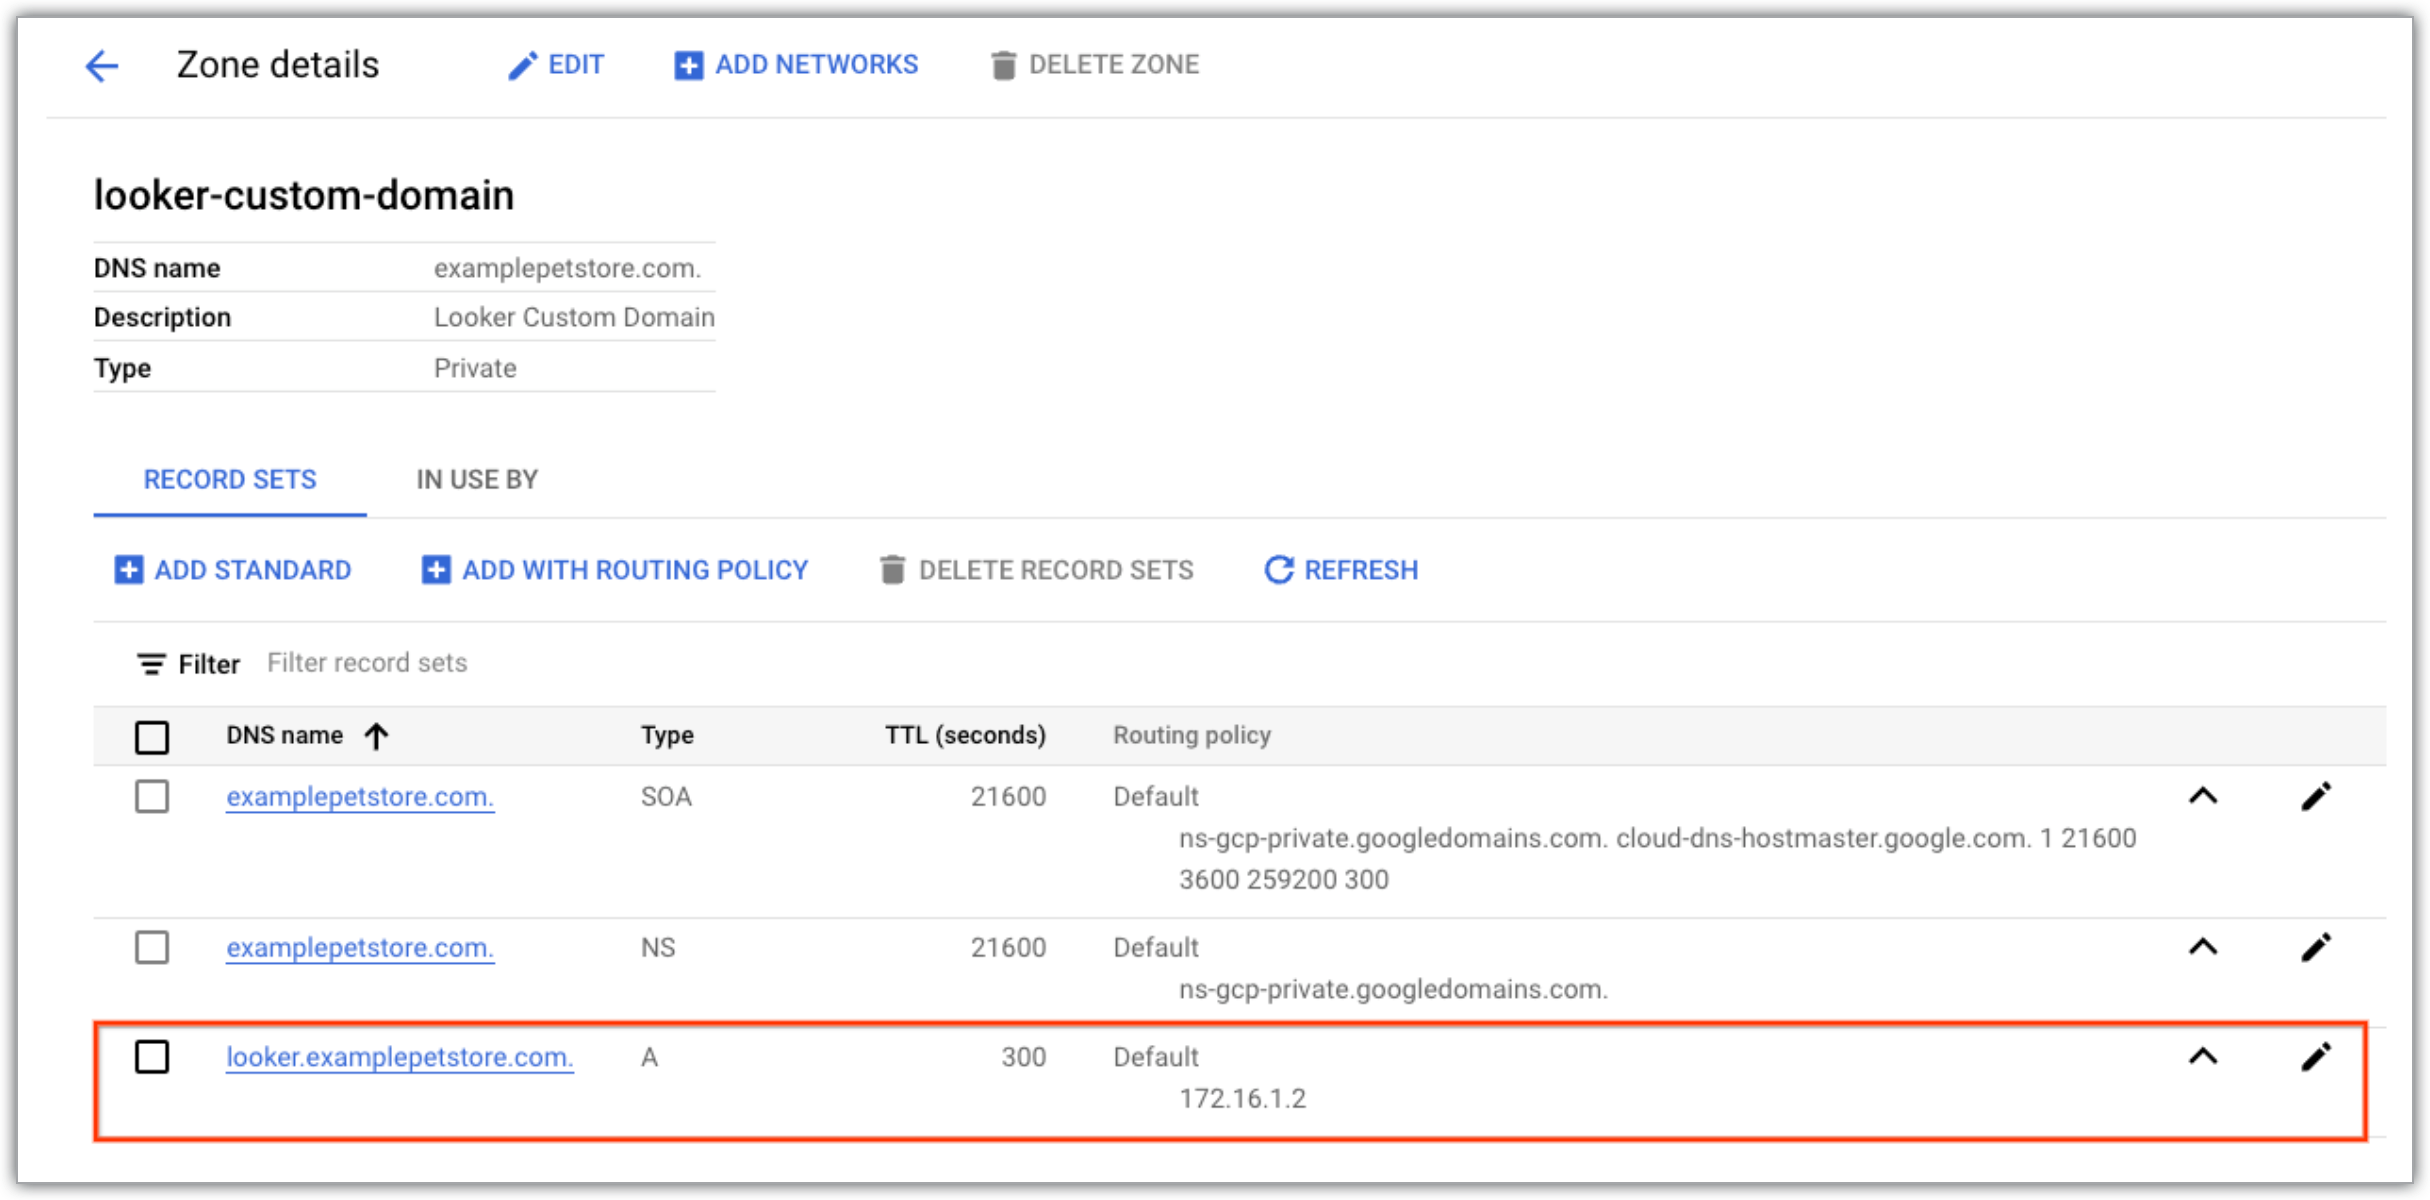
設定區域後,如果您前往 Google Cloud 控制台的「Cloud DNS 區域」頁面,就會看到該區域是私人的,且以自訂網域命名,並具有自訂網域的記錄集。

新增 Cloud DNS A 記錄
如要新增 Cloud DNS A 記錄,請完成下列步驟:
由於您將使用負載平衡器,Cloud DNS 私人區域中的 A 記錄會對應至負載平衡器 IP 位址。

在私人區域中,為自訂網域新增 DNS A 記錄,其中包含 Looker (Google Cloud Core) 執行個體的 Ingress IP 位址。A 記錄會使用完整網域名稱 (FQDN),與您設定的 Looker (Google Cloud Core) 自訂網域相同。

在 Google Cloud 控制台的「Cloud DNS 區域」頁面查看私人區域詳細資料時,完整設定應會顯示自訂網域的 A 記錄。
如要讓透過 Cloud VPN 通道、Cloud Interconnect VLAN 連結或路由器裝置連線至虛擬私有雲網路的內部部署網路,使用虛擬私有雲網路的名稱解析服務,可以採用傳入伺服器政策。
更新網域的 DNS 記錄,並在 Google Cloud 控制台中驗證網域後,對應至執行個體的自訂網域狀態會從「未驗證」更新為「可用」,顯示在「執行個體」頁面的「自訂網域」分頁中。

設定反向 Proxy 伺服器
您可以將任何網路伺服器設定為反向 Proxy 伺服器。選取下列其中一個選項,查看如何使用 NGINX 或 Apache 設定反向 Proxy 伺服器的範例:
NGINX
以下範例使用 NGINX 1.22.1 版和 Red Hat Enterprise Linux 8.9 版 (Ootpa)。如要檢查 VM 使用的 NGNIX 和 Red Hat 版本,請針對每個 VM 執行下列指令。
請先連線至 VM。
使用下列指令安裝 NGINX:
sudo yum install nginx -y
如要找出 VM 執行的 NGINX 版本,請執行下列指令:
sudo nginx -v
這時應會傳回類似下列內容:
nginx version: nginx/1.22.1如要查看 VM 執行的 NGINX 版本,請執行下列指令:
sudo rpm -qi nginx | grep Release
這時應會傳回類似下列內容:
Release : 1.module+el8.8.0+20355+6d9c8a63.1如要查看 VM 使用的 Red Hat 版本,請執行下列指令:
sudo cat /etc/redhat-release
如要設定每個 Proxy 伺服器,請針對您建立的兩個 VM 分別使用下列操作說明。
- 連線至 VM。
編輯
/etc/nginx/nginx.conf檔案,加入下列設定:events { worker_connections 1024; } http { log_format main '$remote_addr - $remote_user [$time_local] "$request" ' '$status $body_bytes_sent "$http_referer" ' '"$http_user_agent" "$http_x_forwarded_for"'; log_format debug '$http_x_forwarded_for - $remote_user [$time_local] ' '"$request_method $scheme://$host$request_uri $server_protocol" ' '$status $body_bytes_sent "$http_referer" ' '"$http_user_agent" $request_time'; access_log /var/log/nginx/access.log debug; sendfile on; tcp_nopush on; keepalive_timeout 65; types_hash_max_size 4096; include /etc/nginx/mime.types; default_type application/octet-stream; server { listen 443 ssl; # listen [::]:443 ssl; include snippets/self-signed.conf; # include snippets/ssl-params.conf; server_name CUSTOM_DOMAIN; location / { proxy_pass https://INGRESS_PRIVATE_IP/$request_uri; proxy_set_header Host $server_name; proxy_http_version 1.1; } } server { listen 80; # listen [::]:80; server_name CUSTOM_DOMAIN; return 302 https://$server_name$request_uri; } }更改下列內容:
CUSTOM_DOMAIN:Looker (Google Cloud Core) 執行個體的自訂網域INGRESS_PRIVATE_IP:Looker (Google Cloud Core) 執行個體的連入 IP
此外,請注意下列事項:
- 這項設定僅適用於 IPv4。如果需要 Proxy 也監聽 IPv6 位址,請取消註解檔案中的
listen [::]:443 ssl行。 - 存取記錄層級已設為
debug,請務必調整為特定環境中使用的層級。 - 如果您導入
ssl-params.conf檔案 (這些步驟稍後會提及),請取消註解include snippets/ssl-params.conf。
建立有效的 TLS 憑證,並參照 Looker (Google Cloud Core) 自訂網域網址。這個憑證會由 Proxy 提供給嘗試存取 Looker (Google Cloud Core) 的用戶端。用於簽署憑證的憑證授權單位 (CA) 必須受到用戶端信任;您也可以使用內部私有 CA 簽署這個 TLS 憑證。(或者,您也可以使用自行管理的 SSL 憑證)。
在本範例中,假設憑證已使用 Let's Encrypt 免費服務建立,但未透過 Certbot 設定自動續訂。建立憑證後,請在每個 Proxy VM 的certs和private目錄中儲存相關檔案:/etc/pki/tls/certs/custom-domain.custom-domain.com.fullchain.pem; /etc/pki/tls/private/custom-domain.custom-domain.com.key.pem;
將 custom-domain.custom-domain.com 替換成自訂網域。
如果安裝目錄中沒有
certs和private目錄,您可以建立這些目錄,也可以使用其他資料夾。如要確保 NGINX 擷取憑證檔案,請建立
/etc/nginx/snippets目錄:sudo mkdir /etc/nginx/snippets
建立設定檔
/etc/nginx/snippets/self-signed.conf:sudo touch /etc/nginx/snippets/self-signed.conf
編輯設定檔,加入您儲存的憑證檔案路徑:
ssl_certificate /etc/pki/tls/certs/custom-domain.custom-domain.com.fullchain.pem;
ssl_certificate_key /etc/pki/tls/private/custom-domain.custom-domain.com.key.pem;
將 custom-domain.custom-domain.com 替換成自訂網域。
如要確認設定檔是否包含上一個步驟中提及的檔案參照,請執行下列指令:
sudo more /etc/nginx/snippets/self-signed.conf
這時應該會傳回您新增的檔案路徑。
(選用) 建立
ssl-params.confNGINX 檔案,用於儲存可在日後 NGINX 設定中重複使用的參數。如需參考,檔案內容應類似於下列內容:
ssl_protocols TLSv1.3;
ssl_prefer_server_ciphers on;
ssl_dhparam /etc/nginx/dhparam.pem;
ssl_ciphers EECDH+AESGCM:EDH+AESGCM;
ssl_ecdh_curve secp384r1;
ssl_session_timeout  10m;
ssl_session_cache shared:SSL:10m;
ssl_session_tickets off;
ssl_stapling on;
ssl_stapling_verify on;
resolver 127.0.0.53 valid=300s;
resolver_timeout 5s;
# Disable strict transport security for now. You can uncomment the following
# line if you understand the implications.
#add_header Strict-Transport-Security "max-age=63072000; includeSubDomains; preload";
add_header X-Frame-Options DENY;
add_header X-Content-Type-Options nosniff;
add_header X-XSS-Protection "1; mode=block";
如要設定 SELinux,允許 NGINX 將流量轉送至 Looker (Google Cloud Core) 傳入 IP,請將
httpd_can_network_connectSELinux 布林參數設為 1:sudo setsebool -P httpd_can_network_connect 1
現在可以使用下列指令重新啟動 NGINX 程序:
sudo systemctl restart nginx
使用下列指令,確認 NGINX 已正確重新啟動:
sudo systemctl status nginx
系統應會傳回類似以下的輸出內容:
nginx.service - The nginx HTTP and reverse proxy server
  Loaded: loaded (/usr/lib/systemd/system/nginx.service; disabled; vendor preset: disabled)
  Active: active (running) since Tue 2024-05-14 11:58:00 UTC; 9min ago
  Process: 144044 ExecStart=/usr/sbin/nginx (code=exited, status=0/SUCCESS)
  Process: 144042 ExecStartPre=/usr/sbin/nginx -t (code=exited, status=0/SUCCESS)
  Process: 144039 ExecStartPre=/usr/bin/rm -f /run/nginx.pid (code=exited, status=0/SUCCESS)
Main PID: 144045 (nginx)
    Tasks: 2 (limit: 11040)
  Memory: 2.6M
  CGroup: /system.slice/nginx.service
          ├─144045 nginx: master process /usr/sbin/nginx
          └─144046 nginx: worker process
May 14 11:58:00 proxy-three-eu-w4 systemd[1]: nginx.service: Succeeded.
May 14 11:58:00 proxy-three-eu-w4 systemd[1]: Stopped The nginx HTTP and reverse proxy server.
May 14 11:58:00 proxy-three-eu-w4 systemd[1]: Starting The nginx HTTP and reverse proxy server...
May 14 11:58:00 proxy-three-eu-w4 nginx[144042]: nginx: the configuration file /etc/nginx/nginx.conf syntax is ok
May 14 11:58:00 proxy-three-eu-w4 nginx[144042]: nginx: configuration file /etc/nginx/nginx.conf test is successful
May 14 11:58:00 proxy-three-eu-w4 systemd[1]: Started The nginx HTTP and reverse proxy server.
Apache
針對每個 VM 完成下列步驟。
請先連線至 VM。
安裝 Apache:
sudo yum install httpd -y
以下範例使用 Red Hat Enterprise Linux 7.9 版。如要查看 VM 使用的 Red Hat 版本,請執行下列指令:
cat /etc/redhat-release
這應該會傳回下列內容:
Red Hat Enterprise Linux Server release 7.9 (Maipo)以下範例使用 Apache 2.4.6 版。如要檢查 VM 使用的 Apache 版本,請為每個 VM 執行下列指令:
sudo httpd -version
這應該會傳回下列內容:
Server version: Apache/2.4.6 (Red Hat Enterprise Linux)
Server built:   date
如要進一步瞭解 Apache 伺服器,請執行下列指令:
sudo rpm -qi httpd
這會傳回類似以下的輸出內容:
Name : httpd Version : 2.4.6 Release : 99.el7_9.1 Architecture: x86_64 Install Date: Tue May 7 15:48:59 2024 Group : System Environment/Daemons Size : 3899819 License : ASL 2.0 Signature : RSA/SHA256, Fri Apr 28 17:09:45 2023, Key ID 199e2f91fd431d51 Source RPM : httpd-2.4.6-99.el7_9.1.src.rpm Build Date : Fri Apr 28 16:56:11 2023 Build Host : x86-vm-40.build.eng.bos.redhat.com Relocations : (not relocatable) Packager : Red Hat, Inc.
在 Proxy VM 上建立設定檔
/etc/httpd/conf.d/ssl.conf,並在檔案中新增下列設定:ServerName custom domain of Looker (Google Cloud core) # SSL Engine Switch: # Enable/Disable SSL for this virtual host. SSLEngine on # SSL Protocol support: # List the enable protocol levels with which clients will be able to # connect. Disable SSLv2 access by default: SSLProtocol all -SSLv2 -SSLv3 # SSL Cipher Suite: # List the ciphers that the client is permitted to negotiate. # See the mod_ssl documentation for a complete list. SSLCipherSuite HIGH:3DES:!aNULL:!MD5:!SEED:!IDEA # Server Certificate: # Point SSLCertificateFile at a PEM encoded certificate. If # the certificate is encrypted, then you will be prompted for a # pass phrase. Note that a kill -HUP will prompt again. A new # certificate can be generated using the genkey(1) command. # SSLCertificateFile /etc/pki/tls/certs/localhost.crt SSLCertificateFile "/etc/pki/tls/certs/custom domain of Looker (Google Cloud core).crt" # Server Private Key: # If the key is not combined with the certificate, use this # directive to point at the key file. Keep in mind that if # you've both a RSA and a DSA private key you can configure # both in parallel (to also allow the use of DSA ciphers, etc.) # SSLCertificateKeyFile /etc/pki/tls/private/localhost.key SSLCertificateKeyFile "/etc/pki/tls/private/custom domain of Looker (Google Cloud core).key" SSLProxyEngine On SSLProxyCheckPeerCN off SSLProxyCheckPeerName off ProxyPreserveHost On RewriteEngine On AllowEncodedSlashes NoDecode ProxyPass / https://private IP of Looker (Google Cloud core)>:443/ RewriteCond %{REQUEST_URI} ^/render/ RewriteRule ^(.*)$ https://private IP of Looker (Google Cloud core)>:443/$1 [P] RewriteRule ^(.*)$ https://private IP of Looker (Google Cloud core)>:443/$1 [P,NE] ProxyPassReverse / https://private IP of Looker (Google Cloud core):443/更改下列內容:
custom domain of Looker (Google Cloud core):Looker (Google Cloud Core) 執行個體的自訂網域。private IP of Looker (Google Cloud core):Looker (Google Cloud Core) 執行個體的私人 IP。
確認 TLS 憑證檔案位於
/etc/httpd/conf.d/ssl.conf檔案參照的目錄中:SSLCertificateFile "/etc/pki/tls/certs/custom domain of Looker (Google Cloud core).crt" SSLCertificateKeyFile "/etc/pki/tls/private/custom domain of Looker (Google Cloud core).key"
檢查是否已安裝
mod_ssl:sudo yum list installed | grep mod_ssl
如果未安裝
mod_ssl,請執行下列指令進行安裝:sudo yum install mod_ssl
安裝
mod_ssl後,您必須在 Apache 設定檔/etc/httpd/conf/httpd.conf中加入下列程式碼,啟用這項功能:LoadModule ssl_module modules/mod_ssl.so
在 Apache 設定檔
/etc/httpd/conf/httpd.conf中,將Listen 80替換為Listen 443。執行下列指令,允許 Apache Proxy VM 將流量轉送至 Looker (Google Cloud Core):
/usr/sbin/setsebool -P httpd_can_network_connect 1
最後,重新啟動 Apache 以套用變更:
sudo systemctl restart httpd
使用下列指令,確認 Apache 已載入並準備好重新編寫模組:
sudo httpd -M | grep rewrite
系統應會傳回類似以下的輸出內容:
rewrite_module (shared)最後,請啟動或重新啟動 Apache 程序,確保所有設定變更都能生效:
sudo systemctl restart httpd
使用下列指令,確認 Apache 程序已正確重新啟動:
sudo systemctl status httpd
系統應會傳回類似以下的輸出內容:
httpd.service - The Apache HTTP Server
Loaded: loaded (/usr/lib/systemd/system/httpd.service; disabled; vendor preset: disabled)
Active: active (running) since Tue 2024-05-14 15:41:57 UTC; 1s ago
  Docs: man:httpd(8)
        man:apachectl(8)
Main PID: 1400 (httpd)
Status: "Processing requests..."
CGroup: /system.slice/httpd.service
        ├─1400 /usr/sbin/httpd -DFOREGROUND
        ├─1401 /usr/sbin/httpd -DFOREGROUND
        ├─1402 /usr/sbin/httpd -DFOREGROUND
        ├─1403 /usr/sbin/httpd -DFOREGROUND
        ├─1404 /usr/sbin/httpd -DFOREGROUND
        └─1405 /usr/sbin/httpd -DFOREGROUND
May 14 15:41:57 proxy-ingress-apache systemd[1]: Starting The Apache HTTP Server...
May 14 15:41:57 proxy-ingress-apache systemd[1]: Started The Apache HTTP Server.
建立及設定負載平衡器
本範例使用區域網路端點群組 (NEG) 和 GCE_VM_IP 端點,做為內部直通式網路負載平衡器的後端。如要使用以執行個體群組為基礎的後端,請參閱「使用 VM 執行個體群組後端設定內部直通式網路負載平衡器」說明文件頁面。
針對您要部署 Proxy 伺服器的每個運算區域,分別建立一個區域 NEG。舉例來說,如果您想在部署 Looker (Google Cloud Core) 的區域中,於三個運算區域各部署一個 Proxy 伺服器,請建立三個區域性 NEG。如要查看每個區域 NEG 支援的端點數量,請參閱「配額與限制」說明文件頁面。
如要建立可用區 NEG,請使用下列
gcloud指令:gcloud compute network-endpoint-groups create NEG_NAME --network-endpoint-type=gce-vm-ip \ --zone=PROXY_INSTANCE_ZONE --network=PROXY_INSTANCE_VPC \ --subnet=PROXY_INSTANCE_SUBNET
更改下列內容:
NEG_NAME:您要建立的 NEG 名稱。PROXY_INSTANCE_ZONE:Proxy 伺服器所在的可用區。PROXY_INSTANCE_VPC:包含 Proxy 伺服器的 VPC。PROXY_INSTANCE_SUBNET:Proxy 伺服器所在的子網路。
如要在其他區域部署 Proxy 伺服器 VM,請重複執行這個步驟。
-
gcloud compute network-endpoint-groups update NEG_NAME --zone=PROXY_INSTANCE_ZONE \
--add-endpoint='instance=PROXY_INSTANCE_NAME'
更改下列內容:
PROXY_INSTANCE_ZONE:Proxy 伺服器所在的可用區。NEG_NAME:與 Proxy 伺服器位於同一可用區的 NEG 名稱。PROXY_INSTANCE_NAME:Proxy 伺服器的名稱。
重複這個步驟,直到每個 Proxy 伺服器 VM 都以端點的形式新增至 NEG 為止。
建立區域健康狀態檢查,供內部負載平衡器使用。使用
compute health-checks create指令:gcloud compute health-checks create PROTOCOL NAME \ --region=REGION \ --description=DESCRIPTION \ --check-interval=CHECK_INTERVAL \ --timeout=TIMEOUT \ --healthy-threshold=HEALTHY_THRESHOLD \ --unhealthy-threshold=UNHEALTHY_THRESHOLD \ PORT_SPECIFICATION \ ADDITIONAL_FLAGS更改下列內容:
PROTOCOL:健康狀態檢查所用的通訊協定,有效選項包括grpc、http、https、http2、ssl和tcp。NAME:健康狀態檢查的名稱。在單一專案中,每個全域健康狀態檢查的名稱都必須是唯一的,且區域健康狀態檢查的名稱在指定區域內不得重複。REGION:除了區域外部應用程式負載平衡器和區域內部應用程式負載平衡器之外,所有負載平衡器都使用全域健康狀態檢查 (--global)。區域內部應用程式負載平衡器使用區域健康狀態檢查,其區域必須與後端服務的區域相符。DESCRIPTION:選填說明。CHECK_INTERVAL:從某個健康狀態檢查探測系統的連線開始時,到下一個健康狀態檢查探測系統的連線開始時的時間間隔,單位為秒。如果省略這個標記, Google Cloud 會採用5s(5 秒) 的值。TIMEOUT: Google Cloud 等待探測回應的時間長度。TIMEOUT的值必須小於或等於CHECK_INTERVAL的值。單位為秒。如果省略這個標記,Google Cloud 會採用5s(5 秒) 的值。HEALTHY_THRESHOLD和UNHEALTHY_THRESHOLD:指定探測作業必須要連續成功或失敗多少次,才會讓系統認定該 VM 執行個體的健康狀態良好或不良。只要您省略其中一個標記,Google Cloud 就會採用2的預設判定門檻值。PORT_SPECIFICATION:使用其中一個通訊埠規格標記定義通訊埠規格。ADDITIONAL_FLAGS:用於指定通訊埠及PROTOCOL專用選項的其他標記。請參閱 HTTP、HTTPS 和 HTTP/2 健康狀態檢查的其他標記、SSL 和 TCP 健康狀態檢查的其他標記,或 gRPC 健康狀態檢查的其他標記。
-
gcloud compute backend-services create BS_NAME --load-balancing-scheme=INTERNAL \
--protocol=tcp --region=PROXY_INSTANCES_REGION --health-checks=HC_NAME \
--health-checks-region=HC_REGION --session-affinity=CLIENT_IP \
--connection-persistence-on-unhealthy-backends=NEVER_PERSIST
更改下列內容:
BS_NAME:您要建立的負載平衡器名稱。PROXY_INSTANCES_REGION:Proxy 伺服器所在的區域。HC_NAME:您建立的區域健康狀態檢查名稱。HC_REGION:健康狀態檢查所在的區域。
此外:
--session-affinity=CLIENT_IP旗標會根據用戶端 IP 位址和目的地 IP 位址建立的雜湊,將特定用戶端的要求導向至同一個後端 Proxy 執行個體 VM。--connection-persistence-on-unhealthy-backends=NEVER_PERSIST旗標表示連線不會保留在健康狀態不良的 Proxy 執行個體 VM 上。
將每個 NEG 新增至後端服務:
gcloud compute backend-services add-backend BS_NAME --region=BS_REGION \
--network-endpoint-group=NEG_NAME --network-endpoint-group-zone=NEG_ZONE
更改下列內容:
BS_NAME:您建立的後端服務名稱。BS_REGION:後端服務所在的地區,應與 Proxy 伺服器所在的地區相同。NEG_NAME:您要新增的 NEG 名稱。NEG_ZONE:NEG 所在的區域。
針對您建立的其他 NEG 重複這個步驟。
在虛擬私有雲中,於 Proxy 執行個體連線的子網路 IP 範圍內保留內部 IP 位址。這是內部負載平衡器的虛擬 IP 位址 (VIP)。保留位址可確保 IP 不會由任何其他物件使用。如要保留內部 IP 位址,請使用
compute addresses create指令:gcloud compute addresses create ADDRESS_NAMES \ --region REGION --subnet SUBNETWORK \ --addresses IP_ADDRESS更改下列內容:
ADDRESS_NAMES:要建立的一或多個[--purpose=SHARED_LOADBALANCER_VIP]位址名稱。如有數個地址,請以空格分隔,並以清單形式指定所有地址,例如example-address-1 example-address-2 example-address-3REGION:這項要求中的地區。SUBNETWORK:這個內部 IP 位址所屬的子網路。IP_ADDRESS:要保留的 IP 位址,必須位於子網路的主要 IP 範圍內。如未指定,系統會從子網路中自動分配 IP 位址。
建立轉送規則,並將其與後端服務和 VIP 建立關聯:
gcloud compute forwarding-rules create FW_RULE_NAME --region=BS_REGION \
--load-balancing-scheme=internal --network=PROXY_INSTANCES_VPC_NAME --subnet=RESERVED_IP_ADDRESS_SUBNET \
--address=RESERVED_IP_ADDRESS --ip-protocol=tcp --ports=ALL --backend-service=BS_NAME \
--backend-service-region=BS_REGION --allow-global-access
更改下列內容:
FW_RULE_NAME:您要建立的轉送規則名稱。BS_REGION:後端服務所在的區域PROXY_INSTANCES_VPC_NAME:建立 Proxy 伺服器 VM 的 VPC 名稱RESERVED_IP_ADDRESS_SUBNET:VIP 所在的子網路RESERVED_IP_ADDRESS:負載平衡器的 VIP 位址BS_NAME:後端服務名稱
此外:
--allow-global-access旗標表示負載平衡器的 VIP 可從任何區域連線 (不只是 BS_REGION)。這可讓每個區域的用戶端連線至 Looker (Google Cloud Core) 執行個體。
建立防火牆規則
如要讓健康狀態檢查正常運作,請為已負載平衡的 Proxy VM 建立適用的輸入防火牆規則,允許來自健康狀態檢查探測器 IP 範圍的流量。
此外,請建立輸入防火牆規則,允許來自內部部署或多雲端環境的流量存取負載平衡器後端服務。
更新 DNS A 記錄
變更 Looker (Google Cloud Core) 自訂網域的 A 記錄,指向負載平衡器的 VIP。您建立的 Cloud DNS 私人區域會管理自訂網域,並由 Proxy 執行個體所在的虛擬私有雲使用。
更新 OAuth 憑證
- 在 Google Cloud 控制台中依序前往「API 和服務」>「憑證」,然後選取 Looker (Google Cloud Core) 執行個體使用的 OAuth 用戶端 ID,即可存取 OAuth 用戶端。
按一下「新增 URI」按鈕,更新 OAuth 用戶端的「已授權的 JavaScript 來源」欄位,加入貴機構用來存取 Looker (Google Cloud Core) 的 DNS 名稱。因此,如果您的自訂網域是
looker.examplepetstore.com,請輸入looker.examplepetstore.com做為 URI。
更新或新增自訂網域至授權重新導向 URI 清單,該清單適用於您建立 Looker (Google Cloud Core) 執行個體時使用的 OAuth 憑證。在 URI 結尾新增
/oauth2callback。因此,如果您的自訂網域是looker.examplepetstore.com,請輸入looker.examplepetstore.com/oauth2callback。
新增使用者
完成上述步驟後,使用者就能存取自訂網域網址。
將使用者新增至執行個體前,請務必為 Looker (Google Cloud Core) 執行個體完整設定使用者驗證方法。
疑難排解
如果您使用 Chrome 存取 Looker (Google Cloud Core) 自訂網域時收到 Chrome 錯誤 (例如
NET::ERR_CERT_COMMON_NAME_INVALID) 或 HSTS 政策錯誤,請按照下列步驟修正:- 開啟「
chrome://net-internals/#hsts」 - 輸入自訂網域,查詢 HSTS/PKP 設定。自訂網域的任何政策都會顯示在「找到:」下方。
- 在「Delete domain security policies」(刪除網域安全政策) 下方,於「Domain」(網域) 欄位中輸入自訂網域。
- 按一下「刪除」即可刪除政策。
- 開啟「
如要排解憑證錯誤,請參閱「排解安全資料傳輸層 (SSL) 憑證問題」說明文件頁面。如果是 Google 代管的憑證,請務必明確授權要允許核發 Google 代管憑證的憑證授權單位。
後續步驟
- 將 Looker (Google Cloud Core) 連線至資料庫
- 為使用者準備 Looker (Google Cloud Core) 執行個體
- 在 Looker (Google Cloud Core) 中管理使用者