You can access the Looker IDE through the Looker Develop menu. See Accessing project files for details and other options.
The Looker IDE supports folders for your project files. Folders are shown in the left navigation pane of the IDE.
![]()
If your Looker project isn't organized into folders, your project will have a flat file structure, with files listed alphabetically in the File Browser panel. See Organizing an existing project with IDE folders for information on updating your project to use IDE folders.
The Looker IDE persists your currently open file and the expanded or collapsed status of the File Browser panel. You can reset the persistence in the IDE Settings.
You can select the icons in the toolbar at the top of the File Browser panel to collapse all folders, move and delete files and folders, search for a project file, or create new folders and new files.
![]()
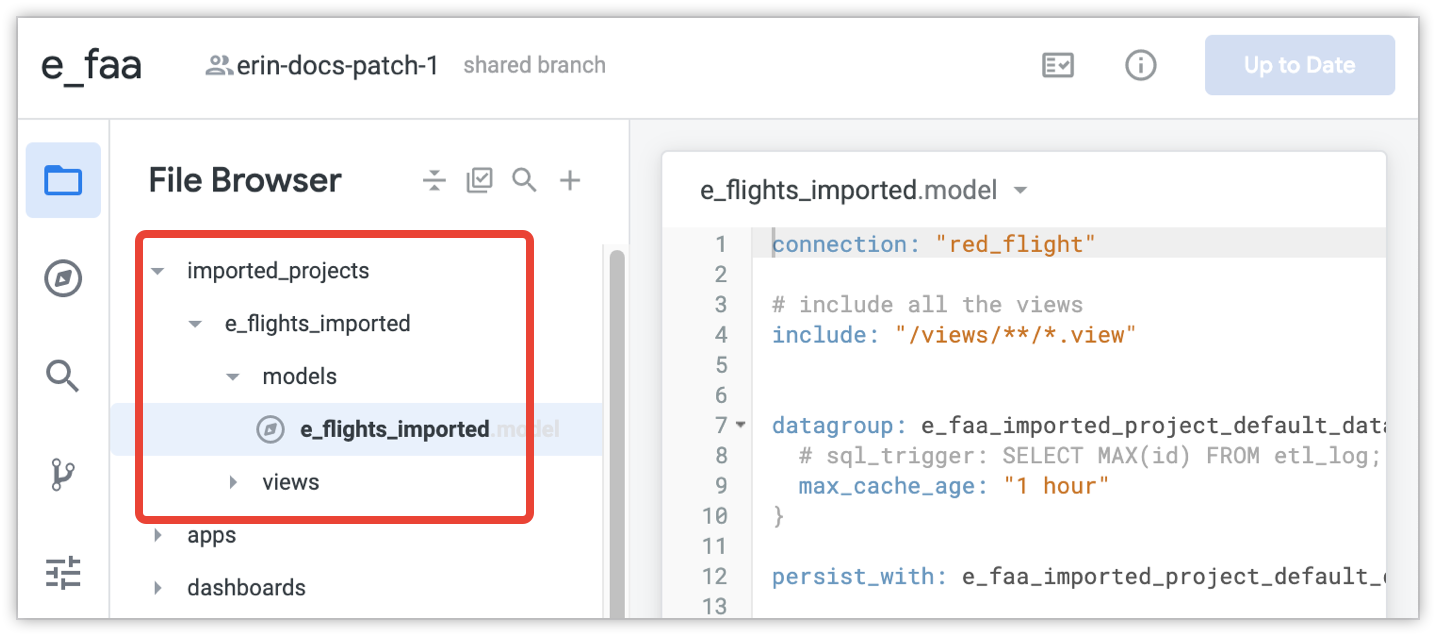
Imported projects folder
If you import a project, the Looker IDE automatically creates an imported_projects folder. Files from both local projects and remote projects are listed in the imported_projects folder. Select an imported project file from the list of files in the imported_projects to view that file's contents.
Because they cannot be edited, imported project files are not visible when you are bulk-editing files in the IDE to move or delete those files.
Organizing an existing project with IDE folders
If your project previously had the legacy flat file structure or if you want to reorganize the files in a folder, you can choose to keep this structure; but if you choose to organize your project files into folders, we strongly recommend that you make the following preparations:
- Plan the file structure ahead of time with all developers.
- Ensure that all your Looker developers have deployed all their updates to production. If a developer has undeployed changes, their branch(es) will reflect the file structure that existed when they last pulled from production. If the project had a flat file structure at that time, the developer's version of the file will be pushed to production in its original location, so you will end up with two copies of the file. In addition, if a developer has undeployed changes during the migration to folders, that developer will face a merge conflict when they pull from production after the migration.
- Enact a temporary code freeze with all your developers until the project has been fully migrated to the new directory structure.
- Assign a single developer to move the files. The following procedure assumes a single developer will be migrating the project to IDE folders. If you need to have multiple developers move files, divide the task among the developers to avoid merge conflicts. If you do encounter merge conflicts, see the Using version control and deploying documentation page for information on resolving them.
Once all your developers have pushed and committed their changes and paused all work on the project, you can then migrate the project to its new directory structure.
Assign a single developer to do all the following steps:
- Verify that all updates on all development branches have been deployed to production. This includes the development branches of the developer performing the migration to IDE folders.
- Verify that all other developers have stopped making changes to the project.
- Pull from production.
- Create the project's folders.
- Move the project files into the folders, either one file at a time or using bulk edit.
- Validate the project's LookML. It is expected that you will have multiple LookML errors and warnings, since the
includeandmap_layerstatements use references to file locations that likely will have been moved during this procedure. Update any
includeandmap_layerstatements in your project to match the file's new path. In addition, you may see LookML validation errors for referenced objects that can no longer be found because their file paths have changed. For more information, see the documentation on usingincludewith IDE folders and on usingmap_layerwith IDE folders.Inform the other Looker developers that they can now pull the updates from production and resume developing in the project.