Mantenha tudo organizado com as coleções
Salve e categorize o conteúdo com base nas suas preferências.
Um conjunto de integração contínua (CI) é um conjunto de instruções de validação associado ao seu projeto do LookML. Um usuário do Looker com a permissão manage_ci pode configurar o seguinte em um conjunto de CI:
É possível configurar e executar os validadores na página Suites do ambiente de desenvolvimento integrado do Looker:
Para criar um conjunto de CI, siga estas etapas:
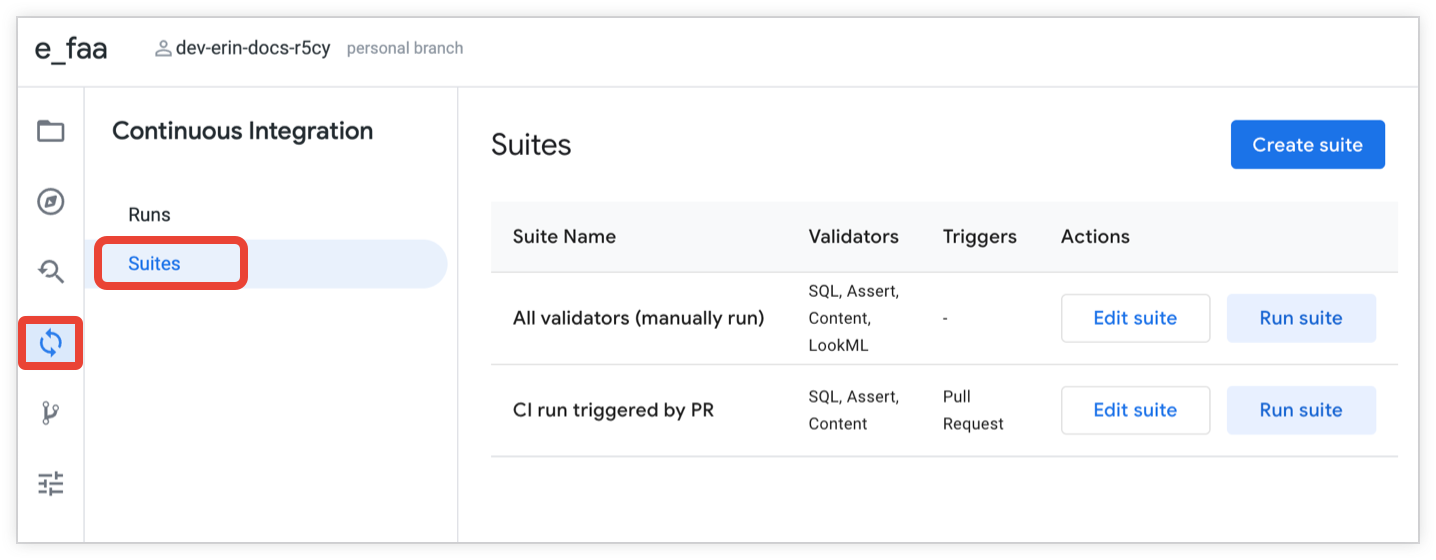
No IDE do Looker, clique no ícone Integração contínua na barra de navegação do IDE.
Clique na guia Suites para abrir a página Suites.
Na página Pacotes, você pode criar um novo pacote ou editar um pacote existente:
Para criar um novo pacote, clique no botão Criar pacote.
Para editar um pacote, clique no botão Editar pacote.
Insira um nome para o nome do pacote. Se você estiver editando um pacote, clique no ícone de lápis para editar o nome dele.
(Opcional) Ative a opção Acionar em solicitações de pull do Looker se quiser configurar testes de validação automática sempre que um desenvolvedor do Looker enviar uma solicitação de envio para seu repositório. Consulte a seção Gatilhos desta página para mais informações.
Se você ativar o acionamento de solicitação de envio para um conjunto de CI, poderá usar o campo Only for target branch para especificar que apenas solicitações de pull para branches específicos no repositório devem acionar uma execução do conjunto de CI. Consulte a seção Gatilhos desta página para mais informações.
Opcionalmente, ative os alternadores de validador para ativar um validador e configurar as opções dele. Consulte as páginas de documentação de cada validador para saber mais:
Para configurar um conjunto de CI para acionamento automático na solicitação de envio, ative a opção Acionar em solicitações de pull do Looker. Para usar o acionamento de solicitação de envio, o repositório do Git precisa ser configurado pelo administrador do Looker na página Integração contínua Admin do Looker.
Se você ativar os acionadores de solicitação de envio para um conjunto de CI, poderá especificar que as solicitações de envio para ramificações específicas no repositório devem acionar uma execução do conjunto de CI. Para limitar os acionadores automáticos de solicitação de envio de execuções de CI a filiais específicas no repositório, insira uma lista separada por vírgulas das filiais no campo Somente para a filial de destino.
Por exemplo, se um repositório tiver três branches chamadas main, release_1 e dev, você poderá inserir main, release_1 no campo Only for target branch. Isso significa que as execuções de CI serão acionadas quando um desenvolvedor do Looker enviar uma solicitação de envio para a ramificação main ou release_1. Se um desenvolvedor do Looker enviar uma solicitação de envio para a ramificação dev, isso não vai acionar uma execução automática do conjunto de CI.
Como excluir um pacote
Para excluir um conjunto de CI, siga estas etapas:
No IDE do Looker, clique no ícone Integração contínua na barra de navegação do IDE.
Clique na guia Suites para abrir a página Suites.
Na página Pacotes, clique no botão Editar pacote.
Na página da suíte, clique no botão Excluir suíte.
Na caixa de diálogo de confirmação, clique no botão Excluir pacote.
[[["Fácil de entender","easyToUnderstand","thumb-up"],["Meu problema foi resolvido","solvedMyProblem","thumb-up"],["Outro","otherUp","thumb-up"]],[["Difícil de entender","hardToUnderstand","thumb-down"],["Informações incorretas ou exemplo de código","incorrectInformationOrSampleCode","thumb-down"],["Não contém as informações/amostras de que eu preciso","missingTheInformationSamplesINeed","thumb-down"],["Problema na tradução","translationIssue","thumb-down"],["Outro","otherDown","thumb-down"]],["Última atualização 2025-08-25 UTC."],[],[],null,["# Creating a Continuous Integration suite\n\n| **Preview:** This product or feature is subject to the \"Pre-GA Offerings Terms\" in the [General Service Terms](https://cloud.google.com/terms/service-terms#1) section of the Service Specific Terms. Pre-GA products and features are available \"as is\" and might have limited support. For more information, see the [launch stage descriptions](https://cloud.google.com/products#product-launch-stages).\n|\n| If you encounter an issue during the Public Preview of Continuous Integration, report it using the [Looker Continuous Integration - Preview Issue Tracker form](https://docs.google.com/forms/d/e/1FAIpQLSed30eICYruU45R8WZQH6hIui28xtdDnejfetzpLHQ5PK0ZeA/viewform?usp=dialog).\n\nA Continuous Integration (CI) suite is a set of validation instructions that is associated with your LookML project. A Looker user with the [`manage_ci`](/looker/docs/admin-panel-users-roles#manage_ci) permission can configure the following in a CI suite:\n\n- How a CI validation run is triggered ([manually from the Looker IDE](/looker/docs/ci-run-suite#manual-run) or [automatically when a pull request is submitted to your repository](/looker/docs/ci-run-suite#pr-run)).\n- Which CI validators to run.\n- Additional options for each validation test. See the documentation pages for each of the validators for details:\n - [SQL Validator](/looker/docs/ci-sql-validator)\n - [Assert Validator](/looker/docs/ci-assert-validator)\n - [Content Validator](/looker/docs/ci-content-validator)\n - [LookML Validator](/looker/docs/ci-lookml-validator)\n\nBefore you begin\n----------------\n\nBefore you can create a CI suite, you need the following:\n\n- A Looker instance that meets the [requirements for CI](/looker/docs/continuous-integration#requirements) and that is [enabled for CI](/looker/docs/continuous-integration#enable-ci).\n- A Looker user account with the [`manage_ci`](/looker/docs/admin-panel-users-roles#manage_ci) permission (this permission is included in the Admin [permission set](/looker/docs/admin-panel-users-roles#permission_sets)).\n\nCreating a CI suite\n-------------------\n\nYou can configure and run the validators on the **Suites** page in the Looker IDE:\n\nTo create a CI suite, follow these steps:\n\n1. From the [Looker IDE](/looker/docs/looker-ide), click the **Continuous Integration** icon from the IDE navigation bar.\n2. Click the **Suites** tab to open the **Suites** page.\n3. On the **Suites** page, you can create a new suite or edit an existing suite:\n - To create a new suite, click the **Create suite** button.\n - To edit an existing suite, click the **Edit suite** button for the suite.\n4. Enter a name for the **Suite name**. If you are editing an existing suite, you can optionally click the pencil icon to edit the suite name.\n5. (Optional) Enable the **Trigger on pull requests from Looker** toggle if you want to set up automatic validation testing whenever a Looker developer submits a pull request to your repository. See the [Triggers](#triggers) section of this page for more information.\n\n If you enable pull request triggering for a CI suite, you can optionally use the **Only for target branch** field to specify that pull requests only to specific branches in the repository should trigger a run of the CI suite. See the [Triggers](#triggers) section of this page for more information.\n6. Optionally, enable the validator toggles to turn on a validator and configure its options. See the documentation pages for each of the validators for details:\n\n - [SQL Validator](/looker/docs/ci-sql-validator)\n - [Assert Validator](/looker/docs/ci-assert-validator)\n - [Content Validator](/looker/docs/ci-content-validator)\n - [LookML Validator](/looker/docs/ci-lookml-validator)\n7. Save your changes:\n\n - If you are creating a new suite, click the **Create suite** button.\n - If you are editing an existing suite, click the **Update suite** button.\n\n### Triggers\n\nCI runs can be triggered in several ways:\n\n- Automatically, when a pull request is submitted to your LookML project's repository by a Looker developer.\n- Manually, [using the **Run suite** button](/looker/docs/ci-run-suite#manual-run) on the **Suites** page in the Looker IDE.\n- Manually, by [rerunning a previous CI run](/looker/docs/ci-run-suite#manual-rerun), from the **Runs** page of the Looker IDE.\n\nTo configure a CI suite for automatic triggering on pull request, enable the **Trigger on pull requests from Looker** toggle. To use pull request triggering, your Git repository must be configured by your Looker admin on the [**Continuous Integration** Admin](/looker/docs/admin-panel-platform-ci#github) page of Looker).\n| **Tip:** Even if you configure the CI suite to run automatically on pull requests, you can still initiate a [manual run](/looker/docs/ci-run-suite#manual-run) or [manually rerun a previous run](/looker/docs/ci-run-suite#manual-rerun) of the CI suite from the Looker IDE.\n\n\nIf you enable pull request triggers for a CI suite, you can optionally specify that pull requests only to specific branches in the repository should trigger a run of the CI suite. To limit automatic pull request triggers of CI runs to specific branches in your repository, enter a comma-separated list of the branches in the **Only for target branch** field.\n\nFor example, if a repository has three branches named `main`, `release_1`, and `dev`, you can enter `main, release_1` in the **Only for target branch** field. This means that CI runs will be triggered when a Looker developer submits a pull request to either the `main` or the `release_1` branch. If a Looker developer submits a pull request to the `dev` branch, this won't trigger an automatic run of the CI suite.\n\nDeleting a suite\n----------------\n\nTo delete a CI suite, perform the following steps:\n\n1. From the [Looker IDE](/looker/docs/looker-ide), click the **Continuous Integration** icon from the IDE navigation bar.\n2. Click the **Suites** tab to open the **Suites** page.\n3. On the **Suites** page, click the **Edit suite** button for the suite.\n4. On the suite's page, click the **Delete suite** button.\n5. In the confirmation dialog, click the **Delete suite** button."]]