您可以通过 IP 许可名单页面指定可以访问 Looker 实例的 IP 地址列表。如需查看根据您的区域而允许的特定 IP 列表,请参阅启用安全的数据库访问。启用 IP 许可名单后,您的 Looker 实例会在应用级别过滤 IP 地址,仅允许来自许可名单中的 IP 地址的连接。Looker 会拒绝来自所有其他 IP 地址的连接尝试。IP 许可名单停用后,您的 Looker 实例可以接受来自任何 IP 地址的连接。
IP 许可名单页面仅适用于 Looker 托管的实例。客户托管的实例在管理菜单中不会显示此选项。如要查看 IP 许可名单页面,请在管理菜单的服务器部分选择 IP 许可名单。
IP 许可名单页面列出了用于配置哪些 IP 地址和子网掩码可以访问 Looker 实例的规则。每条规则还定义了来自这些 IP 地址的用户是只能从 Looker 界面登录、只能通过 Looker API 登录,还是从这两种来源登录。
除了查看现有的 IP 许可名单规则外,您还可以执行以下任务:
使用启用许可名单开关启用或停用 IP 许可名单。许可名单处于启用状态时,只有来自所列 IP 地址的用户才能连接。
定义一条新规则,将更多 IP 地址添加到许可名单中。
启用、停用、修改或删除现有规则。
正在添加您的 IP 地址
如果 IP 许可名单未定义,如您首次访问该列表时,Looker 会显示两条提醒:
启用许可名单开关旁边的提示会显示警告图标
开关旁边会显示一条内容为您的 IP 地址未列入许可名单的备注
选择您的 IP 地址未列入许可名单文本以获取检测到的 IP 地址。选择添加规则,按照以下说明将您的 IP 地址添加到许可名单中。
添加新规则
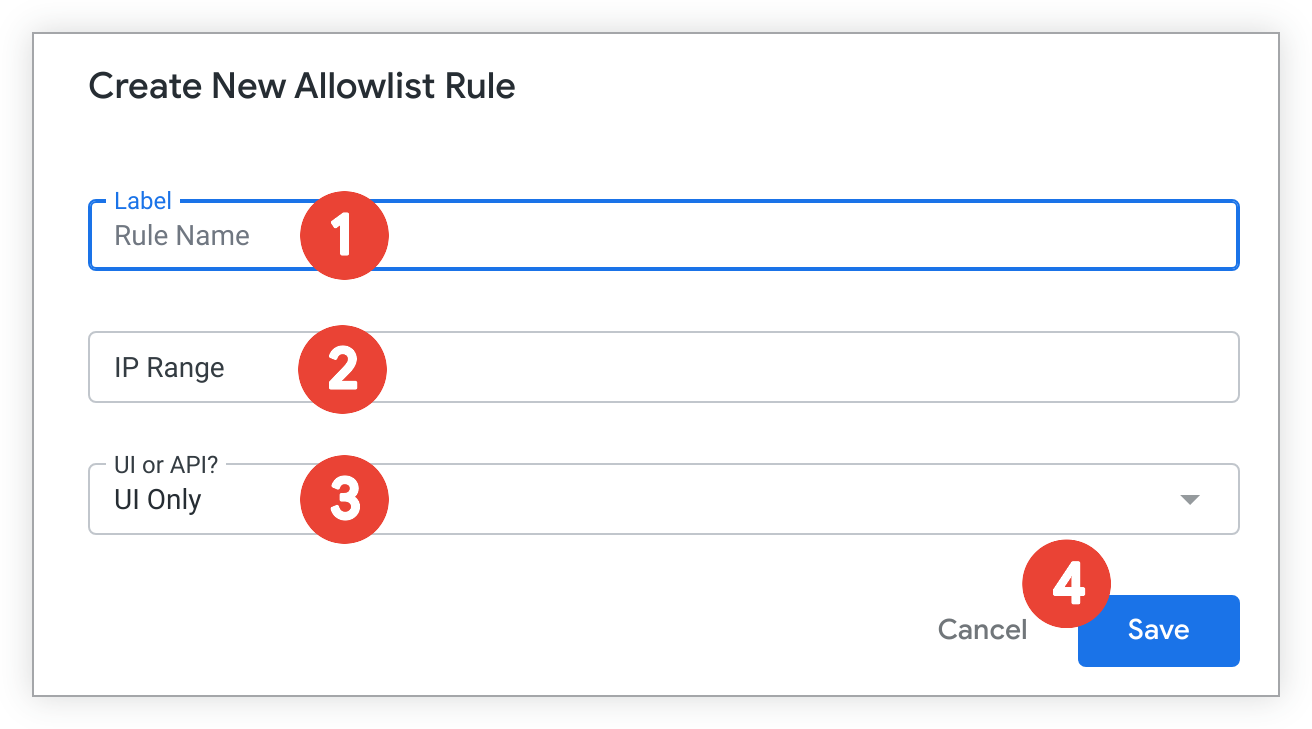
选择添加规则,将一个 IP 地址或地址范围添加到许可名单。Looker 会显示新建 IP 许可名单规则对话框。要添加新规则,请按以下步骤操作:
在标签字段中输入新规则的名称。
在 IP 范围字段中,使用 IP 地址和子网掩码输入一系列已获批准的 IP 地址,如 CIDR 表示法中所述。
在“界面还是 API”下拉菜单中,指定新规则是仅适用于通过 Looker 界面进行的登录尝试、仅适用于通过 Looker API 进行的登录尝试,还是适用于来自这两个来源的登录尝试。
[[["易于理解","easyToUnderstand","thumb-up"],["解决了我的问题","solvedMyProblem","thumb-up"],["其他","otherUp","thumb-up"]],[["很难理解","hardToUnderstand","thumb-down"],["信息或示例代码不正确","incorrectInformationOrSampleCode","thumb-down"],["没有我需要的信息/示例","missingTheInformationSamplesINeed","thumb-down"],["翻译问题","translationIssue","thumb-down"],["其他","otherDown","thumb-down"]],["最后更新时间 (UTC):2025-08-25。"],[],[],null,["| **Note:** [Looker (Google Cloud core)](/looker/docs/looker-core-overview) instances don't include this page. To allow access to Looker (Google Cloud core) for particular IPs, use a [private connections (private services access)](/looker/docs/looker-core-create-private-ip) Looker (Google Cloud core) instance, and control access with your VPC settings.\n\nThe **IP Allowlist** page lets you specify a list of IP addresses that can access your Looker instance. For a list of specific IPs to allow based on your region, see [Enabling secure database access](/looker/docs/enabling-secure-db-access#option_1_ip_address_allowlist). When the IP allowlist is enabled, your Looker instance filters IP addresses at the application level, allowing connections from *only* the IP addresses on the allowlist. Looker refuses connection attempts from all other IP addresses. When the IP allowlist is disabled, your Looker instance can accept connections from any IP address.\n\nThe **IP Allowlist** page is available only for Looker-hosted instances. Customer-hosted instances won't see this option in the **Admin** menu. To view the **IP Allowlist** page, from the **Server** section of the **Admin** menu, select **IP Allowlist**.\n| **Note:** If you have a permission that provides access to only select pages in the Admin panel, such as [`manage_schedules`](/looker/docs/admin-panel-users-roles#manage_schedules), [`manage_themes`](/looker/docs/admin-panel-users-roles#manage_themes), or [`see_admin`](/looker/docs/admin-panel-users-roles#see_admin), but you don't have the [Admin role](/looker/docs/admin-panel-users-roles#default_roles), the page or pages that are described here may not be visible to you in the Admin panel.\n\nThe **IP Allowlist** page lists the rules that you use to configure which IP addresses and subnet masks can access your Looker instance. Each rule also defines whether users from those IP addresses can log in only from the Looker UI, only from the Looker API, or from both sources.\n\nIn addition to viewing existing IP allowlist rules, you can perform the following tasks:\n\n- Enable or disable the IP allowlist with the **Enable Allowlist** switch. When the allowlist is active, only users from listed IP address can connect.\n- Define a new rule, which adds more IP addresses to the allowlist.\n- Enable, disable, edit, or delete an existing rule.\n\nAdding your IP address\n\nIf the IP allowlist has no rules defined, as when you first access the list, Looker will display two alerts:\n\n- a tooltip next to the **Enable Allowlist** switch displays a warning icon\n- a note reading **Your IP address is not allowlisted** appears next to the switch\n\nSelect the **Your IP address is not allowlisted** text to obtain your detected IP address. Select **Add Rule** to add your IP address to the allowlist by using the following instructions.\n\nAdding a new rule\n\nSelect **Add Rule** to add an IP address or a range of addresses to the allowlist. Looker displays the **New IP Allowlist Rule** dialog. To add a new rule, follow these steps:\n\n1. Enter a name for the new rule in the **Label** field.\n2. Enter a range of approved IP addresses in the **IP Range** field using an IP address and a subnet mask, as described in [CIDR notation](https://en.wikipedia.org/wiki/Classless_Inter-Domain_Routing).\n3. Specify whether the new rule applies only to login attempts from the Looker UI, only to login attempts from the Looker API, or to login attempts from both sources in the **UI or API?** drop-down menu.\n4. Select **Save**.\n\nThings to know\n\nWhile configuring your IP allowlist, keep the following considerations in mind:\n\n- Adding more than 50 rules may negatively impact Looker's performance.\n- Certain Looker Action Hub features such as the [Slack integration](/looker/docs/scheduling-slack) and [OAuth-enabled actions](/looker/docs/action-hub#configuring_an_action_for_oauth) don't work when the IP allowlist is enabled.\n- To integrate [Git pull requests](/looker/docs/git-options#integrating_pull_requests_for_your_project) with any LookML projects, you need to add to the allowlist the range of IP addresses from which your Git provider makes outbound requests. For example, GitHub IP addresses are [available from their meta API endpoint](https://docs.github.com/en/authentication/keeping-your-account-and-data-secure/about-githubs-ip-addresses). IPs are subject to change and will be different for other Git providers."]]