SAP ASE (Sybase)
The Sybase connector lets you perform insert, delete, update, and read operations on Sybase.
Before you begin
Before using the Sybase connector, do the following tasks:
- In your Google Cloud project:
- Ensure that network connectivity is set up. For information about network patterns, see Network connectivity.
- Grant the roles/connectors.admin IAM role to the user configuring the connector.
- Grant the following IAM roles to the service account that you want to use for the connector:
roles/secretmanager.viewerroles/secretmanager.secretAccessor
A service account is a special type of Google account intended to represent a non-human user that needs to authenticate and be authorized to access data in Google APIs. If you don't have a service account, you must create a service account. The connector and the service account must belong to the same project. For more information, see Creating a service account.
- Enable the following services:
secretmanager.googleapis.com(Secret Manager API)connectors.googleapis.com(Connectors API)
To understand how to enable services, see Enabling services.
If these services or permissions have not been enabled for your project previously, you are prompted to enable them when configuring the connector.
Configure the connector
A connection is specific to a data source. It means that if you have many data sources, you must create a separate connection for each data source. To create a connection, do the following:
- In the Cloud console, go to the Integration Connectors > Connections page and then select or create a Google Cloud project.
- Click + Create new to open the Create Connection page.
- In the Location section, choose the location for the connection.
- Region: Select a location from the drop-down list.
Supported regions for connectors include:
For the list of all the supported regions, see Locations.
- Click Next.
- Region: Select a location from the drop-down list.
- In the Connection Details section, complete the following:
- Connector: Select Sybase from the drop down list of available Connectors.
- Connector version: Select the Connector version from the drop down list of available versions.
- In the Connection Name field, enter a name for the Connection instance.
Connection names must meet the following criteria:
- Connection names can use letters, numbers, or hyphens.
- Letters must be lower-case.
- Connection names must begin with a letter and end with a letter or number.
- Connection names cannot exceed 49 characters.
- Optionally, enter a Description for the connection instance.
- Service Account: Select a service account that has the required roles.
- Optionally, configure the Connection node settings:
- Minimum number of nodes: Enter the minimum number of connection nodes.
- Maximum number of nodes: Enter the maximum number of connection nodes.
A node is a unit (or replica) of a connection that processes transactions. More nodes are required to process more transactions for a connection and conversely, fewer nodes are required to process fewer transactions. To understand how the nodes affect your connector pricing, see Pricing for connection nodes. If you don't enter any values, by default the minimum nodes are set to 2 (for better availability) and the maximum nodes are set to 50.
- Database: The name of the Sybase database.
- Optionally, click + Add label to add a label to the Connection in the form of a key/value pair.
- Click Next.
- In the Destinations section, enter details of the remote host (backend system) you want to connect to.
- Destination Type: You can specify the destination details either as a host address or a service attachment. Select any of the following destination types:
- Host address: If you want to specify the hostname or IP address of the destination.
- Service attachment: If you want to specify the private endpoint for your internal IP addresses. The service attachment, lets you hide your internal IP addresses from the external network. You can create a service attachment in Google Cloud, by using the Private Service Connect feature. For information on configuring a Private Service Connect, see Publish managed services.
Based on your selection of destination type, enter the host address or the service attachment name.
To enter additional destinations, click +Add destination.
- Click Next.
- Destination Type: You can specify the destination details either as a host address or a service attachment. Select any of the following destination types:
-
In the Authentication section, enter the authentication details.
- Select an Authentication type and enter the relevant details.
The following authentication types are supported by the Sybase connection:
- Username and password
- Click Next.
To understand how to configure these authentication types, see Configure authentication.
- Select an Authentication type and enter the relevant details.
- Review: Review your connection and authentication details.
- Click Create.
Configure authentication
Enter the details based on the authentication you want to use.
-
Username and password
- Username: The Sybase user account used to authenticate.
- Password: Secret Manager Secret containing the password used to authenticate the user.
- Secret version: The version of the secret that contains the password.
Connection configuration samples
This section lists the sample values for the various fields that you configure when creating a SAP ASE connection.
Username and password connection type
| Field name | Details |
|---|---|
| Location | europe-west1 |
| Connector | SAP ASE |
| Connector version | 1 |
| Connection Name | google-cloud-SAP ASE-soap-conn |
| Enable Cloud Logging | Yes |
| Service Account | SERVICE_ACCOUNT_NAME@PROJECT_ID.iam.gserviceaccount.com |
| Database | Alex |
| Verbosity level | 5 |
| Minimum number of nodes | 2 |
| Maximum number of nodes | 50 |
| Host Address | 198.51.100.0 |
| Authentication | User Password |
| Username | USERNAME |
| Password | PASSWORD |
| Secret Version | 1 |
For information about LDAP user authentication, see LDAP user authentication.
SSL connectiontype
| Field name | Details |
|---|---|
| Location | us-central1 |
| Connector | Sybase |
| Connector version | 1 |
| Connection Name | google-cloud-sybase-ssl-conn |
| Enable Cloud Logging | Yes |
| Service Account | SERVICE_ACCOUNT_NAME@PROJECT_ID.iam.gserviceaccount.com |
| Database | Alex |
| Minimum number of nodes | 2 |
| Maximum number of nodes | 50 |
| Trust Store | Private |
| Custom Trust Store | CUSTOM TRUST STORE |
| Secret Version | 2 |
| Client Certificate | CLIENT_CERTIFICATE |
| Secret Version | 7 |
| Client Private Key | CLIENT PRIVATE KEY |
| Secret Version | 4 |
| Client Private Key Passphrase | CLIENT PRIVATE KEY PASSPHRASE |
| Secret Version | 1 |
| Host Address | 198.51.100.0 |
| Port | PORT |
| Authentication | USER PASSWORD |
| Username | USERNAME |
| Password | PASSWORD |
| Secret Version | 1 |
For information about enabling SSL, see Enabling SSL.
Entities, operations, and actions
All the Integration Connectors provide a layer of abstraction for the objects of the connected application. You can access an application's objects only through this abstraction. The abstraction is exposed to you as entities, operations, and actions.
- Entity: An entity can be thought of as an object, or a collection of properties, in the
connected application or service. The definition of an entity differs from a connector to a
connector. For example, in a database connector, tables are the entities, in a
file server connector, folders are the entities, and in a messaging system connector,
queues are the entities.
However, it is possible that a connector doesn't support or have any entities, in which case the
Entitieslist will be empty. - Operation: An operation is the activity that you can perform on an entity. You can perform
any of the following operations on an entity:
Selecting an entity from the available list, generates a list of operations available for the entity. For a detailed description of the operations, see the Connectors task's entity operations. However, if a connector doesn't support any of the entity operations, such unsupported operations aren't listed in the
Operationslist. - Action: An action is a first class function that is made available to the integration
through the connector interface. An action lets you make changes to an entity or entities, and
vary from connector to connector. Normally, an action will have some input parameters, and an output
parameter. However, it is possible
that a connector doesn't support any action, in which case the
Actionslist will be empty.
System limitations
The Sybase connector can process 2 transaction per second, per node, and throttles any transactions beyond this limit. By default, Integration Connectors allocates 2 nodes (for better availability) for a connection.
For information on the limits applicable to Integration Connectors, see Limits.
ExecuteCustomQuery action
This action lets you execute a custom query.
To create a custom query, follow these steps:
- Follow the detailed instructions to add a connectors task.
- When you configure the connector task, in the type of action you want to perform, select Actions.
- In the Action list, select Execute custom query, and then click Done.
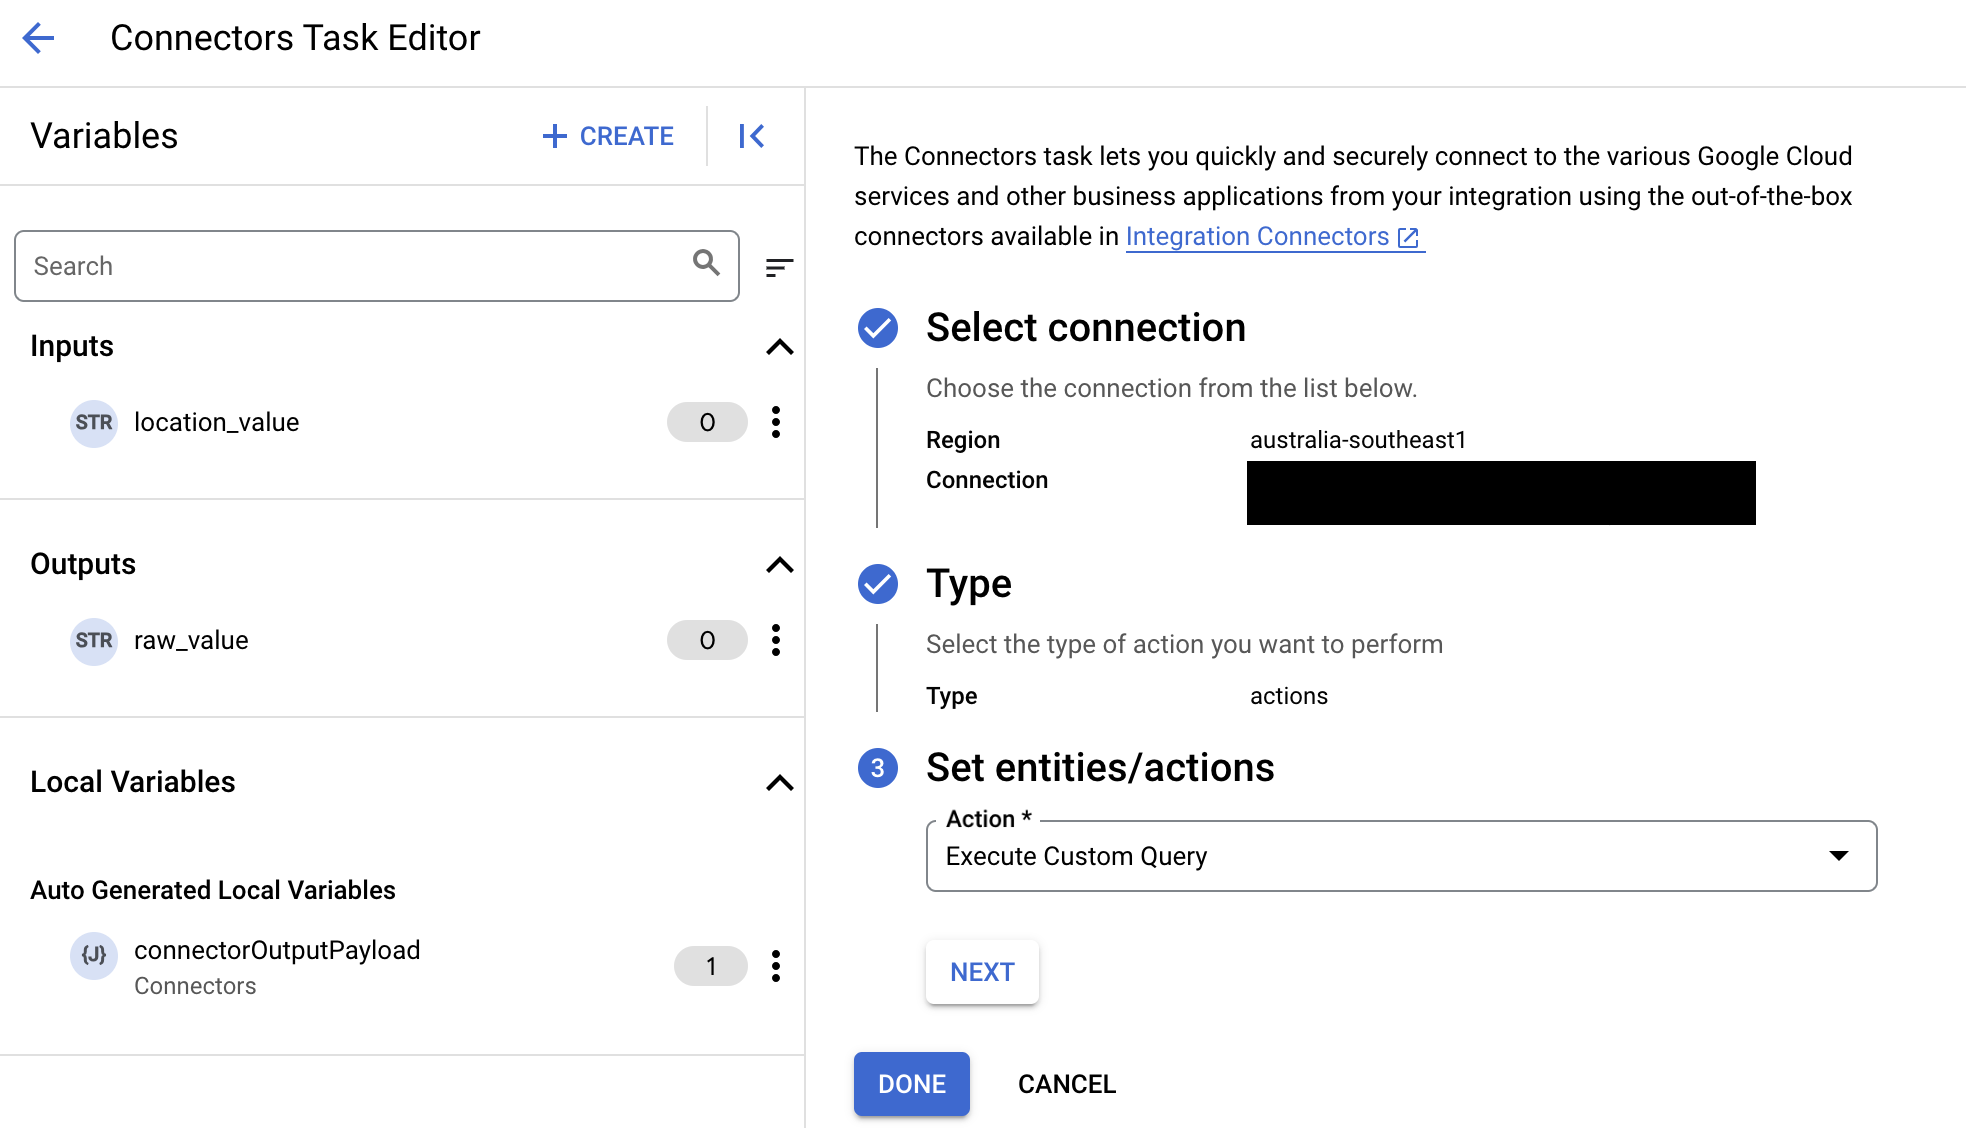
- Expand the Task input section, and then do the following:
- In the Timeout after field, enter the number of seconds to wait till the query executes.
Default value:
180seconds. - In the Maximum number of rows field, enter the maximum number of rows to be returned from the database.
Default value:
25. - To update the custom query, click Edit Custom Script. The Script editor dialog opens.
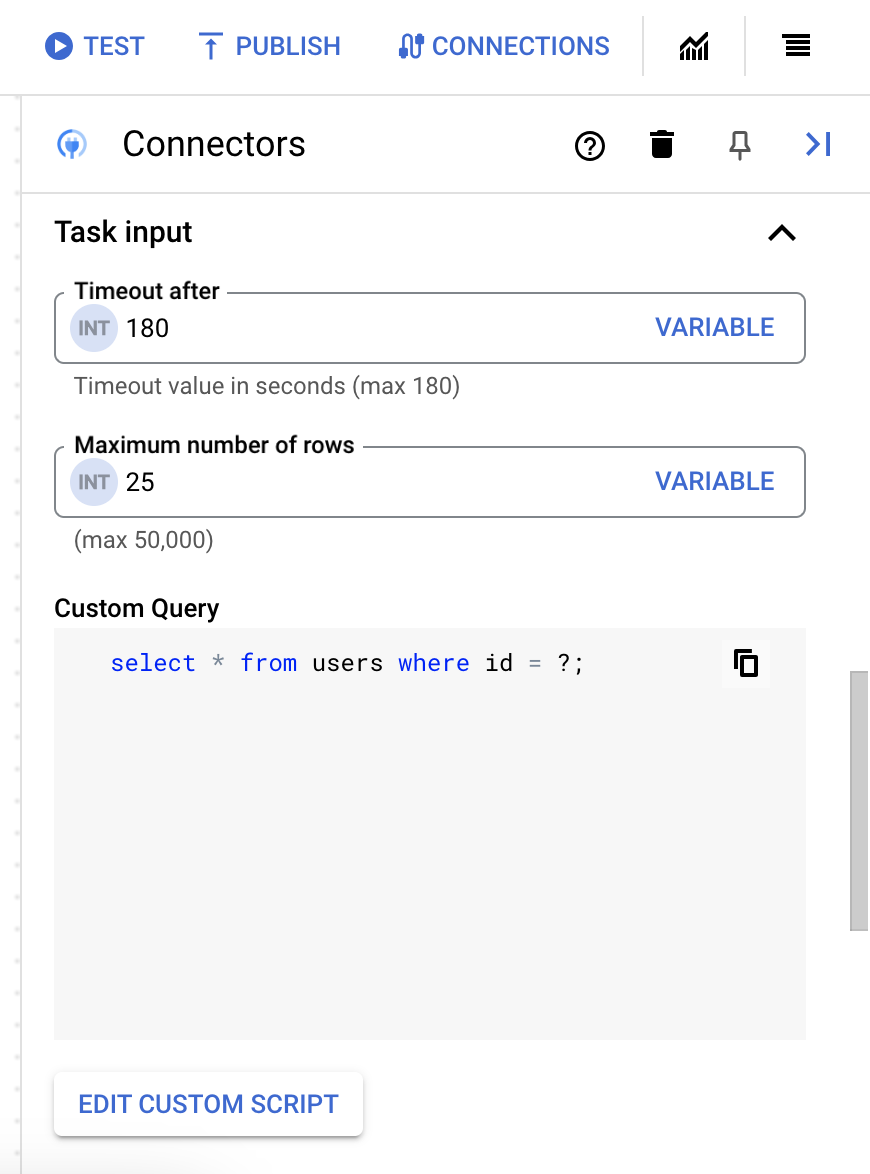
- In the Script editor dialog, enter the SQL query and click Save.
You can use a question mark (?) in a SQL statement to represent a single parameter that must be specified in the query parameters list. For example, the following SQL query selects all rows from the
Employeestable that matches the values specified for theLastNamecolumn:SELECT * FROM Employees where LastName=?
- If you've used question marks in your SQL query, you must add the parameter by clicking + Add Parameter Name for each question mark. While executing the integration, these parameters replace the question marks (?) in the SQL query sequentially. For example, if you have added three question marks (?), then you must add three parameters in order of sequence.
To add query parameters, do the following:
- From the Type list, select the data type of the parameter.
- In the Value field, enter the value of the parameter.
- To add multiple parameters, click + Add Query Parameter.
The Execute custom query action does not support array variables.
- In the Timeout after field, enter the number of seconds to wait till the query executes.
On successful execution, this action returns the status 200 (OK) with a response body that has the query results.
Action examples
This section describes how to perform some of the actions in this connector.
Example - Create a table
- In the
Configure Connectordialog, selectRegion, Connection and Actions. - Select
Execute Custom Queryfrom the actions, and then click Done. - In the Task Input section of Connector, click on
Edit Custom Scriptand then enter a value similar to the following in theCustom Queryfield:CREATE TABLE customqueries98( ID INT , NAME VARCHAR (20), AGE INT, City CHAR (25) , SALARY DECIMAL (18, 2) );
This example shows the Execute Custom Query to create a new table.
If the action is successful, the
Execute Custom Query task's connectorOutputPayload response parameter returns a blank payload.
Example - Alter a table
- In the
Configure Connectordialog, selectRegion, Connection and Actions. - Select
Execute Custom Queryfrom the actions, and then click Done. - In the Task Input section of Connector, click on
Edit Custom Scriptand then enter a value similar to the following in theCustom Queryfield:ALTER TABLE customqueries98 ADD CONSTRAINT ID PRIMARY KEY (ID)
This example shows the Execute Custom Query to alter a table.
If the action is successful, the
Execute Custom Query task's connectorOutputPayload response
parameter returns a blank payload.
Example - Truncate a table
- In the
Configure Connectordialog, selectRegion, Connection and Actions. - Select
Execute Custom Queryfrom the actions, and then click Done. - In the Task Input section of Connector, click on
Edit Custom Scriptand then enter a value similar to the following in theCustom Queryfield:TRUNCATE TABLE customqueries99
This example shows the Execute Custom Query to truncate a table
If the action is successful, the
Execute Custom Query task's connectorOutputPayload response parameter returns a blank payload.
Example - Drop a table
- In the
Configure Connectordialog, selectRegion, Connection and Actions. - Select
Execute Custom Queryfrom the actions, and then click Done. - In the Task Input section of Connector, click on
Edit Custom Scriptand then enter a value similar to the following in theCustom Queryfield:DROP TABLE customqueries99
This example shows the Execute Custom Query to drop a table.
If the action is successful, the
Execute Custom Query task's connectorOutputPayload response parameter returns a blank payload.
Example - Validate SUM
- In the
Configure Connectordialog, selectRegion, Connection and Actions. - Select
Execute Custom Queryfrom the actions, and then click Done. - In the Task Input section of Connector, click on
Edit Custom Scriptand then enter a value similar to the following in theCustom Queryfield:SELECT SUM(SALARY) as Total FROM EMPLOYEES
This example shows the Execute Custom Query to validate the SUM of the Aggregate function.
If the action is successful, the
Execute Custom Query task's connectorOutputPayload response
parameter will have a value similar to the following:
[{
  "Total": 7500.0
  }]
Example - Validate AVG
- In the
Configure Connectordialog, selectRegion, Connection and Actions. - Select
Execute Custom Queryfrom the actions, and then click Done. - In the Task Input section of Connector, click on
Edit Custom Scriptand then enter a value similar to the following in theCustom Queryfield:SELECT AVG(SALARY) as Average FROM EMPLOYEES
This example shows the Execute Custom Query to validate AVG of Aggregate function.
If the action is successful, the
Execute Custom Query task's connectorOutputPayload response
parameter will have a value similar to the following:
[{
  "Average": 7500.0
  }]
Example - Validate MAX
- In the
Configure Connectordialog, selectRegion, Connection and Actions. - Select
Execute Custom Queryfrom the actions, and then click Done. - In the Task Input section of Connector, click on
Edit Custom Scriptand then enter a value similar to the following in theCustom Queryfield:SELECT MAX(SALARY) as Max_Salary FROM EMPLOYEES
This example shows the Execute Custom Query to validate MAX of Aggregate Function.
If the action is successful, the
Execute Custom Query task's connectorOutputPayload response
parameter will have a value similar to the following:
[{
  "Max_Salary": 7500.0
  }]
Example - Validate MIN
- In the
Configure Connectordialog, selectRegion, Connection and Actions. - Select
Execute Custom Queryfrom the actions, and then click Done. - In the Task Input section of Connector, click on
Edit Custom Scriptand then enter a value similar to the following in theCustom Queryfield:SELECT MIN(SALARY) as Min_Salary FROM EMPLOYEES
This example shows the Execute Custom Query to validate MIN of Aggregate function.
If the action is successful, the
Execute Custom Query task's connectorOutputPayload response
parameter will have a value similar to the following:
[{
  "Min_Salary": 7500.0
  }]
Example - Validate COUNT
- In the
Configure Connectordialog, selectRegion, Connection and Actions. - Select
Execute Custom Queryfrom the actions, and then click Done. - In the Task Input section of Connector, click on
Edit Custom Scriptand then enter a value similar to the following in theCustom Queryfield:select count(*) from EMPLOYEES
This example shows the Execute Custom Query to validate Count of Aggregate function.
If the action is successful, the
Execute Custom Query task's connectorOutputPayload response
parameter will have a value similar to the following:
[{
  "": 1.0
  }]
Example - Use Join and GroupBy
- In the
Configure Connectordialog, selectRegion, Connection and Actions. - Select
Execute Custom Queryfrom the actions, and then click Done. - In the Task Input section of Connector, click on
Edit Custom Scriptand then enter a value similar to the following in theCustom Queryfield:SELECT SmallMoney.amount, Sum(Testsybase.clone) AS Total FROM Testsybase INNER JOIN SmallMoney ON Testsybase.id = SmallMoney.id GROUP BY SmallMoney.amount;
This example shows the Execute Custom Query by using Join and GroupBy.
If the action is successful, the
Execute Custom Query task's connectorOutputPayload response
parameter will have a value similar to the following:
[{
    "amount": 1122.56,
    "Total": 14.0
  }, {
    "amount": 123.4567,
    "Total": 11.0
  }, {
    "amount": 1123.45,
    "Total": 13.0
  }]
Example - Use Join and Query parameters
- In the
Configure Connectordialog, selectRegion, Connection and Actions. - Select
Execute Custom Queryfrom the actions, and then click Done. - In the Task Input section of Connector, click on
Edit Custom Scriptand then enter a value similar to the following in theCustom Queryfield:SELECT e.payload,e.rest,ed.id FROM Testsybase e, Smallmoney ed where e.id=ed.id and ed.id=?
This example shows the Execute Custom Query by using Join and Query parameters.
If the action is successful, the
Execute Custom Query task's connectorOutputPayload response
parameter will have a value similar to the following:
 [{
    "payload": 5678.9,
    "rest": 13.6666,
    "id": 2.0
  }]
Example - Use GroupBy, Having and Count
- In the
Configure Connectordialog, selectRegion, Connection and Actions. - Select
Execute Custom Queryfrom the actions, and then click Done. - In the Task Input section of Connector, click on
Edit Custom Scriptand then enter a value similar to the following in theCustom Queryfield:select payload, count(payload) from Testsybase group by payload having count(payload)>=1
This example shows the Execute Custom Query by using GroupBy, Having and Count.
If the action is successful, the
Execute Custom Query task's connectorOutputPayload response
parameter will have a value similar to the following:
[{
    "payload": 1234.56,
    "": 1.0
  }, {
    "payload": 2345.67,
    "": 1.0
  }, {
    "payload": 4352.78,
    "": 1.0
  }, {
    "payload": 6789.12,
    "": 1.0
  }]
Example - Use Column Cast, LIKE, and other operators
- In the
Configure Connectordialog, selectRegion, Connection and Actions. - Select
Execute Custom Queryfrom the actions, and then click Done. - In the Task Input section of Connector, click on
Edit Custom Scriptand then enter a value similar to the following in theCustom Queryfield:select e.id,e.clone from Testsybase e where e.payload>10 and e.rest LIKE '%1%' AND e.id<>3 order by e.id;
This example shows the Execute Custom Query by using Column Cast, LIKE, and other operators, such as i.e. <>.
If the action is successful, the
Execute Custom Query task's connectorOutputPayload response
parameter will have a value similar to the following:
[{
    "id": 1.0,
    "clone": 10.0
  }, {
    "id": 2.0,
    "clone": 99.0
  }, {
    "id": 4.0,
    "clone": 14.0
  }]
Example - Execute a function by providing inputs in integration
- In the
Configure Connectordialog, selectRegion, Connection and Actions. - Select
Execute Custom Queryfrom the actions, and then click Done. - In the Task Input section of Connector, click on
Edit Custom Scriptand then enter a value similar to the following in theCustom Queryfield:SELECT dbo.MultiplyNumbers(5, 10) AS Result
This example shows the Execute Custom Query for executing a function by providing inputs in integration.
If the action is successful, the
Execute Custom Query task's connectorOutputPayload response
parameter will have a value similar to the following:
 [{
    "Result": 50.0
  }]
Example - Create a function by providing inputs in integration
- In the
Configure Connectordialog, selectRegion, Connection and Actions. - Select
Execute Custom Queryfrom the actions, and then click Done. - In the Task Input section of Connector, click on
Edit Custom Scriptand then enter a value similar to the following in theCustom Queryfield:CREATE FUNCTION MultiplyNumbersTest1 (@num1 INT, @num2 INT) RETURNS INT AS RETURN @num1 * @num2
This example shows the Execute Custom Query for creating a function by providing inputs in integration.
If the action is successful, the
Execute Custom Query task's connectorOutputPayload response parameter returns a blank payload.
Example - Execute a procedure by providing inputs in integration
- In the
Configure Connectordialog, selectRegion, Connection and Actions. - Select
Execute Custom Queryfrom the actions, and then click Done. - In the Data Mapping section
Open Data Mapping Editorand then enter a value similar to the following in theInputfield:{ "@EmpID": 1.0 }
This example shows the Execute Custom Query for executing a procedure by providing some input in integration.
If the action is successful, the
Execute Custom Query task's connectorOutputPayload response
parameter will have a value similar to the following:
 [{
    "EmpID": 1.0,
    "LastName": "Test",
    "FirstName": "Bcone",
    "Address": "Noida",
    "City": "UP"
  }]
Example - Create a procedure by providing inputs in integration
- In the
Configure Connectordialog, selectRegion, Connection and Actions. - Select
Execute Custom Queryfrom the actions, and then click Done. - In the Task Input section of Connector, click on
Edit Custom Scriptand then enter a value similar to the following in theCustom Queryfield:CREATE PROCEDURE SelectAllEmployees2 @EmpID int AS SELECT * FROM Employees WHERE EmpID = @EmpID
This example shows the Execute Custom Query for creating a procedure by providing inputs in integration.
If the action is successful, the
Execute Custom Query task's connectorOutputPayload response parameter returns a blank payload.
Entity operation examples
This section shows how to perform some of the entity operations in this connector.
Example - List all the records
- In the
Configure connector taskdialog, clickEntities. - Select numbers_table from the
Entitylist. - Select the
Listoperation, and then click Done.
Example - Get a record from an entity
- In the
Configure connector taskdialog, clickEntities. - Select numbers_table from the
Entitylist. - Select the
Getoperation, and then click Done. - Set the entity ID to Get single numbers_table. To set the entity ID, in
the Data Mapper section of the Data Mapping, click Open Data Mapping Editor and
then enter
1.0in the Input Value field and choose the EntityId as Local variable.
Example - Create a record
- In the
Configure connector taskdialog, clickEntities. - Select numbers_table from the
Entitylist. - Select the
Createoperation, and then click Done. - In the Data mapper section of the Task click
OpenDataMappingeditor and then enter a value similar to the following in thefield:{ "bigint_column": 1.2345678901234516E16, "usmallint_column": 124.0, "numeric_column": 987.664, "real_column": 67.88999938964847, "uint_column": 125.0, "ubigint_column": 1.2345678901234516E16, "decimal_column": 124.459, "smallint_column": 16.0, "int_column": 125.0, "floatn_column": 154.45, "tinyint_column": 127.0, "id": 20.0 }
Running this example, returns a response similar to the following in the Connector task's
connectorOutputPayloadoutput variable:{ "Success": true }
Example - Update a record
- In the
Configure connector taskdialog, clickEntities. - Select numbers_table from the
Entitylist. - Select the
Updateoperation, and then click Done. - Set the entity ID to Update a numbers_table. To set the entity ID, in
the Data mapper section of the Tasks, click entityId and
then enter
20.0in the given field. - In the Data mapper section of the Task click
OpenDataMappingeditor and then enter a value similar to the following in thefield:{ "uint_column": 128.0, "floatn_column": 154.95 }
Running this example, returns an empty payload on success.
Example - Delete data from a table
- In the
Configure connector taskdialog, clickEntities. - Select numbers_table from the
Entitylist. - Select the
Deleteoperation, and then click Done. - Set the entity ID to Delete numbers_table. To set the entity ID, in
the Data Mapper section of the Data Mapping, click Open Data Mapping Editor and
then enter
2.0in the Input Value field and choose the EntityId as Local variable.
Use the Sybase connection in an integration
After you create the connection, it becomes available in both Apigee Integration and Application Integration. You can use the connection in an integration through the Connectors task.
- To understand how to create and use the Connectors task in Apigee Integration, see Connectors task.
- To understand how to create and use the Connectors task in Application Integration, see Connectors task.
Get help from the Google Cloud community
You can post your questions and discuss this connector in the Google Cloud community at Cloud Forums.What's next
- Understand how to suspend and resume a connection.
- Understand how to monitor connector usage.
- Understand how to view connector logs.