SAP ERP
The SAP ERP connector lets you perform insert, delete, update, and read operations on SAP ERP data.
Supported editions
The SAP ERP connector can communicate with SAP R/3 systems using the following methods:
- Business Application Programming Interface (BAPIs)
- Remote Function Calls (RFCs)
- SAP Tables
- SAP Queries
- IDoc Messages
- SAP ECC
- SAP ERP
- SAP R/3
- SAP S/4 Hana on-premise
- SAP JCo version.
This connector requires two JCo files to be provided during connection creation:
sapjco3.jarandlibsapjco3.so(for Unix). You can download the JCo 3.1.5 version from the SAP Connectors site.
If the SAP system supports a RFC connection and the required RFCs are available, then the connection to the SAP system works. Other editions that support RFC connections might also be supported.
SAP Tables: SAP Tables are exposed as views automatically via the TableMode connection property. Specify the SAP Tables that you want to work with using the Views connection property, which overrides TableMode. SAP discourages directly modifying the tables. Instead, it is recommended to use BAPIs to modify any tabular data. Direct modification of SAP Tables isn't supported.
BAPIs and RFCs: BAPIs and RFCs are exposed directly as stored procedures. By default, all RFCs starting with the keyword BAPI are displayed as an available stored procedure.
IDoc: Intermediate Document (IDoc) files are SAP objects that carry business transaction data from one system to another in the form of an electronic message. IDocs transfer data from SAP to non-SAP systems via Electronic Data Interchange (EDI) systems.
For more information about these terms, see SAP glossary.
Before you begin
Before using the SAP ERP connector, do the following tasks:
- In your Google Cloud project:
- Ensure that network connectivity is set up. For information about network patterns, see Network connectivity.
- Grant the roles/connectors.admin IAM role to the user configuring the connector.
- Grant the following IAM roles to the service account that you want to use for the connector:
roles/secretmanager.viewerroles/secretmanager.secretAccessorroles/storage.objectViewer
A service account is a special type of Google account intended to represent a non-human user that needs to authenticate and be authorized to access data in Google APIs. If you don't have a service account, you must create a service account. The connector and the service account must belong to the same project. For more information, see Creating a service account.
- Enable the following services:
secretmanager.googleapis.com(Secret Manager API)connectors.googleapis.com(Connectors API)
To understand how to enable services, see Enabling services.
If these services or permissions have not been enabled for your project previously, you are prompted to enable them when configuring the connector.
If you enable event subscription, you must configure ABAP SDK. For information about configuring ABAP SDK, see Overview of the ABAP SDK for Google Cloud.
-
You must create a designated bucket and upload the following object IDs downloaded from the SAP ERP portal:
- JCo jar Cloud Storage path: The Cloud Storage path of the Java Connector (JCo) JAR file.
- libsapjco3 Cloud Storage path: The Cloud Storage path of the libsapjco3 JAR file.
Configure the connector
A connection is specific to a data source. It means that if you have many data sources, you must create a separate connection for each data source. To create a connection, do the following:
- In the Cloud console, go to the Integration Connectors > Connections page and then select or create a Google Cloud project.
- Click + Create new to open the Create Connection page.
-
In the Location section, choose the location for the connection.
- Region: Select a location from the drop-down list.
For the list of all the supported regions, see Locations.
- Click Next.
- Region: Select a location from the drop-down list.
- In the Connection Details section, complete the following:
- Connector: Select SAP ERP from the drop down list of available Connectors.
- Connector version: Select the Connector version from the drop down list of available versions.
- In the Connection Name field, enter a name for the Connection instance.
Connection names must meet the following criteria:
- Connection names can use letters, numbers, or hyphens.
- Letters must be lower-case.
- Connection names must begin with a letter and end with a letter or number.
- Connection names cannot exceed 49 characters.
- For connectors that support event subscription, the connection names cannot begin with the "goog" prefix.
- Optionally, enter a Description for the connection.
- Optionally, enable Cloud logging,
and then select a log level. By default, the log level is set to
Error. - Service Account: Select a service account that has the required roles.
- To use the connection for event subscriptions, select Enable event subscription. Selecting
this, displays the following options:
- Enable event subscription with entity and actions: Select this option to use the connection for both event subscription and connector operations (entities and actions).
- Enable only event subscription: Select this option to use the connection only for event subscription. If you select this option, click Next, and then configure event subscription.
- Client: The client authenticating to the SAP system.
- System Id: The System Id or R3Name of the SAP System is a string with a maximum of three characters. It is often used in load balancing connections.
- System Number: The number by which the target system is defined. Used when setting the Host connection property.
- Project ID: The ID of the Google Cloud project where the GCS bucket containing the SAP JCo jar resides.
- Bucket: The name of the bucket containing sapjco3.jar and libsapjco3.so files.
- JCo jar Cloud Storage path: Cloud Storage path of the JCo jar.
- libsapjco3 Cloud Storage path: Cloud Storage path of the libsapjco3 jar.
- Table mode: Select the SAP table to be displayed as a view.
- Read table function: Name of the function to be used for reading tables. For more information, see Use a custom read table function.
- System ID: The system ID or the R3Name of the SAP system. You can enter a maximum of 3 characters.
- Query mode: Select which SAP tables must be displayed as views.
-
Browsable views: Enter a comma separated list of views to be displayed.
For example,
ViewA,ViewB,ViewC. - Language: Set this property to the language you specify when you log into SAP. This property is a ISO 639-1 code for the language the SAP system uses. By default, EN will be used.
- Service entries: The service entries to be used for the connection.
-
SNC mode: Select this option to enable SNC for authentication between Integration Connectors and your SAP system. If you select this option, specify the following details:
- SNC_LIB object ID: Object ID of the SNC library.
- PSE name: Name of the Personal Security Environment (PSE) file that is applicable for the bucket. A PSE file stores the public and private key pair as well as X.509 certificates in a ASN.1 structure.
- SNC passcode: Select the Secret Manager secret of the SNC library passcode.
- Secret version: Select the secret version.
- SNC name: Enter a name for SNC connection.
-
SNC qop: Select a protection level. The following are the supported levels:
- 1 - Apply authentication only.
- 2 - Apply integrity protection. This also includes authentication protection.
- 3 - Apply privacy protection. This also includes integrity and authentication protection.
- 8 - Apply the default protection.
- 9 - Apply the maximum protection.
- SNC partner name: Enter the Application Server's SNC name.
-
Connection scheme: Specify whether you are connecting to an SAP system with a Message Server (Group Server) or Application Server. For information about the prerequisites that you must meet to connect to an SAP system with a Message Server, see Message Server (Group Server) connection type.
If you select GroupServer, then you must specify the following details:
- Message Server: Specify the Message Server when connecting to an SAP system that uses load balancing.
- Message Server Service: The Message Server service that you want to connect to.
- Group: The logon group that is used. You must specify this only when connecting to an SAP system that uses load balancing.
If you are connecting to an SAP system with a Message Server (Group Server), you don't need to specify the host address in the Destinations section.
- Optionally, configure the Connection node settings:
- Minimum number of nodes: Enter the minimum number of connection nodes.
- Maximum number of nodes: Enter the maximum number of connection nodes.
A node is a unit (or replica) of a connection that processes transactions. More nodes are required to process more transactions for a connection and conversely, fewer nodes are required to process fewer transactions. To understand how the nodes affect your connector pricing, see Pricing for connection nodes. If you don't enter any values, by default the minimum nodes are set to 2 (for better availability) and the maximum nodes are set to 50.
- Optionally, click + ADD LABEL to add a label to the Connection in the form of a key/value pair.
- Click Next.
- In the Destinations section, enter details of the remote host (backend system) you want to connect to. If you are connecting to an SAP system with Message Server, then you don't need to specify the host address.
- Destination Type: Select a Destination Type.
- Select Host address from the list to specify the hostname or IP address of the destination.
- If you want to establish a private connection to your backend systems, select Endpoint attachment from the list, and then select the required endpoint attachment from the Endpoint Attachment list.
If you want to establish a public connection to your backend systems with additional security, you can consider configuring static outbound IP addresses for your connections, and then configure your firewall rules to allowlist only the specific static IP addresses.
To enter additional destinations, click +Add destination.
- Click Next.
- Destination Type: Select a Destination Type.
-
In the Authentication section, enter the authentication details.
- Select an Authentication type and enter the relevant details.
The following authentication types are supported by the SAP ERP connection:
- X509 certificate based authentication
- Username and password
- Click Next.
To understand how to configure these authentication types, see Configure authentication.
- Select an Authentication type and enter the relevant details.
- If you have enabled the event subscription, the Event Subscription Details section appears on the connection creation page. To understand how to configure event subscription details, see Configure event subscription.
- Review: Review your connection and authentication details.
- Click Create.
Configure authentication
Enter the details based on the authentication you want to use.
-
X509Certificate Based Authentication
- X509Certificate: The X509 certificate that is used to login.
- Secret version: Select the secret version.
-
Username and password
- Username: Username for connector
- Password: Secret Manager Secret containing the password associated with the connector.
Configure for event subscription
If you enable event subscription, you must configure ABAP SDK. For information about configuring ABAP SDK, see Overview of the ABAP SDK for Google Cloud.
Enter the following values in the Event Subscription Details section:
-
Select any one of the following authentication types for the event listener.
- Google Authentication. If you enable this option, follow the steps in Authenticate by using JSON Web Tokens to configure the authentication for ABAP SDK. Also, ensure that the service account has roles/connectors.listener role whose access token is used for authentication.
- API Key Authentication. If you select this option, you must have created an API key, and then saved the key as a Secret Manager secret. For more information, see Create an API key.
-
Enter the event type field name. This field identifies the type of event associated with the
incoming event request.
{
"event_type": "user.created",
...
// other request fields
...
}
- Select Enable private connectivity for secured connectivity between your backend application and your connection. If you select this option, you must perform additional configuration steps after creating the connection. For more information, see Private connectivity for event subscription.
- Enter the dead-letter configuration. If you configure dead-letter, the connection writes
the unprocessed events to the specified Pub/Sub topic. Enter the following details:
- Dead-letter project ID: The Google Cloud project ID where you have configured the dead-letter Pub/Sub topic.
- Dead-letter topic: The Pub/Sub topic where you want to write the details of the unprocessed event.
Connection configuration samples
The following sections lists the sample values for the various fields when you create the SAP ERP connection and the parameters required for the different connection types.
Connecting to a distributed SAP System
If you connect to a distributed SAP system, such as a system using load balancing, you must specify the following additional connection properties. An administrator can obtain these connection properties on the Connection tab of the System Entry Properties dialog in the SAP system.
- System Id: Specify the value that you obtained from the SystemId property. The System Id is the System Id/R3Name of the SAP system. The system Id is a string with a maximum of three characters.
- Message Server: When you connect to an SAP system that uses load balancing, you must specify the Message Server field. Set this property to the value that you obtained from the MessageServer property in the SAP system. Also, prepend the value of the Message Server field with the value of the SAProuter box.
- Group: Set this property to the value that you obtained from the Group/Server property. The Group property specifies the logon group being used. The default value is PUBLIC.
Connecting to a Custom Application Server
If you connect to an SAP system with a dedicated Application Server or a custom Application Server, you must specify the following additional connection properties. An administrator can obtain these connection properties from the SAP system.
- System Id: Specify the value that you obtained from the SystemId property. This is the System Id or R3Name of the SAP system. The system Id is a string with a maximum of three characters.
- Host: Specify the value that you obtained from the Application Server.
This specifies the host name of the target system. This value can be a regular host name, IP address, or SAP router address.
- System Number: Specify the value that you obtained from the SystemNumber property.
The SystemNumber property defines the target system.
Configuring Secure Network Connections
If the administrator has configured Secure Network Communication (SNC), you must set the following additional properties. From the SAP system, you can obtain the following SNC connection string properties on the Network tab of the System Entry Properties dialog.
- SNC Mode: If the "Activate Secure Network Connections" checkbox is enabled in SAP, set the SNC Mode connection property to True. Else, set the SNC Mode connection property to False.
The SNCMode connection property is a boolean value that determines if you are using SNC. The default value is False.
- SNC PartnerName: The SNC PartnerName specifies the Application Server's SNC name. For example: p:CN=IDS, OU=IT, O=CSW, C=DE
- SNC Name: Optional. The SNCName property specifies the name of the SNC connection. Set this property to make sure that the correct SNC name is used for the connection.
- SNC Qop: Set this property to the selected option in the Secure Network Settings section. For example, if the Integrity option is selected, set the SNCQop property to 3.
The SNCQop property specifies the level (or quality) of data protection. If this property is not specified, the integer -1 is set for this property. Valid values are 1, 2, 3, 8, or 9, which correspond to the protection levels.
- SNC_Lib object ID: Set this property to the path and filename of your SNC library. Specify the full path to the security library you are using, such as
C:\Secude\secude.xll.
ApplicationServer connection type
For Application Server connectivity, the Private Service Connect and load balancer must be configured with the SAP system IP and port 33XX in the network endpoint group (NEG) and health check. Where XX is the system or instance number of the SAP system used. The following table lists the sample configuration values for the ApplicationServer connection type. Refer to the connection creation interface in the console to know the mandatory and optional fields.
| Field name | Sample value |
|---|---|
| Region | us-central1 |
| Connector | SAP ERP |
| Connector Version | 1 |
| Connector Name | saperp-applicationserver-conn |
| Description | NA |
| Service Account | xxxxxxxxx-compute@developer.gserviceaccount.com |
| Client | 800 |
| System Number | 00 |
| Project ID | xxxx-gcp-project |
| Bucket | sap-erp-bucket |
| Jco Jar object ID | sapjco3.jar |
| libsapjco3 object ID | libsapjco3.so |
| Table Mode | TransparentApplication/TransparentCustomer/TransparentSystem/Pooled/Cluster/None |
| Read Table Function | Z_CUSTOM_READ_TABLE |
| Connection Scheme | ApplicationServer |
| System Id | SA1 |
| Query Mode | NA |
| Browsable Views | NA |
| Verbosity Level | 5 |
| Minimum number of nodes | 2 |
| Maximum number of nodes | 50 |
| Host Address | 10.30.X.XX or Router string of an external SAP system. |
| Authentication | User Password |
| Username | 12345 |
| Password | xyz@12345 |
| versions | 1 |
Message Server (Group Server) connection type
Before you connect to an SAP system with a Message Server (Group Server), ensure that the following prerequisites are met:- The Private Service Connect and load balancer must be configured with the SAP system IP on port 33XX and 36XX in the network endpoint group (NEG) and health check. Where XX is the system or instance number of the SAP system used.
- You must create a DNS Zone on Cloud DNS and map the endpoint attachment of the Application Server, which is configured on 33XX port with the hostname of SAP system.
- You can connect to an SAP system with a Message Server (Group Server) only if the Message Server returns the fully qualified domain name (FDQN) address of the Application Server. You can't connect to an SAP system with a Message Server (Group Server) if the Message Server returns the IP address.
- The Message Server must respond with the DNS of Application Servers the application needs to connect when the application requests.
- The DNS of Application Servers must be unique and not be used by any other SAP system.
- In the SAP application, the endpoint attachment IPs for the Application Servers and Message Servers must be maintained under gw/alternative_hostnames parameters.
- Go to Tcode - RZ10 and make an entry for the "gw/alternative_hostname" parameter in the instance profile.
- Set the
ms/lg\_with\_hostnameparameter to 1 to configure SAP message server versions earlier than 7.53 to return hostnames. Versions 7.53 and later return hostnames by default. - Restart the SAP application to make the parameters effective.
The following table lists the sample configuration values for the Group Server connection type:
| Field name | Sample value |
|---|---|
| Region | us-central1 |
| Connector | SAP ERP |
| Connector Version | 1 |
| Connector Name | saperp-groupserver-conn |
| Description | NA |
| Service Account | SA-compute@developer.gserviceaccount.com |
| Client | 800 |
| System Number | 00 |
| Project ID | Google-cloud-project |
| Bucket | sap-erp-bucket |
| Jco Jar object ID | sapjco3.jar |
| libsapjco3 object ID | libsapjco3.so |
| Table Mode | TransparentApplication/TransparentCustomer/TransparentSystem/Pooled/Cluster/None |
| Group | PUBLIC |
| Message Server | 10.30.X.XX |
| Read Table Function | Z_CUSTOM_READ_TABLE |
| Connection Scheme | GroupServer |
| System Id | SA1 |
| Query Mode | NA |
| Browsable Views | NA |
| Verbosity Level | 5 |
| Minimum number of nodes | 2 |
| Maximum number of nodes | 50 |
| Authentication | User Password |
| Username | USERNAME |
| Password | PASSWORD |
| versions | 1 |
X509 certificate connection type
For Secure Network Communications (SNC) with X509 connectivity, the Private Service Connect and load balancer must be configured with the SAP system IP and port 48XX in the network endpoint group (NEG) and health check. Where XX is the system or instance number of the SAP system used. The following table lists the sample configuration values for the X509 certificate connection type. Refer to the
connection creation interface in the console to know the mandatory and optional fields.
Configure SNC on a Linux system
Ensure you have the following files before starting the SNC on a Linux system:
- The SAP system certificate file, such as
SA1cert.crt. - The appropriate SAPCAR file version to generate the .PSE file, such as
SAPCAR.exe. - The
.SAR filethat contains the dll files in the libraries oflibsapcrypto.soandsapgenpse, such asSAPCRYPTOLIBP_*.SAR.
- Create a directory named
sncin your desired location and copy all the files mentioned above into the directory. Here, thesncdirectory is created at the location/home/admin/snc. Use terminal/VM/SSH client, such as PuTTY, to create the directory. - Run the following command to extract the SAR archive and the
sapgenpseandlibsapcrypto.sobinaries:./SAPCAR.exe -xvf SAPCRYPTOLIBP_8524-20011697.SAR. - Generate the Personal Security Environment (PSE) file using the command:
./sapgenpse get_pse -p EHP8_GCP_SA1.pse -x google,123.You will be prompted to enter the PSE name in the following format:
CN=EHP8_GCP_SA1, OU=IT, O=CSW, C=DE. Here,EHP8_GCP_SA1is the name provided by you and PSE.You will also be prompted to enter a PASSPHRASE, which serves as a password and must be noted for future reference.
The SNC PSE contains the server's security information to use for securing the SNC connection. This information includes the server's public and private key and the corresponding certificate list.
If you receive an error, such as
SECUDIR is not set, run the following command:SECUDIR=/home/admin/snc; export SECUDIR. - Export the client certificate from the newly created PSE file:
./sapgenpse export_own_cert -o EHP8_GCP_SA1.crt -p EHP8_GCP_SA1.pse -x google,123. This command generates the client certificateEHP8_GCP_SA1.crt, which contains the public key for the SNC identity.Here, you need to provide the certificate name. It is recommended to keep the PSE name and the client certificate name the same.
- Link the system certificate to the PSE:
./sapgenpse maintain_pk -a SA1cert.crt -p EHP8_GCP_SA1.pse, This associates the SAP system's certificate (SA1cert.crt) with the local PSE. - Import the client certificate on the SAP system with the help of the BASIS team and map with the user for X509 certificate connection type.
EHP8_GCP_SA1.crt: This is the public certificate used for establishing a trusted connection from the SAP system to Google Cloud. It ensures the authenticity of the communicating service account.EHP8_GCP_SA1.pse: The Personal Security Environment (PSE) file stores the private key and certificate information required for secure communication in the SAP NetWeaver environment. This file is critical for SSL/TLS-based connections.SA1cert.crt: An additional certificate, potentially for intermediate or root CA verification, used to complete the trust chain during certificate validation. This ensures that SAP can verify the authenticity of the GCP service account or related endpoints.libsapcrypto.so: The SAP Cryptographic Library shared object file (Linux/Unix environments) is required for enabling secure communication (SSL, SNC) within SAP. It provides cryptographic functions, such as encryption and certificate handling.libsapjco3.so: Native library file for the SAP Java Connector (JCo). This is essential for enabling Java-based applications or middleware to communicate with SAP systems.sapgenpse: The SAP command-line tool used to manage PSE files, certificates, and cryptographic operations. This utility is crucial for generating and maintaining secure identities in SAP environments.sapjco3.jar: The Java archive file for the SAP Java Connector. This enables Java applications to call SAP functions via Remote Function Calls (RFC). It's required for any Java-based integration with SAP.- Log in to SAP GUI and open t-code
STRUST. - Go to
SNC (SAPCRYPTOLIB). - In some systems, you might need to switch
Display Changemode. Click Import button at the bottom of the page. - Browse and select a valid client PSE name. Select file format as Binary
- Click Add to Certificate List and Save.
- Log in to SAP GUI and open t-code
SM30 - Map the certificate to the table
VSNCSYSACLusing the following steps:- Open the table
VSNCSYSACLfor maintenance. - Choose external type work area as
E. - Choose New Entries.
- Enter the following data in the corresponding fields:
- System ID: The name of the SAP system.
- SNC Name: The subject name associated with the client certificate (add
p:before the certificate)
Example:p:CN=QAEHP8ER8, OU=IT, O=CSW, C=DE.
- Save the data.
- Open the table
- Map the certificate to the table
VUSREXTIDusing the following steps:- Open the table
VUSREXTIDfor maintenance. - Choose the work area as
DN. - Choose New Entries
- Enter the data in the corresponding fields as explained below:
- User: Enter the user ID to which the certificate needs to be mapped.
- Sequence Number: Enter the SAP client number.
- SNC Name: Enter the subject name associated with the client certificate.
Example:CN=QAEHP8ER8, OU=IT, O=CSW, C=DE - Activated: Select this option
- Save the data.
- Open the table
- Repeat the same process for X.
- Login into SAP GUI and open t-code
SU01 - In the user field, enter the SAP username to which you want to grant permissions to execute the SNC functions.
- Click the Change icon.
- Click the SNC tab.
- In the SNC name field, enter the client PSE Distinguished Name prefixed by
p:as in the example below.
Example:p:CN=QAEHP8ER8, OU=IT, O=CSW, C=DE - Click OK and Save. A message appears stating that the canonical name is determined.
The file names created in the previous steps, the file names uploaded to the target storage bucket, and the file names specified in the connection configuration must all be identical to ensure proper integration and data access.
Required files in Cloud Storage bucket
The following files are required to be stored in the Cloud Storage bucket to facilitate secure communication between SAP systems and Google Cloud services. These files are essential for establishing trusted connections, enabling encryption, and supporting SAP's cryptographic and Java communication libraries:
SAP GUI configuration
Follow these steps to import the client-generated certificate:
SAP Settings for X.509
The certificate must be mapped to the following tables:
User mapping configuration
| Field name | Sample value |
|---|---|
| Region | us-central1 |
| Connector | SAP ERP |
| Connector Version | 1 |
| Connector Name | saperp-X509Certificate-conn |
| Description | NA |
| Service Account | xxxxxxxxx-compute@developer.gserviceaccount.com |
| Client | 800 |
| System Number | 00 |
| Project ID | xxxx-gcp-project |
| Bucket | sap-erp-bucket |
| Jco Jar object ID | sapjco3.jar |
| libsapjco3 object ID | libsapjco3.so |
| Table Mode | TransparentApplication/TransparentCustomer/TransparentSystem/Pooled/Cluster/None |
| SNC_LIB object ID | libsapcrypto.so |
| PSE Name to create cred_v2 file | EHP8_GCP_SA1.pse |
| Read Table Function | Z_CUSTOM_READ_TABLE |
| Connection Scheme | ApplicationServer |
| System Id | SA1 |
| SNC passcode | xyz@gcp |
| SNC Mode | A boolean determining if you are using SNC. Set this to true to use SNC. |
| SNC Name | p:CN=EHP8_GCP_SA1, OU=IT, O=CSW, C=DE |
| SNC Qop | 3 |
| SNC PartnerName | p:CN=SA1, OU=I0020070395, OU=SAP Web AS, O=SAP Trust Community, C=DE |
| Query Mode | NA |
| Browsable Views | NA |
| Verbosity Level | 5 |
| Minimum number of nodes | 2 |
| Maximum number of nodes | 50 |
| Host Address | 10.30.X.XX or Router String of External SAP System. |
| Authentication | X509Certificate Based Authentication |
| X509Certificate | The X509 certificate may be specified using a file path pointing to a file containing an X509 certificate in PEM format, a PEM blob beginning with the "-----BEGIN ..." header, or a PEM blob without the "-----BEGIN ..." header. |
| versions | 1 |
If the SNC connection does not become active after completing all steps:
- Ensure the endpoint attachment IP is added to the SAP profile parameter
gw/alternative_hostnames. - For SNC connections to on-premises SAP systems, the SAP Gateway typically listens on port
48XX, whereXXis the instance number.
The SNC Name and PartnerName should start with the prefix p: when specifying them in the connection configuration.
X509Certificate Authentication: Import the client certificate that was previously generated and is already available on the SAP system.
System limitations
The SAP ERP connector can process 7 transactions per second, per node, and throttles any transactions beyond this limit. By default, Integration Connectors allocates 2 nodes (for better availability) for a connection.
For information on the limits applicable to Integration Connectors, see Limits.
Use the SAP ERP connection in an integration
After you create the connection, it becomes available in both Apigee Integration and Application Integration. You can use the connection in an integration through the Connectors task.
- To understand how to create and use the Connectors task in Apigee Integration, see Connectors task.
- To understand how to create and use the Connectors task in Application Integration, see Connectors task.
Entities, operations, and actions
All the Integration Connectors provide a layer of abstraction for the objects of the connected application. You can access an application's objects only through this abstraction. The abstraction is exposed to you as entities, operations, and actions.
- Entity: An entity can be thought of as an object, or a collection of properties, in the
connected application or service. The definition of an entity differs from a connector to a
connector. For example, in a database connector, tables are the entities, in a
file server connector, folders are the entities, and in a messaging system connector,
queues are the entities.
However, it is possible that a connector doesn't support or have any entities, in which case the
Entitieslist will be empty. - Operation: An operation is the activity that you can perform on an entity. You can perform
any of the following operations on an entity:
Selecting an entity from the available list, generates a list of operations available for the entity. For a detailed description of the operations, see the Connectors task's entity operations. However, if a connector doesn't support any of the entity operations, such unsupported operations aren't listed in the
Operationslist. - Action: An action is a first class function that is made available to the integration
through the connector interface. An action lets you make changes to an entity or entities, and
vary from connector to connector. Normally, an action will have some input parameters, and an output
parameter. However, it is possible
that a connector doesn't support any action, in which case the
Actionslist will be empty.
Actions
This section provides information about the RFCs and lists the actions supported by the connector. To understand how to configure the actions, see Action examples.
Using RFCs
This section provides information about the required RFCs and using the RFCs.
Required RFCs
If any of the required RFCS are not available, then some or all functionality might not work. T-Code SE37 can be used to view available function modules in SAP.
The following RFCs are used by the SAP ERP connector.
- DDIF_FIELDINFO_GET
- RFC_GET_FUNCTION_INTERFACE
- RFC_GET_STRUCTURE_DEFINITION
- RFC_GET_SYSTEM_INFO
- RFC_GET_UNICODE_STRUCTURE
- RFC_READ_TABLE
- SLDAG_CHECK_FOR_UNICODE
Read large data
This section describes the approach that you need to follow to read large data from your SAP backend.
The SAP ERP connector uses the SAP RFC_READ_TABLE function to get data from SAP tables,
and this function has a fixed size of 512 bytes. It can buffer for each row of data, and thus
you cannot select more columns than the amount that would fit in this buffer. If you select
more than 512 bytes, the DATA_BUFFER_EXCEEDED exception will occur
when running your integration; indicating that you have exceeded the maximum
buffer size allowed per row, and need to select fewer columns.
To overcome this issue, you can include the code for a
Custom RFC_READ_TABLE, which is similar to the SAP RFC_READ_TABLE, but with a larger buffer to address the
DATA_BUFFER_EXCEEDED issue.
Using a custom read-table function
The connector supports a Custom RFC_READ_TABLE that is similar to the
SAP RFC_READ_TABLE but has a larger buffer so that
it can address the DATA_BUFFER_EXCEEDED issue.
Create a custom RFC_READ_TABLE in your SAP backend
Follow the steps below to use the sample custom RFC_READ_TABLE.
- Use the
RFC_READ_TABLEfunction as a template for the new function: Select transaction code SE37 and the SDTX Function Group and copyRFC_READ_TABLEto a new function group or your working function group. In this example,RFC_READ_TABLEis copied to theZ_CUSTOM_RFC_TABLE. - In the Attributes tab of the SAP page, select Remote Enabled Module.
- In the Tables tab, set the
DATAparameter toCHAR8000(you may need to right-click, and then click Display -> Change). - In the Source Code tab, enter the custom read-table RFC code. For reference, see sample Z_CUSTOM_RFC_TABLE_function.txt.
- Click Save.
- Define the imports, tables, and exceptions as documented in the provided custom read table.
- Activate the function module.
Custom read-table for ABAP 7.52
If you are using ABAP 7.52 or above, refer to the sample Z_CUSTOM_RFC_TABLE_function_ABAP752.txt.
The sample function is designed for ABAP version 7.52 and above. It is similar to the Z_CUSTOM_RFC_TABLE function,
but it takes advantage of newly available keywords in ABAP 7.52 to perform pagination within
the database instead of in the ABAP script itself. This makes pagination far more efficient,
and improves the performance when working with large tables. It is recommended to use the
Z_CUSTOM_RFC_TABLE_752 RFC when possible.
Access to RFC_READ_TABLE function
This section provides information about the role to be assigned to an SAP user to access RFC_READ_TABLE function. This function is a remote-enabled function module that allows generic read access to arbitrary tables.
For the tables to be listed under Entities while configuring the SAP ERP Connectors task, you must use the RFC_READ_TABLE function in SAP ERP Connection level and authorized to access the R/3 function RFC_READ_TABLE
Add authorization S_TABU_DIS for activity 03 (display) and auth. group 'SC' for the function RFC_READ_TABLE.
The following are some of the technical limitations of RFC_READ_TABLE:
- Only tables with simple data types can be read. There is no support forSTRING or XSTRING fields.
- The maximum line width is 512 characters.
- Number of returned records is limited by memory thresholds.
BAPI_MATERIAL_SAVEDATA action
This action let you perform specific tasks. For example, you can use it to create or change material master data in SAP ERP.
Input parameters of the BAPI_MATERIAL_SAVEDATA action
| Parameter Name | Data Type | Required | Description |
|---|---|---|---|
| HEADDATA | String | Yes | The input parameter HEADDATA. |
| CLIENTDATA | String | Yes | The input parameter CLIENTDATA. |
| CLIENTDATAX | String | Yes | The input parameter CLIENTDATAX. |
| MATERIALDESCRIPTION | String | Yes | The table MATERIALDESCRIPTION. |
Output parameters of the BAPI_MATERIAL_SAVEDATA action
This action returns the status 200 (OK) if the action is successful.
For example on how to configure the BAPI_MATERIAL_SAVEDATA action, see Action examples.
ZFM_GCP_MULTIDATA_TAB action
This action let users perform specific tasks. For example, you can create multi datatype data in SAP ERP.
Input parameters of the ZFM_GCP_MULTIDATA_TAB action
| Parameter Name | Data Type | Required | Description |
|---|---|---|---|
| ReturnTables | String | Yes | A comma separated list that specifies which tables in the function module should be output. If not specified, all returned tables will be output. |
| T_TABLE | String | Yes | The table T_TABLE. |
| IM_INPUT_1 | String | Yes | The input parameter IM_INPUT_1. |
| IM_INPUT_2 | String | Yes | The input parameter IM_INPUT_2. |
Output parameters of the ZFM_GCP_MULTIDATA_TAB action
This action returns the status 200 (OK) if the action is successful.
For example on how to configure the ZFM_GCP_MULTIDATA_TAB action,
see Action examples.
PushIDoc Action
This action let you perform specific tasks. For example, you can transfer data from SAP to an external system.
Input parameters of the PushIDoc action
| Parameter Name | Data Type | Required | Description |
|---|---|---|---|
| FileType | String | Yes | The file type.The allowed values are XML, IDoc. |
| Mode | String | Yes | The transfer mode.The allowed values are Sync, ASync. |
| Content | String | Yes | Content of the file. |
Output parameters of the PushIDoc action
This action returns the status 200 (OK) if the action is successful.
For example on how to configure the PushIDoc action,
see Action examples.
ExecuteCustomQuery action
This action lets you execute a custom query.
To create a custom query, follow these steps:
- Follow the detailed instructions to add a connectors task.
- When you configure the connector task, in the type of action you want to perform, select Actions.
- In the Action list, select Execute custom query, and then click Done.
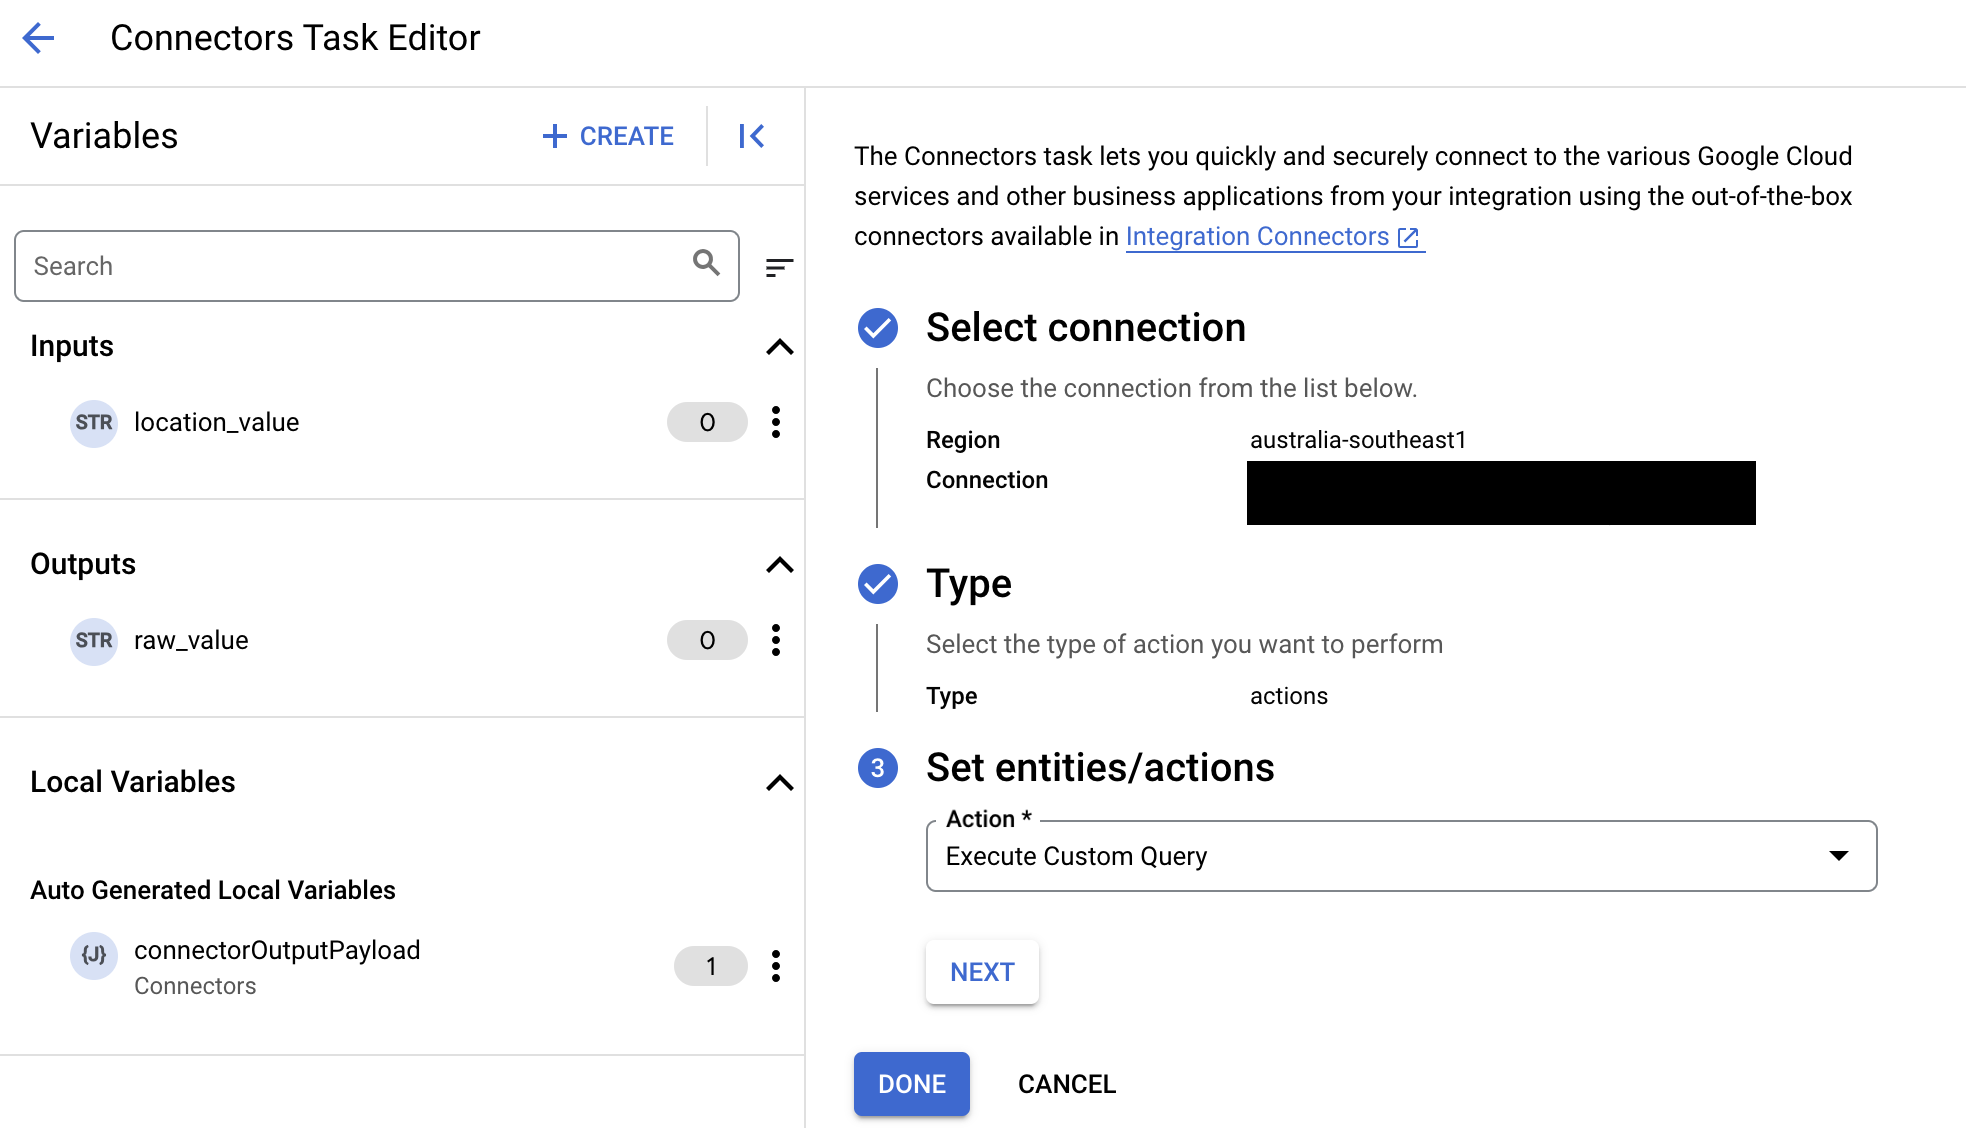
- Expand the Task input section, and then do the following:
- In the Timeout after field, enter the number of seconds to wait till the query executes.
Default value:
180seconds. - In the Maximum number of rows field, enter the maximum number of rows to be returned from the database.
Default value:
25. - To update the custom query, click Edit Custom Script. The Script editor dialog opens.
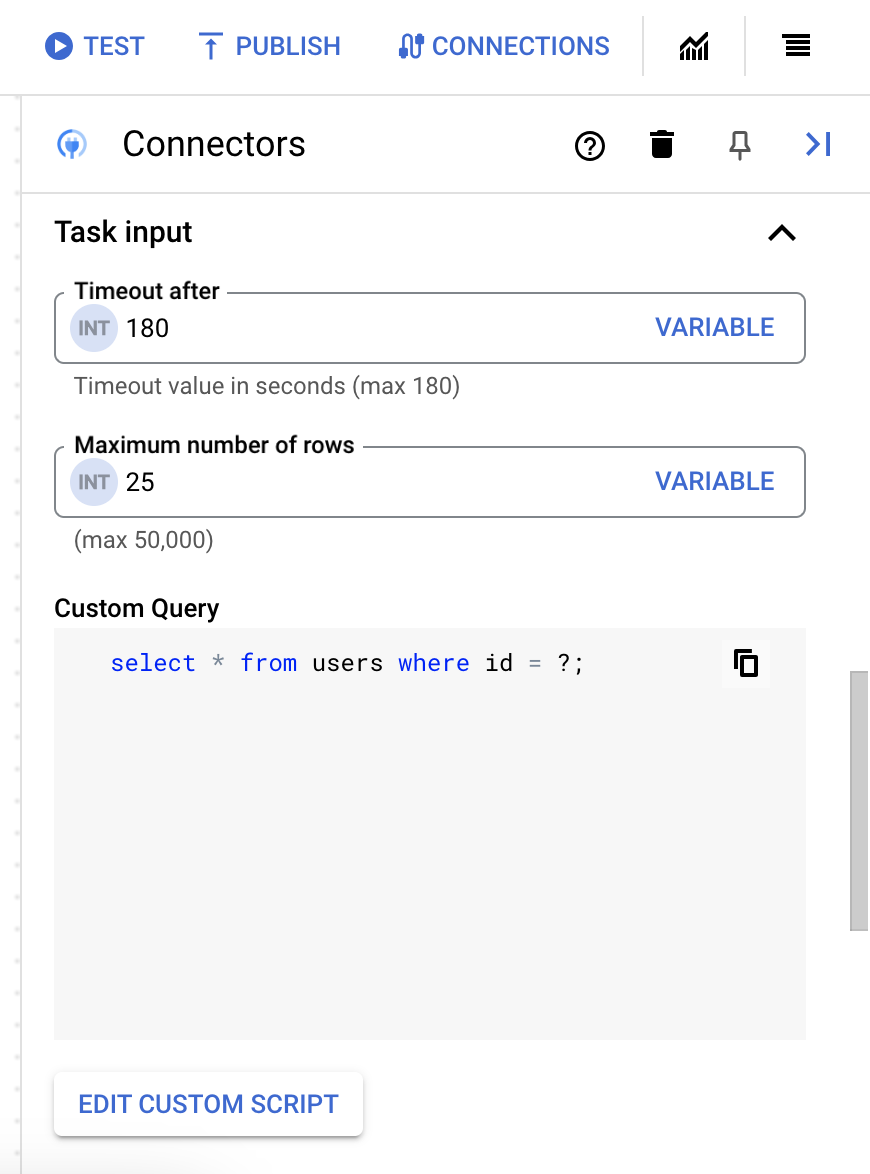
- In the Script editor dialog, enter the SQL query and click Save.
You can use a question mark (?) in a SQL statement to represent a single parameter that must be specified in the query parameters list. For example, the following SQL query selects all rows from the
Employeestable that matches the values specified for theLastNamecolumn:SELECT * FROM Employees where LastName=?
- If you've used question marks in your SQL query, you must add the parameter by clicking + Add Parameter Name for each question mark. While executing the integration, these parameters replace the question marks (?) in the SQL query sequentially. For example, if you have added three question marks (?), then you must add three parameters in order of sequence.
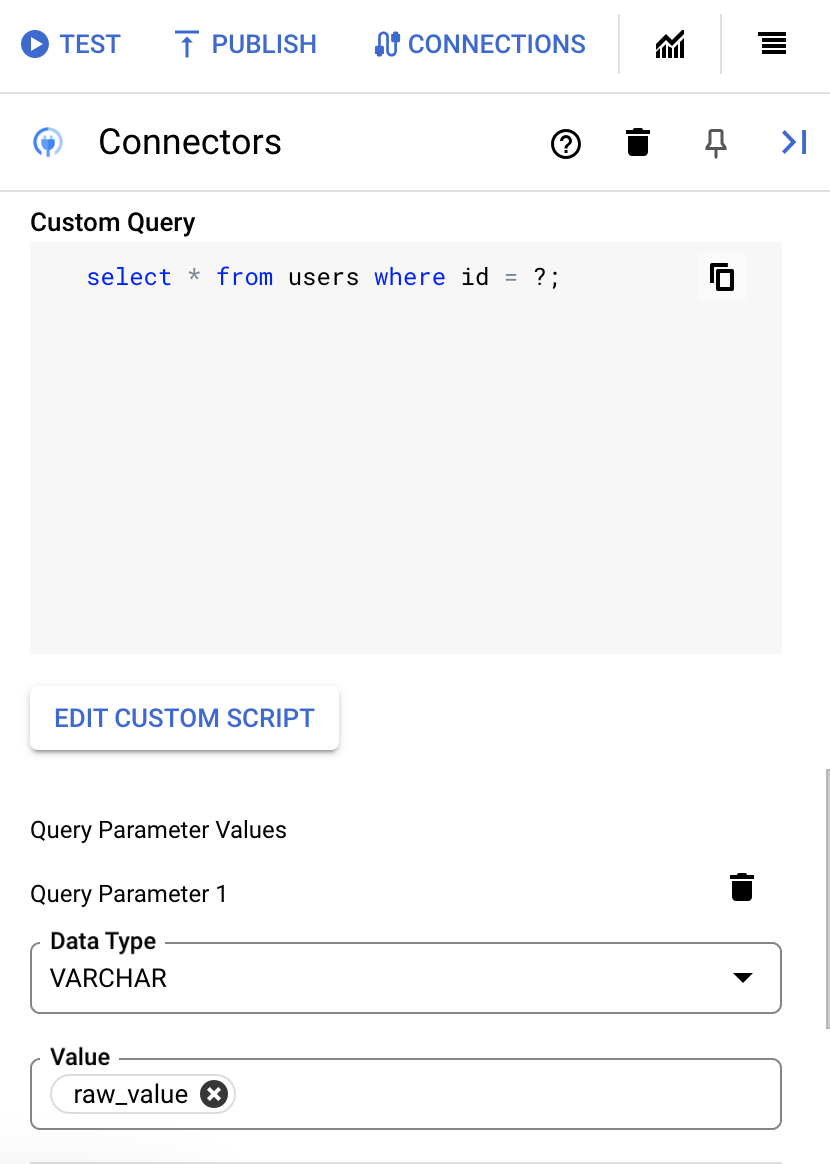
To add query parameters, do the following:
- From the Type list, select the data type of the parameter.
- In the Value field, enter the value of the parameter.
- To add multiple parameters, click + Add Query Parameter.
The Execute custom query action does not support array variables.
- In the Timeout after field, enter the number of seconds to wait till the query executes.
On successful execution, this action returns the status 200 (OK) with a response body that has the query results.
Action examples
Example - Create a record
This example creates a material record by using the BAPI_MATERIAL_SAVEDATA action.
- In the
Configure connector taskdialog, clickActions. - Select the
BAPI_MATERIAL_SAVEDATAaction, and then click Done. - In the Task Input section of the Connectors task, click
connectorInputPayloadand then enter a value similar to the following in theDefault Valuefield:{ "HEADDATA": "{\"MATERIAL\":\"000000000000009001\",\"IND_SECTOR\":\"M\",\"MATL_TYPE\":\"HALB\",\"BASIC_VIEW\":\"X\"}", "CLIENTDATA" : "{\"MATL_GROUP\":\"00107\",\"BASE_UOM\":\"KG\"}", "CLIENTDATAX" : "{\"MATL_GROUP\":\"X\",\"BASE_UOM\":\"X\"}", "MATERIALDESCRIPTION" : "{\"LANGU\":\"E\",\"MATL_DESC\":\"Classification Google\"}" }
If the action is successful, the
BAPI_MATERIAL_SAVEDATA task's connectorOutputPayload response
parameter will have a value similar to the following:
[{
"RETURN_TYPE": "S",
"RETURN_ID": "MM",
"RETURN_NUMBER": 356,
"RETURN_MESSAGE": "The material 9001 has been created or extended",
"RETURN_LOG_NO": "",
"RETURN_LOG_MSG_NO": 0,
"RETURN_MESSAGE_V1": "9001",
"RETURN_FIELD": "",
"RETURN_SYSTEM": "T90CLNT090",
"RESULT_TABLE": null
}]
Example - Update a record
This example updates a material record by using the BAPI_MATERIAL_SAVEDATA action.
- In the
Configure connector taskdialog, clickActions. - Select the
BAPI_MATERIAL_SAVEDATAaction, and then click Done. - In the Task Input section of the Connectors task, click
connectorInputPayloadand then enter a value similar to the following in theDefault Valuefield:{ "HEADDATA": "{\"MATERIAL\":\"000000000000009000\",\"IND_SECTOR\":\"A\",\"MATL_TYPE\":\"FHMI\",\"BASIC_VIEW\":\"X\"}", "CLIENTDATA": "{\"MATL_GROUP\":\"013\",\"BASE_UOM\":\"ST\"}", "CLIENTDATAX": "{\"MATL_GROUP\":\"X\",\"BASE_UOM\":\"X\"}", "MATERIALDESCRIPTION": "{\"LANGU\":\"E\",\"MATL_DESC\":\"Classification Googlecloud\"}" }
If the action is successful, the
BAPI_MATERIAL_SAVEDATA task's connectorOutputPayload response
parameter will have a value similar to the following:
[{
"RETURN_TYPE": "S",
"RETURN_ID": "MM",
"RETURN_NUMBER": 356,
"RETURN_MESSAGE": "The material 9000 has been created or extended",
"RETURN_LOG_NO": "",
"RETURN_LOG_MSG_NO": 0,
"RETURN_MESSAGE_V1": "9000",
"RETURN_PARAMETER": "",
"RETURN_ROW": 0,
"RETURN_FIELD": "",
"RETURN_SYSTEM": "T90CLNT090",
"RESULT_TABLE": null
}]
Example - Delete a record
This example deletes a material record by using the BAPI_MATERIAL_SAVEDATA action.
- In the
Configure connector taskdialog, clickActions. - Select the
BAPI_MATERIAL_SAVEDATAaction, and then click Done. - In the Task Input section of the Connectors task, click
connectorInputPayloadand then enter a value similar to the following in theDefault Valuefield:{ "HEADDATA": "{\"MATERIAL\":\"000000000000009000\",\"BASIC_VIEW\":\"X\"}", "CLIENTDATA": "{\"DEL_FLAG\":\"X\"}", "CLIENTDATAX": "{\"DEL_FLAG\":\"X\"}" }
If the action is successful, the
BAPI_MATERIAL_SAVEDATA task's connectorOutputPayload response
parameter will have a value similar to the following:
[{
"RETURN_TYPE": "S",
"RETURN_ID": "MM",
"RETURN_NUMBER": 356,
"RETURN_LOG_NO": "",
"RETURN_LOG_MSG_NO": 0,
"RETURN_MESSAGE_V1": "9000",
"RETURN_PARAMETER": "",
"RETURN_ROW": 0,
"RETURN_FIELD": "",
"RETURN_SYSTEM": "T90CLNT090",
"RESULT_TABLE": null
}]
Example - Create multidata type data
This example creates multidata type data by using the ZFM_GCP_MULTIDATA_TAB action.
- In the
Configure connector taskdialog, clickActions. - Select the
ZFM_GCP_MULTIDATA_TABaction, and then click Done. - In the Task Input section of the Connectors task, click
connectorInputPayloadand then enter a value similar to the following in theDefault Valuefield:{ "T_TABLE": "{\"ZACCP\":\"111\",\"ZCHAR\":\"CHARACTER1\",\"ZCLNT\":\"100\",\"ZCUKY\":\"INR\",\"ZCURR\": 200,\"ZDATS\": \"20231213\",\"ZINT1\": 45,\"ZINT2\":54,\"ZDEC\": 0.12,\"ZFLTP\": 1234,\"ZLANG\":\"E\",\"ZNUMC\":\"110\",\"ZPREC\": 3,\"ZQUAN\": 188.0,\"ZRAW\":\"01010008010101050401\",\"ZTIMS\": \"103056\",\"ZUNIT\":\"11\",\"ZINT4P\": 45,\"ZINT4\": 54,\"ZLRAW\":\"0101000801010105040100030101010300040000\"}", "IM_INPUT_1": "{\"ZACCP\":\"222\",\"ZCHAR\":\"CHARACTER1\",\"ZCLNT\":\"100\",\"ZCUKY\":\"INR\",\"ZCURR\": 200,\"ZDATS\": \"20231213\",\"ZINT1\": 45,\"ZINT2\":54,\"ZDEC\": 0.12,\"ZFLTP\": 1234,\"ZLANG\":\"E\",\"ZNUMC\":\"110\",\"ZPREC\": 3,\"ZQUAN\": 188.0,\"ZRAW\":\"01010008010101050401\",\"ZTIMS\": \"103056\",\"ZUNIT\":\"11\",\"ZINT4P\": 45,\"ZINT4\": 54,\"ZLRAW\":\"0101000801010105040100030101010300040000\"}", "IM_INPUT_2": "{\"ZSTRING\": \"HI Google\",\"ZSSTRING\": \"HI Google How are you\"}" }
If the action is successful, the
ZFM_GCP_MULTIDATA_TAB task's connectorOutputPayload response
parameter will have a value similar to the following:
[{
"EX_OUTPUT_1_ZACCP": 222,
"EX_OUTPUT_1_ZCHAR": "CHARACTER1",
"EX_OUTPUT_1_ZCLNT": "100",
"EX_OUTPUT_1_ZCUKY": "INR",
"EX_OUTPUT_1_ZCURR": 200,
"EX_OUTPUT_1_ZDATS": "2023-12-13",
"EX_OUTPUT_1_ZRAW": "01010008010101050401",
"EX_OUTPUT_1_ZTIMS": "10:30:56",
"EX_OUTPUT_1_ZUNIT": "11",
"EX_OUTPUT_1_ZINT4P": 45,
"EX_OUTPUT_1_ZINT4": 54,
"EX_OUTPUT_1_ZLRAW": "0101000801010105040100030101010300040000\u0000",
"EX_OUTPUT_2_ZSTRING": null,
"EX_OUTPUT_2_ZSSTRING": null,
"RESULT_TABLE": null,
"T_TABLE_ZACCP": null,
"T_TABLE_ZCHAR": null,
"T_TABLE_ZCLNT": null,
"T_TABLE_ZQUAN": null,
"T_TABLE_ZRAW": null,
"T_TABLE_ZTIMS": null,
"T_TABLE_ZUNIT": null
},{
"EX_OUTPUT_1_ZACCP": null,
"EX_OUTPUT_1_ZCHAR": null,
"EX_OUTPUT_1_ZCLNT": null,
"EX_OUTPUT_1_ZCUKY": null,
"EX_OUTPUT_1_ZRAW": null,
"T_TABLE_ZLANG": null,
"T_TABLE_ZNUMC": null,
"T_TABLE_ZPREC": null,
"T_TABLE_ZQUAN": null,
"T_TABLE_ZRAW": null,
"T_TABLE_ZTIMS": null,
"T_TABLE_ZUNIT": null
},{
"EX_OUTPUT_1_ZACCP": null,
"EX_OUTPUT_1_ZCHAR": null,
"EX_OUTPUT_1_ZCLNT": null,
"EX_OUTPUT_1_ZCUKY": null,
"EX_OUTPUT_1_ZCURR": null,
"EX_OUTPUT_1_ZDATS": null,
"EX_OUTPUT_1_ZDEC": null,
"EX_OUTPUT_1_ZQUAN": null,
"T_TABLE_ZNUMC": 110,
"T_TABLE_ZPREC": 3,
"T_TABLE_ZQUAN": 188,
"T_TABLE_ZRAW": "01010008010101050401",
"T_TABLE_ZTIMS": "10:30:56",
"T_TABLE_ZUNIT": "11"
}]
Example - Push an IDoc
This example pushes an IDoc to the SAP ERP.
- In the
Configure connector taskdialog, clickActions. - Select the
PushIDocaction, and then click Done. - In the Task Input section of the Connectors task, click
connectorInputPayloadand then enter a value similar to the following in theDefault Valuefield:{ "Content": "\n\n\n EDI_DC40\n 800\n 0000000008604824\n 740\n 53\n 2\n \n MATMAS05\n MATMAS\n ZLS_QA23\n LS\n ZLS_QA23\n SAPSA1\n LS\n SA1CLNT800\n 20230218\n 232556\n\n\n 005\n 000000000000000012\n 20170328\n 42039\n 20170727\n 42039\n KLVC\n FERT\n M\n 02\n BG\n 000\n 002\n 0.000\n 0.000\n KGM\n 0.000\n 0001\n 0.000\n 0.000\n 0.000\n 0.000\n 0.000\n", "FileType": "XML", "Mode": "ASync" }
. If the action is successful, the
PushIDoc task's connectorOutputPayload response
parameter will have a value similar to the following:
[{
"Result": "Success",
"Message": "Push IDoc success"
}]
Entity operation examples
This section shows how to perform some of the entity operations in this connector.
Example - List all the records
This example lists all the records in the T001 entity.
- In the
Configure connector taskdialog, clickEntities. - Select
T001from theEntitylist. - Select the
Listoperation, and then click Done. - Optionally, in Task Input section of the Connectors task, you can filter your result set by specifying a filter clause. Specify the filter clause value always within the single quotes (').
Example - Get a record from an entity
This example gets a record with the specified ID from the T001 entity.
- In the
Configure connector taskdialog, clickEntities. - Select
T001from theEntitylist. - Select the
Getoperation, and then click Done. - In the Task Input section of the Connectors task, click EntityId and
then enter
0001in the Default Value field.Here,
0001is a unique record ID in theT001entity.
Create connections using Terraform
You can use the Terraform resource to create a new connection.
To learn how to apply or remove a Terraform configuration, see Basic Terraform commands.
To view a sample terraform template for connection creation, see sample template.
When creating this connection by using Terraform, you must set the following variables in your Terraform configuration file:
| Parameter name | Data type | Required | Description |
|---|---|---|---|
| client | STRING | True | The client authenticating to the SAP system. |
| group | STRING | False | The Logon Group being used. This typically only needs to be specified when connecting to an SAP system that uses load balancing. |
| message_server | STRING | False | The message server must be specified when connecting to an SAP system that uses load balancing. |
| read_table_function | STRING | False | The function to use for reading table data. |
| connection_scheme | ENUM | False | Specifies whether you are connecting to a SAP system with a message server (GroupServer) or without one (ApplicationServer). Supported values are: ApplicationServer, GroupServer |
| system_id | STRING | False | The System Id or R3Name of the SAP System is a string with a maximum of three characters. It is often used in load balancing connections. |
| system_number | STRING | True | The number by which the target system is defined. Used when setting the Host connection property. |
| project_id | STRING | True | The ID of the Google Cloud project where the Cloud Storage bucket containing the SAP JCo jar resides. |
| bucket | STRING | True | The name of the bucket containing sapjco3.jar and libsapjco3.so files |
| sapjco3_jar | STRING | True | The object id for sapjco3.jar |
| libsapjco3_so | STRING | True | The object id for libsapjco3.so |
| snc_lib | STRING | False | The object id for SNC library |
| snc_mode | BOOLEAN | False | A boolean determining if you are using SNC. Set this to true to use SNC. |
| snc_name | STRING | False | An optional input with the name of your SNC connection. |
| snc_qop | ENUM | False | The quality of protection for your SNC connection.Valid values are 1, 2, 3, 8, or 9, which correspond to the following protection levels: 1 Apply authentication only. 2 Apply integrity protection (authentication). 3 Apply privacy protection (integrity and authentication). 8 Apply the default protection. 9 Apply the maximum protection. Supported values are: 1, 2, 3, 8, 9 |
| snc_partner_name | STRING | False | The application server's SNC name. This is a required input when using SNC. |
| query_mode | ENUM | False | Determines which SAP tables will be displayed as views if any. Supported values are: Global, Local, All, None |
| table_mode | ENUM | False | Determines which SAP tables will be displayed as views if any. Supported values are: TransparentApplication, TransparentCustomer, TransparentSystem, Pooled, Cluster, All, None |
| verbosity | STRING | False | Verbosity level for connection, varies from 1-5. Higher verbosity level will log all the communication details (request,response & ssl certificates). |
Troubleshooting SAP on-premise configuration
If your SAP system is on-premise, you must create a proxy load balancer with hybrid NEG.
- Create an IpSec Tunnel between the on-premise system and Google Cloud with allowed subnets.
- Allow load balancing subnet and proxy subnet in on-premise firewalls.
- Add all required ports, such as 33XX for application server connection, 36XX for message server/LB server connection and 48XX SNC-X509 connection. Where XX is system or instance number of the SAP system. Add the required IP for the firewall in the Google Cloud project ingress allowed list, such as LB IP and port, SAP system IP and port.
- Configure Regional internal proxy Network Load Balancer using Hybrid NEG. For more information, see Regional internal proxy Network LB with Hybrid NEG connectivity.
If you encounter an error similar to the following after you set up the network connectivity,then use the below workaround to allowlist the endpoint attachment IP.
Initialization of destination SAP--1910584855 failed: Connect from SAP gateway to RFC server failed
connection parameters: TYPE=A DESTINATION=SAP--1910584855 ASHOST=10.128.0.43 SYSNR=00 PCS=1
LOCATION    SAP-Gateway on host DELVM05S15.bcone.com / sapgw00
ERROR       timeout during allocate
TIME        Wed Apr  3 17:24:40 2024
RELEASE     754
COMPONENT   SAP-Gateway
VERSION     2
RC          242
MODULE      D:/depot/bas/754_REL/src/krn/si/gw/gwr3cpic.c
LINE        2208
DETAIL      no connect of TP sapdp00 from host 10.128.0.43 after 20 sec
COUNTER     2
SAP glossary
SAP: The term SAP is an umbrella term for all supported SAP editions. This in general indicates SAP ECC version 6+. For SAP ERP connector to work, it requires a connection to an edition of SAP that supports the RFC SDK.
Function Module: A function module is a type of program or function in SAP that can be used to execute almost any operation. These modules can be tested and written in SAP via the SE37 TCode.
RFC: A Remote Function Call (RFC) is a call to a given RFM/FM that can be executed by external applications. This includes using libraries distributed by SAP that are installed on the SAP server, and may also be downloaded from sap.com. Specific RFMs may or may not be maintained across SAP upgrades. There are standard RFMs supplied by SAP, and thus may have differences or may not exist in older editions. Custom RFMs can (and frequently are) built to support integrations, and must be maintained by the SAP customer. By convention, custom RFMs begin with the letter Z.
BAPI: A Business API (BAPI) is an API method of a business object which intern is a RFC enabled Function Module by SAP to give access to business locic operations. For example, there are about 60 BAPIs related solely to the Customer object. In practice, only a few are typically used.
SAP Table: An SAP table is a table that stores data in SAP. These are not the same as business objects. For instance, there is no Purchase Order table in SAP. Instead, there are many tables that include purchase order data in them, such as EBAN, EBKN, EINA, EKPO, etc. Custom tables by convention begin with the letter Z.
SAP Queries: An SAP Query is a saved object in SAP that details information to retrieve from one or more tables. These are typically used for reporting purposes.
Get help from the Google Cloud community
You can post your questions and discuss this connector in the Google Cloud community at Cloud Forums.What's next
- Understand how to suspend and resume a connection.
- Understand how to monitor connector usage.
- Understand how to view connector logs.