Trino (in precedenza Presto) è un motore di query SQL distribuito progettato per eseguire query su set di dati di grandi dimensioni distribuiti su una o più origini dati eterogenee. Trino può eseguire query su Hive, MySQL, Kafka e altre origini dati tramite connettori. Questo tutorial mostra come:
- Installa il servizio Trino su un cluster Dataproc
- Esegui query sui dati pubblici da un client Trino installato sulla tua macchina locale che comunica con un servizio Trino sul tuo cluster
- Esegui query da un'applicazione Java che comunica con il servizio Trino sul tuo cluster tramite il driver JDBC Java di Trino.
Obiettivi
- Estrai i dati da BigQuery
- Carica i dati in Cloud Storage come file CSV
- Trasforma dati:
- Esporre i dati come tabella esterna Hive per renderli interrogabili da Trino
- Converti i dati dal formato CSV al formato Parquet per velocizzare le query.
Costi
In questo documento vengono utilizzati i seguenti componenti fatturabili di Google Cloud:
Per generare una stima dei costi in base all'utilizzo previsto,
utilizza il calcolatore prezzi.
Prima di iniziare
Se non l'hai ancora fatto, crea un progetto Google Cloud e un bucket Cloud Storage per contenere i dati utilizzati in questo tutorial. 1. Configurazione del progetto- Sign in to your Google Cloud account. If you're new to Google Cloud, create an account to evaluate how our products perform in real-world scenarios. New customers also get $300 in free credits to run, test, and deploy workloads.
-
In the Google Cloud console, on the project selector page, select or create a Google Cloud project.
Roles required to select or create a project
- Select a project: Selecting a project doesn't require a specific IAM role—you can select any project that you've been granted a role on.
-
Create a project: To create a project, you need the Project Creator
(
roles/resourcemanager.projectCreator), which contains theresourcemanager.projects.createpermission. Learn how to grant roles.
-
Verify that billing is enabled for your Google Cloud project.
-
Enable the Dataproc, Compute Engine, Cloud Storage, and BigQuery APIs.
Roles required to enable APIs
To enable APIs, you need the Service Usage Admin IAM role (
roles/serviceusage.serviceUsageAdmin), which contains theserviceusage.services.enablepermission. Learn how to grant roles. -
Install the Google Cloud CLI.
-
Se utilizzi un provider di identità (IdP) esterno, devi prima accedere a gcloud CLI con la tua identità federata.
-
Per inizializzare gcloud CLI, esegui questo comando:
gcloud init -
In the Google Cloud console, on the project selector page, select or create a Google Cloud project.
Roles required to select or create a project
- Select a project: Selecting a project doesn't require a specific IAM role—you can select any project that you've been granted a role on.
-
Create a project: To create a project, you need the Project Creator
(
roles/resourcemanager.projectCreator), which contains theresourcemanager.projects.createpermission. Learn how to grant roles.
-
Verify that billing is enabled for your Google Cloud project.
-
Enable the Dataproc, Compute Engine, Cloud Storage, and BigQuery APIs.
Roles required to enable APIs
To enable APIs, you need the Service Usage Admin IAM role (
roles/serviceusage.serviceUsageAdmin), which contains theserviceusage.services.enablepermission. Learn how to grant roles. -
Install the Google Cloud CLI.
-
Se utilizzi un provider di identità (IdP) esterno, devi prima accedere a gcloud CLI con la tua identità federata.
-
Per inizializzare gcloud CLI, esegui questo comando:
gcloud init - In the Google Cloud console, go to the Cloud Storage Buckets page.
- Click Create.
- On the Create a bucket page, enter your bucket information. To go to the next
step, click Continue.
-
In the Get started section, do the following:
- Enter a globally unique name that meets the bucket naming requirements.
- To add a
bucket label,
expand the Labels section (),
click add_box
Add label, and specify a
keyand avaluefor your label.
-
In the Choose where to store your data section, do the following:
- Select a Location type.
- Choose a location where your bucket's data is permanently stored from the Location type drop-down menu.
- If you select the dual-region location type, you can also choose to enable turbo replication by using the relevant checkbox.
- To set up cross-bucket replication, select
Add cross-bucket replication via Storage Transfer Service and
follow these steps:
Set up cross-bucket replication
- In the Bucket menu, select a bucket.
In the Replication settings section, click Configure to configure settings for the replication job.
The Configure cross-bucket replication pane appears.
- To filter objects to replicate by object name prefix, enter a prefix that you want to include or exclude objects from, then click Add a prefix.
- To set a storage class for the replicated objects, select a storage class from the Storage class menu. If you skip this step, the replicated objects will use the destination bucket's storage class by default.
- Click Done.
-
In the Choose how to store your data section, do the following:
- Select a default storage class for the bucket or Autoclass for automatic storage class management of your bucket's data.
- To enable hierarchical namespace, in the Optimize storage for data-intensive workloads section, select Enable hierarchical namespace on this bucket.
- In the Choose how to control access to objects section, select whether or not your bucket enforces public access prevention, and select an access control method for your bucket's objects.
-
In the Choose how to protect object data section, do the
following:
- Select any of the options under Data protection that you
want to set for your bucket.
- To enable soft delete, click the Soft delete policy (For data recovery) checkbox, and specify the number of days you want to retain objects after deletion.
- To set Object Versioning, click the Object versioning (For version control) checkbox, and specify the maximum number of versions per object and the number of days after which the noncurrent versions expire.
- To enable the retention policy on objects and buckets, click the Retention (For compliance) checkbox, and then do the following:
- To enable Object Retention Lock, click the Enable object retention checkbox.
- To enable Bucket Lock, click the Set bucket retention policy checkbox, and choose a unit of time and a length of time for your retention period.
- To choose how your object data will be encrypted, expand the Data encryption section (), and select a Data encryption method.
- Select any of the options under Data protection that you
want to set for your bucket.
-
In the Get started section, do the following:
- Click Create.
- Imposta le variabili di ambiente:
- PROJECT: il tuo ID progetto
- BUCKET_NAME::il nome del bucket Cloud Storage che hai creato in Prima di iniziare
- REGION: region dove verrà creato il cluster utilizzato in questo tutorial, ad esempio "us-west1"
- WORKER: per questo tutorial sono consigliati 3-5 worker
export PROJECT=project-id
export WORKERS=number
export REGION=region
export BUCKET_NAME=bucket-name
- Esegui Google Cloud CLI sulla tua macchina locale per
creare il cluster.
gcloud beta dataproc clusters create trino-cluster \ --project=${PROJECT} \ --region=${REGION} \ --num-workers=${WORKERS} \ --scopes=cloud-platform \ --optional-components=TRINO \ --image-version=2.1 \ --enable-component-gateway - Sulla tua macchina locale, esegui il seguente comando per importare i dati dei taxi da
BigQuery come file CSV senza intestazioni nel bucket Cloud Storage
che hai creato in Prima di iniziare.
bq --location=us extract --destination_format=CSV \ --field_delimiter=',' --print_header=false \ "bigquery-public-data:chicago_taxi_trips.taxi_trips" \ gs://${BUCKET_NAME}/chicago_taxi_trips/csv/shard-*.csv - Crea tabelle esterne Hive supportate dai file CSV e Parquet nel tuo bucket Cloud Storage.
- Crea la tabella esterna Hive
chicago_taxi_trips_csv.gcloud dataproc jobs submit hive \ --cluster trino-cluster \ --region=${REGION} \ --execute " CREATE EXTERNAL TABLE chicago_taxi_trips_csv( unique_key STRING, taxi_id STRING, trip_start_timestamp TIMESTAMP, trip_end_timestamp TIMESTAMP, trip_seconds INT, trip_miles FLOAT, pickup_census_tract INT, dropoff_census_tract INT, pickup_community_area INT, dropoff_community_area INT, fare FLOAT, tips FLOAT, tolls FLOAT, extras FLOAT, trip_total FLOAT, payment_type STRING, company STRING, pickup_latitude FLOAT, pickup_longitude FLOAT, pickup_location STRING, dropoff_latitude FLOAT, dropoff_longitude FLOAT, dropoff_location STRING) ROW FORMAT DELIMITED FIELDS TERMINATED BY ',' STORED AS TEXTFILE location 'gs://${BUCKET_NAME}/chicago_taxi_trips/csv/';" - Verifica la creazione
della tabella esterna Hive.
gcloud dataproc jobs submit hive \ --cluster trino-cluster \ --region=${REGION} \ --execute "SELECT COUNT(*) FROM chicago_taxi_trips_csv;" - Crea un'altra tabella esterna Hive
chicago_taxi_trips_parquetcon le stesse colonne, ma con i dati archiviati in formato Parquet per migliorare le prestazioni delle query.gcloud dataproc jobs submit hive \ --cluster trino-cluster \ --region=${REGION} \ --execute " CREATE EXTERNAL TABLE chicago_taxi_trips_parquet( unique_key STRING, taxi_id STRING, trip_start_timestamp TIMESTAMP, trip_end_timestamp TIMESTAMP, trip_seconds INT, trip_miles FLOAT, pickup_census_tract INT, dropoff_census_tract INT, pickup_community_area INT, dropoff_community_area INT, fare FLOAT, tips FLOAT, tolls FLOAT, extras FLOAT, trip_total FLOAT, payment_type STRING, company STRING, pickup_latitude FLOAT, pickup_longitude FLOAT, pickup_location STRING, dropoff_latitude FLOAT, dropoff_longitude FLOAT, dropoff_location STRING) STORED AS PARQUET location 'gs://${BUCKET_NAME}/chicago_taxi_trips/parquet/';" - Carica i dati dalla tabella CSV di Hive nella
tabella Parquet di Hive.
gcloud dataproc jobs submit hive \ --cluster trino-cluster \ --region=${REGION} \ --execute " INSERT OVERWRITE TABLE chicago_taxi_trips_parquet SELECT * FROM chicago_taxi_trips_csv;" - Verifica che i dati siano stati caricati correttamente.
gcloud dataproc jobs submit hive \
    --cluster trino-cluster \
    --region=${REGION} \
    --execute "SELECT COUNT(*) FROM chicago_taxi_trips_parquet;"
- Crea la tabella esterna Hive
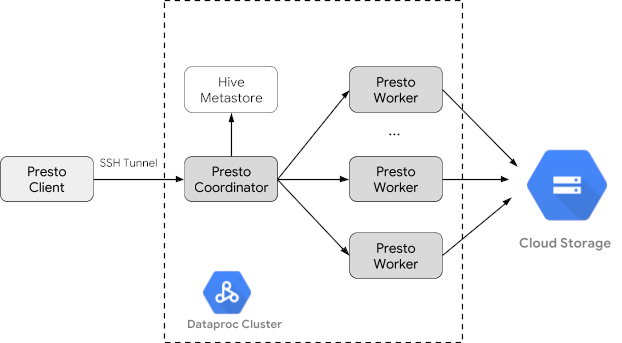
- Esegui il seguente comando sulla tua macchina locale per connetterti tramite SSH al nodo master del cluster. Il terminale locale smetterà di rispondere durante l'esecuzione del comando.
gcloud compute ssh trino-cluster-m
- Nella finestra del terminale SSH sul nodo master del cluster, esegui
l'interfaccia a riga di comando Trino, che si connette al server Trino in esecuzione sul nodo master.
trino --catalog hive --schema default
- Al prompt
trino:default, verifica che Trino possa trovare le tabelle Hive.show tables;
Table
‐‐‐‐‐‐‐‐‐‐‐‐‐‐‐‐‐‐‐‐‐‐‐‐‐‐‐‐‐
 chicago_taxi_trips_csv
 chicago_taxi_trips_parquet
(2 rows)
- Esegui query dal prompt
trino:defaulte confronta le prestazioni delle query sui dati Parquet e CSV.- Query sui dati Parquet
select count(*) from chicago_taxi_trips_parquet where trip_miles > 50;
_col0 ‐‐‐‐‐‐‐‐ 117957 (1 row)
Query 20180928_171735_00006_2sz8c, FINISHED, 3 nodes Splits: 308 total, 308 done (100.00%) 0:16 [113M rows, 297MB] [6.91M rows/s, 18.2MB/s] - Query sui dati CSV
select count(*) from chicago_taxi_trips_csv where trip_miles > 50;
_col0
‐‐‐‐‐‐‐‐
 117957
(1 row)

Query 20180928_171936_00009_2sz8c, FINISHED, 3 nodes
Splits: 881 total, 881 done (100.00%)
0:47 [113M rows, 41.5GB] [2.42M rows/s, 911MB/s]
- Query sui dati Parquet
- In the Google Cloud console, go to the Manage resources page.
- In the project list, select the project that you want to delete, and then click Delete.
- In the dialog, type the project ID, and then click Shut down to delete the project.
- Per eliminare il cluster:
gcloud dataproc clusters delete --project=${PROJECT} trino-cluster \ --region=${REGION} - Per eliminare il bucket Cloud Storage creato in
Prima di iniziare, inclusi i file di dati
memorizzati nel bucket:
gcloud storage rm gs://${BUCKET_NAME} --recursive
Crea un cluster Dataproc
Crea un cluster Dataproc utilizzando il flag optional-components
(disponibile nella versione immagine 2.1 e successive) per installare il
componente facoltativo Trino sul
cluster e il flag enable-component-gateway per attivare il
gateway dei componenti per consentirti di accedere
all'interfaccia utente web di Trino dalla Google Cloud console.
Preparazione dei dati
Esporta il set di dati bigquery-public-data chicago_taxi_trips in Cloud Storage come file CSV, poi crea una tabella esterna Hive per fare riferimento ai dati.
esegui delle query
Puoi eseguire query localmente dalla CLI Trino o da un'applicazione.
Query dell'interfaccia a riga di comando di Trino
Questa sezione mostra come eseguire query sul set di dati sui taxi Hive Parquet utilizzando la CLI Trino.
Query delle applicazioni Java
Per eseguire query da un'applicazione Java tramite il driver JDBC Java di Trino:
1. Scarica il
driver JDBC Java di Trino.
1. Aggiungi una dipendenza trino-jdbc in
Maven pom.xml.
<dependency>
  <groupId>io.trino</groupId>
  <artifactId>trino-jdbc</artifactId>
  <version>376</version>
</dependency>
package dataproc.codelab.trino;
import java.sql.Connection;
import java.sql.DriverManager;
import java.sql.ResultSet;
import java.sql.SQLException;
import java.sql.Statement;
import java.util.Properties;
public class TrinoQuery {
  private static final String URL = "jdbc:trino://trino-cluster-m:8080/hive/default";
  private static final String SOCKS_PROXY = "localhost:1080";
  private static final String USER = "user";
  private static final String QUERY =
      "select count(*) as count from chicago_taxi_trips_parquet where trip_miles > 50";
  public static void main(String[] args) {
    try {
      Properties properties = new Properties();
      properties.setProperty("user", USER);
      properties.setProperty("socksProxy", SOCKS_PROXY);
      Connection connection = DriverManager.getConnection(URL, properties);
      try (Statement stmt = connection.createStatement()) {
        ResultSet rs = stmt.executeQuery(QUERY);
        while (rs.next()) {
          int count = rs.getInt("count");
          System.out.println("The number of long trips: " + count);
        }
      }
    } catch (SQLException e) {
      e.printStackTrace();
    }
  }
}
Logging e monitoraggio
Logging
I log di Trino si trovano in /var/log/trino/ sui nodi master e worker del cluster.
UI web
Consulta Visualizzazione e accesso agli URL del gateway dei componenti per aprire la UI web di Trino in esecuzione sul nodo master del cluster nel browser locale.
Monitoraggio
Trino espone le informazioni sul runtime del cluster tramite le tabelle di runtime.
In una sessione Trino (dal prompt trino:default),
esegui la seguente query per visualizzare i dati della tabella di runtime:
select * FROM system.runtime.nodes;
Esegui la pulizia
Al termine del tutorial, puoi eliminare le risorse che hai creato in modo che non utilizzino più la quota generando addebiti. Le seguenti sezioni descrivono come eliminare o disattivare queste risorse.
Elimina il progetto
Il modo più semplice per eliminare la fatturazione è eliminare il progetto creato per il tutorial.
Per eliminare il progetto: