Trino (sebelumnya Presto) adalah mesin kueri SQL terdistribusi yang dirancang untuk membuat kueri set data besar yang didistribusikan di satu atau beberapa sumber data heterogen. Trino dapat membuat kueri Hive, MySQL, Kafka, dan sumber data lainnya melalui konektor. Tutorial ini menunjukkan kepada Anda cara:
- Menginstal layanan Trino di cluster Dataproc
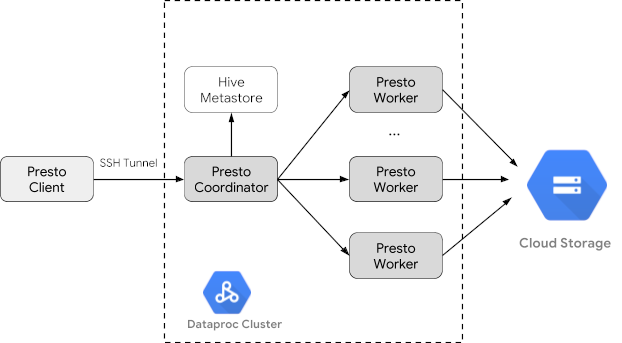
- Membuat kueri data publik dari klien Trino yang diinstal di komputer lokal Anda yang berkomunikasi dengan layanan Trino di cluster Anda
- Jalankan kueri dari aplikasi Java yang berkomunikasi dengan layanan Trino di cluster Anda melalui driver JDBC Java Trino.
Tujuan
- Mengekstrak data dari BigQuery
- Muat data ke Cloud Storage sebagai file CSV
- Transformasikan data:
- Mengekspos data sebagai tabel eksternal Hive agar data dapat dikueri oleh Trino
- Konversi data dari format CSV ke format Parquet untuk membuat kueri lebih cepat
Biaya
Dalam dokumen ini, Anda akan menggunakan komponen Google Cloudyang dapat ditagih berikut:
Untuk membuat perkiraan biaya berdasarkan proyeksi penggunaan Anda,
gunakan kalkulator harga.
Sebelum memulai
Jika belum melakukannya, buat Google Cloud project dan bucket Cloud Storage untuk menyimpan data yang digunakan dalam tutorial ini. 1. Menyiapkan project Anda- Sign in to your Google Cloud account. If you're new to Google Cloud, create an account to evaluate how our products perform in real-world scenarios. New customers also get $300 in free credits to run, test, and deploy workloads.
-
In the Google Cloud console, on the project selector page, select or create a Google Cloud project.
-
Verify that billing is enabled for your Google Cloud project.
-
Enable the Dataproc, Compute Engine, Cloud Storage, and BigQuery APIs.
-
Install the Google Cloud CLI.
-
Jika Anda menggunakan penyedia identitas (IdP) eksternal, Anda harus login ke gcloud CLI dengan identitas gabungan Anda terlebih dahulu.
-
Untuk melakukan inisialisasi gcloud CLI, jalankan perintah berikut:
gcloud init -
In the Google Cloud console, on the project selector page, select or create a Google Cloud project.
-
Verify that billing is enabled for your Google Cloud project.
-
Enable the Dataproc, Compute Engine, Cloud Storage, and BigQuery APIs.
-
Install the Google Cloud CLI.
-
Jika Anda menggunakan penyedia identitas (IdP) eksternal, Anda harus login ke gcloud CLI dengan identitas gabungan Anda terlebih dahulu.
-
Untuk melakukan inisialisasi gcloud CLI, jalankan perintah berikut:
gcloud init - In the Google Cloud console, go to the Cloud Storage Buckets page.
- Click Create.
- On the Create a bucket page, enter your bucket information. To go to the next
step, click Continue.
-
In the Get started section, do the following:
- Enter a globally unique name that meets the bucket naming requirements.
- To add a
bucket label,
expand the Labels section (),
click add_box
Add label, and specify a
keyand avaluefor your label.
-
In the Choose where to store your data section, do the following:
- Select a Location type.
- Choose a location where your bucket's data is permanently stored from the Location type drop-down menu.
- If you select the dual-region location type, you can also choose to enable turbo replication by using the relevant checkbox.
- To set up cross-bucket replication, select
Add cross-bucket replication via Storage Transfer Service and
follow these steps:
Set up cross-bucket replication
- In the Bucket menu, select a bucket.
In the Replication settings section, click Configure to configure settings for the replication job.
The Configure cross-bucket replication pane appears.
- To filter objects to replicate by object name prefix, enter a prefix that you want to include or exclude objects from, then click Add a prefix.
- To set a storage class for the replicated objects, select a storage class from the Storage class menu. If you skip this step, the replicated objects will use the destination bucket's storage class by default.
- Click Done.
-
In the Choose how to store your data section, do the following:
- Select a default storage class for the bucket or Autoclass for automatic storage class management of your bucket's data.
- To enable hierarchical namespace, in the Optimize storage for data-intensive workloads section, select Enable hierarchical namespace on this bucket.
- In the Choose how to control access to objects section, select whether or not your bucket enforces public access prevention, and select an access control method for your bucket's objects.
-
In the Choose how to protect object data section, do the
following:
- Select any of the options under Data protection that you
want to set for your bucket.
- To enable soft delete, click the Soft delete policy (For data recovery) checkbox, and specify the number of days you want to retain objects after deletion.
- To set Object Versioning, click the Object versioning (For version control) checkbox, and specify the maximum number of versions per object and the number of days after which the noncurrent versions expire.
- To enable the retention policy on objects and buckets, click the Retention (For compliance) checkbox, and then do the following:
- To enable Object Retention Lock, click the Enable object retention checkbox.
- To enable Bucket Lock, click the Set bucket retention policy checkbox, and choose a unit of time and a length of time for your retention period.
- To choose how your object data will be encrypted, expand the Data encryption section (), and select a Data encryption method.
- Select any of the options under Data protection that you
want to set for your bucket.
-
In the Get started section, do the following:
- Click Create.
- Tetapkan variabel lingkungan:
- PROJECT: project ID Anda
- BUCKET_NAME: nama bucket Cloud Storage yang Anda buat di Sebelum memulai
- REGION: region tempat cluster yang digunakan dalam tutorial ini akan dibuat, misalnya, "us-west1"
- PEKERJA: 3 - 5 pekerja direkomendasikan untuk tutorial ini
export PROJECT=project-id
export WORKERS=number
export REGION=region
export BUCKET_NAME=bucket-name
- Jalankan Google Cloud CLI di komputer lokal Anda untuk
membuat cluster.
gcloud beta dataproc clusters create trino-cluster \ --project=${PROJECT} \ --region=${REGION} \ --num-workers=${WORKERS} \ --scopes=cloud-platform \ --optional-components=TRINO \ --image-version=2.1 \ --enable-component-gateway - Di mesin lokal Anda, jalankan perintah berikut untuk mengimpor data taksi dari
BigQuery sebagai file CSV tanpa header ke bucket Cloud Storage
yang Anda buat di Sebelum memulai.
bq --location=us extract --destination_format=CSV \ --field_delimiter=',' --print_header=false \ "bigquery-public-data:chicago_taxi_trips.taxi_trips" \ gs://${BUCKET_NAME}/chicago_taxi_trips/csv/shard-*.csv - Buat tabel eksternal Hive yang didukung oleh file CSV dan Parquet di bucket Cloud Storage Anda.
- Buat tabel eksternal Hive
chicago_taxi_trips_csv.gcloud dataproc jobs submit hive \ --cluster trino-cluster \ --region=${REGION} \ --execute " CREATE EXTERNAL TABLE chicago_taxi_trips_csv( unique_key STRING, taxi_id STRING, trip_start_timestamp TIMESTAMP, trip_end_timestamp TIMESTAMP, trip_seconds INT, trip_miles FLOAT, pickup_census_tract INT, dropoff_census_tract INT, pickup_community_area INT, dropoff_community_area INT, fare FLOAT, tips FLOAT, tolls FLOAT, extras FLOAT, trip_total FLOAT, payment_type STRING, company STRING, pickup_latitude FLOAT, pickup_longitude FLOAT, pickup_location STRING, dropoff_latitude FLOAT, dropoff_longitude FLOAT, dropoff_location STRING) ROW FORMAT DELIMITED FIELDS TERMINATED BY ',' STORED AS TEXTFILE location 'gs://${BUCKET_NAME}/chicago_taxi_trips/csv/';" - Verifikasi pembuatan
tabel eksternal Hive.
gcloud dataproc jobs submit hive \ --cluster trino-cluster \ --region=${REGION} \ --execute "SELECT COUNT(*) FROM chicago_taxi_trips_csv;" - Buat tabel eksternal Hive lain
chicago_taxi_trips_parquetdengan kolom yang sama, tetapi dengan data yang disimpan dalam format Parquet untuk performa kueri yang lebih baik.gcloud dataproc jobs submit hive \ --cluster trino-cluster \ --region=${REGION} \ --execute " CREATE EXTERNAL TABLE chicago_taxi_trips_parquet( unique_key STRING, taxi_id STRING, trip_start_timestamp TIMESTAMP, trip_end_timestamp TIMESTAMP, trip_seconds INT, trip_miles FLOAT, pickup_census_tract INT, dropoff_census_tract INT, pickup_community_area INT, dropoff_community_area INT, fare FLOAT, tips FLOAT, tolls FLOAT, extras FLOAT, trip_total FLOAT, payment_type STRING, company STRING, pickup_latitude FLOAT, pickup_longitude FLOAT, pickup_location STRING, dropoff_latitude FLOAT, dropoff_longitude FLOAT, dropoff_location STRING) STORED AS PARQUET location 'gs://${BUCKET_NAME}/chicago_taxi_trips/parquet/';" - Muat data dari tabel CSV Hive ke
tabel Parquet Hive.
gcloud dataproc jobs submit hive \ --cluster trino-cluster \ --region=${REGION} \ --execute " INSERT OVERWRITE TABLE chicago_taxi_trips_parquet SELECT * FROM chicago_taxi_trips_csv;" - Pastikan data dimuat dengan benar.
gcloud dataproc jobs submit hive \
    --cluster trino-cluster \
    --region=${REGION} \
    --execute "SELECT COUNT(*) FROM chicago_taxi_trips_parquet;"
- Buat tabel eksternal Hive
- Jalankan perintah berikut di komputer lokal Anda untuk melakukan SSH ke node master cluster Anda. Terminal lokal akan berhenti merespons selama eksekusi perintah.
gcloud compute ssh trino-cluster-m
- Di jendela terminal SSH pada node master cluster Anda, jalankan
CLI Trino, yang terhubung ke server Trino yang berjalan di node
master.
trino --catalog hive --schema default
- Pada perintah
trino:default, pastikan Trino dapat menemukan tabel Hive.show tables;
Table
‐‐‐‐‐‐‐‐‐‐‐‐‐‐‐‐‐‐‐‐‐‐‐‐‐‐‐‐‐
 chicago_taxi_trips_csv
 chicago_taxi_trips_parquet
(2 rows)
- Jalankan kueri dari perintah
trino:default, dan bandingkan performa kueri data Parquet versus CSV.- Kueri data Parquet
select count(*) from chicago_taxi_trips_parquet where trip_miles > 50;
_col0 ‐‐‐‐‐‐‐‐ 117957 (1 row)
Query 20180928_171735_00006_2sz8c, FINISHED, 3 nodes Splits: 308 total, 308 done (100.00%) 0:16 [113M rows, 297MB] [6.91M rows/s, 18.2MB/s] - Kueri data CSV
select count(*) from chicago_taxi_trips_csv where trip_miles > 50;
_col0
‐‐‐‐‐‐‐‐
 117957
(1 row)

Query 20180928_171936_00009_2sz8c, FINISHED, 3 nodes
Splits: 881 total, 881 done (100.00%)
0:47 [113M rows, 41.5GB] [2.42M rows/s, 911MB/s]
- Kueri data Parquet
- In the Google Cloud console, go to the Manage resources page.
- In the project list, select the project that you want to delete, and then click Delete.
- In the dialog, type the project ID, and then click Shut down to delete the project.
- Untuk menghapus cluster Anda:
gcloud dataproc clusters delete --project=${PROJECT} trino-cluster \ --region=${REGION} - Untuk menghapus bucket Cloud Storage yang Anda buat di
Sebelum memulai, termasuk file data yang disimpan di bucket:
gcloud storage rm gs://${BUCKET_NAME} --recursive
Membuat cluster Dataproc
Buat cluster Dataproc menggunakan flag optional-components
(tersedia di versi image 2.1 dan yang lebih baru) untuk menginstal
komponen opsional Trino di
cluster dan flag enable-component-gateway untuk mengaktifkan
Component Gateway agar Anda dapat mengakses UI Web Trino dari konsol Google Cloud .
Menyiapkan data
Ekspor set data bigquery-public-data chicago_taxi_trips
ke Cloud Storage sebagai file CSV, lalu buat tabel eksternal Hive
untuk mereferensikan data.
Menjalankan kueri
Anda dapat menjalankan kueri secara lokal dari Trino CLI atau dari aplikasi.
Kueri Trino CLI
Bagian ini menunjukkan cara mengkueri set data taksi Hive Parquet menggunakan Trino CLI.
Kueri aplikasi Java
Untuk menjalankan kueri dari aplikasi Java melalui driver JDBC Java Trino:
1. Download
driver JDBC Java Trino.
1. Tambahkan dependensi trino-jdbc di
pom.xml Maven.
<dependency>
  <groupId>io.trino</groupId>
  <artifactId>trino-jdbc</artifactId>
  <version>376</version>
</dependency>
package dataproc.codelab.trino;
import java.sql.Connection;
import java.sql.DriverManager;
import java.sql.ResultSet;
import java.sql.SQLException;
import java.sql.Statement;
import java.util.Properties;
public class TrinoQuery {
  private static final String URL = "jdbc:trino://trino-cluster-m:8080/hive/default";
  private static final String SOCKS_PROXY = "localhost:1080";
  private static final String USER = "user";
  private static final String QUERY =
      "select count(*) as count from chicago_taxi_trips_parquet where trip_miles > 50";
  public static void main(String[] args) {
    try {
      Properties properties = new Properties();
      properties.setProperty("user", USER);
      properties.setProperty("socksProxy", SOCKS_PROXY);
      Connection connection = DriverManager.getConnection(URL, properties);
      try (Statement stmt = connection.createStatement()) {
        ResultSet rs = stmt.executeQuery(QUERY);
        while (rs.next()) {
          int count = rs.getInt("count");
          System.out.println("The number of long trips: " + count);
        }
      }
    } catch (SQLException e) {
      e.printStackTrace();
    }
  }
}
Logging dan pemantauan
Logging
Log Trino berada di /var/log/trino/ pada node master dan worker cluster.
UI Web
Lihat Melihat dan Mengakses URL Component Gateway untuk membuka UI Web Trino yang berjalan di node master cluster di browser lokal Anda.
Pemantauan
Trino mengekspos informasi runtime cluster melalui tabel runtime.
Dalam sesi Trino (dari prompt trino:default),
jalankan kueri berikut untuk melihat data tabel runtime:
select * FROM system.runtime.nodes;
Pembersihan
Setelah menyelesaikan tutorial, Anda dapat membersihkan resource yang dibuat agar resource tersebut berhenti menggunakan kuota dan dikenai biaya. Bagian berikut menjelaskan cara menghapus atau menonaktifkan resource ini.
Menghapus project
Cara termudah untuk menghilangkan penagihan adalah dengan menghapus project yang Anda buat untuk tutorial.
Untuk menghapus project: