Mengelola secret dengan Secret Manager di Cloud Code for IntelliJ
Tetap teratur dengan koleksi
Simpan dan kategorikan konten berdasarkan preferensi Anda.
Dengan integrasi Secret Manager Cloud Code, Anda dapat membuat, melihat, memperbarui, dan menggunakan secret dalam IDE dan tanpa menempatkannya dalam codebase.
Halaman ini menjelaskan cara mengakses Secret Manager dalam IDE dan cara
memulai pembuatan dan pengelolaan secret.
Mengaktifkan Secret Manager
Saat mengelola secret dengan Cloud Code, secret disimpan dengan aman
di Secret Manager dan dapat diambil secara terprogram saat Anda membutuhkannya. Yang Anda butuhkan hanyalah Secret Manager API yang diaktifkan dan izin yang tepat untuk mengelola rahasia:
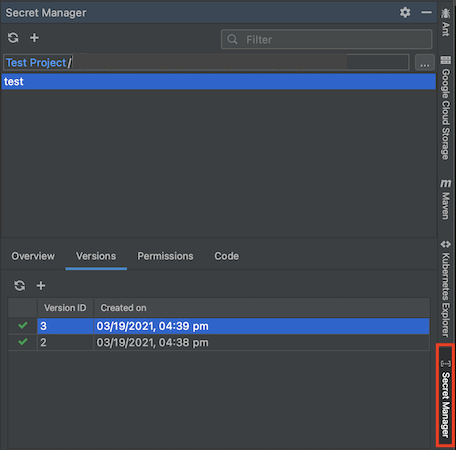
Untuk meluncurkan Secret Manager, klik tab Secret Manager di sidebar Cloud Code kanan.
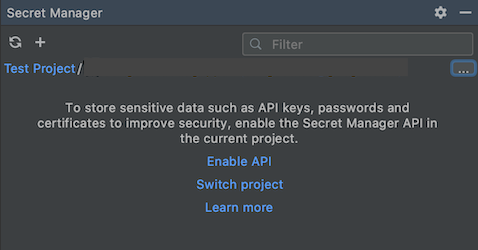
Jika Anda belum mengaktifkan Secret Manager API, Cloud Code akan meminta Anda untuk mengaktifkannya di panel Secret Manager dengan mengklik Enable API.
Secret Anda juga harus berada dalam project yang sama dengan kode aplikasi Anda; pastikan Anda telah memilih project yang tepat atau beralih menggunakan pemilih project di panel Secret Manager.
Membuat dan melihat secret
Membuat secret
Anda dapat membuat secret dengan salah satu metode berikut:
Menggunakan panel Secret Manager
Buka panel Secret Manager.
Klik ikon Tambahkan.
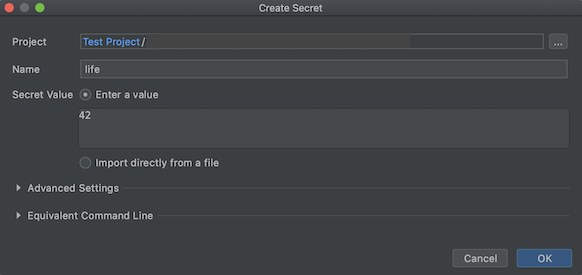
Tindakan ini akan meluncurkan dialog Create Secret tempat Anda dapat menetapkan project, nama, dan nilai secret, serta memilih region untuk menyimpan secret dan label untuk mengatur secret.
Menggunakan editor
Buka file yang berisi teks yang ingin Anda simpan sebagai rahasia di editor.
Tandai dan klik kanan teks ini.
Dari menu, pilih item menu Create Secret in Secret Manager....
Tindakan ini akan membuka dialog Create Secret dengan nilai rahasia yang diisi dengan
teks yang disorot. Anda dapat menyesuaikan project, nama, nilai, region, dan label rahasia di sini.
Menggunakan penjelajah project
Di project explorer, tanpa menandai teks apa pun, klik kanan.
Dari menu, pilih item menu Create Secret in Secret Manager....
Tindakan ini akan membuka dialog Create Secret. Pilih project, nama, nilai, region, dan label rahasia Anda di sini, lalu klik OK setelah selesai.
Membuat versi baru secret
Jika Anda memiliki secret yang sudah ada dan ingin memperbaruinya, Anda dapat melakukannya dengan
membuka tab Versi di panel Secret Manager:
Klik ikon Tambahkan dalam tab Versi.
Tindakan ini akan meluncurkan dialog Tambahkan versi baru tempat Anda dapat menetapkan nilai secret yang ada menggunakan kolom Nilai secret atau dengan mengimpor file.
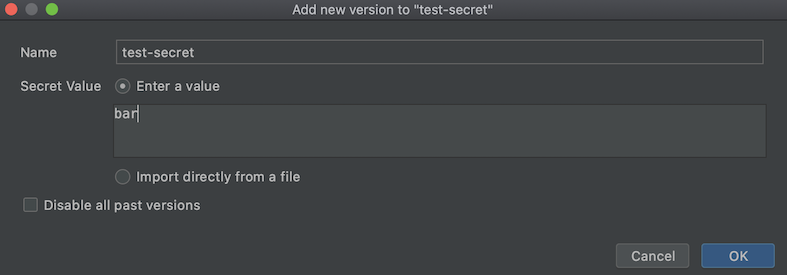
Jika Anda lebih memilih untuk menghapus semua versi rahasia Anda sebelumnya dan hanya menyimpan versi baru yang dibuat, pilih Nonaktifkan semua versi sebelumnya.
Setelah mengklik OK dan versi Anda ditambahkan, Anda dapat melihat versi rahasia terbaru, dan jika berlaku, semua versi rahasia Anda yang tercantum di tab Versi.
Melihat secret
Untuk melihat secret, di panel Secret Manager, pilih secret dari daftar
yang ditampilkan di bagian Nama Secret. Detailnya seperti nama, kebijakan replikasi, stempel waktu pembuatan, dan ID resource dicantumkan di tab Ringkasan.
Anda juga dapat mengklik kanan rahasia dan memilih Open in Cloud console untuk melihat dan mengelola rahasia di browser Anda.
Melihat versi secret
Untuk melihat versi secret, pilih secret dari daftar yang ditampilkan di bagian
Nama Secret, lalu pilih tab Versi.
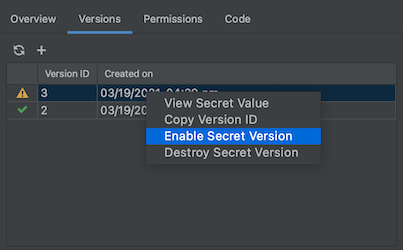
Klik kanan versi rahasia yang ingin Anda tindak lanjuti dan pilih dari opsi yang tersedia; melihat nilai rahasia, menyalin ID versi, mengaktifkan atau menonaktifkan versi, dan menghancurkan versi yang dipilih.
Mengakses secret dari aplikasi Anda
Setelah rahasia Anda dibuat, Anda dapat menyertakannya dalam kode dan menyiapkan autentikasi.
Untuk mengakses secret yang baru dibuat dari aplikasi Anda, ikuti langkah-langkah berikut:
Instal library klien Secret Manager.
Buka Tools > Cloud Code > Add Cloud Libraries and Manage Cloud APIs, lalu pilih Secret Manager > Secret Manager API dari struktur penjelajah Google Cloud API. Ikuti petunjuk khusus bahasa yang diuraikan di bagian Menginstal Library Klien.
Terakhir, untuk menyelesaikan penyiapan autentikasi, Anda harus mengikuti
panduan autentikasi Library klien:
Pengembangan lokal: Jika Anda mengembangkan di cluster lokal (seperti minikube, Docker Desktop) atau emulator lokal, Anda harus menyelesaikan langkah-langkah yang diilustrasikan di bagian Pengembangan lokal yang relevan dengan alur kerja Anda.
Pengembangan jarak jauh: Jika Anda menggunakan cluster GKE atau layanan Cloud Run di aplikasi, Anda harus menyelesaikan langkah-langkah yang diilustrasikan di bagian Pengembangan jarak jauh yang relevan dengan alur kerja Anda, termasuk petunjuk khusus Secret Manager untuk menyiapkan peran yang diperlukan di akun layanan Anda.
Mendapatkan dukungan
Untuk mengirimkan masukan atau melaporkan masalah di IDE IntelliJ, buka
Tools > Cloud Code > Help / About > Submit
feedback or report an issue untuk melaporkan masalah di GitHub.
[[["Mudah dipahami","easyToUnderstand","thumb-up"],["Memecahkan masalah saya","solvedMyProblem","thumb-up"],["Lainnya","otherUp","thumb-up"]],[["Sulit dipahami","hardToUnderstand","thumb-down"],["Informasi atau kode contoh salah","incorrectInformationOrSampleCode","thumb-down"],["Informasi/contoh yang saya butuhkan tidak ada","missingTheInformationSamplesINeed","thumb-down"],["Masalah terjemahan","translationIssue","thumb-down"],["Lainnya","otherDown","thumb-down"]],["Terakhir diperbarui pada 2025-08-11 UTC."],[[["\u003cp\u003eCloud Code's Secret Manager integration allows you to manage secrets directly within your IDE without storing them in your codebase.\u003c/p\u003e\n"],["\u003cp\u003eYou can create secrets using the Secret Manager panel, the editor, or the project explorer, specifying project, name, value, region, and labels.\u003c/p\u003e\n"],["\u003cp\u003eExisting secrets can be updated by creating new versions in the Versions tab, where you can choose to disable all previous versions.\u003c/p\u003e\n"],["\u003cp\u003eSecrets and their versions can be viewed within the Secret Manager panel, with options to view details, open in the Cloud console, or take actions on specific versions.\u003c/p\u003e\n"],["\u003cp\u003eTo access secrets in your application, install the Secret Manager client library and follow the appropriate authentication setup for local or remote development.\u003c/p\u003e\n"]]],[],null,["# Manage secrets with Secret Manager in Cloud Code for IntelliJ\n\nWith Cloud Code's Secret Manager integration, you\ncan create, view, update, and use secrets within your IDE and without having\nthem in your codebase.\n\nThis page describes how to access Secret Manager within your IDE and how\nyou can get started creating and managing secrets.\n\nEnabling Secret Manager\n-----------------------\n\nWhen managing secrets with Cloud Code, secrets are securely stored\nin Secret Manager and can be programmatically fetched when you need\nthem. All you need is the Secret Manager API enabled and the right\npermissions to manage secrets:\n\n1. To launch Secret Manager, click on the Secret Manager tab in the\n right Cloud Code sidebar.\n\n2. If you haven't enabled the Secret Manager API, Cloud Code prompts\n you to enable it within the Secret Manager panel by clicking **Enable API**.\n\n Your secret also needs to be in the same project as your application code; ensure\n you have the right project selected or switch using the project selector in the\n Secret Manager panel.\n\nCreating and viewing secrets\n----------------------------\n\n### Creating secrets\n\nYou can create a secret with one of the following methods:\n\n#### Using the Secret Manager panel\n\n1. Navigate to the Secret Manager panel.\n\n2. Click the **Add** icon.\n\n This launches a Create Secret dialog where you can set your secret's project,\n name, and value, as well as choose a region to store your secret and labels to\n organize your secrets.\n\n#### Using the editor\n\n1. Open a file containing text you would like to store as a secret in the editor.\n2. Highlight and right-click this text.\n\n From the menu, select the `Create Secret in Secret Manager...` menu item.\n This opens the Create Secret dialog with the secret value filled in with\n the highlighted text. You can customize the secret's project,\n name, value, region, and labels here.\n\n#### Using the project explorer\n\n1. In the project explorer, without highlighting any text, right-click.\n2. From the menu, select the `Create Secret in Secret Manager...` menu item. This opens the Create Secret dialog. Choose your secret's project, name, value, region, and labels here, and click **OK** when done.\n\n### Creating new versions of secrets\n\nIf you have an existing secret and would like to update it, you can do so by\nnavigating to the **Versions** tab of the Secret Manager panel:\n\n1. Click the **Add** icon within the **Versions** tab.\n\n This launches a Add new version dialog where you can set the value of your\n existing secret either using the Secret value field or by importing a file.\n\n2. If you'd prefer to remove all previous versions of your secret and keep just\n the new version being created, choose **Disable all past versions**.\n\n3. Once you click **OK** and your version is added, you can see your latest secret\n version, and if applicable, all the versions of your secret listed under\n the **Versions** tab.\n\n### Viewing secrets\n\nTo view secrets, within the Secret Manager panel, select a secret from the list\ndisplayed in the Secret Name section. Its details such as name, replication\npolicy, creation timestamp, and resource ID are listed in the **Overview** tab.\n\nYou can also right-click the secret and choose **Open in Cloud console** to view and\nmanage the secret in your browser.\n\n### Viewing secret versions\n\nTo view versions of a secret, select a secret from the list displayed in the\nSecret Name section and select the **Versions** tab.\n\nRight-click the secret version you'd like to take action on and choose from\nthe available options; viewing the secret value, copying the version ID,\nenabling or disabling the version, and destroying the selected version.\n\nAccessing secrets from your application\n---------------------------------------\n\nOnce your secret is created, you can include it in your code and set up\nauthentication.\n\nTo access your newly created secret from your application, follow these steps:\n\n1. Install the Secret Manager client library.\n\n Navigate to **Tools** \\\u003e **Cloud Code** \\\u003e **Add Cloud Libraries and Manage\n Cloud APIs** and select **Secret Manager** \\\u003e **Secret Manager API** from the\n Google Cloud APIs explorer tree. Follow the language-specific instructions\n laid out in the Install Client Library section.\n2. Customize and include the [relevant code snippet](/secret-manager/docs/access-secret-version)\n in your application's code.\n\n3. Finally, to complete your authentication setup, you need to follow the\n Client libraries authentication guide:\n\n - **Local development** : If you're developing on a local cluster (like minikube, Docker Desktop) or a local emulator, you should complete the steps illustrated in the [Local development section](/code/docs/intellij/client-libraries#local_development) relevant to your workflow.\n - **Remote development** : If you're using a GKE cluster or a Cloud Run service in your application, you should complete the steps illustrated in the [Remote development section](/code/docs/intellij/client-libraries#remote_development) relevant to your workflow, including the Secret Manager-specific instructions for setting up the required roles on your service account.\n\nGet support\n-----------\n\nTo submit feedback or report an issue in your IntelliJ IDE, go to **Tools** \\\u003e **Cloud Code** \\\u003e **Help / About** \\\u003e **Submit\nfeedback or report an issue** to report an issue on [GitHub](https://github.com/GoogleCloudPlatform/cloud-code-intellij/issues)."]]