Tetap teratur dengan koleksi
Simpan dan kategorikan konten berdasarkan preferensi Anda.
Ringkasan
Sebelum dapat mulai menggunakan Cloud Talent Solution (CTS), Anda harus mengaktifkan API di Konsol Google Cloud Platform (GCP). Langkah-langkah di bawah ini akan memandu Anda melakukan tindakan berikut:
Aktifkan CTS di project GCP.
Pastikan penagihan diaktifkan untuk CTS.
Setujui Persyaratan & Ketentuan Logging Data.
Buat dan/atau tetapkan satu atau beberapa akun layanan ke Cloud Talent Solution.
Download kunci kredensial akun layanan.
Tetapkan variabel lingkungan autentikasi Anda.
Penyiapan GCP Console
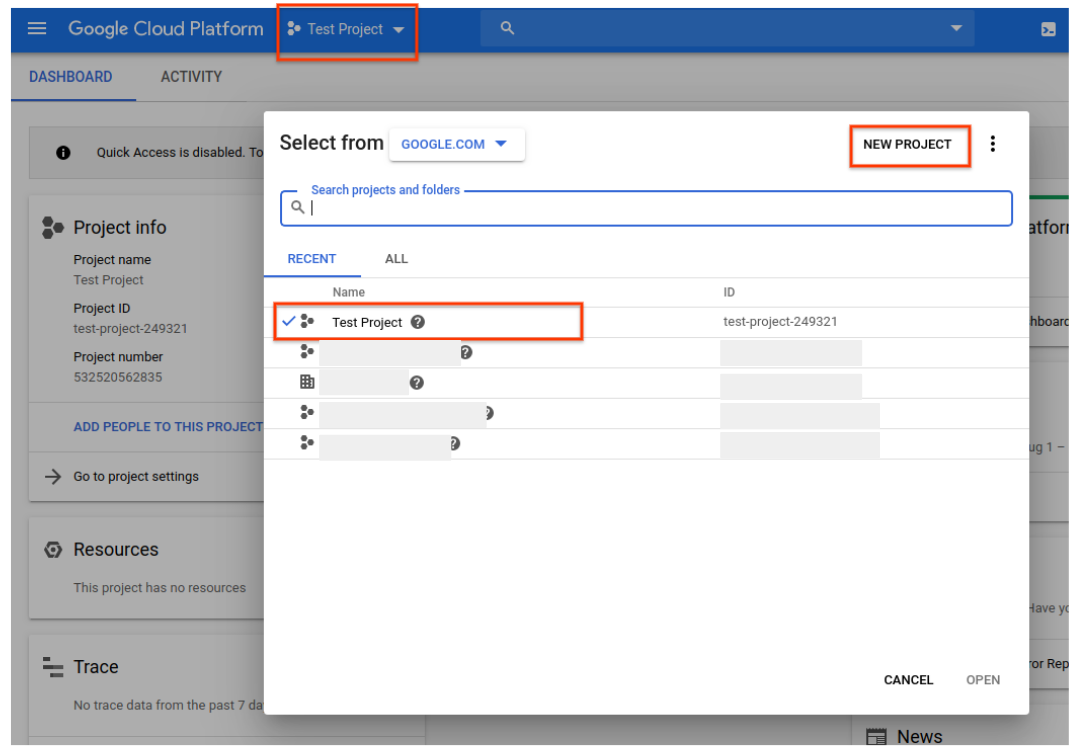
Buka Konsol GCP.
Buka menu drop-down di bagian atas halaman, lalu pilih project GCP yang ingin Anda kaitkan dengan Cloud Talent Solution. Jika Anda
sebelumnya telah membuat satu atau beberapa project, project tersebut akan muncul dalam daftar
di menu pop-up. Anda dapat memilih project yang sudah ada (tanda centang akan muncul di samping project yang Anda pilih) atau membuat project baru dengan mengklik PROJECT BARU. Untuk mengetahui detail selengkapnya tentang cara membuat project GCP, lihat dokumentasi.
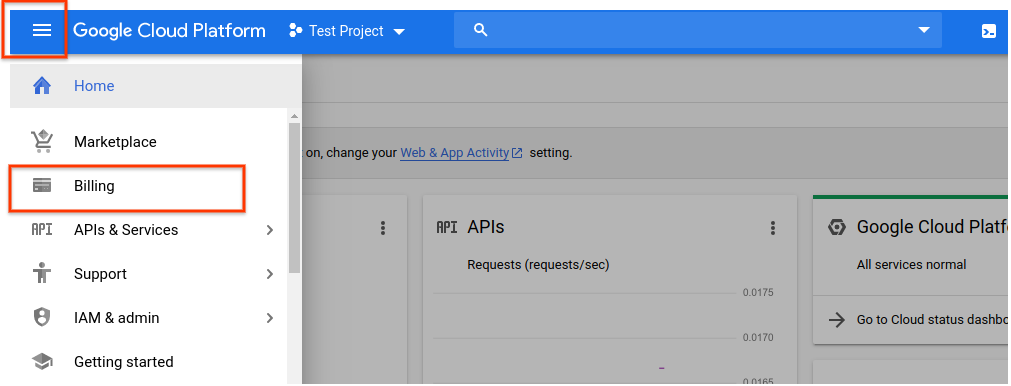
Jika membuat project baru, Anda akan diminta untuk menautkan akun penagihan ke project ini. Jika menggunakan project yang sudah ada, pastikan Anda telah mengaktifkan penagihan. Anda dapat mengakses informasi penagihan project kapan saja dengan membuka menu navigasi utama (ikon tiga garis di sudut kiri atas) dan mengklik opsi Penagihan:
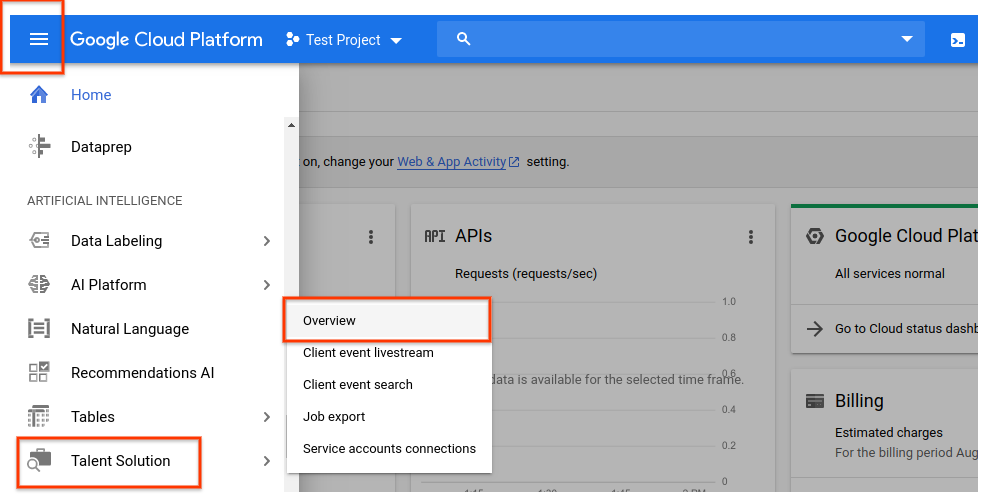
Setelah memilih project GCP dan menautkannya ke akun penagihan, Anda dapat mengaktifkan Cloud Talent Solution API. Buka menu navigasi utama dan scroll ke bawah ke bagian Artificial Intelligence. Klik
Talent Solution, lalu pilih Ringkasan dari menu yang muncul:
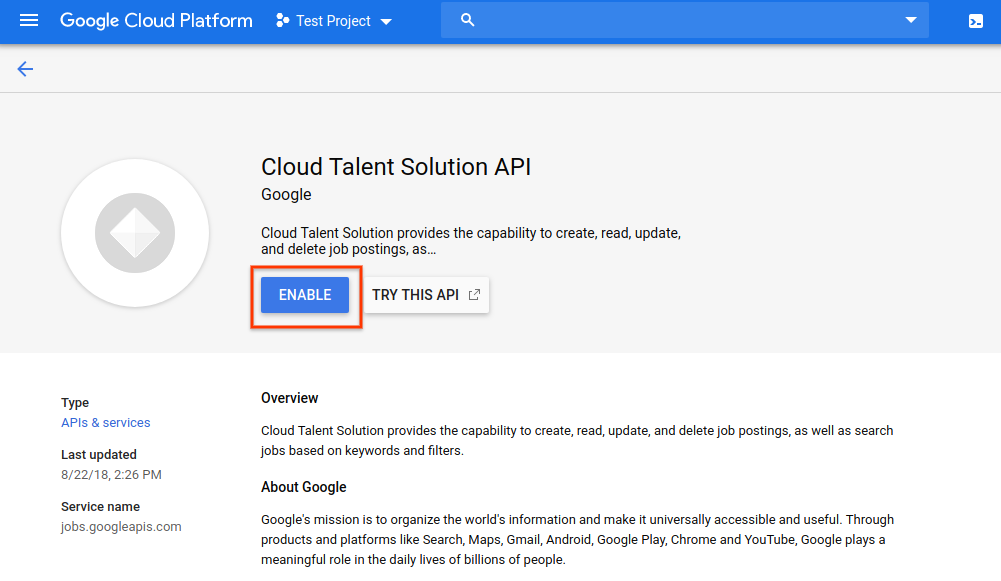
Jika ingin mencoba API terlebih dahulu tanpa menautkannya ke project Anda, Anda dapat memilih opsi TRY THIS API. Lihat dokumentasi
Job Search API Explorer
untuk mengetahui informasi selengkapnya tentang cara menggunakan fitur ini.
Untuk mengaktifkan Cloud Talent Solution API agar dapat digunakan dengan project GCP Anda, klik
ENABLE:
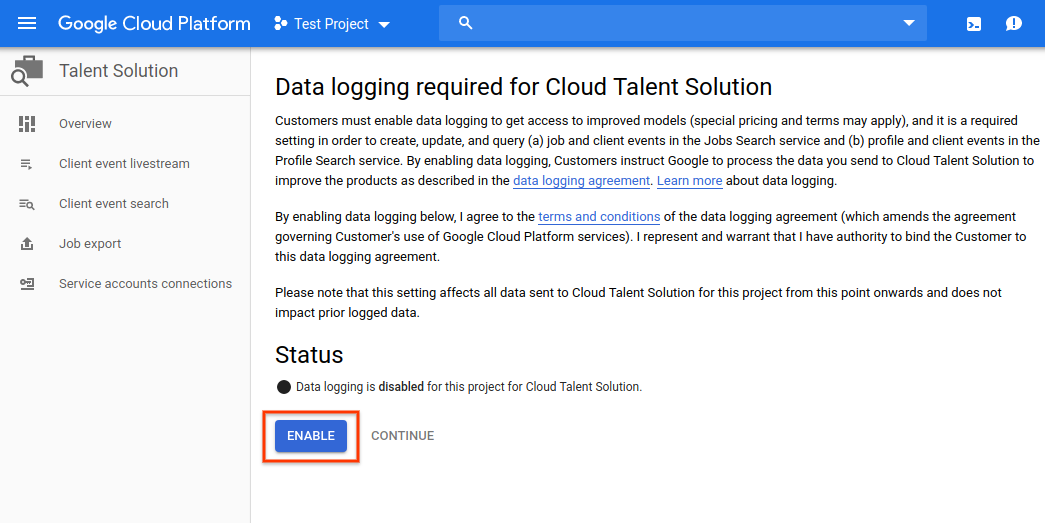
Halaman pencatatan data akan muncul. Anda harus menyetujui persyaratan & ketentuan
untuk memiliki akses penuh ke fitur CTS. Jika memilih untuk tidak menyetujui persyaratan ini, Anda hanya dapat menggunakan permintaan API penghapusan. Klik AKTIFKAN:
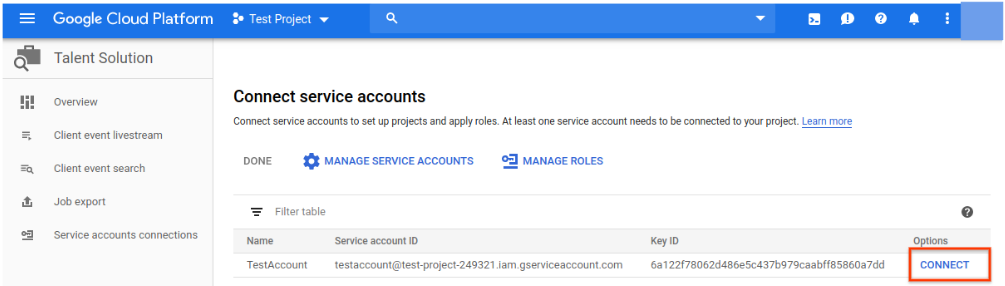
Anda sekarang diminta untuk menautkan satu atau beberapa akun layanan ke CTS API.
Jika Anda menggunakan project yang sudah memiliki akun layanan yang terkait dengannya, akun layanan tersebut akan muncul dalam daftar di halaman ini. Klik HUBUNGKAN di samping akun yang ingin Anda tautkan ke CTS API. Setelah melakukannya,
Anda dapat langsung melanjutkan ke langkah 8 untuk memastikan bahwa Anda telah mendownload kredensial JSON atau P12 untuk akun tersebut.
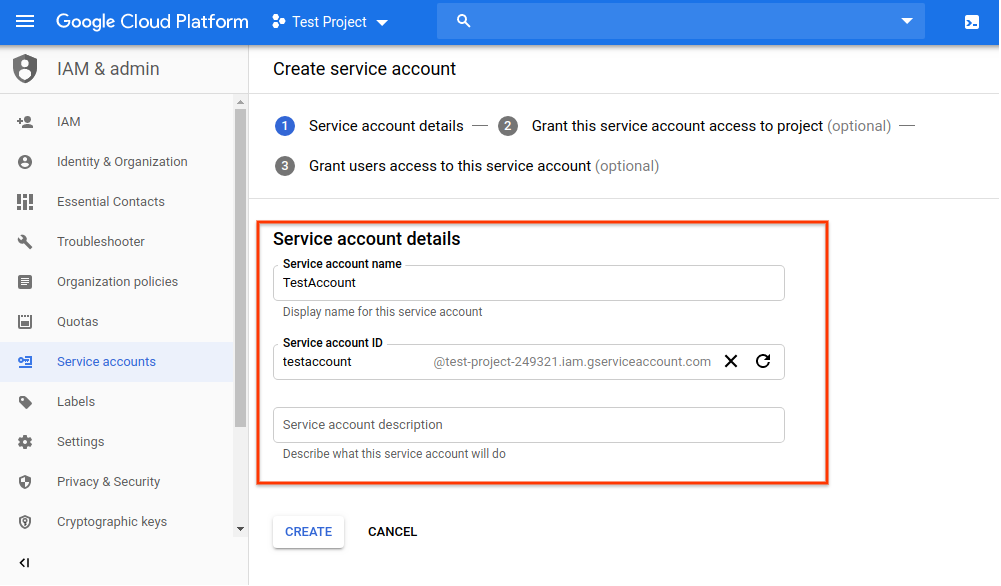
Jika project Anda belum memiliki akun layanan, Anda akan diminta untuk
membuatnya. Ketik nama pilihan Anda di kotak Service account name. Input Anda akan otomatis diisikan di kotak Service account ID. Kotak Service account description bersifat opsional, tetapi direkomendasikan jika Anda ingin mengaitkan beberapa akun layanan dengan project Anda. Masukkan
deskripsi singkat akun layanan ke dalam kotak ini, lalu klik
CREATE.
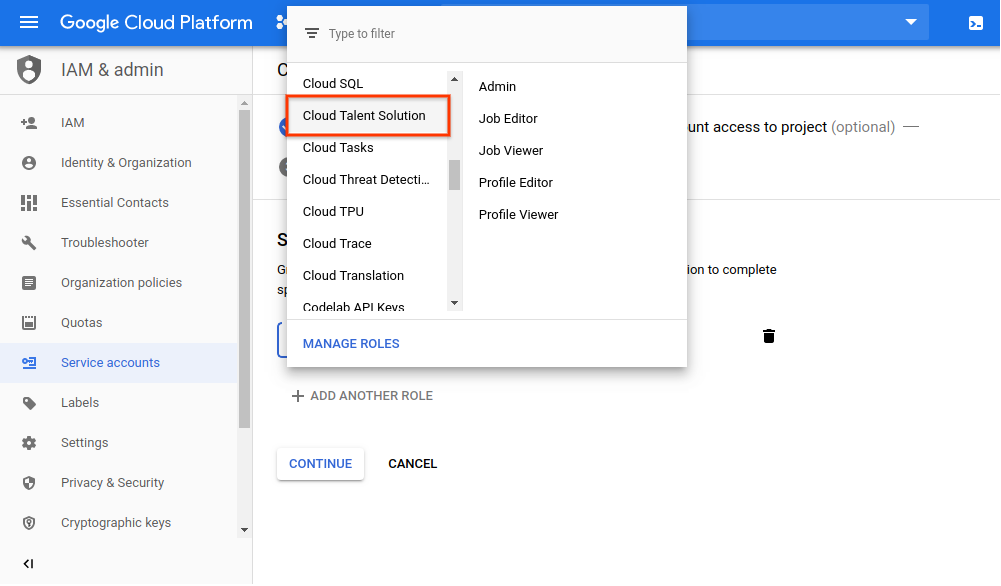
Halaman berikutnya memungkinkan Anda menetapkan peran ke akun layanan baru. Lihat halaman izin IAM CTS untuk mengetahui detail lengkap tentang peran yang tersedia dan izin yang diizinkan untuk setiap peran. Klik menu drop-down Select a role, lalu scroll ke bawah ke Cloud Talent Solution. Anda dapat memilih peran untuk akun layanan ini
dari opsi di kolom sebelah kanan:
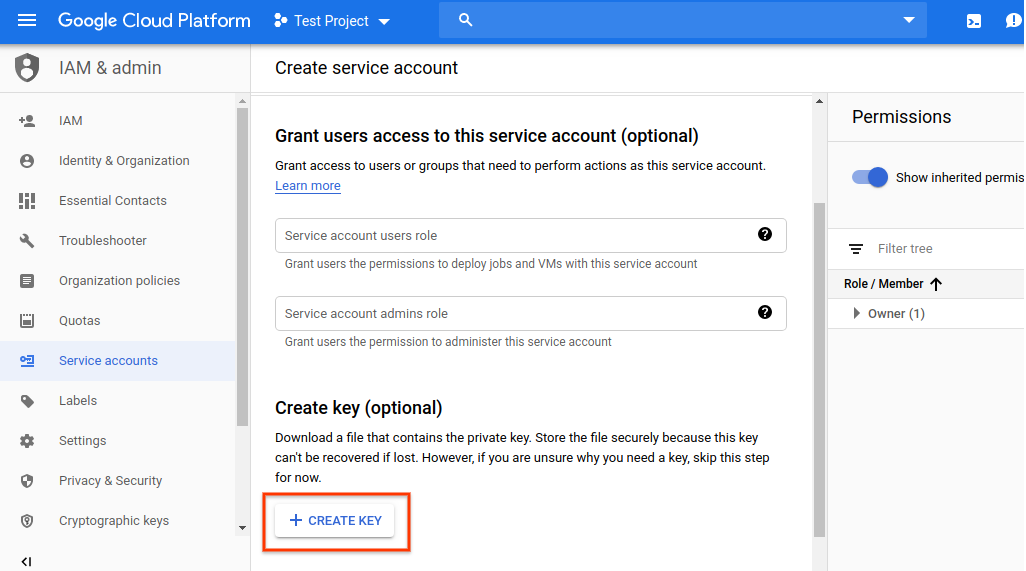
Halaman berikutnya memberi Anda opsi untuk menyelesaikan beberapa tugas. Hal ini tidak wajib, tetapi sangat direkomendasikan. Anda dapat memberikan akses kepada pengguna perorangan
ke akun layanan yang baru saja Anda buat dengan memasukkan alamat email mereka.
Anda juga dapat membuat kunci pribadi untuk akun layanan. Anda harus menggunakan
kunci pribadi selama proses autentikasi
saat menggunakan API. Jika memilih untuk tidak melakukan tindakan ini sekarang, Anda dapat membuat kunci dan menambahkan/mengubah informasi pengguna tertentu kapan saja dengan mengakses akun layanan melalui opsi IAM di menu navigasi utama.
Klik CREATE KEY:
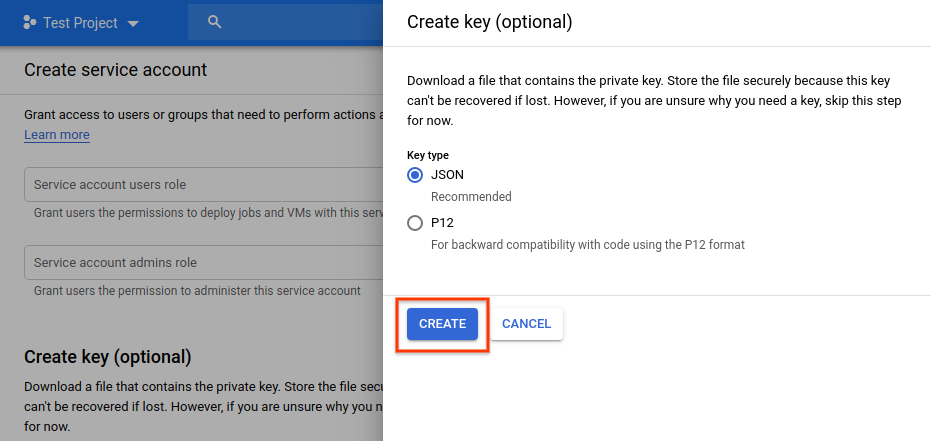
Pilih format yang diinginkan dari menu pop-up, lalu klik BUAT:
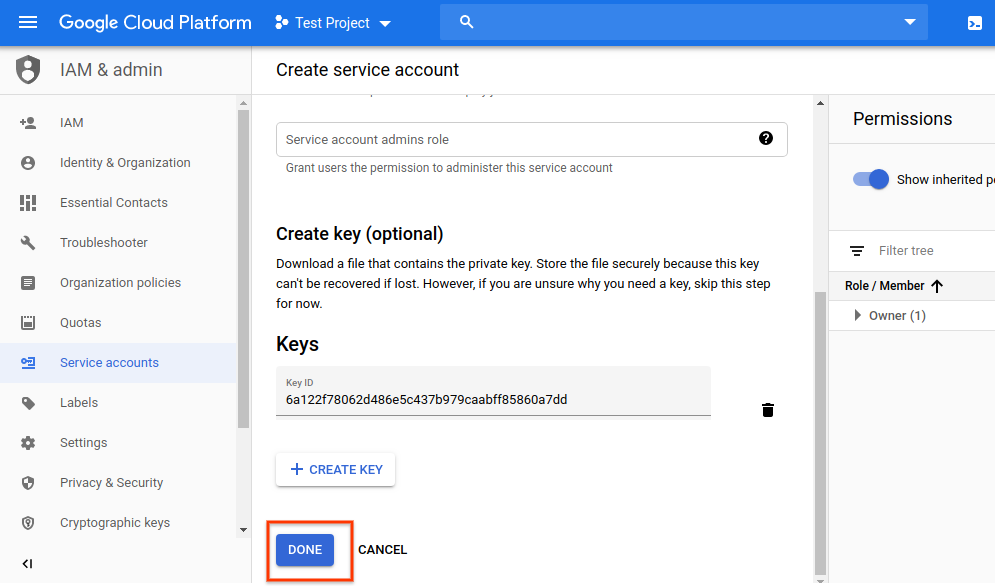
File kredensial JSON atau P12 baru akan otomatis didownload.
Simpan file ini di lokasi tertentu dan catat jalur filenya.
Anda perlu mengarahkan variabel lingkungan GOOGLE_APPLICATION_CREDENTIALS ke file ini saat melakukan proses autentikasi.
Langkah ini penting untuk mengautentikasi permintaan ke Cloud Talent Solution.
Setelah file kredensial Anda didownload, klik SELESAI:
Akun layanan Anda kini muncul di halaman Hubungkan akun layanan.
Klik CONNECT untuk menautkannya ke CTS API:
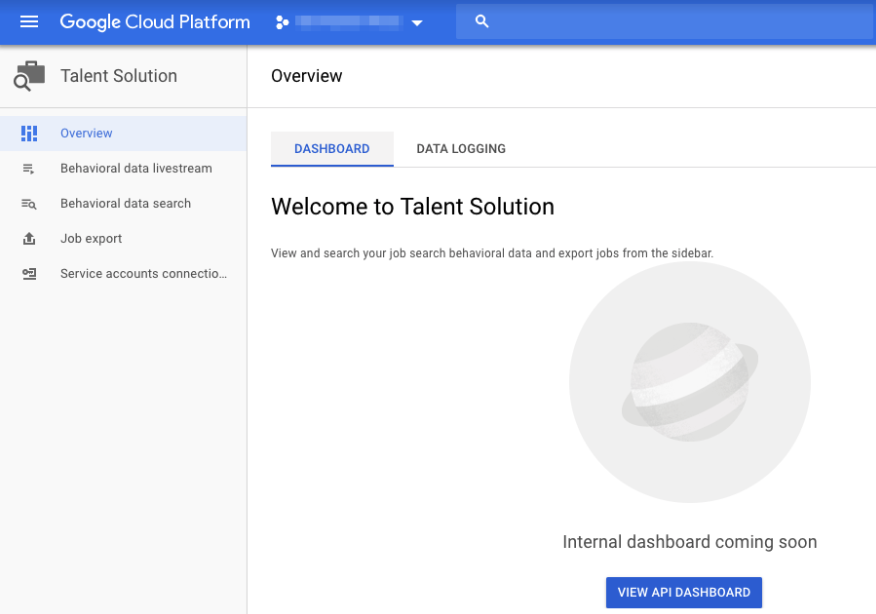
Akun kini telah terhubung, dan Anda siap memulai integrasi Cloud Talent Solution ke dalam sistem Anda:
Menetapkan variabel lingkungan autentikasi
Provide authentication credentials to your application code by setting the
environment variable GOOGLE_APPLICATION_CREDENTIALS. This
variable applies only to your current shell session. If you want the variable
to apply to future shell sessions, set the variable in your shell startup file,
for example in the ~/.bashrc or ~/.profile file.
Linux atau macOS
exportGOOGLE_APPLICATION_CREDENTIALS="KEY_PATH"
Replace KEY_PATH with the path of the JSON file that contains your credentials.
[[["Mudah dipahami","easyToUnderstand","thumb-up"],["Memecahkan masalah saya","solvedMyProblem","thumb-up"],["Lainnya","otherUp","thumb-up"]],[["Sulit dipahami","hardToUnderstand","thumb-down"],["Informasi atau kode contoh salah","incorrectInformationOrSampleCode","thumb-down"],["Informasi/contoh yang saya butuhkan tidak ada","missingTheInformationSamplesINeed","thumb-down"],["Masalah terjemahan","translationIssue","thumb-down"],["Lainnya","otherDown","thumb-down"]],["Terakhir diperbarui pada 2025-08-25 UTC."],[],[],null,["# Before You Begin\n\nOverview\n--------\n\nBefore you can begin using Cloud Talent Solution (CTS), you must\nenable the API in the Google Cloud Platform (GCP) Console. The steps below walk\nyou through the following actions:\n\n- Enable CTS on a GCP project.\n 1. Make sure billing is enabled for CTS.\n 2. Accept the Data Logging Terms \\& Conditions.\n 3. Create and/or assign one or more service accounts to Cloud Talent Solution.\n 4. Download a service account credential key.\n- Set your authentication environment variable.\n\nGCP Console set-up\n------------------\n\n1. Go to the [GCP Console](http://console.cloud.google.com).\n Navigate to the drop-down menu at the top of the page and choose the GCP\n project that you'd like to associate with Cloud Talent Solution. If you\n have previously created one or more projects, they will appear in a list\n in the pop-up menu. You can either choose a pre-existing project (a check\n mark will appear next to the project you select) or create\n a new project by clicking **NEW PROJECT** . For more details on creating a\n GCP project, please see the [documentation](/resource-manager/docs/creating-managing-projects).\n\n2. If you create a new project, you will be prompted to link a billing account\n to this project. If you are using a pre-existing project, make sure that you\n have billing enabled. You can access the project's billing information at\n any time by going to the main navigation menu (the hamburger icon in the\n upper left corner) and clicking the **Billing** option:\n\n | **Note:** You must enable billing to use Cloud Talent Solution, however you will not be charged unless you exceed the free quota of 1-10,000 API calls per month. See the [pricing](/talent-solution/pricing) page for more details.\n3. Once you have selected a GCP project and linked it to a billing account, you\n can enable the Cloud Talent Solution API. Go to the main navigation menu and\n scroll down to the **Artificial Intelligence** section. Click on\n **Talent Solution** and choose **Overview** from the menu that pops up:\n\n4. If you would first like to try the API without linking it to your project,\n you can choose the **TRY THIS API** option. See the\n [Job Search API Explorer](/talent-solution/job-search/docs/quickstart-api-explorer)\n documentation for more information on using this feature.\n To enable the Cloud Talent Solution API for use with your GCP project, click\n **ENABLE**:\n\n5. The data logging page appears. You must accept the terms \\& conditions\n to have full access to CTS features. If you choose not to accept these\n terms, you'll only be able to use deletion API requests. Click **ENABLE**:\n\n6. You are now prompted to link one or more service accounts to the CTS API.\n If you are using a project that already has service accounts associated with\n it, they will appear in a list on this page. Click **CONNECT** next to the\n account(s) that you want to link to the CTS API. Once you have done this,\n you can skip ahead to step 8 to make sure that you've downloaded a JSON or\n P12 credential for that account.\n\n If your project does not yet have any service accounts, you are prompted to\n create one. Type a name of your choosing into the **Service account name**\n box. Your input is automatically populated in the **Service account ID**\n box. The **Service account description** box is optional but recommended if\n you plan on associating multiple service accounts with your project. Enter\n a brief description of the service account into this box, then click\n **CREATE**.\n\n7. The next page allows you to assign a role to your new service account. See\n the CTS [IAM permissions](/talent-solution/docs/iam) page for full details\n on the available roles and the permissions allowed to each. Click on the\n drop-down **Select a role** menu and scroll down to\n **Cloud Talent Solution**. You can choose a role for this service account\n from the options in the right-hand column:\n\n8. The next page gives you the option to complete several tasks. These are\n not required but highly recommended. You can grant individual users access\n to the service account you just created by entering their email addresses.\n You can also create a private key for the service account. You must use a\n private key during the [authentication process](/talent-solution/job-search/docs/before-you-begin#set_up_your_environment_variables)\n when you use the API. If you choose not take these actions now, you can\n generate a key and add/change individual user information at any time by\n accessing the service account through the **IAM** option in the main\n navigation menu.\n\n Click **CREATE KEY**:\n\n Choose your preferred format from the pop-up menu and click **CREATE**:\n\n A new JSON or P12 credential file is automatically downloaded.\n Store this file in a specific location and make a note of the file path.\n You will need to point the \u003cvar translate=\"no\"\u003eGOOGLE_APPLICATION_CREDENTIALS\u003c/var\u003e\n environment variable to this file when you go through the\n [authentication process](/talent-solution/job-search/docs/before-you-begin#set_up_your_environment_variables).\n This is an essential step for authenticating requests to Cloud Talent Solution.\n\n Once your credential file has downloaded, click **DONE**:\n\n9. Your service account now appears on the **Connect service accounts** page.\n Click **CONNECT** to link it to the CTS API:\n\n10. The account is now connected, and you're now ready to begin integrating Cloud\n Talent Solution into your system:\n\nSet your authentication environment variable\n--------------------------------------------\n\n\nProvide authentication credentials to your application code by setting the\nenvironment variable `GOOGLE_APPLICATION_CREDENTIALS`. This\nvariable applies only to your current shell session. If you want the variable\nto apply to future shell sessions, set the variable in your shell startup file,\nfor example in the `~/.bashrc` or `~/.profile` file. \n\n### Linux or macOS\n\n```bash\nexport GOOGLE_APPLICATION_CREDENTIALS=\"\u003cvar translate=\"no\"\u003eKEY_PATH\u003c/var\u003e\"\n```\n\nReplace \u003cvar translate=\"no\"\u003eKEY_PATH\u003c/var\u003e with the path of the JSON file that contains your credentials.\n\nFor example: \n\n```bash\nexport GOOGLE_APPLICATION_CREDENTIALS=\"/home/user/Downloads/service-account-file.json\"\n```\n\n### Windows\n\nFor PowerShell: \n\n```bash\n$env:GOOGLE_APPLICATION_CREDENTIALS=\"\u003cvar translate=\"no\"\u003eKEY_PATH\u003c/var\u003e\"\n```\n\nReplace \u003cvar translate=\"no\"\u003eKEY_PATH\u003c/var\u003e with the path of the JSON file that contains your credentials.\n\nFor example: \n\n```bash\n$env:GOOGLE_APPLICATION_CREDENTIALS=\"C:\\Users\\username\\Downloads\\service-account-file.json\"\n```\n\nFor command prompt: \n\n set GOOGLE_APPLICATION_CREDENTIALS=\u003cvar translate=\"no\"\u003eKEY_PATH\u003c/var\u003e\n\nReplace \u003cvar translate=\"no\"\u003eKEY_PATH\u003c/var\u003e with the path of the JSON file that contains your credentials.\n\nFor more information, see\nthe [GCP authentication documentation](/docs/authentication/production).\n\nWhat's next\n-----------\n\nInstall a [client library](/talent-solution/job-search/docs/libraries) or see\nthe [create jobs and companies quickstart](/talent-solution/job-search/docs/quickstart-jobs-and-companies)\nto begin making API calls."]]